
April Davila's Blog, page 26
January 29, 2020
Book Launch Party

Generally speaking, I love parties. I enjoy getting dressed up, talking with friends, eating good food. But I have to tell you, planning my book launch party had me ALL stressed out.
Because here’s the thing – there is a wide spectrum when it comes to parties. I mean, on one end is the kind of party where I buy a few pizza’s, toss ’em on a table and plunk a 12 pack of beer next to them. On the other end is the kind of party where I blow my entire book advance on fruit platters and ice sculptures. I didn’t even know where to start. I’ve never done this before.
Setting Some Intentions
Clearly, I needed to come in from the ends of the party spectrum. Thankfully, my husband noticed me freaking out and asked a simple question that helped me figure this shit out. He asked why I’m having a launch party.
A simple question. Why am I doing this? Well, it seems to me that people throw launch parties for two main reasons. They’re either celebrating the book being published, trying to sell books, or both.
When I stopped to think about it, I realized I’m going to spend the next several months (years?) trying to sell my book. What I really wanted to do, for just one night, was celebrate that my book is finally going out into the world.
For A Good Time
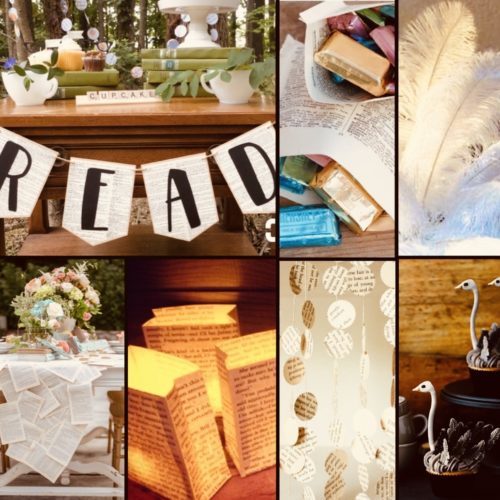
I want all the people who have supported me along the way to come, have a drink, eat a cupcake, maybe partake in something silly like a photo booth or ostrich trivia game. I just want to have fun.
Once I got that nailed down, I said Hello, Pinterest, and started collecting ideas. There will be ostrich cupcakes, a green-screen photo booth, a scavenger hunt for the kids. There will be feathers. Lots of ostrich feathers.
This is not to say that the readings I have planned in the weeks after the party won’t be fun, but the tone will be a little different. Fewer cupcakes, more storytelling.
Basically, the party is a chance to include the people in my life who support me, but may not be super excited to sit and listen to me talk about the book for a period of time. I’m thinking here of the kids in my life (and a fair number of the grown ups too, actually). Crazy as it seems to me, not EVERYONE lives for the love of books.
You’re Invited
If you’re in the area, you can check out the details of the book launch party, and the readings scheduled after the party, on my Upcoming Events page.
And if you can’t make it to any of the events, remember that the best thing you can do to support any author is to buy the book.


January 27, 2020
Creating and Using Scrivener Collections

Last week’s post marked the half-way point in my #52WeeksOfScrivener Challenge. As we head into the second half of our journey, I’m diving into Collections. People seem to love them or hate them, but knowing how they work is a good place to start.
In short, Scrivener Collections can be a super useful way to organize your work in various ways without messing up your master draft. Let’s explore.
Open Collections
To reveal your collections, click the drop down menu at the top left of your screen, and choose SHOW COLLECTIONS.

Then, to create your first collection, click the little + symbol next to the word “Collections.” Your binder will disappear (don’t worry) and you’ll get something that looks like this:

Name your collection by clicking on the highlighted text and typing in whatever you’d like. This is easy to change at any point so don’t stress.
How To Use Scrivener Collections
As the name Scrivener Collections would imply, these folders allow you to collect pieces of your project in one place and play with them a little, without messing up your project.
One example is rearranging the timeline of a story. My second novel (still in early draft stages) jumps around in time. In my binder I have it organized as I intend it to be read. A chapter from the 1700s, followed by a bit from the 1900s, then a chapter set in the 1800s. Frankly it’s kind of a mess right now. I’m not even sure it’s going to work. But that’s how I like it (for now). But sometimes it is helpful to see it arranged chronologically.
I created a collection called “Revised Chrono Order” to experiment with.
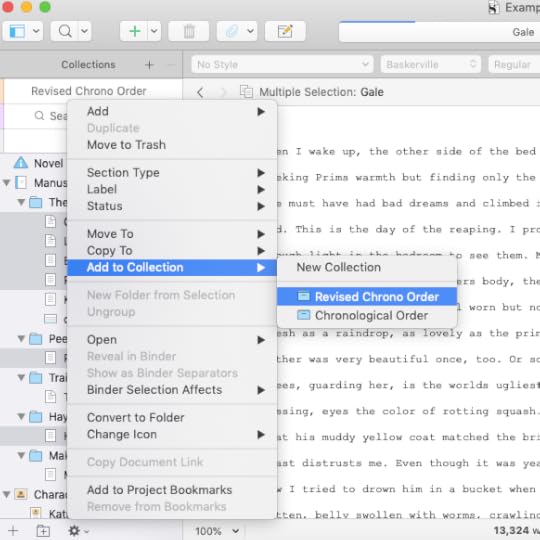
To fill that collection, I click back to the binder (you’ll notice it’s still there on the left, just under the collections list) and select the content I want to move to the collection. Then I click the little wheel icon at the bottom of the binder.

From the pop-up window, I select which collection to move the files to:
(the astute observer will notice that these screen grabs are actually not my WIP, but rather a popular novel that I’m borrowing in the hopes that everyone has read it by now and I’m not spoiling anything)
Now, in the Revised Chrono Order Collection, I can move things around, just to see how they read in a different order:
Notice that, in the collection, the left column is orange. This is to alert you to the fact that you are not in your binder anymore, but are instead working in a collection. You can change the color by clicking on the downward facing greater-than symbol next to the name of your collection at the top there.
Two Things To Know
You can move things around as much as you want in your collection and NOT CHANGE the order they appear in your binder.Any changes you make to the actual content WILL CHANGE what is in your binder. So if you’re reading along in your collection and correct a typo, it will be also be corrected in the binder.
If you delete something from a collection, it will also be deleted from your binder. That goes for whole folders as well. But don’t panic. If you accidentally delete a folder, it will be in your trash (at the bottom of the binder), and you can retrieve it until you do an official “Empty Trash” which I’m not even going to explain how to do, because you just never should.)
A Few Practical Applications
As I mentioned, I like to use this to read my story through in a revised chronological order.
I’ve also heard people say they use it to pull one character’s story apart from the main narrative. If you have a novel that has two perspectives, you could have it all laid out in the binder, then have a collection where you separate out each character’s POV to check the consistency of their narrative.
You could use it to track themes.
Or maybe there’s an object in your story that changes hands a lot. You could pull out the scenes with just that object and track how it moves without the distraction of scenes that don’t address the object.
Like most things in Scrivener, you can experiment without fear of breaking anything. Just never empty your trash, and all will be well. Have fun, play around. And let me know how it works for you. I’m always curious to hear how different people use the various functions in Scrivener.
Next Week
Next Monday we’ll explore Scrivener Timelines. Stay tuned, follow on Twitter with #52WeeksOfScrivener, or sign up for my newsletter to get a weekly digest of all my posts.
January 24, 2020
Abalone in Northern California
 This post is part of an extended series I’m writing about California.
 You can find out more on my Why California page.
The abalone isn’t much to look at in its natural state.
The exterior of their shells are brown and usually encrusted with marine vegetation, which helps the sea snail blend in to tidal rocks and crevices. It’s what that dull exterior hides that makes these marine gastropods highly coveted trophies.
The interior of the abalone shell is an iridescent mother of pearl, protecting a store of meat that is a prized delicacy in Northern California.
Due to poaching, the abalone population in Northern California is falling, and collection of the animal is limited, allowed during certain months of the year. Geographically, it’s only legal to pull them from the waters north of San Francisco bay and it’s illegal to sell either the meat or the shell. So unless you have a friend who’s an avid free diver, you’ve probably never had the pleasure of eating freshly cooked abalone.
You can spot the residence of an abalone diver in Northern California by the collection of shells on or around their homes.
January 22, 2020
Planning A Book Tour


My debut novel comes out on February 25, just over a month from today! I’m very excited and my head is filled with the details of my upcoming book tour.
The Tour
Now, to be clear, it’s a modest book tour. Eight stops, all on the west coast. As a debut author it’s difficult to get people to come out to readings. I get that. I mean, the book hasn’t even come out. Nobody knows who I am. Not yet, at least.
After talking it over with my publisher, we agreed to build the tour around the cities where I have friends and family so I gave them a list of cities and bookstores where I knew I could bring a crowd, and they called on my behalf to set up events.
Side note: since I’m working with a publisher, going the traditional route, that’s the experience I have to share. If you’re self-publishing, check out this post I wrote about my dad and his crazy-successful self-publishing adventure.
What I’ve Learned
Here are a few things I’ve learned about setting up a book tour as a debut author:
You (or your publisher) can’t just say to a bookstore “yeah, I’m sure people will come.” Nu-uh. They want a list of names. The want to know who exactly will show up for your reading and if your list isn’t long enough, they’ll pass. For some bookstores the magic number is 30, for some it’s 100. So start making lists of the people you know, by city. It’s not the bookstore’s job to find someone to be up on the stage with you. You either need to be really comfortable (and entertaining) up there by yourself, or you need to reach out to local authors to find someone to join you. This proved a lot easier to do here in LA where I know a lot of writers. I’ve had zero luck finding authors to work with outside of Southern California. Where I have had some luck is in reaching out to people who are accustomed to being in the interviewer’s seat. In San Francisco, for example, I’ve partnered with Kristy, The Sexy Grammarian. In addition to being a writer and a teacher, she hosts interviews with authors on her blog. She kindly agreed to join me on the stage for my reading in San Francisco and I’m so grateful to have her support. Lastly, Southwest sales are your friend. So is a Southwest credit card. Rack up some miles, wait for a sale and book your travel dates with the knowledge that plans will change and you’re just going to have to roll with it.
Have Fun
I will admit, I got all caught up in planning my grand old eight-stop tour and forgot for a little while that this might actually be fun. I mean, I’m not super excited about being up in front of crowds of people (like most writers, I prefer hiding behind my computer), but I am excited to visit friends and family from LA to Seattle.
Most of all – I’m thrilled to celebrate the launch of my very first novel. I’ve worked hard to get here. It’s definitely time to party.
January 20, 2020
Scrivener Binder Icons
This post marks the half-way point in my #52WeeksOfScrivener Challenge! 26 weeks down, 26 weeks to go. Today we’re talking about Binder Icons and what they all mean.
A little while ago, I noticed subtle differences in the appearance of my binder icons. (If the term “Binder” isn’t familiar, jump back to this post on Scrivener Vocabulary for a quick review.) Some of the page icons had folded corners, some looked like note cards.
What does it all mean? And why do they change as we work on our project? Turns out, the way the file and folder icons display actually tells you something about what (or how much) content you have in them.
The Notecard Icon

You’ll notice that Part 1 of this project has a little notecard stuck to the bottom right of the folder icon. That means that I’ve written something in the Synopsis Section. This note is not something I’ve actually written as part of the story, but rather just something I want to keep in mind for Part 1. On the flip side, notice that Part 2 has no such note card image stuck to it. If I click to view the synopsis for that Part, it will be empty.
The Blank Page Icon
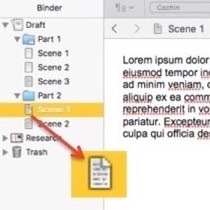
When I create a scene, it shows as a blank page (see scenes 1 and 2 of Part 1). But if I add notes to the synopsis for that particular scene, the blank page will become a notecard.

It’s not until I actually start writing the content of scene 3 that the icon switches to look like a page with writing on it.
The Snapshot Icon
And what about that icon of the written page? Have you noticed that sometimes the top right corner of the page is turned over, bent like it’s been dog-eared? That means something too.

That little turned corner means that the scene has a snapshot associated with it. If you’re not familiar with the snapshot function, check out my post about it here. It is a super-handy way to keep track of drafts without junking up your computer with files.
Scrivener Binder Icons
Knowing what these subtle differences in appearance mean can help you see how your project is coming along with just a glance.
Apparently, you can even change the icons all together so that they’re not folders or pages, but flags or favicons or whatever. That’s one step too far for me to pretend that I’m not just procrastinating, but if you’re interested, The Qualitative Researcher did a pretty good blog post on it a while back.
Next Week
Next Monday, as we boldly step into the second half of this year-long challenge, we will explore Binder Collections. Stay tuned, follow on Twitter with #52WeeksOfScrivener, or sign up for my newsletter to get a weekly digest of all my posts.
January 17, 2020
Murals in California
 This post is part of an extended series I’m writing about California.
 You can find out more on my Why California page.
Franklin Roosevelt’s New Deal sparked the tradition of mural painting in Northern California in 1933. To create employment in the midst of the Depression, artists were commissioned to create works of art for the public.
Many of the artists who undertook the project drew inspiration from Mexican muralists, such as Diego Rivera. But though the style was borrowed, the heart of the work was quite different. While Rivera’s work was Marxist and often meant to spark revolution, the murals that soon popped up all over California depicted men and women happily employed.
The pieces were critically shunned as bland, but the public liked the accessibility of the murals, and the government was pleased that the images championed the New Deal goals of getting the country back to work.
Decades later the Chicano civil rights movement of the 1970s inspired a new generation of muralists to rediscover the works of Mexican muralists, this time changing the style, but embodying the revolutionary passion.

Today there are murals all over California, with more than 600 in San Francisco alone. The largest concentration is in the predominantly Latino Mission District, with Balmy Alley’s 28 murals acting as the epicenter of the movement.

January 15, 2020
A Writing Residency at Dorland Mountain Arts Colony
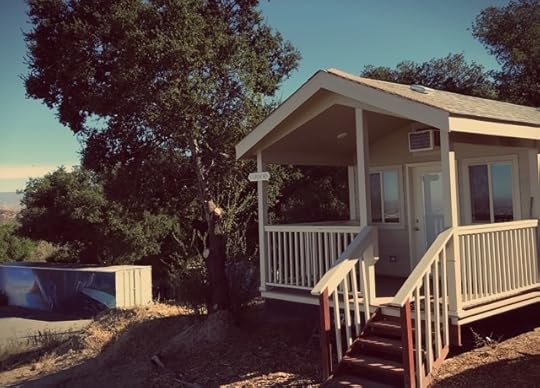

A while back, I wrote about ways that we, as writers, can create big chunks of time for our writing. The post was inspired by a day I spent writing at my sister-in-laws house, but it got me to thinking. I was nearing the end of my draft, and I really wanted to take a few days to do a final pass at the manuscript. So I applied, and was accepted to a writing residency at the Dorland Mountain Arts Colony in Temecula, California.
I spent the second week of November 2017 there (the cabin in the photo is where I stayed) and got more work done than I could have in three months of getting up early to write. It was an intense and exceedingly productive time.
So when things got super hectic this fall (read: my husband was away on business for 3 months) I decided I wanted to go back. I spent all last week there, in the same cabin as before. It was a great way to get my writing back on track after the holidays and make some real progress toward finishing book number two.
How I Spent My Time
I spent the first evening and first full day finishing the draft I had been working on for months. I had hoped to finish before I left, but just couldn’t quite get there, so that was the priority, right off.
Early on the second morning I drove down into Temecula to print out the draft (which, BTW, was way more expensive than I expected! Eighteen cents a page adds up fast!), then I spent that day reading through the whole thing, laying out each chapter in a long line on the floor of my cabin.
On day three I began integrating the notes I had made as I read it through the day before. This ended up taking three solid days.
On day six I started early, and read the whole thing out loud, recording myself so that I could play it back when I got home.
On the morning of the seventh day I hopped online and responded to a week’s worth of emails so that when I got home I could hang with my family without stressing. Then I cleaned up my cabin and handed over the keys.
These were some marathon days of writing. I’m talking 10-12 hours, with breaks for showers and food, but I hardly left the house.
What I Learned
1. Reading my manuscript out loud highlighted obvious mistakes I hadn’t noticed after four complete read-throughs. I was shocked, honestly. I mean, you hear people say that reading it out loud is a good thing to do, and I figured I might notice a couple little things, but I had pages of notes by the time I was done.
2. Using my voice for 10 solid hours of reading out loud was actually kind of painful. I had to take a break half way through the day to drive all the way into town and buy some throat lozenges. I sipped a lot of tea. It would have been better to break this task into two days.
3. The life of a writer in residence is unsustainable. At least for this writer. I ate nothing but microwaved food and cereal, drank nothing but coffee, and the only exercise I got was walking the distance from the desk to the bathroom, all of about twenty feet. I guess if I planned to do a longer residency, I would adjust and plan accordingly, but I was pretty single-minded about the whole thing.
4. Spreading my manuscript over the floor was fun, but after chapter six, I ran out of room. Stacking it up again was kind of a pain, and ultimately, aside from the joy of seeing so many of my pages at once, I didn’t get much benefit from it.
5. Not everyone goes hard core on these types of residencies. On my penultimate night I discovered a journal where previous occupants had each entered a page describing how they spent their time. They wrote about going on long hikes and visiting the farmers market. For a moment I worried that I had missed some important part of the residency experience, but then, I can hike and go to the market at home, with my kids. I can’t indulge in 12 hours of writing with my kids. For me, hardly leaving the cabin was the way to go, but it’s different for everyone.
6. I definitely have a physiological rhythm, and it includes naps. Turns out that, left to my own devices, I start writing around 7am, eat at noon, nap at 2, start writing again at 3, eat again at 7, write for another hour or so, then lounge about reading until I fall asleep. Heaven.
About Dorland Mountain Arts Colony
If you’ve been considering taking some time for your writing, I highly recommend Dorland. They have a rolling application, so you just send in your material when you’re ready, and list the dates that you would like to come.
It’s not easy to set aside your life for a week (or more – you can apply to stay for up to three months), but I can now say from experience, that it is entirely worth the trouble.
Here’s a shot of the view from my cabin. Every morning I saw hot air balloons rising in the distance. So peaceful…
January 13, 2020
Using Scrivener Keywords to Track Ideas at a Glance

This is post number 25 in my #52WeeksOfScrivener Challenge. Next week is the halfway point! Time is zipping past… Today we’re talking about how to use Scrivener Keywords to track themes and bigger ideas in your story. Keywords take a few minutes to set up, but they can be really revealing when used well.
Add Key Words
To start, you have to add key words to your project. To do this go to Project -> Show Project Keywords.
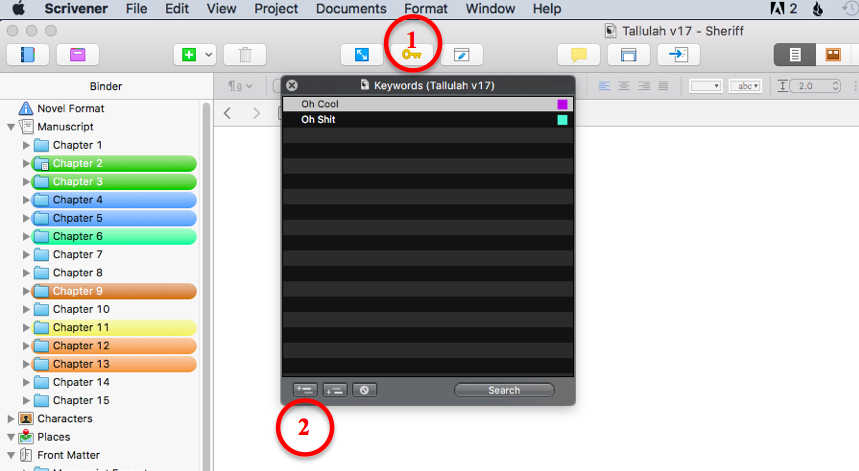
You’ll get a pop-up window that looks like this:
I’ve added three random keywords to use as examples, but you can add your own by clicking the + symbol at the bottom left hand corner of the pop-up window. Don’t worry, you can change these at any time, so feel free to play around, get creative.
You can even use subcategories by using the second button on the bottom there. I imagine you could waste a ton of time geeking out, but keep in mind, the goal is to be writing, so let’s get on with it. Go ahead and close that pop-up window.
Now let’s see how to actually use the keywords.
Tag Each Scene with a Keyword
In each scene, you can add as many key words as you want. First, open the inspector window, then click on the metadata tab (the upward facing red arrow in the image below). If you click on the wheel icon in the Keywords bar (downward facing red arrow), you will be presented with a list of the keywords you added in that last step. You can choose from those, or Show Project Keywords to add more.

I would advise against simply clicking the + icon at this step, because if your keywords don’t match exactly, they won’t work.
See Your Keywords In Action
To check your work, go to the outline view by clicking the outline icon at the top of the page.

Once you’re in the Outline View, you will see columns of info. To change what displays here, click the little “greater than” sign near the top (downward pointing arrow in the next image), and then click or unclick the options in the drop down menu.
Click to display Keywords. I like to see the actual words, so I leave the box immediately below that one (the option that reads “as Color Chips”) unchecked, but you can play with that.
Note that you can move the columns around by dragging and dropping. For this example, I’ve dragged my Keywords to second position after Chapter Title and Synopsis.

After adding keywords to a few more chapters, my outline looks like this:

Looking it over, I might notice that the topic of soup is playing pretty heavily in this manuscript. Maybe I want to mix it up a bit. Or maybe I just can’t get enough chapters about soup and I should go back and revise those first two so that they’re less about the ocean and love, more about soup.
You get the idea.
Get Creative
I imagine you could use keywords to track all kinds of things.
You could create keywords of your characters’ names and see at a glance who appears consistently and who drops off the page for five chapters.
You could track themes. Like say you’re working with the themes of trust and abandonment. As you write each scene you could add a keyword marking which theme you hit. Then when you view them all lined up, you can see if you weigh in too heavy with one or the other.
You could use them to track timelines, if you have a story that jumps around a lot.
So many possibilities… If you have a way you use keywords in Scrivener, please leave a comment below.
Next Week
Next Monday we’ll celebrate the halfway mark of this year of Scrivener by diving into Binder Icons. Stay tuned, follow on Twitter with #52WeeksOfScrivener, or sign up for my newsletter to get a weekly digest of all my posts.
January 10, 2020
Surfing in Northern California
 This post is part of an extended series I’m writing about California.
 You can find out more on my Why California page.
Bone-chilling temperatures, fickle surf, dense fog, and great white sharks all distinguish surfing in Northern California from the sunnier sport practiced in the southern half of the state.
Surfers here don thick wetsuits, including hoods, booties and gloves, to brave the roaring waves stirred up by storms in the Gulf of Alaska. Favored surfing spots are guarded secrets, but some big waves are hard to miss.
Every November, 24 of the world’s best surfers begin patiently waiting for the call from Half Moon Bay announcing that the biggest of the big waves are on their way. They then have 24 hours to get themselves and their board to the world famous, invite only Mavericks Surf Contest to compete on fifty-foot giants.
Not all Northern California waves are quite so intimidating, but it takes guts to surf anywhere in the red triangle – the waters from Bodega Bay to Monterey, and out as far as the Farallon Islands. There have been more shark attacks here than any other place in the world.
January 8, 2020
Goals For A New Decade


As we step into a new decade, I’ve been thinking a lot about what I want the next ten years of my life to look like.
10 years ago I had a toddler and we were trying for a second child. 10 years from now my daughter will be a senior in college and my son will be a senior in high school. The older I get, the faster time goes. Kids seem to highlight that and what’s more, I’m coming to understand how raising kids is just a season of life. In ten short years I’ll be an empty nester.
Years to Come
When I think about what my empty nest will look like, I see myself writing. Long days of writing, broken up by leisurely walks with the dogs. The kind of writing I currently only get when I go on a writing retreat.
I also want to travel. That is to say, I see myself writing in little cabins in the woods, or in a cafe in South America. Adventuring with my husband and writing it all off as a tax expense because it all ends up in my stories.
A Transitional Decade
So this is a transitional decade. My kids will fend for themselves more and more while I write more and more. My hope is to build momentum until I’m publishing a book every two years and then pretty much just keep that up until I die.
Of course there are other things I want to do, like run a marathon, hike Half Dome, raft down the Colorado River. Hopefully I’ll work all those in somehow. The greatest tragedy of this life is that I’ll never do a fraction of the things this amazing world has to offer.
Doesn’t mean I won’t try.
Happy 2020, y’all. May the coming decade bring success and adventure in whatever way is most meaningful to you.


