
Harold Davis's Blog, page 180
June 11, 2014
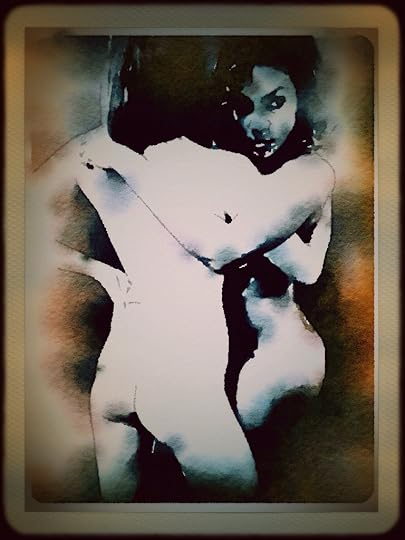
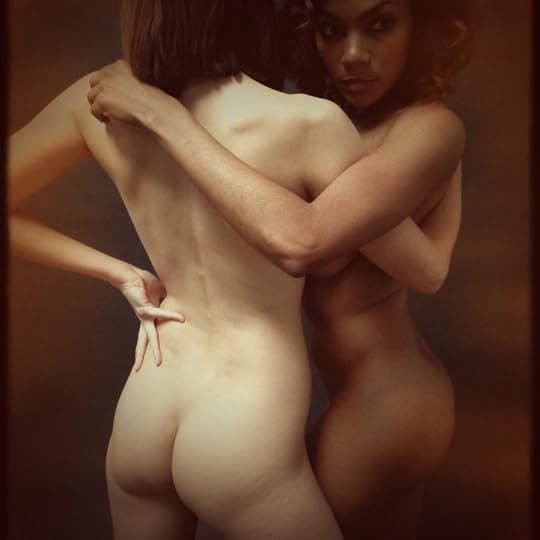
Kali and Les Demoiselles
My latest additions to the Multiple Exposures sequence are Kali (below) and Les Demoiselles (bottom). Kali is essentially an in-camera multiple exposure, while Les Demoiselles is more of a Photoshop confection.

Kali © Harold Davis
Other stories about images in the Multiple Exposures sequence: Being and Becoming; Solace for the Wild Rest; Duos and Redos.
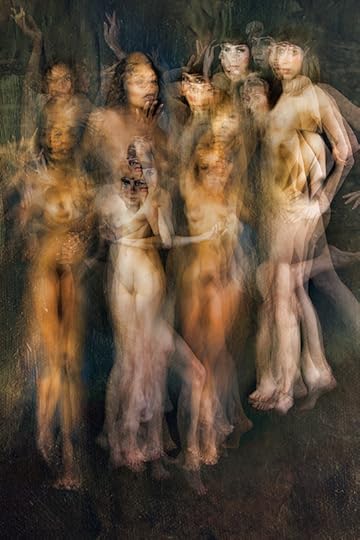
Les Demoiselles © Harold Davis


June 10, 2014
San Francisco Photography Weekend Workshop
Saturday August 23 and Sunday August 24, 2014
The San Francisco Bay area is one of the places on our planet most visited for photography. If you live here, why not spend a weekend photographing San Francisco as if you were seeing it for the first time for the wonder it is?
If you have always wanted to photograph San Francisco but are coming from far away, what better way to go about it with the guidance of master photographer and Bay area resident Harold Davis?
Click here to register for the Harold Davis San Francisco Photography Weekend Workshop
Following a brief orientation, we will carpool and photograph around the Bay area in an exciting and fun weekend with locations depending on weather, lighting and group inclinations. Group size is limited to twelve photographers. There will be time for image review, and Harold will make suggestions for image improvement and creative thinking about image making.
There will be a night shoot on Saturday, and Harold will present material on photographing San Francisco in both color and black & white.
Why not get the imagery of San Francisco you have always wanted?
City as Landscape © Harold Davis
When: Saturday, August 23 and Sunday, August 24, 2014
Where: The orientation and classroom sessions of the workshop will be hosted in Berkeley, California. We will car pool to field shooting locations.
Cost: Tuition is $745 per person. Workshop is limited to a maximum of 12 participants.
Registration: Click here to register for the Harold Davis San Francisco Photography Weekend Workshop
Full Moon Rising © Harold Davis

June 9, 2014
Duos and Redos
The first duo (and redo) is another in-camera multiple exposure in the series with Solace for the Wild Rest and Being and Becoming. With Earthbound Angels (below), I also added a white, transparent scarf as an image element when making the choreographed exposures, creating the wing-like effects. Check out the three Multiple Exposures here!

Earthbound Angels © Harold Davis
The second image, Dance (below), is an iPhone reworking of Models via the Plastic Bullet and Waterlogue iPhone apps.
Dance © Harold Davis
Doing something once can be a great deal of fun, but redoing it can redouble one’s pleasure. I’m having great fun with these abstractions—particularly the multiple exposures—and I’ve heard them likened to Botacelli’s La Primavera, Picasso paintings (specifically Les Demoiselles d’Avignon) and Georgia O’Keeffe skulls.
Maybe, maybe not. But I like doing something in-camera for once, and having people think it is Photoshop. Go figure, I say who cares how an image was created if it is good, but this false dichotomy of photography versus Photoshop seems to be a very emotional issue for some people. I guess the world will always have its big-enders versus little-enders because a bone to quarrel over is easier than actually becoming creative.

June 8, 2014
Selective Sharpening in LAB Color webinar recording now available
 Have you ever over-sharpened an image? (We all have!) Have you ever wanted to to sharpen just one thing in a photo, not the entire image?
If you answer “Yes!” to either of these questions, then this webinar recording is for you!
The internal structure of LAB color makes it ideal for attractive sharpening (without over-sharpening) in Photoshop. This is because you can work on the luminance information, avoiding the unattractive results that can happen when color data is sharpened.
This webinar recording shows how to use the properties of LAB color to selectively sharpen images for aesthetic effect, and teaches you a technique that should be in the toolkit of every photographer who uses Photoshop.
Master photographer and bestselling author Harold Davis says, “I use selective sharpening with LAB color to enhance almost all of my photos.” Sharpening with LAB is one of the true secrets of the masters.
Here are some comments from viewers of this webinar:
“Very informative. All my questions were answered.”
“It was great to see actual examples and Harold using this technique with his own imagery!”
The Selective Sharpening with LAB Color with Harold Davis webinar covers:
Different kinds of sharpening
Using selective sharpening for artistic emphasis
LAB color theory and relative gamut
Understanding the color opponent model
Converting to LAB in Photoshop
Choosing the L-channel in Photoshop
Using the Unsharp Mask Filter
Selectively painting in sharp areas
Converting back to RGB
Click here for Selective Sharpening with LAB Color with Harold Davis (webinar recording, approximately 60 minutes, the cost for unlimited access to the recording is $19.95).
Click here to see more Harold Davis webinar recording offerings, and here for our FAQ About Harold Davis webinar recordings.

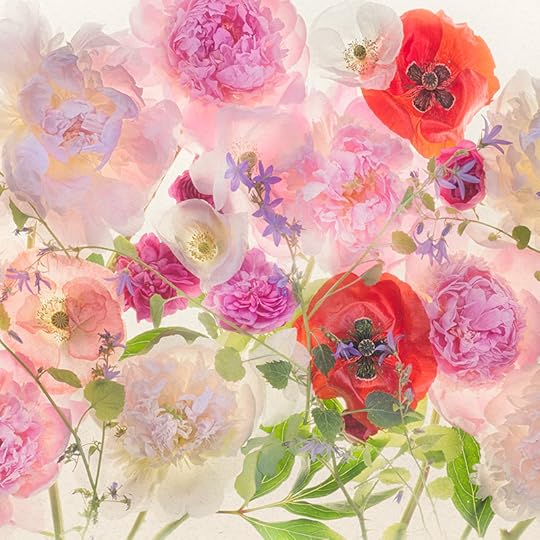
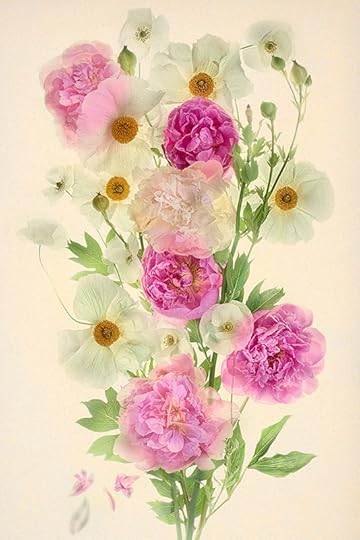
What flowers are these?
“What flowers are these?” a reader asks. Peonies, poppies, a few roses and some campanulas (Canterbury Bells): The bounty of the garden.

Bounty of the Garden © Harold Davis

June 7, 2014
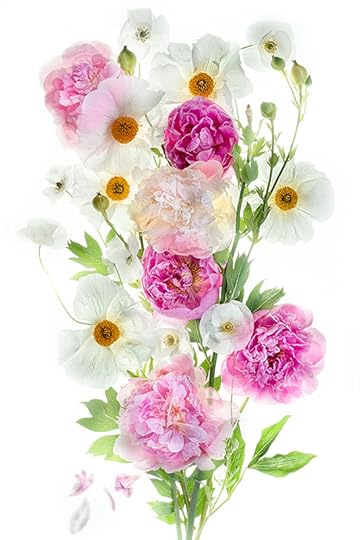
Peonies are in bloom
It’s the peonies time of year, and I am putting aside some time to photograph some luscious Peony blossoms!
To learn how I made this photo, check out the FAQs Photographing Flowers for Transparency and Using a High-Key Layer Stack, and also my webinar recording Painting in Transparency Using a High-Key Layer Stack.
Bounty of the Garden – Center Panel © Harold Davis
Exposure data: Nikon D800, Zeiss Otus 55mm f/1.4, six exposures each at f/11 and ISO 100, tripod mounted, exposures processed using Adobe Camera RAW, Adobe Photoshop, and Nik HDR Efex Pro.
I applied the peonies photo to a background of scanned paper created using a gradient, so it is slightly lighter at the top than the bottom. For more information about this technique, check out my webinar recording Using Backgrounds and Textures.
Related story: Peonies and Poppies.

June 6, 2014
Using Backgrounds and Textures webinar recording available
Using Backgrounds and Textures with Harold Davis Webinar Recording

Have you ever wanted to turn your photos into fine art design pieces? With a little bit of Photoshop know-how, a few inexpensive tools, and the techniques explained in this webinar, it’s easy to create unique art imagery, guided by your vision and creativity.
Placing a photo on a background creates an image that looks like a botanical illustration. Adding a texture to a photo is can be used for an impressionistic and/or painterly effect.
Digital artist and master photographer Harold Davis states, “The two primary techniques that I use to turn straightforward photos into art are to add a photo to a background, and to add a texture to photos. These two techniques have a very visual different impact, and can be particularly effective with my botanical art.”
It’s easy to add a whole set of techniques to your creative use of Photoshop! Watch Harold as he explains the entire process of using backgrounds and textures, then shows how to use them in the actual context of his own work.
Here are some comments from viewers of this webinar:
“I have been using textures for a while, but watching this webinar showed me some new things. Great information.”
“Up all night and enthused about textures after watching your video. Great info about layer masking. Thanks!”
“You hit the mark for me, Harold! Filled in all the gaps. Thank you!”
In this webinar recording, Harold Davis explains how you can use the power of backgrounds and textures in your own work. The Using Backgrounds and Textures with Harold Davis webinar explains:
• Creative use of backgrounds and textures
• The difference between a background and a texture
• Making your own backgrounds
• Making your own textures
• Commercial libraries
• How to apply an image to a background
• Using textures and blending modes
• Backgrounds and textures in botannicals
• Using textures with people photography
• Enhancing landscape photos with artistic effects
• What to do, what not to do, and examples
Click here for the Using Backgrounds and Textures with Harold Davis webinar recording (approximately 65 minutes, the cost for access to the recording is $19.95).

June 5, 2014
Models
I shot this in the studio with my iPhone camera while I was experimenting with multiple exposures on the DSLR, some of which are shown in Solace for the Wild Rest and Being and Becoming.
Models © Harold Davis

June 3, 2014
Peonies and Poppies
Yesterday in the morning I wrote and posted my Using a High-Key Layer Stack FAQ. Around lunch time I took a product development conference call. Phyllis brought in some pizza for lunch. After lunch, I drove over to nearby Kensington, California with my pruning shears and clipped a bunch of Matilija Poppies from a strip right near the old downtown. These shrubby poppies are the only genus in the Papaver family besides those in the Eschscholzia family that are native to California.
Poppies and Peonies © Harold Davis
Back at home I pruned some Papaver rhoeas from the garden, and added some peonies to create a light box composition. Processing the resulting high-key layer stack took me well past a sane bedtime. A very full day, with some time for the kids.
Above, the image is shown on white, and below it is placed on a scanned paper background and lightly texturized.
Poppies and Peonies © Harold Davis
Exposure data: I do not believe the resolution I achieved in this photo would have been possible without the clarity of my Zeiss Otus 55mm f/1.4 lens. Nikon D800, 55mm, six exposures at ISO 100 and f/13, exposures ranging from 1/30 of a second to 1 second, tripod mounted, processing in Adobe Camera RAW, Nik HDR Efex Pro and Adobe Photoshop.

June 2, 2014
New Webinar Sessions with Harold Davis
Please consider one of our upcoming live webinar offerings. Each costs $29.95, has very limited seat availability, and includes access to the webinar recording following the session (a $19.95 value). Details regarding each webinar follow below.
Using Backgrounds and Textures (Second Session, Thursday June 5 at 7PM PT)
Selective Sharpening with LAB Color (Second Session, Sunday June 8 at 3PM PT)
Creative Use of LAB Color (World Premier, Saturday July 26 at 3PM PT)
For more information about the webinar format as a way to learn about photography and Photoshop, check out our FAQ, About Harold Davis Webinar Recordings.
Using Backgrounds and Textures with Harold Davis
Second Session: Thursday June 5, 2014 at 7PM PT. Click here to register for this webinar session ($29.95).
Have you ever wanted to turn your photos into fine art design pieces? With a little bit of Photoshop know-how, a few inexpensive tools, and the techniques explained in this webinar, it’s easy to create unique art imagery, guided by your vision and creativity.
Placing a photo on a background creates an image that looks like a botanical illustration. Adding a texture to a photo is can be used for an impressionistic and/or painterly effect.
Digital artist and master photographer Harold Davis states, “The two primary techniques that I use to turn straightforward photos into art are to add a photo to a background, and to add a texture to photos. These two techniques have a very visual different impact, and can be particularly effective with my botanical art.”
It’s easy to add a whole set of techniques to your creative use of Photoshop! In this webinar recording, Harold Davis explains how you can use the power of backgrounds and textures in your own work. The Using Backgrounds and Textures with Harold Davis webinar explains:
Creative use of backgrounds and textures
The difference between a background and a texture
Making your own backgrounds
Making your own textures
Commercial libraries
How to apply an image to a background
Using textures and blending modes
Backgrounds and textures in botannicals
Using textures with people photography
Enhancing landscape photos with artistic effects
What to do, what not to do, and examples
Click here to register for this webinar session ($29.95).
Selective Sharpening in LAB Color with Harold Davis
Second Session: Sunday June 8, 2014 at 3PM PT. Click here to register for this webinar session ($29.95).
Have you ever over-sharpened an image? (We all have!) Have you ever wanted to to sharpen just one thing in a photo, not the entire image?
If you answer “Yes!” to either of these questions, then this webinar recording is for you!
The internal structure of LAB color makes it ideal for attractive sharpening (without over-sharpening) in Photoshop. This is because you can work on the luminance information, avoiding the unattractive results that can happen when color data is sharpened.
This webinar recording shows how to use the properties of LAB color to selectively sharpen images for aesthetic effect, and teaches you a technique that should be in the toolkit of every photographer who uses Photoshop.
Master photographer and bestselling author Harold Davis says, “I use selective sharpening with LAB color to enhance almost all of my photos.” Sharpening with LAB is one of the true secrets of the masters.
The Selective Sharpening with LAB Color with Harold Davis webinar covers:
Different kinds of sharpening
Using selective sharpening for artistic emphasis
LAB color theory and relative gamut
Understanding the color opponent model
Converting to LAB in Photoshop
Choosing the L-channel in Photoshop
Using the Unsharp Mask Filter
Selectively painting in sharp areas
Converting back to RGB
Click here to register for this webinar session ($29.95).
Creative Use of LAB Color with Harold Davis
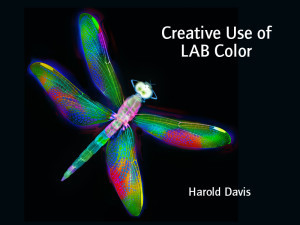 World Premier: Saturday July 26, 2014 at 3PM PT. Click here to register for this webinar session ($29.95).
Understanding the creative use of LAB color in Photoshop unlocks a vast treasure trove of under-utilized and under-explored possibilities.
This webinar explains the structure of LAB color, and demonstrates inversions and LAB equalizations for both image optimization and creative fun. You will learn how to combine Blending Modes with LAB equalizations for an unlimited and powerful palette.
LAB color underlies the color math of Photoshop, and once you discover how to work creatively with LAB your work (and life!) will never be the same!
The Creative Use of LAB Color with Harold Davis webinar covers:
Understanding LAB Color
LAB Color in Photoshop
LAB Channel Inversions
LAB Channel Equalizations
Combining adjustments with blending modes
Creative LAB in a workflow
Examples and case studies
Click here to register for this webinar session ($29.95).


