
Harold Davis's Blog, page 179
June 21, 2014
Giverny Waterlogue Watercolor
I shot this image at Monet’s Garden, Giverny, about an hour outside of Paris. I used my iPhone camera app. I used my bracket to place the iPhone on my tripod, and the ear bud as a shutter release. On the bus ride back to Paris, I processed the image on my phone using the nifty Waterlogue app.

Giverny © Harold Davis


June 20, 2014
Shirakawa River, Kyoto
Getting to Kyoto late in the afternoon, I checked into my hotel. Next, I proceeded to wander with my camera. In November, the sun set early and found me along the banks of the Shirakawa River. Somewhere between a canal and a river, and bounded in a stone channel, one-way streets ran along either bank. I set up my tripod on one of the stone foot bridges that crossed the Shirakawa, and shot the peaceful urban landscape as ducks played in the water.
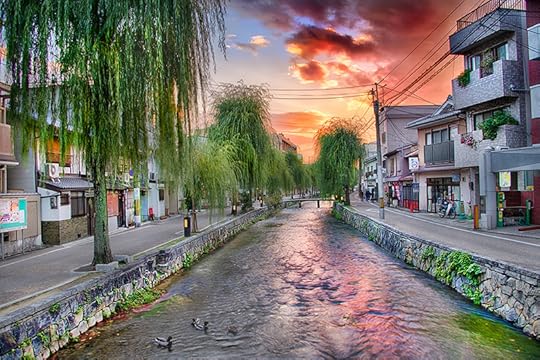
Shirakawa River, Kyoto © Harold Davis

June 19, 2014
White Poppy

White Poppy © Harold Davis
Exposure data: Nikon D800, Zeiss 135mm f/2 lens with 12mm extension tube, 2 seconds at f/22 and ISO 100, tripod mounted, exposed on a light box for transparency, processed in Adobe Camera RAW, Photoshop, and Nik HDR Efex Pro.

June 18, 2014
Sisters
We are all sisters (and brothers) and the skin is only the surface. As human beings, let us be tender with each other.
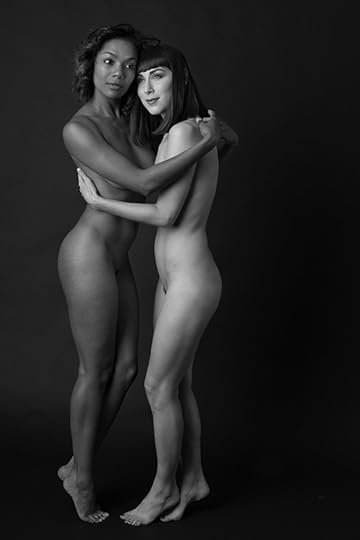
Sisters © Harold Davis
Exposure data: Nikon D800, Zeiss Otus 55mm/f1.4, 1/160 of a second at f/8 and ISO 200, hand held. Two-strobe lighting on black seamless, with large soft box on the left and less powerful unit through an umbrella on the right. Photographed at The Lighthouse in Berkeley, California.
Related images: Multiple Exposures.

June 17, 2014
New Photoshop Webinar Recordings Available
Want to be able to get the nuts and bolts of a subject and play it again as often as you’d like? Access to the following webinar recordings is available. Each webinar is approximately one hour with video and audio. Listen as many times as you’d like, and play back specific portions as often as you wish. The cost is only $19.95 each.
Click here for unlimited access to the Painting in Transparency Using a High-Key Layer Stack Webinar Recording (about 75 minutes, the cost is $19.95)
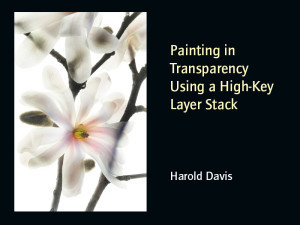 Are you intrigued by transparent flower photos? Ever wanted to know how to make them? Well, here’s your chance!
With photography on a light box, once you photograph a bracketed high-key exposure sequence, then the the next step is to assemble a layer stack.
As you build your layer stack, successively darker layers are masked and painted in to create the illusion of transparency. The results surprise and delight!
Digital artist and master photographer Harold Davis states, “My transparent botanical art has been greatly acclaimed and emulated. Flowers can create the most beautiful compositions. Photographers who are interested in photographing flowers should give this technique a try. Certainly, one of the most sensitive parts of the process is painting in the high-key layer stack.”
Here’s a comment from a viewer of this webinar: “I had read all I could about painting in transparency but only with your layer-by-layer demonstration did it all come together.”
Click here for more information about this webinar recording.
Click here for unlimited access to the Using Backgrounds and Textures Webinar recording (about 65 minutes, the cost is $19.95)

Have you ever wanted to turn your photos into fine art design pieces? With a little bit of Photoshop know-how, a few inexpensive tools, and the techniques explained in this webinar, it’s easy to create unique art imagery, guided by your vision and creativity.
Placing a photo on a background creates an image that looks like a botanical illustration. Adding a texture to a photo is can be used for an impressionistic and/or painterly effect.
Digital artist and master photographer Harold Davis states, “The two primary techniques that I use to turn straightforward photos into art are to add a photo to a background, and to add a texture to photos. These two techniques have a very visual different impact, and can be particularly effective with my botanical art.”
It’s easy to add a whole set of techniques to your creative use of Photoshop! Watch Harold as he explains the entire process of using backgrounds and textures, then shows how to use them in the actual context of his own work.
Here are some comments from viewers of this webinar:
“I have been using textures for a while, but watching this webinar filled in some gaps for me. Great information.”
“Up all night and enthused about textures after watching your video. Great info about layer masking. Thanks!”
“You hit the mark for me, Harold! Filled in all the gaps. Thank you!”
Click here for more information about this webinar recording
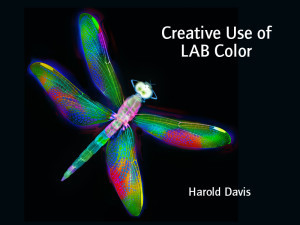
Click here for unlimited access to the Selective Sharpening with LAB Color with Harold Davis webinar recording (about 60 minutes, the cost is $19.95).
 Have you ever over-sharpened an image? (We all have!) Have you ever wanted to to sharpen just one thing in a photo, not the entire image?
If you answer “Yes!” to either of these questions, then this webinar recording is for you!
This webinar recording shows how to use the properties of LAB color to selectively sharpen images for aesthetic effect, and teaches you a technique that should be in the toolkit of every photographer who uses Photoshop.
Master photographer and bestselling author Harold Davis says, “I use selective sharpening with LAB color to enhance almost all of my photos.” Sharpening with LAB is one of the true secrets of the masters.
Here are some comments from viewers of this webinar:
“Very informative. All my questions were answered.”
“It was great to see actual examples and Harold using this technique with his own imagery!”
Click here for more information about this webinar recording.
Current Live Harold Davis Webinar Offerings
July 26, 2014: Creative Use of LAB Color (World premier offering)
Understanding the creative use of LAB color in Photoshop unlocks a vast treasure trove of under-utilized and under-explored possibilities.
This webinar explains the structure of LAB color, and demonstrates inversions and LAB equalizations for both image optimization and creative fun. You will learn how to combine Blending Modes with LAB equalizations for an unlimited and powerful palette.
Each live webinar session has ample time for questions and is limited to twenty participants, so seating is very limited. The $29.95 fee includes unlimited access to the recording of the session.
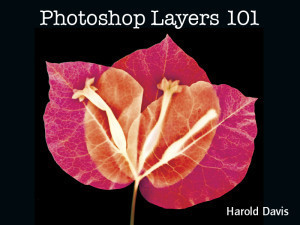 August 16, 2014: Photoshop Layers 101 (World premier offering)
The ability to work with layers and layer masks in Photoshop is what unlocks the power of Photoshop, and separates it from more mundane image editors. Yet many people find working with layers (and the tools related to layers) daunting, both conceptually and practically.
This webinar aims to get you over this learning hump gently. It is intended for serious photographers—for example, those working in Lightroom—who want to take their work to the next level in Photoshop. We will go slowly, work through many examples, and reserve ample time for questions
Each live webinar session has ample time for questions and is limited to twenty participants, so seating is very limited. The $29.95 fee includes unlimited access to the recording of the session.
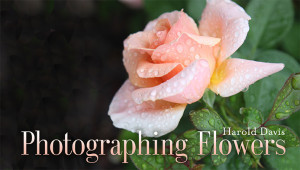
Please consider my interactive, online Photographing Flowers course (with Craftsy).
Class description: Learn how to use exposure, focus and creative techniques for spectacular floral photos. Join top photographer and bestselling author Harold Davis to explore the many facets of successful macro photography, starting with expert tips on composition. Delve into extension tubes and filters for an affordable way to master extreme close-ups, and navigate challenging lighting with ISO, aperture and shutter speed. Cultivate your artistic vision using selective focus, unexpected angles and depth of field to create imaginative, Impressionist-inspired shots. Plus, learn how to execute an indoor shoot and present your photos in a strikingly unique portfolio.

June 16, 2014
Paris Sunset
Towards the end of April, on top of Tour Montparnasse in Paris, France, I watched late afternoon fade into dusk and night. As the sun set, the lights of the City of Light came on. A spectacular view, and best of all because, being shot from the Tour Montparnasse, the view does not include the Tour Montparnasse: a truly ugly building from the 1970s that spoils the symmetry of the classical Paris skyline.
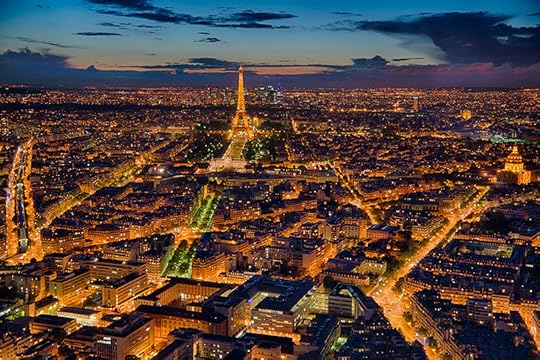
Paris Sunset © Harold Davis

June 15, 2014
Photographing Flowers for Transparency – Weekend Workshop Oct 4-5, 2014
BY POPULAR DEMAND! Space is limited, and this workshop usually sells out, so don’t delay.
Two Day Workshop: Photographing Flowers for Transparency with Harold Davis
Info & Registration: http://www.meetup.com/Harold-Davis/events/183306272/
 Master photographer Harold Davis is well-known for his often imitated—but seldom equaled—digital images of luscious transparent and transulcent flowers.
In this unique workshop offering master photographer Harold Davis shows the techniques he uses to create his floral masterpieces. Arrangement, composition, photography, post-production will all be covered, as will Harold’s special techniques for shooting on a lightbox.
Who is this workshop for?
The workshop is intended for photographers of all levels with an interest in flower photography.
Harold is only planning to give this workshop infrequently. There is no better way to learn the floral transparency techniques that he has pioneered. The two-day format will give participants the chance to complete their imagery using the techniques that Harold will demonstrate.
Here are some comments from previous Floral Transparency Workshops:
“Loved the pace, in-depth instruction and generous sharing.”
“Excellent presentation and information. Harold Davis patiently answered all the questions and helped us get great shots the first time out!”
“Harold, thank you for the time, expense and effort it took to put on a great workshop….You are a wealth of information and share it so graciously.”
“Outstanding workshop!”
“A very packed day! Harold is very clear and organized; an outstanding photographer who is also an outstanding teacher.”
Where: MIG Meeting Place, 800 Hearst Avenue, Berkeley, CA 94710
When: Saturday October 4, 2014, 9:30AM to 5:30PM and Sunday October 5, 2014, 10:00AM to 5:00PM
Tuition: The cost of the workshop is $745 per person. Workshop limited to 16 participants.
Registration: http://www.meetup.com/Harold-Davis/events/183306272/
What to bring: Your camera (preferably capable of shooting in RAW and with a manual exposiure mode), camera manual, tripod (if you have one), and a way to make notes!
If you’d like to follow the post-production examples please bring a laptop loaded with Photoshop, and HDR Efex Pro from Nik Software (trial versions of this software are available for free download).

Curriculum – Day 1
9:30AM – Workshop orientation
10:30 – Glory of the tranlucent petal (understanding translucency and transparency)
11:30 – Introduction to Floral arrangement and composition
12:30 – Lunch break
1:30 – Advanced floral compositon
2:30 – Shooting on a lightbox
3:30 – Understanding high-key hand HDR post-production
4:30 – Advanced HDR topics
5:00 – Review, wrap-up and Q&A
Curriculum – Day 2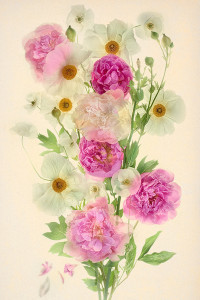
10:00AM - Day 1 recap
10:30 - Individual post-production guided practice
11:30 – Backgrounds and Textures
12:30 – Lunch break
1:30 – LAB Color effects
2:15 – Individual practice
4:00 – Fine art botannical prints
4:30 – Review, wrap-up and Q&A
About Harold Davis
Harold Davis is an award-winning professional photographer and widely recognized as one of the leading contemporary photographers.
He is the author of more than 30 books, including Monochromatic HDR Photography (Focal Press), The Way of the Digital Photographer (Peachpit Press), Creating HDR Photos: The Complete Guide to High Dynamic Range Photography (Amphoto), Photographing Flowers: Exploring Macro Worlds with Harold Davis (Focal Press), The Photoshop Darkroom 2: Creative Digital Transformations (Focal Press), and The Photoshop Darkroom: Creative Digital Post-Processing (Focal Press).
Harold is the author of the Creative Photography series from Wiley Publishing.
“Harold Davis’s Creative Photography series is a great way to start a photography library”—Daniel Fealko, PhotoFidelity.
The Creative titles include: Creative Landscapes: Digital Photography Tips & Techniques (Wiley), Creative Lighting: Digital Photography Tips & Techniques (Wiley), Creative Portraits: Digital Photography Tips & Techniques (Wiley), Creative Black & White: Digital Photography Tips & Techniques (Wiley), Creative Composition: Digital Photography Tips & Techniques (Wiley), Creative Night: Digital Photography Tips & Techniques (Wiley), Creative Close-Ups: Digital Photography Tips & Techniques (Wiley). He’s also written a book on the fundamentals of exposure, Light & Exposure for Digital Photographers (O’Reilly Media).

June 14, 2014
Peony Softness
I shot Peony Softness on a light box, showing the versatility of back lighting when it comes to flower photography. This is a very different look than most of my light box photography, but also very attractive.

Peony Softness © Harold Davis

June 13, 2014
Falling Rose Petals – New Print Edition
We are making available a new print of Falling Rose Petals directly from my studio. Falling Rose Petals is printed on Awagami Unryu washi, generously sized on 12″ X 17″ paper. Each print has my Photographer as Poet stamp hand-applied in archival ink on the lower left, and is signed on the face of the print in pencil.

Falling Rose Petals, shown on Unryu washi
The delicacy and uniqueness of the Unryu washi with its visible Mulberry swirls combined with the bitter-sweetness of an image that shows both the beauty of the rose blossoms and the passage of time with the falling, translucent petals makes for unforgettable botanical art that anyone can be proud to display in their home or collection.
Falling Rose Petals © Harold Davis
The price for this one-of-a-kind print that blends classical aesthetic with modern sensibility and technology is $395. Please contact my studio for more information, or to purchase a print.

June 12, 2014
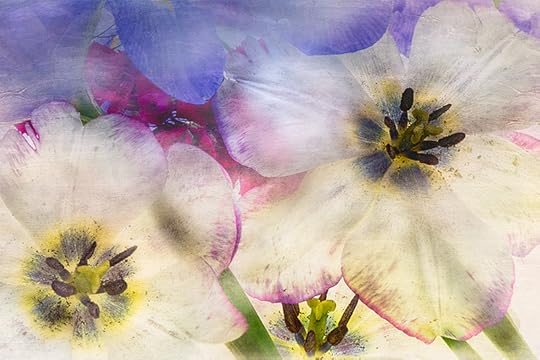
Creative Photoshop Fun Day
Registration and information for the Creative Photoshop Fun Day with Harold Davis (Saturday, September 13, 2014)
I often get asked about my Photoshop techniques in the course of a workshop. In a general workshop that involves photography there just isn’t enough time to cover the vast multitude of creative Photoshop techniques that you can use in depth. This workshop will provide a one-time opportunity to do that exploration of Photoshop: both as a creative medium, and as an artistic partner with digital photography.
High-Key Tulips © Harold Davis
I will also work with each participant to develop their personal Photoshop style and to process one or more of their own images using the techniques demonstrated in this workshop.
Let’s spend a fun day together playing in Photoshop! We’ll work with layers, masking, textures, backgrounds, selections, filters, LAB color, and more. There will be time for image review, and for helping participants with individual creative projects.
The focus will be on creating an individual Photoshop workflow that is fun and that energizes. Take your Photoshop creativity to the next level!
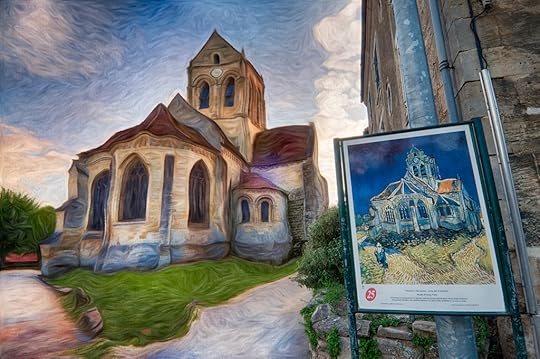
Van Gogh’s church at Auvers-sur-Oise © Harold Davis
Registration: http://www.meetup.com/Harold-Davis/events/186153022/
Prerequisites: Participants are expected to know how to use their computers and to have (at a minimum) a basic knowledge of Photoshop. Please contact us with any questions about whether you have the appropriate background for this workshop.
 Suggested advance reading/viewing: The Way of the Digital Photographer and the Harold Davis Photoshop webinar recordings.
What to bring: Please bring a laptop with Photoshop installed and some of your images that you would like to work on. The following software is also suggested (but not required): the Nik Collection, Topaz Adjust and Topaz Simplify.
When: Saturday, September 13, 2014 from 9AM to 6PM, with an hour break for lunch.
Where: The workshop is hosted in Berkeley, California, in a convenient location near the upscale Fourth Street shopping district and close to the University Avenue exit from I80.
Tuition: $295 per person. Workshop is limited to a maximum of 16 participants.

Flowering Quince by Moon © Harold Davis


