Eoghann Irving's Blog, page 6
May 23, 2020
Local Knowledge Is King
I have been following Gary Gough on YouTube for some time now and he always has interesting content to post. Here he is exploring part of Wales while talking about the importance of local knowledge for landscape photography.
I think he’s making a very important point. It’s easy to look at people on YouTube who are going to all these amazing locations, that you can’t afford to travel to, but investing your time in your location can pay huge dividends as you start to find the less well known locations, the special angles and just have the ability to be there in all sorts of different weather to capture the light.


May 22, 2020
An Introduction to the Exposure Triangle
If we’re talking about the mechanics of taking a good photograph, and putting aside for now artistic merits, then the thing that everyone needs to learn about is exposure. Inside the camera there are three settings you can adjust that will control exposure and they are commonly referred to as the Exposure Triangle:
Shutter SpeedApertureISO
What is Exposure?
In the simplest of terms Exposure is the amount of light that reaches your camera’s sensor and as a result it’s how light or dark your photo will turn out to be. Having the correct exposure for your image will make a huge difference to its quality. If your photo is over-exposed then it will look washed out, if it is under-exposed it will be so dark that you can’t see most of the details. The precise amount of exposure is different for every single image.
Sometimes you may want an image to be mostly dark, say if you’re photographing silhouettes. Other times, perhaps you are going for a dreamy look and you want it to be much lighter. It is possible to adjust your photo’s exposure using software like Photoshop. However, there are limits to that and you will most likely introduce a lot of unpleasant noise into your images. The goal then is to get your exposure dialed in as accurately as possible in camera.
The Exposure Triangle Explained
Just in case anyone who cares about geometry is reading I have to acknowledge that this is not a triangle in any mathematical sense. It doesn’t really follow any of the properties of one. However the three values are interlinked. A change to any one of the three will require a change to at least one of the other two in order to balance out your exposure. Exposure Triangle sounds better doesn’t it? Let’s look at each of these elements in turn:
Shutter Speed
This is probably the most intuitively obvious of the three. It is quite simply how long your camera’s shutter stays open. The longer it stays open, the more light gets to your sensor. The more light, the brighter your image. Of course there’s a catch. Long shutter speeds, and in this case by long I mean anything longer than one hundredth of a second can cause problems.
[image error]This was shot at 160th of a second but see how blurry the bird’s wings are?
Imagine that you’re trying to take a picture of something that moves fast like a bird or a car. While a hundredth of a second may seem like a very short time indeed the thing you’re trying to photograph will move quite a lot in that amount of time and the chances are your photograph will be little more than a blur. And while you can probably hold your camera steady for that amount of time, shutter speeds of a 60th of a second will probably suffer from camera shake as it’s hard to hold your hands completely steady.
For some types of photography this is less of a problem, particularly if you are using a tripod but it’s clear that adjusting shutter speed has it’s limitations. Which is why it’s fortunate we have other options as well.
Aperture
Every camera lens has an iris which performs a similar function to the iris in your eye. It opens and closes to let in more or less light as required. The range of aperture values for a lens depends on how it was engineered but is measured in “f-stops” with f standing for focal length. When we change the aperture of our lens not only do we increase or decrease the amount of light that gets to the sensor, we change the depth of field of our image.
[image error]
Depth of field is a topic that deserves an entire article but to give you the edited highlights, when the f stop is low (say f1.7 or f2.2) the amount of light getting into the camera is high but the depth of field is narrow which means that most of the image will be out of focus. Conversely when the f-stop is high (say f11 or more) much less light is getting into the camera but the depth of field is much greater so more of your image will be in sharp focus. The image here illustrates that. Far more of the Roku remote is in focus when I use high f-stop than when I use a low one.
ISO
Our final element in the Exposure Triangle is ISO which is the most abstract of them all. In the days of film cameras, ISO reflected the type of film that was in your camera. Different types of film were engineered to be more or less sensitive to light. In the digital world things are a little different and now ISO is effectively a measure of how much the exposure is boosted in camera.
[image error]This picture clearly shows the effect of High ISO on an image
This sounds great. Why bother with those other two settings if you can just boost or reduce exposure via ISO? Well, you guessed it, there’s a catch. By boosting exposure via ISO settings you increase the amount of noise in your image. So a low ISO of say 100 or 200 will show no discernible noise in your image while an ISO of 1,600 or 3,200 will show a lot of noise.
The image here clearly shows the impact. The top part of the image was shot with an ISO of 200 while the bottom use 3,200. To get the full difference I turned off any noise reduction in my processing software.
A Delicate Balance
[image error]
Since each of these settings has limits on it and we can’t simply crank one of them up to 11, the trick is to learn to balance them all against each other to minimize any noise or other negative impacts on your photo. Exactly how these three balance depends very much on the type of photo you are taking and the amount of light available to you at the time. Fortunately modern cameras are very good at adjusting these values for you.
When you are starting out it’s perfectly acceptable to let the camera pick the cameras for you but by doing that you are limiting your ability to make artistic decisions about what your photo will look like. So in the next article we will talk about how to take your camera off auto and run through a few different scenarios and what settings you might use.
May 21, 2020
One White Tree
Full Size Digital Download (suitable for printing at up to 9″ x 12″) Available for $6.00
These two trees in Harpers Ferry near the Virginius Island bridge have become favorite targets for my photography lately. It’s the contrast of the white against it’s surroundings that I love. Particularly if I catch it at the right time in the morning when the sun directly hits the tree, then it’s almost as though the tree has an internal light.
[image error]Straight from camera, the tree already stands out, but the image is cold and dark
I’ve tried different angles and styles, this time out I went for a more edited and less naturalistic look. In this case I think the starting image was a strong, one but there was room for improvement, because it didn’t evoke what I felt when I was standing there. The first step (and often last) in my editing process is always Lightroom.
At a minimum for any photo I’m going to do some whole image adjustments. Just some basic tweaking of the exposure, color balance etc. In this case I warmed what seemed like a visually cold image to reflect the sunlight that was streaming into the clearing. That alone can really change the tone of a photo. Plus a little nudge of the Shadows slider brought out some of the hidden detail in the photo. But the real fun comes when you start applying local edits and my favorite tool for that is Lightroom’s radial filters. In this case I used two radial filters of slightly different sizes, but both centered over the tree.
[image error]Toned and enhanced in Lightroom
The first filter created a vignette effect by darkening the edges of the the image, which helps to focus the viewer’s attention on the tree in the image. The second, and smaller, radial filter was designed only to affect the tree itself. I achieved that by using the Luminence mask feature so that my area of effect was only the brightest parts of the image inside the circle. I nudged the highlights down a little because the sun was so bright against the tree and made the color tones a little colder because I wanted to keep the almost “blue” whiteness of the tree vs the yellow light elsewhere. I also decreased the Clarity slider while increasing Texture and Contrast. This combination accentuates the details while creating a slight blurring around the edges.
Then it was back to whole image edits to reduce Vibrance a bit. For the most part I prefer Vibrance to Saturation as it has a more subtle impact. Those simple changes made a huge difference to the feel of the image as you can see, making it much more inviting. But I couldn’t quite get the effect I wanted, plus there were some distracting elements. So imported the image with my current edits into Photoshop
[image error]Final Photoshopped image without the stray branches
The first an most important edits I made in Photoshop were to remove the annoying branches that were hanging into the scene. I’d tried to compose around them on site but couldn’t find a satisfactory angle. Nor could I figure out a crop that would work, so Photoshop’s amazing spot healing brush tool saved the day.
The final step then was to apply my Orton Effect action macro to give an even dreamier an more magical look to the final image. No doubt some will prefer a more naturalistic look but that wasn’t what I was going for here.
And yes I’m referencing Tolkien again!
Tall ships and tall kings
Three times three.
What brought they from the foundered land
Over the flowing sea?
Seven stars and seven stones
And one white tree.J.R.R. Tolkien
Full Size Digital Download (suitable for printing at up to 9″ x 12″) Available for $6.00
May 17, 2020
The History of Science Fiction and Fantasy Part 1: Origins
Where better to start than at the very beginning with the origins of these intertwined genres. What we now consider fantasy and science fiction started in the 19th century but it did not spring fully formed from these writers’ imaginations. Rather, they built on centuries of traditions to create their works.
FantasyFantasy has been part of our fiction since storytelling began. We can see it in the Greek myths, Norse mythology, and many other places. In these stories, the gods regularly use their impossible powers to bend reality to their whim, at the expense of unfortunate humans. It is present in the Arabian Nights, and Thomas Malory’s Le Morte d’Arthur, itself inspired by earlier tellings of the Arthur myth and is present in many iconic works of literature so we can see this is an inspiration that crosses cultures and borders.
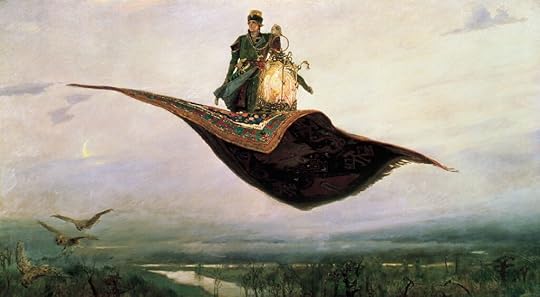 The Flying Carpet, a depiction of the hero of Russian folklore, Ivan Tsarevich by Viktor Mikhailovich Vasnetsov
These earlier works all featured fantastic elements set in the, then, present day. They primarily focus on the fantastic impinging on the natural. In that regard, they are reminiscent of today’s urban fantasy. But they have little in common with the fantasy genre as it later became defined.
One common element in early fantastical stories is that they were written or told to teach a lesson. Fantasy creatures abound in fairytales for example. Another common feature is that the fantasy elements are accepted as real in these stories and little effort is made to explain or justify them. The fantastic and fantasy creatures much the same as ghosts and spirits. In this respect, they differ from modern works of fantasy.
Modern fantasy is directly inspired by these earlier works, but the structure that we now associate with fantasy did not arrive until the early 19th century.
Science FictionUnlike its cousin Fantasy fiction, which can point to many great works of literature as source material, the roots of science fiction lie much closer to the present day. It is a junior branch of fiction and did not come into being as we would recognize it until the 19th century. Even then it did not really become a defined genre of its own until the 20th century.
This isn’t as surprising as it might first appear when you consider that our culture’s ideas of what science is have changed radically over the years. We get the word science from the Latin word scientia which means knowledge. The word scientist did not appear in our vocabulary until 1833, coincidentally just about the time that science fiction blossomed. The term science fiction was fit used in 1851 (specifically in A Little Earnest Book Upon A Great Old Subject by William Wilson)
It’s also not surprising that perhaps the earliest example of proto-science fiction might be an Arabic novel called in English, Theologus Autodidactus by Ibn al-Nafis in the 13th century. Arab culture was far ahead of western Europe in science and philosophy.
The first European work that is often considered as primordial science fiction is Utopia by Thomas Moore. Written in 1516, it depicted a fictional island and its religious, political, and social customs. While not precisely science fiction as we understand it now, this method of creating a fictional society to explore philosophical issues takes a similar form to much contemporary SF. But none of these books would be recognizably science fiction to a modern reader.
If we are looking for an obvious starting point for Science Fiction as a genre then perhaps Frankenstein has the strongest claim. In his history of science fiction, Billion Year Spree, Brian Aldiss makes the claim that Mary Shelley’s 1818 novel was “the first seminal work to which the label SF can be logically attached” and who am I to argue with Aldiss? The book concerns itself heavily with science to the extent they understood the disciplines. Arguably though Frankenstein is at least straddles the line but is perhaps predominantly a gothic novel in its tone and content.
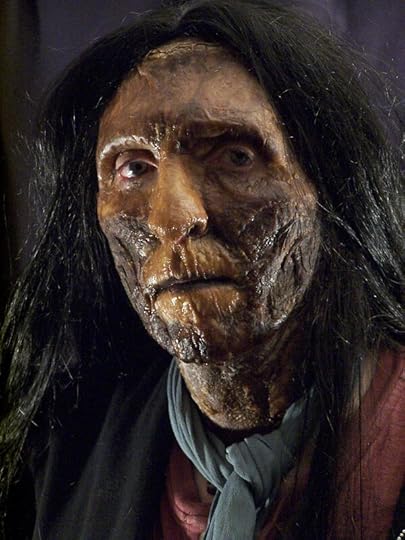 Frankenstein’s Monster by Derrick Tyson
One alternative “first” has been proposed by the likes of Isaac Asimov and Carl Sagan and that is Somnium or “The Dream” by Johannes Kepler published in 1634 after the author’s death. This pre-dates Frankenstein by many years though it is far less well known. It is an odd meshing of education and entertainment using the fictional scenario of a student being transported to the moon by a daemon to present a discourse on physics and astronomy.
Neither of these firsts feels like science fiction as we expect to see it today. But things would soon change. The 1800s were a time of great scientific progress in a western culture dominated by the expansive British Empire which controlled a quarter of the world’s population. Within Britain’s sphere of influence, there were major developments occurring in mathematics, physics, chemistry, biology, electricity, and metallurgy.
Science was becoming a recognized profession for the first time, with Pasteur, Edison, and Faraday all active and hugely influential. On top of which Charles Darwin published The Origin Of The Species in 1859 and challenging our understanding of human nature itself.
Ideas and technology developed at a faster pace than ever before and perhaps in that heady culture, it was almost inevitable that the genre of science fiction would emerge as a distinct entity in the 1900s.
May 15, 2020
How to Improve Your Photography – Where to Start?
If you are reading this article then I’m going to make a couple of assumptions. First that you want to learn how to improve your photography skills and second that you are comparatively new to photography and are still learning the basics. If either or both of these things apply then this is the article for you. I will be writing on more advanced topics as well, but you’ve got to establish the foundations first.
What Do You Need to Learn Photography?
[image error]Photo by Andrea Piacquadio on Pexels.com
Well you need yourself and you need some form of camera. That’s pretty much it. In a pinch any sort of camera will do, including a smartphone but for maximum flexibility you’re going to want some sort of interchangeable lens system (any format will do).
Learning the basics of photography is actually very easy. Yes if you’re interested there can be physics and math, but it’s really not neccessary to understand all of that in order to take great photos.
Can anyone learn photography?Absolutely Anyone can master the basics if they have an interest.Can I learn photography on my own?Yes you can. There are advantages to having someone to guide you or provide constructive criticism, but you can find that on the internet if you go looking. Photography can be either a group or solo hobby, whichever you prefer.How long will it take to learn photography?You can learn the basics in a few weeks, it will take your life to master it.
Practice, Practice, Practice
Which leads me nicely onto the single most important thing to understand as you work to improve your photography skills. Practice is the key to getting better. The old Malcolm Gladwell quote about it taking 10,000 hours of practice to become a master isn’t literrally true, but it’s essence is true. The rules and techniques of photography are all pretty simple, but mastering them requires you to apply them repeatedly and do it in a conscious manner.
[image error]
In short if you want to get better at photography, you’re going to need to take a lot of photos, but more than that, you’re going to need to think about each photo you take. It is easy, particularly with modern cameras and their almost unlimited storage, to just keep hitting the button and taking photos but if you don’t think before you click then you won’t be able to learn from what you’ve done.
If you want to improve your photography quickly then you need think before each shot you take and ask yourself “what is it that I want from this photo?”, “what am I trying to capture in the image?” At this stage you may only have a very general feeling of what that is, but it’s enough to build from. Keep the answers to those questions in mind because you’ll need them for the next step.
Learn From Your Mistakes and Your Successes
When you get back in front of a computer either later that day or the next day, you need to review all the photos you took. You could do this on your phone in a pinch, but the tiny screen size is not well suited for this sort of activity. You want to be able to see the flaws in your photos so you can ask yourself several questions:
Did I achieve what I wanted with this photo?Is it blurry when I wanted it to be sharp?Can I clearly see the focus element of the image?Does it capture the feeling that I was going for?
You want to be as honest with yourself as you can be when reviewing the images. If they’re just flat out bad (out of focus, so dim you can’t see anything) you’re going to delete them and not keep them. If they’re okay but not what you pictured in your head then you’ll want to look at them more closely to see what could be done differently. Future articles will help you do that.
At this stage it is normal to feel a bit frustrated with the photos that you take, particularly if you are comparing them to the ones you see online. Keep in mind that most people only share their best work on the internet and they may well have been practicing photography for years. But over time, using this method of practicing and applying the techniques that I’m going to discuss, you will rapidly improve.
The point of reviewing your photos critically is not to make you feel bad about your abilities, but simply to identify where you need to improve. In some cases the issue isn’t even the photo but just that the feeling you had needs to be teased out of the raw photo via editing and we’ll talk about that in another article as well.
Future Articles
Upcoming articles in Photography 101 will include the following topics, but this is by no means the full list.
Learn your cameraThe Exposure Triangle and Basic TerminologyComposition Basics
May 14, 2020
Find Beauty In The Little Things
I’ve been trying to do more macro photography lately, but I am somewhat limited by not having an actual macro lens because they can be a little pricey. Perhaps I should invest in some extension tubes. However with a bit of effort it is still possible to get some decent macro shots with even some pretty basic lenses.
[image error]
In this case we have a lot of ferns springing up at this time of year and while from a distance an all green plant isn’t particularly interesting, up close ferns are fascinating with all their little details. So that makes them the perfect subject for a macro photo.
Lacking a dedicated macro lens, I used my Panasonic 25mm, f1.7 lens which is a great multi-purpose lens and works well in this scenario because you can dial the depth of field low and blur out the backgrounds to focus only on the item close to the lens.
While it’s definitely easier to do macro photography on plants, since they don’t actively move away from you, they do still move and with such a narrow depth of field all it takes is the slightest breeze or twitch of your hand to move everything out of focus. With that in mind I have found that the most important thing to do is use a fast shutterspeed to remove any movement. Having a tripod can definitely help reduce shake, but it won’t stop the wind.
[image error]Image Straight From Camera
For post-processing on this one I kept it pretty simple. There’s only one focus element so my goal was to eliminate any distractions and I did that first by cropping out a lot of the empty space and then with an old favorite of mine, using a radial filter to subtly darken and reduce saturation of the background. After that it was jut a matter of tweaking the color profile an setting the contrast to my satisfaction.
I think if you compare the before an after images it makes a compelling case for the importance of spending some time editing your images.
May 13, 2020
Jefferson Rock
Named after Thomas Jefferson who stood on this spot in Harpers Ferry and was inspired to write about it, the rock itself now has to be supported by those stone pillars which were added at some point in the mid-1800s. I’ve taken plenty of shots of this scene in the past, but none from this particular angle before.
[image error]Color Version of the Same Image
This wasn’t the best time of day for it as there was a little too much direct sunlight with no fog to diffuse it. This Is definitely an angle to remember and try earlier in the morning or later at night. I’ve been on a bit of a black and white kick lately it seems, but in this case it just came down to practicality. The sun was too harsh and too strong to make for a good color image from this angle, but that harshness actually improved the image in black and white.
I did want to highlight the glow from the sun and the way it surrounded the rock though so I applied the “Orton Effect” to parts of the image.
The end result was an image which emphasized the textures of the rock and pushed the, honestly rather dull, greenery firmly into the background.
May 10, 2020
Street Photographer Does Food Photography
This video by Anete Lusina is a good illustration of one of the things I was talking about in my recent blog post Hit a Photographic Rut? Here are 6 Ideas To Switch Things Up. In this case the limitation wasn’t so much creative as physical since it was a result of the lock-downs and stay-at-home orders around the world to slow the spread of COVID-19. But the resulting problem, and the solution is much the same.
Rather than just not taking any photos Anete pivoted to a different type of photography and applied her skills and creative eye to that. Certainly there are new challenges to address when tackling different forms of photography, but the core principles all still apply.
So, how are you going to shake up your creativity? Let me know in the comments below.
May 9, 2020
Still Standing
Full Size Digital Download (suitable for printing at up to 9″ x 12″) Available for $9.00
I’ve been walking past this tree for a few weeks now and it catches my eye every time. It stands apart from most of the other trees an has clearly been through some battles. However most times when I got past it has been sitting in shadow. On this particular morning though the dawn sun had finally made it’s way above the mountain and was hitting one side of the tree.
[image error]
There were still problems though. For a start, I could not find an angle where the tree was completely separated from the line of trees in the background and as a result branches of the tree were merging into the the background. In the end this was the best angle I could come up with.
To increase the separation between foreground and background I converted the image to black an white. That helped slightly in that it focused on the most interesting element of the tree (the texture of the trunk an branches).
To enhance that further I adjusted several sliders in Lightroom:
TextureClaritySlight tweak to the Black an White Mix sliderAdjusted sharpness, primarily by adjusting the mask settingExposure
By this point I was fairly pleased with the look of the image, but I wanted to ensure that the viewer’s eye went to the tree above everything else. So I applied a radial filter over the tree that created a gradual darkening the further away from the tree you got and also reduced the sharpness and texture so that the viewer’s eye was less likely to be attracted to some minor detail at the edge of the image.
Full Size Digital Download (suitable for printing at up to 9″ x 12″) Available for $9.00
May 7, 2020
Hit a Photographic Rut? Here are 6 Ideas To Switch Things Up
I think it’s inevitable that after you’ve been into photography for a while you will hit a patch where you just don’t feel inspired. Perhaps you feel you’ve taken all the photos there are to take locally? Or you just can’t think of a subject you want to take. Or you just can’t drag yourself out of be 2 hours before dawn.
It’s certainly happened to me more than once over the years and I have found that the solution is to switch things up a bit. I’m not looking to reinvent myself or my photographs, but it’s good to do something a little different from time to time. It’s far too easy to fall into a creative rut.
So here here are six suggestions of things to try or change (yes it’s a listicle!):
1. Black and White
[image error]
Most modern photography is color photography. It’s the default setting of your and everyone else’s camera and why not, the world is in color after all. But if you haven’t tried black and white photography, you really should.
Taking away color from the image you are creating will force you to look at the world differently and compose your pictures differently. Color is an easy hook to give a picture impact, without it you need to find a new focal point for your image. Textures and patterns become much more important and finding those patterns may have you looking at familiar places in an entirely new light.
2. Use a Different Lens
I think all photographers have a favorite lens. It sits on your camera most of the time unless you find yourself in a situation where it just won’t work. And that means you’re missing out on all sorts of opportunities. Every lens has unique characteristics. I don’t just mean different focal lengths, or even f-stops. Some lenses are sharper than others, colors are slightly different, the all important (according to the internet at least) bokeh have different characteristics.
Some of the differences are subtle certainly but when you look at the image you get from that lens it may well inspire you to edit differently too in order to pull out what you see there. I am a firm believer that editing is half of what makes a really good photo and I often find that after switching to a different lens I am inspired to move away from my go to editing presets.
3. Change Focal Length
One of the simplest ways to change your view of the world is to see it through a different focal length. Most likely all you need to achieve that is the kit lens that came with your camera as they are usually a zoom of some sort.
Without getting into the details of lens compression and how that varies by focal length, because this is not intended to be a technical article, you can’t entirely replicate focal length just by walking backwards or forwards and refocussing on an image. When you look at the world through a different focal length you are looking at it through a different pair of eyes.
4. Shutter Speed
[image error]
Changing shutter speed can completely change the look an feel of an image. Most of the time photographers are probably looking for the fastest shutter speed they can achieve without introducing too much noise into their image. Fast shutter speeds freeze motion and minimize blur so you get a nice crisp image, right?
But a slowing the shutterspeed way down can create some really interesting looks. The classic example is probably waterfalls, but you shouldn’t limit it to that, other uses include:
Rivers – Capture the motion of a large riverClouds – Long shutter speeds create lovely cloud trailsSea – If you time it right you can capture the movement of the water going outTrees – It’s hard to photograph trees on a blustery day because of the movement of the branches, unless you slow things down and make that movement part of the image.
5. Macro Photography
[image error]
Macro photography is popular in part because it allows us to look at the world in a way that we as humans do not normally. If your lucky or have invested in multiple lenses then you may even have a macro lens.. Those lenses are designed to focus very close up and allow you to take pictures at a 1 to 1 or larger magnification. They can also be a little expensive.
Fortunately you don’t have to own a specialized lens to take these sorts of photos as a telephoto lens can achieve a similar effect. It’s a little harder as you are trying to focus from much further away, but you still get the nice bokeh and an image that is close to 1:1. Another cheap way to achieve macro is to buy magnifying filters that you screw on to the front of your lens but I have to admit I’ve never had much success with those.
One great thing about macro photography is that there’s almost no limit to the possible subjects. Yes certainly flowers or insects are favorites, but you could just as easily photograph feathers or rust or really anything with texture.
6. Change Your Subject
Another way to change things up is to change your subject. I don’t mean you have to do anything as drastic as going from Landscapes to Sport (though by all means do if you want to). I’m thinking of more subtle changes. The point here isn’t to completely change what you do just to give you a spark of something different.
Landscapes – If your normal subject matter is sweeping vistas then try for a more intimate landscape or maybe some woodland photography. Or change the time of day that you go out and photograph sunsets instead of dawns.Portraits – What about experimenting with self-portraits for a while instead of photographing other people? Or maybe animals instead of people?Urban photography – if you feel like you can’t take one more black and white photo of an isolated individual crossing the street, then maybe turn your attention to the buildings in the city?
What About You?
Have you found yourself stuck in a photographic rut? And if so what did you do to jolt yourself out of it? Let me know in the comments below.