Scrivener Tip: Making Document Templates
All writers face the blank screen and think about what they’re going to write. Too often we start and realize we didn’t format properly and stop, then get distracted by something else and we’ve lost our train of thought be the time we get back. Getting started can be daunting enough without spending time getting everything just right in your word processor.
Well, in Scrivener there’s a good way to beat back all that pre-writing distraction so you can sit down with your ideas and write. Who wants to lose their ideas to setting everything up? The answer is to make a template within your project.
Follow Blog via Email
Enter your email address to follow this blog and receive notifications of new posts by email.
What did you just read? That’s right a template within the project. You’ve heard of making a project template but how do you make a template within a project? Just follow these instructions.
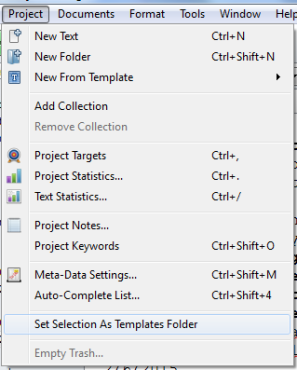
1. Create a folder within the project and designate it as the Template folder by clicking on Project and Set Selection as Template Folder. Some project templates come with a template folder already designated so check you binder for one. Here’s what the template folder looks like: 
Here’s how to set a folder as the project template folder:
2. Once you’ve set the Template folder then create a document container under the folder. Configure all the settings you want with formatting in this container but leave it blank.
3. After you’ve completed configuring your document template it’s ready to use. Go to one of you folders in your project and when creating a new document container (text). Choose Project from the upper menu bar and then go to New from Template to get a fly-out menu. On this menu you will see all the document templates created for the project in which you are working.
4. You can also create such a document template from the cork-board view of a folder. Right click for a context menu, go to Add for a fly-out menu. Slide your cursor to New from Template to reveal the fly-out menu or your document templates. You can also do the same from the Binder by right clicking on a folder for a context menu and using the same directions.
5. At this point, you can name the new container and start writing without a need to change settings. Create as many of these document templates as necessary for your project.
One again, here’s a simple way to use Scrivener to make writing easier than ever.
Are you in NaNoWriMo yet? If so, what are you doing to prepare? Please share your thoughts and ideas in the comments section. Sign up for my Archer’s Aim Digest mailing list to receive the forthcoming edition of my newsletter with announcements about upcoming releases and events. You’ll be the first to have news about my books, especially some free offers this summer related to the upcoming release of The Bow of Destiny, the first novel of The Bow of Hart Saga. Speaking of which, it is now available on Amazon – Kindle. Additionally, I have FREE book, What Is Needed is available at Barnes & Noble, Kobo, iBooks and Smashwords & Amazon.
Follow Blog via Email
Enter your email address to follow this blog and receive notifications of new posts by email.
Just as a note: I am not affiliated with Scrivener in any official capacity. For support questions, pricing and other concerns please contact the vendor. However, I am working on becoming an affiliate for Scrivener ads since I like the product so much. I’m not required to write about Scrivener to be an affiliate; I just like it that much. For more about my FTC statement see my sidebar.
Filed under: Blogging, Cover Reveal, Creativity, Editing, Indie Publishing, Planning, Scrivener, Self-publishing, Tech Tips, Templates, Tips, Twitter, Writing Tagged: blogging, Coverart, creativity, Editing, Facebook, Formatting, Indie Publishing, P. H. Solomon, Planning, Scrivener, Self-publishing, Social Media, The Black Bag, The Bow of Destiny, Twitter, writing


