Creating and Modifying WordPress Pages
Welcome to the next installment of WebDesign for Writers! At this point you’ve got a website with a gorgeous new theme installed. Now it’s time to start posting! Creating pages and posts in WordPress is incredibly easy. Log in to your admin panel (www.yourwebsite.com/wp-admin). Once logged in, you will be on your site dashboard. This is your home base for your site—where you’ll start for pretty much all the work you will want to do here.

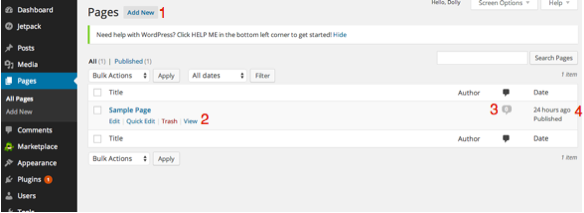
To create a page, navigate to the Pages option on the menu to the left side of the screen. When you hover over that item you’ll see the options All Pages or Add New. For the purposes of this example I’m going to select All Pages, but you can also select the option to create a new page directly from here.
You can see now that you are in the Pages section of your site. Every page you have on your website will be displayed here. Most websites have at least a few pages: usually an About page, a Contact Us page, and a Home page. The homepage is created by default, and I’ll show you how to create the other two here.
You can do and see all sorts of things from the Pages section. I’ve noted a few of the items you’ll use most frequently in your blogging efforts:
You can add a new page from this screen by clicking the Add New button.
For every page you’ve created (there is only the one sample page at this stage) you can Edit, Trash, or View the page from the menu items below the page name.
You can see how many (if any) comments you’ve received on that page.
You can see the date and time the page was published
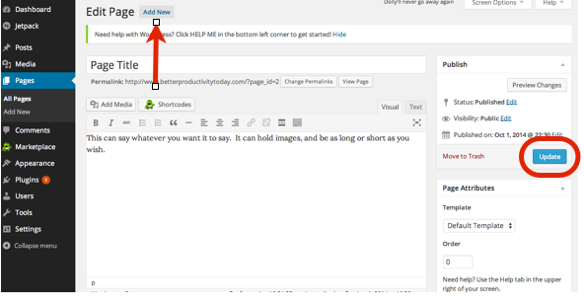
At this point, we are going to modify the existing sample page and turn it into an About page. First, click on the title of the page—in this example the title is Sample Page. Clicking the title opens the actual page itself and gives you the ability to edit as desired. You change the content by simply typing in the available fields. Delete the words Sample Page and replace them with About Me (or whatever you want the text to say). Then go into the body of the page and modify the text to say whatever you desire.
Once you’ve finished typing in whatever information you’d like for this page, click the Update button on the far right. If you’d like to see what the page looks like before you publish it, you can use the Preview Changes button located just above the Update button.
Now we are going to create a new page. From the page you just updated, click on the Add New button up at the top of the page. This will open up a page just like the one you just edited but all the fields will be blank. Add the title and the content of the new page, and then click the Publish button. When you are modifying an existing page, you use the Update button to save it. When you are creating a new page, you publish it.
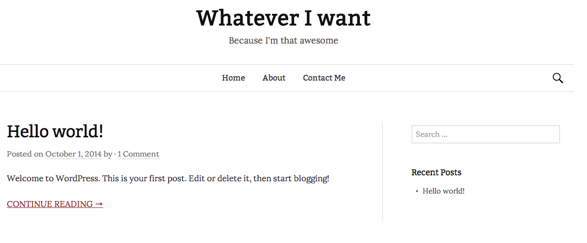
 For this example, I created a Contact Me page. Once you’ve done the same (creating whatever page you’d like), navigate to the front end of your site to see what it looks like. Remember, the back end is your admin panel where you modify your site, and is not something your visitors will ever see. The front end is the actual website itself—what people see when they pull up your site.
When you pull up the front end, you should see both the modified and the new page you created in this exercise. You can see below the site now has a Home page (created by default), an About page, and a Contact Me page. Congratulations, you now rule the world of WordPress pages!
Next we will talk about how to create and publish your first post, as well as how to remove the sample posts and comments that your theme created by default.
For previous articles in this series please see the articles below. Next week we’ll cover creating and modifying pages in your WordPress Theme!
The Importance of a Website to Your Author Platform
Why You Need a Self-Hosted Website
Naming Your Website
Selecting a Registrar and Web Hosting Company
Installing WordPress
Picking and Installing a WordPress Theme