Picking and Installing a WordPress Theme

Welcome to the next installment of WebDesign for Writers! This is where things get really fun. Picking the look and feel of your site can be absorbing. You can spend hours on this step alone—I certainly have! In this article you’ll learn how to find and install a WordPress theme that fits perfectly with your style and genre.
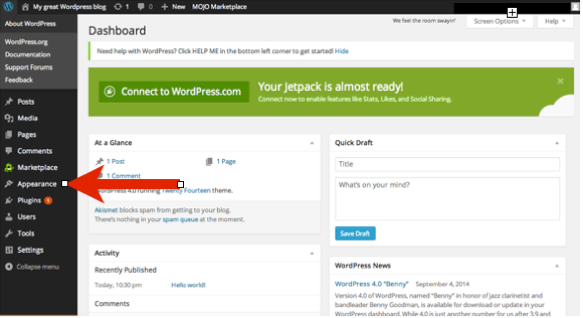
The first step is to log in to the admin panel of your site. Remember the URL, username, and password you recorded after you installed WordPress? It’s time to pull those out and use them. Open up www.yourwebsite.com/wp-admin and log in using your username and password. You’ll be directed to a webpage that looks something like this. To find and install themes, you’ll want to navigate to the Appearance tab.
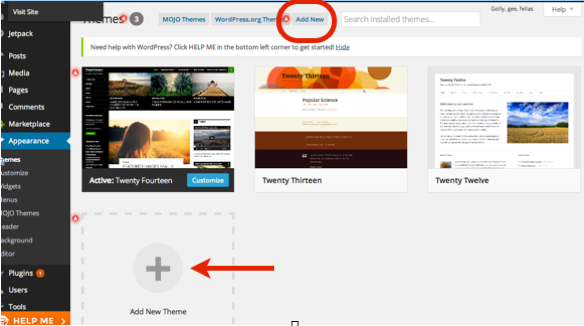
If you hover over this menu option you’ll see that it expands out into a second menu. Select the Themes option.

From here you’ll want to add a new theme, and you can use either of the two options highlighted below to accomplish this.
The search function allows you to see featured themes, popular themes, or the latest themes. There is also a feature filter that allows you to search themes with a specific color or a specific layout in addition to other possible features. Since you’re new to all this, I recommend that you just search through the featured or popular lists to see what kinds of themes are out there.
Don’t fixate on things such as the included images; these will all be changed as you tweak and customize it to suite your needs. Instead, focus on finding a layout you like. Do you like a clean, minimalist design with nothing but a single blog post visible at any time? Do you prefer something that is designed more for the display of graphics or for a store? Or maybe a magazine layout?
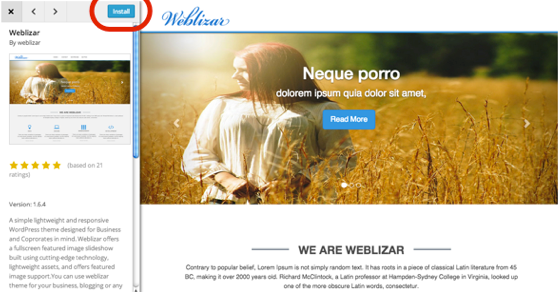
Read the descriptions of the themes (by clicking on the image) to get a better idea of what the theme is capable of. Many of them provide multiple color schemes, the ability to modify the font, and so on. It may also be useful to read through the comments and see what other users thought of the theme and whether they ran into any problems while using it.
Once you’ve found a theme you like, click the Install button at the top left of the display.
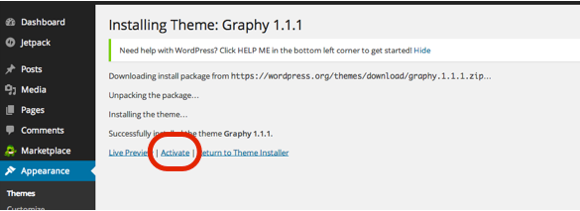
The system will do everything needed to get the theme properly installed for your site. Once it’s done, you’ll get a screen that looks like the following. Here, you’ll want to hit the Activate button to make this the active theme for your site.
 Once you’ve activated the theme it will take you back to the mojo marketplace page. From here you can customize the theme in a variety of ways, depending on the theme you have chosen. The theme I chose for this example allows you to change the site title and tagline, the logo, the colors, the navigation, and widgets. The main thing for you to worry about at this stage is the site title and tagline. This changes the name that is visible on your website.
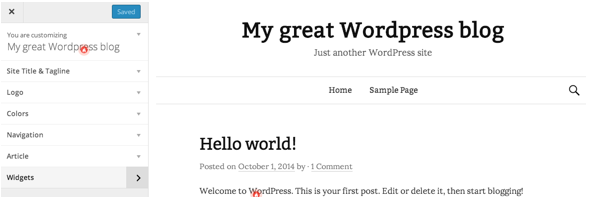
As an example, the theme I installed looks like the following by default. Note that the “Hello world!” is a sample blog post—all themes come with a sample post and a sample comment so you can see what they look like.
This is the default page for the template I chose. You can see the title, “My great WordPress blog,” and the tagline, “Just another WordPress site.” Definitely not what you want your site to say!
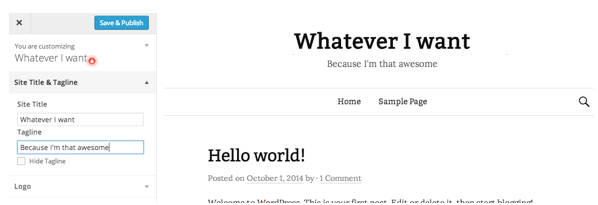
By modifying the Site Title & Tagline section you can change this to say whatever you want. Because yeah, you are that awesome. When you are done modifying these options, click the Save & Publish button in the upper left.
For now, I would recommend you disregard the remainder of the available options unless you really want to change up the font or colors. You can play with these options over time and learn what they do to change the site itself. Widgets are a critical component, and I will talk about those a bit later in this series. For now, you should check out your site to see it with your newly installed theme. Congratulations, you’ve designed your first website!
Next we will talk about how to create and publish your first post, as well as how to remove the sample posts and comments that your theme created by default.
For previous articles in this series please see the articles below. Next week we’ll cover creating and modifying pages in your WordPress Theme!
The Importance of a Website to Your Author Platform
Why You Need a Self-Hosted Website
Naming Your Website
Selecting a Registrar and Web Hosting Company
Installing WordPress