
Scrivener - How I use it, part 2: Labels, keywords, and meta-data
First, let's recap the main takeaway from part 1: Name your chapters to denote what happens in them. The list can (and does, for me) end up serving as your outline, which makes it incredibly easy to navigate your book later.
To keep with our Star Wars example, here's the whole thing laid out (and viewed in "Outline Mode" which I've highlighted):
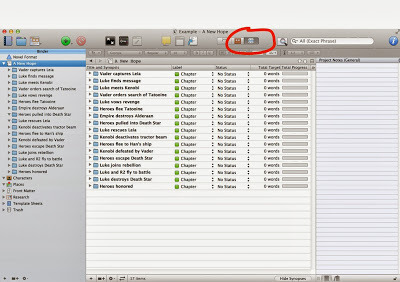
Nice and tidy, right? Now, as an outline this may look a bit light. If you didn't know Star Wars you wouldn't be able to get the full gist of the story from this. That's okay. This is for your use, not to communicate the story to others. And, once it's fleshed out with Scenes inside these chapters, the details, if needed, will emerge.
For you pantsers out there, it's perfectly fine to NOT do this ahead of time. Just create a new chapter, write it, and when you're done name the chapter with a terse summary.
Last note on this: If you look at these chapters, I've tried to have the words summarize what happens at the END of that chapter. This way, every time I start writing a chapter I know what my goal is, and I can have fun getting there. It works for me, but as always your kilometerage might vary.
Moving on then!
Labels, keywords, and meta-data
Scrivener gives you a lot of different wants to flag things for later reference. And because of that it can be easy to get overwhelmed by these options, and equally easy to go overboard using them.
So my main piece of advice here is KISS: Keep It Simple, Stupid.
You don't have to use all these features, and indeed I don't. I started out adding keywords and meta-data all over the place, but in the end I found I wasn't ever making use of them. Your technique will likely evolve, too. For now, we'll keep it simple and just make use of Labels.
In the screenshot earlier, you can see that each Chapter, by default, gets the label of... Chapter.
Personally, I think this is next to useless. For me, what was useful when writing my Dire Earth novels was to know which character's POV was used in each chapter. The reason's I'll get into in a second, but first let me show you how to change these.
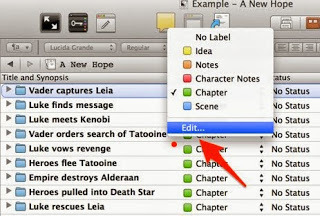
First, click the little up/down arrow next to one of the "Chapter" labels and then select "Edit..."
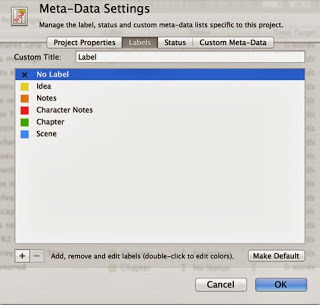
Here are the default labels:
Change the custom title from "Label" to "POV". Then, edit the label names themselves (double-click on them) to be the main characters in your book.
For our example purposes, here's what the screen should look like:
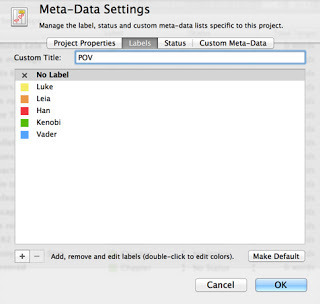
I also made "No Label" the default.
When you click OK, everything that labeled "Chapter" before will now have "Kenobi", since we edited the existing label. That's okay. Go through each chapter now and change it to the character who's point-of-view is used. The final result is something like this:
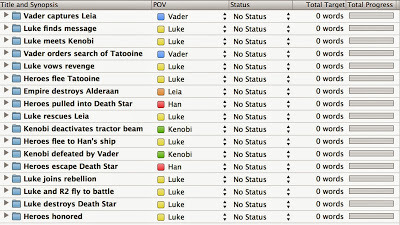
Now, Star Wars itself might not be the best example for using POV as the label we care most about. But for my novels POV was very important, so let's just pretend it matters here, okay? Okay.
What you can learn from this is if some characters are under or over represented. There's a lot of Luke chapters at the end for example, so perhaps sticking a Vader POV chapter in there might be better for flow (again, just pretending - the actual film cuts back and forth a lot between characters, I know). Maybe the final chapter can be told from Leia's POV. And so on...
If you're writing a mystery, maybe change the label column to "Clues" and keep track of what is learned when. Or if you're writing a 1st person story of emotional journey, you could denote the mental state of the main character. Again, this is all to help you identify issues like pacing or focus. In the mystery example, you might find at this stage that you've got a large section in the middle of your book where no clues are given. Whether or not that's an actual problem is something for you to decide. Follow your gut!
Now, Scrivener does offer other ways to do this. In addition to label there's status, keywords, and meta-data. For me, just using labels is really enough. I've done other things like adding keywords for locations and meta-data to note every character that appears in a given scene, but honestly I hardly ever used these. For the more detail oriented writer, you might LOVE this sort of thing, and I also suspect some of you are already looking at this POV label and thinking it wouldn't help you at all.
The main thing you need to realize about using these is that once setup you can SEARCH based on them. It's easy, just click the little down error next to "Search" and tell it you only want to search labels. Search for "Luke" and you'll find every chapter where Luke is the POV character. Again, perhaps not so useful with this Star Wars example, but imagine if you had 60 chapters with 10 different POV characters. Using this, you can instantly get a view of your book from just that character's POV. Used well, this can be very, very powerful tool.
Part 3 of this series will cover using comments as an amazing way to keep track of every little idea or correction or concern you think of as you write.
To keep with our Star Wars example, here's the whole thing laid out (and viewed in "Outline Mode" which I've highlighted):

Nice and tidy, right? Now, as an outline this may look a bit light. If you didn't know Star Wars you wouldn't be able to get the full gist of the story from this. That's okay. This is for your use, not to communicate the story to others. And, once it's fleshed out with Scenes inside these chapters, the details, if needed, will emerge.
For you pantsers out there, it's perfectly fine to NOT do this ahead of time. Just create a new chapter, write it, and when you're done name the chapter with a terse summary.
Last note on this: If you look at these chapters, I've tried to have the words summarize what happens at the END of that chapter. This way, every time I start writing a chapter I know what my goal is, and I can have fun getting there. It works for me, but as always your kilometerage might vary.
Moving on then!
Labels, keywords, and meta-data
Scrivener gives you a lot of different wants to flag things for later reference. And because of that it can be easy to get overwhelmed by these options, and equally easy to go overboard using them.
So my main piece of advice here is KISS: Keep It Simple, Stupid.
You don't have to use all these features, and indeed I don't. I started out adding keywords and meta-data all over the place, but in the end I found I wasn't ever making use of them. Your technique will likely evolve, too. For now, we'll keep it simple and just make use of Labels.
In the screenshot earlier, you can see that each Chapter, by default, gets the label of... Chapter.

Personally, I think this is next to useless. For me, what was useful when writing my Dire Earth novels was to know which character's POV was used in each chapter. The reason's I'll get into in a second, but first let me show you how to change these.
First, click the little up/down arrow next to one of the "Chapter" labels and then select "Edit..."

Here are the default labels:

Change the custom title from "Label" to "POV". Then, edit the label names themselves (double-click on them) to be the main characters in your book.
For our example purposes, here's what the screen should look like:

I also made "No Label" the default.
When you click OK, everything that labeled "Chapter" before will now have "Kenobi", since we edited the existing label. That's okay. Go through each chapter now and change it to the character who's point-of-view is used. The final result is something like this:

Now, Star Wars itself might not be the best example for using POV as the label we care most about. But for my novels POV was very important, so let's just pretend it matters here, okay? Okay.
What you can learn from this is if some characters are under or over represented. There's a lot of Luke chapters at the end for example, so perhaps sticking a Vader POV chapter in there might be better for flow (again, just pretending - the actual film cuts back and forth a lot between characters, I know). Maybe the final chapter can be told from Leia's POV. And so on...
If you're writing a mystery, maybe change the label column to "Clues" and keep track of what is learned when. Or if you're writing a 1st person story of emotional journey, you could denote the mental state of the main character. Again, this is all to help you identify issues like pacing or focus. In the mystery example, you might find at this stage that you've got a large section in the middle of your book where no clues are given. Whether or not that's an actual problem is something for you to decide. Follow your gut!
Now, Scrivener does offer other ways to do this. In addition to label there's status, keywords, and meta-data. For me, just using labels is really enough. I've done other things like adding keywords for locations and meta-data to note every character that appears in a given scene, but honestly I hardly ever used these. For the more detail oriented writer, you might LOVE this sort of thing, and I also suspect some of you are already looking at this POV label and thinking it wouldn't help you at all.
The main thing you need to realize about using these is that once setup you can SEARCH based on them. It's easy, just click the little down error next to "Search" and tell it you only want to search labels. Search for "Luke" and you'll find every chapter where Luke is the POV character. Again, perhaps not so useful with this Star Wars example, but imagine if you had 60 chapters with 10 different POV characters. Using this, you can instantly get a view of your book from just that character's POV. Used well, this can be very, very powerful tool.
Part 3 of this series will cover using comments as an amazing way to keep track of every little idea or correction or concern you think of as you write.


No comments have been added yet.


