
Turning Your Music Into A Ringtone Via ITunes
I’m blogging this because I am going to forget, and I might as well help anyone out there like me who really (really) doesn’t want to go through the same research pain that I did.
This is complicated, but not difficult. Lots of screenshots are provided to try and at least make the complex stuff easy to follow.
Apple? I love you, but fix your shit. This is ridiculous.
Step 1 : Choose your Music
You probably already own a lot of music and don’t want to buy a ringtone based on it … or maybe you can’t find the .m4r extension required by the iPhone.
(Yes, I have an iPhone and I love it. Apple-frustration is allowed in the comments. Apple-hate is not.)

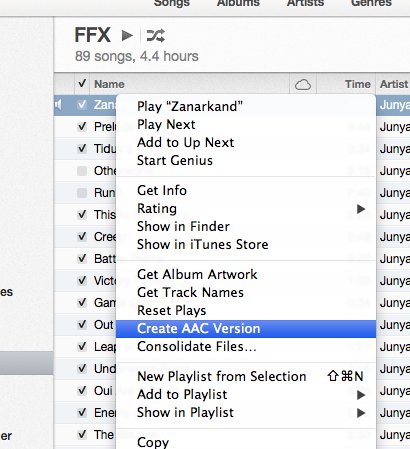
In the above image, I have located the song I want to turn into a ringtone. It’s Zanarkand, from the Final Fantasy X soundtrack.
Not being a huge fan of the newest iTunes UI (it’s just as confusing as the old one, only they moved where everything was so now I have to relearn the new UI. Not awful, just … irritating.) I will point out a few things that you may or may not know.
Sort of in the upper left, there’s a dropdown. In this screenshot, it’s set to “Music”. That’ll be important later when we need to change it. On that same horizontal bar, but in the center, there are little pill buttons for changing how you are organizing your current view. Right now, I’m on “Playlists”, which gives me a menu on the left side of the screen where I could choose FFX in order to find my song.
Step 2 : Shorten Your Song

You cannot have more than 30 seconds of music for a ringtone. At least, that’s what I’ve been told, and I’m sticking to it. Obviously, most songs are rather a lot longer than that. To “shorten” the song, you right click on the song and select “Get Info”.

Inside the resulting menu form, select “Options” from the horizontal menu, then fiddle with the start and stop times to get the exact fragment of the song that you want, making sure that your selected song fragment is no longer than 30 seconds. In the case of Zanarkand, I wanted the opening part of the song, and I found that the 25 second mark was a decent cut-off. The ringtone won’t chop off in the middle of a note or anything.
Once you hit okay, remember that you have not CHANGED your original song. You’ve just told iTunes that when it plays this song, you want it to only play that section. You can listen and keep fiddling with the start/stop times until you’re happy.
Important! When you are done creating your ringtone, go back in and remove your start and stop times. Otherwise, you’ll always only hear that tiny fragment.
Step 3 : Create AAC Version
This next step will either be easy, or stupid. In my case, it was stupid.
Right click on your newly shortened song and select “Create AAC Version”.
Everyone who was capable of doing that step can just skip merrily along to the next bolded header. The rest of you will need to keep going here.
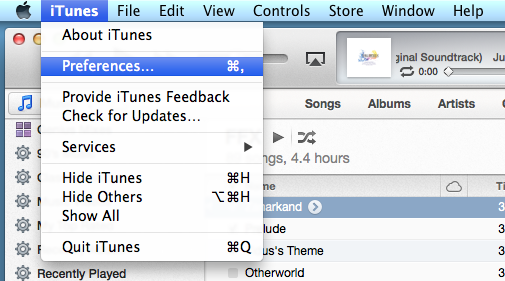
There is a chance that your right click menu does not include “Create AAC Version”. In that case, I am sorry but we need to jump through some more hoops. Almost certainly you have an option that says “Create MP3 Version”, right?
Well, we need to change that.
Go up to your iTunes menu and select “Preferences”.
Inside the Preferences window, you’ll need to be in the General tab, then down at the bottom where it has “When You Insert a CD” click the “Import Settings” button. Then in THAT window, change the setting to AAC Encoder using the dropdown.

Accept the change and now you should have the “Create AAC Version” in the right-click menu off the song.
Are you feeling the stupid yet? Right about here, I was pretty sure I didn’t even CARE what my ringtone was. I kept going though, because I am stubborn.
When you’re done here, you might want to change that setting back, assuming you want mp3s to come out of your CD imports.
Also? Those of you on Android phones? You’re free to preen like crazy right now because Androids allow you to use mp3 clips for ringtones.
Moving on.
Step 4
Find, copy, and rename your ringtone.
Find your song by changing that horizontal pill menu to “Songs” and sorting so that your newest songs pop to the top of the list. Do NOT scream incoherently at your computer because the song you created is not in the playlist you’ve been staring at. That doesn’t help.
I checked.

Now that you’ve found your newly-created song clip, I want you to drag it from your iTunes window to your desktop. Don’t worry, it won’t live there long. As soon as you see the copy on your desktop, you can delete the new little song clip from inside iTunes. (I like to keep my stuff tidy).
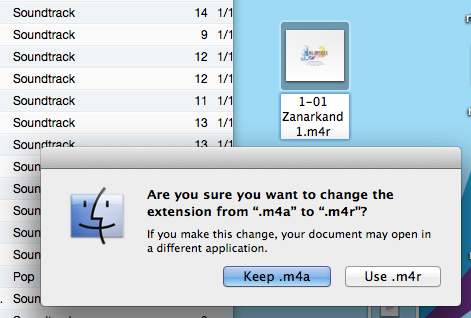
On your desktop, you should have [filename].m4a.
You need to change the file extension to .m4r.
You can do it manually with the keyboard. No need for extra software or weird steps. You DO need to make sure this step happens.
Step 5 : Add Your Ringtone To Your Phone
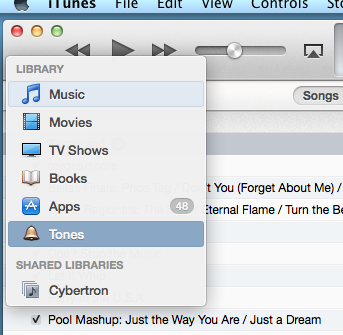
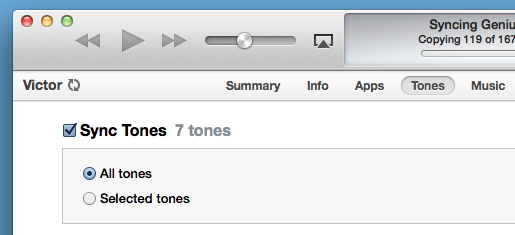
Change your iTunes to look at “Tones” using that dropdown I mentioned earlier, kind of in the upper left.
Once you’re looking at your list of custom ringtones (it may be empty right now), drag the newly-renamed file from your desktop into iTunes.
Here’s another stupid thing. If you did this correctly, you’re fine. If, however, you forgot to rename the file on the desktop? You drag the file in and it doesn’t show up in iTunes. Or rather, it DOES, just not in your Tones. At that point, simply renaming the file on the desktop and dragging it in again doesn’t work. You actually have to go into your songs and delete the one you just dragged in before it will allow you to drag the m4r song into the Tones.
Yes. I know. Super ridiculous stupid. If I chose to jailbreak my phone or use illegal software, I’d have been done with this an hour ago.
Moving on.

So that’s what my Tones looks like now. Yes, I have the baby murloc gurgle as my text message sound. Yes, it’s adorable and I love it.
Also, bonus points for anyone who knows the Bastion song Build That Wall (my normal ringtone). Jenny is probably the only person who might see the singham tone up there and laaaaaugh. Jenny, that’s Steven’s ringtone. (She probably didn’t even read this far down. Alas! A wasted joke!)
Also in there is a MLP song and some ringtones from Borderlands 2 (offered already in .m4r format for free off their website. Anyone who loves Tiny Tina should check out the mp3s there)
Anyway. Now, you’ve got your ringtone in the Tones area of your iTunes. Congratulations! Now you need to plug your phone into the laptop and tell it to synch the Tones.
After that, you just synch the phone and you’re golden.
Yes, my phone is named Victor. Two reasons for that. One: The “Wictor, Wictor” gag from the recent Star Trek movie. Two: The character from Dollhouse whose actor needs to get a LOT more work.

Step 6 : Set Your Ringtones on your Phone
No screenshots for this one. You can access your default ringtones from the Settings app, and you can set individual ringtones and sms alerts for people by using the Contacts app and editing a contact.
As an interesting side note, the tone I created for this tutorial was done to replace my alarm. We use my phone as the alarm clock in the morning, and I need something gentler than the default iPhone ringtones to wake me. Zanarkand is pretty, soft, and has all kinds of happy FFX memories wrapped up in it.
All Done!
Hopefully, that saved someone who wants to do this a lot of time and frustration looking up all the other tutorials I used while doing this. They changed enough stuff with the new iTunes that the old tutorials weren’t 100% correct.
Even if future-Tami uses this one time, it will have been worth it.
Related posts:
Music I’m Loving – Walk Off The Earth
Christmas Music
Quicksilver For Mac


Taven Moore's Blog

- Taven Moore's profile
- 5 followers

