Converting a book cover for Createspace from jpeg to pdf
Introduction
This is a step by step instruction of how to take a jpeg and convert it to a pdf file using Open Office. I'm writing it for you, but I'm also writing it for me because I forgot how last time and there is a terrible lack of tutorials out there on how to do this.
First, I'd like to say that it's absolutely silly that Createspace won't just take jpegs *sigh*
I use GIMP to make my book covers. The easiest way would be to use Adobe Photoshop, but that's assuming you can afford it. (I can't) Adobe can save as pdf since they own the format or something like that. For some reason, GIMP can't save as pdf. Createspace provided a template based on the size of my book. I then made the cover, which was another insanely involved process that I'm not doing a walkthrough for.
I also want to make it clear that I am a complete amateur at this. The steps I'm taking are the best I was able to figure out by . . . guessing. That's right. I guessed. However, the cover was accepted by Createspace, so it works. There may be an easier way to do it. I just don't know.
Note: If you have a problem seeing the images, hold down 'crtl' and zoom in with your mouse wheel. It'll make the page larger. :)
Tutorial
So, this tutorial starts once the cover is completely done in GIMP. You can get GIMP here: http://www.gimp.org/

1. Save it as a jpeg.
2. If you don't have Open Office (freeware), download it. I use Microsoft Office for all my normal files, so I was careful not to let Open Office take over all the files it wanted to. Basically uncheck all the boxes that ask if you want to make it the default program for documents, worksheets, etc.
You can get Open Office here: http://www.openoffice.org/download/
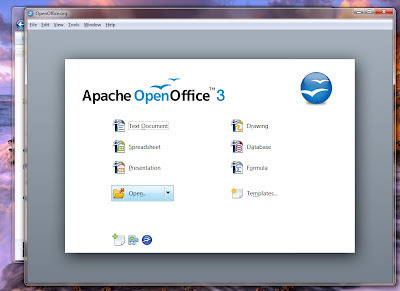
 3. Open Open Office. (No, I'm not stuttering. :p)
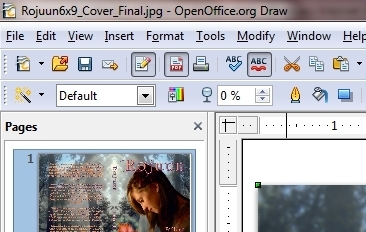
4. Click on the folder image that says "open"
5. Right click on the picture and select original size.
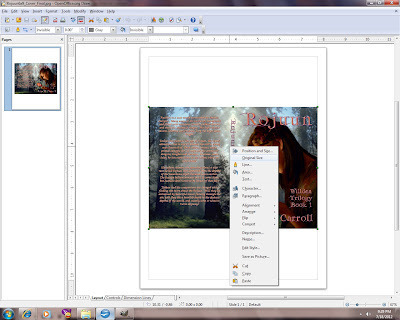
6. Right click on the picture again. Choose 'Alignment'. Choose 'Top'. That will put your image in the top left corner.
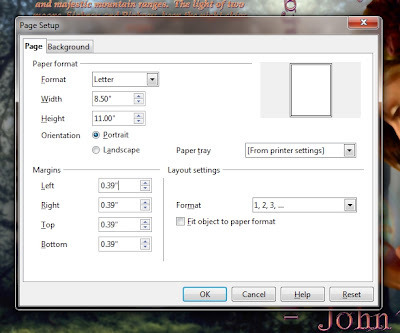
7. Go to 'Format' at the top of Open Office. It will bring down a box. In that, choose 'Page'.
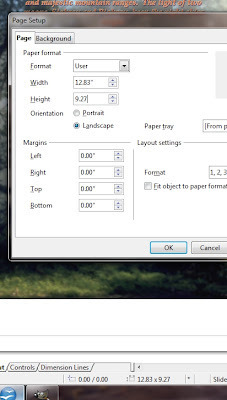
8. Switch the orientation to 'Landscape'. Then adjust all of the margins to 0. (Mine default to .39. I don't know why) Open Office will complain about this being outside print range, but ignore it. You don't want margins on your book cover.
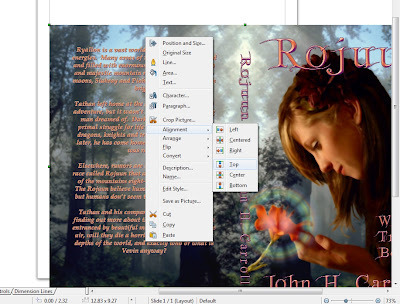
9. Next, you'll want to change your width and height. At the bottom of the next picture, you can see the dimensions of your picture. In this case, 12.83x9.27. So change the width and height to those numbers. When you're done with that, your cover should be exactly the right size. Double check to make sure the alignment is top and left again (step 6) For some reason it shifted my image once.
10. Next, you're ready to export it to pdf. This step is super simple. Just click the pdf icon at the top. Then make sure it's named as you like and click 'save'.
Finish
You're done!!!! You now have a file that can be uploaded to Createspace. :) Congratulations. Hope it went well.
All my best,
John H. Carroll

This is a step by step instruction of how to take a jpeg and convert it to a pdf file using Open Office. I'm writing it for you, but I'm also writing it for me because I forgot how last time and there is a terrible lack of tutorials out there on how to do this.
First, I'd like to say that it's absolutely silly that Createspace won't just take jpegs *sigh*
I use GIMP to make my book covers. The easiest way would be to use Adobe Photoshop, but that's assuming you can afford it. (I can't) Adobe can save as pdf since they own the format or something like that. For some reason, GIMP can't save as pdf. Createspace provided a template based on the size of my book. I then made the cover, which was another insanely involved process that I'm not doing a walkthrough for.
I also want to make it clear that I am a complete amateur at this. The steps I'm taking are the best I was able to figure out by . . . guessing. That's right. I guessed. However, the cover was accepted by Createspace, so it works. There may be an easier way to do it. I just don't know.
Note: If you have a problem seeing the images, hold down 'crtl' and zoom in with your mouse wheel. It'll make the page larger. :)
Tutorial
So, this tutorial starts once the cover is completely done in GIMP. You can get GIMP here: http://www.gimp.org/
1. Save it as a jpeg.
2. If you don't have Open Office (freeware), download it. I use Microsoft Office for all my normal files, so I was careful not to let Open Office take over all the files it wanted to. Basically uncheck all the boxes that ask if you want to make it the default program for documents, worksheets, etc.
You can get Open Office here: http://www.openoffice.org/download/
3. Open Open Office. (No, I'm not stuttering. :p)4. Click on the folder image that says "open"

5. Right click on the picture and select original size.

6. Right click on the picture again. Choose 'Alignment'. Choose 'Top'. That will put your image in the top left corner.

7. Go to 'Format' at the top of Open Office. It will bring down a box. In that, choose 'Page'.
8. Switch the orientation to 'Landscape'. Then adjust all of the margins to 0. (Mine default to .39. I don't know why) Open Office will complain about this being outside print range, but ignore it. You don't want margins on your book cover.

9. Next, you'll want to change your width and height. At the bottom of the next picture, you can see the dimensions of your picture. In this case, 12.83x9.27. So change the width and height to those numbers. When you're done with that, your cover should be exactly the right size. Double check to make sure the alignment is top and left again (step 6) For some reason it shifted my image once.

10. Next, you're ready to export it to pdf. This step is super simple. Just click the pdf icon at the top. Then make sure it's named as you like and click 'save'.

Finish
You're done!!!! You now have a file that can be uploaded to Createspace. :) Congratulations. Hope it went well.
All my best,
John H. Carroll


No comments have been added yet.