
Mail Merge: Creating a Data Source

Creating a Data Source
When sending out letters to a large number of people, it is important to have contact details such as first name, address line 1 and telephone number. This is why creating an accurate data source is important. Ensure that fields are filled in correctly so that the letters will be addressed to the correct recipients.
1. Open a blank document
2. On the Mailings tab in the Start Mail Merge group select Step-by-Step Mail Merge Wizard
3. Move to Step 3: Select Recipients of the Step-by-Step Mail Merge Wizard
4. Select Type a New List under the Select Recipients List then click Create
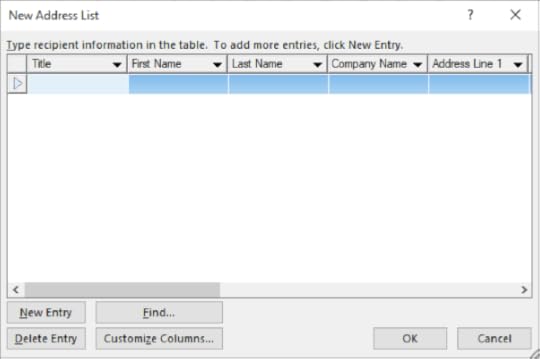
5. Click the Customize Columns button to enter in the field names that will be put into your letter: First Name, Last Name, Address Line 1, Address Line 2 and Town
6. Remove field names by selecting the Field Name and clicking on the Delete Button
7. Press the Rename button to change the name of City to Town and click OK until you are left with First Name, Last Name, Address Line 1, Address Line 2 and Town
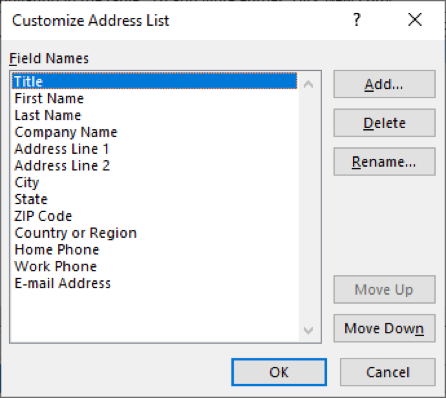
8. Click the Add button to add a new field
9. Type Title into the box and click OK
10. Use the Move Up button to place the new field at the start
11. Enter a list of contact details into your fields
12. Press the Tab key to go to the next field while you enter details
13. After each Row (Record) is complete, click on the New Entry button to start a new Record
14. Click OK when finished
15. When the Save Address List dialog box appears, save it as a Microsoft Office Address List file (*.mbd) named “Data Source”
16. Click OK
17. Save the document as “Mail Merge”
Learn more about advanced word processing here:


Conor Jordan's Blog


