
Intro to Comic Craft: Linear Perspective for Believable Environments
Back in March of 2017, I first touched on the roughs stage in my Intro to Comic Craft series. In that post, I introduced roughs as the stage between thumbnails and pencils/inks, an opportunity to tighten up acting, facial expressions, and scenery. I mentioned that one could skip roughs, particularly if their thumbnails are tight, or their work is cartoony or gestural. In a follow-up post, Environment in Roughs I touch on the concept of comic environments, comic worldbuilding as a character worthy of development and attention. In that post, I use the worldbuilding I've done for 7" Kara- designing Kara's home, the shed, the yard, Naomi's home- worldbuilding that is experienced through very different sets of eyes- Kara's 7" tall, and Naomi's 5'5". In order to accurately portray these environments from both perspectives, I utilize linear perspective to create semi-realistic environments. In that post, I also introduce the concept of linear perspective, but in a fairly rudimentary way. Today, I'm going to expand on that with more examples and helpful resources for those interested in using linear perspective in their comics.
I had a lot of difficulties learning the basics of perspective. It was demonstrated, quickly and poorly, in my Drawing Fundamentals class, using the age-old chestnut of boxes in perspective. It wasn't until I found Andrew Loomis's Successful Drawing, and then augmented that with a little pamphlet on perspective purchased at Michaels, now lost to the sands of time, that it started to click. For me, I needed more than just a single class introduction to perspective, I needed someone to walk me through every step.
 Spring 2009For my undergraduate senior project, a 20 page comic, I began tentatively using 1 point perspective to give my backgrounds depth.
The uses of linear perspective were really driven home during my first semester at SCAD, in Tom Lyle's drawing intensive. I was relying heavily on one point perspective for backgrounds at the time, but his class really forced me to practice 2 and 3 point perspectives. Extremely uncomfortable at first, the repeated practice helped make 2 point perspective second nature, so I highly recommend that if you decide to learn 2 point perspective, you practice it frequently until you understand it well.
 Fall 2010
 Fall 2010
 Fall 2010
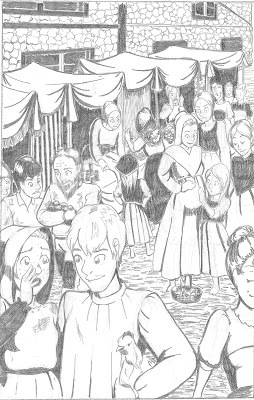
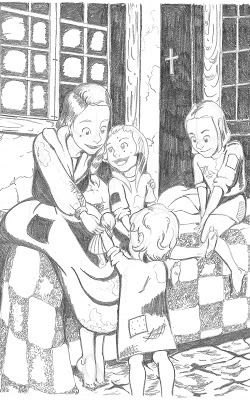
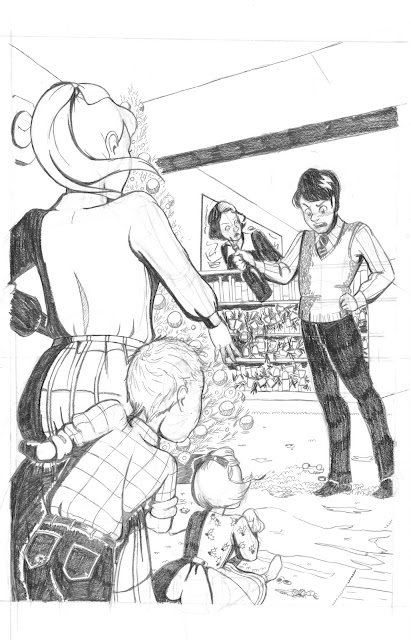
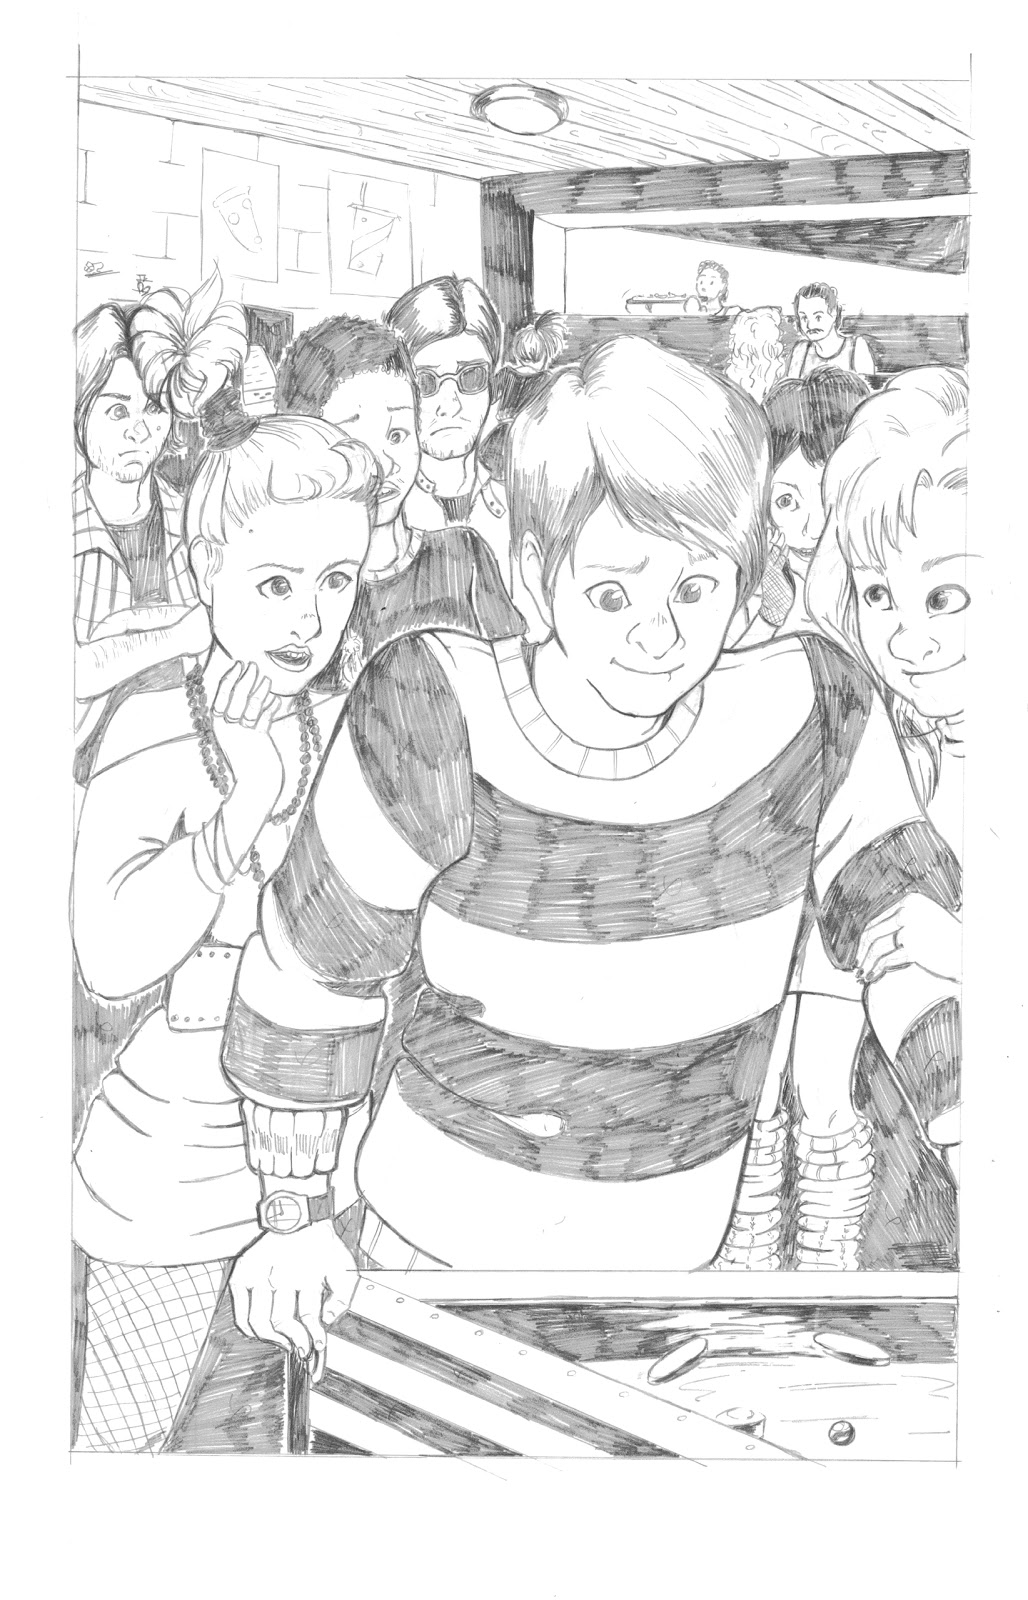
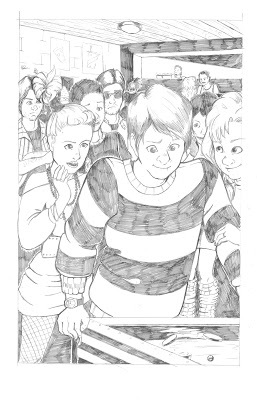 Fall 2010This class required us to do 4 11"x17" illustrations every two weeks. These illustrations were done without the aid of non-photo blue, nor the aid of multiple steps of revision- those concepts were introduced the next semester- I remember these assignments really kicking my butt, time and self esteem-wise, but I think if I were to revisit it now as a challenge, the thumbnail and roughs process would make for a quicker turnaround, and a stronger product. These were some of my first illustrations that utilized a 2 point perspective grid, and I tried to challenge myself to leave my comfort zone each time, drawing group scenes and in perspective texture.
Looking back, it might be fun to redraw these, using the same grids, but fixing the faces and clothes.
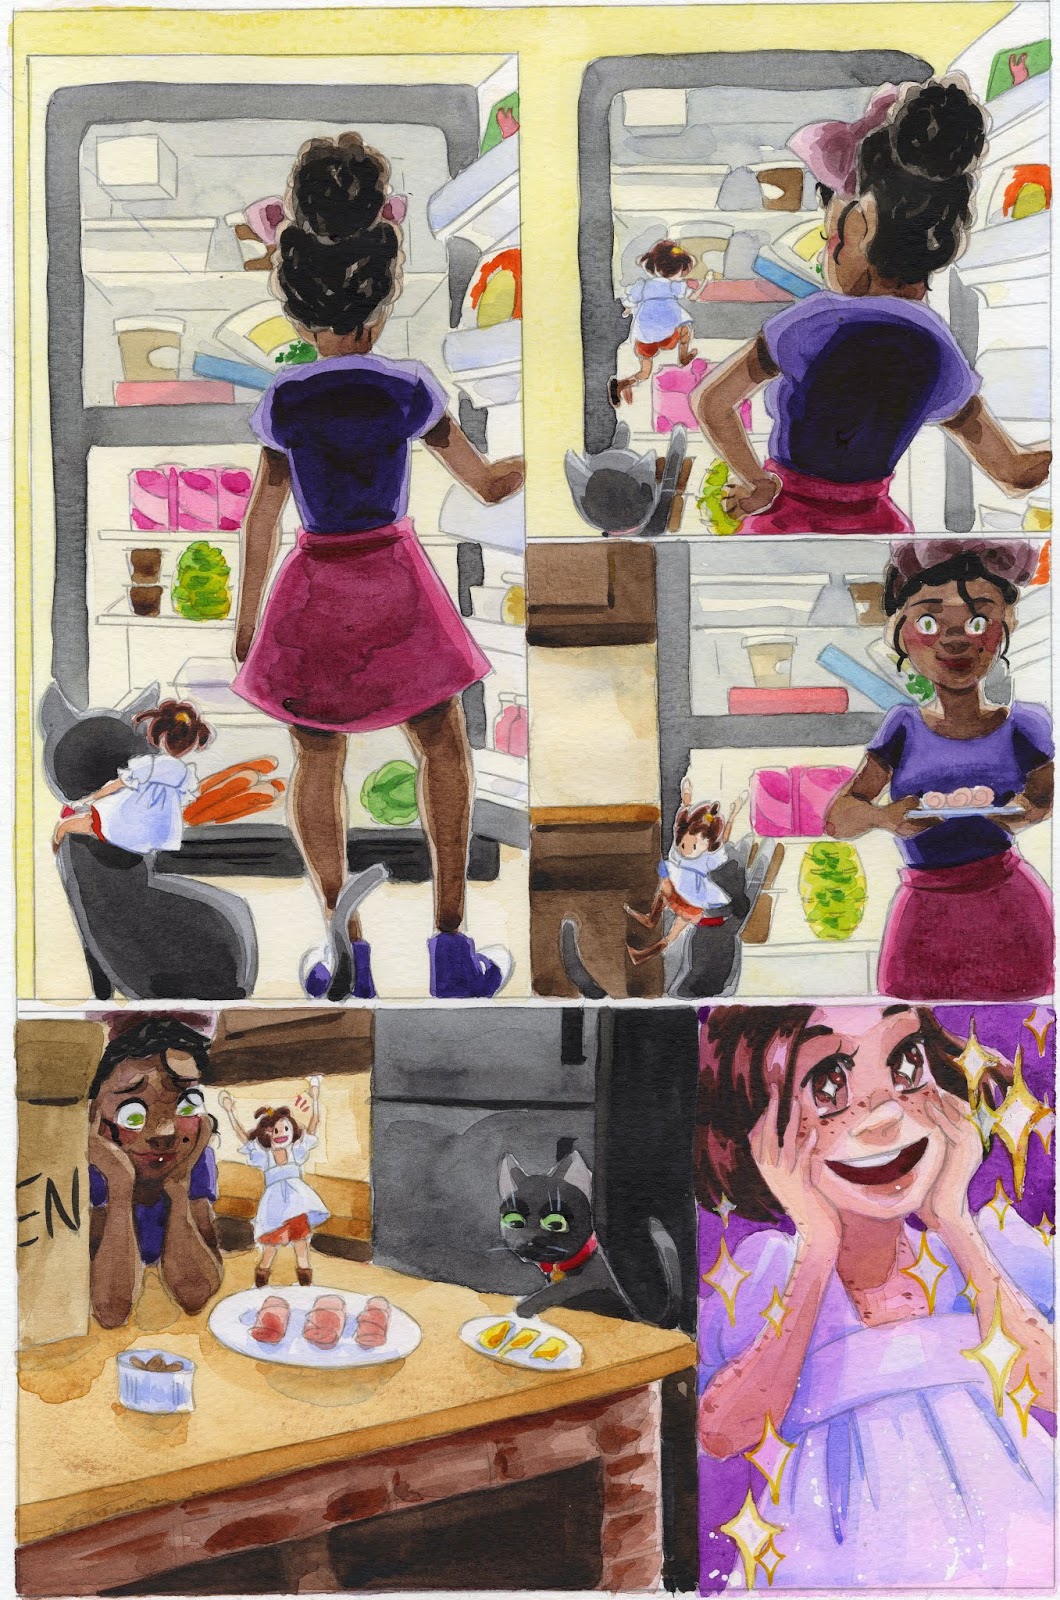
As rough as the art is in the above examples, the backgrounds are consistent with the art, and are fairly believable spaces. You don't have to be an expert for linear perspective to improve your illustration.
 Spring 2017I still set up my perspective by hand, a task that is tedious and frustrating. I wouldn't do it if I didn't find the end result worthwhile, but I will admit that there are digital tools (such as the perspective grid tools in Manga Studio/Clip Studio Paint) that can make this task much easier. There are even printable templates, as well as plastic templates you can slip under your panels, to aid in this task. So take what you need from this post, and alter it to suit your comic's needs. Maybe you need very simple backgrounds- the world isn't important, the character interactions are. Maybe you need elaborate natural scenes- then perspective isn't quite as necessary, but it certainly helps. Or perhaps you want to draw something superheroic and set in a city- then you certainly need to be familiar with 2 and 3 point perspective to accomplish breathtaking city sweeps and vistas.
Materials I Use in This Process:
Thumbnail page blown up, converted to non photo blue, and printed on printer paperScrap printer paperLow tack tape such as washi tape or blue painters tape12" clear acrylic ruler24" rulerNon photo blue leadGraphite pencil (B or softer)Erasers of various types
Setting Up My Workspace:
To create perspective grids for my comics, I need A LOT of room to work. Ideally, I am working at a table or drafting table, and can really spread out.
Intro to Comic Craft: You Need Perspective: Perspective In the Panels: Intro to Comic Craft:
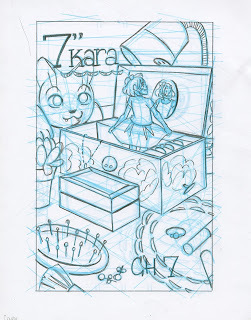

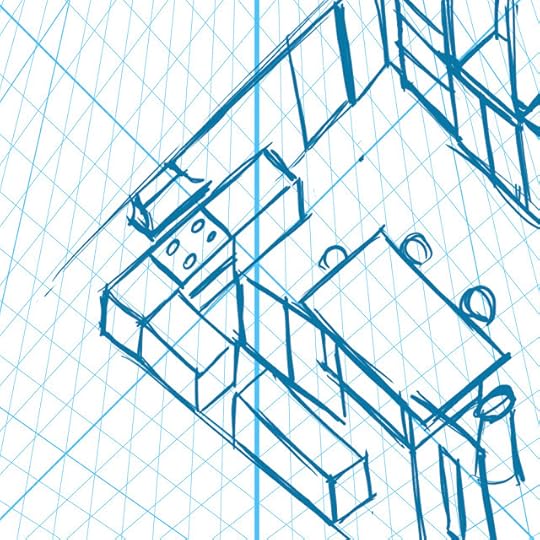
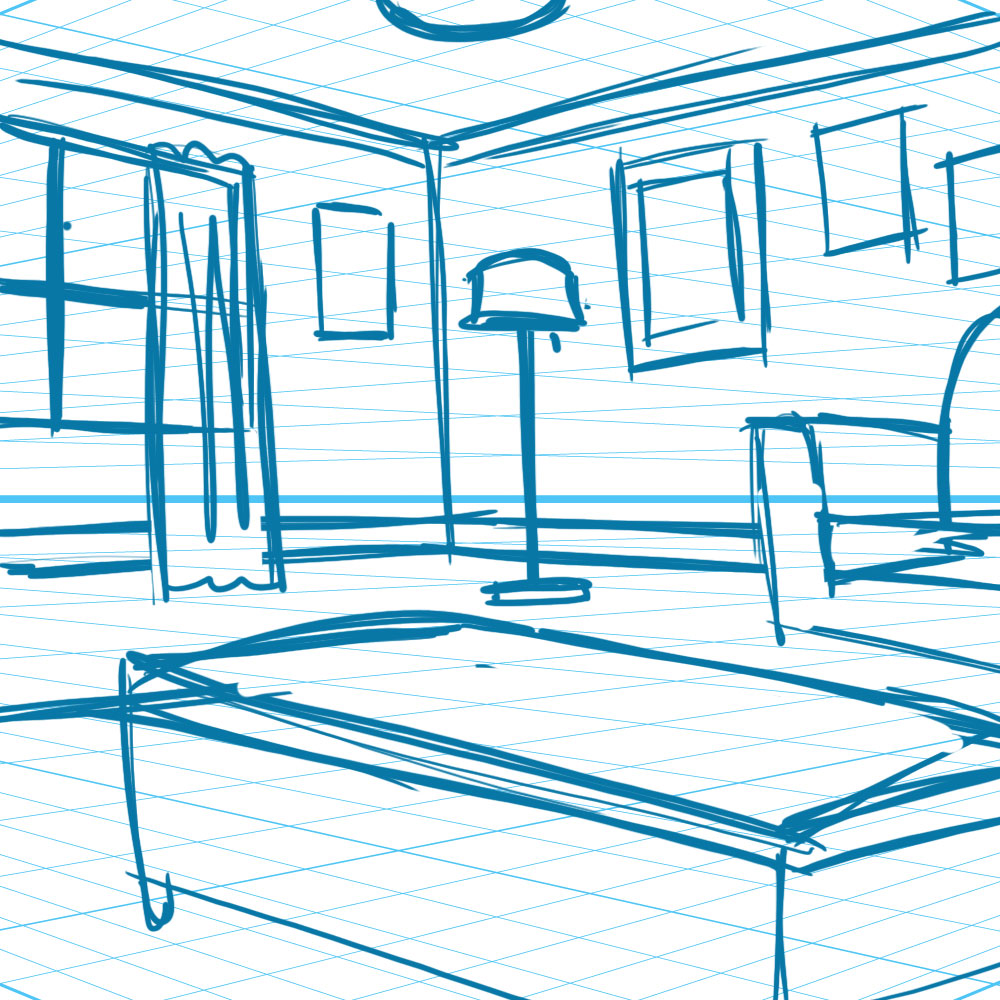
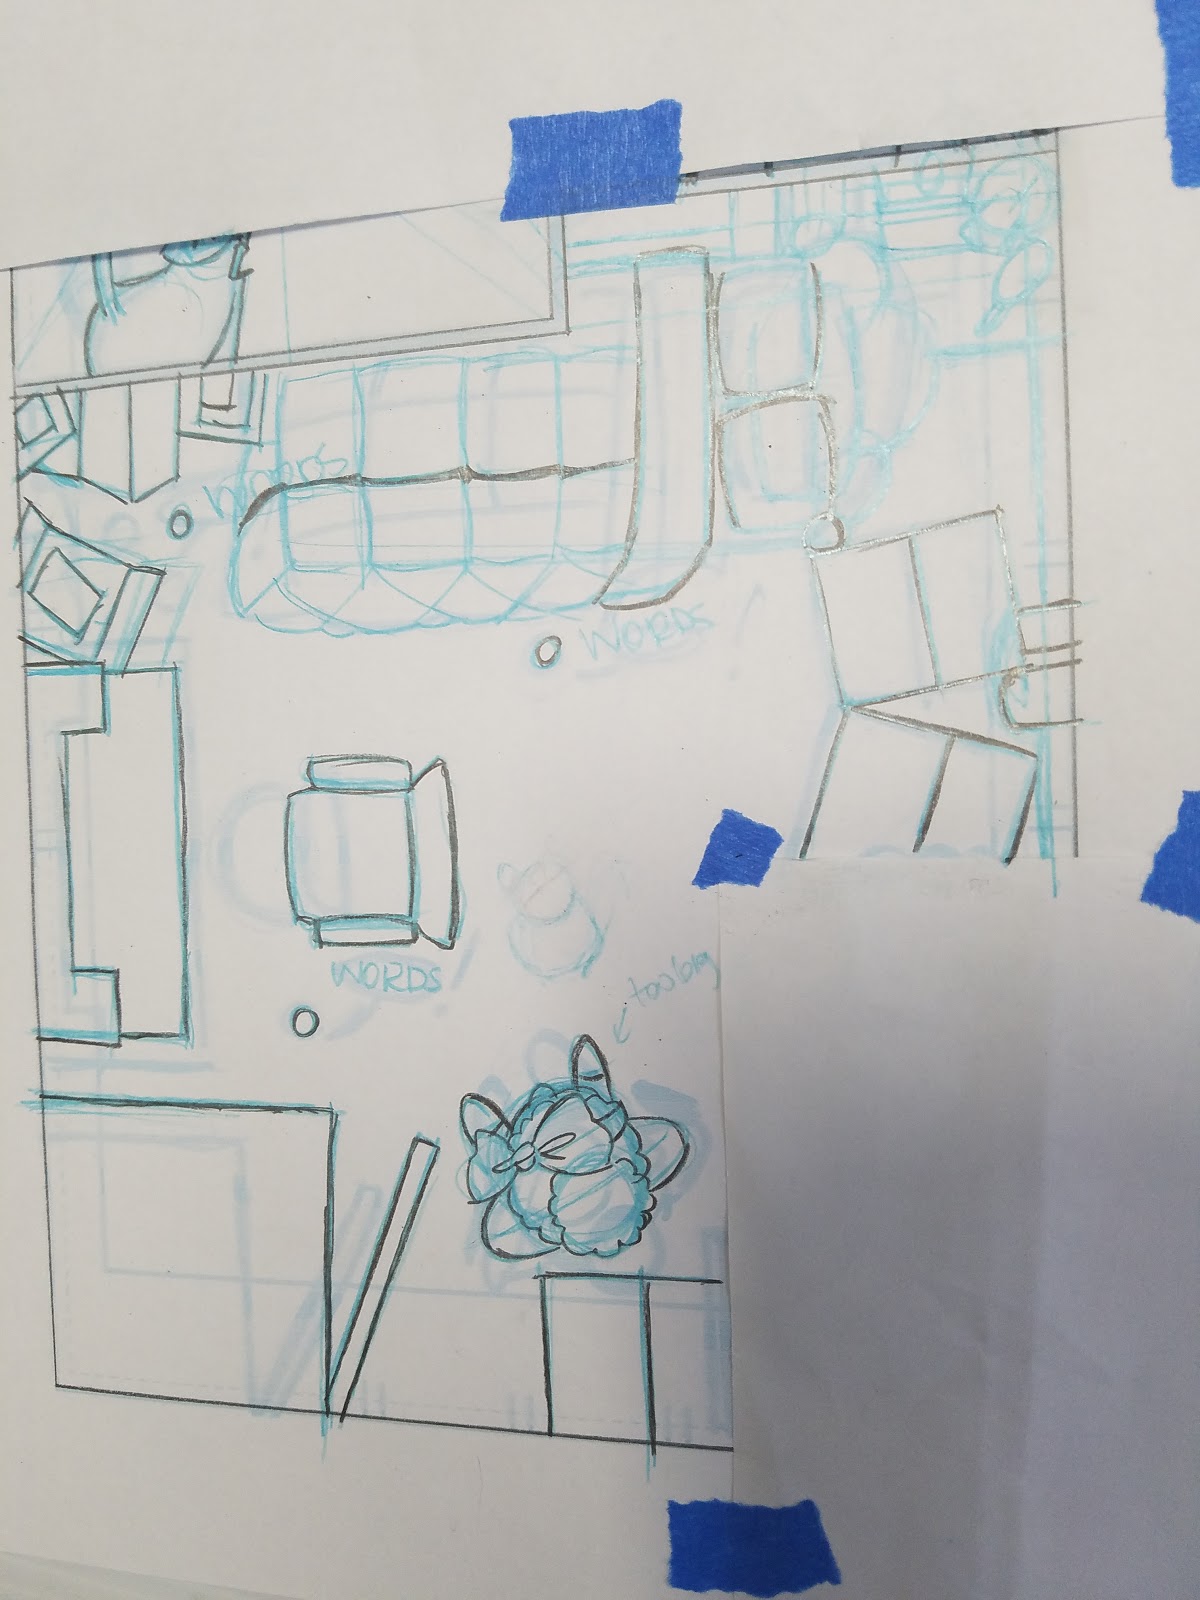
The criss-cross of faint blue lines represents my perspective grids, drawn individually to suit the needs of the panel. Sometimes I use one point (the easiest grid to grasp, but somewhat boring for the viewer), but frequently I use two point to better capture the environment. For a comic like 7" Kara, where scale and size play important roles, showing the environment plays a vital part of my storytelling. While the environments aren't groundbreaking to the reader, they're a whole new world for tiny Kara, and I want the reader to experience some of the wonder that Kara feels as she explores her new environment. As the story progresses, I will introduce 3 point perspective shots, as well as birds eye and worms eye views, to create a sense of unease and tension.
Using grids should be considered a tool, a technique, an aid that helps you create comics, not an obstacle. I do think learning how to use this tool is worthwhile, but many comic artists successfully create comics with believable backgrounds without using linear perspective.
Linear Perspective
Perspective Grid
Source
Horizon Line
Source
Vanishing Points:
One Point Perspective:


Source
Note: Some artists try to fudge one point with the vanishing point way off to the side. For one point, the vanishing point should be in the middle of the picture plane, or near the middle, as that's the only way all points would converge towards a single point.
Two Point Perspective:


Definition of two-point perspective
"...only the vertical edges of rectangular objects are parallel to the picture plane..."Source
Three or More Point Perspective:


Source
Isometric Projection
Source
Often used in top down videogames, in architectural plans, and for product designs.
Creating Perspective Grids by Hand:
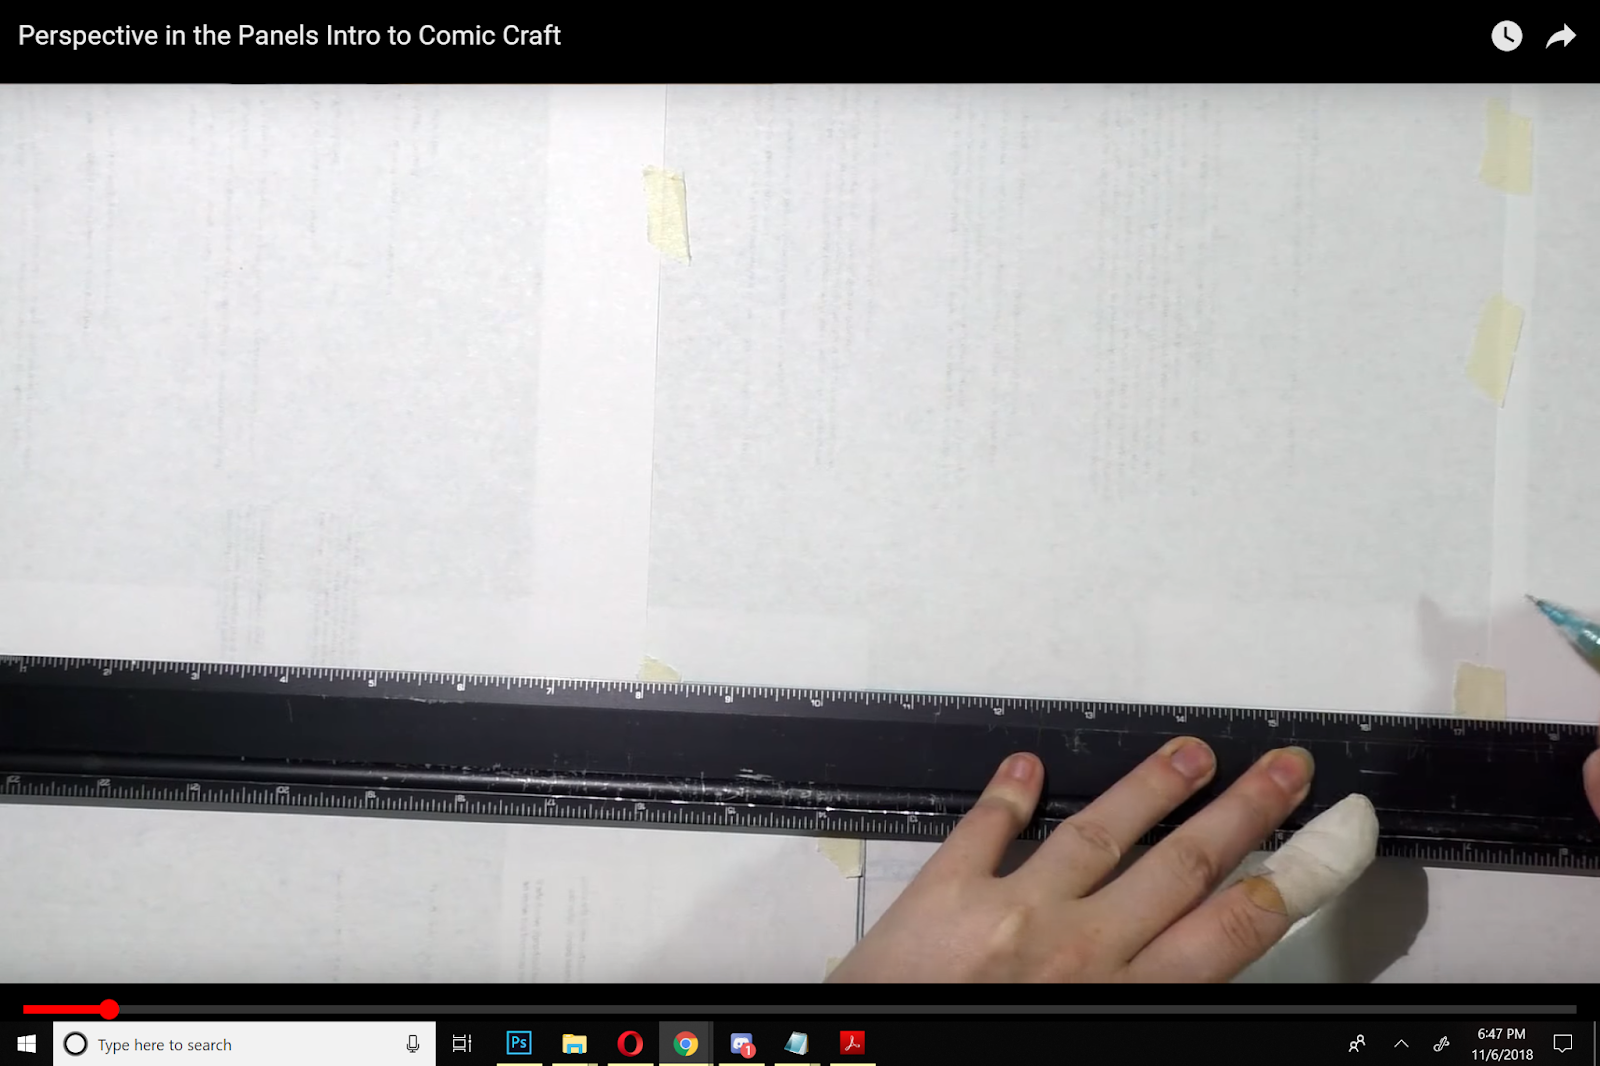
Note: These are screencaps grabbed from my Perspective in the Panels video. If you learn best from observing, you should just watch that.
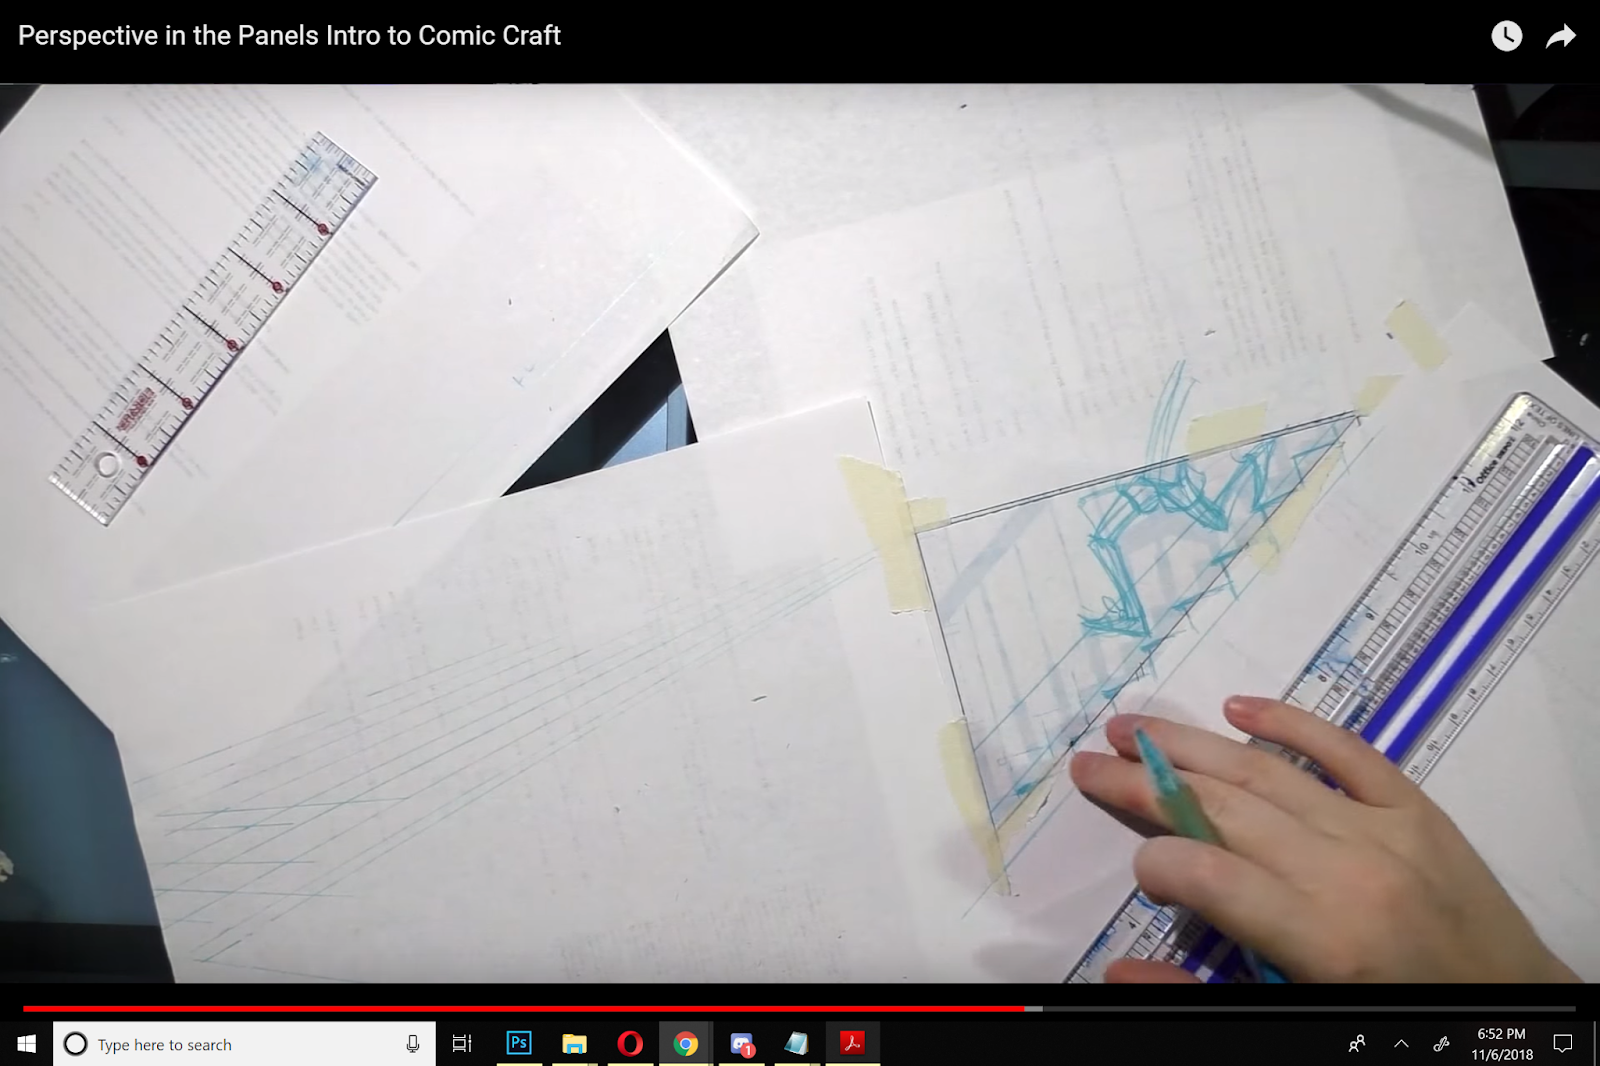
PANEL 1- Two Point Perspective
Step 1: Tape scrap paper to the four borders of your panel.

Step 2: Based on your thumbnail, determine where your horizon line should be.
How I do it:
I do tight thumbnails that include background and basic shot choices because I'm often quite accurate with estimating my perspective in small scale. So to determine my accurate horizon line, I will line my ruler up with the background lines (like say floorboards)- one from each side, and put a mark where the lines from each side would cross. That's usually a decent place to start for a horizon line.
Note: If you would like to see this demonstrated, shoot me an email!
This isn't surefire- sometimes I'll start doing my grids, realize they're all wrong, and have to erase the whole thing.
Step 3: Draw your horizon line

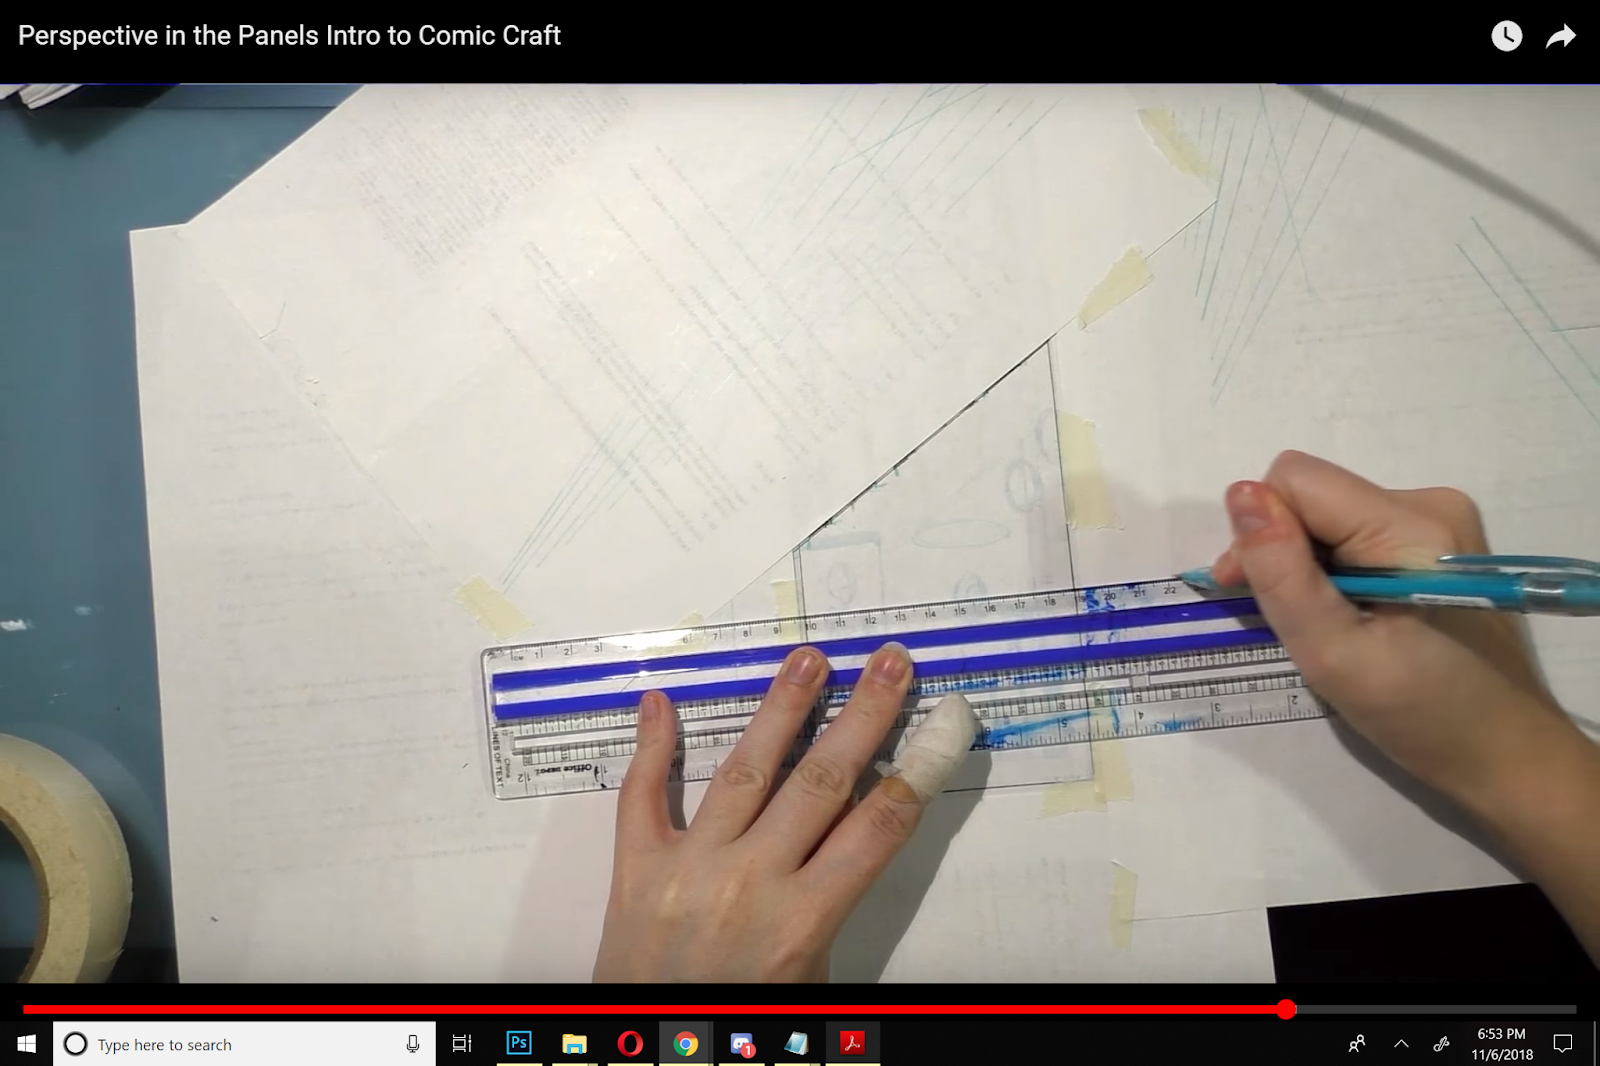
Step 4: Determine Where Your Vanishing Points Will Go
Using a similar technqiue as described in finding where my horizon line will go, I select a mid panel background line (such as a picture frame border), and extend it towards my horizon line. I may do this a couple more times, and average out which point will work best for the panel.
If you'd like to see this demonstrated, please email me!
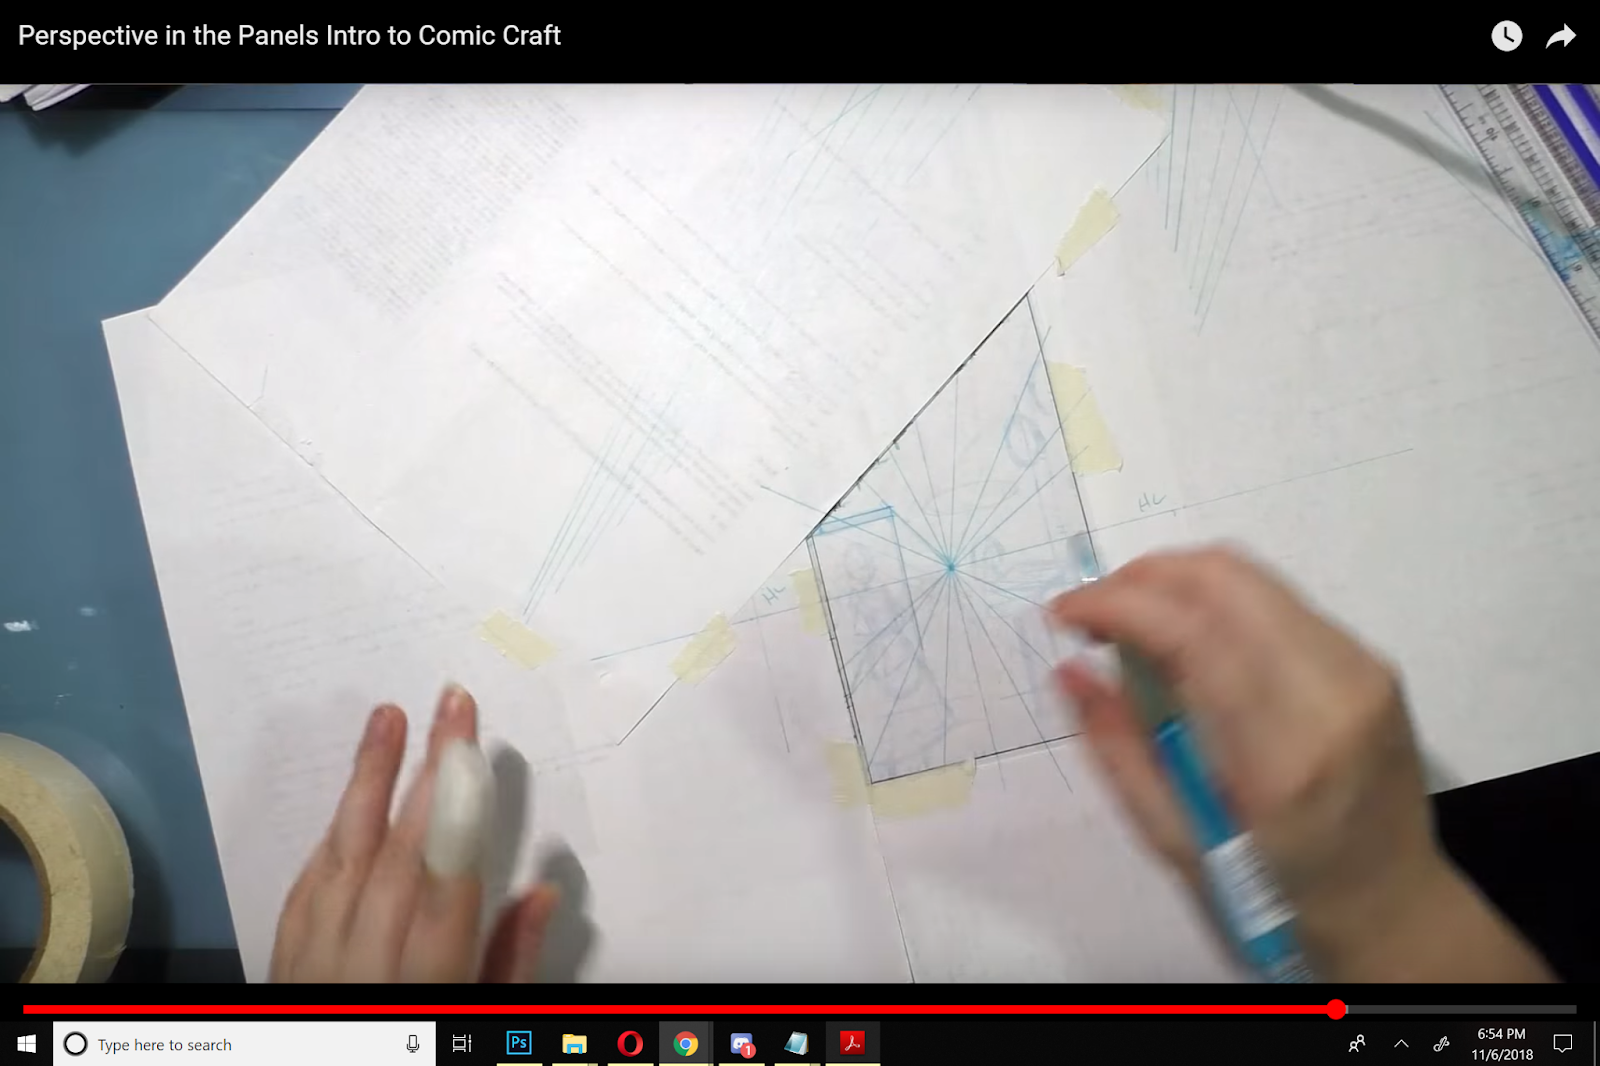
Step 5: Begin Creating Your Perspective Grid
Draw lines radiating from your vanishing points


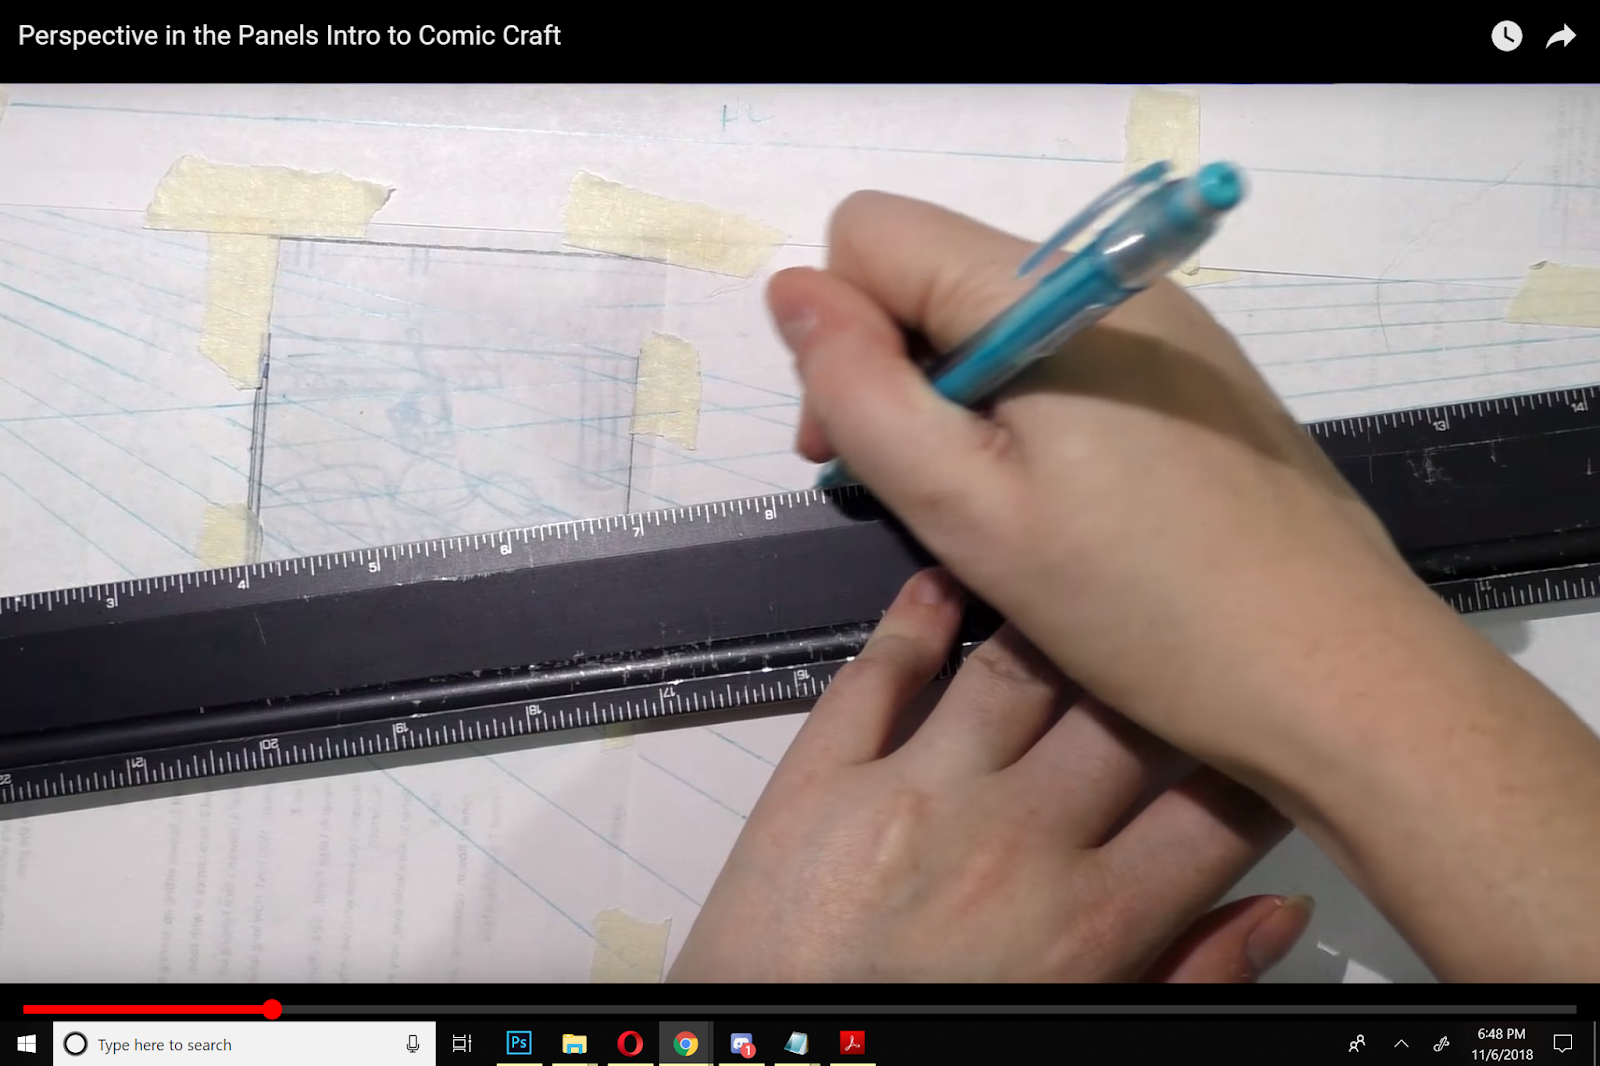
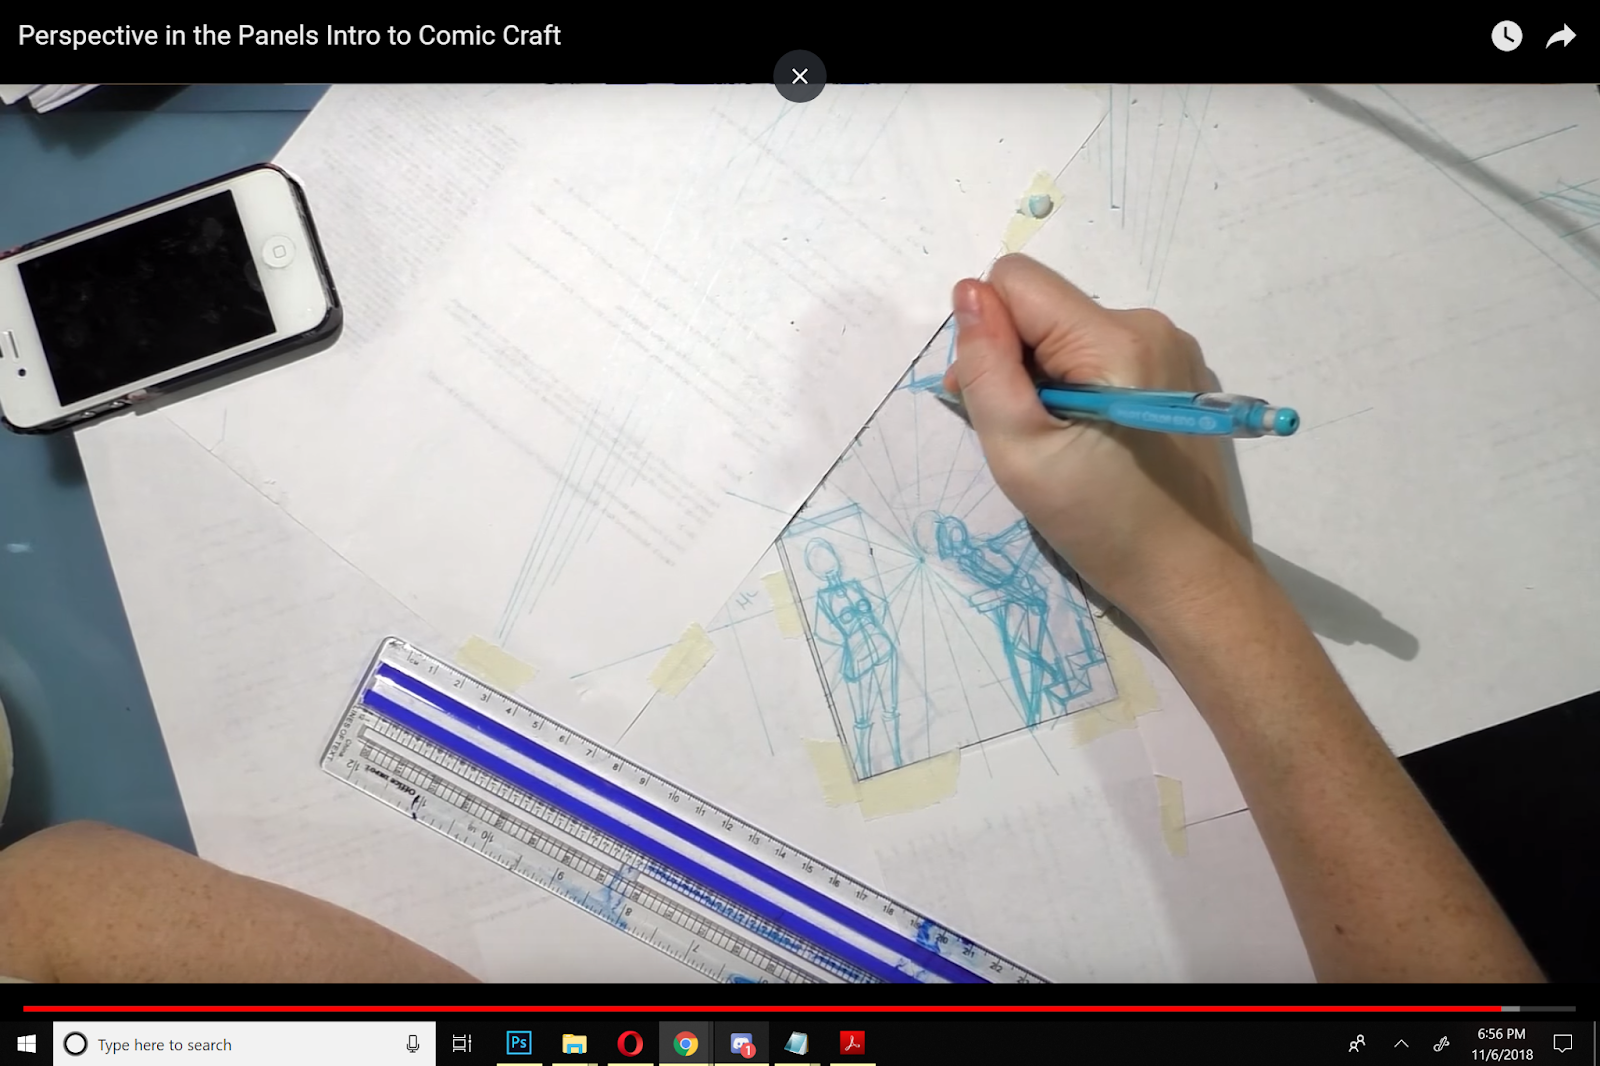
Step 6: Begin Fleshing Out Your Panels, Using the Grid as Your Guide
This is the stage that probably benefits most from demonstration. How you choose to approach it is up to you, and will change as you gain experience. I usually prefer to start by fleshing out the characters, then fleshing out the background, working from foreground to background, as this results in the least amount of erasing. If you're interested in learning how to stage characters in proportion, Andrew Loomis' Successful Drawing covers this in detail. As with perspective, these are techniques that may take some time to get the hang of, so practice is recommended!
Once I've drawn in my characters, using constructive figure drawing to construct them accurately, I begin drawing in the background, using the perspective grid as my guide. When drawing backgrounds, it's helpful to work from staged reference if accuracy is your goal- many artists even recreate their comic environments using 3D programs like Google Sketchup to make it easier to draw later on.
For a step by step video of this, please email me.


Step 7: Tightening Up Your Forms in Graphite


PANEL 2- Flat Silhouette
Step 1: Tape off your edges

Step 2: Sketch in your character

Step 3: With a ruler, tighten up your straight edges

Step 4: Pencil and tighten with graphite

Step 5: Remove Paper

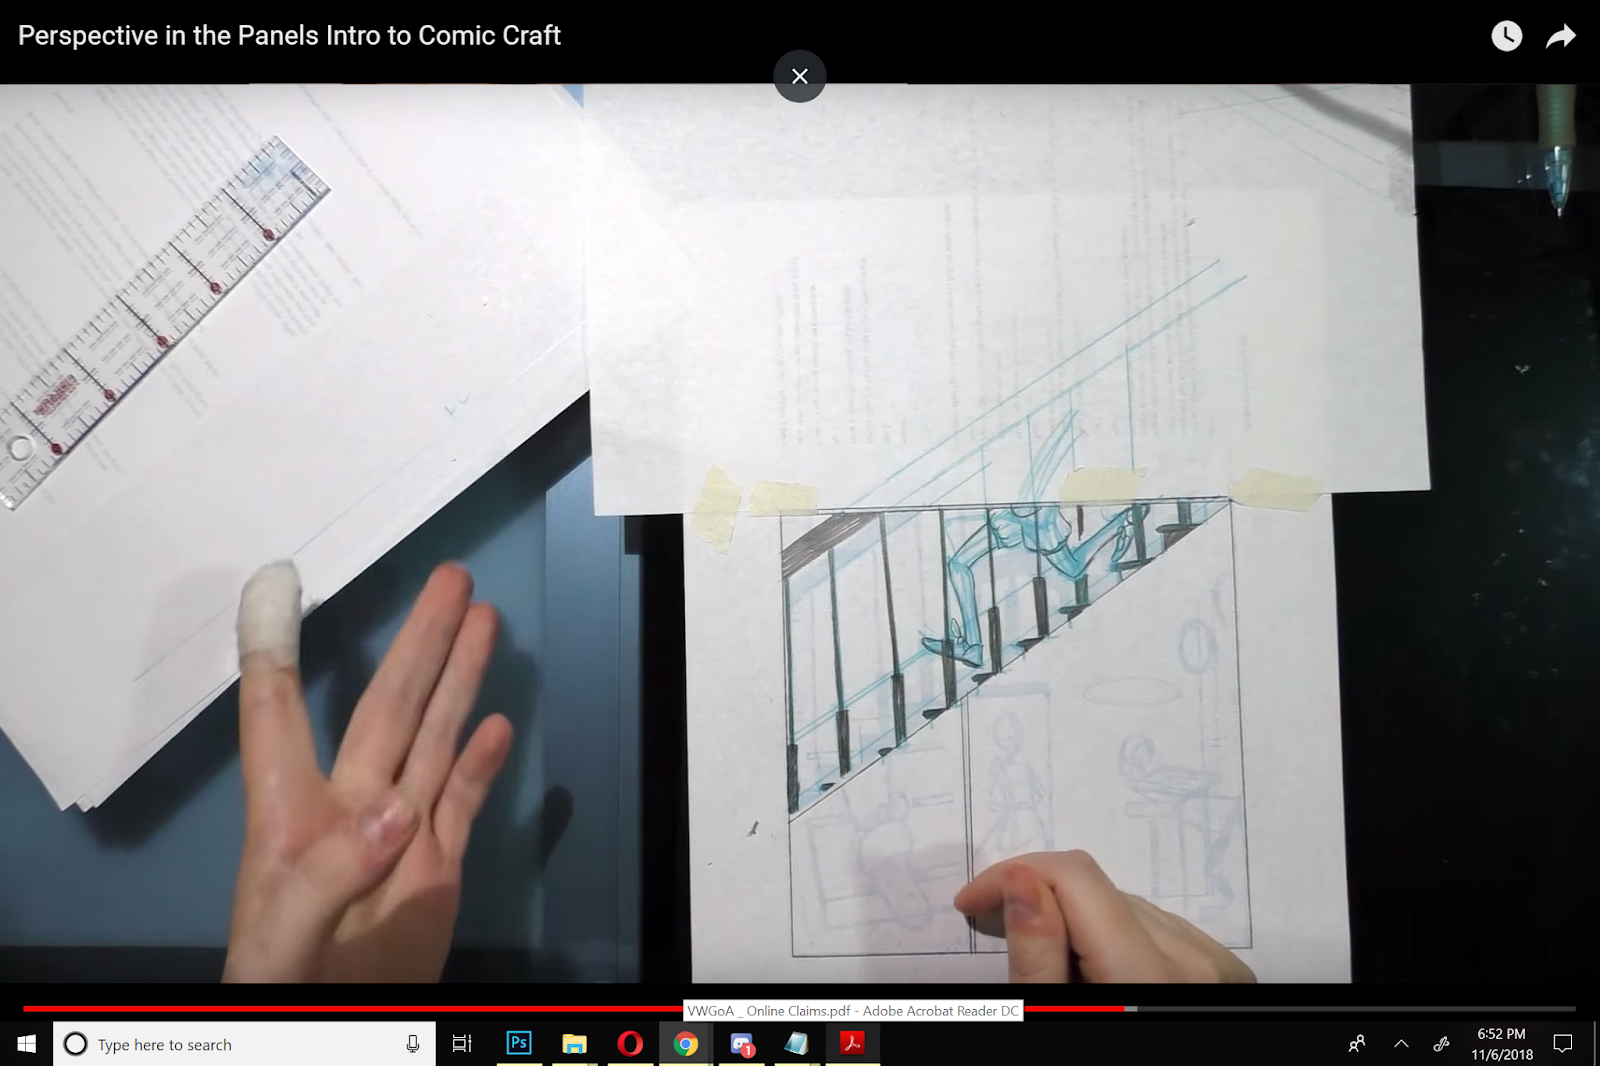
PANEL 3- One Point Perspective
Step 1: Tape off your edges with scrap paper and masking tape
Step 2: With a ruler, determine your horizon line.
For this shot, it's about mid panel

Step 3: Determine your vanishing point.
For One Point Perspective, it's usually the middle of the panel
Step 4: Begin drawing lines radiating away from the Vanishing Point


Step 5: Begin blocking in your figures


If necessary, pull up reference. In the below example, I have staged a shot of me falling down the stairs but catching myself, so I have good reference for Kara's pose in this panel.


Step 6: Tighten Up with Graphite
Step 7: Remove Paper

Et voila! Another page completed!
For a simple map view like the example below, you may not need to use perspective grids. If you were- you could go complicated and use 3 point perspective (great for birds eye view of cityscapes), or very simple with 1 point perspective. I opted to freehand it.
[image error] Printed bluelines. Additional paper has been taped on to mask and protect finished areas.
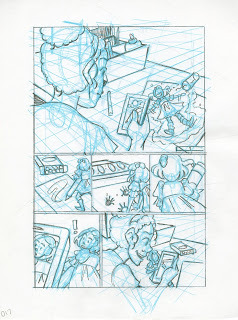
 Non photo blue sketching to tighten up the thumbnail
 Going over the bluelines with graphite, for the final sketch
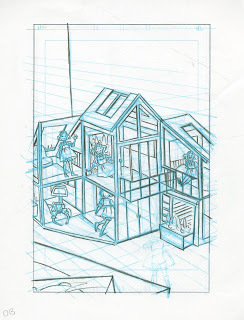
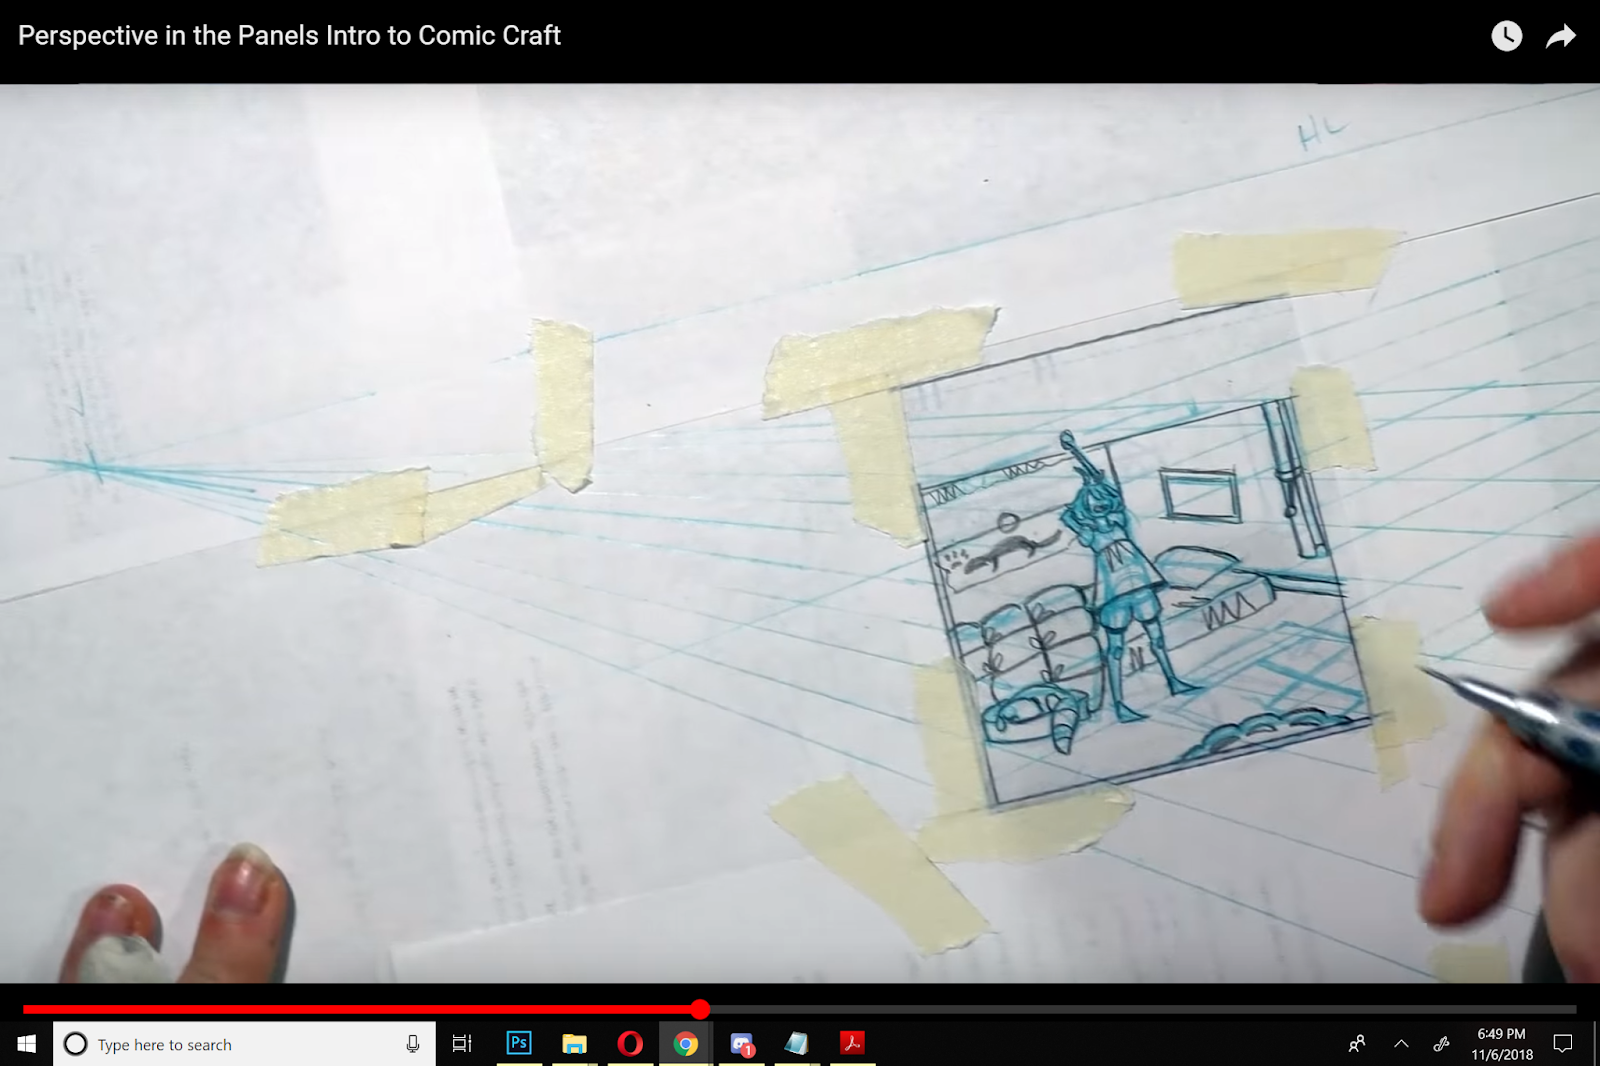
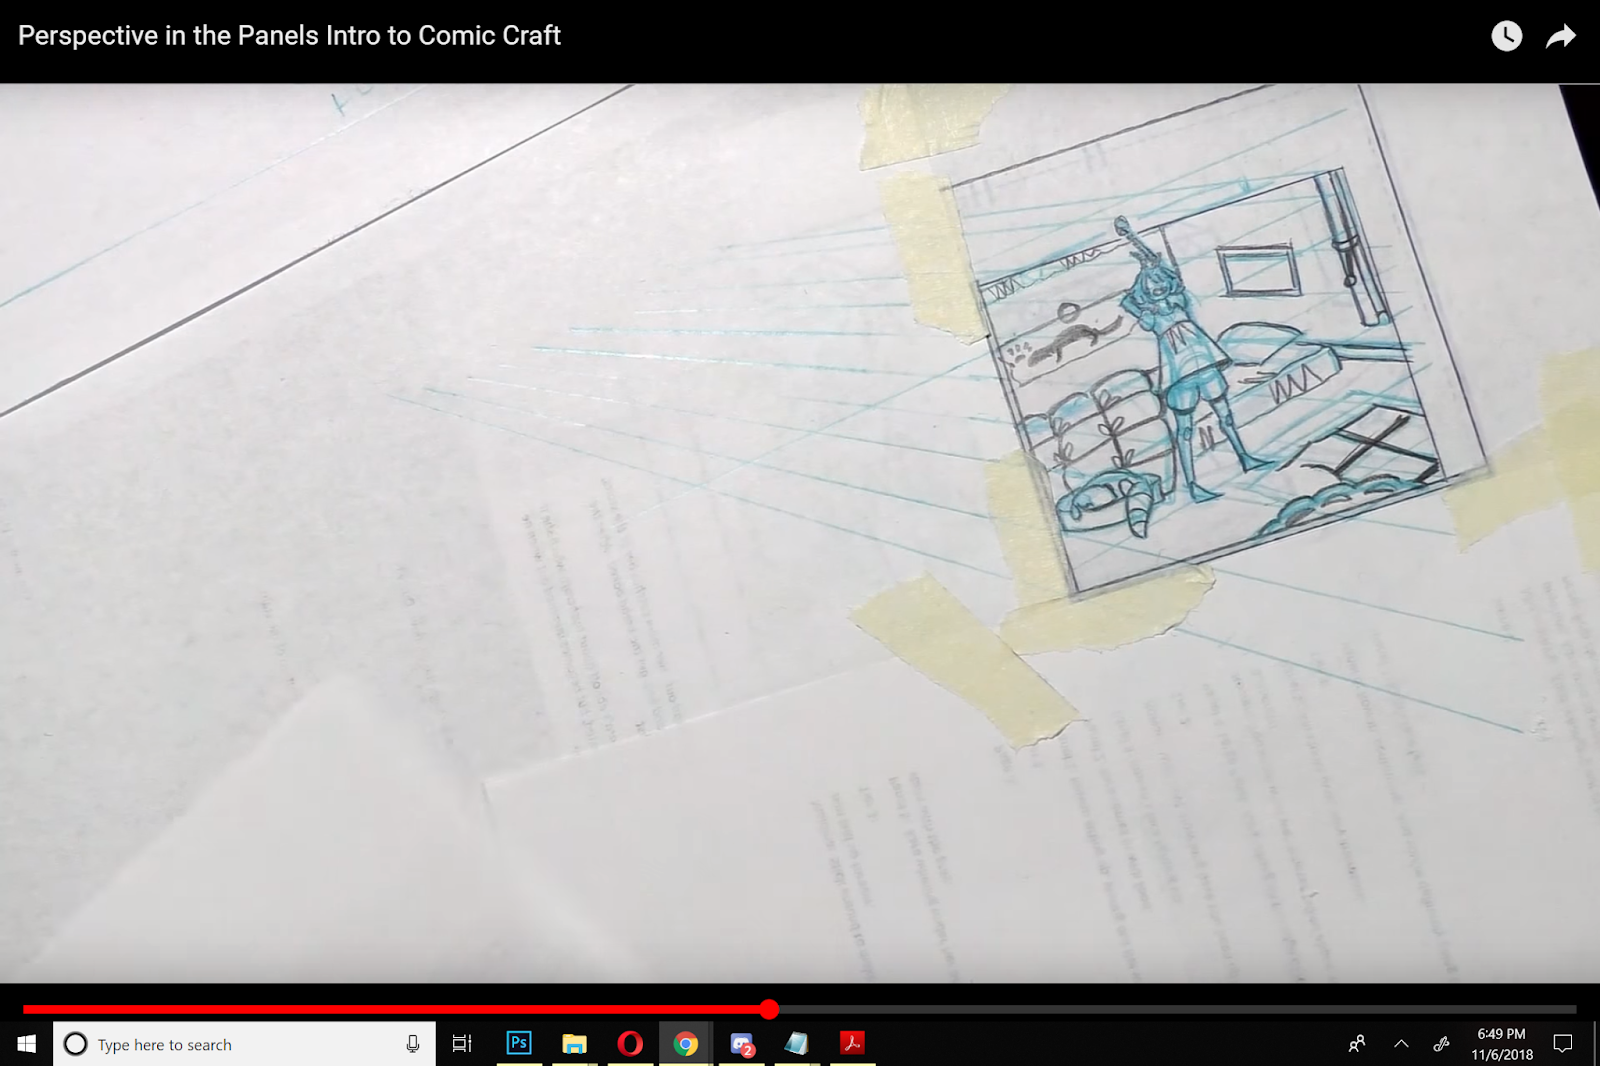
 A panel that has been taped off. Additional paper is taped around the 4 sides of the panel, to create enough room for me to lay down a perspective grid. Since w are looking down at the desktop in this image, the horizon line is high- above the panel.
Demonstrations:
Traditional Media:
Intro to Comic Craft: You Need PerspectivePerspective in the Panels: Intro to Comic CraftOne Point Perspective: Improvement HellImprovement Hell Challenge- 2 Point Perspective
Digital Media:A recent discovery, Miconi's perspective brushes for Photoshop are a quick and easy way to slap down a perspective grid, perfect for sketching environments, doing mockups, or tightening up existing sketches. You can see these used in this post (the sketchy blueline drawings), and I plan on utilizing them often from here on out.
Prior to this, I kept my use of digital perspective grids to a minimum, which is why most of the links to Digital Media demonstrations will be outside links.
PHOTOSHOP:
Create Perspective Grids in Photoshop: 2 Quick and Easy Ways
Perspective Grid in Photoshop
How to Use the Vanishing Point Tool in Photoshop
Perspective Grid Tool in Adobe Photoshop Sketch
Photoshop Perspective Grid Brushes
ILLUSTRATOR:
Define Perspective Grids
Illustrator in 60 Seconds: The Perspective Grid
CLIP STUDIO PAINT/MANGA STUDIO
Manga Studio Grids: Manga Studio 5 and 5EX Tutorials: Perspective Rulers
How to 'Perspective' Manga Studion 5EX- Scribbles with Jonathan
Perspective for Comics: Google Sketchup Demo
PROCREATE
Perspective Grids
KRITA
Perspective Grid Tool
In Finished Art:
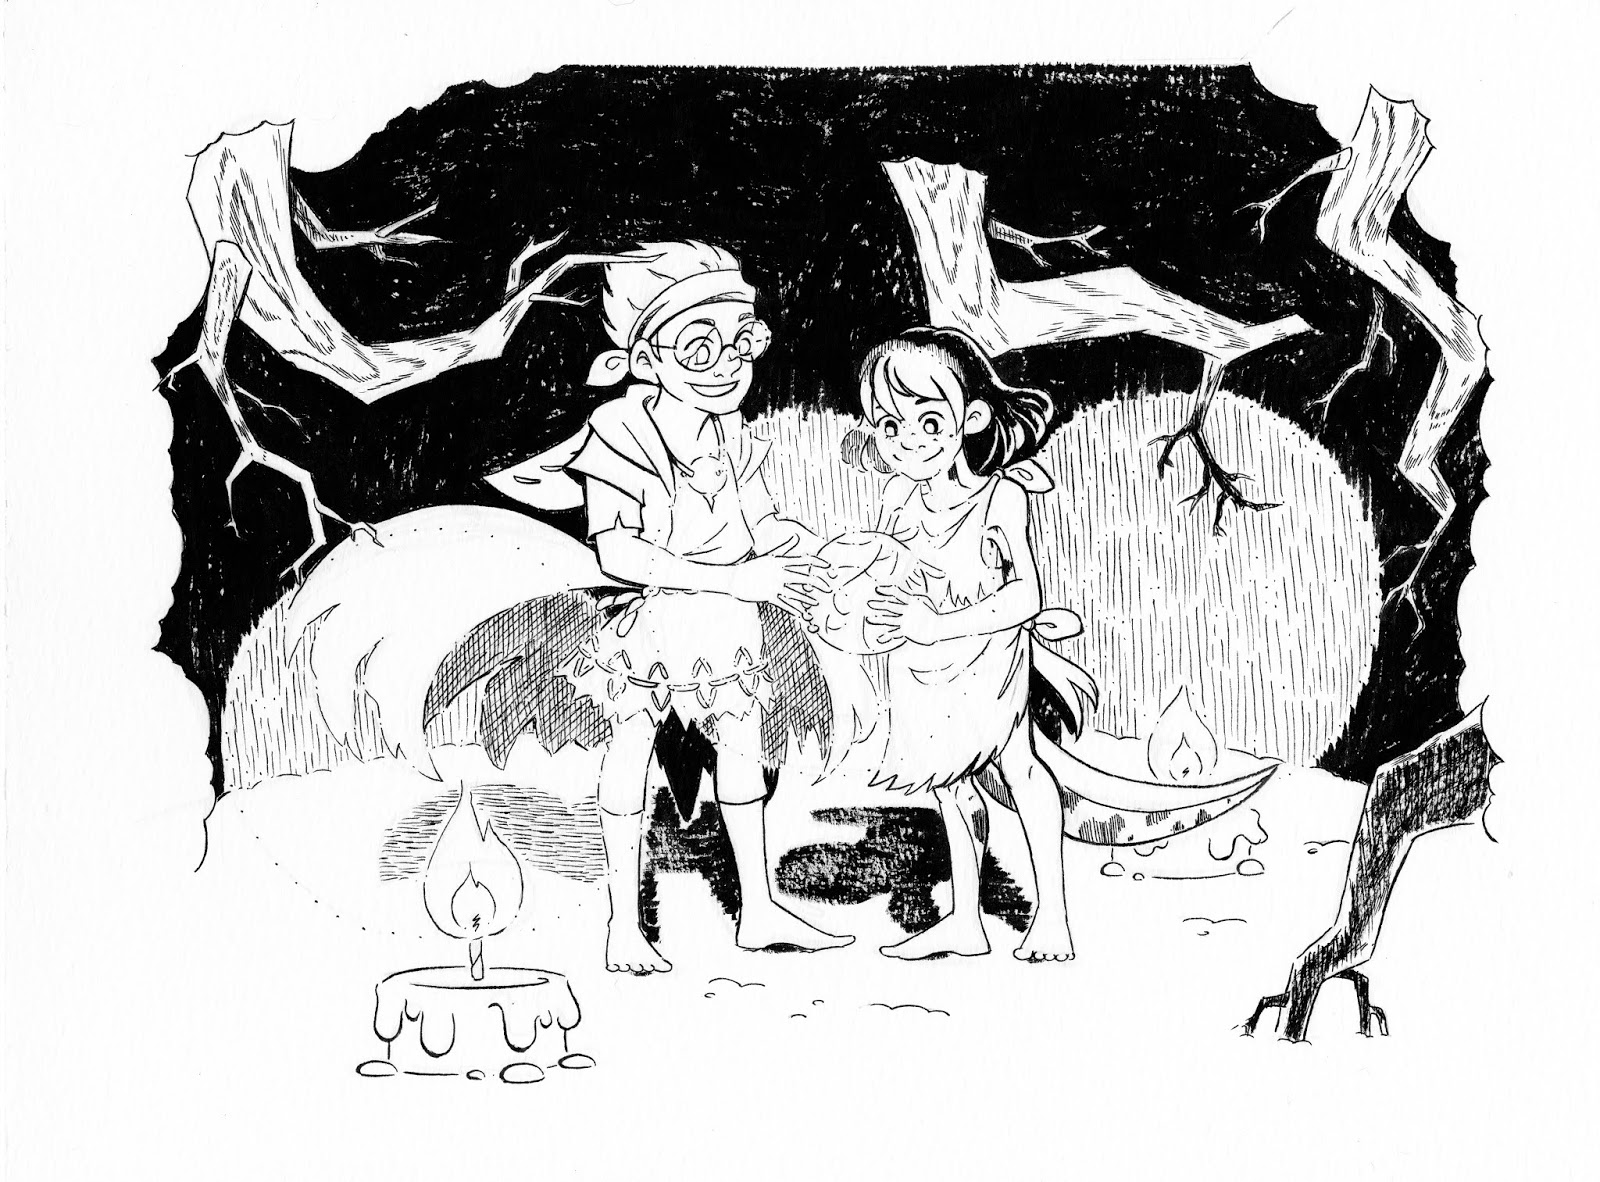
One Point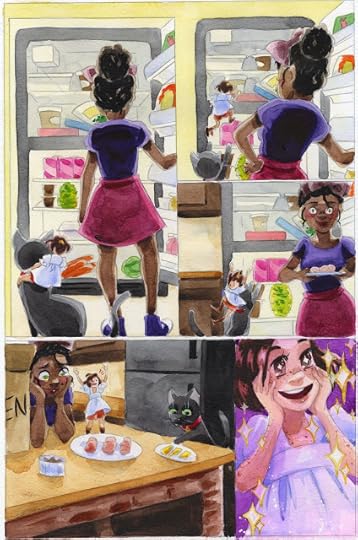


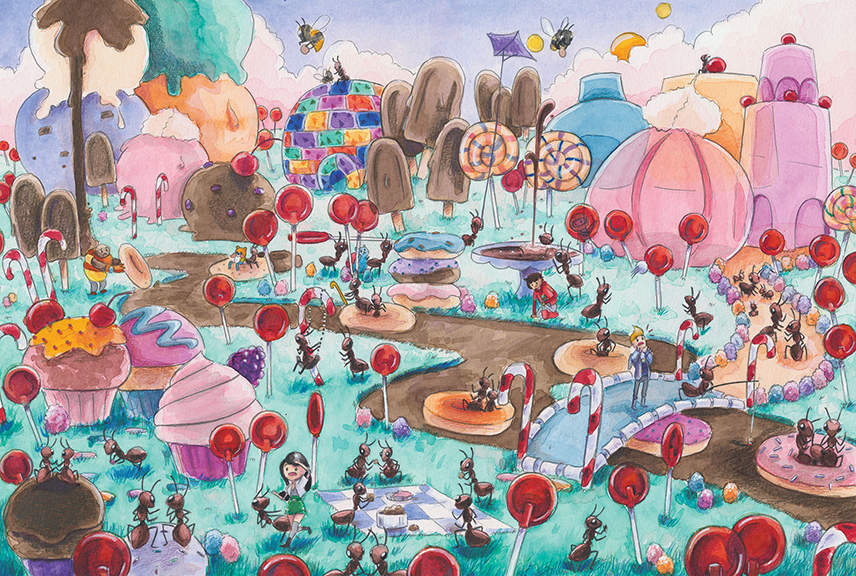
Two Point
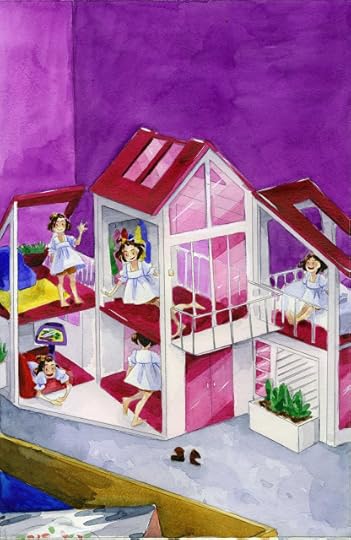

Isometric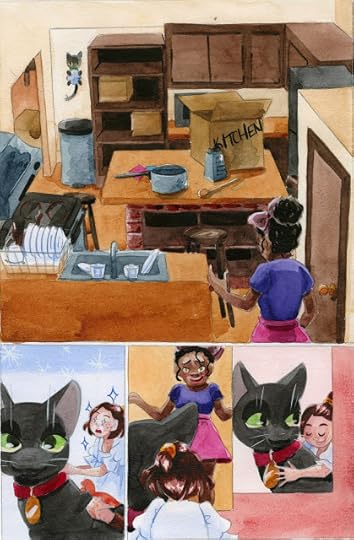

There are other tools at an artist's disposal for creating believable, inhabitable environments and backgrounds in their comics and illustrations. Many artists utilize Google's free SketchUp tool to create mock ups of environments that they can rotate, or zoom in to. Clip Studio Paint has perspective grid tools, and there are tons of downloadable grids that artists can use as templates.
Outside Resources and More Information:
What is a Vanishing Point in ArtWhat is one, two, and three point perspectiveHow the Horizon Line Controls Perspective in ArtWhat is a Vanishing Point in Art
One Point Perspective:
One Point Perspective Drawing: The Ultimate GuideWikipedia: Perspective (graphical)Artyfactory-Perspective Drawing-One Point PerspectiveHello Artsy: Beginner's Guide to One Point Perspective DrawingOne Point PerspectiveHow One Point Linear Perspective Works
Two Point Perspective:
Two Point Perspective
Three Point Perspective:
Bill Martin's Guide to Drawing: Three Point Perspective
The Basics of Three Point Perspective
Three or More Points of Perspective:
Understanding 6 Point Perspective New Perspective Systems
Digital Drawing Tools:
Photoshop Perspective Grid Brushes
Printable perspective grid templates:Printable Paper- Perspective GridFree Perspective GridsAyal Pinkus: Experiments in Comics: Perspective Grid Generator
Recommended Reading
David Chelsea's Perspective Books:
Perspective! for Comic Book Artists: How to Achieve a Professional Look in Your ArtworkExtreme Perspective! For Artists
Perspective in Action: Creative Exercises for Depicting Spatial
Representation from the Renaissance to the Digital Age
Andrew Loomis' Successful Drawing
Please consider donating to this blog or purchasing from Natto-shop (http://nattosoup.com/shop) if you want me to continue publishing quality content. All materials tested were purchased from my own pocket. Keep on Truckin' Nattosoup is not under any sponsorship.
I had a lot of difficulties learning the basics of perspective. It was demonstrated, quickly and poorly, in my Drawing Fundamentals class, using the age-old chestnut of boxes in perspective. It wasn't until I found Andrew Loomis's Successful Drawing, and then augmented that with a little pamphlet on perspective purchased at Michaels, now lost to the sands of time, that it started to click. For me, I needed more than just a single class introduction to perspective, I needed someone to walk me through every step.
 Spring 2009For my undergraduate senior project, a 20 page comic, I began tentatively using 1 point perspective to give my backgrounds depth.
The uses of linear perspective were really driven home during my first semester at SCAD, in Tom Lyle's drawing intensive. I was relying heavily on one point perspective for backgrounds at the time, but his class really forced me to practice 2 and 3 point perspectives. Extremely uncomfortable at first, the repeated practice helped make 2 point perspective second nature, so I highly recommend that if you decide to learn 2 point perspective, you practice it frequently until you understand it well.
 Fall 2010
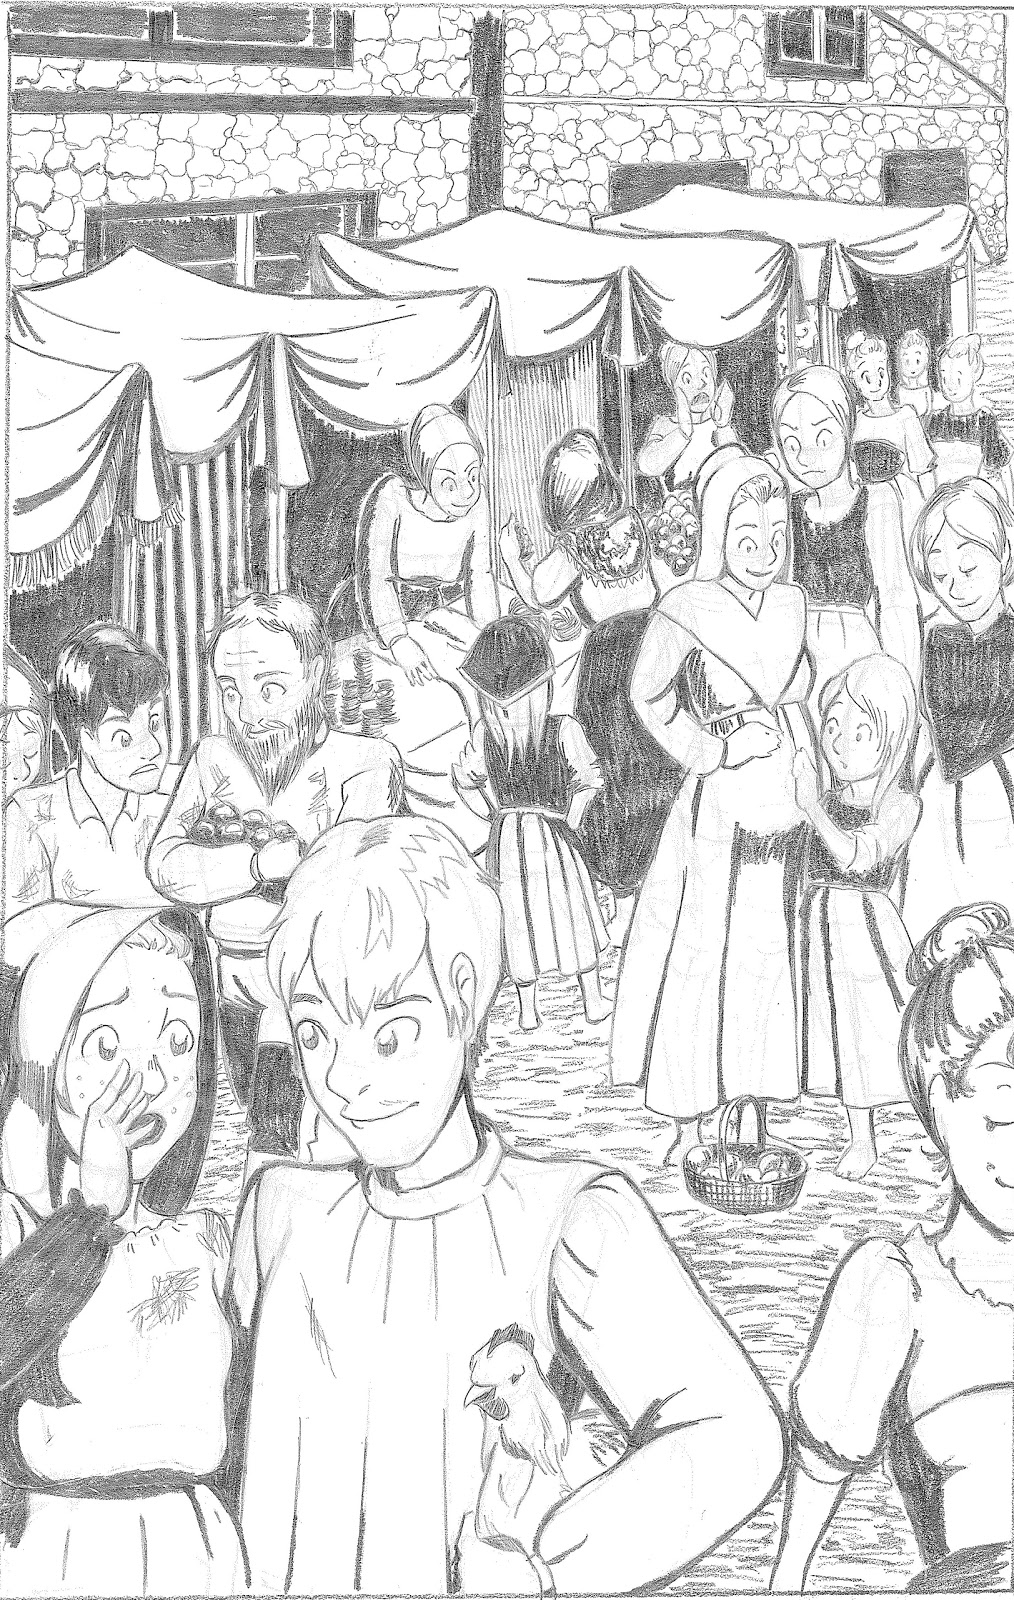 Fall 2010
 Fall 2010
 Fall 2010This class required us to do 4 11"x17" illustrations every two weeks. These illustrations were done without the aid of non-photo blue, nor the aid of multiple steps of revision- those concepts were introduced the next semester- I remember these assignments really kicking my butt, time and self esteem-wise, but I think if I were to revisit it now as a challenge, the thumbnail and roughs process would make for a quicker turnaround, and a stronger product. These were some of my first illustrations that utilized a 2 point perspective grid, and I tried to challenge myself to leave my comfort zone each time, drawing group scenes and in perspective texture.
Looking back, it might be fun to redraw these, using the same grids, but fixing the faces and clothes.
As rough as the art is in the above examples, the backgrounds are consistent with the art, and are fairly believable spaces. You don't have to be an expert for linear perspective to improve your illustration.
 Spring 2017I still set up my perspective by hand, a task that is tedious and frustrating. I wouldn't do it if I didn't find the end result worthwhile, but I will admit that there are digital tools (such as the perspective grid tools in Manga Studio/Clip Studio Paint) that can make this task much easier. There are even printable templates, as well as plastic templates you can slip under your panels, to aid in this task. So take what you need from this post, and alter it to suit your comic's needs. Maybe you need very simple backgrounds- the world isn't important, the character interactions are. Maybe you need elaborate natural scenes- then perspective isn't quite as necessary, but it certainly helps. Or perhaps you want to draw something superheroic and set in a city- then you certainly need to be familiar with 2 and 3 point perspective to accomplish breathtaking city sweeps and vistas.
Materials I Use in This Process:
Thumbnail page blown up, converted to non photo blue, and printed on printer paperScrap printer paperLow tack tape such as washi tape or blue painters tape12" clear acrylic ruler24" rulerNon photo blue leadGraphite pencil (B or softer)Erasers of various types
Setting Up My Workspace:
To create perspective grids for my comics, I need A LOT of room to work. Ideally, I am working at a table or drafting table, and can really spread out.
Intro to Comic Craft: You Need Perspective: Perspective In the Panels: Intro to Comic Craft:

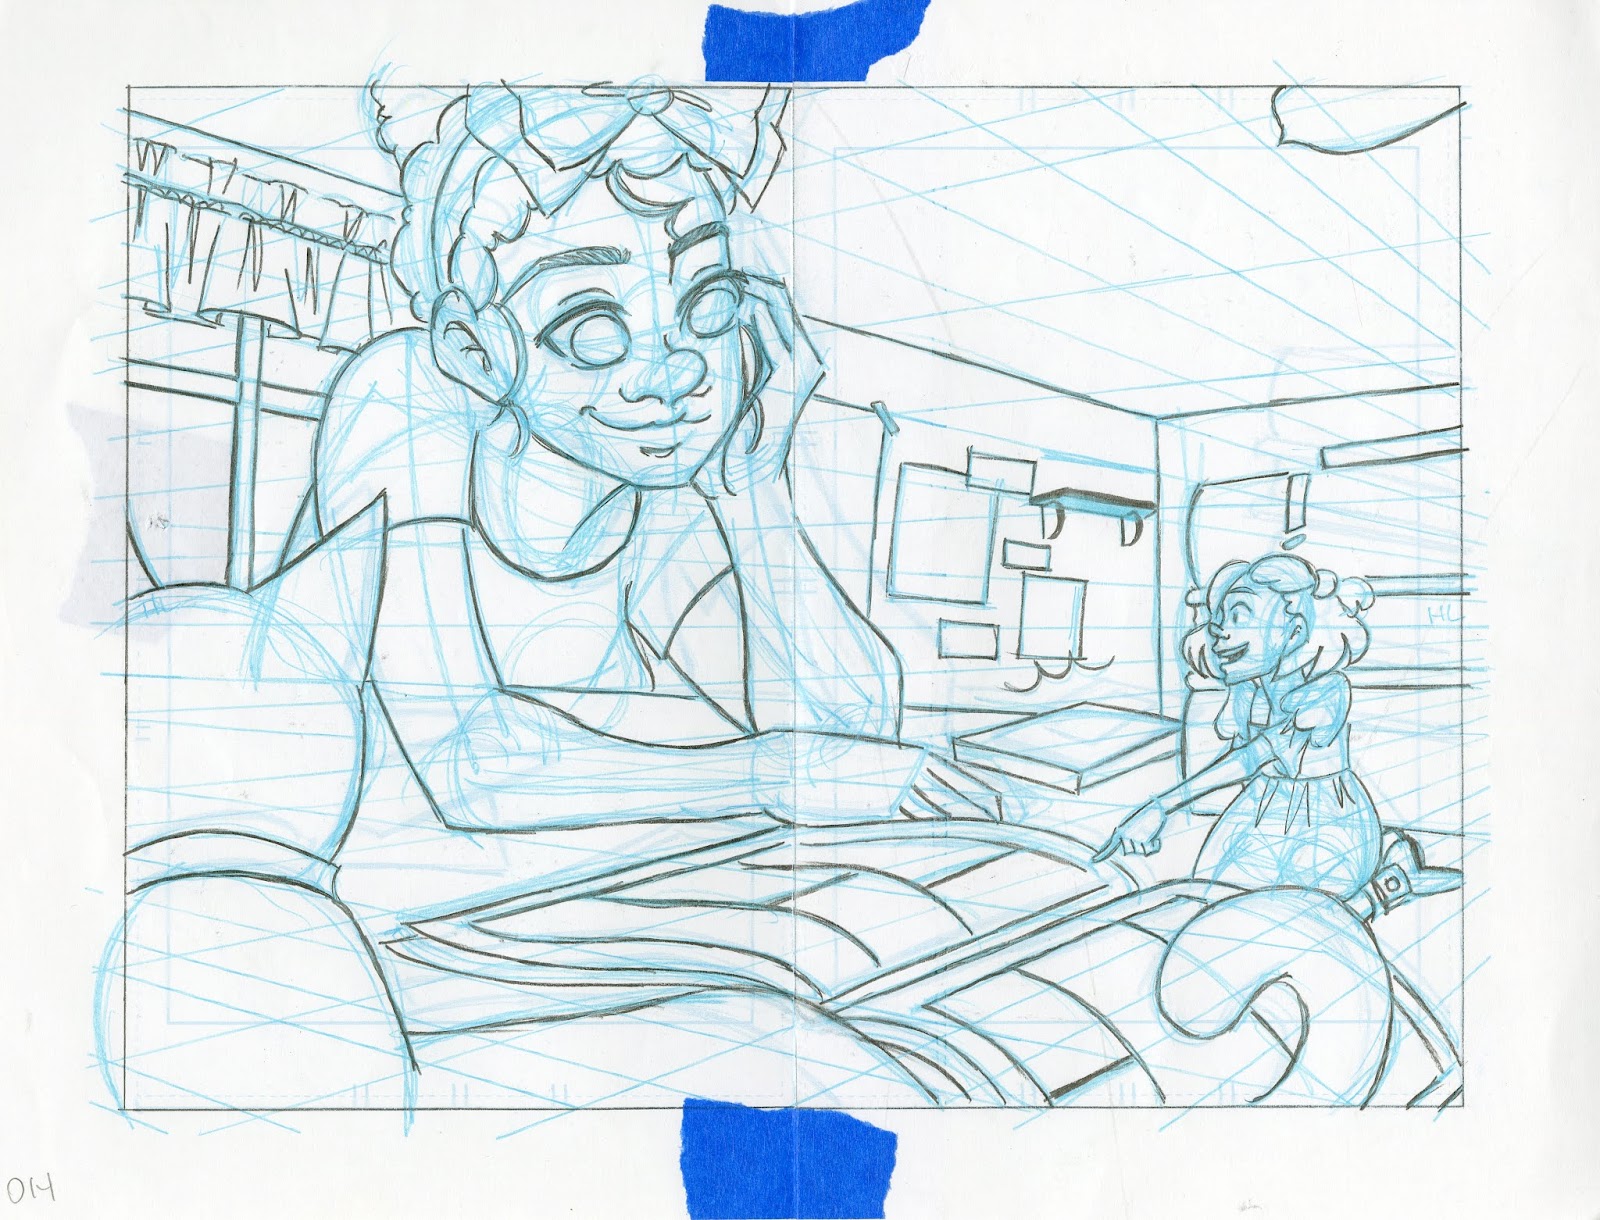


The criss-cross of faint blue lines represents my perspective grids, drawn individually to suit the needs of the panel. Sometimes I use one point (the easiest grid to grasp, but somewhat boring for the viewer), but frequently I use two point to better capture the environment. For a comic like 7" Kara, where scale and size play important roles, showing the environment plays a vital part of my storytelling. While the environments aren't groundbreaking to the reader, they're a whole new world for tiny Kara, and I want the reader to experience some of the wonder that Kara feels as she explores her new environment. As the story progresses, I will introduce 3 point perspective shots, as well as birds eye and worms eye views, to create a sense of unease and tension.
Using grids should be considered a tool, a technique, an aid that helps you create comics, not an obstacle. I do think learning how to use this tool is worthwhile, but many comic artists successfully create comics with believable backgrounds without using linear perspective.
Linear Perspective
a type of perspective used by artists in which the relative size, shape, and position of objects are determined by drawn or imagined lines converging at a point on the horizon.Source
Perspective Grid
'perspective grid. A network of lines, drawn or superimposed on a photograph, to represent the perspective of a systematic network of lines on the ground or datum plane.'
Source
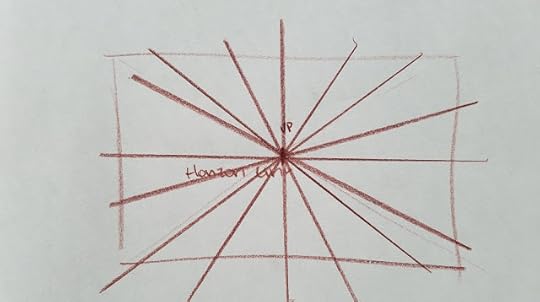
Horizon Line
The terms “horizon line” and “eye level” are often used synonymously. Horizon line/eye level refer to a physical/visual boundary where sky separates from land or water. It is the actual height of the viewer's eyes when looking at an object, interior scene, or an exterior scene.
Source
Vanishing Points:
the point at which receding parallel lines viewed in perspective appear to converge.Source
In a linear perspective drawing, the vanishing point is the spot on the horizon line to which the receding parallel lines diminish. It is what allows us to create drawings, paintings, and photographs that have a three-dimensional look.Source
One Point Perspective:
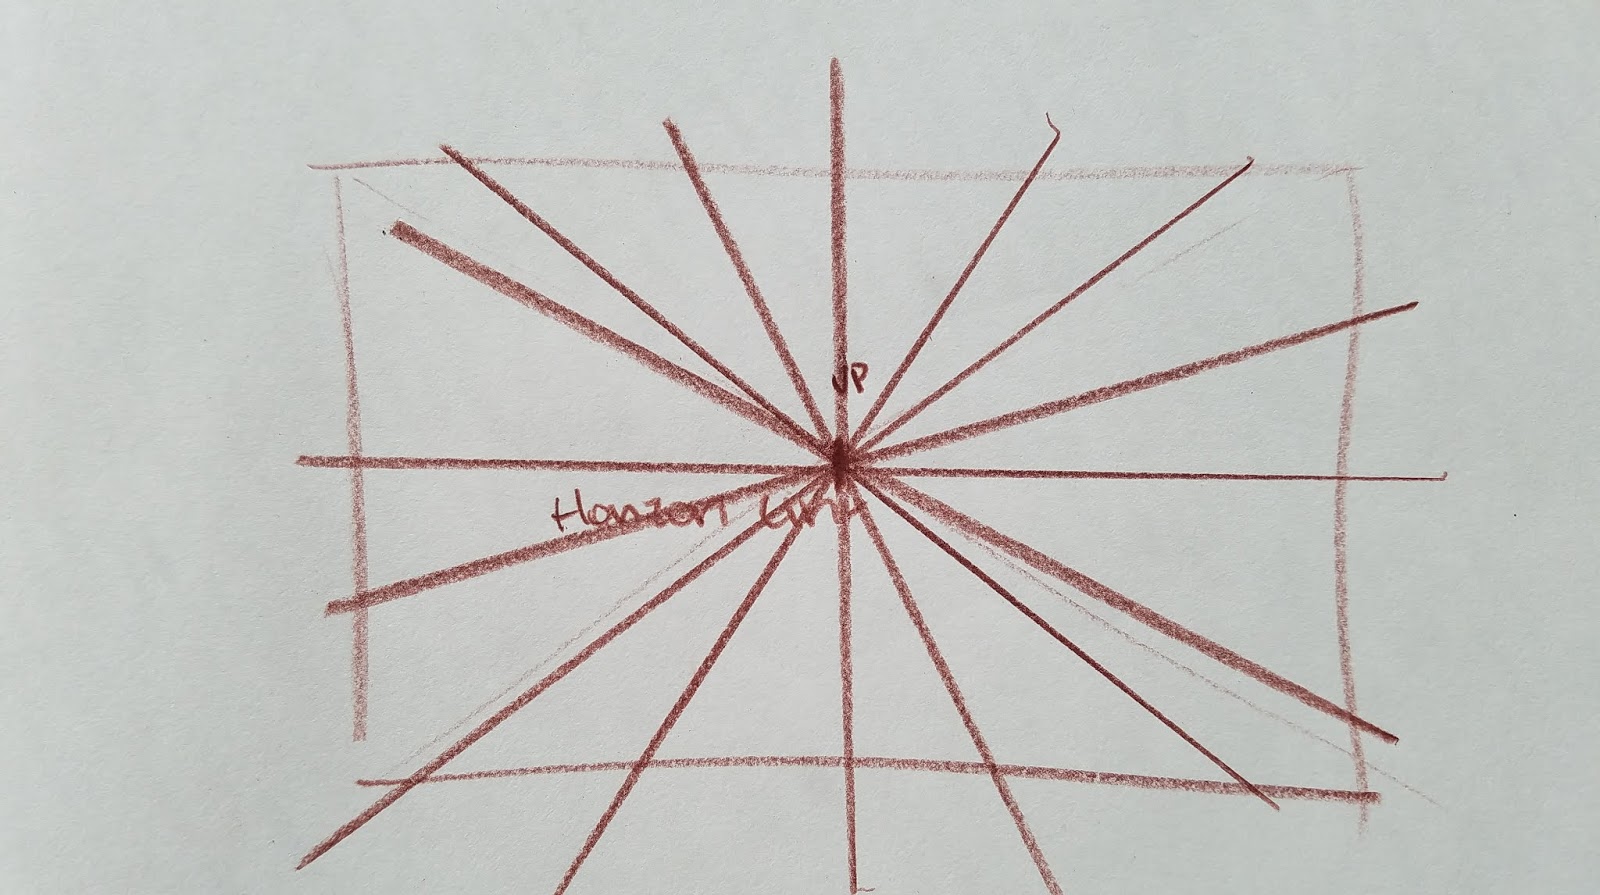
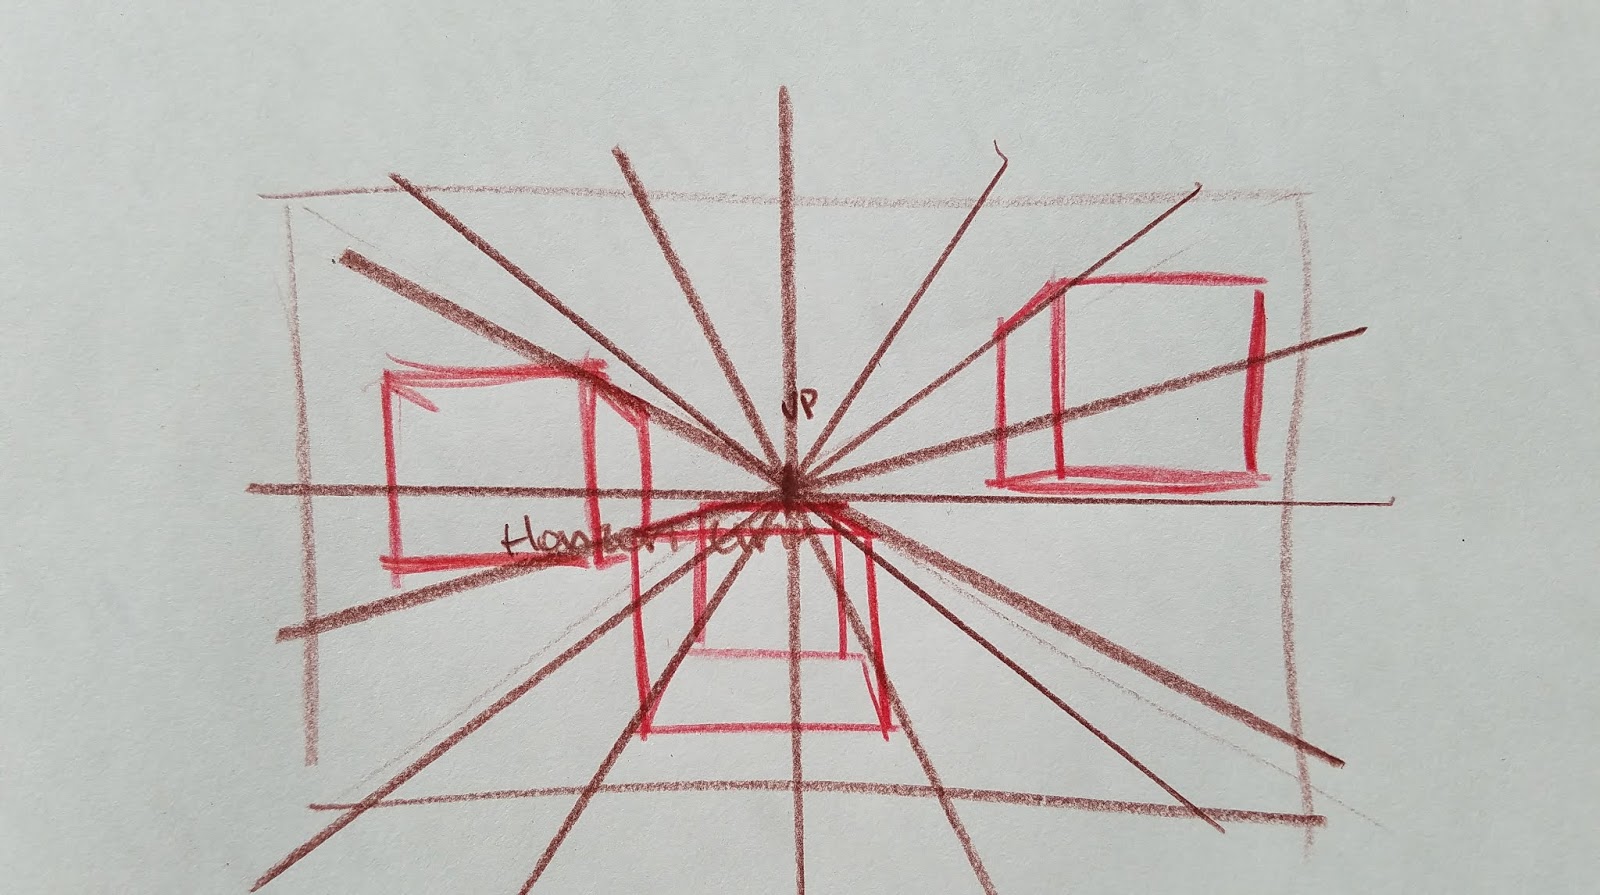


One point perspective is a drawing method that shows how things appear to get smaller as they get further away, converging towards a single 'vanishing point' on the horizon line.
Source
Note: Some artists try to fudge one point with the vanishing point way off to the side. For one point, the vanishing point should be in the middle of the picture plane, or near the middle, as that's the only way all points would converge towards a single point.
"...whole sides of an object-and therefore horizontal and vertical edges-are parallel to the picture plane..."Source
Two Point Perspective:
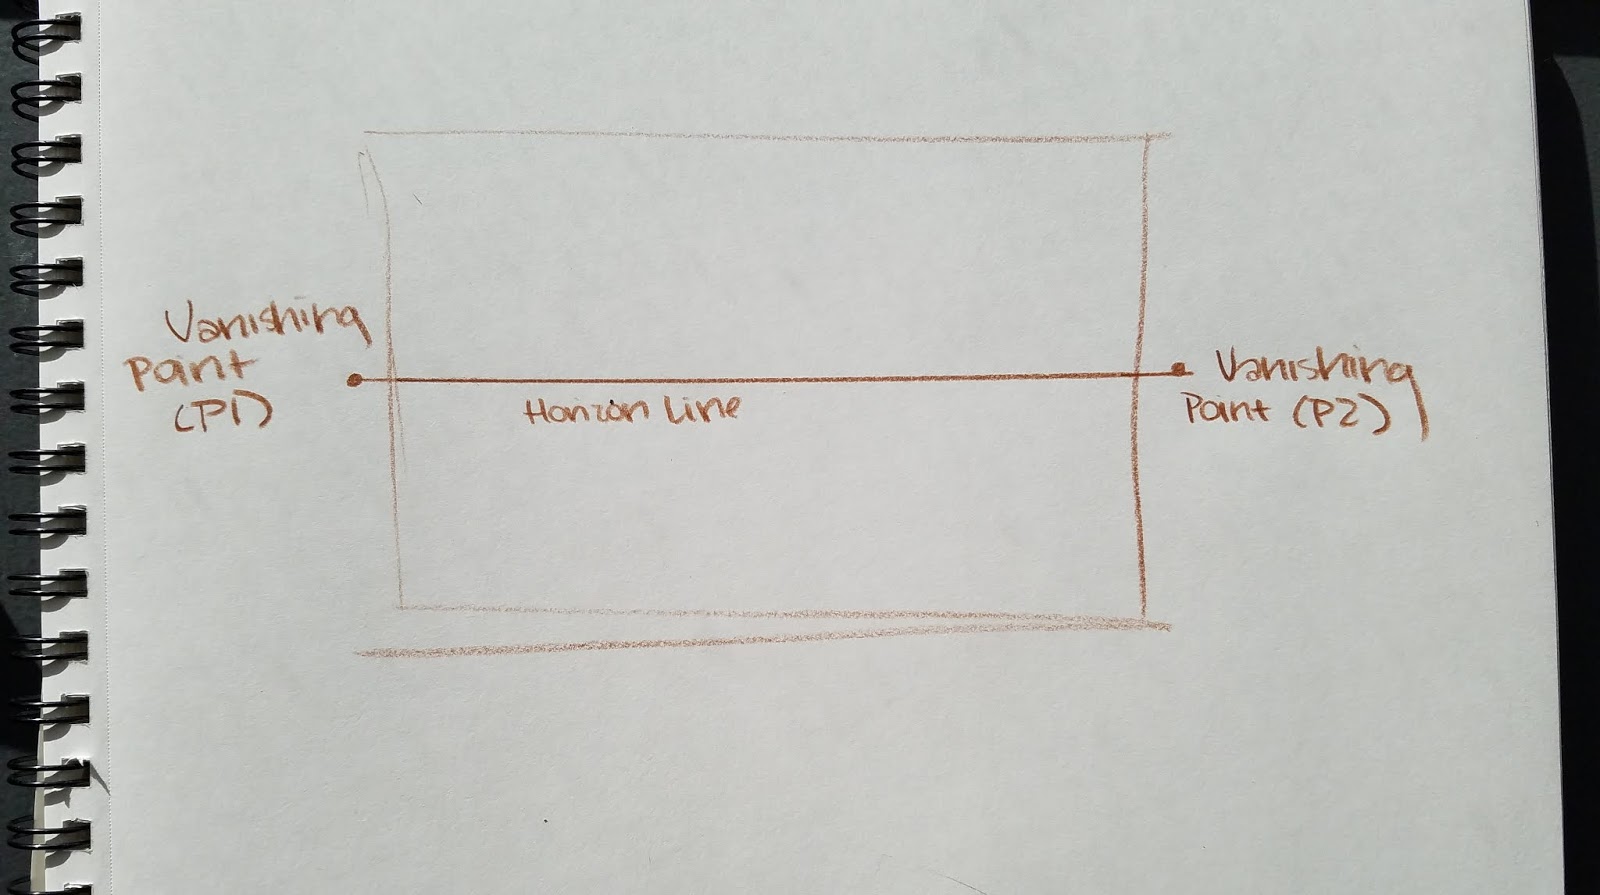
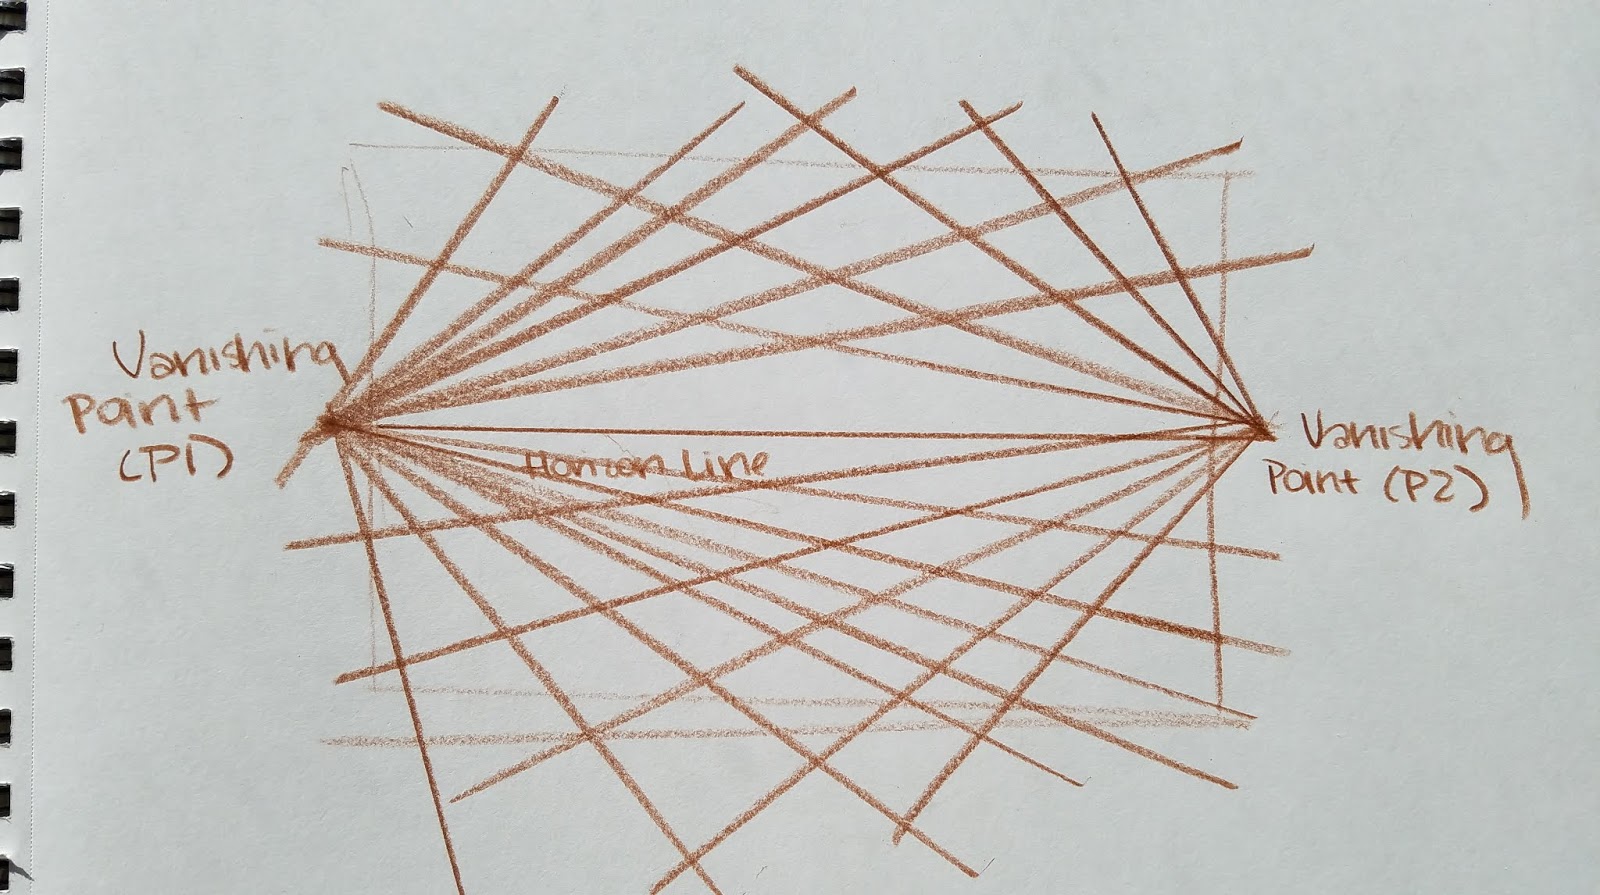
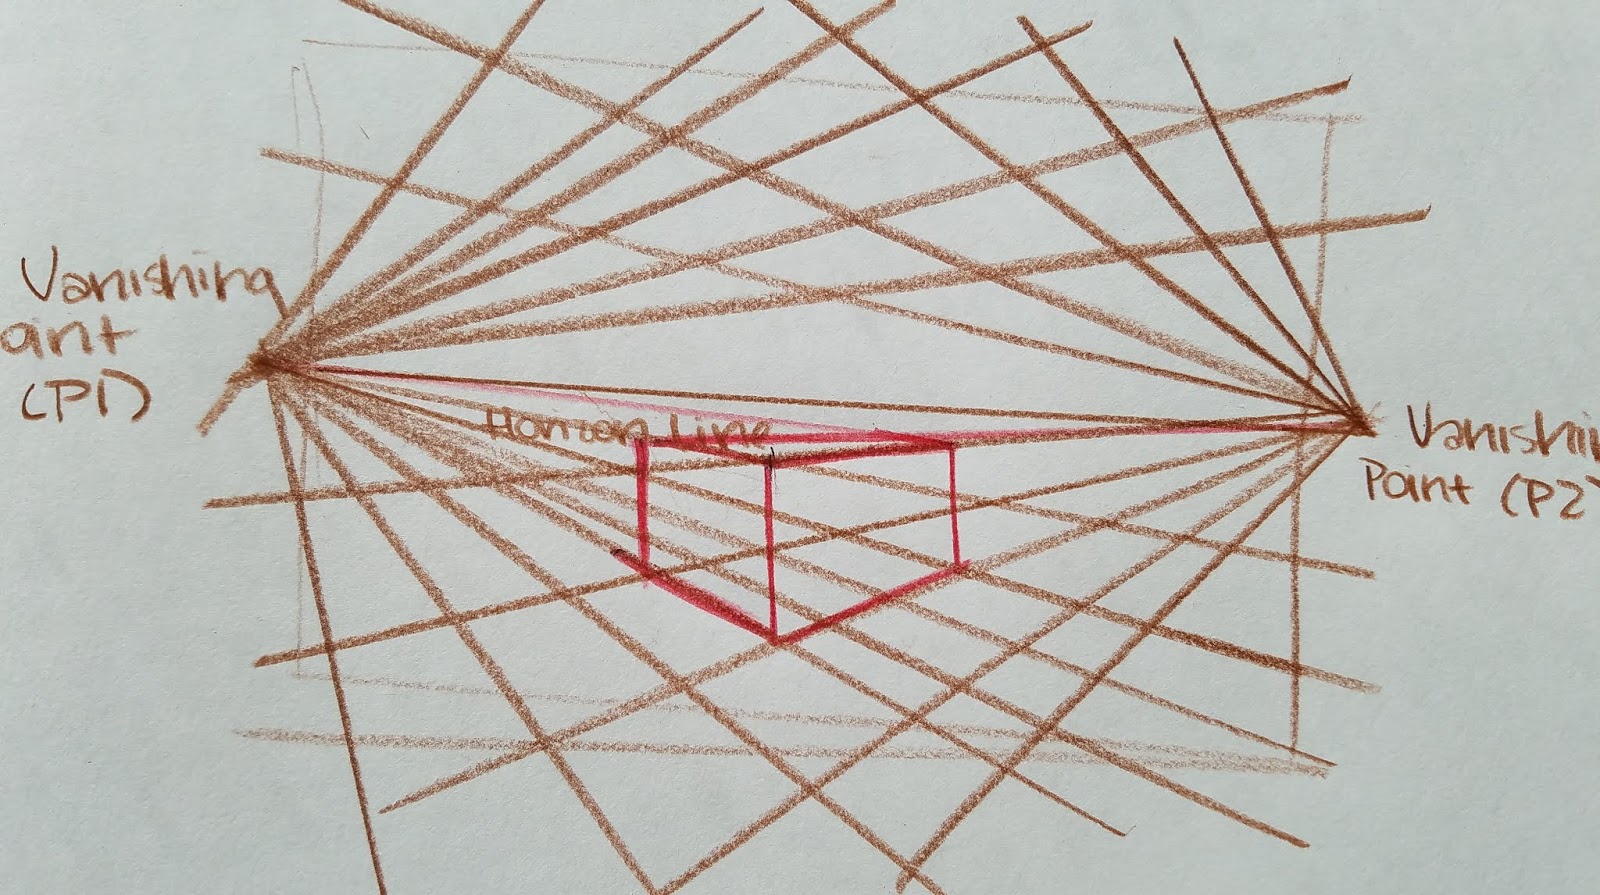
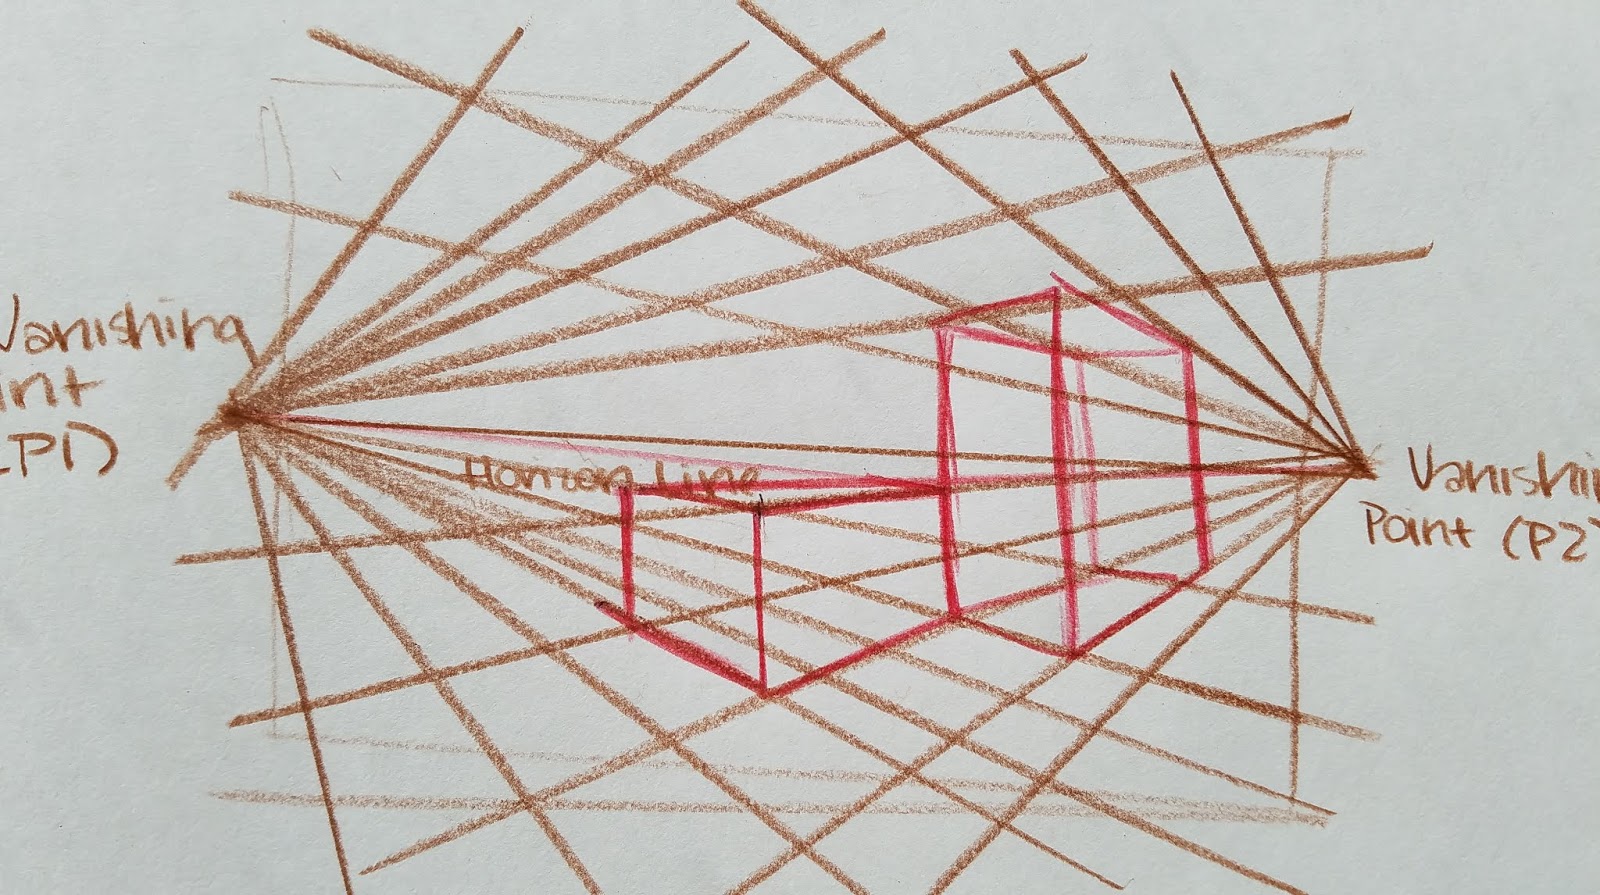

Definition of two-point perspective
linear perspective in which parallel lines along the width and depth of an object are represented as meeting at two separate points on the horizon…Source
"...only the vertical edges of rectangular objects are parallel to the picture plane..."Source
Three or More Point Perspective:

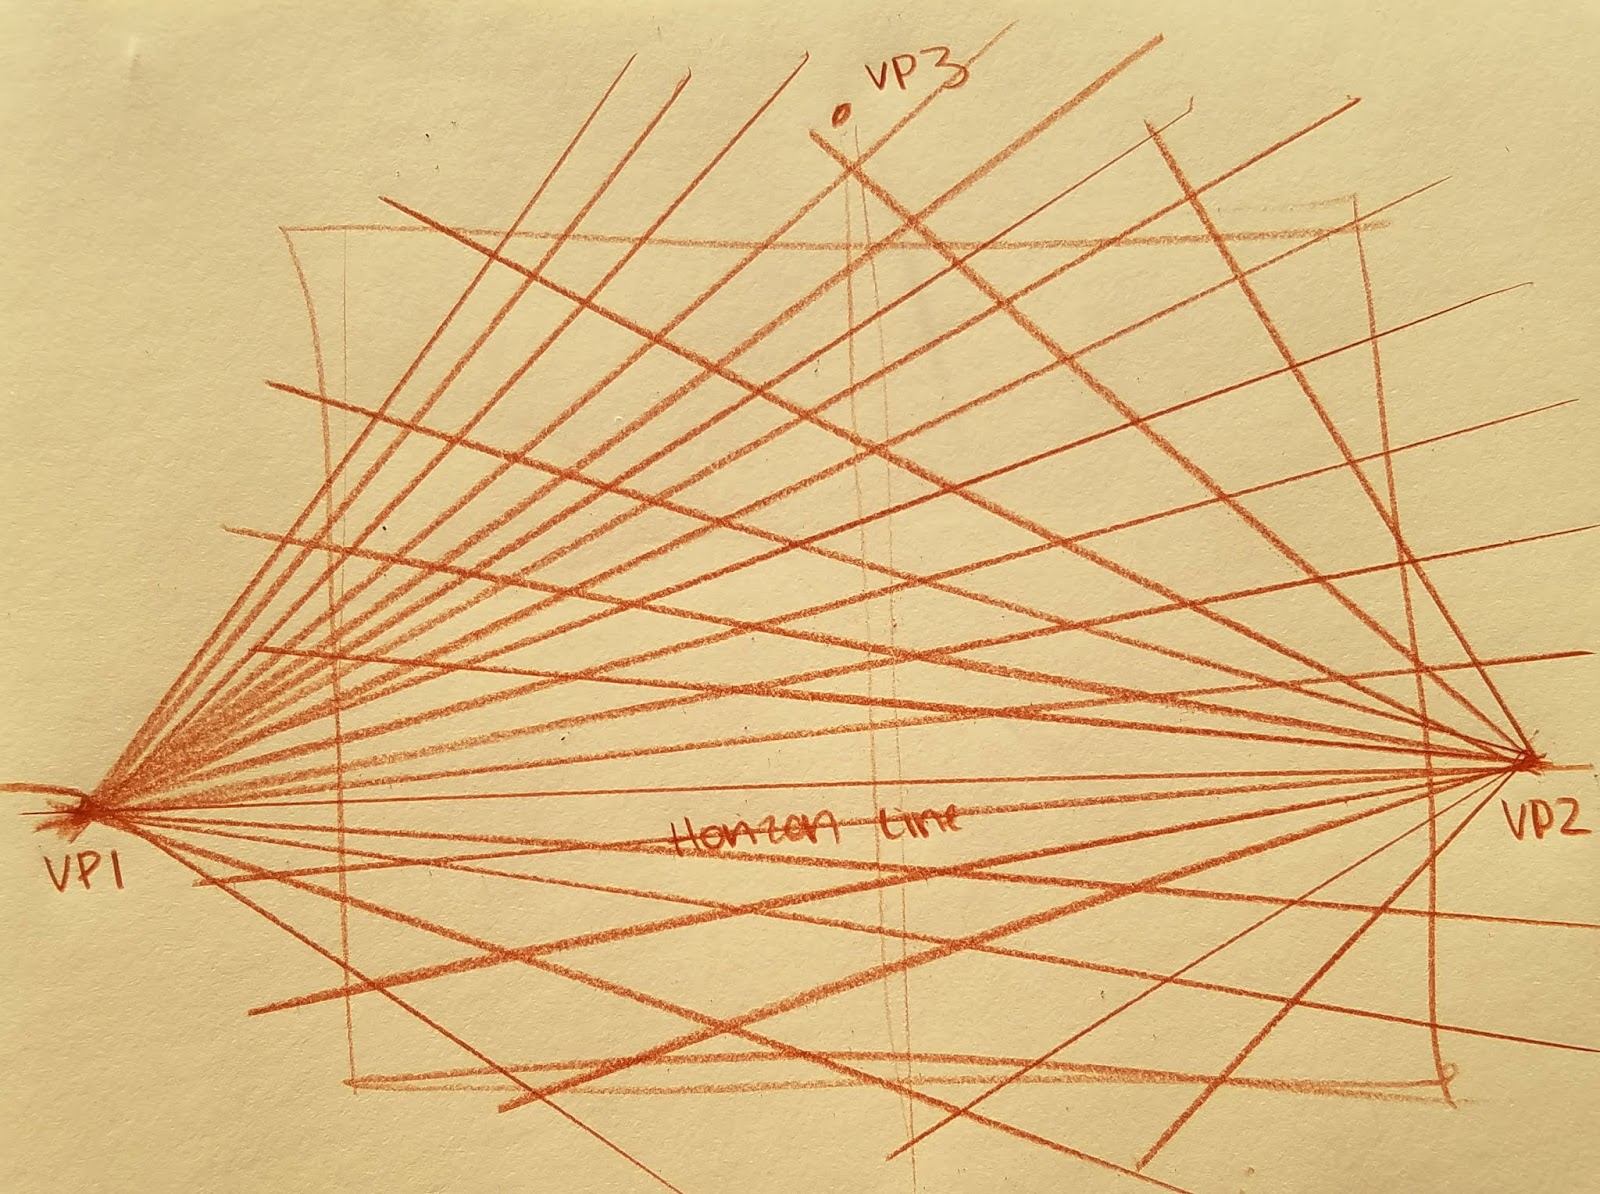

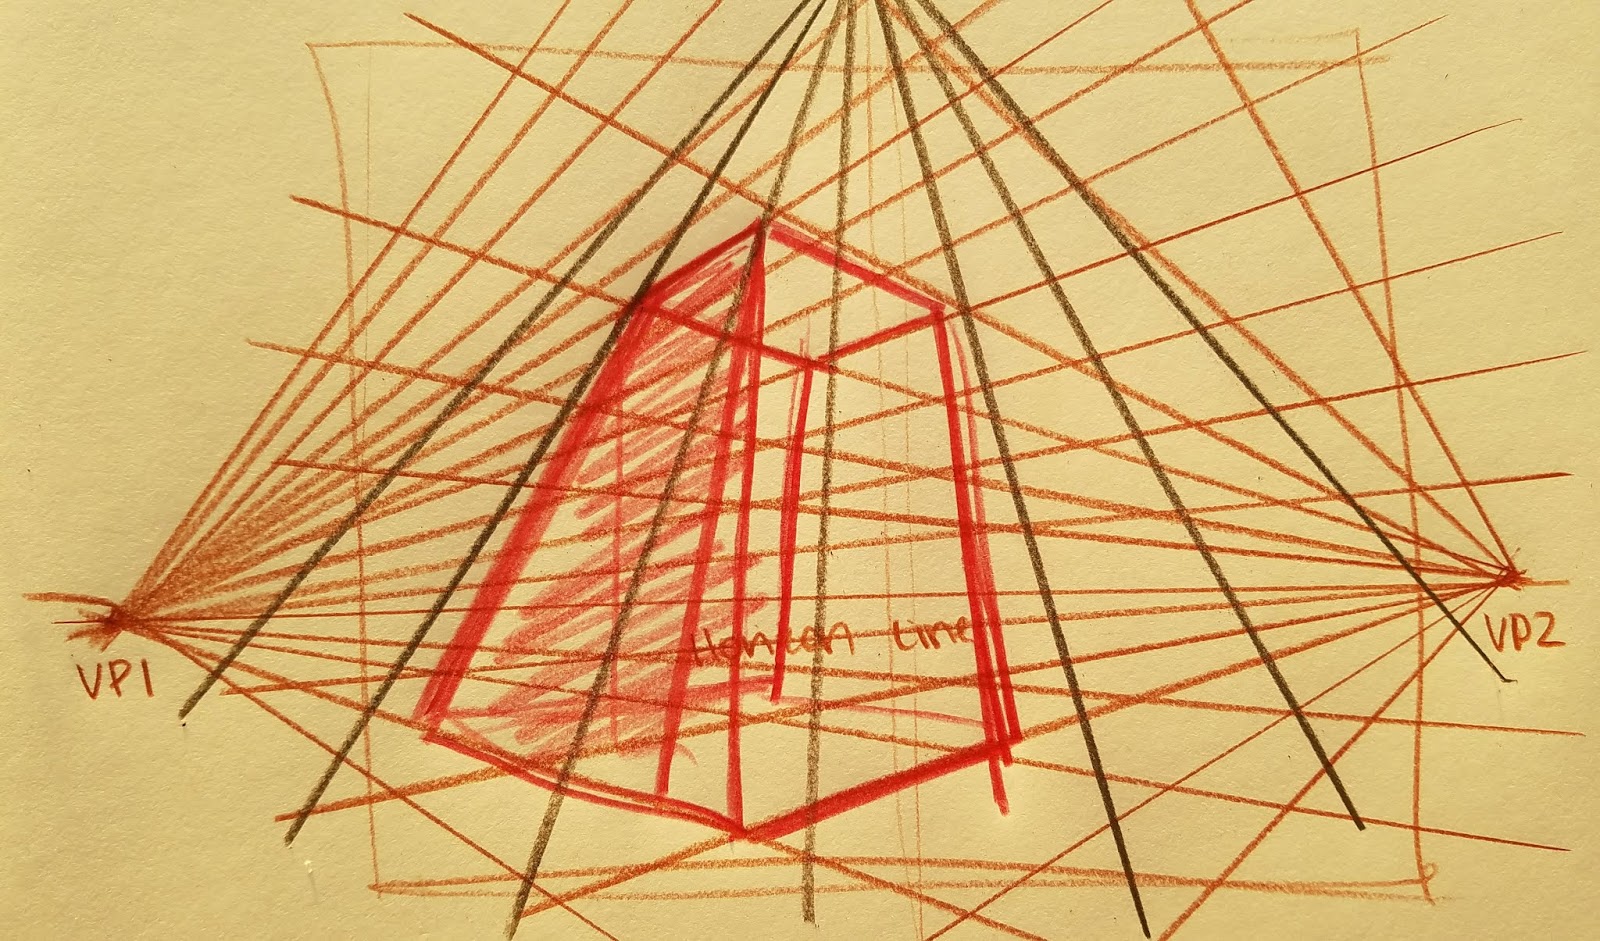
Definition of three-point perspective. : linear perspective in which parallel lines along the width of an object meet at two separate points on the horizon and vertical lines on the object meet at a point on the perpendicular bisector of the horizon line.Source
"...vertical edges are drawn to a vanishing point above or below the horizon. In three-point perspective there are no truly parallel lines in your drawing."
Source
Isometric Projection

Isometric projection is a method for visually representing three-dimensional objects in two dimensions in technical and engineering drawings. It is an axonometric projection in which the three coordinate axes appear equally foreshortened and the angle between any two of them is 120 degrees.
Source
Often used in top down videogames, in architectural plans, and for product designs.
Creating Perspective Grids by Hand:
Note: These are screencaps grabbed from my Perspective in the Panels video. If you learn best from observing, you should just watch that.
PANEL 1- Two Point Perspective
Step 1: Tape scrap paper to the four borders of your panel.

Step 2: Based on your thumbnail, determine where your horizon line should be.
How I do it:
I do tight thumbnails that include background and basic shot choices because I'm often quite accurate with estimating my perspective in small scale. So to determine my accurate horizon line, I will line my ruler up with the background lines (like say floorboards)- one from each side, and put a mark where the lines from each side would cross. That's usually a decent place to start for a horizon line.
Note: If you would like to see this demonstrated, shoot me an email!
This isn't surefire- sometimes I'll start doing my grids, realize they're all wrong, and have to erase the whole thing.
Step 3: Draw your horizon line
Step 4: Determine Where Your Vanishing Points Will Go
Using a similar technqiue as described in finding where my horizon line will go, I select a mid panel background line (such as a picture frame border), and extend it towards my horizon line. I may do this a couple more times, and average out which point will work best for the panel.
If you'd like to see this demonstrated, please email me!
Step 5: Begin Creating Your Perspective Grid
Draw lines radiating from your vanishing points


Step 6: Begin Fleshing Out Your Panels, Using the Grid as Your Guide
This is the stage that probably benefits most from demonstration. How you choose to approach it is up to you, and will change as you gain experience. I usually prefer to start by fleshing out the characters, then fleshing out the background, working from foreground to background, as this results in the least amount of erasing. If you're interested in learning how to stage characters in proportion, Andrew Loomis' Successful Drawing covers this in detail. As with perspective, these are techniques that may take some time to get the hang of, so practice is recommended!
Once I've drawn in my characters, using constructive figure drawing to construct them accurately, I begin drawing in the background, using the perspective grid as my guide. When drawing backgrounds, it's helpful to work from staged reference if accuracy is your goal- many artists even recreate their comic environments using 3D programs like Google Sketchup to make it easier to draw later on.
For a step by step video of this, please email me.


Step 7: Tightening Up Your Forms in Graphite

PANEL 2- Flat Silhouette
Step 1: Tape off your edges

Step 2: Sketch in your character

Step 3: With a ruler, tighten up your straight edges
Step 4: Pencil and tighten with graphite
Step 5: Remove Paper

PANEL 3- One Point Perspective
Step 1: Tape off your edges with scrap paper and masking tape
Step 2: With a ruler, determine your horizon line.
For this shot, it's about mid panel
Step 3: Determine your vanishing point.
For One Point Perspective, it's usually the middle of the panel
Step 4: Begin drawing lines radiating away from the Vanishing Point

Step 5: Begin blocking in your figures


If necessary, pull up reference. In the below example, I have staged a shot of me falling down the stairs but catching myself, so I have good reference for Kara's pose in this panel.

Step 6: Tighten Up with Graphite
Step 7: Remove Paper
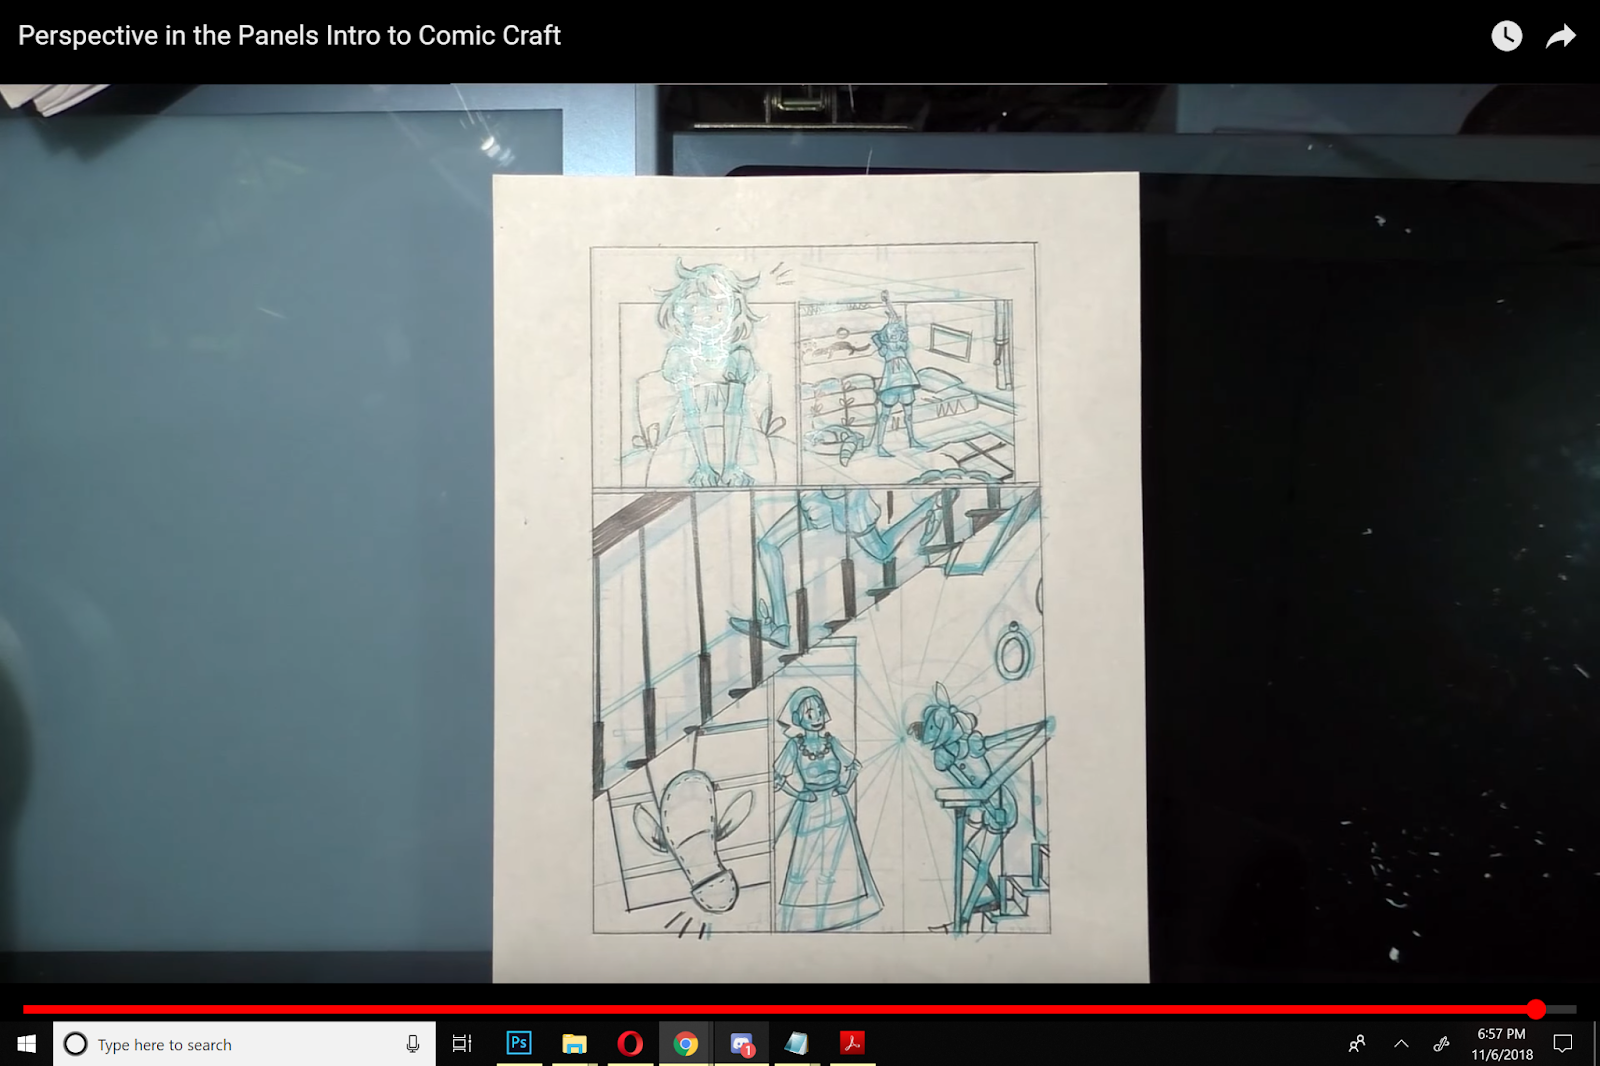
Et voila! Another page completed!
For a simple map view like the example below, you may not need to use perspective grids. If you were- you could go complicated and use 3 point perspective (great for birds eye view of cityscapes), or very simple with 1 point perspective. I opted to freehand it.
[image error] Printed bluelines. Additional paper has been taped on to mask and protect finished areas.
 Non photo blue sketching to tighten up the thumbnail
 Going over the bluelines with graphite, for the final sketch
 A panel that has been taped off. Additional paper is taped around the 4 sides of the panel, to create enough room for me to lay down a perspective grid. Since w are looking down at the desktop in this image, the horizon line is high- above the panel.
Demonstrations:
Traditional Media:
Intro to Comic Craft: You Need PerspectivePerspective in the Panels: Intro to Comic CraftOne Point Perspective: Improvement HellImprovement Hell Challenge- 2 Point Perspective
Digital Media:A recent discovery, Miconi's perspective brushes for Photoshop are a quick and easy way to slap down a perspective grid, perfect for sketching environments, doing mockups, or tightening up existing sketches. You can see these used in this post (the sketchy blueline drawings), and I plan on utilizing them often from here on out.
Prior to this, I kept my use of digital perspective grids to a minimum, which is why most of the links to Digital Media demonstrations will be outside links.
PHOTOSHOP:
Create Perspective Grids in Photoshop: 2 Quick and Easy Ways
Perspective Grid in Photoshop
How to Use the Vanishing Point Tool in Photoshop
Perspective Grid Tool in Adobe Photoshop Sketch
Photoshop Perspective Grid Brushes
ILLUSTRATOR:
Define Perspective Grids
Illustrator in 60 Seconds: The Perspective Grid
CLIP STUDIO PAINT/MANGA STUDIO
Manga Studio Grids: Manga Studio 5 and 5EX Tutorials: Perspective Rulers
How to 'Perspective' Manga Studion 5EX- Scribbles with Jonathan
Perspective for Comics: Google Sketchup Demo
PROCREATE
Perspective Grids
KRITA
Perspective Grid Tool
In Finished Art:
One Point


Two Point


Isometric


There are other tools at an artist's disposal for creating believable, inhabitable environments and backgrounds in their comics and illustrations. Many artists utilize Google's free SketchUp tool to create mock ups of environments that they can rotate, or zoom in to. Clip Studio Paint has perspective grid tools, and there are tons of downloadable grids that artists can use as templates.
Outside Resources and More Information:
What is a Vanishing Point in ArtWhat is one, two, and three point perspectiveHow the Horizon Line Controls Perspective in ArtWhat is a Vanishing Point in Art
One Point Perspective:
One Point Perspective Drawing: The Ultimate GuideWikipedia: Perspective (graphical)Artyfactory-Perspective Drawing-One Point PerspectiveHello Artsy: Beginner's Guide to One Point Perspective DrawingOne Point PerspectiveHow One Point Linear Perspective Works
Two Point Perspective:
Two Point Perspective
Three Point Perspective:
Bill Martin's Guide to Drawing: Three Point Perspective
The Basics of Three Point Perspective
Three or More Points of Perspective:
Understanding 6 Point Perspective New Perspective Systems
Digital Drawing Tools:
Photoshop Perspective Grid Brushes
Printable perspective grid templates:Printable Paper- Perspective GridFree Perspective GridsAyal Pinkus: Experiments in Comics: Perspective Grid Generator
Recommended Reading
David Chelsea's Perspective Books:
Perspective! for Comic Book Artists: How to Achieve a Professional Look in Your ArtworkExtreme Perspective! For Artists
Perspective in Action: Creative Exercises for Depicting Spatial
Representation from the Renaissance to the Digital Age
Andrew Loomis' Successful Drawing
Please consider donating to this blog or purchasing from Natto-shop (http://nattosoup.com/shop) if you want me to continue publishing quality content. All materials tested were purchased from my own pocket. Keep on Truckin' Nattosoup is not under any sponsorship.


No comments have been added yet.


![[image error]](https://3.bp.blogspot.com/-dWuuRKZuYC8/WKyjzmKsAoI/AAAAAAABQKw/PgS6HBIOjXIqR-Unl8eZXrObXGVsFSgCACLcB/s640/20170220_140301.jpg)