
Tutorial: Methods to purify backcountry water || Pros, cons & my picks


There was little doubt if I needed to purify the water from this stock tank on Arizona’s Coconino Plateau.
Earlier this month there was a healthy online debate over the true risk of drinking water from backcountry sources without purifying it first. I appreciate that Ethan Linck brought up the topic and agree that many sources are safe to drink without treatment.
But I agree more with Wes Siler and Christie Wilcox:
It’s difficult to be certain of the contamination risk, and
Waterborne cooties can be uncomfortable (understatement).
So, as a general rule of thumb, just purify it.
Missing from their debate, however, was any instructional knowledge, specifically:
How to effectively purify water sources in the backcountry; and,
How to assess water quality and risk in the field.
I’m generally competent in explaining the how’s of backpacking, so in this two-part series I will try to fill this gap.
If you’ve read The Ultimate Hiker’s Gear Guide, some of this text may sound familiar — it’s from the chapter on Water, which also includes discussion of contaminants and water storage. (A clause in my contract allows me to share short sections of the book.) If you haven’t read the Gear Guide, you should consider it: it’s filled with trail-tested advice, and almost certain to save you time and money.

A decomposing cow or steer in Harris Wash, Grand Staircase-Escalante National Monument. I had filled up my bottles below here and had purified the water, but thankfully didn’t drink any before encountering this.
How to purify water from backcountry sources
There are four basic techniques for treating water:
Boiling
Filtration
Chemicals
Ultraviolet light
Boiling is time-tested, but impractical as a regular treatment: it consumes time and fuel, and hot water is normally unsatisfying to drink. I rely on this method only when I’m heating up water anyway for meals or coffee.
The three remaining methods are available in a variety of form factors, and are better for routine treatment. There is not a single “best” water treatment method, even though some of my online peers will lure you with click-bait headlines that say so. Your specific preference will likely be a function of:
Group size,
Frequency and quality of water sources, and
Importance of time, long-term reliability, and cost.
Some treatment methods are labeled as a “purifier,” a distinction reserved for those that extract or kill all pathogens (i.e. protozoa, bacteria, and viruses). The same effect can sometimes be achieved by combining two non-purifiers. For example, filter and then chemically treat the water.
At a glance
This chart highlights and pros and cons of the various treatment options. Keep scrolling for a more in-depth discussion.
Filtration
At a minimum, filters will strain out larger-bodied pathogens like protozoa and bacteria, as well as sediment, larvae, and other floaties. This should be sufficient for most backcountry watersheds, where viruses are rare.
Some filters go above and beyond, by removing chemicals and improving water taste. The MSR Guardian Purifier does all of the above, and even removes viruses. But its exceptional performance comes at a high price — it’s $350 and 17 oz.
Filters have other trade-offs, too:
They leak retained water.
Their flow rates are slow to begin with, and get worse until the filter is backwashed, scrubbed, or replaced. And,
Most cannot be operated on the move.
Specific filter types have additional considerations:
Pump filters
Pump filters like the Guardian are my least preferred treatment technique. In addition to being the heaviest option, their operation involves considerable effort. Pumping large volumes of water is downright tiresome — imagine treating a few liters of water for you and several partners, at a typical flow rate of about one quart per minute.
Gravity-fed filters
Gravity-fed filters like the Platypus GravityWorks 4.0 ($120, 11 oz) are ideal for groups and extended camps. Simply suspend a reservoir of untreated water above an empty reservoir — using a branch, boulder, or steep slope — and return a few minutes later to a full reservoir of filtered water that can then be decanted into individual bottles.

A gravity-fed system, using the CNOC bladder and a Sawyer Mini. This system is ideal for groups and long camps. Simply suspend the dirty bladder on a tree branch or rock, and then decant the filtered water into individual bottles.
Inline filters
Inline filters like the Sawyer Squeeze ($40, 3 oz) share the same filter technology with gravity-fed filters, but rely on a manual force like suction or squeezing. With some inline filters, you can drink directly from creeks, pools, or bottles by using it as a straw. But it’s much easier to squeeze untreated water through it from a collapsible bottle.

Left to right: the original Sawyer Squeeze, Sawyer Mini attached to a 16-oz bottle, and the backflush plunger.
Chemicals
There are three chemical options, only one of which I would recommend. Note: If you expect floaties in your water, it is advised to bring a bandana or coffee filter in order to strain out large particles before treatment.
Iodine
Iodline-based treatments like the classic Potable Aqua tablets ($7, 1 oz) are lightweight, inexpensive, and widely available, but they are not effective against Cryptosporidium and their overall
effectiveness is impaired by cold and turbidity. Your water will also taste like a medicine cabinet.
Bleach
Household liquid bleach (sodium hypochlorite) would be a better home remedy than iodine. However, it degrades with age and it’s still slow against Cryptosporidium. Plus, it’s like drinking pool water.
Chlorine dioxide
Chlorine dioxide been used by municipal water treatment plants since the late 1940’s and is the superior chemical treatment. The tablet and droplet forms share identical technology, but only tablets like those from Aquamira ($10 for a 20-pack, 1 oz) have been approved by the Environmental Protection Agency as a “purifier.” The marketing copy for the liquid drops claims only that they “kill odor-causing bacteria and enhance the taste of potable water.”
Fear not. A proper dose of chlorine dioxide (in tablet or droplet form) will kill most pathogens within 15 minutes, or within 30 minutes for very silty and contaminated (“worst-case”) water. Cryptosporidium is more resilient, however: The recommended dwell time is four hours. Unlike iodine and bleach, chlorine dioxide has minimal chemical aftertaste, if any.
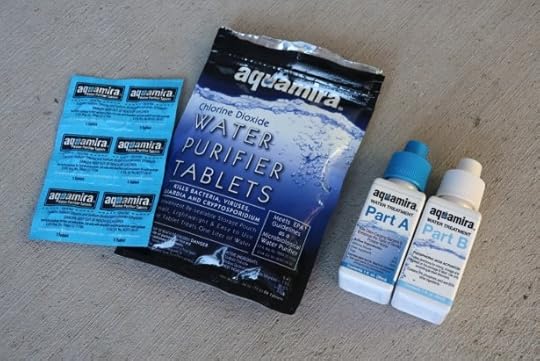
Aquamira tablets (left) and drops (right)
Ultraviolet light
UV treatments like the SteriPEN Ultra ($100, 5 oz) and similar products prevent all pathogen types from reproducing by scrambling their DNA. You still ingest the pathogen, but without offspring there should be no effect. Its speed — at about 90 seconds per quart — is attractive, but the technology has problems:
The cost and weight of replacement batteries adds up.
Narrow-mouth bottles like the Platyplus SoftBottle and smartwater 1L bottle cannot be used, because the light cannot be submerged to the required depth.
Its effectiveness decreases in turbid water (although it must be good enough to have earned the “purifier” label). And,
There are too many possible points of failure. The unit can break if dropped, stepped on, or stored poorly. The batteries die, and the battery compartment is not necessarily waterproof. And the electronics can be fickle.
For such a critical item, its reliability is discomfiting. If you go this direction, I recommend having a backup system.
My picks
For about 15 years my go-to water treatment method has been chlorine dioxide. It is the standard technique on my guided trips, too. The results have been excellent, and now statistically significant given the number of clients that have gone through my program — if it wasn’t effective enough, we’d have noticed by now.
I prefer Aquamira drops ($15, 3 oz), but in temperatures below about 15°F I swap to tablets because they don’t freeze. Versus tablets, droplets are more economical (at about 50 cents per gallon) and flexible, since I can easily modify dosages with proportional changes to dwell times. Especially when decanted into smaller dropper bottles, the weight is negligible.
Chlorine dioxide is transported as a two-part solution and must be mixed for five minutes before it can be dispensed into water. By storing premix in an airtight and opaque dropper bottle, this wait time can be eliminated. McNett, the manufacturer of Aquamira, discourages premixing due to potency concerns, but the practice seems to be safe with some degree of user education.

My go-to water purification treatment is Aquamira, in drop form. I bring a small “pre-mix” bottle that holds about of a day of treatment.
In recent years I have also warmed to the Sawyer Squeeze, which has the advantage of instant potable water. It’s ideal for wet environments and for backpackers who always purify. I recommend the original Squeeze over the smaller Mini, because its weighs marginally more but has a reliably better flow rate.
In group settings, the Platypus GravityWorks is worth mentioning. It’s effective, hassle-free, and very fast. The Squeeze can function the same way, when packaged in the Sawyer Gravity System.
The combination of chlorine dioxide and the Squeeze or GravityWorks may make the ultimate purifier combination. Use the filter to quickly filter small amounts, and the Aquamira to purify large quantities that will sit overnight or in your pack for several hours. For highly suspect water, use both methods.
How do you purify water, and why is that you go-to approach? Any tips or shortcomings to share? Leave a comment.
Disclosure. This website is supported mostly through affiliate marketing, whereby for referral traffic I receive a small commission from select vendors, at no cost to the reader. This post contains affiliate links. Thanks for your support.
The post Tutorial: Methods to purify backcountry water || Pros, cons & my picks appeared first on Andrew Skurka.


