Quick Notes: Make Your Own Facebook Profile Banner
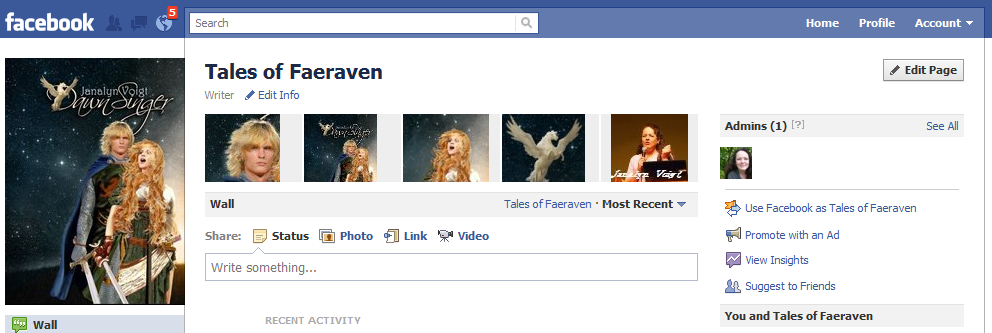
Facebook's new Top Picture Bar adds interest to your Page and allows an opportunity for branding. You can feature your book cover images or products and show yourself either engaging with others or in different moods and poses. While several applications for making Facebook banners exist, If you're like me, you want to avoid using outside applications in Facebook.
Making your own Facebook Page banner is not too difficult if you already know how to size photos. There's a little more to learn but it's still manageable even if you don't. I'll walk you through it.
To size photos in Microsoft Office Picture Manager (a free program on Windows-based computers):
From your picture library, double click on the photo. This should open it in Windows Photo Viewer.
Click the "Open" tab and select Microsoft Office Picture Manager.
In Picture Manager, Click the "Edit Pictures" tab, which should bring up an editing menu in the right sidebar.
In the editing menu under "Change Picture Size" click on "Resize."
Under "Resize Settings" select "Custom Width and Height."
Type "97" in the first pixels box under "Custom Width and Height." Don't worry about what the second box shows. You've put in the width figure, and the picture will automatically size to be in proportion.
At the bottom of the menu bar, under "Size Setting Summary" you'll find "New Size" with some numbers. The width should show as 97 pixels. Click on the "OK" button.
If your picture was higher than 68 pixels, you'll need to crop it to that height. Click on "Edit" in the top menu bar, and then select "Crop" from the right side bar.
Crop your picture by moving the cropping bars down from the top of the picture and/or up from the bottom until the correct dimensions of 97 wide by 68 high show as the "New Size" in the Size Setting Summary. Click the "OK" button.
In the top menu bar, click "File," and then "Save As." Now give your new picture another name. I like to use IMAGE NAME fb. The fb at the end of the image name tells me this is my fb banner picture, which makes it easier to find when I upload it into Facebook.
To Create a Banner in Facebook:
Size 5 photos to approximately 97 pixels wide X 68 pixels high. I tried to crop a 485 x 68 pixel banner of my book title and name, but even though I tagged them in order, the pictures don't stay in order. I kind of like that they rotate, but if you want to create a banner that stays in order, you'll need to use an application. Although I don't recommend using applications, one such application is Profile Banner Maker.
Go to your Facebook Page and click the "Photos" link in the left sidebar. Your photo albums will come up.
In the far left top, click the "Upload Photos" button.
You have your choice of a complicated or simple Uploader. If you're advanced enough to use the more complex Uploader, you probably don't need me to tell you how to make a Facebook banner. We'll use the simple Uploader, so please click "Try the Simple Uploader."
A "Create Album" box will come up. Fill in the name "Profile Banner" and leave "Location" blank (since you're not adding these pictures to an existing album), and then click the "Create Album" button.
In the box that comes up, click one of the "Choose File" buttons and select one of your resized photos. You'll need five for your banner.
Click the "Upload Photos" button.
After the upload completes, you can add a description or caption to the photos if you want. After you save, a box will come up, asking if you want to publish to your wall.
Drag to arrange the pictures in the order you want them to appear on your banner.
Click on the picture that you want to show on the far left of your banner. In the box that comes up, click "Tag This Photo." Click on the picture anywhere and enter your Facebook Page name in the box that appears.
Now click the left arrow and move through the photos, tagging yourself.
When you are finished with the last picture, click the "Done Tagging" box, and go admire your new Facebook Page banner.
If you make a mistake or tag something and don't want it to remain in your banner, you can click the little "x" in the left top corner of the picture in your banner. This hides the picture from your banner while allowing it to remain visible in your album.
Enjoy! If you get the chance, I hope you'll stop by my Tales of Faeraven Facebook Page.

© 2010 Janalyn Voigt
Click to Subscribe to LiveWriteBreathe by Email
|