Nancy I. Sanders's Blog, page 64
February 5, 2014
Nonfiction Picture Book: The Outline, Part 2
I usually work with two outlines.
My first outline is what I call my “short” outline. It’s usually one page so I can see the main structure of my manuscript at a glance. I usually post this somewhere at my writing center where I can keep the whole scope of my project front and center. When working on a 40,000 nonfiction manuscript such as Frederick Douglass for Kids, this is usually comprised of the chapters and a couple of bullets for each one.
The second outline I like to use for most projects is what I call my “working” outline. This outline can get very, very long. This is the outline where I’m plugging in all my notes and changes and ideas as I’m working.
For example, sometimes I’m writing the first half of the middle when an idea for the ending comes to me. Or I run across a tidbit of research that will fit into the ending. I just pull up my working outline (which is usually on the computer) and I quickly type that in at the section it belongs under a bullet point. Then I go right back to where I was working on the middle and continue with my writing.
Let’s start by creating your short outline.
You can find some fun worksheets to fill out as you create your outline for your nonfiction picture book. Just visit the site of my writing buddies, Writing According to Humphrey and Friends. Scroll down to the section on CHARTS AND WORKSHEETS TO GET ORGANIZED FOR SUCCESS. Click on two files to download them and print them out:
Outline for a Nonfiction Picture Book
and
Outline for a Nonfiction Picture Book document file.
The first file is a pdf file. This is what we’ll use to create our short outline.
Take all the information you plugged into your Basic Plot Worksheet A and fill it in at the corresponding places on the Outline for a Nonfiction Picture Book.
For example, on the line at the top, copy down how the story starts. (Don’t fill in the spaces for the * yet…that will be for details and we’ll talk about that soon.)
Then in the box for Change 1, copy down what your first change is.
On the lines for the 1st Half and the 2nd Half, copy the info from your plot worksheet to say what happens in the middle.
In the box for Change 2, copy down what your second change, or turning point, of the story is.
In the box for Change 3, copy down what your third change is.
Then on the line at the bottom, copy down how your story will end.
Don’t fill in any of the spaces after the *. Those spaces are for brainstorming ideas for the DETAILS that will take place in each of the four parts of your manuscript (beginning, 1st half of the middle, 2nd half of the middle, ending).
For now, your outline should just show the exact information your wrote down on your Basic Plot Worksheet A.
You can just use the pdf file for your short outline as you’re getting ready to start writing. (We’re almost at that point!)
But if you’re someone who wants to get all your ideas down onto paper and not just squeeze it into this small space on this chart, go ahead and fill in the document file. Again, copy the information that you plugged into your Basic Plot Worksheet A. Don’t fill in anything for the * yet. But in the document file you can write as much content as you want about how the story starts, what happens in the middle, and the significant changes that will occur.
In the next post I’ll explain more about how to fill in the details on the * lines for your outline.


February 3, 2014
Nonfiction Picture Book: The Outline
Are you a Panster? Or do you like to work from an outline?
What’s a Panster? Someone who works by the seat of her pants…in other words just likes to make up the story as you go without using an outline.
And which way is better?
I’ve seen lots of arguments all over the Internet favoring one or the other. And often I hear people in either party INSIST their way is the best.
But here’s what I’ve learned over the years of my writing career working with editors on nearly 90 published books…drum roll please…
It’s best to be BOTH!!!!!
Learning to write an outline (also known as a synopsis) before you write your manuscript is your ticket to earning income as a children’s writer. That’s because if you want to sign a contract before you write the book (or magazine article) the editor will insist you cough up an outline first. I talk more about this in Section 9.4 Contact Your Target Publisher in my book, Yes! You Can Learn How to Write Children’s Books, Get Them Published, and Build a Successful Writing Career.
However, learning to let your imagination run free and letting your story come to life as you work on it is your ticket to fresh, unique, packed with emotion, and charged with real characters readers want to fall in love with.
So how do you do both? Here’s a strategy I’ve developed over the years that works really really well for me. I wanted to share it with you because I hope you’ll give it a try. See if it will help bring you success, too.
Step #1. Decide to create an outline. Like for this nonfiction picture book manuscript.
Step #2. When you sit down to create your outline, turn on your “Panster’s” imagination. Pretend you’re writing your story and let it come to life in your mind. The benefit is that you don’t have to struggle with words at this point to achieve your goal because you’re not actually writing the story yet…you’re just jotting down key points to include in your outline. But let your imagination go wild! And dream up your story from beginning to end.
Sure, if you have entire scenes come to mind, go ahead and write them down! Keep them in files you’re creating for your project. But let your characters develop and your plot develop and get it from the start to the finish line. By this point you’ve got your Basic Plot Worksheet A to help you along.
I’ve learned how much fun this can be! When I write work-for-hire chapter books, I’m required to submit a 15-chapter outline that’s pretty detailed in it scope. It almost feels like I’m writing the book…without the angst of having to worry about dialogue or scenes. It’s exciting to see the story gel and the characters come to life and the structure of the entire story from beginning to end get down on paper.
If you’ve been someone who shies away from writing outlines, the key might be to allow yourself to go into the same zone as when you’re writing a story, and just spend time there enjoying watching the story grow and grow until you can see it from beginning to end.
Step #3. As you develop the story in your head from beginning to end and jot down the elements of each section, this will form your outline. Verify that it follows the structure of our Basic Plot Worksheet A and contains the significant changes at the right intervals with the turning point in the middle. Just a note: Your outline doesn’t need to be put into a formal format like they teach you in school. Bullets are fine to use in a picture book outline (or synopsis). Paragraphs under each chapter are great to use in an outline or synopsis for a novel.
Step #4. When you’ve actually got an outline to work with, you are ready to start writing your manuscript.
But here’s the amazing wonderful thing I’ve learned!!!!! Editors realize that outlines aren’t written in stone!!!! As you sit down and work on your manuscript and start creating scenes and actually developing your characters to their deepest levels and weaving in facts, you do not…I repeat YOU DO NOT have to feel hampered by your outline! You can toss out huge chunks of it if it’s just not working. You can reorganize and revamp and let your story grow as it’s begging to grow. In other words, you can still be a Panster if that’s your true style of writing! Editors understand that something magical happens while you’re actually in the writing process. And if your outline really really takes a U-turn, just check in with your Editor to talk about it. I’ve never met one that didn’t just say at this stage, “Go for your gut instincts here!”
But your outline was there to get you started and help keep you from wandering aimlessly for 1000 extra words or 20 extra chapters. Plus, it helped structure your plot so you’ve got a strong framework for your manuscript.
So with all this in mind, are you ready to start working on your outline? Great! Just keep your enthusiasm fired up and in the next post I’ll tell you the steps to take to create an outline for a nonfiction picture book.


January 31, 2014
Nonfiction Picture Book: Title Tryouts
Let’s brainstorm ideas for a working title.
Brainstorming sessions are always good to help generate ideas for the part of the project you’re working on.
And for our brainstorming session today, we get to use a fun worksheet!
Just hop on over to the site of my writing buddies, Writing According to Humphrey and Friends, and scroll down until you reach the section on CHARTS AND WORKSHEETS TO GET ORGANIZED FOR SUCCESS.
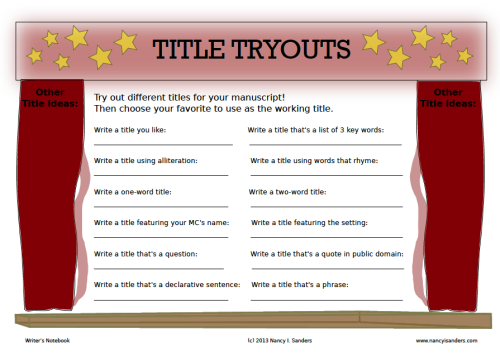
Download and print out the free worksheet, Title Tryouts.
Following the Title Tryouts worksheet, write down a potential title for each of these different prompts, then choose your favorite to use as your working title. Even if you already have a title you’ve been using, you might be pleasantly surprised at some the ideas your brain comes up with in response to these various prompts.
Always remember, though, that this is just a working title, so don’t fall in love with it! Many publishers have entire marketing teams who research key words and other titles and marketing trends and develop a title that will help your book shine in today’s market.
But go ahead and have some fun! Choose your favorite working title. Then write it down in the STATS column on your Basic Plot Worksheet A.
Go ahead and fill in the rest of the stats for your nonfiction picture book, too. If you have any questions about that, just let me know!


January 30, 2014
Nonfiction Picture Book: Why a Plot Chart?
You may be wondering WHY I recommend filling out a plot chart for your picture book. I mean, this isn’t a novel, right? And it’s not even fiction.
Well, I’ll let you in on a secret.
Ever since I started using this plot chart to spend time thinking about the significant changes and key plot points in my manuscripts, I’ve become a better writer. How do I know? Because I’ve been getting comments. From editors!!!!
I use this plot chart now to plot out my magazine stories, picture books, and chapter books. Both fiction and nonfiction.
Here’s an example of what I’ve been hearing:
We LOVE this story! You really hit it out of the park.  Great action all the way through.
(If I remember correctly, this is the first time ever this editor didn’t ask me to revamp the structure of my manuscript!)
So if you’ve been hesitating, wondering if you should really take the time to try to plan out the structure of your picture, I hope this convinces you to give it a try!
Just do as much as you can on this project. Then, for your next manuscript try it again. Then the next. The more you use this, the easier it will become and the stronger your plots will be.
And that’s a true sign of a better writer.


January 29, 2014
Nonfiction Picture Book: Chart YOUR Story
Now let’s plot ideas for your picture book story on the BASIC PLOT WORKSHEET A.
(If you’ve already written your story, go ahead and plot your manuscript on the chart.)
First choose which of our target picture books you want your picture book structure to follow. (The Camping Trip That Changed America or Those Rebels: John and Tom or So You Want To Be President?) Refer to just that one book’s chart that you filled out. (Note: If you have a different picture book you want to use to follow the format and structure, plot it on the Basic Plot Worksheet A and refer to that chart.)
Now, for your very own story, fill out a blank Basic Plot Worksheet A:
The Beginning, Middle, and End
• Jot down a note on how you want your story to begin.
• Jot down a note on how you want your story to end.
• Think about your story’s middle.
The Changes
• What significant change do you want to have happen to start the middle where all the action takes place?
• What change should happen in the middle of the book (the middle of the middle) or commonly known as the turning point of the book?
• What change do you want to have happen to start the end where the story wraps up?
The Middle
• Finally, what type of action do you want to take place in the first half of the middle to lead up to the turning point?
• And what type of action do you want to take place in the second half of the middle to lead up toward the climax at the end?
Don’t worry if you don’t come up quickly with ideas. Fill in ideas that come to mind. For the blank parts you need ideas for, pick up some of your research books and dig around until you find tidbits that look good. Then plug those ideas into your chart.
This chart isn’t written in stone. It’s just to get you started in the right direction. Fill it out as best as you can.


January 28, 2014
Nonfiction Picture Books: Chart Published Plots, Part 3
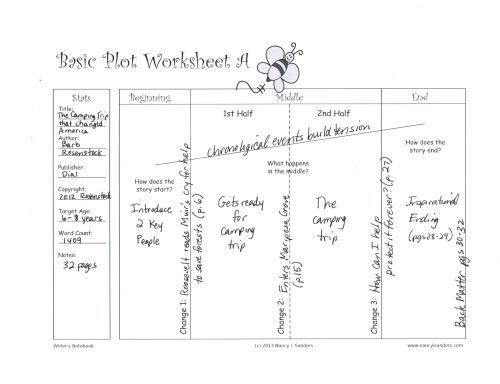
Now let’s chart the plot and structure of the picture book, The Camping Trip that Changed America.
Before we do, though, I just want to mention that this picture books is historical fiction. It’s NOT nonfiction. But I wanted to include this book as an example for two reasons.
#1 It is called a “slice of life.” Many editors I am getting feedback from seem to be interested in slice of life picture books whether nonfiction or historical fiction. I thought this book was a great example of this genre.
#2 I wanted to examine a historical fiction picture book here on our journey just in case you might decide to switch from nonfiction to historical fiction. Sometimes when we’re digging around in cold hard facts, we come to a point in our research when we realize that we will have a better children’s story if we switch gears to write historical fiction instead of nonfiction. That’s okay! In fact, many editors are perfectly fine with this. So I wanted to give all of us this option in case we reach that point. So unless you’re writing this picture book for a publisher who insists on nonfiction, feel free to switch over to writing historical fiction instead.
Okay, now back to our chart. Once again, let’s use a copy of the Basic Plot Worksheet A. Print it out and write down the information on it.
Start by filling in the stats on the left column.
* Fill in the title and the author’s name, Barb Rosenstock.
* The publisher is Dial.
* The copyright is 2012 in the author’s name. So this book is very current. Another reason this is a great example for us to study.
* According to Amazon, the Target Age is 6-8.
* The word count is 1409.
* Under notes, make a note that is is 32 pages. This is the page length we’ll be aiming for in our manuscripts.
Now we’re ready to fill in the plot chart.
Once again, there’s no right or wrong way to do this, but the key thing we want to look for is SIGNIFICANT CHANGE.
In the first column under “Beginning,” you can answer the question, “How does the story start?”
* Introduce two key people
Change 1: Roosevelt reads Muir’s cry for help to save forests (p. 6)
In the second column under “1st Half,” you can write:
Gets ready for camping trip.
Change 2: Enters Mariposa Grove (p. 15)
In the third column under “2nd Half,” you can write:
The camping trip
Change 3: How can I help protect it forever? (p. 27)
In the fourth column under “End,” you can write:
Inspirational ending (pages 28-29)
And on the last line, note that there is Back Matter on pages 30-32.
On the line that goes from beginning to end, rising up toward the right, write:
Chronological events built tension
Here’s what my completed chart looks like:


January 27, 2014
Nonfiction Picture Books: Chart Published Plots, Part 2
Now let’s chart the plot and structure of the nonfiction picture book, So You Want to Be President?
Once again, let’s use a copy of the Basic Plot Worksheet A. Print it out and write down the information on it.
Start by filling in the stats on the left column.
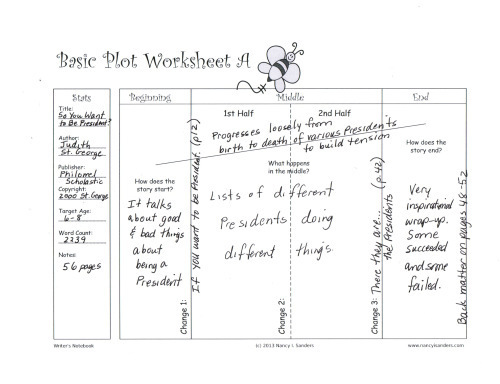
* Fill in the title and the author’s name, Judith St. George.
* The original publisher was Philomel but the copy I have is published by Scholastic.
* You can find the copyright date inside. It’s registered 2000 under the author’s name. This shows us that it’s not a recent book, so it’s not quite as current in today’s market. Also, since it’s registered in the author’s name and not in the publisher’s name, it’s probably a royalty contract, which is a good plus.
* According to Amazon, the Target Age is 6-8 years.
* The word count is a whopping 2239 words. This is where it’s important to realize this book was published 14 years ago, and most nonfiction picture book publishers want books about 800 words these days. The exception to this is a publisher who is currently publishing longer books. For example, when I talked with the publisher at Lee and Low at a conference about 2 years ago, she said she likes longer nonfiction picture books. So for our purposes here we’re writing an 800-word manuscript, but if you want to write a longer one, first do a little bit of homework and dig around to find longer current nonfiction picture books and look up their publisher information to target.
* Under notes, make a note that it is 56 pages. Once again, that’s pretty hefty for today’s market. We’re going to aim for 32 pages, unless you are targeting a specific publisher you know does longer nonfiction books.
Now we’re ready to fill in the plot chart.
Once again, there’s no right or wrong way to do this, but the key thing we want to look for is SIGNIFICANT CHANGE.
For example, in the first column under “Beginning,” you can answer the question “How does the story start?”
* It talks about good and bad things about being a President
Change 1: If YOU want to be President… (page 12)
Now, it’s at this point that this picture book starts to LIST things. Instead of a story arc, the middle of this book is comprised of LISTS. Some nonfiction picture books do this. For example, they might list women in the American revolution or teachers in the space program.
So on this chart, there is NO CHANGE in the middle. The entire middle is one long list of different presidents doing different things. So in the middle under the second and third column write: Lists of different presidents doing different things.
Change 3: There they are…the Presidents. (page 42)
In the fourth column under “End,” you can answer the question “How does the story end?”
* Very inspirational wrap-up. Some succeeded and some failed. (pages 42-47)
And on the last line, note that there is Back Matter on pages 48-52.
One last item to note…on the line that goes from beginning to end, rising up toward the right, write:
Progresses loosely from birth to death of various Presidents to build “tension.”
Here’s what my completed chart looks like:


January 24, 2014
Author Interview: Rebecca Hirsch

Meet Author Rebecca Hirsch!
Website: Rebecca Hirsch: Children’s Writer
Linkedin: Rebecca Hirsch: Science Writer and Author
Bio:
Rebecca Hirsch is the author of more than twenty books for children, including Arctic Tern Migration, a Junior Library Guild Selection. Her writing has appeared in Spider, Odyssey, Today’s Science, and more. She was awarded the Anna Cross Giblin Award for nonfiction from the Society of Children’s Book Writers and Illustrators. She lives with her husband and three children in State College, Pennsylvania.
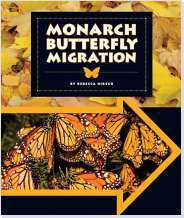
Featured Book:
Monarch Butterfly Migration
by Rebecca Hirsch
Interview:
Q: Describe a highlight for you personally while you were writing this book.
A: I was approached by Red Line Editorial, a book packager I had worked with in the past, to write some titles for a new animal migrations series. I knew right away I wanted to write the Monarch book. I love Monarchs. I enjoy spotting them when they are heading south to Mexico in August and September, and I look forward to their return to my garden the following summer.
I ended up writing six books for the series, but Monarch Migration was the first. At the time my kids and I were volunteering at a butterfly garden, so working with the butterflies while writing about them was a special experience.
Q: What is your favorite genre to write in at this point of your career?
A: My favorite genre is science and nature nonfiction, and my favorite audience is upper elementary through middle grade. There’s something about writing for kids of this age that I find really appealing — they have a strong sense of curiosity about their world. They are fascinated by the same kinds of things I am.
Q: Describe the journey you’ve taken as a writer.
A: Before I became a writer, I had trained and worked as a biologist. After I quit my job to stay home and raise my kids, I decided to try freelance writing. At first I thought I would write magazine articles for adults, because I was reading books about freelance writing, and all the books tell you how to write magazine articles for adults. I did try writing for adults, and it was okay.
Then I got the chance to write for kids. My first assignment was writing tests. I could tell right away that this kind of writing came naturally to me. I decided to specialize in it. I made a website and called myself a science education writer. For the next few years, I got assignments writing tests and textbook ancillaries, which are the workbooks and other materials that supplement textbooks.
I gradually got better and better assignments and before long I was asked to write an entire middle school workbook devoted to environmental issues. The book didn’t have my name on it, but it was my first complete book, and it was so much fun to write. I decided to try and steer my career toward book writing. By that time I was getting more offers for freelance work than I could take, so I started to be more selective, saying no to textbook writing and saying yes to book writing when it came along.
And that’s how I got started. To date, I’ve written over twenty books in the educational market, all of them under work-for-hire contracts, which means I get paid in one lump sum with no royalties. It’s been a lot of fun and a great learning experience. Now I’m trying to get published in the trade market, and that’s been a fun challenge as well.
Q: What is one word of advice you received as a writer that you would like to share with others?
A: My husband has been a terrific mentor to me. He makes his living as a freelance musician, music teacher, and composer, and he gave me some excellent advice early on.
He advised me to concentrate on doing my best work on the project that was right in front of me. Don’t worry if the pay isn’t that great. Don’t worry if it’s not the most exciting assignment, or it’s not the kind of work you want to be doing in the long run. Just do a really good job on this project. Follow the guidelines to the letter. Don’t complain. Turn everything in on time. Do it all with a smile. Do that, he promised, and more and better work will follow.
Well, that was terrific advice. I’ve tried to do that on every project. I’m sure sometimes I’ve failed, but most of my clients seem happy with my work, and nearly all of my assignments have been from repeat customers.
Many people think that success in writing is all about talent. Talent is only part of it. Hard work, a cheerful attitude, and professionalism count for an awful lot.


January 23, 2014
Nonfiction Picture Book: Chart Sample #1
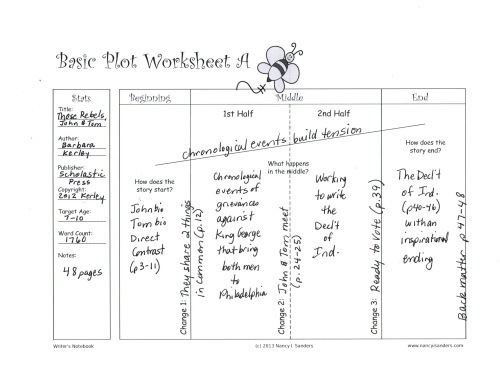
Here’s how I filled out my Basic Plot Worksheet A for Those Rebels, John and Tom.
If you have any questions about this chart, or other suggestions, just let me know! We’ll take a look at plotting the other two picture books in upcoming posts.


Nonfiction Picture Book: Chart Published Plots
Let’s continue our discussion on plot and structure of a nonfiction picture book by charting the plot and structure of the three books we’re using as our sample books.
First we’ll plot the structure of the nonfiction picture book, Those Rebels, John and Tom. Let’s use a copy of the Basic Plot Worksheet A. Print it out and write down the information on it.
Start by filling in the stats on the left column.
* Fill in the title and the author’s name, Barbara Kerley.
* The publisher is Scholastic Press.
* You can find the copyright date inside. It’s registered 2012 under the author’s name. This shows us that it’s a recent book, so it’s current in today’s market. Also, since it’s registered in the author’s name and not in the publisher’s name, it’s probably a royalty contract, which is a good plus.
* According to Amazon, the Target Age is 7 to 10.
* And the word count is 1760 words. That’s a bit hefty for today’s market that likes picture books of 800 words max, but some publishers still accept slightly longer manuscripts for nonfiction.
* Under notes, write down that it’s also 48 pages. Most picture books are 32 pages, but some nonfiction ones go up to 48 pages like this one.
Now we’re ready to fill in the plot chart.
There’s no right or wrong way to do this, but the key thing we want to look for is SIGNIFICANT CHANGE.
For example, in the first column under “Beginning,” you can answer the question “How does the story start?”
* John bio
* Tom bio
* direct contrasts (pages 3-11)
Change 1: They share two things in common (page 12)
In the second column under “1st Half,” you can write:
Chronological events of grievances against King George that bring both men to Philadelphia.
Change 2: John and Tom meet (pages 24-25)
In the third column under “2nd Half,” you can write:
Working to write the Declaration of Independence
Change 3: Ready to vote (page 39)
In the fourth column under “End,” you can answer the question “How does the story end?”
* The Declaration of Independence (pages 40-46) with an inspiration ending
And on the last line, note that there is Back Matter on pages 47-48.
One last item to note…on the line that goes from beginning to end, rising up toward the right, write:
chronological events build tension


Nancy I. Sanders's Blog
- Nancy I. Sanders's profile
- 76 followers


