
Amy Myers's Blog, page 38
November 8, 2019
Chocolate Coconut Protein Bites


You never need to buy expensive energy bars when you replace those wrappers full of processed ingredients with these healthy Chocolate Coconut Protein Bites. Filled with protein and healthy fats, these no-bake bites are Paleo and grain-free. If you need a quick and easy snack or a filling breakfast, these Chocolate Coconut Protein Bites will give you plenty of energy to power you through your day.
What Makes Chocolate Coconut Protein Bites Better for Your Body?
When it comes to making bite-sized snacks better for your body, it’s all about the ingredients. Chocolate Coconut Protein Bites are very healthy, and it has to do with all of the delicious and nutrient-dense components used in this recipe.
Despite health food claims, most energy bites and protein bars are not actually healthy. You have to be especially wary of processed ingredients and additives! These bars will sometimes contain too many ingredients to count, and they rely on sugar or artificial sweeteners to make them palatable.
I always prefer a homemade snack for a mid-day boost, and these Chocolate Coconut Protein Bites have the wholesome, clean ingredients that your body will love. You’ll also save money when you buy the ingredients to make your protein bites at home, rather than wasting your income and your health on pre-packaged sugar bombs with mysterious ingredients. Instead of looking to the aisles lined with flashy, single-serve packages, check out the simple, wholesome ingredients that will take your snack game to the next level.

Dates
Dates are a wonderful whole foods sweetener, rich in fiber, vitamins, and minerals. They provide iron, potassium, phosphorous, magnesium, and Vitamin A. Although dates usually spike carb counts in all-natural snacks, these Chocolate Coconut Protein Bites are balanced with additional nutrients to ensure you’re getting all of the macronutrients you need for sustained energy.
Superfood Juice Powder
Nutritional powders made from superfoods and greens are an easy way to get full recommended nutrient values every day. Most minimally-processed juice powders contain high concentrations of Vitamins A, C, and K along with fiber, iron, calcium, potassium, and magnesium, and my Organic Greens powder is no exception. It’s made from 14 powerful USDA certified organic superfoods, and contains adaptogenic herbs like maca and ashwagandha, as well as turmeric root and ginger root to support your body’s inflammatory response.
Coconut Butter
This has got to be one of my favorite ingredients. I could eat coconut butter with a spoon! Not only does it give Chocolate Coconut Protein Bites a rich texture, coconut butter also lends a natural sweetness to the recipe without any additional sugar. On top of all that, it’s an amazing source of saturated fat — specifically medium chain triglycerides. MCTs are the most easily digested and accessible form of fat, providing your body with almost instant fuel.

Chocolate Coconut Protein Bites Are an Anytime Option
Protein bites are an amazing snack at any time of day, whether you need a post-workout refuel, a pre-dinner snack, or a late-night nibble. I always have a snack on hand for whenever I need a pick-me-up, and I love that Chocolate Coconut Protein bites don’t take up too much space in my bag. They’re so convenient and delicious!
The fact that these are made with my Double Chocolate Paleo Protein and coconut is an added bonus. They’re sweet, but not too sweet, and filling, but not in the “I ate too much dessert” way. It’s a healthy indulgence. Trust me. You can snack on them anytime, and I recommend bringing a few with you while you’re on-the-go or running errands. You can even turn them into a meal if you want to chop them up as a topping for smoothie bowls or coconut milk yogurt.

How to Make Chocolate Coconut Protein Bites
These no bake Chocolate Coconut Protein Bites couldn’t be easier to make. Measure all of your ingredients, combine them in a blender or food processor, and then roll your dough into equal-size balls. Allow them to chill in the refrigerator so they can firm up a bit.
Roll each ball in melted chocolate and sprinkle with flaked sea salt before returning to the fridge and allowing the chocolate to harden.
Store these in an airtight container in the refrigerator for up to a week. You can let them soften at room temperature for a little while before eating for a softer texture, or enjoy them straight from the refrigerator. They’ll stay firm for a couple of hours if you want to take them with you.
If you want, you can definitely freeze your protein bites. Layer them in an airtight container or reusable silicone bag. Do not allow them to touch, as they’ll freeze together. Transfer the bites to the refrigerator to soften before eating.

Chocolate Coconut Protein Bites

Course
Breakfast, Dessert, Snack
Protocol
Autoimmune Solution (AIP), Elimination Diet, Paleo, Thyroid Connection
Ingredients
12 pitted dates2 scoops Organic Greens Superfood Powder4 Tbsp coconut butter melted1 scoop The Myers Way® Double Chocolate Paleo Protein2 Tbsp full fat coconut milk1 Tbsp honey3 Tbsp coconut flour1/4 cup sugar-free chocolate chips (or naturally sweetened) flakey sea salt
Servings:
Units:
MetricUS Imperial
Instructions
Place all ingredients into a high-speed blender or food processor. Process until combined, occasionally scraping down sides.Roll into 1-inch balls and place in the refrigerator to chill and firm. Using a double boiler method, melt the chocolate chips. Remove protein bites from the fridge and roll 1 ball at a time in the melted chocolate to coat evenly. Remove from the chocolate and set on a wire baking rack. Sprinkle with flaked sea salt and let chocolate harden completely. Store in refrigerator.
You never need to buy expensive energy bars when you replace those wrappers full of processed ingredients with these healthy Chocolate Coconut Protein Bites. Filled with protein and healthy fats, these no-bake bites are Paleo and grain-free. If you need a quick and easy snack or a filling breakfast, these Chocolate Coconut Protein Bites will give you plenty of energy to power you through your day.
What Makes Chocolate Coconut Protein Bites Better for Your Body?
When it comes to making bite-sized snacks better for your body, it’s all about the ingredients. Chocolate Coconut Protein Bites are very healthy, and it has to do with all of the delicious and nutrient-dense components used in this recipe.
Despite health food claims, most energy bites and protein bars are not actually healthy. You have to be especially wary of processed ingredients and additives! These bars will sometimes contain too many ingredients to count, and they rely on sugar or artificial sweeteners to make them palatable.
I always prefer a homemade snack for a mid-day boost, and these Chocolate Coconut Protein Bites have the wholesome, clean ingredients that your body will love. You’ll also save money when you buy the ingredients to make your protein bites at home, rather than wasting your income and your health on pre-packaged sugar bombs with mysterious ingredients. Instead of looking to the aisles lined with flashy, single-serve packages, check out the simple, wholesome ingredients that will take your snack game to the next level.
Dates
Dates are a wonderful whole foods sweetener, rich in fiber, vitamins, and minerals. They provide iron, potassium, phosphorous, magnesium, and Vitamin A. Although dates usually spike carb counts in all-natural snacks, these Chocolate Coconut Protein Bites are balanced with additional nutrients to ensure you’re getting all of the macronutrients you need for sustained energy.
Superfood Juice Powder
Nutritional powders made from superfoods and greens are an easy way to get full recommended nutrient values every day. Most minimally-processed juice powders contain high concentrations of Vitamins A, C, and K along with fiber, iron, calcium, potassium, and magnesium, and my Organic Greens powder is no exception. It’s made from 14 powerful USDA certified organic superfoods, and contains adaptogenic herbs like maca and ashwagandha, as well as turmeric root and ginger root to support your body’s inflammatory response.
Coconut Butter
This has got to be one of my favorite ingredients. I could eat coconut butter with a spoon! Not only does it give Chocolate Coconut Protein Bites a rich texture, coconut butter also lends a natural sweetness to the recipe without any additional sugar. On top of all that, it’s an amazing source of saturated fat — specifically medium chain triglycerides. MCTs are the most easily digested and accessible form of fat, providing your body with almost instant fuel.
Chocolate Coconut Protein Bites Are an Anytime Option
Protein bites are an amazing snack at any time of day, whether you need a post-workout refuel, a pre-dinner snack, or a late-night nibble. I always have a snack on hand for whenever I need a pick-me-up, and I love that Chocolate Coconut Protein bites don’t take up too much space in my bag. They’re so convenient and delicious!
The fact that these are made with my Double Chocolate Paleo Protein and coconut is an added bonus. They’re sweet, but not too sweet, and filling, but not in the “I ate too much dessert” way. It’s a healthy indulgence. Trust me. You can snack on them anytime, and I recommend bringing a few with you while you’re on-the-go or running errands. You can even turn them into a meal if you want to chop them up as a topping for smoothie bowls or coconut milk yogurt.
How to Make Chocolate Coconut Protein Bites
These no bake Chocolate Coconut Protein Bites couldn’t be easier to make. Measure all of your ingredients, combine them in a blender or food processor, and then roll your dough into equal-size balls. Allow them to chill in the refrigerator so they can firm up a bit.
Roll each ball in melted chocolate and sprinkle with flaked sea salt before returning to the fridge and allowing the chocolate to harden.
Store these in an airtight container in the refrigerator for up to a week. You can let them soften at room temperature for a little while before eating for a softer texture, or enjoy them straight from the refrigerator. They’ll stay firm for a couple of hours if you want to take them with you.
If you want, you can definitely freeze your protein bites. Layer them in an airtight container or reusable silicone bag. Do not allow them to touch, as they’ll freeze together. Transfer the bites to the refrigerator to soften before eating.
"image": "https://www.amymyersmd.com/wp-content...",
"recipeIngredient": [
"12 pitted dates", "2 scoops Organic Greens Superfood Powder", "4 Tbsp coconut butter", "1 scoop The Myers Way® Double Chocolate Paleo Protein", "2 Tbsp full fat coconut milk", "1 Tbsp honey", "3 Tbsp coconut flour", "1/4 cup sugar-free chocolate chips", " flakey sea salt" ],
"name": "Chocolate Coconut Protein Bites",
"prepTime": " ",
"recipeInstructions": "
Place all ingredients into a high-speed blender or food processor. Process until combined, occasionally scraping down sides.Roll into 1-inch balls and place in the refrigerator to chill and firm. Using a double boiler method, melt the chocolate chips. Remove protein bites from the fridge and roll 1 ball at a time in the melted chocolate to coat evenly. Remove from the chocolate and set on a wire baking rack. Sprinkle with flaked sea salt and let chocolate harden completely. Store in refrigerator.
",
"recipeYield": " "
}
The post Chocolate Coconut Protein Bites appeared first on Amy Myers MD.


November 4, 2019
Testing for Diabetes: How and Why
In my first article on diabetes, I discussed the different types of diabetes (including a few that may be new to you), the symptoms accompanying each type, and the negative effects on your health. This information is so important for all of us! Diabetes could easily be called an epidemic; it is rampant around the globe. The World Health Organization recently reported that the number of people with diabetes has risen from 108 million in 1980 to 422 million in 2014.1 To sound the alarm even louder, the Center for Disease Control reports that one in four people who have diabetes don’t even know it.2
Now that I have your attention, let me outline a number of tests you can take to measure your blood sugar to find out where you may be on the diabetes spectrum. This will arm you with the knowledge necessary to move forward in your health journey.
What is Diabetes?
Just to recap (if you missed it in my first article), diabetes is a chronic disease that occurs either when the pancreas does not produce enough insulin or when the body cannot effectively use the insulin it produces, resulting in high blood sugar.3 The problem is compounded because high blood sugar causes inflammation and can lead to a host of health concerns for those who have any of the forms of diabetes. Blindness, kidney failure, and cardiovascular disease are a few of the more serious health risks for those with diabetes. Let me explain how diabetes sets you on the path for heart complications.
Can Elevated Blood Sugar Cause Heart Problems?
Well, diabetes contributes to a process called “glycation.” Glycation is the result of insulin not properly metabolizing sugars, which are high if you are diabetic. This excess sugar, which should be metabolized and used for energy,4 remains in your bloodstream and attaches to proteins and lipids (fats). Glycation then forms harmful advanced glycation end products (literally AGE!) These AGE molecules do just that: age your body.
These damaging little molecules are destructive to the collagen in your body, including the arteries and blood vessels in your heart. They become brittle as a result and plaque forms in your arteries and blood vessels. This vascular damage can lead to heart attacks and strokes.5 Advanced glycation end products are considered the major cause of most diabetic complications due to the increased sugar levels in the blood. AGEs have been linked to Alzheimer’s (type 3 diabetes), neuropathy (nerve damage causing numbness), retinal (eye) disease, and kidney failure.6
The good news is that diabetes, for the most part, can be controlled and even reversed through diet and lifestyle. The first step is assessing your risk factors, so I recommend everyone take a blood test. If you have type 1 diabetes, it is a good idea to test for Hashimoto’s and Celiac disease. Likewise, if you have type 2 diabetes and are over age 60, it is a good idea to have your healthcare professional evaluate you for if you have early signs of dementia, which can progress into Alzheimer’s.
I’ll walk you through some tests you can take, and explain what levels show.
What Are the Diabetes Tests and Levels?
Most of the tests for diabetes measure blood glucose or insulin levels, but do so in a variety of different ways. The top range listed is “ideal – normal” rather than just “normal,” because optimal health is the goal — not just “normal” health. The most common tests include:
Glycated Hemoglobin or A1C Test:
This is the most common blood sugar test. It measures how many of your red blood cells are glycated, or coated with sugar. It provides your average blood glucose for 2 to 3 months without fasting or using a sweet substance.
Ideal – Normal: 4.8 -5.4 mg/dl or less7Prediabetes: 5.7–6.4 mg/dlDiabetes: 6.5 mg/dl or higher8
Random Blood Sugar Test:
With this test, a blood sample will be taken at a random time. Regardless of when you last ate, a random blood sugar level test is taken.
Ideal – Normal: below 125 mg/dL (6.9 mmol/L)Prediabetes: 126 mg/dl or higherDiabetes: 200 milligrams per deciliter (mg/dL) — 11.1 millimoles per liter (mmol/L)mg/dl or higher
Fasting Insulin Test:
For this test, you can’t eat or drink anything for 8 hours before the test is administered.
Ideal – Normal: below 8uIU/ml (ideally, below 3) Mild Insulin Resistance: 5 mg/dL (5.3 mmol/L) mg/dlModerate Insulin Resistance: 10 uIU/mL (>60 pmol/L) mg/dl or higherSevere Insulin Resistance: greater than 12 uIU/mL (>72 pmol/L)
Insulin Tolerance Test:
In an insulin tolerance test, insulin is injected into a patient’s vein, after which blood glucose is measured at regular intervals.
Ideal – Normal:
Fasting glucose is between 75–95 mg/dL (4.2–5.3 mmol/L).Fasting insulin is between 3–8 uIU/mL (18–48 pmol/L).
Mild Insulin Resistance:
Fasting glucose is greater than 95 mg/dL (5.3 mmol/L).Fasting insulin is greater than 8 uIU/mL (>48 pmol/L).
Moderate Insulin Resistance:
Fasting glucose is greater than 100 mg/dL (>5.6 mmol/L).Fasting insulin is greater than 10 uIU/mL (>60 pmol/L).
Severe Insulin Resistance:
Fasting glucose is greater than 110 mg/dL (>6.1 mmol/L). Greater than 125 mg/dL (>7.0 mmol/L) is diabetes.Fasting insulin is greater than 12 uIU/mL (>72 pmol/L).9
Fasting Blood Sugar Test:
In this test, a blood sample will be taken after an overnight fast.
Ideal – Normal: less than 95mg/dl or less per deciliterPrediabetes: 100 to 125 mg/dL (5.6 to 6.9 mmol/L)Diabetes: 126 mg/dL (7 mmol/L) mg/dl or higher on two separate tests
Oral Glucose Tolerance Test:
For this test, you will fast overnight, and the fasting blood sugar level is measured. Then you drink a sugary liquid, and blood sugar levels are tested periodically for the next two hours.
Normal: 140 mg/dL (7.8 mmol/L) lessPrediabetes: 140 and 199 mg/dL (7.8 mmol/L and 11.0 mmol/L)Diabetes: more than 200 mg/dL (11.1 mmol/L) after two hours
Fasting Plasma Glucose (FBC):
This test is usually done in the morning to check your fasting blood glucose levels. Fasting means not having anything to eat or drink (except water) for at least 8 hours before the test.
Normal: Prediabetes: 100–125 mg/dlDiabetes:
Oral Glucose Tolerance Test (OGTT):
The OGTT is a test that checks your blood glucose levels before and 2 hours after you drink a sweet drink designed for the test.
Normal: Prediabetes: 140–190 mg/dlDiabetes: 200 mg/dl or higher
A modification of this test is commonly used to check for gestational diabetes between weeks 24 and 28 weeks of pregnancy. After eating normally in the days prior to the test, you will fast for 8 hours, then drink a glucose solution. After one hour, your blood will be tested.
Normal: Diabetes: >190 mg/dL
If your range falls between 140 mg/dl and >190 mg/d after the one-hour test, your healthcare provider will likely perform a three-hour test. For the three-hour test your blood will be checked several times after fasting for eight hours and then drinking the solution to see how your body manages glucose over time.
Normal fasting: One hour after drinking the glucose solution, normal: Two hours after drinking the glucose solution, normal: Three hours after drinking the glucose solution, normal:
If one of the results is higher than normal, your healthcare professional may schedule another test in four weeks. If a second test has higher-than-normal results, you will be diagnosed with gestational diabetes.10
Type 1 Diabetes Test:
For type 1 diabetes, urine will be tested to look for the presence of ketones, a byproduct produced when muscle and fat tissue are used for energy because the body doesn’t have enough insulin to use the available glucose.
A healthcare professional may also test for destructive immune system cells called autoantibodies, which are a marker for autoimmunity. Four particular autoantibodies are markers of autoimmunity in type 1 diabetes:
Islet Cell Antibodies (ICA) – Present in 69%-90% and 54%-75% of type 1 patients.Glutamic Acid Decarboxylase Antibodies (GAD-65) – Present in 80% of type1 patients.Insulin Autoantibodies (IAA) – Present in about 70% of children at time of type 1 diagnosis.Tyrosine Phosphatase Antibodies(IA-2A)11
Alzheimer’s or Type 3 Diabetes Test:
While there is not one particular all-inclusive test for dementia, Alzheimer’s and other types of dementia are carefully diagnosed by a healthcare professional based on many factors including:
Medical history A physical examLab tests Characteristic changes in thinking (MMSE Exam, see below) Day-to-day function and behavior12
To screen if you have early stages of dementia or late stage dementia (Alzheimer’s), your doctor can administer a few different exams to gauge mental acuity. One such test is called the Mini Mental State Examination or MMSE. The MMSE measures concentration, memory, and language. The results determine the extent of dementia that is present and the speed of its progression.
Normal: Score of 27 or higherModerate Dementia: Score between 10 – 20Severe Dementia: Score less than 10
Note: A lower score on the MMSE does not always mean the patient has dementia, as other conditions may be present, which a doctor can diagnose upon further testing.13
What are the Autoimmune Tests and Levels?
All of the tests I have outlined are for diabetes, and will equip you with the knowledge of where you are on the diabetic spectrum. However, I also recommend anyone with diabetes have other tests conducted for autoimmune conditions which commonly accompany diabetes. These tests will give you a picture of where you fall on the autoimmune spectrum, so you can address all your health conditions, and take back your health completely!
Celiac Disease Test:
Celiac disease commonly accompanies type 1 diabetes, so it is a good idea to have a celiac test administered by your healthcare professional if you have type 1 diabetes, because often people with this condition don’t even realize they have it. There are two blood tests used to diagnose it:
Serology testing: This test detects the presence of antibodies in your blood. Elevated levels of certain antibody proteins indicate an immune reaction to gluten.Genetic testing: This test measures human leukocyte antigens (HLA-DQ2 and HLA-DQ8), which can be used to rule out celiac disease.
If you are going to have your blood tested for celiac, do not eliminate gluten from your diet, as it might make the results of blood tests appear normal. Gluten must be present in your blood to test if antibodies to it are present. If the results of the tests indicate celiac disease, your doctor will probably order an endoscopy as well. This is the use of a tiny camera to measure damage to the villi in the small intestine.14
Hashimoto’s Thyroiditis Test:
It is also a good idea to have a test conducted for Hashimoto’s thyroiditis, or hypothyroidism, which can be diagnosed when a doctor determines the presence of particular symptoms including:
A goiter, an enlarged thyroid gland, upon physical exam.Laboratory tests showing hypothyroidism- elevated thyroid stimulating hormone (TSH). A normal range for TSH is 0.4 mU/L. If TSH is higher than 4.0 mU/L on repeated tests, it indicates hypothyroidism.15Low thyroid hormone (Free thyroxine or Free T4) levels.TPO antibody is elevated.
C-reactive Protein (CRP) test for inflammation:
A common risk factor for cardiovascular disease is diabetes, so I recommend a CRP test if you have any form of diabetes. The American Heart Association (AHA) recommends the following guidelines for assessment of cardiovascular disease risk:
Normal or Low Risk: CRP levels of 1 mg per liter or lower Moderate Risk: CRP levels of 1-3 mg per liter High Risk: CRP levels greater than 3 mg per literHeart Attack: CRP levels greater than 10 mg per liter16
Antinuclear Antibody (ANA):
This test is used to detect certain autoimmune diseases including Sjogren’s syndrome and lupus, among others. Antinuclear antibodies (ANA) are produced by your immune system when it doesn’t distinguish between your own cells and invaders. When this happens, you produce something called autoantibodies, which can be detected in your blood. They’re termed “antinuclear” because they target substances within the nucleus of a cell. ANA cause inflammation, fatigue, and pain, particularly in joints and muscles.
There are two types of ANA test: the indirect fluorescent antibody, in which blood cells are mixed with a reagent and examined under a slide, and the immunoassay, an automated test that looks for certain proteins produced in an immune response and compares them against a standard determined by the particular lab.
Indirect fluorescent antibody (IFA) — the results are reported as a titer, or ratio. The lower the dilution ratio at which ANA is detected, the greater the amount of autoantibody present. Low levels of ANA are in the range of 1:40 to 1:60. A titer in the range of 1:160 will likely mean your healthcare provider will order additional tests for autoantibodies that are specific to a certain illness.17Immunoassay — the results are usually reported as a number with an arbitrary unit of measure (abbreviated as a “U” on the report, for example). A positive result from this method will be a number of units that is above that particular lab’s reference number for the lowest value that is considered positive.18
Homocysteine:
Increased levels of homocysteine, an amino acid in your blood that you make from methionine, another amino acid found in meat and fish, is often associated with heart disease. However, it has also been linked to autoimmune disease, particularly rheumatoid arthritis, and IBD.19 Homocysteine levels in the blood are measured as micromoles/liter (µmol/L); a micromole is a scientific measurement used to quantify extremely small quantities.
Optimal: Between 10 to 12High: >15 Low: 20
Whatever your diabetes and autoimmune test results show, there is a way you can take back your health and reverse diabetes and autoimmunity. If you need information on the types of diabetes please see my first article in this 3-part series. In my next article on diabetes, I explain 6 ways you can naturally balance your blood sugars, whatever level they are, and return them to optimal levels.
The post Testing for Diabetes: How and Why appeared first on Amy Myers MD.
November 3, 2019
7 Warning Signs and Symptoms of Diabetes


We’ve all heard that diabetes is a major issue in the US, yet do you know what it really is? Very simply put, it’s a group of diseases that now includes prediabetes, gestational, type 1, type 2, and type 3 that result in chronically elevated blood sugar levels. The type of diabetes, the elevation of the blood sugar, and the length of time the levels have gone unchecked all impact where you are on the spectrum of this disease, from prediabetes at the low end to type 3 at the far end.
Currently, there are 30.3 million people in the US with diabetes.1 Add in the number of Americans the Centers for Disease Control believes are prediabetic, and the number jumps to more than 100 million people affected in the US alone. 100 million! This is serious. However, despite the daunting numbers, there is good news. There are steps you and your loved ones can take right now to halt and even reverse diabetes naturally. You can take the first step with this free training.
Let’s take a closer look at what diabetes is, the types, and the warning signs and symptoms of this widespread condition, so you can analyze your risk and take action now.
What is Diabetes?
Each type is a chronic condition that develops over time and has everything to do with how your body manufactures or processes insulin. To help you better understand diabetes, let me explain the insulin connection. Many people don’t realize that insulin is a hormone made by the pancreas, a small organ behind your stomach. Insulin is the key that helps the glucose in your blood enter cells in your muscles, fat, and liver, where it’s used for energy to power your body.
As soon as you eat, your blood sugar levels, also called blood glucose levels, begin to rise. This stimulates your pancreas to produce insulin so that you can use the glucose. When everything is functioning optimally, insulin and another hormone called glucagon keep blood glucose levels balanced. They are neither too high (hyperglycemia) nor too low (hypoglycemia).
All forms of diabetes are characterized by higher-than-normal blood sugar levels. This can be because your pancreas is damaged and simply can’t make enough insulin to balance the sugar in your blood. It could also be because the insulin receptors in your body are not working properly. This is called “insulin resistance.” Regardless of why it happens, persistent high blood sugar is detrimental to your health.
What is Insulin Resistance?
Insulin resistance is when cells in your muscles, fat, and liver don’t respond well to insulin. They can’t easily take glucose from your blood. Excess weight gain, too much belly fat, a lack of exercise, smoking, and too little sleep can all cause your receptors to begin to fail.2 As a result, your pancreas makes more and more insulin to help glucose enter your cells. Over time, these overworked pancreas cells get worn out and just can’t keep up with the demand.
What Happens When Diabetes is Not Controlled?
Diabetes causes 1.6 million deaths annually, according to the World Health Organization. The global rate of diabetes has almost doubled since 1980.3 If uncontrolled, diabetes damages blood vessels all over the body, and causes complications including lack of circulation in legs and feet. It doubles the risk of heart attack and stroke, and impacts the eyes, kidneys, and nerves. As you can see, it impacts virtually your entire body! It is worth your effort to assess your risk factors, adjust your diet and lifestyle, and avoid diabetes altogether. Let’s take a look at the types of diabetes in more detail and where the symptoms place you on the diabetes spectrum.
What are the Types of Diabetes?
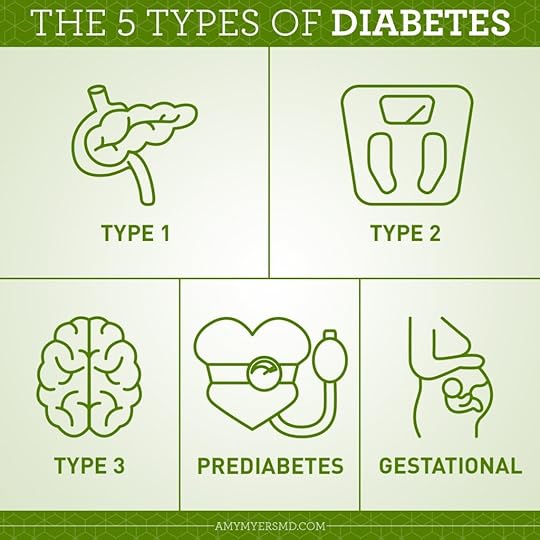
Type 1:
This type, formerly called juvenile or insulin-resistant diabetes, is a condition in which the pancreas produces little to no insulin. It affects 1.25 million people in the US alone. This chronic condition, in the middle of the diabetes spectrum, is the result of the immune system attacking the insulin-producing cells in the pancreas, and it is usually diagnosed in childhood or early teen years.4
Type 1 diabetes is not at all associated with being overweight like type 2 diabetes often is. Rather this type of diabetes has a hereditary component, and can be caused by autoimmunity. Like all autoimmune diseases, diet and environment have a huge impact on the condition. Leaky gut is also a path to autoimmunity. It’s also worth noting that the damage to the pancreas can even be the result of a type of virus called enteroviruses, such as congenital rubella syndrome.5 Recent research suggests that your body may be able to regain its ability to produce insulin.6
Type 2:
If you have type 2 diabetes, your body resists insulin or it doesn’t make enough insulin to maintain normal glucose levels. There are 24 million cases of people with type 2 diabetes in the US.
Historically, type 2 diabetes has not been considered an autoimmune condition, yet new research points to autoimmunity impacting this condition. It tends to develop after age thirty, so it is often called “adult-onset” diabetes. However, more and more young people are being diagnosed due to the increase in childhood obesity.
Type 2 diabetes is associated with being overweight, having large amounts of belly fat, high blood pressure, and high cholesterol. New research indicates that the insulin resistance in type 2 diabetes is the result of B cells (the cells that work by producing antibodies to fight antigens or “invaders”) and other immune cells attacking your body’s own tissue.7 This is also considered in the middle of the diabetes spectrum, with the ability to progress if symptoms are not controlled.
Type 3: Alzheimer’s
It has long been known that being overweight and having type 2 diabetes can increase the risk of developing Alzheimer’s. In fact, if you have type 2 diabetes, you have quadrupled your risk for Alzheimer’s. Globally, this disease that negatively affects the neurons in the brain impacts 40 million people. Furthermore, two out of three cases of Alzheimer’s, a type of dementia, are women.
Alzheimer’s is a neurodegenerative disease that affects memory and thinking skills. It primarily occurs in those over 65. Early onset is very rare, yet can occur between the mid 30s and early 60s. It is the result of nerve cells getting tangled, called neurofibrillary tangles. Another factor is protein deposits called beta-amyloid plaques which build up in the brain. The disease originates in the hippocampus, the part of the brain that controls memory, yet as neurons die, and the disease progresses, the brain tissue significantly shrinks. In advanced stages, brain function continues to decline dramatically.8 This is the far end of the diabetes spectrum.
Recent research shows that Alzheimer’s occurs when neurons in the brain become unable to respond to insulin, which is essential for basic tasks, including memory and learning. This is due to a process called glycation, which is caused by elevated blood sugar that is not metabolized by insulin. I will explain this process further in my next article on diabetes, but suffice it to say that high blood sugar “breaks down” all of your body, including your brain.9
Prediabetes
Prediabetes is high blood sugar that is not high enough to be considered type 2 diabetes.
If your blood sugar levels are higher than normal, yet have not crossed the threshold to warrant a diabetes diagnosis, you are considered prediabetic. 84 million American adults — more than one out of three — have prediabetes. Of those with prediabetes, 90% don’t even know they have it.
And although you may not know it, the long-term damage to your kidneys, blood vessels, and heart may already be starting. Prediabetes, considered the beginning of the diabetes spectrum, is a warning sign that you need to act now to preserve your health. Without appropriate diet and lifestyle changes, people with prediabetes tend to progress to type 2 diabetes within five years.10,11
Gestational
As its name suggests, this form of diabetes occurs only during gestation, or pregnancy. Women with gestational diabetes not only urinate frequently (that’s pretty typical during pregnancy!), they may also pass greater quantities of urine at those times.12
It is usually diagnosed between weeks 24 and 28 by an OB/GYN. Roughly 10% of women have gestational diabetes. In this condition, hormones from the placenta block insulin receptors, preventing a pregnant woman from balancing the high blood sugars common in pregnancy. It is usually controlled with diet, but in severe cases, insulin injections are necessary.
This condition is dangerous for the baby. Pregnant women with unmanaged gestational diabetes, or any of the other forms of diabetes, may have a baby that’s too large. This makes delivery more difficult and a C-section more likely. They are also at risk for preeclampsia — a dangerous condition marked by high blood pressure — and stillbirth. Gestational diabetes generally corrects itself naturally after your baby is born. However, women who have had this condition are at greater risk, 5% – 10% to be exact, of developing type 2 diabetes later in life,13 so it is also considered to be at the low end of the spectrum.
Warning Signs and Symptoms of Types 1, 2, and 3 Diabetes
Let me be very clear: prediabetes and gestational are warning signs! These conditions place you on the low end of the spectrum and if you currently have either of them, or have had them in the past, you need to take action now. They are your body’s alarm system which, if ignored, could push you farther down the diabetes spectrum. Here are some of the most common signs and symptoms of diabetes:
Hunger and fatigueThirst and increased urination frequencyDry mouth and itchy skinBlurred visionYeast infectionsSlow-healing cutsPain/numbness in feet and in legs
If you have type 2 diabetes, you may also experience tingling, pain, or numbness in your hands and feet. Those with type 1 diabetes can experience weight loss even when they are eating more than normal.14 Symptoms of type 1 diabetes appear quickly and are often the reason for checking blood sugar levels. Type 2 diabetes comes on gradually, so make sure you get screened for diabetes if the following apply to you:
BMI higher than 25 with additional risk factorsOver 45Had gestational diabetesHave one or more of the symptoms listed above
People with Type 2 diabetes are 50–65% more likely to develop type 3 diabetes, than people with normal blood sugars. People at risk for type 3, or in the early stages of it will likely have one of these warning signs:
Memory loss that disrupts daily lifeDifficulty planning and/or problem solvingConfusion about dates, names, and/or placesVisual problems, often first apparent while drivingForgetting common words or losing the train of thought in the middle of a sentence Misplacing objectsWithdrawal from social activitiesMood or personality changes15
While any of these changes can come with normal aging, or with other health problems including drug or alcohol abuse, if these symptoms persist, a blood screening is in order.
My next article in this three-part series will deal with how to check your own blood testing and how to get to the root cause to reverse the symptoms of diabetes naturally. In the meantime, check out this free training that can get you started on your journey to optimal health.
The post 7 Warning Signs and Symptoms of Diabetes appeared first on Amy Myers MD.
November 2, 2019
Holiday Memories of My Mom


The holiday season is fast approaching and I’m starting to plan this year’s celebrations with my family. I love this time of year! It can be so hectic, yet it’s filled with excitement. Like many of you, I look forward to spending special times with family and friends. Although I do like to incorporate new things — customs from my husband’s side of the family, fresh table decorations, a new ornament or two — our family celebrations are rooted in my days growing up with my mom, Betty.
Of course, food is such a key part of any celebration, and it was a big part of my life growing up. Both of my parents are from New Orleans, a city known for its food culture. My parents brought this with them when they moved to South Carolina, where I was born. They understood the value of nourishing themselves and their family with whole foods. “Food is medicine” was their motto!
Growing Up with Healthy Food
Even in those early days, my mom knew the impact of food on the microbiome (although we didn’t call it that back then!) and she would talk to me about this as we made our weekly batch of yogurt on Sundays. Although I avoid dairy now (and recommend that you do, too!) I still remember that tart flavor so well. We always made plain yogurt without additional flavors or sweeteners. Sometimes my mom let me put raw honey on it for a special treat. For a really special treat I would top it with my mom’s homemade granola.
I loved baking whole wheat bread with my mom each week, too. Setting the yeast aside to let it bubble up in a warm place. Then putting the wheat flour together, needing the dough, putting it in the pan, and watching it in the oven. Finally pulling it out piping hot and spreading butter all over it. And, of course, we made sometimes made treats like gingerbread or cookies (always molasses or oatmeal, never chocolate chip). We didn’t bake them often but they were delicious. I loved her molasses cookies.
Life in New Orleans
After my parents divorced when I was about 10, my mother and I moved to New Orleans. Yet cooking was still a part of our culture. We lived in an apartment above my great-grandmother. Because my mother worked two jobs to send me to private school while studying for her architecture degree, I spent a lot of time downstairs with my great-grandmother. She cooked wonderful meals and lived to be nearly 103!
On Sundays, we would all go to my grandmother’s house after church for the midday meal we called dinner. My aunts, uncles, cousins, great-grandmother, and great-aunt would all gather there for a big meal. My grandfather made BBQ chicken on the grill; my grandmother made fried chicken, or sometimes a roast or baked chicken with vegetables and rice. And since it was New Orleans, of course, we had French bread and butter.
Salad, Anyone?
Whether it was our Sunday dinner or a special occasion, my mom made the salad. It was always a delicious combination of flavors. She became famous for her salads! When I was very young, it was the classic 1970s “California” with lettuce, shredded carrots, tomato, avocado sprouts, and sunflower seeds. Over time it evolved into a Mediterranean style with onions, olives, and feta cheese. Whatever was in it, it was always amazing.
Her Italian-style dressing was so delicious! I’ve made this a part of my family’s daily life. We usually have a salad every night at our house, and I always have a bottle of Betty’s Italian Dressing. I make it up in batches and keep it in a mason jar. And like my mom, if I go somewhere, I always bring the salad. If I have people over — especially during the holidays — I make an extra big, delicious salad. I’ve even become a bit famous in Xavier’s family for my salads. I’m proud to be carrying on this tradition from my mom.
I’m glad that I can share the recipes for Betty’s Italian Dressing and Mom’s Molasses Cookies with all of you. I’ve made sure they are approved for Autoimmune Solution and Thyroid Connection meal plans, and I even included the dressing in The Autoimmune Solution Cookbook. Both recipes are in my AIP & Paleo Holiday Ebook that’s available now. You can purchase it here or get it as a free gift when you purchase $100 or more in my store this weekend. Get it now so you’ll have plenty of time to incorporate these healthy recipes into your own holiday plans. Let’s make some new, healthy traditions!
The post Holiday Memories of My Mom appeared first on Amy Myers MD.
November 1, 2019
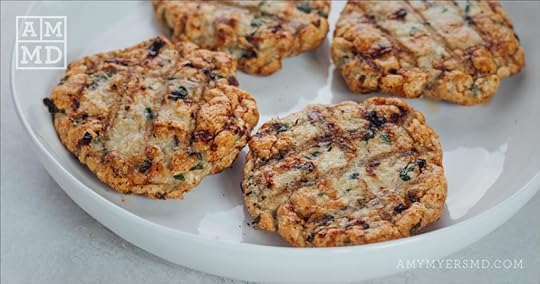
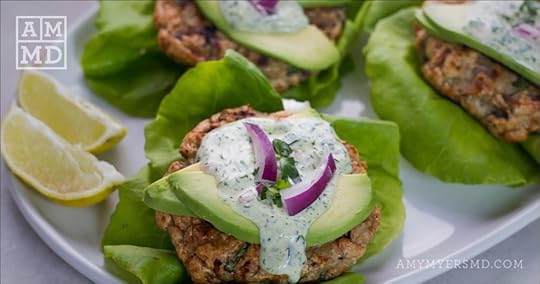
Ground Chicken Burgers with Cilantro Aioli


My favorite recipe for healthy chicken burgers just got an upgrade with a delicious cilantro aioli The Myers Way®. These juicy ground chicken burgers are the perfect weeknight dinner. All of the ingredients are Paleo, gluten-free, Whole30, and The Myers Way® so you can feel good about what you’re eating. Full of protein and healthy fats, Ground Chicken Burgers with Cilantro Aioli will keep you happy, healthy, and satisfied.
Are Ground Chicken Burgers Healthy?
Of course! Ground chicken burgers are not only a healthy dinner for you and your family, these burgers are also a completely gluten-free recipe that is Paleo and Whole30. You can serve these chicken burgers on top of your favorite lettuce leaves for a low-carb option, or with sweet potato fries for a meal that’s full of healthy carbs (you can even make a “bun” with round slices of roasted sweet potato). The burgers are also full of satiating fat and protein, so they’ll stand on their own without any additional carbohydrates. Here are some of the best ingredients in my favorite Ground Chicken Burgers with Cilantro Aioli.
Ground Chicken
The star ingredient of these chicken burgers is, of course, the ground chicken. Using free-range, pasture-raised ground chicken gives this meal some substantial protein, vitamin E, and B vitamins, including selenium and phosphorus.
Cilantro
Cilantro is one of the best herbs to include in your diet. It’s a fantastic way to support your detoxification pathways and has been shown to help balance blood sugar levels.

Red Onion
Red onions not only provide an amazing flavor, they’re also full of nutrients. Red onions contain an antioxidant compound called quercetin that helps fight damage from free radicals. They’re also high in allicin, chromium, Vitamin C, and Vitamin B6.
Can you Bake Ground Chicken Burgers?
You certainly can. The texture may be a little different and they will likely be a little less juicy than if you cook the burger on a grill, but they will still be delicious. If you do bake them, be sure not to overcook the burgers. I recommend baking them in a 400 degree oven for about 20-25 minutes.

How to Make Ground Chicken Burgers
These burgers are simple and quick to make. You’ll combine your ground chicken with cilantro, onion, garlic, and spices before forming it into four patties of equal size. Each patty will be four ounces, which equates to a single serving of protein.
Then it’s time to make your cilantro aioli. Use a food processor or blender to combine the coconut cream, cilantro, garlic, lime juice, and spices. Let this chill in the refrigerator while you grill the chicken patties.

These patties are best cooked for 4-5 minutes each side over medium heat on a grill or cast-iron skillet. Both methods allow the patties to get deliciously browned on the outside, while remaining juicy on the inside. Alternately, you can bake the burgers in a 400 degree oven for 20-25 minutes.
You can make it a recipe for a keto meal with some sliced avocado, Quick Pickled Onions, and lettuce wraps. Or increase the carb count with some sweet potato fries and a large salad. Then drizzle your burgers with cilantro aioli for a healthy, wholesome, and flavorful dinner!
Ground Chicken Burgers with Cilantro Aioli

Course
Main Dish
Protocol
Autoimmune Solution (AIP), Candida Breakthrough® and SIBO, Elimination Diet, Paleo, Thyroid Connection
Servings
4 burgers
Ingredients
Ground Chicken Burgers1 lb free-range ground chicken1/4 cup cilantro chopped1 clove garlic minced1/4 cup red onion finely chopped1/2 tsp cumin (omit for AIP)1/4 tsp fine sea salt1/4 tsp ground black pepper1-3 Tbsp coconut flourCilantro Aioli1/2 cup coconut cream1/4 cup cilantro chopped juice of 1/2 lime1/8 tsp sea salt1/8 tsp ground black pepper
Servings:
burgers
Units:
MetricUS Imperial
Instructions
In a bowl, combine chicken with cilantro, garlic, onion, spices, and coconut flour. If your burgers are too wet, add coconut flour to the mixture 1 Tbsp at a time until desired consistency is reached. I used 2 tbsp.Wash and oil your hands to prevent the chicken from sticking, and form into 4 individual patties.In a small food processor or blender, add coconut cream, cilantro, lime juice, garlic, salt, and pepper. Blend until well combined. Place in refrigerator until ready to serve.
Preheat grill to medium heat or a large cast iron skillet. Grease grill or cast iron skillet with avocado oil. Cook burgers for 4-5 minutes on each side or until cooked through.Serve wrapped in lettuce or on a bed of salad. Top with Cilantro Aioli and any additional burger toppings such as pickles, sliced onions, and avocado.
Notes
Optional toppings: lettuce, avocado, Quick Pickled Onions
My favorite recipe for healthy chicken burgers just got an upgrade with a delicious cilantro aioli The Myers Way®. These juicy ground chicken burgers are the perfect weeknight dinner. All of the ingredients are Paleo, gluten-free, Whole30, and The Myers Way® so you can feel good about what you’re eating. Full of protein and healthy fats, Ground Chicken Burgers with Cilantro Aioli will keep you happy, healthy, and satisfied.
Are Ground Chicken Burgers Healthy?
Of course! Ground chicken burgers are not only a healthy dinner for you and your family, these burgers are also a completely gluten-free recipe that is Paleo and Whole30. You can serve these chicken burgers on top of your favorite lettuce leaves for a low-carb option, or with sweet potato fries for a meal that’s full of healthy carbs (you can even make a “bun” with round slices of roasted sweet potato). The burgers are also full of satiating fat and protein, so they’ll stand on their own without any additional carbohydrates. Here are some of the best ingredients in my favorite Ground Chicken Burgers with Cilantro Aioli.
Ground Chicken
The star ingredient of these chicken burgers is, of course, the ground chicken. Using free-range, pasture-raised ground chicken gives this meal some substantial protein, vitamin E, and B vitamins, including selenium and phosphorus.
Cilantro
Cilantro is one of the best herbs to include in your diet. It’s a fantastic way to support your detoxification pathways and has been shown to help balance blood sugar levels.
Red Onion
Red onions not only provide an amazing flavor, they’re also full of nutrients. Red onions contain an antioxidant compound called quercetin that helps fight damage from free radicals. They’re also high in allicin, chromium, Vitamin C, and Vitamin B6.
Can you Bake Ground Chicken Burgers?
You certainly can. The texture may be a little different and they will likely be a little less juicy than if you cook the burger on a grill, but they will still be delicious. If you do bake them, be sure not to overcook the burgers. I recommend baking them in a 400 degree oven for about 20-25 minutes.
How to Make Ground Chicken Burgers
These burgers are simple and quick to make. You’ll combine your ground chicken with cilantro, onion, garlic, and spices before forming it into four patties of equal size. Each patty will be four ounces, which equates to a single serving of protein.
Then it’s time to make your cilantro aioli. Use a food processor or blender to combine the coconut cream, cilantro, garlic, lime juice, and spices. Let this chill in the refrigerator while you grill the chicken patties.
These patties are best cooked for 4-5 minutes each side over medium heat on a grill or cast-iron skillet. Both methods allow the patties to get deliciously browned on the outside, while remaining juicy on the inside. Alternately, you can bake the burgers in a 400 degree oven for 20-25 minutes.
You can make it a recipe for a keto meal with some sliced avocado, Quick Pickled Onions, and lettuce wraps. Or increase the carb count with some sweet potato fries and a large salad. Then drizzle your burgers with cilantro aioli for a healthy, wholesome, and flavorful dinner!
",
"image": "https://www.amymyersmd.com/wp-content...",
"recipeIngredient": [
"1 lb free-range ground chicken", "1/4 cup cilantro", "1 clove garlic", "1/4 cup red onion", "1/2 tsp cumin", "1/4 tsp fine sea salt", "1/4 tsp ground black pepper", "1-3 Tbsp coconut flour", "1/2 cup coconut cream", "1/4 cup cilantro", " juice of 1/2 lime", "1/8 tsp sea salt", "1/8 tsp ground black pepper" ],
"name": "Ground Chicken Burgers with Cilantro Aioli",
"prepTime": " ",
"recipeInstructions": "
In a bowl, combine chicken with cilantro, garlic, onion, spices, and coconut flour. If your burgers are too wet, add coconut flour to the mixture 1 Tbsp at a time until desired consistency is reached. I used 2 tbsp.Wash and oil your hands to prevent the chicken from sticking, and form into 4 individual patties.In a small food processor or blender, add coconut cream, cilantro, lime juice, garlic, salt, and pepper. Blend until well combined. Place in refrigerator until ready to serve.
Preheat grill to medium heat or a large cast iron skillet. Grease grill or cast iron skillet with avocado oil. Cook burgers for 4-5 minutes on each side or until cooked through.Serve wrapped in lettuce or on a bed of salad. Top with Cilantro Aioli and any additional burger toppings such as pickles, sliced onions, and avocado.
",
"recipeYield": "4 burgers"
}
The post Ground Chicken Burgers with Cilantro Aioli appeared first on Amy Myers MD.
October 25, 2019
Instant Pot Mongolian Beef


When you crave the ease of eating out but don’t want to risk filling your body with sodium, sugar, and possibly even gluten, this Instant Pot Mongolian Beef is an easy, healthy copycat of a favorite restaurant meal! My Mongolian Beef recipe uses healthy fats and wholesome ingredients to make it Paleo, AIP, and The Myers Way® approved. Using an Instant Pot also makes it a quick weeknight dish that’s perfect for even the busiest families.
Is Mongolian Beef Healthy?
Absolutely. This Instant Pot Mongolian Beef is made entirely of clean ingredients. It’s gluten-free, dairy-free, soy-free, and it can even fit into more than one dietary protocol. Don’t let all that fool you — it tastes just like the dish you would find at a restaurant (and way better than any take-out)! Let’s take a look at some of the star ingredients:
Flank Steak
Using flank steak from grass-fed cattle gives this recipe a healthy dose of protein, B vitamins, and iron. Grass-fed beef has a better Omega-3 to Omega-6 ratio than grain-fed beef, and it’s also high in zinc. You’ll be able to taste the difference between the steak you use in your Mongolian Beef and any cheap meat from the restaurant on the corner.

Green Onions
Green onions offer an amazing nutrient package in even small amounts. Don’t miss the chance to use the healthy garnish in as many recipes as possible. It gives the dish amazing flavor and offers vitamins A, K, and C along with a range of B vitamins and minerals.
Coconut Aminos
This is the soy sauce alternative for your recipe. Most soy sauce is made from genetically modified soy, a highly phytoestrogenic food that can disrupt hormonal balance. You can avoid any MSG-laden soy sauce by using coconut aminos in its place. Made from coconut tree sap, this condiment offers a slightly sweet, tangy flavor that makes for a cleaner alternative to soy sauce.
What to Serve With Mongolian Beef
The recipe stands well on its own, or it can be served with even more veggies like broccoli and cauliflower rice, or even something unexpected such as avocado. If you’re hoping to maintain your weight with a heartier recipe to power you through your next workout, you can increase the carbohydrates by pairing this alongside roasted sweet potato.

Can You Freeze Mongolian Beef?
Yes; this recipe for Instant Pot Mongolian Beef freezes well. It’s a great recipe to double for freezer leftovers. I only recommend leaving the green onions out of the dish until you can garnish it after reheating.
To freeze, first let the Mongolian Beef cool completely at room temperature. Then freeze separate portions in airtight containers or reusable silicone bags.
To reheat, allow it to thaw in the refrigerator for several hours before warming up on the stovetop. This method will yield the best texture.
How to Make Mongolian Beef
This is one of those recipes that looks difficult, yet is actually really easy. That’s mostly thanks to the Instant Pot, which can have this meal ready to serve in under 30 minutes.

I recommend measuring all of your ingredients before you start cooking, so that the many components for your Mongolian Beef ready to go. Once you have all your ingredients ready, preheat your Instant Pot on the ‘Saute More’ function. While that heats up, combine arrowroot starch and flank steak in a bowl or bag and shake to coat. Saute the strips in the Instant Pot, deglazing with a little water if it sticks.

Now, add the rest of your ingredients, stir, and cook on HIGH for 2 minutes. Let the pressure release naturally while you make your arrowroot slurry.
Whisk your remaining arrowroot starch and water until well combined, then add it to the Instant Pot and turn on the Saute function once more. Allow the sauce to thicken for 2-3 minutes, then let everything settle for 8-10 minutes to thicken further.
Serve with green onions and your favorite side!
https://www.amymyersmd.com/wp-content/uploads/2019/10/Instant-Pot-Mongolian-Beef.mp4
Instant Pot Mongolian Beef

Course
Main Dish
Protocol
Autoimmune Solution (AIP), Candida Breakthrough® and SIBO, Elimination Diet, Paleo, Thyroid Connection
Servings
4
Ingredients
3 Tbls coconut oil or avocado oil1/2 tsp ground ginger4 cloves garlic finely minced1/4 cup +2 Tbls coconut aminos1/8 cup fish sauce (can sup 1/8 cup additional coconut aminos)1 1/4 cup water divided1/4 cup coconut sugar packed1 lb flank steak thinly sliced3 Tbls arrowroot starch divided2 green onions sliced
Servings:
Units:
MetricUS Imperial
Instructions
Heat your pressure cooker: press 'Sauté' and make sure it is on the “Less” setting. This means that the food will be sautéed over low-medium heat. Wait for the Instant Pot to read HOT.While waiting for the Instant Pot to heat, add sliced beef to a large bowl, add 1 tablespoon arrowroot start and stir well to coat the beef.Add the oil to the Instant Pot. Once it’s hot, add the beef in batches and sauté for 3 minutes, stirring a few times. Do not fully cook the beef, it should be only lightly browned on the outside.Using a wooden spoon, scrape the bottom of the pot to remove anything that sticks. If you don’t do this, you’ll get a burn notice during the cooking process. Add remaining ingredients to the pot: minced garlic, minced ginger, coconut aminos, fish sauce, coconut sugar, and 1 cup of water. Stir well until all the ingredients are combined.Close lid and pressure cook on High Pressure for 2 minutes. Let the pressure release naturally for 10 minutes. Hit “Cancel” to turn off the heat. Release the remaining pressure and then open the lid. In a small bowl, whisk together arrowroot starch with 1/4 cup water. With the Instant Pot on the Sauté function, add the slurry to the pot, stir to combine, and cook for 2-3 minutes until the sauce thickens. Turn off the Instant Pot and serve over cauliflower rice. Garnish with fresh chopped green onions.
When you crave the ease of eating out but don’t want to risk filling your body with sodium, sugar, and possibly even gluten, this Instant Pot Mongolian Beef is an easy, healthy copycat of a favorite restaurant meal! My Mongolian Beef recipe uses healthy fats and wholesome ingredients to make it Paleo, AIP, and The Myers Way® approved. Using an Instant Pot also makes it a quick weeknight dish that’s perfect for even the busiest families.
Is Mongolian Beef Healthy?
Absolutely. This Instant Pot Mongolian Beef is made entirely of clean ingredients. It’s gluten-free, dairy-free, soy-free, and it can even fit into more than one dietary protocol. Don’t let all that fool you — it tastes just like the dish you would find at a restaurant (and way better than any take-out)! Let’s take a look at some of the star ingredients:
Flank Steak
Using flank steak from grass-fed cattle gives this recipe a healthy dose of protein, B vitamins, and iron. Grass-fed beef has a better Omega-3 to Omega-6 ratio than grain-fed beef, and it’s also high in zinc. You’ll be able to taste the difference between the steak you use in your Mongolian Beef and any cheap meat from the restaurant on the corner.
Green Onions
Green onions offer an amazing nutrient package in even small amounts. Don’t miss the chance to use the healthy garnish in as many recipes as possible. It gives the dish amazing flavor and offers vitamins A, K, and C along with a range of B vitamins and minerals.
Coconut Aminos
This is the soy sauce alternative for your recipe. Most soy sauce is made from genetically modified soy, a highly phytoestrogenic food that can disrupt hormonal balance. You can avoid any MSG-laden soy sauce by using coconut aminos in its place. Made from coconut tree sap, this condiment offers a slightly sweet, tangy flavor that makes for a cleaner alternative to soy sauce.
What to Serve With Mongolian Beef
The recipe stands well on its own, or it can be served with even more veggies like broccoli and cauliflower rice, or even something unexpected such as avocado. If you’re hoping to maintain your weight with a heartier recipe to power you through your next workout, you can increase the carbohydrates by pairing this alongside roasted sweet potato.
Can You Freeze Mongolian Beef?
Yes; this recipe for Instant Pot Mongolian Beef freezes well. It’s a great recipe to double for freezer leftovers. I only recommend leaving the green onions out of the dish until you can garnish it after reheating.
To freeze, first let the Mongolian Beef cool completely at room temperature. Then freeze separate portions in airtight containers or reusable silicone bags.
To reheat, allow it to thaw in the refrigerator for several hours before warming up on the stovetop. This method will yield the best texture.
How to Make Mongolian Beef
This is one of those recipes that looks difficult, yet is actually really easy. That’s mostly thanks to the Instant Pot, which can have this meal ready to serve in under 30 minutes.
I recommend measuring all of your ingredients before you start cooking, so that the many components for your Mongolian Beef ready to go. Once you have all your ingredients ready, preheat your Instant Pot on the ‘Saute More’ function. While that heats up, combine arrowroot starch and flank steak in a bowl or bag and shake to coat. Saute the strips in the Instant Pot, deglazing with a little water if it sticks.
Now, add the rest of your ingredients, stir, and cook on HIGH for 2 minutes. Let the pressure release naturally while you make your arrowroot slurry.
Whisk your remaining arrowroot starch and water until well combined, then add it to the Instant Pot and turn on the Saute function once more. Allow the sauce to thicken for 2-3 minutes, then let everything settle for 8-10 minutes to thicken further.
Serve with green onions and your favorite side!
https://www.amymyersmd.com/wp-content/uploads/2019/10/Instant-Pot-Mongolian-Beef.mp4
","image": "https://www.amymyersmd.com/wp-content...",
"recipeIngredient": [
"3 Tbls coconut oil", "1/2 tsp ground ginger", "4 cloves garlic", "1/4 cup +2 Tbls coconut aminos", "1/8 cup fish sauce", "1 1/4 cup water", "1/4 cup coconut sugar", "1 lb flank steak", "3 Tbls arrowroot starch", "2 green onions" ],
"name": "Instant Pot Mongolian Beef",
"prepTime": " ",
"recipeInstructions": "
Heat your pressure cooker: press 'Sauté' and make sure it is on the “Less” setting. This means that the food will be sautéed over low-medium heat. Wait for the Instant Pot to read HOT.While waiting for the Instant Pot to heat, add sliced beef to a large bowl, add 1 tablespoon arrowroot start and stir well to coat the beef.Add the oil to the Instant Pot. Once it’s hot, add the beef in batches and sauté for 3 minutes, stirring a few times. Do not fully cook the beef, it should be only lightly browned on the outside.Using a wooden spoon, scrape the bottom of the pot to remove anything that sticks. If you don’t do this, you’ll get a burn notice during the cooking process. Add remaining ingredients to the pot: minced garlic, minced ginger, coconut aminos, fish sauce, coconut sugar, and 1 cup of water. Stir well until all the ingredients are combined.Close lid and pressure cook on High Pressure for 2 minutes. Let the pressure release naturally for 10 minutes. Hit “Cancel” to turn off the heat. Release the remaining pressure and then open the lid. In a small bowl, whisk together arrowroot starch with 1/4 cup water. With the Instant Pot on the Sauté function, add the slurry to the pot, stir to combine, and cook for 2-3 minutes until the sauce thickens. Turn off the Instant Pot and serve over cauliflower rice. Garnish with fresh chopped green onions.
",
"recipeYield": "4 "
}
The post Instant Pot Mongolian Beef appeared first on Amy Myers MD.
October 22, 2019
Semi-Elemental Diet Chocolate Shake


Semi-Elemental Diet Chocolate Shake

Course
Smoothies, Snack
Protocol
Autoimmune Solution (AIP), Candida Breakthrough® and SIBO, Elimination Diet, Paleo
Servings
1 shake
Ingredients
1.5 scoops The Myers Way® Double Chocolate Paleo Protein2 tsp Complete Omega-3 Liquid2 tsp MCT oil1 capsule Probiotic Powder 30 Billion (capsule opened)1 scoop Immune Booster Powder1 capsule The Myers Way® Multivitamin (capsule opened)1 large banana8 oz filtered water small handful of ice cubes adjust for desired consistency
Servings:
shake
Units:
MetricUS Imperial
Instructions
Combine all ingredients in blender or Nutribullet. Blend until smooth.
",
"image": "https://www.amymyersmd.com/wp-content...",
"recipeIngredient": [
"1.5 scoops The Myers Way® Double Chocolate Paleo Protein", "2 tsp Complete Omega-3 Liquid", "2 tsp MCT oil", "1 capsule Probiotic Powder 30 Billion", "1 scoop Immune Booster Powder", "1 capsule The Myers Way® Multivitamin", "1 large banana", "8 oz filtered water", " small handful of ice cubes" ],
"name": "Semi-Elemental Diet Chocolate Shake",
"prepTime": " ",
"recipeInstructions": "
Combine all ingredients in blender or Nutribullet. Blend until smooth.
",
"recipeYield": "1 shake"
}
The post Semi-Elemental Diet Chocolate Shake appeared first on Amy Myers MD.
Semi-Elemental Diet Vanilla Shake


Semi-Elemental Vanilla Shake

Course
Smoothies, Snack
Protocol
Autoimmune Solution (AIP), Candida Breakthrough® and SIBO, Elimination Diet, Paleo, Thyroid Connection
Servings
1
Ingredients
1.5 scoop The Myers Way® Vanilla Bean Paleo Protein2 tsp Complete Omega-3 Liquid2 tsp MCT oil1 capsule Probiotic Powder 30 Billion (capsule opened)1 scoop Immune Booster Powder1 capsule The Myers Way® Multivitamin (capsule opened)1 cup sweet potato cooked then chilled8 oz filtered water small handful of ice cubes
Servings:
Units:
MetricUS Imperial
Instructions
Combine all ingredients in a blender or Nutribullet. Blend until smooth.
",
"image": "https://www.amymyersmd.com/wp-content...",
"recipeIngredient": [
"1.5 scoop The Myers Way® Vanilla Bean Paleo Protein", "2 tsp Complete Omega-3 Liquid", "2 tsp MCT oil", "1 capsule Probiotic Powder 30 Billion", "1 scoop Immune Booster Powder", "1 capsule The Myers Way® Multivitamin", "1 cup sweet potato", "8 oz filtered water", " small handful of ice cubes" ],
"name": "Semi-Elemental Vanilla Shake",
"prepTime": " ",
"recipeInstructions": "
Combine all ingredients in a blender or Nutribullet. Blend until smooth.
",
"recipeYield": "1 "
}
The post Semi-Elemental Diet Vanilla Shake appeared first on Amy Myers MD.
October 20, 2019
The Stress-Hormone Connection


Stress isn’t just a feeling, it’s a physical response that can lead to widespread hormonal imbalance in your body. Balancing all your hormones is integral to your health, and fortunately, there are natural ways to do this. Estroprotect is the supplement I take every day to support healthy hormone levels and balance. Let’s talk a bit about how stress and hormones are connected. Then we’ll cover which hormones are commonly affected, and the symptoms that hormonal imbalance can cause.
How Stress and Hormones are Connected
Hormone production naturally fluctuates during your lifetime, so you can meet the needs of each phase of your life. This includes puberty and reproduction for both genders, as well as bringing a baby to term during pregnancy and menopause in women. However, hormone fluctuations due to stress are a different matter.
Stressors can be emotional, mental, or physical; they can come from physical injury, sleep deprivation, exposure to toxins, leaky gut, or eating a diet full of inflammatory foods. It can either be acute or chronic. Acute stress doesn’t last long, and recovery is quick. Chronic stress, such as continuous pressure to perform in a challenging job or maintaining a difficult personal relationship, has a different effect on your body and brain. Chronic stress, for example, damages the nerve cells in the medial amygdala, which is implicated in increased anxiety and posttraumatic stress disorder.1 Acute stress, on the other hand, enhances immune system action.2
Hormones are integral to stress because your stress response is controlled by hormones. Here are the various different hormones that may be produced by your body when you encounter a stressor, and how your specific hormones can be affected by stress.
Adrenaline
Adrenaline is commonly called “the fight-or-flight hormone”, and is produced by your adrenal glands when they receive a message from the brain that there’s a stressful situation to deal with.3 Along with norepinephrine, it is responsible for the immediate reactions you make when you’re stressed, such as sweating, a faster heart rate, etc. It also gives you a boost in energy and focuses your attention.4
Cortisol
This steroid hormone is commonly called “the stress hormone”, and kicks in minutes rather than seconds after you encounter a stressor. This is because a part of the brain called your amygdala must first recognize the threat before it sends a message to your hypothalamus. This sets off a chain reaction that tells your adrenal glands to produce cortisol.5 Cortisol mobilizes glucose reserves for energy and facilitates the consolidation of fear-based memories so you can survive in the future and avoid danger.6
However, too much cortisol can suppress the immune system, increase blood pressure and blood sugar levels, decrease libido, and contribute to acne, obesity, and chronic diseases such as Alzheimer’s disease, heart disease, diabetes, depression and asthma.7,8 Your body is just not designed to live in fight or flight mode all the time. It needs to rest and relax to function optimally.
Testosterone
Testosterone is a steroid hormone that is secreted continuously by your testicles if you’re a man and in smaller quantities by your ovaries if you’re a woman.9,10 Psychological and physical stressors such as surgery have been shown to lower blood testosterone levels, which can cause many symptoms including fatigue, hair loss, and loss of muscle mass.11,12
Estrogen
When cortisol is released by your adrenal glands, it can stimulate a type of activity that converts pregnenolone — a hormone that acts as the starting material for the production of various different hormones — to progesterone, which can alter your progesterone/estrogen balance, causing estrogen dominance.13 This balance is important for healthy and pain-free menstrual cycles, a normal ovulatory cycle and fertility levels, as well as healthy cognitive function.14,15
Estrogen commonly gets out of balance in your body due to stress. This can have a significant impact on your day-to-day life. For example, higher than normal estrogen levels can impact your brain’s ability to deal with stress. This affects fewer men than women, who are more likely to suffer from stress-related mental health issues than men.16 Estrogen deficiency can also lead to a decline in serotonin, and thus to depression.17 This is why it is so critical that your estrogen levels are in balance.
One key example of stress-induced hormone imbalance is that high levels of stress can make your body “steal” the hormone progesterone to manufacture the stress hormone cortisol. This upsets your estrogen and progesterone balance, creating estrogen dominance, which can cause issues such as PMS, weight gain, and autoimmunity.
Oxytocin
This hormone stimulates labor contractions and milk production in women during and after giving birth to a baby. It can also reduce anxiety as well as heart rate, blood pressure, and cortisol levels.18 In men, it is less important, but it does help move sperm and help with testosterone production in the testes.19 Having too little has been associated with depression and post-traumatic stress disorder. Oxytocin is being explored as a supplement to prevent and treat stress-related psychiatric disorders.20
Vasopressin
Vasopressin plays a role in water and sodium regulation in your body. However, it is also considered a stress hormone. It keeps your cortisol and adrenaline levels higher for longer by inhibiting the chemicals that break them down in your body, as well as the levels of other steroid hormones released by your adrenal glands such as aldosterone, which plays a role in sodium balance and blood pressure in your body.21,22
DHEA
Dehydroepiandrosterone-ST (DHEA), is a steroid hormone produced in your adrenal glands. It is a very complex substance. It is the precursor to all sex hormones and primarily turns into testosterone and then ultimately into estrogen. Without the proper amount of it, your body can’t synthesize estrogen.
It is produced by your adrenal glands and is believed to be secreted in response to stress. Levels peak around the ages of 20-25, and then decline to around 20 to 30% of the peak values at 70-80 years. DHEA enhances memory and reduces the symptoms of depression.
Its levels in relation to cortisol may indicate the degree to which your body can buffer itself against the negative effects of stress, according to studies.23 Luckily, cortisol levels also begin to decline and then plateau between 30-60 years of age.24 And your sense of how much you can control situations also decreases with age, helping you cope and adapt to stressful situations more effectively as you grow older, because you simply accept circumstances instead of fighting against them.25
Progesterone
Your body needs to keep your progesterone levels elevated following conception.26 But stress can intervene. A study on the effect of stress on women’s cortisol, estrogen, and progesterone levels showed that estrogen levels stayed the same, whereas progesterone and cortisol increased.27
However, when your body has to prioritize defense over fertility, such as when you’re stressed, it will choose defense, making cortisol instead of progesterone from pregnenolone, lowering your chances of getting pregnant.28 This is called “pregnenolone steal”.
6 Signs That Stress Could be Impacting Your Hormones
As we now know, chronic stress can cause hormonal imbalance, particularly in the hormones listed above. Any or all of the factors below could point to stress being the cause of the imbalance.

High blood pressure
Cortisol can raise systolic blood pressure by a highly significant measure, as well as increase your risk of cardiovascular and cerebrovascular disease, such as stroke.29
Elevated blood sugar
The stress hormones, including adrenaline and cortisol, increase your blood sugar and then insulin. This is particularly problematic if you’re diabetic because you may not produce enough insulin to bring your blood sugar back down to normal levels.30 This is also an issue for people with or without diabetes who also have Candida overgrowth, because Candida feeds on sugar.31
Loss of libido and fertility
Stress can interfere with sex drive because elevated cortisol levels can also cause irregular periods, affecting fertility.32 Studies have shown that distressed women have lower pregnancy rates.33 This may be due to pregnenolone steal.
Anxiety/depression/mood disorders
Stressful events such as losing jobs and loved ones has been linked to the onset of depression. The HPA axis is your hormone response system for stress.34 It is made up of a part of the hypothalamus, part of the pituitary gland and the adrenal glands, and is where all the hormones involved in your stress response are released.35 In one study, dysfunction of the HPA axis also manifested in around 70% of patients with depression.36
Weight gain
During acute stress, your appetite is often suppressed so you can concentrate on escaping danger rather than eating your next meal. However, chronic stress promotes the intake of foods that contain a lot of calories, particularly unhealthy ones, because cortisol stimulates your appetite.37 This may be why chronic stress is linked to weight gain and obesity.
Memory loss
Stress affects a part of the brain called the hippocampus, which plays a key role in processing memories.38 Neuroimaging studies have reported that stress-related cognitive changes are associated with atrophy of your hippocampus, which is associated with dementia and memory problems.39,40
No one can avoid stress completely, so learning to relieve it is a key part of improving your overall health and in keeping your hormones in balance. Any activity that you find relaxing will help you combat stress. If you can get outdoors to do it, that’s even better because being in nature has added stress-relief benefits. In fact, even just the sounds of nature can make a difference.41 So if you’re on the treadmill, pop on a pair of headphones and work out to the sounds of nature.
As I mentioned, I supplement with Estroprotect to help ensure my hormones are in balance. Its powerful natural botanicals including DIM, green tea extract, and trans-resveratrol work together to make sure your estrogen levels are optimal. It’s such an important part of a woman’s health and well-being!
The post The Stress-Hormone Connection appeared first on Amy Myers MD.
October 18, 2019
Paleo Pumpkin Muffins


Paleo Pumpkin Muffins are a delicious treat to start your day or fill up on a snack with some favorite fall flavors. This recipe for gluten-free muffins is perfectly spiced, subtly sweet, and they’re the perfect soft and moist texture. The grain-free cinnamon streusel topping adds the perfect touch of additional sweetness without making the muffins taste like dessert. These are already gluten-free and dairy-free, and on top of everything else, they can also be made egg-free for those following the Autoimmune Protocol.
How to Make Paleo Pumpkin Muffins
These Paleo Pumpkin Muffins have two components: muffin base and the streusel topping. Yet they’re not complicated at all. You don’t have to be a baker to successfully make these muffins. Just follow these easy steps and you’ll be ready to impress family and friends with some deliciously healthy baking.
First, you’ll prepare your streusel topping. Use a fork to cut your cold palm shortening into your tigernut flour, coconut sugar, pumpkin pie spice, and sea salt. This should create the wonderfully crumbly topping (which may not-so-secretly end up being your favorite part). Keep this mixture chilling in the refrigerator until it’s time to bake the muffins.
While your streusel topping chills, whisk together your wet ingredients with the coconut sugar to start a smooth batter. Combine your dry ingredients in a separate bowl, then you’ll add dry ingredients to your wet ingredients and whisk until smooth.

Fill 10-12 muffin liners about ¾ of the way full with batter. At this point, get the streusel mixture out of the fridge and sprinkle generously on top of the batter in the muffin tins. Bake at 350°F for 20-25 minutes.
To make your maple drizzle, stir together melted coconut butter, vanilla, and maple syrup. Once the muffins are cooled, drizzle your coconut butter icing over the muffins.
To make this recipe AIP compliant, omit the eggs and use a gelatin egg instead. Additionally, I’ve included an AIP-friendly pumpkin pie spice blend, so you be sure to have that ready.
Why Are My Paleo Pumpkin Muffins Healthier?
These Paleo Pumpkin Muffins are full real food ingredients so they won’t derail your health even if you want to have a sweet snack or an indulgent breakfast. My favorite ingredients that make these muffins a healthier baked treat include some flavorful favorites of the Paleo community.

Pumpkin Puree
The darling of the season, pumpkin hosts a ton of great health benefits. You’ll not only be keeping your muffins moist and fluffy, you’ll also provide your body with fiber, vitamins, and minerals.
Choose a pure pumpkin puree to get amazing nutrients like Vitamin A, Vitamin C, and potassium. You can even use homemade pumpkin puree if you have the time. I find that the stuff from the store, although convenient, is not as flavorful.
Coconut Sugar or Maple Sugar
Coconut sugar and maple sugar are whole food sources of granulated sugar, as these evaporated syrups contain a more intact nutrient profile. White sugar, or cane sugar, is stripped and highly processed.
While unrefined sugar is still sugar, if you’ve followed a dietary protocol and are in the reintroduction phase, unrefined sugars are allowed in moderation. The Myers Way® is, after all, a way of life, and these natural, wholesomely delicious additions can be enjoyed in moderation.

Tigernut Flour
This gluten-free, grain-free flour is actually made of a nutrient-rich tuber high in Vitamin E and iron. Since it’s a tuber rather than a nut, tigernut flour is also AIP compliant.
Conventional white wheat flour can lead to chronic inflammation from the proteins found in gluten. Tigernut flour can replace wheat flour at a 1:1 ratio in the foods you love to make and eat (including these muffins!) It’s one of the flours I recommend in the essential foods to swap for AIP-friendly cooking.
Tigernut flour is very high in fiber — If you’re not meeting the daily recommendations for dietary fiber, tigernut flour could be your new favorite baking ingredient for all of your holiday cakes, muffins, cookies, and more. You’ll love the natural sweetness that comes from tigernut flour and lends itself to the rich quality of your recipes.
How to Store Paleo Pumpkin Muffins
You can also store the muffins at room temperature for a day or two, or in the refrigerator for up to a week.
And yes, you can freeze these muffins. These are great to have on hand in the freezer for a quick breakfast, or if you need to whip out a quick treat for some unexpected guests.
If you do choose to freeze a batch, I recommend freezing them without the streusel topping. Wrap each muffin in parchment paper and store in a tightly closed freezer bag. Reheat in a warm oven or in the microwave and top with a new batch of streusel and a fresh drizzle of maple icing.

Paleo Pumpkin Muffins

Course
Breakfast, Dessert, Snack
Protocol
Autoimmune Solution (AIP), Elimination Diet, Paleo, Thyroid Connection
Servings
12 muffins
Ingredients
Streusel Topping 1/4 cup tigernut flour2 Tbsp coconut sugar1/2 tsp pumpkin pie spice2 Tbsp sustainably harvested palm shortening solid and chilledPaleo Pumpkin Muffins3 eggs (or AIP gelatin egg)1 cup organic pumpkin puree (or homemade pumpkin puree)1/3 cup full fat coconut milk1/3 cup organic coconut sugar or maple sugar2 Tbsp pure maple syrup1 tsp vanilla extract1 3/4 cup tigernut flour1/4 cup arrowroot flour1 tsp baking soda1 Tbsp pumpkin pie spice (or AIP pumpkin pie spice blend)Maple Icing (optional)2 Tbsp coconut butter melted1/2 Tbsp pure maple syrup pinch vanilla extractAIP Pumpkin Pie Spice Blend2 tsp ground cinnamon1 tsp ground mace1 tsp ground gingerAIP Gelatin Egg Mix3 Tbsp The Myers Way® Gelatin1/2 cup filtered water
Servings:
muffins
Units:
MetricUS Imperial
Instructions
For the Streusel ToppingCombine tigernut flour, coconut sugar, and pumpkin pie spiceCut cold palm shortening into the tigernut flour, coconut sugar, and pumpkin pie spice. Do not overmix — this should be crumbly in texture. Store in the fridge until ready to use. For the Paleo Pumpkin MuffinsPreheat your oven to 350°F and line a muffin pan with 12 liners. In a large mixing bowl, whisk together the pumpkin, eggs (or gelatin egg), coconut sugar, maple syrup, coconut milk, and vanilla. This batter should be very smooth.In a separate bowl, combine the flours, baking soda, and pumpkin pie spice (see notes for AIP spice blend). Slowly sift flour mixture into wet ingredients, beating until batter is smooth and the flour mixture is well integrated. Pour batter into each liner until the muffin tins are each about ¾ of the way filled with batter. If using the AIP gelatin egg replacement, you can fill the muffin tins a little more because it will not rise as much. This will reduce the serving size to 10.Spoon chilled streusel on top of each muffin and bake for 20-25 minutes or until a toothpick inserted in the center comes out clean. Cool in the muffin tin for 10 minutes, then transfer to a wire rack. Allow to cool completely before eating or it will crumble. For the Maple IcingStir coconut butter, maple syrup, and vanilla extract in a bowl until smooth. Drizzle icing over cooled muffins prior to serving.For the AIP Pumpkin Pie Spice BlendCombine cinnamon, mace, and ginger.For the Gelatin EggPlace 3 Tbs. of unflavored gelatin in a saucepan.Add 1/2 cup water. Let the gelatin sit for a few minutes to bloom. Once the gelatin has absorbed the water, heat over low heat to liquefy the gelatin. Use in place of the eggs.
Paleo Pumpkin Muffins are a delicious treat to start your day or fill up on a snack with some favorite fall flavors. This recipe for gluten-free muffins is perfectly spiced, subtly sweet, and they’re the perfect soft and moist texture. The grain-free cinnamon streusel topping adds the perfect touch of additional sweetness without making the muffins taste like dessert. These are already gluten-free and dairy-free, and on top of everything else, they can also be made egg-free for those following the Autoimmune Protocol.
How to Make Paleo Pumpkin Muffins
These Paleo Pumpkin Muffins have two components: muffin base and the streusel topping. Yet they’re not complicated at all. You don’t have to be a baker to successfully make these muffins. Just follow these easy steps and you’ll be ready to impress family and friends with some deliciously healthy baking.
First, you’ll prepare your streusel topping. Use a fork to cut your cold palm shortening into your tigernut flour, coconut sugar, pumpkin pie spice, and sea salt. This should create the wonderfully crumbly topping (which may not-so-secretly end up being your favorite part). Keep this mixture chilling in the refrigerator until it’s time to bake the muffins.
While your streusel topping chills, whisk together your wet ingredients with the coconut sugar to start a smooth batter. Combine your dry ingredients in a separate bowl, then you’ll add dry ingredients to your wet ingredients and whisk until smooth.
Fill 10-12 muffin liners about ¾ of the way full with batter. At this point, get the streusel mixture out of the fridge and sprinkle generously on top of the batter in the muffin tins. Bake at 350°F for 20-25 minutes.
To make your maple drizzle, stir together melted coconut butter, vanilla, and maple syrup. Once the muffins are cooled, drizzle your coconut butter icing over the muffins.
To make this recipe AIP compliant, omit the eggs and use a gelatin egg instead. Additionally, I’ve included an AIP-friendly pumpkin pie spice blend, so you be sure to have that ready.
Why Are My Paleo Pumpkin Muffins Healthier?
These Paleo Pumpkin Muffins are full real food ingredients so they won’t derail your health even if you want to have a sweet snack or an indulgent breakfast. My favorite ingredients that make these muffins a healthier baked treat include some flavorful favorites of the Paleo community.
Pumpkin Puree
The darling of the season, pumpkin hosts a ton of great health benefits. You’ll not only be keeping your muffins moist and fluffy, you’ll also provide your body with fiber, vitamins, and minerals.
Choose a pure pumpkin puree to get amazing nutrients like Vitamin A, Vitamin C, and potassium. You can even use homemade pumpkin puree if you have the time. I find that the stuff from the store, although convenient, is not as flavorful.
Coconut Sugar or Maple Sugar
Coconut sugar and maple sugar are whole food sources of granulated sugar, as these evaporated syrups contain a more intact nutrient profile. White sugar, or cane sugar, is stripped and highly processed.
While unrefined sugar is still sugar, if you’ve followed a dietary protocol and are in the reintroduction phase, unrefined sugars are allowed in moderation. The Myers Way® is, after all, a way of life, and these natural, wholesomely delicious additions can be enjoyed in moderation.
Tigernut Flour
This gluten-free, grain-free flour is actually made of a nutrient-rich tuber high in Vitamin E and iron. Since it’s a tuber rather than a nut, tigernut flour is also AIP compliant.
Conventional white wheat flour can lead to chronic inflammation from the proteins found in gluten. Tigernut flour can replace wheat flour at a 1:1 ratio in the foods you love to make and eat (including these muffins!) It’s one of the flours I recommend in the essential foods to swap for AIP-friendly cooking.
Tigernut flour is very high in fiber — If you’re not meeting the daily recommendations for dietary fiber, tigernut flour could be your new favorite baking ingredient for all of your holiday cakes, muffins, cookies, and more. You’ll love the natural sweetness that comes from tigernut flour and lends itself to the rich quality of your recipes.
How to Store Paleo Pumpkin Muffins
You can also store the muffins at room temperature for a day or two, or in the refrigerator for up to a week.
And yes, you can freeze these muffins. These are great to have on hand in the freezer for a quick breakfast, or if you need to whip out a quick treat for some unexpected guests.
If you do choose to freeze a batch, I recommend freezing them without the streusel topping. Wrap each muffin in parchment paper and store in a tightly closed freezer bag. Reheat in a warm oven or in the microwave and top with a new batch of streusel and a fresh drizzle of maple icing.
"image": "https://www.amymyersmd.com/wp-content...",
"recipeIngredient": [
"1/4 cup tigernut flour", "2 Tbsp coconut sugar", "1/2 tsp pumpkin pie spice", "2 Tbsp sustainably harvested palm shortening", "3 eggs", "1 cup organic pumpkin puree", "1/3 cup full fat coconut milk", "1/3 cup organic coconut sugar", "2 Tbsp pure maple syrup", "1 tsp vanilla extract", "1 3/4 cup tigernut flour", "1/4 cup arrowroot flour", "1 tsp baking soda", "1 Tbsp pumpkin pie spice", "2 Tbsp coconut butter", "1/2 Tbsp pure maple syrup", " pinch vanilla extract", "2 tsp ground cinnamon", "1 tsp ground mace", "1 tsp ground ginger", "3 Tbsp The Myers Way® Gelatin", "1/2 cup filtered water" ],
"name": "Paleo Pumpkin Muffins",
"prepTime": " ",
"recipeInstructions": "
For the Streusel ToppingCombine tigernut flour, coconut sugar, and pumpkin pie spiceCut cold palm shortening into the tigernut flour, coconut sugar, and pumpkin pie spice. Do not overmix — this should be crumbly in texture. Store in the fridge until ready to use. For the Paleo Pumpkin MuffinsPreheat your oven to 350°F and line a muffin pan with 12 liners. In a large mixing bowl, whisk together the pumpkin, eggs (or gelatin egg), coconut sugar, maple syrup, coconut milk, and vanilla. This batter should be very smooth.In a separate bowl, combine the flours, baking soda, and pumpkin pie spice (see notes for AIP spice blend). Slowly sift flour mixture into wet ingredients, beating until batter is smooth and the flour mixture is well integrated. Pour batter into each liner until the muffin tins are each about ¾ of the way filled with batter. If using the AIP gelatin egg replacement, you can fill the muffin tins a little more because it will not rise as much. This will reduce the serving size to 10.Spoon chilled streusel on top of each muffin and bake for 20-25 minutes or until a toothpick inserted in the center comes out clean. Cool in the muffin tin for 10 minutes, then transfer to a wire rack. Allow to cool completely before eating or it will crumble. For the Maple IcingStir coconut butter, maple syrup, and vanilla extract in a bowl until smooth. Drizzle icing over cooled muffins prior to serving.For the AIP Pumpkin Pie Spice BlendCombine cinnamon, mace, and ginger.For the Gelatin EggPlace 3 Tbs. of unflavored gelatin in a saucepan.Add 1/2 cup water. Let the gelatin sit for a few minutes to bloom. Once the gelatin has absorbed the water, heat over low heat to liquefy the gelatin. Use in place of the eggs.
",
"recipeYield": "12 muffins"
}
The post Paleo Pumpkin Muffins appeared first on Amy Myers MD.
Amy Myers's Blog

- Amy Myers's profile
- 74 followers

