Adidas Wilson's Blog, page 41
March 21, 2019
Habits Of Successful People You Need To Adopt
A purpose gives direction to a man’s life. Without it, you end up living by somebody else’s standards, or just follow the crowd and never live up to your full potential.
But, hey! You’re an individual.
What’s more, you have powers within you waiting to be unlocked. Any vision you create in your mind’s eye today can be the life you live. To get there, though, you should have a clearly defined purpose — one that you follow day after day.
If you haven’t done this yet, now is the time. In fact, you’ll need to be purpose-oriented in order to be able to develop all the other habits of successful people.
Describe your life purpose, include details about every aspect of your life. Be sure you want these things and aren’t just doing what others expect you to do.
2. Do what successful people do first thing in the morning

How you begin your day is crucial. If you fill your morning with successful habits, you’ll see progress every single day.
To begin, wake up a bit earlier than you have to. This can improve your whole day if you also dedicate this extra time to some healthy, productive and positive behaviors.
One of the main habits of successful people is having a powerful morning routine. They plan their mornings the night before, then wake up with determination, ready to kickstart another great day that will get them closer to their goals.
What they do at that time, however, is equally important. . .
They first make their beds and welcome the day with a few positive affirmations. Some include their daily workout now, as they don’t usually find time for it later on in the day. Plus, they eat a healthy breakfast to keep them energetic until the evening.
It is also important to set some time aside for your spiritual and mental well-being, which means a quick meditation session, as its health benefits are tremendous. Then, perhaps read from an inspirational book to feed your mind with positive thoughts. Make sure you breathe deeply, too— just let go of any tension before you continue with your day.
3. Embrace failure and try again every time.
To change your habits, you’ll need to change your mindset.
Something you’ll need to accept early on (in order to form the habits of successful people), is that failure is not just part of the process, it’s a stepping stone. You need it to form the mental patterns of a winner and continue trying until you finally reach all your goals.
Most people avoid trying new things, as there’s always a chance of failure. However, that’s exactly why they don’t make any change and continue living the same life that makes them miserable. . . Don’t do that— know that failure is powerful and that you can even benefit from it.
Learn from it every time you make a mistake. Analyze exactly why that happened. Then, make a plan on what to do next time to perform better.
4. Create the ideal daily routine.

If you start your mornings energetically, Great! Keep it energetic until the evening. Don’t worry, you can do so with the right daily schedule.
Your successful habits should be combined in a certain way, and it’s best if you have fixed time slots for everything.
However, don’t be in a hurry to create the ideal day just yet. Test a few versions first. See when you’re most productive in the day and save your most important work for then. Take breaks and use them to stretch, take a daily walk, drink water, talk to a loved one, or check your to-do list. That’s the healthy type of multitasking.
Your whole day can be an example of success if you manage to structure it effectively. . . Plan what time you’ll start your wind-down process in the evening. Use the time before bed to declutter, prepare for tomorrow, let go of the stress that followed you at work, and smile for doing your best.
If that sometimes feels a bit overwhelming, remind yourself that it’s what successful people do.
5. Take risks
Wanna build successful habits? Well, you’ll need to become a risk-taker.
All high-achievers learned how to take risks, accept uncertainty, embrace change, go out of their comfort zones, and do something (even when the situation looked hopeless).
Often, you might hear from others that your goals are impossible. Remember though, you are your best motivator and shouldn’t let others interfere with your vision. Impossible is just a limitation you set for yourself— you can easily remove it and be unstoppable.
Change your habits by taking risks often.
6. Build confidence in your abilities

You won’t make it without confidence.
Confidence is one of the top qualities of winners in any field. The truth is, you need to believe in yourself and your abilities long before you’re successful. That’s why you should let go of the doubts and fears and just keep telling yourself you can do it, until you actually start making things happen.
Confidence is not just one of the habits of successful people, it’s an attitude of life that should support everything you do. In fact, it’s proven to be a bigger success trait than talent itself.
7. Let go of the past.
Last but not least, if you want to do what successful people do, you need a clear mind.
A clear mind will help you make good decisions, focus on work, build discipline, not get overwhelmed or distracted, and keep your purpose and vision in mind. To make that happen, you need to leave the past and anything connected to it behind.
Why?
It’s harmful for your mindset and behavior in the present. You can’t build the habits of successful people if you’re constantly comparing your current life to your past, or reminding yourself of painful situations from back when you were less confident and less responsible.
By looking in the past, you’re basically reliving it all over again, and taking a step back in your personal development.
Once you let go, you make room for so much more. You can finally change your habits more easily and let positive transformation into your life. You can breathe freely, enjoy life, take action to reach your goals, and form a better mindset.


John David Washington Lands Lead Role In Christopher Nolan’s Next Film
Golden Globe BlacKkKlansman nominee John David Washington is set to star in Christopher Nolan’s next event film which is rumored to be an action blockbuster. Plot details under serious wraps. Warners is opening the movie on July 17, 2020, which is when Nolan has launched the last two Dark Knight movies and Dunkirk. Variety had the news about Washington.
Nolan recently finished the script for the movie and Warner Bros. quickly dated it for July 17, 2020 — a slot the studio often reserves for the director, most recently with “Dunkirk.” Not only was the film a huge success at the box office bringing in $526 million at the worldwide Box Office but earned Nolan a Oscar nomination for director, his first in the category.
The gig has become one of the more highly coveted in town, even though most of the industry has been kept in the dark about who has been meeting for the role and what the movie is even about.
Nolan is also producing along with his partner Emma Thomas. Production is set to commence later this year.
After breaking out in Dwayne Johnson’s hit HBO series “Ballers,” Washington is coming off a monster year on the film side, starting with his starring gig in “BlacKkKlansman,” which won best adapted screenplay at the Oscars. The role earned him rave reviews, as well as Golden Globe and SAG nominations for best actor. Washington also had strong performances in “The Old Man & the Gun” and “Monsters and Men.”
Bushido Code – The Way Of The Warrior In Modern Times
The Bushido code is a code of honor that greatly influenced Japan’s culture in the 700’s. Bushido started as a code of war and went onto become a way of life and art. It governed every part of life, from honor and war to literature and poetry. Moreover, it impacted history in a significant way, from medieval times to World War II period. Available on amazon. google play, apple books, kobo, libraries. Audiobook coming soon to retail.
How to Start Your Own Podcast
Before you rush into things, it’s important to keep in mind that podcasts take a lot of effort to get going. They’re not just recordings of people talking (not the good ones, anyway). Pat Flynn, host of the Smart Passive Income podcast, recommends you treat podcasting the same way you would any other big project:
Podcasting is extremely fun and exciting, but there is one thing you must do before you start podcasting: Commit. You must internally commit to podcasting, as you must do with anything that is potentially beneficial but takes some time and effort to do.
It’s easy to assume that podcasts are easy to produce because they’re audio only, but don’t be fooled. They can take up a lot of time to put together, especially at first. Also, podcasts do best when they’re released consistently. If you’re interested in developing any kind of listener base, you have to be ready to release episodes on a regular basis. All in all, podcasting can be fun work, but it’s still work and should be treated as such.
You also shouldn’t expect to get rich from podcasting either. It’s certainly possible to generate income from podcasting, but that usually requires advertisements and sponsorships—both of which you’ll get after you’ve built up a listenership big enough to make it worthwhile to advertisers. If you’re not interested in starting a podcast for the fun of it or to have your voice heard, you might not get much out of it unless you already have an audience.
What You’ll Need
[image error]
You can’t start a podcast without equipment, and good equipment will go a long way. Here’s what you’ll need:
Microphone(s): Any microphone will work for recording your podcast, but listeners can usually tell the difference between low and high quality microphones. If you’re not sure what to look for, our list of the five best desktop microphones is a great place to start (I use four analog Audio-Technica AT2020s for my own podcast). As you shop around, you’ll also need to decide whether you want to use a USB or analog (XLR) microphone. USB mics convert analog sound into digital so you can plug a USB mic directly into any computer and start recording without much hassle, but you could potentially get lower audio quality compared to analog. Considering you don’t need any extra tools or devices to record with a USB mic, they can be a little cheaper in the long run. Analog microphones use XLR connectors, which means you need another device to get your audio onto your computer, but you can get higher audio quality and can use them with other sound equipment (if you had a PA system or wanted to play live music, for example). Of course, if you have a gaming headset or other basic microphone around, you can easily use that too.
Portable XLR Recorder (optional): If you plan on using analog microphones for your podcast, you’ll need something that captures your analog audio and converts it to digital. Portable XLR recorders can capture multiple microphone channels and allow you to do basic sound level adjusting and muting on the fly. Audio files automatically get organized and stored on a memory card that you can insert into a card reader or slot in your computer. These are amazing tools, but they can be expensive. You can find them for anywhere between $100 and $500, depending on how many channels and options you need (I use a $400 Zoom H6 Handy Recorder with four available analog channels).
Audio Interface (optional): If you want to record directly to your computer with your analog microphones, you’ll need an audio interface. These devices allow you to plug in one or more analog microphones and will convert the analog audio to digital. Most audio interfaces will connect to your computer via USB or Firewire. Audio interfaces can cost as little as $30 and go as high as $300, depending on what you need. (You can see why a USB microphone is a cheaper option.)A Computer: Any Windows computer or Mac should work fine to record, edit, and upload your podcast. Thankfully, editing audio doesn’t take a ton of computing power. Additionally, depending on how you choose to record—directly to the computer or onto a dedicated recording device—your computer will also need the right ports. USB microphones, for example, will obviously need an open USB port. If you’re using analog microphones with a portable XLR recorder or audio interface device, you’ll need either a 3.5 mm audio-in jack, a USB port, or in some cases, a Firewire port. So before you spend any money on equipment, make sure you have a computer that can support it.Audio Editing Software: For the actual recording and editing, you’ll need a Digital Audio Workstation (or DAW), there are a lot of good options out there, but the licenses for some of them can cost a pretty penny, though. Licenses for professional level DAWs like Reason or Pro Tools can cost anywhere between $300 and $900. Apps like Hindenburg offer simpler audio editing software for under $100, Reaper is a fully loaded audio production app for $60, and Adobe’s audio editing software Audition CC is available with a $19.99 monthly subscription, but you probably shouldn’t start dumping money into podcasting software if you’re just starting out. Because of that, most people will recommend free open source programs like Audacity when you’re just getting started, and that’s what we’ll use an example throughout this how-to guide.Pop Filters (optional): The clearer your audio can sound, the better. Pop filters, while not required, are fairly cheap and can keep your plosives from making a nasty sound on your recording. If you don’t want to buy any, though, you can make some of your own.
You might be thinking that all this equipment is pretty expensive, and you’re not wrong. However keep in mind that decent audio equipment will last forever if you take care of it. It may be expensive to get started, but after the initial purchase, you’re set.
Step One: Narrow Your Topic and Find Your Niche
Just like blogs, there are a ton of podcasts out there. That means that you can probably find a podcast about everything under the sun already. Don’t get discouraged! While just about every broad topic is already covered, you just have to find your spin on things to make an old idea something new..
For example, if you wanted to make a podcast about music, ask yourself if there’s an audience out there for what you want to talk about. Maybe you narrow your idea down from music in general to bluegrass specifically. Now your coverage is specific: the music, people, and culture of bluegrass. Once you have your topic narrowed down, it helps to add a spin to it. Maybe you talk about bluegrass music and culture while sipping moonshine with your co-hosts. It’s kind of true that everything has been done before, but it hasn’t all been done the way you would do it. So find an angle that’s personally interesting and you’ll be better off.
Step Two: Download, Install, and Set Up Audacity
[image error]
As mentioned earlier, Audacity is a great DAW for podcasting beginners. It’s open source, free to use as long as you like, and is available for Windows, OS X, and Linux. Before you can jump into recording, however, there are a few tricks to getting it all set up properly:
Download Audacity 2.1.3 at audacityteam.org and install it.Connect your microphone and open Audacity.See if your microphone is being recognized by Audacity by checking the drop-down menu next to the small microphone icon. If you see your mic, go ahead and select it.In the top-left corner, you should see the pause, play, stop, skip back, skip forward, and record buttons. Click the record button and talk into your mic to make sure it’s working properly.Stop recording and playback what you just recorded to make sure everything sounds okay.You’ll want to export your audio in the MP3 format later on. In order to do that, you’ll need to download and install the Lame MP3 encoderfor either Windows or Mac.Once that’s installed, close and reopen Audacity. Record yourself talking for a few seconds like before, then go to File, then Export Audio, and select MP3 Files in the ‘Save as type’ dropdown menu. Name your file something simple like “test1” and save it to your desktop.Find the MP3 file on your desktop and try playing it in your MP3 player of choice, just to make sure everything is working properly.
If the audio in your MP3 test file sounds okay, you’re ready to start recording your podcast in Audacity.
Step Three: Record and Edit Your Podcast In Audacity
[image error]
Recording is pretty straightforward in Audacity, but there are a few things you should do before you jump into your first show:
Connect your microphone and make a quick recording the same way as before to check your audio levels.You can adjust your recording volume with the slider right above the drop-down menu where you selected your recording device.When you’ve found a good level, go ahead and remove your recording test by clicking the small X at the top left of the track. You don’t need it anymore.Make sure your recording space is silent and record around 5 seconds of “silence.” This is called room tone and you can use this to cut out things like swearing or even cover up some background noise that happens while you’re recording. You can mute this track for now by clicking the mute toggle button on the left side of the track. You can also minimize it by clicking the arrow at the bottom-left of the track.Go to File, then Save Project As, and choose a name for your project. Keep in mind that this doesn’t export any audio, just saves your progress.
[image error]
Now you’re ready to actually record the main part of your podcast. Just hit the record button and Audacity will start capturing your audio in a new track. When you’re done recording, hit the stop button. It’s as simple as that. Before you continue be sure to save your work. Now it’s time to add music and make any necessary edits:
Go to File, then Import, and then Audio. Locate the music you chose earlier (or your own if you made some), and click Open. The music will get dropped into Audacity as its own separate track.Now find the Selection Tool in the Audacity toolbar. It will look like a typing cursor.Drag the Selection Tool over the section of music you’d like to use for your intro and outro music.With that section of music currently selected, find the Trim Audio button on the Audacity toolbar and click it. You should be left with only the section of music you chose.While that section of music is still selected, find the Copy button on the toolbar and click it (you can also use CTRL+C or Command+C).On the same music track, click anywhere to the right of that music section. Then find the Paste button on the toolbar and click it (or CTRL+V or Command+V). You now have your intro and outro music, but it’s still not quite ready.With the Selection Tool, select one of the music copies. Then go to Effect at the top and choose Fade Out. Do the same for the other music copy, but choose Fade In instead. You’re intro and outro music is now ready to go.
[image error]
If you need to cut something out of your podcast—like swearing if you’re trying to keep clean, or information that shouldn’t be made public—it’s easy to fix:
Find the section of audio that needs to be cut out.Use the Selection Tool to select the entire section that needs to be removed.Find the Cut button on the toolbar and click. Boom, it’s gone. Alternatively, you could also use the Silence button.Now, remember the room tone you recorded earlier? You can copy a section of that and overlap it with the cut out portion so you have a less jarring silence.
With your music ready to go and your necessary edits made, you can now line everything up with the Time Shift Tool (two arrows connected by a thin line). Just slide each piece of audio in its respective track until you’re happy with how all of the audio lines up. You might need to play around with it a little to find the sweet spot.
As powerful as Audacity is, using multiple microphones requires some extra work and money. Why would you want to record with multiple mics? Well it makes it a lot easier to fix someone’s audio, either on the spot by adjusting their mic level or later on if you have multiple audio tracks recording at once.
Even with multiple USB microphones, however, Audacity can only recognize one audio input for recording at a time. The Audacity team does, however, suggest a couple ways to sneak around this limitation:
Windows: For using multiple USB microphones on Windows, you can aggregate them all into a single recording device using software like Voice Meeter (free) or Virtual Audio Cable (trial version supports up to three devices). The audio from each mic will get picked up just fine, but all level adjustments have to be made through the software. In Audacity, you’ll still only see a single recording track to edit.OS X: In OS X 10.7 and later you can set up aggregate devices without any additional software. Check Apple’s official instructions to aggregate devices here.
If you’re using multiple analog microphones, there are two ways you can go about it:
Use an audio interface device or mixer that connects to your computerRecord everything on a portable XLR recorder and upload the files onto your computer
To use analog microphones you’ll need one of those devices anyway, but if you get one that supports multiple microphones, you’re all set.
If your co-host isn’t nearby and you want to use Skype, Google Hangouts, or other internet calling services, it can be tough. Audacity doesn’t support Skype recording directly, but the Audacity team has some ways you might be able to sneak around it for both Windows and Mac. Otherwise, you’ll have to use additional software like MP3 Skype Recorderor Pamela and import the call audio into Audacity the same way you would bring in music or other audio files. Once it’s in Audacity, you can adjust levels and make sure everything sounds okay. As powerful as Audacity is—especially being free—it certainly has it’s limitations, so if you really enjoy podcasting, it could be worth it to spring for a better DAW down the line.
March 19, 2019
Google unveils Stadia cloud gaming service, launches in 2019
Google is launching its Stadia cloud gaming service at the Game Developers Conference (GDC) in San Francisco today. Google CEO Sundar Pichai, who says he plays FIFA 19“quite a bit,” introduced the Stadia service during a special keynote at GDC this morning. Describing it as a platform for everyone, Pichai talked up Google’s ambitions to stream games to all types of devices. Stadia will stream games from the cloud to the Chrome browser, Chromecast, and Pixel devices, and it will launch at some point in 2019 in the US, Canada, UK, and Europe.
Phil Harrison, a former Sony and Microsoft executive, joined Pichai onstage to fully unveil Stadia in his role at Google. Harrison says Google will amplify this game streaming service by using YouTube and the many creators that already create game clips on the service. Google previously tested this service as Project Stream in recent months, allowing Chrome users to stream games in their browser. Assassin’s Creed Odyssey was the first and only game to be tested publicly using Google’s service, and the public tests finished in January.
Of course, Google won’t limit Stadia to just one game. Google demonstrated a new feature in YouTube that lets you view a game clip from a creator and then hit “play now” to instantly stream the title. “Stadia offers instant access to play,” says Harrison, without the need to download or install any games. At launch, games will be streamable across laptops, desktops, TVs, tablets, and phones.
GOOGLE WILL LEVERAGE YOUTUBE FOR STADIA
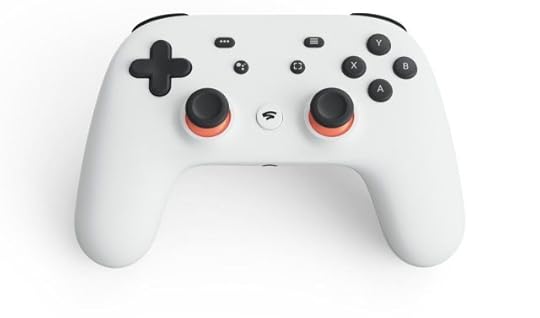
Google demonstrated moving gameplay seamlessly from a phone to a tablet and then to a TV, all using Google-powered devices. While existing USB controllers will work on a laptop or PC, Google is also launching a new Stadia Controller that will power the game streaming service. It looks like a cross between an Xbox and PS4 controller, and it will work with the Stadia service by connecting directly through Wi-Fi to link it to a game session in the cloud. This will presumably help with latency and moving a game from one device to another. You can also use a button to capture and share clips straight to YouTube, or use another button to access the Google Assistant.
To power all of this cloud streaming, Google is leveraging its global infrastructure of data centers to ensure servers are as close to players around the world as possible. That’s a key part of Stadia, as lower latency is a necessity to stream games effectively across the internet. Google says it expects to support up to 4K at 60 fps at launch over an internet connection with approximately 25Mbps of bandwidth, and it’s planning to support up to 8K resolutions and 120 fps in the future.

STADIA HAS MORE TERAFLOPS OF POWER THAN AN XBOX ONE X
Google is partnering with AMD to build a custom GPU for its datacenters. It’s a chip that Google claims will deliver 10.7 teraflops of power, which is more than the 4.2 teraflops of the PS4 Pro and the 6 teraflops of power on the Xbox One X. Each Stadia instance will also be powered by a custom 2.7GHz x86 processor with 16GB of RAM.
One of the first games to launch on Google’s Stadia service will be Doom Eternal, which will support 4K resolution, HDR, and 60 fps game play. Doom Eternal doesn’t have a firm launch date just yet, but it will also be available on PC, Nintendo Switch, PS4, and Xbox One. Stadia will also embrace full cross-platform play, so developers can enable cross-platform multiplayer and game saves and progression.
March 17, 2019
How To Use Siri On The iPad
Siri has seen a lot of growth
ever since it was launched on the iPad. She can take voice dictation, schedule
meetings, update your Facebook page, read your email and remind you to take out
your trash. She can also speak in a British accent if you like.
How To Turn Siri On or
Off For Your iPad
Most probably, Siri is
turned on for your iPad and if your iPad is newer, you might have set up the
“Hey Siri” feature already. However, there are a few important features and settings
that you should check out to ensure your iPad’s security.
Go to Settings on your iPad.On the left-side menu scroll down and
select “Siri”.Turn Siri on or off using the green on/off
button at the top. An active internet connection is required to use Siri. Being able to access Siri on the lock
screen is important. Although apps cannot be launched when the screen is off,
you can access some calendar options and set reminders. This feature is great, but
other people can access the same features on your iPad. To protect your
privacy, use the slider to turn Siri off on the lock screen. You can change Siri’s Voice. The voice settings
depend on your chosen language. The English language has a Male and Female
voice option and an Australian, British or American accent.
What Is “Hey Siri?”
Hey Siri, lets you
activate Siri using your voice. Start a normal directive or question with “Hey
Siri”. With most iPads a power connection is necessary for this to work.
How To Use Siri On Your iPad
First, let your iPad know
that you would like to ask Siri a question. Just like with the iPhone, hold the
Home Button down to perform the function.
When Siri is activated,
she will beep at you and you will be prompted for a directive or question.
Glowing lines at the bottom of your screen are an indication that Siri is
listening so you can ask your question.
To ask more questions
while Siri is still open, touch the microphone and the lines will appear. (If
those lines are not glowing, Siri is not listening).
If the “Hey Siri” feature
is turned on, pressing the Home Button is not necessary; it is, however, the
easier option if you are holding your iPad.
What Questions Can Siri
Answer?
Siri has been programmed
using different databases to help her answer most of your questions. Here is
what she can do:
Call [name], example, “Call Paul”Send text to [name] [text], example, “send
text to Paul: what was the name of the song?”Launch [app], example, “launch Music”Search the web for [anything]Listen to [song name, band name]Get me directions to [address/restaurant/shop]Will it rain [date]?
As a Personal Assistant
Schedule a meeting for [whatever] at [time
and date]Tweet [content]Remind me to [action] at [time and date]
Use Siri To Entertain and
Feed You
Show me a trailer for [any movie]Who wrote [TV series, book, or movie]?Find me [any food] in [city]Book me a table at [time] for [restaurant]
Siri For Sports and Other
Information
Who are the [team] playing tonight?How are the [team] doing?What is 15 percent of 42 dollars 50 cents?What time is it in Russia?What is the definition of [words]?
3 Reasons Taking Social Security Benefits at 62 Is Smart
Social Security is a major source of retirement income for 47 million retired American workers, and its importance will only increase as more baby boomers retire. If you’re among those approaching retirement, you’re probably wondering if it’s wise to claim benefits early. There are good reasons for waiting, but these three reasons may convince you that filing for Social Security benefits at age 62 is smart.
1. Your goals are more important than the size of your check
Social Security only pays 100% of the benefits you earn over your career if you wait until full retirement age to claim. File for benefits earlier than full retirement age, and you’re going to get a much smaller check. How much smaller depends on how many months before full retirement age you begin collecting Social Security, but claiming at 62 could result in a reduction of as much as 30%.
That’s a lot of monthly income to forgo, but it could be worth it if you have other sources of retirement income and your retirement bucket list includes an active lifestyle. The average 65-year-old has a life expectancy into the mid-80s, but that doesn’t mean you’ll be healthy enough in your 70s to live the retirement you imagine.
2. Family benefits could make a difference
More Americans are heading into their 60s with minor children, and if that’s the case for you, then Social Security benefits for family members could make claiming at 62 wise.
Children who are eligible can collect up to 50% of your primary insurance amount (PIA), regardless of whether you claim your benefits early. PIA is the monthly benefit amount you can collect at full retirement age, before adjustments for retirement age. To qualify, children must be under 18 and unmarried, 18 or 19 and a full-time student in a secondary school, or over 18 and disabled before turning 22.
Spousal benefits may be an option, too. If your eligible child is under 16, then your spouse may qualify for up to 50% of your full retirement age benefit even if he or she is less than 62, the earliest age at which spouses can usually claim spousal benefits. However, once the child turns 16, spousal benefits will stop unless the spouse has reached 62.
There is a family maximum, though. Including benefits that you’re receiving, the maximum payable on your work record ranges between 150% and 180% of your full retirement benefit, depending on your PIA. Here’s how Social Security maximum family benefits are calculated:
150% of the first $1,056 of the worker’s PIA plus…272% of the worker’s PIA over $1,056 through $1,524 plus…134% of the worker’s PIA over $1,524 through $1,987 plus…175% of the worker’s PIA over $1,987.
3. You need the money because of job loss or declining health
The most common age to claim Social Security is age 62, but people often aren’t claiming at that age because of the two previous reasons. Instead, it’s because they’ve suffered a job loss or their health has them worrying they’ll die younger than average life expectancy.
Social Security has a one-time do-over provision that allows you to claim Social Security benefits and then reverse your decision within 12 months. As a result, claiming early while searching for a job can help you shore up monthly finances, while also allowing you to change your mind. One word of caution, though. To reverse your decision, you’ll need to cut Social Security a check for any benefits you pocketed while receiving it.
In terms of declining health, Social Security’s designed to pay you the same amount in lifetime benefits based on average life expectancy, regardless of the age you claim. That’s why people who claim early have their benefit amount reduced, while people who delay claiming until 70 see their benefit increased. If you wait to claim and die younger than average, you could be leaving benefits on the table. Conversely, if you outlive the averages, you could wind up with a windfall in lifetime benefits.
Of course, there’s no way of knowing what the future has in store. But if you’re in poor health and longevity doesn’t run in your family, then claiming early to collect as much in benefits as possible before you die could make sense. A word of caution here, too, though. If you’re married and expect someone to receive survivor’s benefits based on your work record, you should know that those survivor’s benefits will be based on the amount you were receiving, not your PIA. Therefore, if you claim early, your survivors will be locked into a lower income.
Tesla’s Elon Musk unveils Model Y crossover
Tesla Inc. unveiled the highly anticipated Model Y crossover SUV on Thursday night, which Chief Executive Elon Musk predicted would sell better than the Model S, Model X and Model 3 combined.
Speaking to a crowd of fans at Tesla’s design center in Hawthorne, Calif., Musk touted the Model Y’s expected safety and performance, and said the crossover will have “the functionality of an SUV, but ride like a sports car.”
The long-range Model Y, with a battery range of about 300 miles, will be available first and have a starting price of $47,000. Deliveries are expected to begin in fall 2020. Musk said a cheaper, standard-range model will be available in spring 2021 for about $39,000. Tesla’s website said the Model Y is now available to pre-order, along with a $2,500 deposit.
Musk said the Model Y will be available with Tesla’s Autopilot features, and seat up to seven people.
The crossover is aimed at the growing part of the U.S. population favoring SUVs in recent years. The emergence of compact SUVs is a large part of the body style’s sales success, thanks to their lower price tag and fuel consumption.
The Model Y’s “big brother,” the Model X SUV, arrived in the fall of 2015 after being promised for late 2013. Tesla first showed a concept for the seven-seat, gull-wing vehicle in 2012.
In numerous calls with analysts and other occasions, Musk has blamed what he deemed Tesla’s overly ambitious plans for the Model X for the delays, and vowed to make a simpler Model Y.
For starters, the compact SUV would share most of its components with the Model 3 in hopes of streamlining its production ramp. According to a report earlier this month, Tesla has not yet decided where it will build the Model Y.
The compact SUV arrives as Wall Street is worried about Tesla’s liquidity, demand and margins. Musk announced the Model Y unveiling date only days after Tesla announced its $35,000 Model 3 sedan.
A new product could further weigh on the Model 3 demand, analysts have said. Others have greeted the arrival of the Model Y as boost for Tesla once it goes into full production next year.
Tesla shares TSLA, -5.01% were down 2.7% in premarket trade Friday and are off more than 9% this month. The stock is down 11% in the past 12 months, contrasting with gains around 2% for the S&P 500 index SPX, +0.50% over that time.
March 16, 2019
HBO Announces ‘Game of Thrones’ Season 8 Episode Runtimes: Four Episodes Feature Length
HBO disappointed some fans when announcing earlier this week the first two episodes of “Game of Thrones” Season 8 would clock in under two hours. The season premiere, directed by “The Rains of Castamere” helmer David Nutter, will run 54 minutes, while the second episode, also directed by Nutter, will be slightly longer at 58 minutes. Rumor had it every episode of the show’s final season would be feature length, but that’s not the case. Fortunately, the remaining episodes in Season 8 will all run well over 60 minutes.
In a press release, HBO has provided the estimated runtimes for all six episodes of “Game of Thrones” Season 8. The longest episode of the season will be the fourth, directed by Miguel Sapochnik. None of the episodes have titles, but the fourth will run one hour and 22 minutes. Sapochnik is also directing the penultimate episode of the series, which will run one hour and 20 minutes. That runtime will be matched by the series finale, directed by “Game of Thrones” showrunners David Benioff and D. B. Weiss
The Emmys announced this year it considers projects over 75 minutes to be a feature film and therefore eligible for its Outstanding Television Movie prize. In terms of theaters, most exhibitors consider 80 minutes the benchmark for playing a theatrical release. The Academy mandates films must be longer than 40 minutes in order qualify for feature-length categories.
The complete list of “Game of Thrones” Season 8 runtimes is below. HBO has stressed these are estimated runtimes for now, so the final releases could run shortly longer or shorter than what is listed. The final season begins Sunday, April 14 on HBO.
Season 8, episode 1
Debut date: SUNDAY, APRIL 14 at 9:00 p.m. (ET/PT) Estimated running time: 0:54
Season 8, episode 2
Debut date: SUNDAY, APRIL 21 at 9:00 p.m. (ET/PT) Estimated running time: 0:58
Season 8, episode 3
Debut date: SUNDAY, APRIL 28 at 9:00 p.m. (ET/PT) Estimated running time: 1:22
Season 8, episode 4
Debut date: SUNDAY, MAY 5 at 9:00 p.m. (ET/PT) Estimated running time: 1:18
Season 8, episode 5
Debut date: SUNDAY, MAY 12 at 9:00 p.m. (ET/PT) Estimated running time: 1:20
Season 8, episode 6
Debut date: SUNDAY, MAY 19 at 9:00 p.m. (ET/PT) Estimated running time: 1:20
March 15, 2019
Pathfinder: Awakening
The air stink of nothing but blood and it didn’t help with the tattered pieces of flesh forcefully and aggressively sliced off the bodies of the dead victims lining the path leading into the crypt. Simon and Josiah had been tracking it for months and they had only come close enough to catch it two nights back before it laid waste to the entire village without anyone particularly seeing it strike or make its disappearance.
They weren’t meant to feel fear, but it groped their souls like they had one in the first place. Their perfect vision led them through the pieces of torn body parts lying everywhere, with the blood stained wall leading into the crypt burning brightly while they kept their urges in check.
“Kahlil needs it alive”, Josiah reminded his jittery partner.
He could see the vampire he hunted with for years having a rather hard time keeping his paranoia and senses in check. He could tell even the formidable Simon was terrified of the unknown they hunted. It waited for them and they could perceive the blood smeared all over it from its last hunt.
“You mean him and not it?” Simon managed to reply in a whisper, trying not to alert the beast with super sensitive hearing just a few feet away from them.
They both froze in their steps, pondering on what to do next, and not get killed in the process. The news that some new creature with heightened senses, speed, and killing abilities had torn through an entire village in two successive nights had been a cause for concern for the vampire ruler Kahlil. It had occurred on a full moon, prompting the assumption it could be a newbie; a vampire that had just been bitten and without any means of controlling its urges and impulses.