Aventuras De Viaje's Blog, page 20
August 8, 2016


August 7, 2016
Mojiko Review, Kitakyushu, Japan
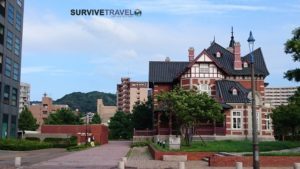
This post is a Mojiko review. Mojiko is the area around the Moji Ko station which is located in Kitakyushu of the Fukuoka prefecture in Japan. This Mojiko review also includes directions on how to get to Mojiko, Mojiko pictures and other useful information about Mojiko as well as personal opinions.
Right Picture: Buildings in Mojiko.
Featured Picture: View into the port at Mojiko.
Cost(s): Free.
Address: Mojiko, moji-ku, kitakyushu city,fukuoka prefecture. 福岡県北九州市門司区門司港 .
Mojiko Review, Kitakyushu City
Last time I wrote a Moji Port review, but I was kind of confused with Moji and Mojiko (moji port). I like both of them.
Mojiko is closer to Yamaguchi prefecture.
I went to Mojiko this time. Mojiko seems have more souvenir shops compared to Moji.
Everything is close to JR station so it is quite easy just to stop over on the way to go somewhere else, such as Shimonoseki (下関) which is on the next Island.
Mojiko is famous for Yaki-curry. I had it for dinner. A man was playing accordion nearby the restaurant. He was just playing for fun and the sound made the streets of mojiko seem warm. People stopped to sit on a bench while listening to his music.
After listening to him for a while I just strolled around the area. I looked at the port and some shops. There was a honey shop called “bee honey”. I had a vanilla ice cream with honey on top whilst I sat inside and read a picture book.
I really enjoy being near the sea in summer. It cools my body down and the sky was beautiful in the evening.

A picture-story show on the street in Mojiko.
Want to know more awesome things to do in Kitakyushu? Get all the information on Kitakyushu and the rest of Japan that you need with arguably the best travel guide books on the planet.
How to Get to Mojiko in Kitakyushu
Thanks to the train getting to Mojiko is very easy. Just get off the JR train at Mojiko station.
Need somewhere to sleep while visiting Kitakyushu in Japan? Find your perfect accommodation no matter what your budget.
Do you agree with this Mojiko review? Feel free to leave your own Mojiko review (or anything else you want to say or ask) in the comments 
August 4, 2016
Maizuru Park Review, Fukuoka City, Japan
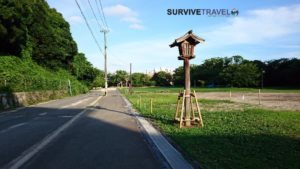
This post is a Maizuru Park review. Maizuru Park, a.k.a. Maizuru Koen, is a park located in Fukuoka City which is a city in Japan. This Maizuru Park review also includes direction on getting to Maizuru Park, pictures and other useful information as well as some not so useful personal opinions.
Right Picture: Small entrance from the gate.
Featured Picture: Ruins of Fukuoka castle.
Cost(s): Free.
Address: 1 Jonai, Chuo Ward, Fukuoka, Fukuoka Prefecture 810-0043. 福岡県福岡市中央区城内 1
Maizuru Park Review, Fukuoka City
I came across Maizuru park by chance. I was actually looking for Ohori Park (to get more pictures for a previous post I wrote) when I passed through a gate and ended up in Maizuru Park.
Previously I had been thinking “What’s that place next to Ohori Park?” To me it looked like a big, old, gate. I was half expecting ninjas to come out of it. Curiosity got the better of me so I went to check it out. It was just a gate.

Gate of the Fukuoka castle.
Eventually I came out on a street and wondered if I should go back. I decided to just keep going and discovered I could just go directly to Ohori Park via a small street inside Maizuru Park.
Maizuru Park has an old styled gate, lights, and benches. It was especially nice in the morning with it’s ultra-green grass and some nice paths for walking or jogging. Some people were jogging there through Ohori Park.
This park is located close to the seaside. The air is cooler and it felt very nice. I wanted to stay there for a couple of hours.
Overall, Maizuru park is a nice place. Actually it’s much bigger than I thought and I didn’t explore the whole park this time. You can get more information on Fukuoka castle in this park, but if it’s just for chilling I would spend more time in Ohori Park.

Inside Maizuru park.
Want to know more awesome things to do in Fukuoka? Get all the information on Fukuoka and the rest of Japan that you need with arguably the best travel guide books on the planet.
How to Get to Maizuru Park in Fukuoka City
Take the subway towards Meinohama (姪浜 ) from Fukuoka airport subway station 福岡空港 (or Hakata station博多, Tenjin station天神). Get off at Ohori park station. You can get out of the station from exit 6. Walk along the “river”. You will see the old castle. Walk across the small bridge to the castle.
Start: 大濠公園駅 Ohori park subway station.
Goal: 福岡城潮見櫓 is the gate I got in.
Need somewhere to sleep while visiting Fukuoka City in Japan? Find your perfect accommodation no matter what your budget.

A map to get into Maizuru Park.
Have you been to Maizuru Park in Fukuoka City before? Help out other readers and leave your Maizuru Park review (or anything else you want to say) in the comments
July 31, 2016
Ohori Park Review, Fukuoka City, Japan
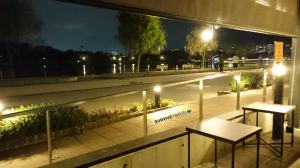
This post is an Ohori Park review. Ohori Park is a park found in Fukuoka City, in the prefecture of Fukuoka in Japan. This Ohori Park review includes personal opinions and useful information including directions, pictures, costs, etc.
Right Picture: Taken from the bench outside Starbucks.
Featured Picture: Overlooking the lake in Ohori Park.
Cost(s): Free.
Address: Ohori park1, Chuo-ku, Fukuoka city, Fukuoka, Japan.
Ohori Park Review, Fukuoka
Ohori Park might be the nicest park in the Fukuoka prefecture (Japan).
The town it is located in has a subway so getting to Ohori Park is very convenient.
Inside Ohori Park there is a big lake with some benches along it and a running/walking path.
There is also a small island in the middle of the lake which can be accessed via a bridge.
The restaurants in Ohori Park provide both Japanese and Western meals as well as the usual refreshments, e.g., coffee.

Ohori Park in the Morning.
Need somewhere to sleep while visiting Fukuoka in Japan? Find your perfect accommodation no matter what your budget.
There is also a Starbucks which (as always) offers WI-FI.
I really enjoy going to Ohori Park because when I go there I can forget about busy life for a while and just relax, especially on weekends. I like to bring my kindle and just read with a cup of tea in the afternoon.
During festive times, such as Christmas, the “mood” in the park changes with decorations and other things. I enjoy this because it means I can go there and experience it in a different light.

Walking/Jogging path.
Want to know more awesome things to do in Fukuoka? Get all the information on Fukuoka and the rest of Japan that you need with arguably the best travel guide books on the planet.
Getting to Ohori Park in Fukuoka
Take the subway towards Meinohama (姪浜) from Fukuoka airport subway station 福岡空港 (or Hakata station博多, Tenjin station天神). Get off at Ohori park station.
Have you been to Ohori Park in Fukuoka before? Help out other readers and leave your Ohori Park review below, and if you know of more or updated information or even if you just want to say hi then please leave a comment
July 28, 2016
How to Make Coconut Oil
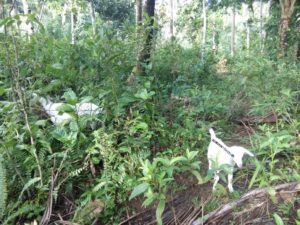
This post shows how to make coconut oil, the old school way. I mean, it shows how to make coconut oil like they do in the mountain villages in the Philippines.
Right Picture: A goat along the jungle path to where we made coconut oil.
I think coconut oil is one of the greatest things in the world. Seriously. I use it for a bunch of stuff. One day while preaching the awesomeness of it to my Filipina friend she blurted out “That’s so easy to make. We can do it at my sisters place.” So the next weekend we went.
To get to her sister’s house is about a half hour habal-habal ride out of Baybay. We got dropped of at the side of the road and then walked into the Barangay, which, to my delight, was well off the path of normal residence. About twenty minutes walk into the jungle along a small foot path that apparently gets cut off when it rains to hard. Lately the rainy season has started. They must get cut off every day.

When it rains too hard they can’t cross this stream to get out of the jungle.
Eventually we got to the end of the path that opened out into which seemed to me like a little commune of sorts, with a few little huts scattered around a central “clearing”. A few chickens, dogs, cats, pigs and even a small horse.

The family horse.
As it turns out this is her family’s property so each little hut is like an uncle or something. Apparently, all the people in the Barangay we had to walk through to get to the jungle path are related in someway or another to her also.
Anyway, I discovered that the process of making coconut oil is extremely simple, although it takes some time.
How to Make Coconut Oil
Not surprisingly, you need coconuts. My friends younger brother sorted it out. He didn’t speak English so everything written here is just from observation.
Step 1. Get the Coconut Flesh
First you need to break the coconut so you can get the flesh out. He just hit it with the back of a big knife to split it in half. All the coconuts were brown so I’m guessing it won’t be good with green ones. We drank the water from some of them.

Breaking the coconuts open.
To get the flesh out he had some type of gismo which shaved it out. It looked like hard work but he made it look easy.

Using the home-made coconut shaver.
Step 2.Cook out the Oil
Once he had gutted about seven coconuts they called in their Aunt to cook the oil out of them. She got all the shredded coconut flesh and put a little water. Just enough to soak the flesh, but not too much. Then she squeezed the water out into another bowl. She did this twice.
Next she just put the liquid over a flame and boiled it for a while. It was just a wood fire so I guess there’s no need to worry about temperature control. Just boil away and stir often/constantly. Once it goes clear it is ready.

My friends aunt cooking the oil out of the coconuts.
Can’t be bothered making your own coconut oil? It’s easily purchased from many places, and can even be delivered to your door!
Step 3. Strain the Oil
Let it cool down a little and then strain it into whatever your going to carry it in. We just used an old rum bottle.

The finished product.
There’s black grainy stuff left over which we ate. I think it was burnt coconut bits. A deep fried coconut resin snack.
Any store bought coconut oil I’ve come across is clear (or white when it’s solid) but home-made stuff seems to be yellow. This is just going off some stuff I got off a lady in Bali and this batch.
Do you have experience on how to make coconut oil? Let us know your methods and/or if you have any questions or other comments 
July 24, 2016
How to Win at the Casino When Traveling
Most travelers are not big gamblers but there are some places where you will no doubt end up in a casino (think Las Vegas or Macau). I figure if you are going to gamble then you may as well do it to win so I have created this guide on how to win at the casino when traveling.
The aim here is not to become a “professional gambler”. If you want to do that then you should read Beat the Dealer by Edward O Thorpe and then spend many hours learning intricate systems until you are like Rainman.
Featured Image: Casino on Sentosa Island in Singapore.
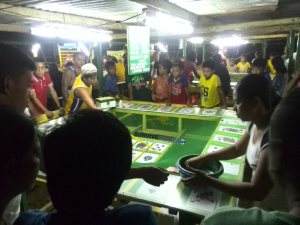
Right Image: A ‘pop-up’ casino in Bagasbas Beach, Philippines.
How to Win at the Casino When Traveling
The idea of how to win at the casino when traveling is more about having fun than winning big. Hopefully this guide on how to win at the casino when traveling will allow you to have a few hours of fun at the casino every now and again without losing your airfare, and even walking out a modest winner most of the time.
We do this with Blackjack.
This guide assumes you know the basic rules of Blackjack including what doubling down and splitting is.
Blackjack is the only game in the casino where the player can actually gain a small advantage over the dealer, assuming he/she knows three things.
Blackjack Strategy, i.e., whether to hit, stand, double, etc. depending on yours and the dealers cards.
Card Counting. Figuring out if the remaining cards to be dealt are in your favour or not.
Betting System. When to raise or lower your bets.
Blackjack Basic Strategy
There is a tried and true blackjack strategy table readily available on the internet. It is the same (or should be) everywhere because some smart bloke (or gal) scientifically and mathematically figured it out to perfection a long time ago.
Blackjack strategy changes slightly depending on how many decks there are, but once you memorise the basics it’s fairly easy. It follows a pattern so it actually isn’t too hard to memorise.
If you want you can buy a physical strategy card – or just find it on the internet.
It is important to know when to double down and split as these are the times you make the most money. You can have a big losing streak and then get a great hand with multiple splits and double down opportunities to bring you back (and on top), but if you don’t know how then you are screwed.
Learning basic blackjack strategy is a MUST if you want to stand any chance of beating the casino. Without it everything else don’t mean squat.
Card Counting
There are many different card counting systems and most of the good ones are fairly intricate taking lots of practice to master such as the fundamental Hi-Lo count. The one used here is simple and still pretty effective. It is called the OPP system. Explained here is actually a slight variation of the OPP system which makes it even easier to do and since we are not serious gamblers I omit things like back-counting, table-hopping and alike.
I won’t go into details of how it works, if you want to know that you can google it. Instead I will just explain how to do it and a simple betting system to go with it.
The information given here is mainly based on what i read on BlackJackForumonline.com/content/card_counting_technique_easyOPP.htm
Most card counting systems give a point value based on the cards dealt with a different negative or positive point assigned depending on the card. With the OPP system the point value is based on the hand, and you only need to consider the “low cards”.
Low cards are 2-6 (2, 3, 4, 5, 6).
Doing the Count
Start your count at +6. The main reason for this is because it is easier to count in the positive and starting with +6 will lessen the chances of have to negatively count. It is best to start just after the cards have been shuffled.
However many hands are being played, subtract that number from your count. This is your running count. Note that a single player may be playing multiple hands.
As each hand is played just add the number of low cards dealt to your running count.
When a new round is dealt you just repeat the above subtracting and adding from your running count.
When the cards get shuffled reset your count to +6.
Example
I approach a table and there are 3 players (including myself and the dealer). 6 (my starting count) -3 (number of players) = 3 (my running count).
Player one has 2 low cards. 3 + 2 = 5
I have no low cards. Running count stays at 5.
Dealer has 1 low card. Running count = 4.
Split hands are counted as separate hands and the original hand is ignored.
Betting System
To keep things simple we use a very basic progressive betting system. The amount of decks used is not considered although it is based on a six deck game. Having a more intricate betting strategy will give yield better results, but is harder to implement. If you happen to come across a two deck or a single deck game then you may want to raise your bet at a slightly lower count.
First decide on your minimum bet.
Bet the minimum bet, or one unit, when your running count is +11 or lower.
When the count is +12 bet two units.
Bet three units when the count is +13.
Continue this progression.
If the count reaches zero or less for two consecutive rounds then stop playing until the new shuffle/shoe.
If the count is +18 or more then take insurance when the dealer has an ace showing.
Bankroll
Bankroll refers to how much money you bring to the table.
Statistically, the more you bring the longer you can play and the less likely you are of ruin (losing all your money).
I recommend having a bankroll of at least 50 times your betting unit. This would be the very least. It would be much more preferable to have 50 times your maximum bet as it would greatly decrease your risk of ruin.
There are two things to remember.
In order to enjoy yourself (remember, we are not professional gambler, we just want to have some fun) you must be willing to lose your bankroll.
The larger your bankroll is in terms of multiplication of your minimum bet means the longer play-time you can have which equals a greater your chances of walking out a winner.
Final Tips for How to Win at the Casino When Traveling
Give yourself a bit of practice first. I just use a free Blackjack app on my phone. There are lots to choose from.
Decide how much you are willing to lose before you start gambling and walk away if you lose it all. Do not try to win it back.
Give yourself cut off limit for when you win. I mean, set yourself goal and once you reach it, stop gambling.
Think of it as paying for entertainment. If you happen to win it is a bonus. You decide what you are willing to spend and once you’ve “spent” that much you walk away, happy with your purchase. If you happen to reach your winning goal you walk away a modest winner. Don’t get greedy, you will lose.
Pick the right table. The most advantageous table is one than uses the least amount of decks and the least amount of players. If there are other players do your best to get the seat where you are dealt to last.
Don’t drink too much. If you aim is to get drunk at the casino then play the 1c slots, claim your free drinks and tip the waitresses (assuming you are in a casino where they give free drinks to players.)
Don’t try this with online casinos. Card counting does not work with online casinos because the cards are shuffled after every hand.
If you really want to win at the casino when traveling (I mean win BIG) then I suggest reading Beat the Dealer by Edward O Thorpe.
What strategies do you use to win at the casino when traveling? We’d love to hear about them or your thoughts on this strategy in the comments
July 23, 2016
10 Uses for Baby Powder While Traveling

This post lists my top 10 uses for baby powder while traveling.
I first came across the usefulness of baby powder many years ago back in my military days. They used to issue a blend of medicated talcum power to put on your feet. Then , during my earlier days of traveling, I would occasionally throw a bunch of stuff out in an attempt to minimize. I would always get rid of the baby powder (or talcum powder) because I wouldn’t have used it in a while, but then in a few months it would creep its way back in.
Nowadays my pack contents more or less stays the same. A few things still come and go but I have a good core of stuff that I now know will always be useful, even if it is only once every few months. Baby powder is one of them.
Right Image: Many of my uses for baby powder while traveling are as as a back-up when I run out of coconut oil.
Bert’s Top 10 Uses for Baby Powder While Traveling
You’ll notice that most of these uses for baby powder while traveling are as a back-up. When I have all my stuff, i.e., in the hotel room, I will use my usual item for doing what-ever it is I need to do. If that usual item runs out, or when I’m on a day trip and only have my day-pack, then I make use of the baby powder. Yep, I keep a small bottle of baby powder in my day-pack.
1. Moisturizer
When in Bohol (the Philippines) I noticed a girl applying baby powder on her face before heading off to university. I asked what for and she (playfully) answered “keeps me beautiful”. After she left her Aunt told me it was to protect her skin. After that I noticed lots of Filipinas doing it. It seems they use it as a multi-purpose “beauty powder” / moisturiser / sunscreen.
My usual moisturiser is coconut oil (which also doubles as sunscreen) but when that runs out I use the baby powder.
2. Sun Screen
As mentioned in number 1 of these uses for baby powder while traveling it offers a bit of sun protection. Actually, I don’t think it is very effective (I wouldn’t replace my sunscreen with it) but is better than nothing.
2. Deodorant
Again, when my coconut oil runs out, I use baby powder as deodorant. Also, unlike coconut oil, I keep baby powder in my day-pack, which means I can freshen up during the day.
3. Chaffing
Baby powder saved me a lot of too much walking in the heat pain while in India. This is when I started carrying it in my day-pack.
4. Dry Lubricant
Baby powder isn’t a lubricant I would use with a “special friend” (try coconut oil for that) but for practical means it is pretty good, especially as a graphite replacement when a lock is sticking.
5. Ant Repellent
Sprinkling a line of baby powder around ant entry points will help keep them away.
6. De-Salter
The first time I ever lived in another country I learned from a group of Malay’s (I was in Malaysia) that baby powder can be used to get that yuck feeling off your skin after being in salt water, i.e., so you can put your t-shirt back on.
This also works for the sand that gets stuck to you.
7. Aftershave
I usually use coconut oil but if I’m out of that then baby powder takes its place.
8. Cool Your Bedsheets
I spend a lot of time in tropical countries. Sprinkling some baby powder on my sheets keeps me cool. I admit that I don’t do this often but when I do on those extra hot nights it works wonders.
9. Moisture Remover
Many of the items in this list of uses for baby powder while traveling are possible because of this one. Baby powder soaks up moisture. If you have a spillage then just put some baby powder on it.
10. Freshen Your Shoes
The last item on my list of uses for baby powder while traveling is to freshen up your stinky footwear. After a long day of exploring on a hot day my shoes can become a little “iffy”. Baby powder sorts out the moisture and freshens them up.
Do you have any baby powder in your pack? If not, get some now!
What uses for baby powder while traveling do you know? Let us know them (or anything else you want to say) in the comments
July 20, 2016
6 Easiest Ways to Cure a Stiff Neck
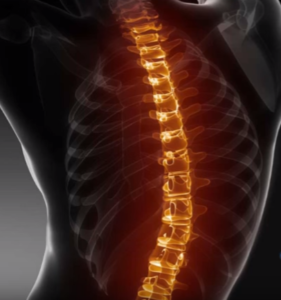
While I was in Sri Lanka I woke up with a stiff neck so I did a bunch of research on how to get rid of it. This post summaries my research down to what I have found to be the 6 easiest ways to cure a stiff neck.
A sore or stiff neck is not uncommon for travelers seeing as we seem to sleep in awkward positions more often than the normal crowd (like when doing overnight bus journeys or all those hour spent on planes or even the airport floor.)
In fact, even when not traveling I spend a lot of time in front of the computer which is not that great for posture and bad posture is the main culprit for a stiff neck, i.e., having your head leaning forward puts strain on the neck. Other forms of bad posture are usually in the way of bad sleeping positions.
Another cause for a stiff neck is due to sudden jerking force that may happen in a accident or during contact sports. Even a very forceful sneeze may result in a stiff neck.
Images are snapshots from the video used in this post. If you are the videos publisher and would like the video and/or images removed please let us know via the contact form.
Preventing a Stiff Neck
As with any ailment, or even any problem in life, the best cure is prevention. It means that this is actually the easiest of the easy ways to cure a stiff neck, because you won’t get one in the first place
July 17, 2016
Travelers Exercise Routine
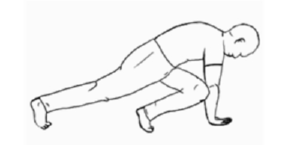
Here is a travelers exercise routine that needs no equipment and very little space, i.e., you can do it in an average size hotel room. This travelers exercise routine includes all the components of a good workout including warm up, cool down and stretching. It also doubles as ongoing self-defense training and is flexible enough to be done whether you have ten minutes or a full hour.
Right Image: Taken from the book Survival Fitness courtesy of Sam Fury
Travelers Exercise Routine
The information in this post does not actually detail the full exercise routine. Instead we built a whole website dedicated to it! This post will simply give you an introduction and links to the information you need.
This travellers exercise routine is based on parts of the Survival Fitness Plan.
Warm Up
This full-body warm up lasts for approximately ten minutes and even includes five super-burpees which is an exercise developed especially for the Survival Fitness Plan that conditions the whole body including cardio stamina.
If you have a busy day exploring ahead of you and no time to “work out” then at the very least do the Survival Fitness warm-up.
Cool Down and Stretch
On those days that you have twenty minutes to spare spend ten minutes on the warm up and then do a ten (or fifteen) minute yoga routine that focuses on increasing flexibility. I won’t harp on about the all the benefits of yoga but there are a lot of them and the encompass mind, body and soul/spirit/qi or however you like to think about it.
Self-Defense Training
When you have thirty minutes or more you can add in self-defense training. I have chosen self-defense training because it is a very useful skill, needs no equipment, and by using the Survival Fitness Plan Self-Defense method you can go through everything you need each week, assuming you are already familiar with the techniques.
Survival Fitness Self-Defense has been specifically designed as an easy to learn and highly effective self-defense system. It is good for those that don’t want be “a martial artist” while still being effective (I dare say it is more effective than most martial arts) however, for those that do want to learn more then with a bit of extra training you can delve into the Self-Defense Series.
Yoga Nidra
When doing a full training session you will start with the warm-up followed by self-defense training and then the yoga cool down. Finally you can end with Yoga Nidra which is kind of like meditation.
Other Training
In the Survival Fitness Plan there are many more activities besides self-defense such as parkour, swimming, climbing, survival skills, etc. Unfortunately it is hard to keep to the full Survival Fitness Plan training routine when traveling due to lack of time, equipment, space, etc. but when you do get the opportunity to do them, take it. Outdoors activities such as snorkelling, mountain bike riding, rock climbing, hiking, etc. are all (in my opinion) fun to do and will help to increase your Survival Fitness skills.
Walking
One activity that there is almost always an opportunity to do when traveling is walking. Not only will it keep you fit but you’ll save money on transport and see loads of stuff that would usually just zip by when in a car or bus. It’s a great way to explore.
Sometimes I go for weeks with just doing the morning routine and then walking around and, as long as I keep my nutrition up, it keeps me pretty fit.
Nutrition
The last thing to touch on for this travelers exercise routine is nutrition. One of my favorite things about traveling is testing all the local foods but it is also important to keep up a good diet. Eating properly and not taking too many drugs (including alcohol, pharmaceuticals, smoking and illicit) is essential to ensure good health, and even more-so when traveling since being “on the road” and around unfamiliar surroundings (different people, foods, pollutants, etc) can have a toll on your immune system.
Do you have your own travelers exercise routine? Let us know about it (or anything else you want to say) in the comments
July 13, 2016
12 Uses for Tiger Balm Whilst Traveling
This post gives twelve uses for tiger balm whilst traveling.
There are two types of tiger balm. White and red.
I carry white tiger balm because it is more versatile.
Red tiger balm is stronger and used more for more severe muscle aches. For not so severe muscle pain I just use white and it does the trick fine.
I’ve known about tiger balm since I was a small child but I only really started carrying it around whilst traveling less than a year ago. Prior to that I was all about clove oil. In my opinion, tiger balm is better to travel with than clove oil, and I think it actually lists clove oil as one of its ingredients.
The two main reasons I think tiger balm is better than clove oil is that it is easier to replace (more readily available, even in more remote places) and easier to carry. Oil can get messy. Tiger balm comes in a small but very strong glass container. I use it almost every day to soothe mosquito bites. It lasts for ages. Also, it does everything clove oil can do and more since it is mild enough to put straight on your skin, unlike pure clove oil which you need to dilute first.
Clove oil does have stronger healing properties but I i figure that if I ever need something that strong whilst on the road then I’d probably turn to pharmaceuticals for a “quick reliable fix” (such as anti-biotics) and/or a doctor/hospital. Actually, there’s no probably about it. It’s happened and when I’m really that ill I turn to a professional.
12 Uses for Tiger Balm Whilst Traveling
Here is my list of 12 uses for tiger balm whilst traveling presented in alphabetical order.
1. Alleviate Headaches.
Simply put a little tiger balm on both your temples.
2. Bad Stomach Cure. Whether you have the sh*ts, constipation, or just a stomach ache, you can rub some tiger balm on it and let the heat do its magic.
3. Clear Congestion. Whether you have a blocked nose, allergies or other congestion rubbing some tiger balm on your chest (like vapour rub) can help to open your sinuses.
4. Get Rid of Corns. Put some tiger balm on your corn (or callus) three times a day.
5. Cure a Sore Throat. Put some tiger balm on your neck when you feel a sore throat coming on. This works best if you catch it early and do it before sleeping.
6. Insect Repellent. It soothes the bites and will keep the bugs away in the first place. Nothing better than prevention.
7. Pain Killer. Apply directly to sore muscles and bones.
8. Prevent Motion Sickness. Put a tiny amount of tiger balm on your lips. Emphasis on the word tiny. Alternatively (and what I do) is just take a big whiff of it every now and again whilst traveling.
9. Prevent Odors. Tiger balm has a strong scent so if you prefer that over any other smell then use it to overpower. A good example would be to leave and open container in your shoes.
10. Remove Ink. If you have ink or paint stains on your skin cover them in tiger balm and wait a couple of minutes. You will be able to pull them off easily. This also works with sticker residue.
11. Soothe Bug Bites. This is the thing I use tiger balm for most often, mosquito bites.
12. Soothe Minor Burns. Applying some tiger balm to a mild burn will help with the pain and also lessen the chances of blisters.
Well that’s it for this list of 12 uses for tiger balm whilst traveling. For more information on staying healthy whilst traveling check out Wilderness and Travel Medicine by Sam Fury.
Do you know any other uses for tiger balm while traveling? Let us know them or anything else you want to say in the comments