Kristen Martin's Blog, page 2
October 25, 2016
How to Write a Mindblowing Plot Twist
Since NaNo is quickly approaching, I figured it would be fitting to do a video on Plotting, and more specifically how to write a damn good plot twist. So that’s what we’re going to talk about today. If you'd rather watch the video on this topic, feel free to click play below. Otherwise, keep on reading!
The best plot twist is an unexpected one. This means that something happens in your story that the reader couldn’t possibly have guessed, or maybe that a semi-expected change in your story happens at a completely unexpected time. Once you think of a good way to put a twist in your story, it’s important to map that entire plot twist out to ensure you really can make it work and that it’s still plausible and believable.
In general, there are three types of plot twists: Revealing, Shocking, and Clever
1. “Revealing”· Revealing plot twists lead to an answer muddled in uncertainty in the story
2. “Shocking”· Shocking plot twists completely reverse the truth mentioned in the story
3. “Clever”· Clever plot twists use the constraints of the story to extract an interesting twistEach plot twist has a different effect on your audience; yet there is only one true difference in each type of plot twist: It’s how you twist your reader’s expectations. And twisting the reader’s expectations is what hooks them to your writing which is obviously what we want. So we’re going to talk about 6 ways you can twist your reader’s expectations:
1. The Obvious· During the outlining phase, think of all the “obvious” things that could happen in your story and write them down. The reader may expect certain things to happen throughout your book surrounding lies, betrayals, secret lovers, or (shocker) love triangle! Once you have your ideas, it’s time to organize them into three piles.o The first pile is the: Throw out pile: Some of these twists will be too clichéd, too vague, make no sense, or are just way too obvious. These are ideas that will make your readers groan in agony due to your inability to shock them. Get rid of these ideas while they’re undeveloped. You’ll thank yourself later.o File for later pile: These certain twists are unique, but maybe they don’t fit the pacing of your story. Hold onto them though, because you may be able to work them in later on.o Keep pile: Sometimes while you’re outlining, a great and surprising plot twist will work its way into your head. If this happens to you, keep it and try expanding on it to see if it’s worthwhile having in your story.
2. The Foreshadow· Foreshadowing directly coincides with the “revealing” type of plot twist. The greatest plot twists are those that are hard to guess the first time, but make perfect sense the second time around. This requires a great deal of cleverly placed hints throughout your story to lead up to the big twist. In order to foreshadow, first, you need to plant the idea that something strange is happening. Have your characters familiarize themselves with concepts that will be important in the future for your plot twist. This could be interacting with important objects, mentioning certain topics, or having them react to certain things. Second, you should increase the tension around your idea and leave clues muddled in them. The easiest way to increase the tension is to have your characters fail due to ignorance. Allow your characters to mess up and fumble, all because they are missing one important fact. And lastly, make your reveal. Show the hidden piece of information as interestingly as possible and try to have your character explore what they must now overcome with this new knowledge your twist has provided.
3. The Open Ending· When you leave a story open-ended, this means that you don’t explain how the story ends, but rather, you leave it up to the imagination of the reader. A great example of this is in Fight Club by Chuck Palahniuk. Spoliers ahead! So if you haven’t read or seen Fight Club yet, you may want to jump ahead in this video by 15 seconds or so. In Fight Club, after the narrator pulls the trigger, he wakes up . . . somewhere. It could be heaven. It could be a lunatic asylum. He is told Tyler will return but Tyler doesn’t exist . . . or does he? With an open-ending, the audience doesn’t really know what happened to the characters in the end, but based on the story and what has occurred up to that point, they can usually infer an ending in order to satisfy their need to tie up any remaining loose ends in their minds.
4. The Untrustworthy Narrator· This is a great technique to use because people are often conditioned to take the narrator’s word when reading a story. The narrator is the perfect character to use in order to confuse the reader, and maybe give them hints and suggestions that will lead them to a completely different conclusion from the one that you are setting up for your plot twist. However, if you are going to use this method, it’s important to not make it glaringly obvious that the narrator is untrustworthy in telling the story. You should be foreshadowing it subtly, but the story that the narrator is telling must also be completely believable. When used effectively, the reader will be very surprised at the plot twist, but will also have a feeling of “Man, I should have seen that coming.”
5. The Reverse Character· This is when your plot twist consists of either the hero turning into the villain or vice versa. Sometimes it comes off forced when the character becomes a polar opposite of what he or she has been throughout the story, so it is best to give these characters some traits that would make their transitions believable.
6. The Unexpected Kill· Your readers might hate you for a short while, but this technique provides an unexpected plot twist. Killing off one of the main characters in the middle of the story is something that always comes as unexpected. Readers pick up on who the key characters are early in the story if they are well-developed, and they attach to these characters early on. Having one of these main characters die really twists things into an unexpected direction, because the reader was already looking forward to what will happen to this character at the end of the story, and so finding out that this character will not be playing any type of role in the story’s ending is always a good shock for the reader.
So there you have it, 6 ways for you to write a mind-blowing plot twist that your readers will never see coming. That's all that I have for you guys today. Thanks for reading! Don't forget to check out my debut novel, THE ALPHA DRIVE, on your way out, as well as the sequel, THE ORDER OF OMEGA, which releases on November 8, 2016. As always, I will see you in the next post!
Until next time,

source 1
source 2
source 3


October 18, 2016
How To Balance Multiple Writing Projects
Recently, someone had a question that really got me thinking on My Ask Me Anything Page on Tumblr. They asked how to balance multiple writing projects, as well as how to stay focused on just one when you may have two or three other book ideas bouncing around in your head. They referred to it as Shiny Idea Syndrome, which is where you either a) are working on your current book project when suddenly a shiny new idea pops into your head so you drop your old book project to start working on the new one OR b) you have an idea for a new book project, but your current one is taking up all of your energy and you can never seem to find time to work on the new one. I'm guilty of the first one because when I get a new idea that I'm so excited about, I want to drop what I'm doing and focus all of my attention on that new idea. But it's important to remember that your old project was once a new idea, too . . . so how do we make it new and shiny and get excited about it again? And on the flip side, how can we stay focused on our new project when we just can't tear ourselves away from our current project? I've come up with seven tips that I hope will help you stay focused and balance multiple writing projects. If you'd rather watch the video on this topic, feel free to click play below. Otherwise, read on!
1. Write everything down in its appropriate notebookI used to write everything down in a single notebook and while this worked for a while, the more I wrote down for multiple book projects, the more confused I became. I started flipping through page after page, trying to mark them so I could differentiate what was for Book A and what was for Book B. I'm sure you can imagine that things started getting really chaotic having ideas for one series consisting of three books and another consisting of 6 or 7 books and another nonfiction project that is completely unrelated and having all those ideas in a single notebook. So the first step here is to use different notebooks for each of your book projects. If it's a series, and it's a large notebook, then you can probably get away with using one notebook for it, but for multiple series? Nuh-uh, honey. Grab a new notebook. Trust me, you'll be glad you did.
2. Organize your thoughtsAs you can probably imagine, it is much easier to organize your thoughts when you have your ideas in separate notebooks. I know I've mentioned this in a previous video, I think the topic was on outlining, but once I have all of my ideas for a book, I'll write them down on index cards. My ideas usually come to me in the form of scenes, so this makes it easier for me. Once I have all of my ideas or scenes written down on index cards, I will start to organize them into a storyline that makes sense. I always keep blank index cards with me so that I can write down new scenes as they pop into my head while I'm organizing my thoughts into said storyline. Please note that this is just my creative process and that it may not work for you. If it doesn't, that's okay. The more time you spend in your "creative zone", the more clear your "writing process" will become.
3. CompartmentalizeThe definition of compartmentalize is to divide into sections or categories. As the definition suggests, in order to stay focused on your current book project or jump into your new one, you'll have to learn to compartmentalize. FOREWARNING: This is no easy feat and is not something that can be learned overnight. Compartmentalizing takes practice, patience, and energy. For example, say something happens to you that completely ruins your day, like someone flipping you off while driving even though they're the ones who cut you off, or multiple people telling you that you look tired at work when you actually aren't and put a lot of effort into your make-up or outfit that day, or maybe you have a disagreement with your partner, family member, or friend. And yes, if you couldn't tell, these are all things that have happened to me and tend to put me in a bad mood. Now most people would stay in that bad mood all day and write it off as "just one of those days". But the people who can compartmentalize are able to take those negative feelings, put them in a box or compartment in their brain, secure the lid tightly, and shove it back to the furthest depths of their subconscious and go about having a spectacular rest of their day. Compartmentalization is not for the weary, so don't be disappointed if it's hard for you to do. For our writing projects, we have to compartmentalize our ideas for Book A, put them in a box, and shove them to the back of our minds if we ever want a chance to work on Book B with our undivided attention.
4. One project a day, don't strayThis is something that I still struggle with and am improving upon daily. Every morning when I wake up, I tap into my writing brain to see which project I should focus on for that day. Each day is different, which means I feel different, which means my focus is going to be different. If I'm feeling more analytical, I tend to focus on editing one of my manuscripts instead of writing. If I'm feeling creative with a side of organized, I tend to dedicate that day to outlining. And on the days when I have ideas coming out of my eyes, ears, and mouth, I dedicate that day to writing. Normally, those ideas will only be for one book project, so it makes it easy to pick which one. And usually, I'm only writing one manuscript at a time. Though even when I'm not, my ideas still tend to be for one book project and one book project only. I recommend picking one project a day and sticking with it because you'll be much more productive and get a lot more done if you say "I'm going to work on Book A today" than if you were to bounce around editing, outlining, and writing for all 8 of your other projects. So, when you wake up, tap into how you're feeling and use that energy to focus on your chosen project.
5. Get in the right "zone"More often than not, things happen to us throughout our day that can throw us off our game, anger us, rile us up, or exhaust us. It's life, it happens. But, as mentioned in the previous step, you chose your book project for the day and by golly, you're going to stick to your guns! So it's important to get yourself in the right zone for your chosen book project. Whether it's music or certain playlists that get you in the mood to write for Book A, or a different writing space for Book A than Book B, or a Pinterest board you created with all things related to Book A, get yourself in the zone. I can tell you that, for me, I actually have different writing spaces. For all 3 books in THE ALPHA DRIVE trilogy, I wrote most of them either at my desk in my home office or in my bed, but for my dark fantasy series, I've written the majority on my couch in my living room. And for my nonfiction project? I've written most of it at Starbucks. Sometimes having a certain "place" or routine associated with a certain book project will help you stay focused on that project. If you don't have the luxury of changing up your writing space, try using different candle scents, different outfits, or even writing outside and being in nature. It may not work for everyone, but I know when I sit down on the couch, it's dark-fantasy-writing-time.
6. The 10-minute ruleI can't remember who told me this when I was younger, but I do remember it had to do with homework. They told me that when I didn't feel like doing homework, if I would just sit down at the kitchen table and do it for just ten minutes, it was guaranteed that I'd sit there and finish the whole assignment. And it worked. Every single time. I like to think that this is because I'm the kind of person who likes to finish what I start, but I've come to realize that it's just part of human nature. When you start something and you start getting into it, ten minutes go by and you'll think "Well, I'm already a third of the way into this, so I may as well keep going and finish it." If you've never tried this before, I highly recommend it. Sit down at your desk or wherever your writing space is, open up a Word document on your laptop, set a timer for 10 minutes, and just start typing. I can almost guarantee that when that ten minutes is up, you'll want to keep going. And if it doesn't, hopefully one of the other previous steps I mentioned will keep you focused.
7. Be patient with yourselfWriting a book is a marathon, not a sprint. Oh I know, how cliche, but I don't care because it's true. Learning how to write a book will take time and so will learning how to balance multiple book projects. I hate to break it to you, but getting the first book down is a piece of cake. Each book after that gets a little harder not so much in writing it, but keeping all of your ideas at bay and in line with one another. Storylines get crossed, it takes more creativity to differentiate your characters, and keeping everything straight can feel like an impossible feat at times. But if you can find a way to stay organized, take a deep breath, and focus on one thing at a time, you'll be just fine. I promise.
So there you have it, 7 tips to help you balance multiple book projects. That’s all that I have for you guys today. Thanks for reading! Don't forget to check out my debut novel, THE ALPHA DRIVE, on your way out. As always, I will see you in the next post!
Until next time,
September 26, 2016
8 Mistakes Newbie Writers Make
Hi friends, happy Tuesday! Today we’re going to talk about 8 mistakes that newbie writers make when they’re first starting out. Many of these mistakes are ones that I made when I first started writing.
If you'd rather watch the video on this topic, feel free to click play below. Otherwise, read on!
Ready? Let's do this.

1. Failing to outline· I know all the pantsers out there are probably rolling their eyes right now, but outlining and planning ahead are two critical things that newbie writers really need to consider. You might have a million ideas floating throughout your mind and, as a newbie writer, it can be extremely difficult to translate those thoughts into a coherent, well-versed story. This is where outlining comes in handy. Even if it’s a sparse outline with just the beginning, middle, and end, at least you know where to start, what the midway point is, and how your story will end. As you get more comfortable with writing, you may end up not needing an outline and can just pants your way through your story. But for beginners, I highly recommend planning out your story, chapter by chapter, in a detailed outline.

2. Being indecisive on POV, or point-of-view· There are four major points of view: 1st person (I); 2nd person (you); 3rd person (Joey); and omniscient (author’s, sometimes used for setting scene but keeps reader from getting into the story). For newbie writers, third person POV will probably be easiest and the least confusing to use for fiction stories. First person is another POV that is often used, however it can be more difficult to write because it requires keeping the tenses straight throughout your book. My first series, The Alpha Drive, is written in third person POV, whereas my new dark fantasy series is in 1stperson POV. I started out with third person POV because it fit The Alpha Drive trilogy and the story I was trying to convey, whereas first person POV fits my dark fantasy storyline and really draws the reader in. Ultimately, the POV you decide to write in depends on the genre of your book and how you think your story will best be represented.
· Quick tip: Once you choose your POV, DO NOT CHANGE IT! Trust me, it is such a pain to get halfway through your novel to realize that you actually want to switch from 1st to 3rd person. Because the tenses are completely different, you’ll have to comb through your manuscript line by line and edit 95% of the sentences. There is no quick fix to do this in Word or any other writing program that I know of, so make the POV decision upfront and stick with it.

3. Imbalance of telling and showing· The art of writing lies in a writer’s ability to SHOW their readers the world and people they’ve created. Anyone can tell you about Joey taking his boat out on the ocean in the middle of a summer day, but it takes a writer to put you inside of Joey’s mind, feeling the stickiness of the humidity in the air, the smell of salt and seaweed, the summer sun beating down on his already bronzed skin, his shoulders tingling from the mix of sunscreen and heat. Did you picture that?
· When you “tell”, your readers actually distance themselves from the story, whereas “showing” draws them in close. There is a delicate balance here, so you have to pick out what information can be told and what information needs to be shown. If you find yourself providing large chunks of explanation, then you are telling and not showing. If your story is weighed down with too much telling, then find a way to turn those explanations into scenes and decide which characters will best portray what you’re trying to get across. Showing keeps the readers engaged; telling pushes them away.

4. Poor use of dialogue· We’ve all read it. The clumsy dialogue that sounds unnatural and the multitude of characters who all sound exactly the same. You can’t tell them apart! As a newbie writer, it’s important to remember that dialogue should be used to convey important information and enhance your characters. Ultimately, you want your dialogue to show your readers something extra, whether it’s a window to your characters’ souls, to heighten tension, or to reveal a twist in the plot. Your dialogue should also SHOW and not TELL. Here’s an example of dialogue that tells : “You can’t be serious,” she said in astonishment. And here’s that same example of dialogue that shows : She dropped her spoon, eyes wide. “You have to be kidding me.” Can you hear the difference?
 5. Lack of Editing· If you think that once you finish your first draft, all you’ll have to do is a quick proofread to look for spelling errors and typos, I hate to break it to you, but you are sorely mistaken. Editing is critical and it’s a lot more detailed and complex than just scanning your work for typos. It’s best to prepare yourself for the possibility of cutting chunks of text, removing entire chapters, writing new scenes, and completely re-writing old ones. Here’s some advice: When you think your story is the best you can make it, put it aside and leave it for as long as possible – a minimum of 2 weeks, the longer the better. Then come back and read it out loud. Your errors will literally leap off the page and it will make the editing process so much clearer and easier.
6. Repetition· During our writing journeys, it’s common for us to develop “pet phrases” or “pet sayings”, which are little terms or quirks associated with certain settings or characters that are repeated many times throughout our manuscript. This unnecessary repetition can be found within sentences, paragraphs, pages, chapters, and the overall book. Chances are, you won’t even realize you’ve done this, which is why editing is so important. Repetition should be used to place emphasis on certain things – just be careful you don’t overdo it.

7. Not checking for plot holes· Your plot is the underlying basis of your book. Without it, you have no story, and no story means no book. The concept of a plot hole is relatively broad – it can encompass everything from the slow start, a sagging middle section, uneven pacing, unreliable details, and using gimmicks as hooks. When it comes to plots, especially complicated ones, planning or using some sort of timeline can really help you find the holes before you even put pen to paper, or in most cases nowadays, fingers to keyboard. If you’re a pantser and not a fan of outlines, then try this instead: Write your entire story, then plot out major events in bullet point format AFTER you finish your manuscript. This will give you an eagle’s eye overview of everything you’ve written so you can sense check your work and make sure you didn’t miss anything critical to the development of the plot.

8. Being impatient & expecting miracles· Coming up with story ideas takes time. Writing a book takes time. Editing a book takes time. Building your author platform takes time. The whole writing journey takes time. So don’t be impatient with yourself or your work. Being impatient means that your work is at higher risk for error, and trust me, you do not want to release something into the world, especially your bookbaby, your pride and joy, if it’s riddled with errors. Strive to put your best work out there and understand that it could take months, even years, to get there. Be patient with yourself.
· In addition, don’t expect to become a bestseller overnight. Hell, selling even 100 books your first year will seem like an insurmountable task at one point or another. You’ve put in the work to write the book, and now you’ll have to put in even more work to market it and get it to the right audience. Again, this will take time and it will not happen overnight. Don’t expect to release your book and then the next day, wake up to find you’ve sold 1,000 copies. If this happens for you, then that’s amazing and we need to talk, but most likely, it won’t. And that’s okay. We all have different journeys. So set realistic expectations and continue to work hard, just like you’ve been doing all along. You’ll get to where you want to be eventually. It just takes time.

So there you have it, 8 common mistakes newbie, and even seasoned, writers make. That’s all that I have for you guys today. Thanks for reading! Don't forget to check out my debut novel, THE ALPHA DRIVE, on your way out. As always, I will see you in the next post!
Until next time,
source 1source 2
September 6, 2016
How To Finish Writing Your Book
I hope everyone had a relaxing Labor Day weekend!
Today I want to talk about something very near and dear to my heart, and that is: Finishing Writing Your Book. If you'd rather watch the video on this topic, feel free to click play below. Otherwise, read on!
We all know that writing a book is hard. Having written three of them myself, I can tell you that it’s not an easy journey. It’s one filled with trial and error, self-doubt, and criticism, yet it’s also filled with a-ha moments and a great sense of accomplishment. Nowadays, it’s not enough to start writing a book. When you think about it, pretty much everyone starts writing a book, but there are very few who actually finish.
I’m currently going through a “non-finishing” phase for the third book in The Alpha Drive series. (I know, I know, don't hate me!) I know exactly how I want it to end – I have it all plotted out and ready to be written, but for some reason, I keep putting it off. I honestly think it’s because I’ve grown so close to these characters over the past four years and I don’t want the series to end. I don’t want to say goodbye to them just yet. And I know that if I write the ending to the final installment, it will be over. I won’t write about those characters ever again and that’s truly terrifying. And really sad.
So obviously, that’s one reason to not finish writing your book, but there are a number of other reasons we, as writers, don’t finish writing our books. Maybe we lose interest in the story. Maybe we took a writing break that was a little too long and the thought of reading through what we’ve already written to refresh our memory is overly daunting. Or maybe we honestly have no idea how we want our story to end.
So what can we do to ensure that when we set out to write a book, we finish what we start? Try following these 4 foolproof steps to ensure your book isn’t another half-written story thrown into your ever-growing slop pile.
1. Have a plano I’m sure all the pantsers are running for the hills right about now. I will tell you right now that having a plan will actually help you write a better book faster. I’m not talking about some crazy detailed schematic for every scene in your book. I’m talking about a basic plan that will help you to keep your head on straight when your ideas have you spinning in eighteen different directions. So what should be in this plan? You should have these 7 things:· A premise or logline: You need to write down the main idea of your book. Just a couple of sentences. Keep it short and sweet.· A synopsis. Write 500 to 600 words that tell the story from beginning to end. Hint: this helps because then you HAVE to write down the ending of your book!· Differentiator: Write one paragraph stating what is unique about your book.· Target Audience: Who will be attracted to your book? Try to describe them as a single person to help you get a better idea of who you’re writing for.· Competition. Write down three books that are comparable to the one you’re writing.· Marketing Tactics. What will you do to market your book? Will you hire a marketing expert? Will you use social media? Will you run ads and giveaways? When? How often? Knowing how you’re going to market your book is just as important as writing it!· An outline. This can be as detailed or as brief as you want, but at the bare minimum should give an idea as to your beginning, middle, and end.2. Know the consequences and write them downo To avoid procrastination, it can be helpful to create your own painful consequences when you miss deadlines.o If you have weekly deadlines, make consequences for yourself if you miss them. I found some interesting ones online that I’d like to share. For example, if you miss your first deadline, you have to delete your favorite game (or social media site) from your phone and not reinstall/access it until the book is finished. If you miss your second deadline, you have to give your phone to your spouse (or lock it up somewhere) and buy three pints of Bluebell ice cream for the people who work in your office. If you miss your 3rd deadline, send a $500 check to the presidential candidate you despise.o Okay, so some of these are pretty severe, especially that last one, but I think you get the point of this exercise. If you create consequences for missing your deadlines, and those consequences are things you really don’t want to do or don’t want to live without, you’ll be surprised at how focused and productive you’ll become. o You have to actually stick to your guns on these consequences though, and enforce them, otherwise they won’t work.3. Accountabilityo Have people to hold you accountable to your writing goals, whether it’s your significant other, a close friend who supports your writing journey, a family member, or a writing buddy. It is good to be around people who are struggling with the same problems you are – the writing community is a great place to connect and to not feel so alone during the writing process. These people will support you, and by spending time with other writers and listening to their ideas and what they’ve learned from their mistakes, you’ll only become a better writer. These people can hold you accountable and help motivate you to hit that word count goal, or even better, surpass it!4. Set your intentions each and every single dayo I am very much a visual person, so imagining where, when, and how much I will write everyday really helps me to actually get it done. During the week, I usually imagine myself at the Starbucks across the street from my office with my laptop and a venti chai tea latte during my lunch hour, notebooks strewn open with my ten different colored pens, listening to ODESZA through my headphones, just typing away. During the weekends, I usually imagine this same scenario, just at Barnes & Noble.o Creating that visual image of yourself writing can be surprisingly motivating. Studies show that if you set an intention and imagine your environment and time of day, you are much more likely to follow through with your goal. An example to envision is: Each morning before work, I will write 750 words at my favorite coffee shop.
So let’s try this out with a little assignment. Wait . . . You’re giving us homework? Why yes, I am!
When writing a book, it can be tempting to just dive in with little to no thought and start writing. And sometimes this is necessary just to get started. However, you will likely save yourself time and create a better story if you settle on a solid premise before you start writing. Your premise acts as the foundation of your book. For fiction, your premise is also called a logline, a one-sentence summary of the protagonist, main conflict, and setting. So grab a piece of paper and use this formula:
The character + their goal + the conflict that character will go through + the result that comes from overcoming the conflict
Once you have your logline written down, I want you to take another piece of paper and write one to three sentences describing how your book will end. And if you’re not sure yet, then write down the different ideas you have for ways your book can end. You now have the basic premise of your story, as well as the end, and all that’s left is filling in the middle. Trust me, once you know the end of your story, it makes it much easier to figure out what should happen in the middle to lead up to your grand finale.
Think about it this way: If you don’t know the ending, then you don’t know what it is you’re writing up to!
So there you have it, 4 foolproof steps to ensure you finish writing that dang book. That’s all that I have for you guys today. Thanks for reading! Don't forget to check out my debut novel, THE ALPHA DRIVE, on your way out. As always, I will see you in the next post!
Until next time,

August 30, 2016
How to Craft a Killer Query Letter
Hello All and Happy Tuesday!
I know we’ve talked about self-publishing in some of my previous posts, and I even made a mini-series on YouTube, but what about those of you wanting to go the more traditional route? Just because I’m self-publishing my first series doesn’t mean I never considered going the traditional route. Originally, I actually did query some agents and even sent some sample chapters to a couple which got us talking, but in the end, self-publishing was a better choice for me. Today I want to share my experiences and research on crafting a killer query letter, as well as some do’s & don’ts for querying literary agents.
If you'd rather watch the video on this topic, feel free to click play below. Otherwise, read on!
First, it’s important to understand what a literary agent is and does. A literary agent is someone who attempts to sell your book to a reputable publishing house. They keep up to date with editors’ interests and contact information, and they also negotiate the terms of your contracts with publishers. A literary agent does not guarantee fame and riches, nor do they sell every MS she or he agrees to represent. Nowadays, it’s very difficult (and almost looked down upon) to send your book proposal straight to a publishing house – they expect you to have a literary agent and many won’t work with individual authors. They will work with literary agents only. So it’s good to have an agent in your corner because they will offer guidance or suggestions for improving your book, get it into the hands of editors, and secure an advance or sell your book at an auction. Plus, they know the business and the industry, so their knowledge is invaluable.
So how does one go about snagging a literary agent? By submitting a killer query letter! And today we’re going to talk about how to do that, along with the entire querying process.
First things first, what is a query letter? It’s a one-page letter sent to literary agents in an effort to get them excited about your book. You have one page and 300 words or less to woo a literary agent into falling in love with your story and then requesting your manuscript. Here are some guidelines to consider before writing your query letter:
1. Ensure your MS (manuscript) is 100% complete. Do not start querying with a MS that is only 50% or even 75% complete. Why? If the agent loves your story idea so much and asks for the full manuscript, you’re going to be S-O-L (shit out of luck). Trust me on this one, make sure your MS is completed and has been edited/revised at least twice before starting to query agents.
2. Research potential agentsa. There are many different tools out there to research potential literary agents. I’ve found that AgentQuery is the most user-friendly and up-to-date. And it’s free
3. Check and double check submission guidelinesa. Some agents will request sample chapters be pasted into the body of the query letter email, and others will want them as attachments. Some may not even want sample chapters in the first go around. Every agent is different, so make sure you read the submission guidelines before pressing send!
4. Prepare the necessary submission itemsa. Make sure you have the submission items ready to go before even opening up a new email. Some agents may ask for a full book synopsis, which can take some time to write. Just make sure you have everything ready before drafting the email.
Once you’ve done these things, you can now move onto actually crafting the query letter. Depending on the submission guidelines, the literary agency may only accept emailed submissions. Many agencies have moved to accepting email submissions only because the turn-around time is faster. Just check on this before sending your query letter!
For this video, we are going to focus on query letters for fiction books. There are four basic components of a query letter:
1) Paragraph 1: Opening Lines a. This is your opportunity to hook the literary agent. Share any connection you have with the agent, especially if you met him/her at a conference or if you’re a fan of specific authors that he or she represents. If you have no specific connection with the agent, then immediately get into the action. The job of this first paragraph is to keep the agent reading and for them to get a sense of your book’s genre and marketability. This is not the time to broadcast your sense of humor or to ask broad questions to make the agent ponder. Share the title and genre of your book as well as your book’s word count.b. An example of a weak opening is: Have you ever wondered what it would be like to star in your own reality TV show? What if you were the only one who didn’t know the cameras were rolling? Find out in my book. An example of a strong opening is: Dear Mr. Smith, I’m currently seeking representation for my 70,000-word YA science fiction, THE ALPHA DRIVE. Given your interest in dystopian stories, I thought it might be a good fit for your list. Did I mention I might use parts of my previous query letter as an example?d. Make sure to address the agent you are writing the letter to. If the agent you are querying is named Sandra Clark, write Dear Sandra or Dear Ms. Clark – not Dear Agent. Personalize it!
2) Paragraph 2: The Synopsisa. Succinctly describe the plot of your story. This should be one to two paragraphs that focus on the main plot, setting, and characters. Let the agent know where the story takes place, introduce no more than a couple of characters who are pivotal to the main plot, and vividly describe the arc of the story. Let the agent know what is at stake or on the line for these characters – give them something to get invested in – but don’t give away the entire plot! End on a cliffhanger - you need to leave the agent wanting more!
3) Paragraph 3: Author bioa. Tell the agent a little about yourself. If you have publication credits, writing experience and education, mention it! Any excerpts you’ve published in literary journals or magazines should be mentioned. If nothing relates to the book you’re presenting, list the writing conferences and workshops you’ve attended or general publication credits. If you’re part of a writing organization, like RWA (Romance Writers of America) or SFWA (Science Fiction and Fantasy Writers of America), you should mention it. Keep your author bio relatively short, two sentences at most.
4) Paragraph 4: Appreciation a. We can’t even begin to imagine how inundated these agents’ email boxes are, so don’t forget to thank them for taking the time to review your query. Remember to offer sample chapters and/or the complete manuscript. If you are mailing your query by postal mail, be sure to enclose a self-addressed, stamped envelope, also called a SASE, for the agent’s response.
And what would this post be without an example of a great query letter? I’m sure many of you know Marissa Meyer, author of The Lunar Chronicles. She actually shared the query letter that got her an agent for her debut novel, Cinder, on Novel Novice. It’s actually one of my favorite query letters and I think it’s such a great example, so let’s have a look:
Dear Ms. Grinberg,
I’m seeking representation for Cinder, an 85,000-word futuristic young adult novel and a re-envisioning of the classic Cinderella story. I’m submitting to you because Scott Westerfeld’s Uglies series was hugely inspirational in the writing of this novel, and I hope my futuristic world will capture your interest as well.
(This is paragraph one. She does a great job because she addresses the agent by name, mentions her book title, the genre, and word-count, and connects with the agent by mentioning Scott Westerfeld’s book, which is one that this particular agent represents.)
Sixteen-year-old Cinder is a cyborg, considered a technological mistake by most of society and a burden by her stepmother. Being cyborg does have its benefits, though—Cinder’s brain interface has given her an uncanny ability to fix things (robots, hovers, her own malfunctioning parts), making her the best mechanic in New Beijing. This reputation brings the prince himself to her weekly market booth, needing her to repair a broken android before the annual ball. He jokingly calls it a matter of national security, but Cinder suspects it’s more serious than he’s letting on.
Although eager to impress the prince, Cinder’s intentions are derailed when her younger stepsister, and only human friend, is infected with the fatal plague that’s been devastating Earth for a decade. Blaming Cinder for her daughter’s illness, Cinder’s stepmother volunteers her body for plague research, an “honor” that no one has survived.
But it doesn’t take long for the scientists to discover something unusual about their new guinea pig. The surgeons who turned Cinder into a cyborg had been hiding something. Something valuable.
Something others would kill for.
(This is paragraph 2. Marissa gives a detailed synopsis, where she mentions the setting, only a few of the characters, and she vividly describes the arc of the story, but doesn’t give away the entire plot. She ends on a cliffhanger! Well done.)
I’ve had a novelette, “The Phantom of Linkshire Manor,” published in the gothic romance anthology Bound in Skin (Cats Curious Press, 2007), and am a member of the Romance Writers of America. I hold an MS in Publishing and a BA in Creative Writing, emphasis on children’s literature. My bi-monthly writing newsletter reaches over 450 subscribers.
(This is paragraph 3. Her author bio gives the agent plenty to go off of. I like how she mentions her bimonthly newsletter subscription – this tells the agent that you have a growing fan-base!)
Cinder is the first of a planned series.
I’ve attached the first fifty pages. Thank you for your consideration.
Best regards,
Marissa Meyer
(This is paragraph 4. She lets the agent know that she plans to make this a series (which shows the agent she is serious about writing as a career) and thanks the agent for reviewing her query. The close of the letter is very professional.)
So there you have it! A quick guide to crafting a killer query letter and an awesome example. I hope this helps you craft your own awesome query letter and helps you snag an agent!
Don't forget to check out my books on Amazon:
I'll see you guys in the next post!
Until next time,
[source]
August 23, 2016
Killing Your Characters
Because I seem to be on a dark streak here, what with writing my new dark fantasy series, today we’re going to talk about something both terrifying and exciting that many writers choose to add to their plotlines. Let me give you a hint: It’s not so much adding as it is taking away. Can you guess what it is? I’ll give you another hint. If someone were to browse my Google Search history, they would probably be very concerned and may even alert the authorities. That probably just gave it away, but if you guessed that today we’ll be talking about how to kill off characters in your book, you guessed correctly! If you'd rather watch the video on this topic, feel free to click play below. Otherwise, read on!
First off, I will say that I love killing characters. I know that’s a horrible thing to “love” to do and it probably makes me a terrible person, but planning a character’s death is truly exhilirating. As a writer, it pulls things out of you that you didn’t even know were there and really forces you to connect with that character on a completely different level. I think when writers make a really difficult decision, like to kill off a character who isn't the villain, they learn a lot about themselves as writers and in turn, it essentially hones their story-telling capabilities.
So, there are a few things to consider beforehand:
1. What kind of character are you killing?2. How will they die?3. How will that character’s death affect the protagonist as well as the other characters in the book?4. Is it truly necessary for the character in question to die?
Let’s start with the first question: What kind of character are you killing? Knowing the kind of character you’re about to kill is incredibly important. If it’s the antagonist, then you may have it a little easier than someone wanting to kill off the protagonist or the protagonist’s sidekick, usually it’s another good guy. Readers tend to root for the protagonist to take down the antagonist in some way, and a lot of the time that means killing the antagonist. But ending your book with the hero killing the villain can be pretty anticlimactic . . . and expected, which may cause it to feel like a cliché ending. That’s usually when writers switch focus and consider killing off a good guy. Most likely not the protagonist (although there are some books where this happens), but maybe their sidekick, love interest, or close friend. Before you kill that good guy off, think about how important this character is and what the ramifications of their death will be. To write the scene properly, you must understand that character inside and out. You must understand why this character has to die. Know why it has to be this particular character and not another.
Let’s move onto the second question: How will they die? Knowing whether the death will be clean or messy, what kind of weapon or force kills the character, and who/what is doing the killing are all really important elements of writing your character’s death scene. When I say clean versus messy deaths, I mean are they ones you’re going to go into great gory graphic detail about, or will you make it more of a clean death, maybe a swift slice to the neck or a gunshot to the head. The messier the death scene, the more you’ll have to do your research on the effects of someone after they’ve been shot in the head or sliced in the neck, how quickly they’ll bleed out, if there’s a possible chance of them recovering, etc. If you are in a medieval setting, then swords, blades, and arrows are likely weapons. These are also used in fantasy settings, but you can also add in magical elements and “forces beyond the realm”. If you’re writing in modern times, then a gun or knife is probably your weapon of choice. Who or what is doing the killing is also an important thing to consider, especially if one of your good guys is killing another one of your good guys. There’s a delicate balance writers need to strive for when making a good guy kill another good guy. You have to make the readers feel more connected to the one who’s doing the killing, otherwise you’ll have a bunch of crying, hysterical readers. HOW COULD SHE DO THAT? HOW COULD SHE KILL HIM? WHAT WAS THE AUTHOR THINKING?!
Moving onto question number three: How will that character’s death affect the protagonist as well as the other characters in the book? So to answer this, let’s think about one of two scenarios. Either someone ELSE will do the killing and your protagonist and others will mourn and react to the death; OR your protagonist will do the killing and the rest of the characters will turn their reaction onto the protagonist. Depending on the relationship between the protagonist and the newly deceased, the death will obviously hit them in different ways. Your protagonist might close up and retreat into their shell, or they may explode with fury and demand retribution. They might be appalled at what they’ve done and absolutely disgusted with themselves, or they might discover a new kind of twisted thrill and sudden urge to kill in order to feel that way again. If you want to strike your reader with emotions, you must first give them a reason to care about the character you are killing. You must make them care, otherwise that character’s death will add nothing to the story. It’ll be a waste of words and a waste of time.
And question number four: Is it truly necessary for the character in question to die? This is difficult to answer, but if you’re still struggling even after answering the previous three questions, it might be a good idea to run through this checklist. I found a great checklist on Helping Writers Become Authors by K.M. Weiland:
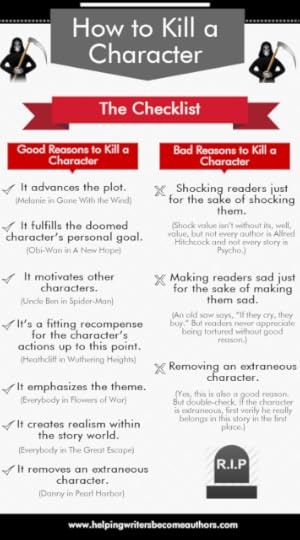
So there you have it, a quick guide to deciding whether or not to kill off your characters. I hope you found this post helpful!
Don't forget to check out my debut novel, THE ALPHA DRIVE, as well as the sequel, THE ORDER OF OMEGA!
Until next time,
[source]
August 10, 2016
How to Start a Publishing Company in 7 Steps
Today’s post is one that has been highly requested, and that is: How To Start Your Own Publishing Company. This is something that I did as a self-publisher. I am the President and Owner of Black Falcon Press, which is what I decided to name my company. I want to share my experiences with you all and give you a step-by-step guide on how to do this, in case you’re thinking about starting your own publishing company. If you'd rather watch the video on this topic, feel free to click play below. Otherwise, read on!
Quick disclaimer: This post and corresponding video are for informational purposes only. I am not an account or a lawyer, and I am not giving legal advice. Before making any business decisions, it is recommended that you consult a tax professional and a lawyer.
With that out of the way, first, let’s get into whyit’s a good idea to create your own publishing company. And make sure to stay tuned at the end of this post, because I’ll announce the 3 winners for my 1K giveaway! So, the pros of setting up a publishing company are:
1. Professionalisma. With your own publishing company, you can register your ISBN with your company name as the publisher. This will show up on your book sales page and looks more professional than having “CreateSpace” or "Your Name" as the publisher. Also, if you want to use IngramSpark, it’s required that you sign up as a publishing company and not an individual. Just something to keep in mind.
2. Separation of church and statea. By this, I mean that having a publishing company separates your book publishing activities from your personal income and assets. It can be helpful to have your business and personal finances separate for tax purposes. There are even times when it can save you money.b. Also, if you decide to form an LLC or S-corporation (more about those in a little), these companies shield your personal income and assets from lawsuits that may occur. While lawsuits are pretty rare in this line of business, it’s nice to have that extra layer of protection in place, just in case.
3. Options galorea. Once you have your own publishing company, the sky is the limit! Down the road, you may want to offer your services to the public. You can offer not only publishing services and publish other author’s books (which hint, hint is something I’m thinking of doing in the future!), but also offer editing, revision, or marketing services. It’s your business, so you can make it whatever you want it to be!
Okay, so if all this sounds fine and dandy and you’ve made the decision to start your own publishing company, follow these 7 steps:
1. Research your optionsa. It’s important to know what options are available in your country. Since I live in the U.S., the steps in this video are for starting publishing companies in the U.S. There are three main options to choose from in the states: sole proprietorship, LLC, and an S-Corporation.b. A Sole proprietorship is an unincorporated business that you run yourself. You would claim this under your SSN (social security number) for taxes. This is the easiest way to start.c. An LLC is a limited liability company (this is the one I chose) that is taxed similarly to a sole proprietorship. However, an LLC is an incorporated business and separates and protects your personal assets from business assets under, you guessed it, limited liability.d. An S-Corporation is an incorporated business and gives more tax advantages and savings.
2. Decide on a name for your publishing companya. Once you’ve decided on the type of business you’re going to set up, you need to choose a name for your publishing company. You must make sure the name you’ve chosen is not trademarked or already taken in your state. Also, make sure to choose a business name that is professional and fits your brand. Don’t rush this step because your business name is one that will stick with you for a long time.
3. Finalize the business type and file the paperworka. Now that you have chosen a name for your publishing company, you need to finalize the set-up and file the paperwork. This step is difficult for me to explain because the filing process is different for every state, so I’m going to tell you how to do it in Texas since that is where my publishing company is set up. Really, all I did was Google “How to start an LLC in Texas”. LegalZoom was one of the first websites that popped up and I had seen commercials on TV, so I figured I’d check that out first to see exactly how much this was going to cost. I answered all the questions and finally got to the pricing page and HOLY COW. So first of all, just to file in the state of TX for an LLC is $300. And because LegalZoom is a third-party service that is going to do all of the filing and paperwork for you, they have three different Packages: Economy ($149 + $300 filing fee), Standard ($289 + $300), or Express Gold ($359 + 300). I was willing to spend $300 to set up my publishing company, but not $450-$660. I knew there had to be another way, so I googled again.b. By going to the Texas Secretary of State SOSDirect website, I was able to do all my paperwork and file my certificate online AND it only cost me $300. And on this website, I was even able to search other company names registered in the state of Texas to make sure Black Falcon Press wasn’t already taken. Bingo. So moral of the story here is, DO YOUR RESEARCH and be patient about finding the best way to file your paperwork. I recommend going to the Secretary of State’s website for whichever state you live in to truly find out what it costs to start your own company. Don’t jump the gun, it’ll save you a lot of money.
4. Set up your business bank accounta. It only took 48-72 hours for my publishing company to be approved and I was emailed a certificate right away with my EIN (or employer identification number) and was told the signed certificate was in the mail. Once you have your EIN, you can apply for a business bank account. I personally bank through Wells Fargo, but my business account is set up through Chase. Each bank has a different process and requirements for setting up a business account, so you’ll need to consult with your local bank for more details.b. I also recommend setting up a business Paypal account for online transactions, especially if you’re going to offer and sell signed copies of your book. You can use PayPal to send electronic invoices and receive payment directly into your business bank account.
5. Set up an accounting systema. I wouldn’t worry about this too much in the beginning, especially if you’ve only published 1 or 2 books, but as you start publishing more and start earning higher revenues, you’ll need to have an accounting system in place so that you’re not running around with your hair on fire when tax season rears its ugly head. I recommend buying the cheapest version of QuickBooks. And since this isn’t a QuickBooks tutorial, you’ll have to follow the instructions that come with the software or find a different YouTube video to learn how to use that :^) b. Also, it’s important that you implement a system for tracking your receipts. Never buy personal items with a business account and vice versa. You want to be organized and keep this separate.
6. Register a domain name for your businessa. Every company has a website nowadays, so it’s critical that you make one for your publishing company! Register a domain name for your business. Domain names are the .coms, .nets, .orgs, .infos, etc. By this, I mean that I’ve registered blackfalconpress.com, as well as blackfalconpress.net, .info, and .org. You can do this through domain registrars, like GoDaddy or 7. Learn the laws related to publishing companiesa. Make sure you learn the laws related to your business. For example, in the United States, there are laws about collecting sales tax when you sell books at live events and it differs from state to state. I just experienced this at Leviosa Con in Nevada. You may also need to register for a sales tax license in your state and/or your city. Again, your State’s Secretary of State website should be your starting point to find all of this information.
So there you have it, 7 steps to help you start your own publishing company. One quick thing I did want to mention is that if you’re nervous to set up a company because you’re worried about potentially owing a lot at tax time, don’t fret. You have to sell quite a few books before you’ll even get taxed, and this doesn’t normally happen to self-published authors with 1, 2 or even 3 books under their belt. But if it’s still a concern, make sure you visit the Small Business Administration Website at sba.gov. I’ll put the full link right here: https://www.sba.gov/blogs/how-calculate-and-make-estimated-tax-paymentsThey explain everything really well and will hopefully ease your mind a little.
Just a couple of weeks ago, I reached 1,000 subscribers on my YouTube channel and promised that I would do my 1K giveaway drawing in a mid-August post. Three winners will get to choose from the following prizes: 1. A signed copy of The Alpha Drive; 2. A $15 Amazon gift card, and 3. A 1st chapter critique (to be used at anytime, it doesn’t have an expiration date!) So without further ado, the winners are:
1) Freda Cervantes2) Lara Tomasoa3) hihomatey10
Congratulations! Be sure to email me at authorkristenmartin@gmail.comto claim your prize. You can pick whatever you want, so if all three of you want one prize, like the $15 Amazon gift card, that’s okay by me. You can choose whichever prize your little heart desires.
Even if your name wasn’t picked for my 1K giveaway, you can still win a signed copy of THE ALPHA DRIVE during the Goodreads giveaway that starts today, August 9thand goes through Tuesday, August 16th. You can enter to win by clicking here.
That’s all I have for you guys today!
Until next time,
[source]
July 25, 2016
6 Ways To End Your Story
Today, we’re going to talk about some different ways that you can end a story. Not every book needs to have a happy ending, although there are many readers out there who prefer these, even if they won’t admit it. There are multiple ways you can end your book, and it doesn’t have to be all rainbows, butterflies, and unicorns. So let’s look at 6 common story endings. If you'd rather watch the video on this topic, feel free to click play below! Otherwise, read on.
Explicit endingThis is the ending that wraps everything up and answers all the questions. This ending will frequently tell what happens to each of the major characters, and is usually very satisfying in its completeness. Particularly well suited for novels (over short stories), when using this ending, it is especially important to watch for plot holes and missing clues. Example: Watership Down by Richard Adams.
Implicit endingIf you like an ending that is strongly based on interpretation, then you like implicit endings. These endings are more common in short fiction. An example is
Twist endingAs the name implies, this ending is unexpected or twisted. As a writer, everything you’ve led your reader to believe gets thrown out at the end, and is replaced by a new revelation when well done. If done poorly, your reader will feel cheated. The TV show The Twilight Zone was known for its twist endings.
Tie-back endingThis ending ties the end of the story back to clues planted in the beginning. The example provided in the endings class is the short story entitled The Star by Arthur C. Clark, where the story opens with what the main character’s conflict is and ends with why.
Unresolved endingIn unresolved endings, the main conflicts are left unanswered, such as in The Lady, or the Tiger by Frank R. Stockton. The reader is left to ponder the outcome. Cliffhanger endings would also fall under this category.
Long view endingThese endings tell what happens to the characters a significant timeframe into the future. An example is Harry Potter and the Deathly Hallows by J.K. Rowling, which ends telling who married whom, who had kids, etc. out into the future.So there you have it, 6 ways for you to end your story. I hope you enjoyed this post, I’ll see you guys in the next one!

Until next time,
 [source]
July 20, 2016
Self-Publishing 101 Part 3
Today I want to continue the self-publishing mini-series and venture on into the final segment, which is Part 3. If you missed Parts 1 & 2, I will link those videos down below for you to watch.
PART ONE
PART TWO
If you'd rather watch Part 3 instead of read this post, feel free to click play below! Otherwise, read on.
PART THREE
To recap, in Part 1 we talked about all of the things you should have completed before even uploading your manuscript to a POD company: ensuring your MS is in tip-top shape, choosing your title carefully, finding a high-quality professional cover designer, writing the back cover synopsis, creating a publishing company, and getting your ISBN numbers. I’d recommend having all of these things completed 5-6 months your projected publication date. And then there was Part 2, which consists of setting up your account with the POD company, setting up your title, setting your retail price, setting your wholesale discount, setting your categories, working through the edits from your professional editor, and thinking about getting early reviews for your book. If you haven’t watched these videos, I’d highly recommend doing so before watching this one, otherwise you’ll probably be confused, and more likely than not, overwhelmed. With that being said, let’s talk about Part 3. And since we left off at number, 13 we’ll start at number 14, which is to:
14. Look over your back cover blurb· I know we talked about the back cover blurb or synopsis in Part 1, but it’s an incredibly important part of your book when it comes to getting it to sell, which is why I want to bring it up again. If you missed Part 1, you’re probably asking yourself, “What exactly is a blurb?” Blurbs are essentially a paragraph or two that paint a brief picture of the main plot of your book with just enough information to leave the reader satisfied, yet leaving enough information out to make them want to read more. Sound difficult? That’s because it is. You thought writing a book was hard? Now try condensing all of those thoughts and ideas into 8-10 measly sentences. Blurbs can be very challenging to write and it’s certainly something that takes practice. Take a look at your back cover synopsis and make sure it includes these 5 core elements:1. The first is to think of the first sentence of your book blurb as a pick-up line. It must be new, clever, and engaging – not a line that we’ve all heard a million times before. In this first sentence, you could introduce your main characters by focusing on the predicament in which they find themselves like Bella Pollen does in Hunting Unicorns: “Adrift in a rapidly changing world, the Bevan family cling to tradition while wrestling with taxes, tree blight and the need to keep the family skeleton firmly in the cupboard.” Or you could set the scene and create the mystery right out of the starting gate like Kate Morton does for The House at Riverton – “On the eve of a glittering society party, by the lake of a grand English country house, a young poet takes his life.” Try to avoid clichés in your opening line at all costs. Nobody likes them.2. Second, you’ll want to talk about your characters in your blurb. When introducing your main characters, show them in their best or most interesting light and give them dimension. Remember to talk about the dilemma your characters are facing. What personal demon do they need to conquer? You need to give your reader a reason to care or be interested enough to find out more.3. Third, make sure your blurb is not misleading. Write the blurb for the audience you want to read your book and be honest. Don’t dress a murder mystery as a romance novel. There’s only so long someone can be strung along before they realize, “Hey, this isn’t what I thought it was”, and eventually toss your book aside. If you don’t deliver on your back cover blurb, your reader will most likely stop reading it, and you don’t want that!4. Fourth, don’t give everything away. You want your potential reader to buy your book, so try not to give away too much of the plot. This is the part that takes some serious skill and focus because you need to find that fine line between revealing enough for your reader to want to know more while maintaining that air of mystery.5. Fifth, keep your readers wanting more. Trying finishing the blurb with a cliffhanger. Rather subtly, but very cordially, invite people to find out more. End your blurb with conflict. Your reader should wonder, “How in the world are they going to solve that?” There are a few different ways you can end your blurb:§ With a question like in A Scandalous Proposition– “What will Adam do when he discovers Florentina’s deception?”§ Hint at future danger like in Risking Trust– “When their investigation leads them to a city hall conspiracy, both their lives and their newly reignited flame could be permanently extinguished.”· At all costs, resist the urge to hint at how things work out and your back cover blurb will be pure gold!
15. Write your wholesalers’ blurb· The wholesalers’ blurb is what is fed automatically from your distributor (such as Ingram Spark) to wholesalers and online retailers about your book. You may also have heard this called the ‘meta’.· Different distributors have different rules and specifications for their blurbs. Most have a character limit. Ingram Spark, for example, has a limit of 4000 characters (including spaces) for their ‘meta’.· It’s important that your meta/blurb is constructed properly so that you will attract the right audience and the right customers when they read it online. Most of the time, if you’ve written a great synopsis for your back cover, you can use that same synopsis as your meta. You may have to trim a few sentences, but it will work. For nonfiction, your meta is extremely important because it must address and acknowledge where your readers have come from, where they are now, and where you are going to take them. Try to avoid schmoozy hype and overblown descriptors in your copy. Try not to use words like amazing, life-changing, incredible, etc. Find your unique selling point and use it to your advantage.16. Determine what you’ll put on your back pages· While the blurbs we just talked about are invitations for your readers to step into your book, the back pages of your book must be an invitation for your readers to step into a deeper connection with you. Here are some ideas of things to fill your back pages:· An acknowledgements page· An about the author page with website and social media links· Sneak preview of a chapter or two from the next book (if it’s a series)· A list of other books you’ve written (sometimes this is on the opposite side of the title page in the front of the book)17. Format the interior to prepare for paperback printing· The first question here is, “Should I do my interior myself or hire someone?” This really depends on two things: whether or not you have the technical skills and software to do it and whether you have the time, patience, and interest to learn how to do it right. Many cover designers offer interior formatting and layout services, but this can be expensive. I actually did my interior layout myself and I’ve received numerous compliments about how professional it looks. I searched for some interior templates formatted specifically for paperback books, tweaked them in Microsoft Word, and copied my text over to that template. The website www.diybookformats.com has some great interior layouts for free, and I actually used one of them for The Alpha Drive, if you want to check those out. I’ll link it below in the description.· Most professionals use InDesign to do the interior book layout. But now with POD, such as Ingram Spark, you can actually format your paperback book in Word and convert it to a high-resolution PDF. If it’s formatted correctly, the print book will look exactly as it does in the PDF. · I used Word for my interior layout and I couldn’t be happier with it. Let’s go over some basic tips if you want to use Word to format the interior of your book:o Use formatting styles in Word and define headers, footers, and page numbers carefully. Most people who use Word will format every word or paragraph individually, but Word has the capability of defining styles, which will make your life a whole lot easier. Spend some time getting to know how to use these styles and plan out the styles for your book. Or use a pre-made interior template and skip this step entirely.o Use section breaks and page breaks. Putting a section break for each chapter can help you organize your headers and footers, keep the page numbers consistent, etc. But again, if you use a pre-made interior template, you can save yourself the headache of learning this and skip this step.o Use high-res (300 dpi images). This is more important for nonfiction books, but try to ensure your author photo is at least 300 dpi, otherwise it may print blurry. Both Ingram Spark and CreateSpace will give you a warning notice if your images are below 300 dpi. Just be careful with IngramSpark because every time you re-upload something, it’ll cost you $40. With CreateSpace, you can upload as many times as you want at no cost and no additional fee.o Use a commercial quality PDF Converter. For Createspace, you can upload a Word document with your interior layout or a PDF. But for IngramSpark, you can only upload a PDF version, no Word documents. All fonts need to be embedded into the document, especially for IngramSpark, otherwise your document won’t be accepted, plus it costs you $40 to upload a new version each time you mess up. Word 2013 does have the capability to embed fonts, but I would highly recommend getting the free trial of Adobe Acrobat Pro DC. You can get a free trial for 30 days. Once your manuscript is complete, you can save it as a PDF, then open Adobe Acrobat Pro DC, go to File à Save As à Press Ready PDF (PDF/X). This type of PDF will ensure that all fonts have been embedded.18. Upload your final draft to the POD company and upload your cover, either ARC or Final· Once you have your interior formatted, you can finally upload your MS to the POD company of your choosing, as well as the cover. If you’ve chosen to get early reviews and have people you want to send ARCs (or advance reader’s copies) to, then you can upload an ARC cover. You can ask you cover designer to make one for you. Normally, this is a red bar at the top of the book that says NOT FOR SALE – UNCORRECTED PROOF or NOT FOR SALE – ADVANCE READER’S COPY. It can also be a red square on the cover that says the same thing.· Createspace is great for ARCs because you can upload as many edited/updated versions as you want for free AND see the actual layout in their digital proofing program, all for free. This lets you see what your book will actually look like once it’s printed out, but is digital on your computer, so you can see if the pages are laid out correctly, if there are consecutive blank pages, if there are weird characters, or if the text is lining up properly.19. Order a physical proof· Once you have your manuscript and cover uploaded to the POD company of your choosing, make sure you ORDER A PHYSICAL PROOF. Please do not blindly approve your title until you are holding a finished copy in your hands that you’ve gone through with a fine-tooth comb and you’re confident it’s free of errors. · Ordering a proof can cost $5-10, depending on the size of your book, and you can expedite shipping if you want, but CreateSpace tends to deliver your books within 4-5 business days. · Once you’ve gone through that physical proof, make adjustments as needed, or if it’s fine as is, you can order more (up to 5 at a time on CreateSpace) to send as ARCs to early reviewers.
20. Approve the title· If you’re not sending ARCs and you have your final MS and cover design uploaded, AND you’ve ordered a physical proof that you’ve reviewed multiple times to ensure it’s ready for publication and you’re 100% satisfied with that proof, ONLY THEN should you finally approve the title. This means that your book will officially be available for purchase on Amazon and will be a part of expanded distribution, if you chose that option. So congratulations! You did it! You are now a published author!
So that concludes Part 3, the final segment, of this Self-Publishing 101 Mini Series. I hope you enjoyed this post and found it helpful. I'll see you guys in the next post!

Until next time,
June 21, 2016
How to Read More Books More Often
Today I want to veer away from talking about writing and talk about something else that we writers also love. And that is reading! If you'd rather watch this content in video format, feel free to click play below. Otherwise, read on!
Now some people might think this post is unnecessary. “You want to read more? Just sit down and read!” But for some people, this advice is not that simple, especially for those of us who have full-time jobs, families, school, and other life priorities to worry about. For some people, their days are so busy and filled to the brim with STUFF that it can be difficult to just sit down, unwind, and read a book. Not to mention, we have so many things that can distract us these days – a lot of what we can read is in digital format now and while this is great, it also has its consequences. You may start reading an ebook on your Kindle app, but get distracted by the hundreds of social media notifications and emails popping up at the top of your screen. So, how do we ignore the never-ending stream of distractions that always seem to be right in front of our faces? Try these 7 tips to help you read more books more often:
1. Start a morning and/or evening ritual· Tell me if this is what most of your mornings look like: you wake up 5-10 minutes past your alarm, rush to get ready, make yourself a quick cup of coffee, and dash out the door to get to work or school. And tell me if this is what most of your evenings look like: you’re sitting on the couch binge-watching Netflix when you realize that it’s suddenly 9:00, you haven’t eaten dinner, and you’ve spent way too much time in front of the TV. As much as I hate to admit it, this is what both my mornings and evenings used to look like. Rush to work, burn myself out at work, come home and relax for hours until it’s time to go to bed. Sound familiar? · So, I’ve actually been working really hard at creating morning and evening rituals to avoid these traps of excessive nothingness. Now in the mornings, I set my alarm for 30 minutes earlier so I can go for a run outside before the Texas humidity creeps in and kills me. And at night, I have an alarm set on my phone for 9PM. Once that alarm goes off, I stop whatever I’m doing, put my pajamas on, brew a cup of tea, and curl up in bed with a book. I block out time, from 9:00-9:30, every weeknight to read. And you know what? When you make something a ritual, it becomes a habit and it becomes something you look forward to doing each day. Are there still days where I want to binge-watch Netflix? Of course, and some days I do. It’s all about balance, though.· I would recommend making your ritual either at the very start of your day or at the very end. Why not in the middle? Because you’ll get distracted. You’ll sit down to read and be unable to focus because you’ll be thinking of the 18 other things you could be doing besides reading. “It’s not raining, I should walk the dogs. The house is dirty, I should clean it. I’m running out of clean clothes, I should do laundry. The dishes are piling up in the sink, I need to run the dishwasher.” You can tell the things I get distracted by have to do with chores and cleaning. Hello, Type A. But if you make your reading ritual in the morning, you can carve out some “me-time” and get it done before things start piling up to distract you. Or, you can do it at night once you’ve done everything for the day as a way to relax and unwind. Try reading just 20 pages either in the morning or at night and you’ll be surprised at how much more reading you’ll get into your day. Even if you can only devote 15-30 minutes of reading each morning or evening, you can read 20-30 books per year. Not bad, right?
2. Speed read· Okay, there is a common misconception when it comes to speed reading. This is not a magical technique that allows you to blur through pages and scan words where you hardly understand anything you just read. It’s simply a technique to speed up the actual pace of your reading so that you can read more in less time with the same understanding as if you’ve read at your normal pace. A couple of tips if you want to try speed reading is to use a pointer. Try running your index finger beneath the text on the page. This keeps your eyes focused on a specific point on the page and keeps your mind from getting distracted. After a week or two of adapting to using your finger, your reading rate will be boosted considerably. You can also try “practice reading”. This means reading slightly faster than you can actually comprehend. Try doing this with news articles and other types of text where you don’t need to glean every single detail. This will train you to read without needing to subvocalize (which means repeating the words in your head), and eventually you’ll be able to do this with books and read at a faster pace.
3. One book at a time· Okay, I am guilty of not reading one book at a time. I normally have at least two I’m currently reading. Trying to multi-task between books can be a waste of time. I would say to not read two books at once if they are in similar genres, like two fantasy books or two sci-fi books. You may end up confusing the worlds and characters and this will just backtrack your reading progress even further. But when I’m reading two books at once, I tend to read a self-help/motivational book as well as another book, whether it’s fantasy, science fiction, or contemporary. This works for me because there is no way I would get the two confused because they are COMPLETELY DIFFERENT. One of them is telling me how to live my best life and offering advice and the other is a story I can fall into where I’m transported to a different world. See the difference? So, unless they are in different genres, try sticking with just one book, finish it, and then pick up another.
4. Carry a book with you· I carry a physical book with me ALWAYS. It sits in my car while I’m up in my office working. On my lunch breaks, sometimes I will grab a meal and go to Starbucks and sit outside (weather permitting) and read. There may be times throughout your day where you might be forced to wait, whether it’s at a doctor’s appointment, in a line, during a break, or traveling. Having a book with you means that those moments aren’t wasted checking social media for the umpteenth time.
5. Audio books· I love audio books. If you’ve ever been to Texas or lived in Texas, you understand that it is a giant state with giant cities. I live in Houston, but not really. I live an hour and a half north of Houston. It takes me 45 minutes to drive to work every morning and 45 minutes to drive home. That’s 90 minutes, or an hour and a half, of precious time that I could be reading! And while it is definitely NOT a good idea to read a physical book and drive simultaneously, there is a way to get your reading in – by listening to audio books.· I normally listen to TED talks during my morning commutes, but audio books are another great option if you spend a lot of time in the car. Most popular books have audio formats and while they can be expensive, you can usually rent them from your local library for FREE! Don’t forget about the library, folks. It’s a great resource, especially if you’re strapped for cash.
6. Have another book ready before you finish the one you’re reading· Having a TBR (to-be-read) list of books can be great motivation to get you to read more. Many times, when we finish one book and don’t have one lined up to read next, we can sort of “forget” to read because maybe going out and searching for another book you’ll enjoy reading seems like a chore. By having a TBR list, you’ll know exactly what you’re going to read next and avoid the hassle of “finding a book as great as the last one”.
7. If you aren’t enjoying a book, stop reading it immediately· This is a hard one for me. When I buy a book and start reading it and invest some of my time, even if I’m not enjoying it, I find it difficult to put it back on my bookshelf knowing I will probably never pick it up again. Why? Plain and simple, I like to finish what I start. But I’ve come to realize that if I’m not enjoying a book, reading 20 more pages probably won’t make me enjoy it anymore, and if I do finish reading it, it’ll more likely than not feel like a waste of time and I’ll wonder why I didn’t just put it down and start reading something that I actually would have enjoyed in the first place. I know it can be hard, but if you’re not enjoying the book you’re currently reading, then what’s the point? You don’t owe it to anyone to read that book, so tuck it back in your bookshelf (or donate it to a local library) and move on.
So, there you have it, 7 tips to help you read more. What it really does come down to is using your time well. So many of us mismanage our time and spend too much energy on social media or watching TV, things that, when you really think about it, don’t add any value to our lives. They are time wasters, ways to relax and do something mindless after a long day. And that’s okay some of the time, because there will be days where we’ve done so much that all we want to do is something that requires nothing. But don’t make these do-nothing activities a large part of your daily schedule. Manage your time well so that you can do things that add value to your life, like reading. If you write down everything you truly do in a day, I think you’ll find a lot of blank spaces that could be filled in with reading (such as a commute – hello audiobooks) or two or three hours where you seem to fall into a black hole of Netflix and nothingness.
Now for a few announcements: This weekend, I have my very first author event at Katy Budget Books in the greater Houston area. The event will be on Saturday, June 25th from 2-4PM, so if you’re in the area and want to stop by, I’d love to meet you.

I will also be attending Leviosa Con in Las Vegas from July 8th-9thwhere I will be selling and signing copies of The Alpha Drive, so if you’re going to Leviosa Con, please stop by my table!
Thanks for reading, and I'll see you guys in the next post!

Until next time,
source