
Angela Liddon's Blog, page 20
August 5, 2014
Easy Carob Almond Freezer Fudge + Frosty Recipe

Oh do I have a fun treat for you today. It showcases one of my old favourites – carob. Have you tried carob powder before? The pods of the tropical carob tree contain a sweet pulp which is dried, roasted, and ground into powder form. Carob is caffeine-free and contains antioxidants as well as calcium, iron, potassium, and fibre. I love mixing a spoonful of it into my vegan overnight oats, banana soft serve, homemade almond milk, or tossing some into a smoothie for a natural sweetener. I usually buy it in bulk from Bulk Barn (a great way to sample it if you are on the fence), but certain brands like Bobs Red Mill also sell it by the bag in many grocery stores and you can also find it online.
Here’s the kicker – carob powder is naturally sweet which reduces the need for a lot of added sweeteners in a recipe – a total bonus if you ask me. If you can get over the fact that carob doesn’t taste like chocolate, you are golden. Some people say carob has a flavour similar to dates. I think that’s a better comparison, but you really just have to try it for yourself!
The makings of freezer fudge…

In this recipe, I paired carob with a touch of cocoa powder to add some chocolate flavour. You really can’t go wrong when these two powders are combined as you get the sweetness from the carob and the rich chocolate flavour of the cocoa powder. Of course, if you want to skip the cocoa powder all together you can do that too. Or if you want to use all cocoa powder you can try that, although you’ll need to add more liquid sweetener to the recipe to make up for carob’s lost sweetness.
I worked off my favourite Seductive Raw Chocolate Walnut Freezer Fudge and this carob variation was born. This recipe has a fraction of the added sugar (about 75% less), but I promise you won’t notice anything is missing. Now that’s my kind of treat. Best of all it takes 10 minutes to whip up and only another 20 minutes to set in the freezer. The only downside is that the hubby keeps eating it all on me!

Carob Almond Freezer Fudge
Vegan, gluten-free, no bake/raw, refined sugar-free, soy-free
Ready in 30 minutes, this carob freezer fudge is low in sugar while still tasting quite decadent. Feel free to change up the nut butter, sweetener, and mix-ins as you see fit. The coconut oil is necessary in this recipe though as it helps solidify the fudge when chilled. It melts quickly so be sure to enjoy it straight from the freezer and don't let it sit on the counter for more than a couple minutes.
Yield
10 large or 16 smaller squares
Freeze time
20 minutes
Prep Time
10 Minutes
Cook time
0 Minutes
Total Time
10 Minutes
Ingredients:
1/2 cup virgin coconut oil, melted1/4 cup creamy natural almond butter (roasted or raw are both fine)1/4 cup carob powder, sifted1 tablespoon unsweetened cocoa powder, sifted2-3 tablespoons pure maple syrup (or liquid sweetener of choice), to taste1 teaspoon pure vanilla extract1/8-1/4 teaspoon fine grain sea salt1/2 cup gluten-free rice crisp cereal (to add crunch - optional)
Directions:
Line a very small loaf pan (4" x 8") with plastic wrap for easy removal. Mix all ingredients together in a large bowl until smooth. With a spatula, scoop the mixture into the prepared pan and smooth out. Freeze for about 20 minutes, or until solid. Slice into squares and enjoy! Store leftovers in a container in the freezer as it melts quickly at room temperature.

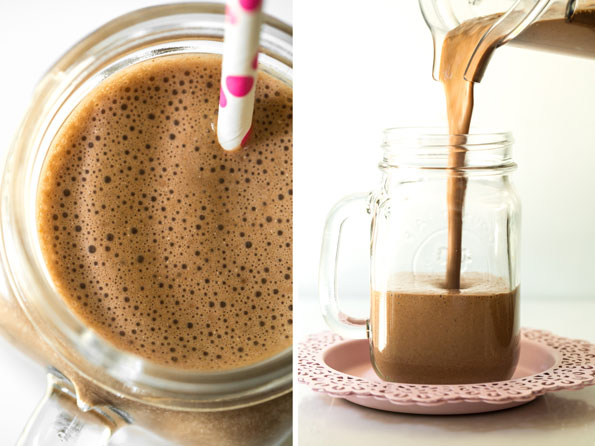
pssst – Bonus recipe alert! Carob powder makes a healthy “frosty” too. Just blend 1 large frozen banana, 1 1/2 tbsp carob powder, 3/4 cup almond milk, 1/2 teaspoon vanilla extract, 1 tsp cocoa powder, 1 ice cube, and 1 tbsp chia seeds until smooth, icy, and thick. Absolutely delish! It reminds me of the Wendy’s frosty drinks of my youth.

Comments (17) | Share on Facebook | Tweet | Pin It | Stumble© copyright 2014 Oh She Glows. All Rights Reserved.


July 30, 2014
21 Vegan Freezer-Friendly Meal/Snack Recipes + My Tips for Freezing

I’ve had several requests lately for freezer-friendly meal ideas. It must be that time of year! With our little bambino on the way in a couple months, I’ve been making a list of meals I’m going to try to make in advance to stash away in the freezer. It will be a miracle if I can even get through a third of this list below (considering I have no working oven until late August…minor detail, hah), but I included plenty of options so you have some variety to choose from! The recipes at the top of my “must-make” list are: My Favourite Vegan Chili; Spiced Red Lentil, Tomato, and Kale Soup; Pumpkin Gingerbread Snack Bars; Summer Harvest Tortilla Soup (from OSG cookbook); Crowd-Pleasing Tex Mex Casserole (OSG cookbook); Feel Good Hearty Granola Bars; veggie burgers/balls; Chocolate Chip Cookie Dough ‘Larabars’; and my Indian-Lentil Cauliflower Soup (also from OSG cookbook). That should be a good start!
First a few Q + A’s…
What to freeze in? I switched to glass, BPA-free freezer + oven-safe containers last year, so I always use those for freezing (I use these Pyrex containers). The added bonus is that you can bake thawed casseroles/enchiladas right in the very dish! Yay, for less dishes. I also use Glasslock containers, but those are not oven-safe, fyi. Lastly, I use freezer-safe zip bags for foods like granola bars, granola, and cookies. I always rinse and reuse the bags when I’m done with them to cut down on waste and save money (those things are expensive). Mason jars (for canning/freezing) also work well. Tip: We also use freezer bags for freezing bananas for smoothies. At any given moment you can find about 2 bags stuffed with peeled bananas in the freezer!
How to freeze? As for the method I use to freeze things, it’s pretty basic. I’m a big fan of what I call the wrap + seal technique (totally just made that up), meaning that I wrap the cooled food first (usually in tin foil or other freezer-safe bag) and then place the wrapped food in the glass container and lock/seal the lid. I like that it has two layers of protection from freezer burn. This method works great for single-serving foods like veggie burgers/balls, burritos, or snack bars. If it’s a liquid-based dish like soup, pesto, sauce, casserole, or chili, I will pour it into the dish and then sometimes put a layer of wrap on top of it. Press the foil/wrap down to prevent freezer burn from forming and then secure the lid as usual. It helps to leave an inch of so of space at the top to allow for any expansion.
How long to freeze for? Ah, the million dollar question! I find this depends on the type of food and your freezer. I’m pretty sensitive to the dreaded freezer-burn taste, so I try not to freeze things for longer than a month or two in my regular (fridge) freezer. It’s really just trial and error though. You can get more mileage out of certain dishes and less with others.
For the recipes that don’t make a very large serving, I like to double or triple the recipe whenever possible. I haven’t tried freezing every single one of the recipes below, but I’ve tried a lot of them. Generally speaking, these categories tend to freeze quite well.
I encourage you to share your freezing methods in the comments! I’m certainly not a freezing pro and welcome all your tips.

Veggie Burgers + Balls
When it comes to veggie burgers and bean balls, I now prefer to cook them first, cool completely, and then use the wrap + seal freezing technique I mentioned above (wrap individually in tin foil and then place them all in a glass container). When ready to eat, thaw on the countertop or in the fridge and reheat on the skillet with some oil or in the oven on a baking sheet. I find cooking the burgers/balls first and then freezing helps the patties stay together better.
Thai Sweet Potato Veggie Burgers
Soup + Chili
Liquids like soup and chili are freezer-friendly superstars! Most will do just fine. After cooking the soup, let it cool completely, and then place in a freezer-friendly glass container leaving a bit of space at the top for any expansion that might occur. Sometimes I add a layer of tin foil on top of the soup to prevent freezer burn.
Luxurious 7-Vegetable and ‘Cheese’ Soup
Spiced Red Lentil, Tomato, and Kale Soup
Black Bean, Sweet Potato, and Red Quinoa Soup
Pasta Sauce + Pesto
Sauces and pesto’s tend to freeze nicely too. I only freeze the sauce and rarely ever freeze the sauce mixed into cooked pasta or other noodle (it tends to get soggy for many dishes). I use the same freezing method as written above for soup/chili. You can even freeze sauces/pesto’s in smaller portions (for “two” is a popular one around here!), so you don’t need to thaw the entire batch for just one meal. Try freezing pesto in silicone muffin trays for easy removal. Once they are frozen, you can pop them into a reusable freezer-safe zip bags to save freezer space.
I haven’t tried freezing these two below yet, but if you have please leave a comment!
Cauli-power Fettuccine Alfredo Sauce
Enchiladas + Burritos + Casserole
I freeze the Tex Mex Casserole in an extra large oven/freezer-safe glass dish with a layer of tin foil pressed tightly on top of the casserole to prevent freezer burn. Tips: For this specific casserole, I skipped the 15-20 minute oven cooking because I knew I would be cooking it after thawing. I let the skillet mixture cool before adding it into the container. I also waited to add the corn chip garnish until just before baking so they didn’t get soggy. When you are ready to eat it, thaw it completely (this takes well over 24 hours in the fridge – FYI), remove the tin foil, sprinkle on the corn chips, and pop it in the oven at 350F for about 30 minutes. Easy! Serve it with sliced avocado, cashew sour cream , sliced green onion, salsa, etc. As for enchiladas, people have told me they had success freezing the entire lot all at once, thawing, and baking as instructed. I would wait to make + add the cilantro avocado sauce until just before serving since it’s avocado based. For burritos, you can wrap them up individually in tin foil or freezer bags and freeze for quick grab and go meals.
Crowd-Pleasing Tex Mex Casserole (from The Oh She Glows Cookbook, page 149)
Black Bean and Sweet Potato Enchiladas (for an updated version with a 5-minute homemade enchilada sauce (this freezes well too!), see pages 147 and 300 in the OSG cookbook)
Black Bean and Butternut Squash Burritos
Snacks/Breakfast
For cookies, I bake them as directed, cool completely, and then freeze in freezer-safe zip bags. Some people also have success freezing the portioned cookie dough on a baking sheet and then popping the frozen dough balls into freezer baggies. Then you can thaw on the counter and bake as usual. I’ve also included a link to my recent granola bar recipe – I tested freezing these and they lasted for over a month in the freezer which I was very happy about! They make a great snack and I love that I can thaw one bar at a time as I need them. Lastly, granola always freezes well. My favourite granola is on page 31 of my cookbook.
Raspberry Almond Thumbprint Cookies
Chocolate Chip Cookie Dough ‘Larabars’
Ultimate Nutty granola Clusters (from The Oh She Glows Cookbook, page 31)
Blissful Blueberry Banana Spelt Muffins
Heavenly Carrot Cake Baked Oatmeal
Pumpkin Gingerbread Snack Bars
~~~~
This list is by no means inclusive of all the freezer-friendly recipes on the blog over the past 6 years. If I’ve forgotten any good blog recipes that you’ve had freezing success with, be sure to let us know in the comments! The more the merrier.
Happy freezing!
Comments (55) | Share on Facebook | Tweet | Pin It | Stumble© copyright 2014 Oh She Glows. All Rights Reserved.
July 28, 2014
Gena’s Hemp Seed Tabouli

Don’t you love when you come across a recipe and it’s made in a way that has never occurred to you before? Culinary discoveries are one of my favourite things about vegan food creation. Before I started experimenting with a plant-based diet, I had no idea there were so many exciting ways to change up traditional animal-based recipes. Almonds make milk? Coconut Cream makes whipped cream? Avocados make chocolate pudding? Lentils make meatloaf and taco meat? Cauliflower makes alfredo sauce? Buckwheat makes raw porridge? GET OUT.
Almost 6 years later, I’m still discovering new twists on classic recipes and often find they taste even better than the real thing. Just when I feel like I can’t possibly come up with a new recipe, I’m inspired by talented bloggers, restaurants/bakeries, and cookbooks just to name a few.
One such talented blogger who has become a dear friend over the years is Gena Hamshaw from the blog, Choosing Raw. She’s been a constant source of inspiration since my early days of blogging (waaaaay back to 2008), so I was naturally excited to be offered a copy of her first cookbook. Her writing is evocative, thoughtful, and informative and her recipes are uncomplicated, full of plants, and always satisfying. If you’ve ever thought that raw recipes require too many steps or hard-to-find ingredients, Gena’s recipes prove just how simple and unfussy they can really be.

Case in point: This Hemp Seed Tabouli straight from Gena’s new cookbook, Choosing Raw: Making Raw Foods Part of the Way You Eat.
Rather than using bulgur in her tabouli recipe, Gena uses hulled hemp seeds. I don’t know why I hadn’t thought of using hulled hemp seeds as a base for tabouli before (cauliflower and quinoa variations were as crazy as I got), but it’s a brilliant swap. This easy switch packs in loads of protein and healthy omega fatty acids, while doing without any cooking. Just chop, mix, and serve. Isn’t that what summer meals are all about? It’s the perfect recipe to whip up for a quick lunch on a hot day and even better if you are without an oven during a renovation. Pair this tabouli with some hummus and crackers (I served it with my Endurance Crackers made in the dehydrator instead of the oven!) and you have yourself a fine summer lunch packed with fresh summer veggies, protein, healthy fats, and more. Fresh, fresh, fresh!

Gena's Hemp Seed Tabouli
Vegan, gluten-free, grain-free, no bake/raw, nut-free, refined sugar-free, soy-free
Tabouli with a high-protein twist! A tasty raw summer dish that doesn't require any cooking and comes together in less than 10 minutes. Try serving it with my Endurance Crackers and hummus for a fun mezze platter. Recipe from Choosing Raw by Gena Hamshaw. Reprinted with permission from Da Capo Lifelong, © 2014.
Yield
4 servings
Prep Time
10 Minutes
Cook time
0 Minutes
Total Time
10 Minutes
Ingredients:
1 cup fresh parsley1/2 cup fresh mint leaves1/4 teaspoon sea salt (I used 1/4 + 1/8 teaspoon)4 medium yellow vine or Jersey tomatoes, chopped (I used 2-3 large red tomatoes)1 cup shelled hemp seeds2 tablespoons hemp oil (I used olive oil)2 tablespoons freshly squeezed lemon juice
Directions:
1. In a food processor fitted with the “S” blade, process the parsley, mint, and sea salt until minced.2. Transfer the herbs and salt to a large mixing bowl. Add the tomatoes, hemp seeds, hemp oil, and lemon juice. Mix well, and serve.Stored in an airtight container in the fridge, the tabouli will keep for 2 days.
Choosing Raw is packed with 125 fresh and easy recipes (many of which don’t even require an oven), in addition to a few opening chapters on vegan nutrition, myths and misconceptions, and how to get started. I have several of her recipes bookmarked during our kitchen renovation. The other night I made the Raw Gazpacho and it was lovely too. I threw in some fresh dill and hemp hearts for fun.
For dessert, I tried out Gena’s Raw Key Lime Pie. This is a fun treat to stash in the freezer during the summer.

I made cupcake-sized tarts instead of one 9-inch pie. We just love eating these straight from the freezer. I should also note that I changed up the crust. I cut the cashews down to 1 cup (from 2 cups) and then used 1 cup of rolled oats in its place to save some money. Then I just added a tablespoon of water to make the dough stick together nicely. Worked like a charm!

Be sure to check out Gena’s cookbook: Choosing Raw: Making Raw Foods Part of the Way You Eat if you are looking for easy ways to incorporate more raw (or just veggie-centric) foods into your diet.
Comments (40) | Share on Facebook | Tweet | Pin It | Stumble© copyright 2014 Oh She Glows. All Rights Reserved.
July 22, 2014
Creamy Cherry Pie Fruit Dip with Rainbow Fruit Kabobs


If you’ve ever wanted to fancy-up fresh summer fruit without much fuss, this is your solution. This dip is creamy and luxurious with a hint of cherry-vanilla flavour. Throw some fruit onto a kabob for a special event or just drizzle it onto a bowl of fruit for a quicker option. Heck, it’s even great drizzled on granola and yogurt, pancakes, and fruit crisps. You can’t go wrong if you tried!
I blended soaked cashews with almond milk, cherries, vanilla, and coconut syrup creating a decadent, lightly-sweetened dip free of dairy. Eric went crazy over this dip and he isn’t even a dip person, so there you go. You will probably have to hide it.


Sunday evening, we emptied our kitchen cupboards to prepare for the kitchen reno. The dishes, gadgets, glasses, appliances, and food now have a home in our previously empty dining room. On Monday, Eric and our friend Pete started to take the kitchen cabinets apart. Several hours later the kitchen was empty! I’m saying goodbye to a working sink, oven, counter tops, and dishwasher for the next month and a half or so. So far the biggest “emergency” has been my missing dark chocolate stash (the horrors!), so I can’t complain too much. But have you ever seen a 31-week pregnant lady riffling through boxes to find her chocolate? It wasn’t my proudest moment.
So here we have it – an almost blank slate. The sad, beige tiles will be ripped off today and the electrical work starts tomorrow. I created a new Instagram account for non-food related things (like renos, life stuff, pregnancy, etc) so you can follow along @theglowspot if you’d like to see updates!


Creamy Cherry Pie Fruit Dip with Rainbow Fruit Kabobs
Vegan, gluten-free, grain-free, no bake/raw, oil-free, refined sugar-free, soy-free
The creamiest non-dairy fruit dip ever! Soaked raw cashews form the base of this creamy, lightly sweet dip. Drizzle it on fresh fruit, oatmeal, fruit crumbles, pancakes, waffles, and more.
Yield
1.5-2 cups
Prep Time
10 Minutes
Cook time
0 Minutes
Total Time
10 Minutes
Ingredients:
For the fruit dip:1 cup raw cashews, soaked1/2 cup + 1-2 tablespoon almond milk (or non-dairy milk of choice)1/2 cup frozen or fresh pitted cherries1 teaspoon pure vanilla extract2-3 tablespoons coconut nectar syrup (or liquid sweetener of choice), to tastefor the kabobs:Fruit of choice (I used strawberries, cantaloupe, grapes, nectarines, kiwi, watermelon)Skewers
Directions:
Place the cashews in a bowl and cover with an inch of water. Soak overnight or for at least 8 hours. If using a Vitamix you can get away with soaking for only 2-3 hours. Drain and rinse the cashews thoroughly. Add the almond milk into the blender followed by the drained and rinsed cashews, pitted cherries, vanilla, and sweetener. Blend on low and increase the speed gradually until blending at full speed. Keep blending until the mixture is velvety smooth and doesn’t have any texture to it. You can add a splash more milk if you need to help the blender along. Chill the fruit dip for a few hours (or overnight) for the best flavour, but you can also enjoy it right away if desired. Prepare the fruit kabobs (if making) or simply drizzle the fruit dip over a bowl of fruit. The fruit dip will keep in a sealed container in the fridge for about 1-1.5 weeks, possibly longer.
Tip: For a nut-free fruit dip option, try making coconut whipped cream instead. You can mix a bit of chia seed jam into it for a similar fruity effect.

Comments (22) | Share on Facebook | Tweet | Pin It | Stumble© copyright 2014 Oh She Glows. All Rights Reserved.
July 10, 2014
An Ode To Toast: 4 Easy (But Drool-Worthy) Vegan Combos

Just like smoothies, I make toast just about every day of the week in some form or other. It’s one of my favourite quick and easy lunches or snacks. It’s hard to beat the comforting, warm, and crunchy experience that toast provides in just a few minutes. Plus, the flavour possibilities are endless! I’ve always preferred an open-faced sandwich to the traditional kind because I can load on the toppings as much as I please and if it ever gets out of control I just eat it with a knife and fork. Fancy, right? Since we’ll soon be relying on our toaster quite a bit during our kitchen reno in August, I thought it would be nice to round up some of my favourite toast combos of late – two savoury and two sweet. Be sure to share your favourite toast combos (or dream combos) below!

For my chia seed jam recipe, see this post. Note: You can use any kind of fruit you prefer. Some large fruit pieces (like frozen mango or strawberries) will benefit from a gentle mashing near the middle of cooking.

Cheater’s Maple Baked Beans on Toast
This is a quick, high-protein meal that doesn’t require slow baking the beans for hours. Just 10 minutes on the stove top is all you need!
Serves 2
1/2 tablespoon extra virgin olive oil
1 cup diced sweet onion
1 (15-ounce) can navy beans, drained and rinsed (or 1.5 cups cooked navy beans)
2 tablespoons ketchup
1 tablespoon + 1 teaspoon pure maple syrup
1 teaspoon blackstrap molasses
1/2 teaspoon vegan Worcestershire sauce (this is the kind I use)
1/4-1/2 teaspoon fine grain sea salt (I use 1/4 + 1/8 teaspoon)
1/4 teaspoon apple cider vinegar
1/4 teaspoon dry mustard powder
Freshly ground black pepper, to taste
1. In a medium pot or skillet, sauté the onion in the oil for 6-7 minutes over medium heat until soft and translucent.
2. Add the rest of ingredients, stir well to combine, and cook over low-medium heat for another 5 minutes or so. Adjust ingredients to taste if desired.
3. Serve over toast.
Note: The beauty of this recipe is that you can play around with the condiments and adjust them to taste. You might like yours on the sweeter side, tangier, etc. so feel free to use my recipe as a starting point.

I shared this beauty on Instagram the other day and it had a great response which is why I thought a toast round-up might be a nice change of pace! This combo is probably my most made toast ever…I just can’t get enough of it. Tip: I love the Kirkland brand of organic slow-roasted tomatoes found at Costco! They are totally dreamy on toast and in homemade pesto.

You need this one in your life. ‘Nough said.

Enjoy!
Comments (26) | Share on Facebook | Tweet | Pin It | Stumble© copyright 2014 Oh She Glows. All Rights Reserved.
July 3, 2014
Creamy Chocolate Hemp Smoothie for Two

One of the most popular questions I’ve received over the years is “How can I get my partner to eat healthier?” What I’ve come to realize is that for most people change has to happen from within. Whether it’s a personal struggle they go through or a light bulb moment they experience, many of us have to figure it out for ourselves. Plus, some people are naturally more resistant to change than others and if you push them, they repel in the opposite direction. I don’t believe in pressuring someone to eat a certain way and I don’t think that there is a one size fits all approach for everyone. Leading by example helps (and sharing great-tasting food!), but ultimately if someone is going to make any kind of change in their life it usually has to be internally motivated for it to stick. This has been especially true for my own dietary changes and the shifts I’ve seen in Eric too. I’ve been singing the praises of green smoothies to Eric for 6 years now, but it just took him one moment of internal motivation to get hooked. Go figure. Although in his defense, I think I scared him off with an utterly gross concoction I made for him years ago.
Earlier this year, Eric ditched his morning cereal in an effort to cut down the gluten and processed carbs in his diet as he was suffering from some major brain fog and wanted to experiment with his diet. He now drinks a huge green smoothie every morning and claims he is feeling better. His only problem, he says, is keeping his pants up because he dropped some weight in the process.
This year, we’ve been big fans of adding hulled hemp seeds into our smoothies for a natural protein, fibre, and omega-3 boost. One 3-tablespoon serving has an impressive 2.5 grams of omega-3 fatty acids, 10 grams of protein, and 3 grams of fibre. It also has oodles of manganese, magnesium, iron, zinc, B6 and more. You can find the huge bags of hulled hemp seed at Costco for a good price. Hemp seeds can be a bit bitter or grassy tasting, so it does take some experimenting to find the right ratio of ingredients in a smoothie (I’ve definitely made some bad ones). Luckily, hemp pairs with chocolate effortlessly so it’s a no-brainer.
I’ve been enjoying my hemp-filled Green Warrior Protein Smoothie for a few months now. When I’m too lazy to prep all the veggies I simply add a couple spoons of hemp seed into my classic green monster recipe. Does the trick! Not long after, I decided to make a chocolate-hemp spin-off. I wanted something that I could enjoy on a hot summer day that would satisfy a craving for something sweet, chocolaty, and cold – while still packing in tons of nutrition. I made this recipe in May and was planning on sharing it during our kitchen reno this August, but recipe development has been a bit slow for me the past couple weeks so I decided to pull it out of the draft folder early. Plus, I just didn’t feel right keeping it from you given how hot and humid the weather has been lately. This smoothie has been my saving grace and has kept me from buying expensive pints of vegan chocolate ice cream more often than not.
Another thing I like about this recipe is that it makes 3 1/2 cups worth. When I’m feeling especially generous, I call this recipe “for two”, but there are definitely times when I chug it back faster than anyone can even see me make it.

Creamy Chocolate Hemp Smoothie for Two
Vegan, gluten-free, grain-free, no bake/raw, oil-free, refined sugar-free, soy-free
Cool down with this creamy, ice-cold, and luxurious chocolate hemp smoothie. Enjoy the boost of protein and omega-3's that the hemp seeds provide while indulging in a lightly sweet chocolaty treat. For a fun twist, try this recipe with homemade almond milk, Coffee Shop Worthy Hazelnut Milk, or even adding homemade coffee ice cubes. This recipe is inspired by my Cheerful Chocolate Smoothie from The Oh She Glows Cookbook.
Yield
3 1/2 cups (2 servings)
Prep Time
5 Minutes
Cook time
0 Minutes
Total Time
5 Minutes
Ingredients:
2 cups almond milk (see note)2-3 pitted large Medjool dates, to taste (I use 2)3 tablespoons unsweetened Dutch-processed cocoa powder3 tablespoons hulled hemp seed1 large peeled and frozen banana1/4 teaspoon cinnamon4 large ice cubes
Directions:
Add all ingredients into a high-speed blender and blend until super smooth.
Tip: 1) This recipe yields a fairly thin consistency. If you want a thicker shake-like texture, try reducing the milk to 1.5 cups instead of 2 cups or go wild and add a scoop of your favourite non-dairy ice cream. 2) If your dates are a bit firm or dry, soak them in water for 30-60 minutes before making this smoothie. You can also swap the dates for liquid sweetener if desired. Just reduce the almond milk a bit so it's not too thin.

Comments (48) | Share on Facebook | Tweet | Pin It | Stumble© copyright 2014 Oh She Glows. All Rights Reserved.
June 24, 2014
Coffee Shop Worthy Caramel Vanilla Bean Hazelnut Milk

Summer is known for having a slower pace, but this season looks like it will be more productivity-seeking than anything. Eric and I sat down the other night and made a big list of all the stuff we want to complete (or at least get underway) before this fall. Maybe we’re a bit over-ambitious, but we figure now is the time to take advantage of our free arms, restful sleep (at least for him), and long summer evenings. More than anything, I think it makes us feel more in control of our big upcoming life change, even if the sense of control/organization is merely a myth. Whatever works, I say.
Among the house renos that we’re tackling, another big project that we’ve been working on is starting a new business. It’s the project we’re most excited about, but it’s also the thing that has been the most challenging and gray-hair inducing over the past several months. Lots of research, roadblocks, legal documents, design, obsessing over details, etc. I enjoy this project immensely because it’s so near to my heart, but my lack of patience doesn’t suit me well for this type of slow-to-make-progress work. It always amazes me how long things take. I guess that’s why I love blogging so much. I can work on a post for a few days and then hit publish. Taking 3 years to write a cookbook was the ultimate challenge, but it helped me appreciate the valuable lessons and learning opportunities along the way. I think this new project is already doing that. Considering all the obstacles we’ve faced with this hopeful business I know it’s still a bit too early to divulge all the details, but when things start coming together a bit more I’ll be sure to share!
On the recipe front, I’m still making a lot of quick and easy recipes! I’ve been on a big homemade nut milk kick over the past couple weeks. Tell me, is there anything better than guzzling a cold jar of homemade milk straight from the fridge? This is my first time making hazelnut milk, but let me tell you it’s the best milk (from any source!) that I have ever tasted. I was really not expecting to love hazelnut milk so much, but it just worked. I made two batches on the weekend and both disappeared within 24 hours. Hazelnuts are a splurge-worthy purchase for me so it’s more of an once in a while treat rather than an everyday affair, but I guess that makes it even more special. It’s the kind of homemade nut milk you whip out to dazzle house guests or simply to treat yourself, just because. It’s a drink that reminds you just how satisfying plant-based milks can be when you feel a bit burned out on the store-bought stuff.
With a super creamy, nutty base and notes of caramel, cinnamon, and vanilla bean, this nut milk is fit for a high end coffee shop. Actually, it would be my dream come true if I walked into a coffee shop one day and they had this milk as an option! Just like I hoped, this hazelnut milk is the most amazing compliment to a morning cup of coffee or black tea. Coffee and hazelnuts are a match made in h-e-a-v-e-n. Yesssssssss! Skip the creamer and try this out instead. Or simply chug it back with abandon, pour some into a bowl of cereal, or blend it into a chocolate hazelnut smoothie or ice cream shake. I think I’ll do that next.
Note: I used a ratio of 3/4 cup hazelnuts and 1/4 cup almonds, but feel free to use 1 cup of hazelnuts if you prefer.

Coffee Shop Worthy Caramel Vanilla Bean Hazelnut Milk
Vegan, gluten-free, grain-free, no bake/raw, oil-free, refined sugar-free, soy-free
Decadent, luxurious, and totally splurge-worthy, this homemade hazelnut milk is fit for a high end coffee shop and it pairs perfectly in a cup of coffee or black tea. I use a mix of soaked hazelnuts and almonds, but feel free to use all hazelnuts if you prefer. It's lightly flavoured with notes of caramel (from Medjool dates), cinnamon, and a whole vanilla bean and I imagine you could turn it into a chocolate hazelnut milk quite easily by adding a bit of dutch-processed cocoa powder. This recipe is lightly adapted from my Homemade Almond Milk recipe.
Yield
3-3 1/2 cups
Soak time
overnight or 2-8 hours
Prep Time
10 Minutes
Cook time
0 Minutes
Total Time
10 Minutes
Ingredients:
3/4 cup raw hazelnuts1/4 cup raw almonds3 1/2 cups water2 1/2-3 pitted Medjool dates, to taste1 vanilla bean, roughly chopped1/2 teaspoon cinnamontiny pinch of fine grain sea salt (optional)
Directions:
Place hazelnuts and almonds in a bowl and cover with water. It’s preferred to soak them overnight (for 8-12 hours) in the water, but you can get away with soaking for 1-2 hours in a pinch. Rinse and drain the soaked hazelnuts and almonds. Place nuts into a blender along with water, pitted dates, vanilla bean, cinnamon, and salt (if using). Cover and blend on highest speed for 1 minute or so. Place a nut milk bag (here is the bag I love) over a large bowl and slowly pour the milk mixture into the bag. Gently squeeze the bottom of the bag to release the milk. This process can take 3-5 minutes, so be patient. You should be left with about 1 cup of pulp in the bag. See my tips below on using the leftover pulp. Rinse out blender and pour the milk back in. Now, pour it easily into a Mason jar and secure with lid. Chill in the fridge. It will stay fresh for 2-3 days. Give the jar a good shake before enjoying. Drink it alone, use it in cereal or smoothies, make hot oatmeal, and one of my favourites - use as a creamer in coffee or black tea.
Tips: 1) If your dates or vanilla bean are dry/stiff, soak in water to soften before use. You can also use another sweetener of your choice like maple syrup instead of dates. Same goes for vanilla – feel free to use vanilla extract for a more subtle vanilla flavour.
2) Ideas for using leftover pulp: stir into oatmeal or muffin batter, add to smoothies, make crackers, or you can even dehydrate it and then blend it up to make hazelnut meal. You can freeze it for a later use too.
3) You might be wondering – If I don’t have a nut milk bag can I use a fine mesh sieve? Yes you can. I don't find the milk gets as smooth compared to using a nut milk bag, but if you strain it several times, it comes out decent. Also, feel free to try a cheesecloth (you can even line the sieve with a layer of cheesecloth).

Comments (6) | Share on Facebook | Tweet | Pin It | Stumble© copyright 2014 Oh She Glows. All Rights Reserved.
June 17, 2014
Ultimate Green Taco Wraps with Lentil-Walnut Taco Meat (Vegan + Gluten-Free)

My desire for vegetables has been fleeting over the course of the first and second trimesters. Some days I don’t want to touch them with a ten foot pole (except in smoothies, maybe), but when I do get a craving for veggies I have to eat all the vegetables, as soon as possible. There’s no middle ground. I either make a salad the size of my head or no salad at all.
These lettuce-wrapped tacos are the result of one of my undeniable, all-consuming veggie cravings last week. All I could think about was something super fresh and crunchy. Before I knew it I was pulling every single vegetable out of my fridge and piling it onto the counter. Eric could see that crazy look in my eyes and he knew I would stop at nothing to get my fix. I whipped up the lentil-walnut taco meat from my cookbook, sautéed some red pepper and onion, blended up some cashew sour cream, and got to chopping. I knew this was going to be the veggie-packed meal of my dreams. I almost shed a tear of joy when I took my first bite. Heck yes. I hit the flavour, texture, freshness jackpot! Somehow I managed to share with Eric and we stuffed ourselves silly. Surprisingly, we even had leftovers for lunch the next day. I’m telling you, these tacos prove that leftovers can be a great thing. It was such a fun treat to open the fridge the next day and have this great lunch waiting to be gobbled up a second time around.

Here’s how I constructed the wraps:
1) Romaine/Iceburg/Butter lettuce “wrap” + Lentil-Walnut Taco Meat (creates an amazing base for a taco!)

2) Sautéed onion and bell pepper:

3) Chopped tomatoes or salsa:

4) Lots of Cashew Sour Cream:

5) Chopped green onion + a squeeze of lime juice

Other topping ideas = sliced avocado, cilantro, hot sauce, _________ ?
6) Stuff into face. Make a HUGE mess. Repeat as necessary (until you can’t fit one more bite).
Veggie craving conquered.

Ultimate Green Taco Wraps
Vegan, gluten-free, grain-free, soy-free
Get ready to pack in a ton of veggies in one irresistible, healthy meal. If you haven't tried my lentil-walnut taco meat, this is a great recipe to do so. It's high-protein, and the taco seasonings and chewy texture create a realistic-tasting taco base. Feel free to use tortilla wraps or corn shells instead of lettuce wraps or you can make this recipe into a big salad too. You can save time by cooking the lentils and prepping the taco meat in advance. This recipe is inspired by Minimal Eats taco wraps and it's adapted from my Raw Taco Salad and the lentil-walnut meat is adapted from the The Oh She Glows Cookbook (page 186).
Yield
8 large tacos (approx)
Prep Time
30 Minutes
Cook time
30 Minutes
Total Time
1 Hour
Ingredients:
FOR THE LENTIL-WALNUT MEAT (makes 2 1/2 cups):1 cup uncooked French green lentils (you will need 1 3/4 cups cooked lentils)1 cup walnut pieces, toasted1 1/2 teaspoons dried oregano1 1/2 teaspoons ground cumin1 1/2 teaspoons chili powder1/2 teaspoon fine grain sea salt, or to taste1 1/2 tablespoons extra virgin olive oil2 tablespoons waterFOR THE TOPPINGS/WRAPS:1-2 bell peppers, thinly sliced (I used one, but next time I will use 2 for ample leftovers)1/2-1 large onion, thinly sliced (I used 1/2 onion, but next time will use 1 for ample leftovers)Cashew Sour Cream (see below for link)Diced tomatoes or salsaGreen onion & fresh lime juice, for garnishlettuce wraps (large romaine, Iceburg, or Butter lettuce leaves)Other topping options: Sliced avocado, hot sauce, cilantro, etc.
Directions:
Cook the lentils: Rinse lentils in a fine mesh sieve. Add to a medium pot along with a few cups of water. Bring to a boil, reduce heat to medium, and simmer for 20-25 minutes until tender (cook time will vary depending on the type of lentils you use - see package). Drain off excess water. Toast the walnuts: Preheat oven to 300F. Add walnuts onto a rimmed baking sheet and toast for 10-13 minutes, watching closely, until lightly golden and fragrant. Set aside to cool for a few minutes. Saute the pepper + onion filling: Add 1/2-1 tablespoon of oil into a large skillet or wok. Cook the onion and peppers over medium heat for about 15-20 minutes, reducing heat if necessary and stirring frequently, until translucent. Prepare the taco meat: Add 1 3/4 cups cooked lentils (you'll have some leftover) and all the toasted walnuts into a food processor and pulse until chopped (make sure to leave texture). Stir or pulse in the oregano, cumin, chili powder, and salt. Stir in the oil and the water until combined. Prepare the rest of your vegetable toppings and wash + dry the lettuce wraps. Assemble: Add a large lettuce leaf onto a plate, top with taco meat, sauteed peppers + onion, and the rest of your desired toppings. Leftovers can be stored in the fridge in sealed containers to be enjoyed the next couple days. The cashew cream will keep for at least a week in the fridge. Use sour cream leftovers on sandwiches, wraps, stirred into salad dressings, on vegan nachos, or with chili or soup.
Tips:
1) I used French green lentils in my taco meat because I love their chewy texture, but regular green and brown lentils work too. Do not use red lentils as they are too mushy and don't have the required chewy texture for this recipe.
2) Nut-free taco meat: I haven't tried this yet, but you might want to try subbing the walnuts for 1/2-3/4 cup toasted sunflower seeds. Let us know how it goes if you try it out!
3) My Cashew Sour Cream recipe can be found here.

Comments (34) | Share on Facebook | Tweet | Pin It | Stumble© copyright 2014 Oh She Glows. All Rights Reserved.
June 10, 2014
Vegan Green Goddess Dressing with Grilled Veggie Kabobs

Welcome to barbeque season! Have you fired up the grill yet? I’ve been collecting some easy barbecue recipes to have on hand for July and August because we’re renovating our kitchen at the end of July. I’m doing a happy dance for the Future Kitchen, but I’ll be mourning the loss of Current Kitchen for several weeks. How’s a food blogger gonna get by? Well, I have a plan, my friends. Rather than abandoning the blog for 5-6 weeks, I’ve been setting aside recipes in advance that I can post during the renovation. I’m also setting aside recipes for late September/October while I’m soaking up time with our new baby. So, if things seem a bit quieter around here lately, that’s because I’ve been working hard sneaking away recipes for the upcoming months (you might see sneak peeks on Instagram though). I’m hoping this will help make these upcoming transitions a bit smoother!
Oh, and if any of you have any suggestions for “kitchen-free” or barbeque meals to make during a kitchen renovation, I welcome them with open arms. I have a feeling the spiralizer and Vitamix are going to get lots of use. We don’t own a microwave, but I’m wondering if I should invest in a hot plate to have on hand. Of course, lots of barbeque action will be going down too. This was a great one to kick off the season.

Vegan Green Goddess Dressing with Grilled Veggie Kabobs
Vegan, gluten-free, grain-free, nut-free, refined sugar-free, soy-free
This recipe is adapted from my first attempt at a vegan Green Goddess dressing a few years ago. The former version was quite different from the original Goddess Dressing recipe, so this time I wanted to make something a bit more similar to the original using the same herbs (tarragon and chives) and a bit of egg-free mayo for an authentic flavour. I also added in some fresh avocado to give it a lovely creamy texture while giving it a boost of healthy fats. You can use this tangy and fresh dressing so many ways, but we especially love it spooned over grilled veggie kabobs. It's also lovely on a wrap, as a dip, or on a veggie burger.
Yield
about 3/4 cup dressing
Prep Time
25 Minutes
Cook time
15 Minutes
Total Time
40 Minutes
Ingredients:
FOR THE DRESSING:1 small garlic clove2 tablespoons fresh tarragon4 tablespoons fresh chives2 tablespoons extra virgin olive oil2 tablespoons fresh lemon juice1 tablespoon apple cider vinegar4 tablespoons egg-free mayo (I use soy-free Veganaise)2 tablespoons water1/3 cup avocado flesh (1/2 a small avocado)1/4 teaspoon fine grain sea salt, or to tasteFreshly ground black pepper, to tasteFOR THE KABOBS:Bell peppersRed onionZucchiniMushroomsExtra virgin olive oilSalt and pepper
Directions:
For the dressing: Mince the garlic in a food processor. Now add in the tarragon and chives and process until minced. Finally, add in the rest of the ingredients and process until the dressing is smooth (or just about). Adjust seasonings to taste if desired. Dressing can be used immediately or stored in the fridge (in a sealed container) for 3-4 days.
For the kabobs: Preheat the BBQ over medium-low heat. Chop vegetables into desired sizes and place on vegetable skewers. Brush oil on veggies to coat all sides and season with salt and pepper. Grill the kabobs for around 15 minutes, rotating every 5 minutes. We grilled for the first 10 minutes on the top rack and then moved them to the bottom rack for the last 3-5 minutes.
Serve kabobs immediately with a drizzle of dressing on top.

Happy grilling!
Comments (32) | Share on Facebook | Tweet | Pin It | Stumble© copyright 2014 Oh She Glows. All Rights Reserved.
June 3, 2014
Speedy Veggie ‘n Brown Rice Noodle Bowl with Homemade Teriyaki Sauce

Now that I’m carting around a small watermelon-sized bump, I find myself relying on quick and easy recipes more than ever. My feet just don’t want to be on the ground for long come 7pm, especially since I spend a lot of the day on my feet testing recipes. So, I figure now is a great time to build on my quick and easy recipe collection to help us get through the next several months (years?). No matter what your particular situation, I think there’s always a demand for healthy, delicious meals that don’t take long to throw together. I hope to showcase more of these recipes in the months to come. With summer around the corner, this seems like the perfect time to kick it off!

This is one such easy meal that we’ve been making lately (when I can peel myself away from the watermelon and kiwi, that is) and it’s on the table in 30 minutes flat. Noodle bowls are awesome because you can customize them any way you like – a total clean out the fridge kind of meal. If I have some veggies on their last legs (rubbery celery, I’m looking at you), they are brought back to life in a noodle bowl.
This is a flavourful and comforting meal without feeling heavy in the slightest. Just like the noodle bowls in my cookbook, I use a small amount of noodles (rather than a whole package) and pair it with several cups of vegetables for lots of nutrition and fibre-packed satiety. The julienned carrots add a pasta-like texture, softening like a noodle when heated. It’s my secret to keeping the meal light and energizing without feeling like you’re missing out on those comforting, starchy noodles.

Speedy Veggie 'n Brown Rice Noodle Bowl with Homemade Teriyaki Sauce
Vegan, gluten-free, nut-free, refined sugar-free
A veggie-packed, light-on-the-noodles noodle bowl that's paired with a quick and easy homemade Teriyaki sauce. The sauce isn't traditional by any means - I've swapped the soy sauce for coconut aminos (a great low-sodium option) and the Mirin (sweet rice wine) for seasoned rice vinegar. It turned out great regardless. Go ahead and customize this noodle bowl with whatever you have hanging around. I made lots of Teriyaki sauce so you’ll have some to bring the leftovers back to life the next day. Also, feel free to change up the protein source. I used frozen shelled edamame because it’s so quick, but fried tofu would also be tasty. Teriyaki sauce is inspired by allrecipes.com.
Yield
2-3 servings
Prep Time
15 Minutes
Cook time
15 Minutes
Total Time
30 Minutes
Ingredients:
FOR THE TERIYAKI SAUCE:4 1/2 tablespoons seasoned rice vinegar1/4 cup + 2 tablespoons coconut aminos (see note)1 tablespoon sesame oil3 to 4 1/2 teaspoons coconut sugar (or granulated sugar of choice), to taste2 small cloves garlic, minced1 1/2 teaspoons minced fresh ginger1/4 teaspoon red pepper flakesfresh ground black pepper, to tasteFOR THE NOODLE BOWL:3 ounces/85g gluten-free brown rice soba noodles (or soba noodles of choice)1 tablespoon coconut or olive oil2 1/2 cups broccoli florets, chopped small3 celery stalks, chopped3/4 cup shelled frozen edamame2-3 medium carrots, julienned2-3 green onions, thinly sliced1-2 teaspoons sesame seeds, for garnish
Directions:
Prepare the sauce: In a medium bowl, whisk together the sauce ingredients until combined. Set aside.
Bring a medium pot of water to a boil.
For the noodle bowl: Meanwhile, preheat a large skillet or wok over medium-high heat. Add the oil and coat the pan. Add the broccoli florets, celery, and 2 tablespoons of Teriyaki sauce and saute for about 7-9 minutes, reducing heat if necessary.
When the water boils, add the noodles and reduce heat to medium-high. Cook the noodles as instructed on the package directions (about 4-5 minutes for most soba rice noodles). Drain.
Add the frozen edamame and julienned carrots to the skillet and saute another 5 minutes, or until the edamame is heated throughout.
Stir the drained noodles into the stir-fry mixture along with 2/3 of the Teriyaki sauce. Cook for a couple minutes and then serve immediately with a garnish of sliced green onion and sesame seeds.
Store leftovers in a container in the fridge for 1- 2 days. To re-heat leftovers, add them into a skillet with a bit of oil. Pour on the leftover dressing and toss to coat. Heat over medium until heated throughout and serve immediately.
Notes: I used coconut aminos (which is very low in sodium), but feel free to use low-sodium tamari instead. I recommend adding it to taste since it has a higher sodium content than coconut aminos so you might not need as much. To get more servings out of this dish, feel free to add more soba noodles.
Soy-free option: Omit the edamame and replace with adzuki beans, chickpeas or another bean of choice. Use coconut aminos instead of tamari.
gluten-free option: Use gluten-free soba noodles such as brown rice or buckwheat. Be sure to check the label of your tamari and other ingredients as well.


Comments (8) | Share on Facebook | Tweet | Pin It | Stumble© copyright 2014 Oh She Glows. All Rights Reserved.
Angela Liddon's Blog

- Angela Liddon's profile
- 134 followers

