
Angela Liddon's Blog, page 15
October 25, 2015
Homemade Pumpkin Pie Spice Mix

For the past couple seasons, I’ve been on the hunt for pumpkin pie spice mix. And I’ve been slowly going crazy not being able to locate it in any local grocery stores. Don’t they know how many they would sell from me alone?! I longed for the day I would cross paths with it, making a mental note to buy 10 if I ever did. Only that day never came and I went about my life smiling on the outside, but secretly feeling like a piece of me was missing. Until that beloved day when a recipe just fell into my lap!
I feel like fellow bloggers and cookbook authors, Nicole Axworthy and Lisa Pitman, get me. They know that vegan staples aren’t always offered in grocery stores (yes, I just called pumpkin spice mix a “vegan staple”…let’s go with it), and sometimes we want or need to make things in our own kitchen. In their new book, DIY Vegan, you’ll find more than 100 vegan recipes showing home cooks just how easy it is to create knock-offs of common store-bought staples, only without the sometimes scary ingredient lists. For the most part, I try to limit the amount of prepared foods that I purchase due to the unpronounceable ingredients many contain. And really, these foods don’t always leave me feeling my best. Yes, more and more brands are coming out with simple, whole-foods ingredient lists (hooray), but sometimes these brands aren’t accessible or they’re just plain old expensive. So, I enjoy making my own staples when time allows; especially if I can make a huge batch and store it for several months, like with this pumpkin pie spice mix. Major kitchen win!
As Nicole and Lisa say, "Seriously, are you going to pay extra for someone else to stir your spices? We didn’t think so. Make your own in seconds, make some for your friends, start a business selling your own spice-stirring services. And then eat pie."
In DIY Vegan, you’ll find vegan recipes like Buttermilk, Cashew Coffee Creamer, Simple Sour Cream, Coconut Yogurt, Cultured Nut Cheese, Whole-Grain and Seed bread, Cheesy Crackers, Taco Seasoning, Spelt Pizza Dough, and many more. I went straight for the Pumpkin Pie Spice Mix of course, and after falling in love I made a triple batch to keep on hand. It’s just so easy and flavourful, and now I never have to go without. If you noticed that super cute jar at the top of this post, you’ll see that it also makes a fun gift for the pumpkin pie spice mix lover in your life. Just place the spices into a tiny jar (you can layer it for fun), add some baker’s twine, and loop on a homemade tag. Wouldn’t this be a cute idea for a housewarming gift or a party favour? Or maybe I’m just weird. Rest assured, if you ever brought me this I would light up like a Christmas tree.
Coming up soon, I’ll be sharing a baked good that I created using this very pumpkin pie spice mix. You don’t want to miss this one, folks. It’s the seasonal baked good I promise you’ll want to whip up all season long. So go on and make this spice mix then meet me back here for Part 2! Deal?

Homemade Pumpkin Pie Spice Mix
Vegan, gluten-free, grain-free, no bake/raw, nut-free, oil-free, refined sugar-free, soy-free
Use this pumpkin pie spice mix in cakes, cookies, bars, oatmeal, smoothies, lattes, chia seed pudding, and more! I like to keep a large batch of it on hand and I find myself using it in just about everything. This recipe is reprinted with permission from DIY Vegan. Copyright © 2015 Nicole Axworthy and Lisa Pitman. Published by St. Martin's Griffin.
Yield
2 1/2 tablespoons
Prep Time
5 Minutes
Cook time
0 Minutes
Total Time
5 Minutes
Ingredients:
4 teaspoons cinnamon2 teaspoons ground ginger1 teaspoon freshly grated nutmeg (I pack it in the teaspoon)1 teaspoon ground allspice1/2 teaspoon ground cloves
Directions:
Combine all the ingredients in an airtight container or jar. Attach lid and shake to combine. Store at room temperature for up to 6 months. Shake jar before each use.

Photography credit: Ashley McLaughlin Photography
A big congrats to Nicole and Lisa on this beautiful cookbook, and for allowing me to share this recipe with you today! DIY Vegan is hot off the press this Tuesday, October 27th so be sure to check it out online and in bookstores!
Comments (8) | Share on Facebook | Tweet | Pin It | Stumble© copyright 2015 Oh She Glows. All Rights Reserved.


October 20, 2015
A simple roasted butternut squash salad

Last year my dear friend Karly mentioned that she started seeing a business coach. She was struggling to find balance with her quickly growing career while juggling a busy personal life, and found some much needed support and accountability with a coach. Consider me intrigued! I admire her for taking the initiative to get outside help with running her own business, and for gently planting the seed in my own mind. As I wrote in my last post, asking for help has never been my forte, but I’m lucky to be surrounded by many self employed friends who are always eager to share their sanity-saving tips.
Life got busier than ever with our new family and work. The business coach idea fell off my radar, as I didn’t think I could add one more thing to an already full plate. Looking back, it probably would’ve helped me more than it didn’t, but recently, it was as if the universe was giving me a gentle nudge to go for it. Don’t you love when that happens? First, our friend Chris mentioned his business coach, and what a great experience he’s had over the years. Then, I saw Karly recently and she told me she’s been seeing her coach for over a year now with amazing success (and I’ve noticed the positive changes, too). Well, that was it. In the words of my girl crush Mindy Kaling, Why not me?! I decided right then and there that I would make time to give it a shot.
Our first session started with an exploratory exercise. My coach presented me with “The Wheel of Life”. It has various labels on it like “career”, “fun”, “personal growth”, “money”, “significant other”, “health”, “friends/family”, etc. Then I rated each one on a numerical scale from least to most satisfaction. The poor little wheel was so imbalanced by the time I was finished. I wasn’t the least bit surprised since I’ve felt like a wagon with 3 wheels for a while now, but this exercise helped me decide on a few areas to improve. Even though my original intent was to focus on business, I realized that personal growth, or lack thereof, impacts every single area of my life. I think it makes sense to start with this area as I’m sure it’ll have a positive impact on all the other areas too. I’m in my early thirties, but I occasionally feel like my personal growth is stuck in the last decade (or on bad days, maybe my first decade of life, hah). Is this just me, or can you relate to that feeling?
I can’t even tell you how many insights I had in our first session. We set some goals in a few categories, and I came up with some potential solutions to issues. Before we met, I decided that I wasn’t going to sugar coat things or make excuses for myself; as a result, our conversation was authentic, passionate, real, and inspiring. One thing I love is the accountability that I now have to follow though with goals. Rather than simply saying, “oh I’d love to hire a team some day…”, I’m actively moving forward with the goal! I don’t want to stand in my own way anymore. It’s amazing how much we can hold ourselves back by telling ourselves the same stories each day. The question is – what would YOU do if you got out of your own way?

A Simple Roasted Butternut Squash Salad
Vegan, gluten-free, nut-free, refined sugar-free, soy-free
This is my favourite method for cooking butternut squash - chopping it into small cubes, and roasting until it's browned and slightly caramelized. I have to exercise some serious restraint not to eat the whole pan straight from the oven! I also include an easy recipe suggestion if you'd like to create a very simple fall salad. Roasted cubes of butternut squash are layered on a base of fluffy quinoa, and topped with creamy chopped avocado, sea salt, and a squeeze of lemon or lime juice. It's simple, but delightful. Thank you to my friend Karly for inspiring this recipe. She brought this salad to a recent get together, and I knew I had to try recreating it at home. Lastly, my biggest tip for this dish is to make sure you season it properly. Quinoa and roasted squash will fall flat without a generous seasoning of sea salt, so don't be shy. I also like to keep some Herbamare on hand when serving so others can season with additional salt if desired. Be sure to see my tips below on the many ways that you can change up this salad!
Yield
4-6 servings
Prep Time
25 Minutes
Cook time
50 Minutes
Total Time
1 Hour, 15 Minutes
Ingredients:
For the roasted butternut squash:1 large butternut squash (about 3-3.5lb) peeled, seeded, and diced (1/2-inch cubes, 8-9 cups chopped)2 tablespoons melted coconut oil, or oil of choiceFine sea salt, to tasteFor the salad:1 cup uncooked quinoa1 large avocado, pitted and choppedFresh lemon or lime juice, to tasteFine sea salt and freshly ground black pepper, to taste
Directions:
For the squash: Preheat the oven to 400F and line two large baking sheets with parchment paper. Spread the chopped squash onto the baking sheets and drizzle on 1 tablespoon of oil over top each. Toss to coat. Spread the squash into an even layer, being careful not to overcrowd the squash, and garnish with a few pinches of sea salt. Roast the squash until the bottoms are just starting to brown. For my oven, this takes about 50 minutes, but your time may vary. I recommend checking on it after 30 minutes, and then every 5-10 minutes after that. I don’t bother flipping it halfway through, but I do rotate the pans once half way through roasting as I have a hot spot in my oven. I find the squash tastes best when the bottoms are slightly browned (more than the photo shows). For the salad: Prepare the quinoa once you have about 25 minutes left of roasting the squash. Rinse the quinoa in a fine mesh sieve and transfer to a medium pot. Add 1 3/4 cups water and bring to a simmer over medium-high heat. Reduce heat to medium, cover with a tight-fitting lid, and cook for 13-16 minutes, until the water is absorbed and the quinoa is tender and fluffy. Once cooked, fluff with a fork and remove from heat. Season the quinoa to taste with a generous amount of salt and pepper and stir to combine. Keep the lid on until ready to use so it stays warm. Pit and chop the avocado and have it ready to go just before assembly. When the squash is finished cooking, spread the warm quinoa onto a platter (or you can simply combine everything in a large bowl). Top the quinoa with all of the (hot out of the oven) roasted squash, and finally the chopped avocado. Garnish with a couple more pinches of salt, and a small amount of fresh lemon juice (or lime juice) drizzled over top (or you can try lemon or lime zest for a twist). I use a light touch with lemon juice as it can quickly overwhelm the other flavors. Serve immediately.
Want to change this dish up? Here are some ideas on how you can create a new dish!
- Add some minced garlic to the cooked quinoa for a subtle garlic flavour
- Sprinkle on some garlic powder or nutritional yeast
- Add black beans, chickpeas, or any bean of choice for a boost of protein
- Try experimenting with spices like cumin + chili powder + cayenne; cinnamon + nutmeg; curry powder + coriander, etc.
- Switch it up and use lemon juice instead of lime juice, and vice versa
- Try sprinkling fresh minced herbs to finish, such as parsley or cilantro
- Switch up the grains - I think a small amount of rice would pair really well here
- Skip the avocado and sprinkle on my pecan parmesan for a nutty crunch
- Add finely shredded kale, chard, or spinach for a boost of green power

Photography credit: Ashley McLaughlin Photography
Comments (24) | Share on Facebook | Tweet | Pin It | Stumble© copyright 2015 Oh She Glows. All Rights Reserved.
October 12, 2015
Golden Red Lentil Dal with Cilantro-Speckled Basmati

Asking for help isn’t something that comes to me naturally as I’ve always been a fiercely independent worker. My previous supervisors always commented on this trait almost immediately whether it was in an academic or business setting, and I often took a lot of pride in the fact that I could do things on my own. I never considered that this trait could potentially hold me back from growth. I guess I feared that asking for help would be a sign that I was incompetent, so I avoided it as much as possible. And I often thought that if I could just figure out how to manage my time better, I could do it all on my own. Case in point: In the 7 years that I’ve grown this blog, I’ve yet to hire a team member.
However, this past year has helped me realize otherwise, at least in some areas of my life (I still have a long way to go). Working with Ashley on the photography for the next book has allowed me to focus more on my biggest passions – the writing and recipe creation – not to mention finish on time! Our working relationship has really opened my eyes to what I could achieve if I just asked for a bit more help. It has been a total light bulb moment. You know what else I realized? Collaboration is so darn fun. So much more fun than trying to do it on my own!
One of my many goals for this blog is to post at regular intervals once again. An idea I’ve had is to step back from food photography, so I can streamline my workflow and focus on recipe development and writing. I often have recipes in cue waiting to be shared with you all, but the one thing that holds me back is often the fact that I haven’t shot the photography for the post. I adore photography and really grappled with this idea, but in the end I also know that something needs to change if I’m going to be able to grow. So in spirit of collaborating with other talented people, I’m excited to tell you that Ashley will be shooting the food photography for my upcoming blog recipes! It kicked off last week with my Pumpkin Spice Latte with Homemade Pumpkin Spice Syrup post, as some of you already noticed. This doesn’t mean that I won’t do food photography in the future, but it’s definitely working for this stage in my life. For the first time in a very long time, I have the next 2 blog posts already in the works and scheduled in my calendar. It feels awesome to be getting into a groove again and I know this is only the beginning. I will be sure to keep you posted with my other plans!

Golden Red Lentil Dal with Cilantro-Speckled Basmati
Vegan, gluten-free, nut-free, refined sugar-free, soy-free
This easy, flavorful curry is a great one to whip up during the workweek, and leftovers only get better the next day. Light coconut milk makes this curry so luxuriously rich and decadent-tasting, while still feeling quite light and energizing. It definitely won’t weigh you down, but I can promise it’ll warm and comfort you on a chilly day. While it’s lovely all on its own (enjoyed like a rich, thick stew), I love it even more spooned overtop my cilantro-speckled basmati rice with toasted pepita seeds, sliced green onion, cilantro, and a squeeze of lime juice. The amount of broth called for yields for a very thick consistency; if you’d like it thinner and more “soup-like” feel free to thin it out with a bit more broth (if so, you might need to also increase the spices and seasonings as the extra broth will dilute the flavours). This comforting curry recipe is adapted from Super Fresh: Super Natural, Super Vibrant Vegan Recipes by Jennifer Houston and Ruth Tal (2015, Penguin Canada) which is a new cookbook featuring the recipes from Fresh (!), one of my favourite vegan restaurants here in Toronto.
Yield
Serves 4 (makes 5 1/2 cups)
Prep Time
15 Minutes
Cook time
25 Minutes
Total Time
40 Minutes
Ingredients:
For the curry:2 tablespoons virgin coconut oil or grapeseed oil1 1/2 cups diced onion (about 1 medium onion)3 large or 4 medium garlic cloves, minced2 tablespoons freshly grated ginger1 1/2 cups peeled and finely diced carrots (about 2-3 large)*2 teaspoons curry powder, or to taste**1 teaspoon ground cumin1/2 teaspoon ground turmeric1 1/2 cups dried red lentils1 (14-oz/398ml) can light coconut milk2 cups low-sodium vegetable broth, plus more if desired to thin the broth1/2-3/4 teaspoon fine sea salt, to taste1 (5-oz) package baby spinachFor the rice:1 cup dry basmati rice1 tablespoon virgin coconut oil or vegan butter1 3/4 cups low-sodium vegetable broth, or as needed1 cup unpacked fresh cilantro, large stems removed and finely chopped***Fine sea salt and black pepper, to tasteSqueeze of fresh lime juice, to tasteSuggested toppings:Green onions, thinly slicedFresh cilantro leaves, choppedToasted pepita seeds (shelled pumpkin seeds)Squeeze of lime juice, optional
Directions:
For the curry: Add the oil in a large pot and increase heat to medium. Add the onion, garlic, and a pinch of salt. Stir to combine. Saute over medium heat for 4-5 minutes, stirring occasionally, until softened. Stir in the ginger and carrots, and continue sauteing for another few minutes over medium heat. Add the curry powder, cumin, and turmeric. Stir well. Cook for a minute, until fragrant. Pick over and rinse the lentils in a fine mesh sieve. Stir in the entire can of coconut milk, red lentils, broth, and salt. Bring to a simmer and reduce heat to medium-low. Cook, covered with the lid ajar, for about 15-20 minutes, or until the lentils and carrots are tender. Stir occasionally to prevent the lentils from sticking to the bottom. Stir in a touch more broth if you'd like a slightly thinner consistency. After cooking, stir in all of the spinach until wilted. Meanwhile, prepare the rice. Add the rice into a medium pot along with the oil and broth. Increase heat to medium-high and bring to a simmer. Reduce heat to medium, cover with a lid, and cook for 12-16 minutes, until the rice is soft and tender. Fluff with a fork and stir in the cilantro. Season to taste with salt and lime juice. Keep the lid on until ready to serve. Add a generous scoop of rice on a plate or bowl and top with a couple ladlefuls of curry. Add your desired toppings and serve immediately. Leftovers will keep in an air-tight container in the fridge for up to 4-6 days. The curry can also be frozen for up to 4 weeks, possibly longer. For easy freezer-storage, add the cooled curry into a freezer-safe bag, press out the air, and freeze on a flat surface. Thaw overnight in the fridge, or simply leave on the counter until mostly thawed.
*The smaller you dice the carrots, the faster they cook! I opt for thinly sliced carrots here to hasten cook time. You don't have to dice quite as small as in the recipe photos though.
**Be sure to use a good-quality curry powder (one you enjoy the taste of) as a poor-tasting one can throw the flavors off. I am quite fond of Simply Organic curry powder.
***Not a cilantro fan? Simply leave it out and prepare the rice without it. No biggie!

Photography credit: Ashley McLaughlin Photography
Last but not least, I want to wish all my fellow Canadians a very Happy Thanksgiving! We’ve been blessed with gorgeous, warm weather this weekend, and I hope you are too. Thank YOU for coming back to this blog time and time again, and for making this career so personally rewarding.
Comments (18) | Share on Facebook | Tweet | Pin It | Stumble© copyright 2015 Oh She Glows. All Rights Reserved.
October 6, 2015
Homemade Pumpkin Spice Latte with Salted Pumpkin Spice Syrup

I’m baaaaaaaack!
Miss me? Better yet…did you miss my tempting recipes popping into your feed each week? I sure have missed you all and this blog. Thankfully, it’s finally time to kick up my heels and celebrate because I handed in my second cookbook manuscript yesterday. All 250 pages of it including 100+ recipes (most are new!), headnotes, chapter openers, introductory chapters, etc. I seriously can’t believe I did it. Can someone pour me a drink…or 10?! I’m so excited to get my life back in order! And I’m so excited to start sharing recipes on here again at regular intervals. I have SO many ideas/goals/hopes/dreams for this space.
It’s funny how different the first book writing process went compared to the second. When I submitted my first book’s manuscript, I don’t think I had ever felt so much doubt in my life. I had all this anxiety near the very end and concluded that a bunch of finalized recipes had to be re-worked at the last minute. All of a sudden, none of them were good enough. Eric was like, did you fall on your head…they taste amazing! Yes, writing recipes for print brought the cray cray out in me. I turned into a full-fledged RECIPE-ZILLA.
I kept coming back to the age old question – Is this book enough? – which I think deep down means, Am I enough? Am I good enough? Yea, I’m getting deep today. It’s a question I’ve struggled with my entire life so I shouldn’t have been surprised when this crippling doubt reared its ugly head. In the end, the first process taught me how to make peace with my work, the creativity I put out into the world, and with whatever the response to the book would be. That’s a big one. I just had to let it all go.
I’m not saying I haven’t had moments of doubt during the second book’s creation because I surely have, but this time around I’ve felt much more focused, organized, and best of all, confident in my ability. It was something only experience could teach me, I think. Even Eric mentioned how calm I was this last week as I put the final touches on everything. (Ok, ok, I handed it in 4 days late, but when your editor gives you an extra weekend you take it!) Even though I know there is plenty of work ahead (many rounds of edits, design collaboration, press, etc), at least I (kinda, maybe) know what’s to come.
But I’m totally not thinking about that right now. Now is the time to drink all the espresso! Can you tell I’m hyper? Just a bit. Yes, I’m getting festive with homemade pumpkin spice lattes, and I hope you’ll join me. I’d say these are a serious upgrade from my 2010 attempt (cue nostalgia from a blog post 5 years ago!), but how could it not be with a homemade pumpkin spice syrup?! I am obsessed with this homemade latte recipe. Can’t stop. This syrup is a game changer, and you’ll find yourself dreaming up many ways to use it. Always a good detective, I bought a legit Pumpkin Spice Latte from Starbucks so I could compare them side by side. Guess which latte won?

Homemade Pumpkin Spice Latte with Salted Pumpkin Spice Syrup
Vegan, gluten-free, grain-free, oil-free, refined sugar-free, soy-free
I don't have an espresso machine so I find the easiest way to make an authentic-tasting latte at home is to simply buy a few shots of espresso at the local coffee shop! I've tried using strong coffee as a substitute for espresso (in varying amounts) and I don't find it comes close to being as good as the espresso version. It's not horrible tasting by any means, but it misses that incredibly rich, deep, and flavorful espresso flavour which I think is key for a latte. So yes, I think it's worth the effort to use actual espresso here. That being said, feel free to experiment with coffee versions too. Eric, who isn't a coffee fan, loved a version I made with 1/4 cup strong coffee instead of 1 shot of espresso. It was so much milder, and didn't have a pronounced coffee flavour. Lastly, a note about milk frothers: I don't own one, but I discovered that you can create super creamy and frothy almond milk by adding the heated milk into a French press and pumping the plunger for 30-60 seconds vigorously. It creates the creamiest almond milk EVER! I am seriously hooked. I tried coconut milk and didn't have quite as frothy results. Soy milk will also work well, but I prefer the flavour of almond milk here. Actually my @theglowspot instagram post had a great discussion about various plant-based milks and their frothing ability...pretty interesting stuff! Let me know your tips below.
Note: The Salted Pumpkin Spice Syrup is lightly adapted from Paleo'ish On A Dime.
Yield
3/4 cup syrup + 1 latte
Prep Time
5 Minutes
Cook time
5 Minutes
Total Time
10 Minutes
Ingredients:
For the Salted Pumpkin Spice Syrup:1/2 cup coconut sugar1/2 cup pure maple syrup1/3 cup unsweetened pumpkin purée1 teaspoon cinnamon1/2 teaspoon freshly grated nutmeg1/4 teaspoon ground cloves1/4 teaspoon pink Himalayan sea salt or other fine sea salt, or to taste1/4 teaspoon pure vanilla bean powder or 1 vanilla bean, seeded or 1/2 tsp pure vanilla extractFor the Pumpkin Spice Latte:2 tablespoons (1 shot/1 ounce) espresso1 cup unsweetened almond milk3-4 teaspoons Salted Pumpkin Spice SyrupCoconut Whipped Cream, for garnish (optional - I usually skip it)Dash cinnamon or pumpkin pie spice, for garnish
Directions:
For the Pumpkin Spice Syrup: Whisk together all syrup ingredients in a medium pot over medium heat. Simmer for about 5-6 minutes, stirring frequently, until smooth and slightly thickened. Remove from heat. Once cool, pour leftovers into a jar and secure lid. Prepare the espresso. Tip: I like to buy a few espresso shots from the coffee shop since I don’t have an espresso maker. I keep leftovers in the fridge for 1-2 days and reheat as needed. Add milk into a small pot. Heat over medium and bring to a simmer. Immediately remove from heat. Froth the milk using a milk frother or a French Press. Tip: I use my French Press to froth the milk. Simply add the heated milk into the press and secure lid (make sure it’s closed and not vented). Pump the plunger vigorously for about 30-60 seconds. Be careful as the hot milk can shoot out a bit. Pour hot espresso into a mug. Top with all of the frothy milk. Add 3-4 teaspoons of the syrup, to taste, and gently stir to combine. Top with a dash of cinnamon or pumpkin pie spice, and Coconut Whipped Cream, if desired. Serve immediately. The syrup will keep in an air-tight container in the fridge for at least 2 weeks, most likely longer. You can use it in regular coffee too, or try stirring it into a bowl of hot oatmeal for a seasonal twist!

Photography credit: Ashley McLaughlin Photography
Comments (30) | Share on Facebook | Tweet | Pin It | Stumble© copyright 2015 Oh She Glows. All Rights Reserved.
September 13, 2015
Back To School: Luxurious Homemade Sunflower Seed Butter

Not only is it the month that my baby will turn one*, it’s also the time of year when my nut-free recipes are getting a lot more action. Yup, back to school season. After receiving a request from a blog reader recently, I decided to share this sunflower seed butter recipe that’s been raved about by my testers. It’s so creamy and delicious! (I recently heard that some schools are now banning seed butters too, so I realize this recipe won’t work for those schools.)
This blog post is also proof that I’m still alive! Not that you are waiting with bated breath for my next post or anything, but I wanted to apologize for my absence. My manuscript is due at the beginning of October and I’ve been working around the clock finalizing recipes, writing, and editing the introductory chapters and headnotes. I can’t believe I’m SO CLOSE to finishing the first draft. It feels amazing and I’m looking forward to getting back to a (somewhat) normal life again. Thanks for hanging in there with me.
*gentle sobs.

We start by roasting the sunflower seeds. For the love of everything nut/seed buttery, please do not skip this part. Not only does roasting give the seeds a nutty, toasted flavour, but it helps the seeds turn into butter much faster. I speak from experience because I once tried to make sunflower seed butter using raw sunflower seeds and I processed for like 30 hours and nothing happened except dust. It took me years to try it again after that experience!

Sunflower seed glam shots. Just cuz.

Here is a glimpse into the various food processor stages below. It takes me about 7-8 minutes in my processor. Keep in mind your own processing times will vary based on your food processor and its butterizing prowess. I recommend using a heavy-duty food processor (such as this model) to make nut or seed butter as smaller machines can overheat. You can also make nut and seed butter in the Vitamix, but I never do because I find the butter a huge pain to scrape out from the bottom of the Vitamix container. For me, the food processor for nut/seed butter is where it’s at!

I always let it run a couple minutes longer than I think I should just to get it super silky and runny.

Luxurious Sunflower Seed Butter
Vegan, gluten-free, grain-free, nut-free, refined sugar-free, soy-free
Plain sunflower seed butter can taste quite bitter so I’ve improved its flavour by adding a touch of coconut sugar, cinnamon, and some virgin coconut oil to thin the consistency just a bit. The result is a sunflower seed butter you’ll want to add to everything, and eat by the spoonful. Even though it’s not the ever popular almond or peanut butter, you won’t feel like you’re missing out when you make this nut-free spread.
Yield
1 3/4 cups
Prep Time
15 Minutes
Cook time
10 Minutes
Total Time
25 Minutes
Ingredients:
3 cups (about 400g) raw shelled sunflower seeds1/4 cup coconut sugar2 tablespoons virgin coconut oil, softenedPinch of pink Himalayan sea salt or other fine sea salt, to taste1/2 teaspoon cinnamon, or to taste (optional)1 teaspoon pure vanilla extract1 vanilla bean, seeded or 1/4 teaspoon pure vanilla bean powder (optional)
Directions:
Preheat oven to 325F. Line a large baking sheet with parchment paper and spread on the seeds in an even layer. Roast for 9-12 minutes, until some of the seeds are lightly golden. Cool the seeds for a few minutes before using. Meanwhile, add the sugar into a high speed blender and grind until a powder forms. Leave the lid on and set aside so the “dust” can settle. Spoon the toasted seeds into a heavy-duty food processor. (I like to spoon the seeds into my measuring cup and transfer them that way. When I have about 1/2 cup of seeds left on the pan I will use the parchment paper to “funnel” the remaining seeds into the processor.) Process the seeds for a few minutes, stopping to scrape the bowl every minute. It will look dry and powdery at this stage. (If you have a chute, you can leave it open to allow steam to escape.) Add the coconut oil and process for another couple minutes. The butter will clump together into a large ball and it'll start rattling around for a bit. Then, the ball will eventually break down into butter again. Stop to scrape down the bowl as needed. Now, add in the ground sugar, salt, and cinnamon. Process for another few minutes until smooth. Now, slowly stream in the vanilla while processing. Add in the vanilla bean seeds, if using. You can add a touch more oil if you need to thin out the butter (but do not add water or liquid sweetener because it will seize). I like to let the machine run at least another 2 minutes to get the sunflower seed butter super smooth. I process for a total of about 8 minutes, but timing will vary based on your food processor and preference. Some machines may need to run for upwards of 15 minutes to get the seed butter smooth enough. Transfer the sunflower seed butter into an air-tight container. Chill in the fridge. Here it'll keep for about 2 months and it will remain “spreadable” even when chilled.
Tips: 1) Do not skip toasting the seeds; it’s necessary for the seeds to break down in the processor. 2) The sweetener is added because sunflower seed butter is bitter; feel free to adjust the sweetener to your own taste. 3) If for some reason your seeds aren’t breaking down after the specified times, add a touch more coconut oil, a teaspoon at a time. Some machines just might need to run a bit longer though, so be patient!

And now some recipes to use homemade sunflower seed butter…
Quick and Easy No Bake Protein Bars
Flourless Thumbprint Breakfast Cookies
PS – 21 Allergy-Friendly Back To School Snack Recipes
Comments (33) | Share on Facebook | Tweet | Pin It | Stumble© copyright 2015 Oh She Glows. All Rights Reserved.
August 7, 2015
The Blender Girl’s Mystical Mango Smoothie


Happy almost weekend, friends! Today, I’m excited to share a recipe from The Blender Girl Smoothies: 100 Gluten-Free, Vegan, and Paleo-Friendly Recipes by Tess Masters. I had the pleasure of getting to know Tess a few years ago at the Vida Vegan Con and let me tell you, she is as vivacious, bubbly, and thoughtful as she comes across online. I totally wish we lived closer so we could bond over our love for green smoothies, Vitamix blenders, and plant-based cuisine. Well, all the more reason to visit California, I suppose!
Not only is tess the force behind The Blender Girl website, The Blender Girl cookbook, and The Blender Girl Smoothies app, but her second cookbook, The Blender Girl Smoothies, was just released on June 30th. It’s packed with 100 creative smoothie recipes including a beautiful photo for each recipe. The book is divided into 4 chapters: 1) Smoothie Secrets, 2) Find Your Perfect Blend, 3) The Recipes (light and fruity; clean and green; an exotic ride; dessert), and 4) The Smoothie Pantry. Each smoothie recipe has icons that let you know whether the smoothies are nut-free, detox-approved, high-protein, immunity-boosting, alkaline, and more. She also provides a comprehensive list of pantry ingredients. This comes in handy, especially for the lesser known superfood ingredients (such as spirulina, camu powder, wheatgrass, etc.). Lastly, she dishes on her top tips for blending perfect smoothies and shares a “build your own smoothie” guide so you can create your own unique recipes.
Today, I’m happy to share her “Mystical Mango” smoothie! It’s so energizing and makes enough to share (just under 4 cups worth, although I could’ve easily chugged it all myself). I served it alongside the tofu scramble from my cookbook and some toast for an easy, satisfying breakfast.

The Blender Girl's Mystical Mango Smoothie
Vegan, gluten-free, grain-free, no bake/raw, nut-free, oil-free, refined sugar-free, soy-free
I fell in love with this smoothie's thick and creamy texture and sweet, tangy flavor. It makes the perfect breakfast drink to pair with a bowl of overnight oats, tofu scramble, or chia pudding. This recipe is lightly adapted from Tess Master's The Blender Girl Smoothies (2015) published by Ten Speed Press.
Tess writes, "With a creamy texture and exquisite flavor, this immunity blend is a fabulous for collagen formation and glowing skin, hair, and nails. Mango's enzymes and vitamins A, C, and E cleanse the liver and aid digestion, and it's potassium and fibre help regulate blood pressure and cholesterol. This one will make your heart happy."
Yield
4 cups (2 servings)
Prep Time
5 Minutes
Cook time
0 Minutes
Total Time
5 Minutes
Ingredients:
1.5 cups orange juice1/2 cup water, or more if needed1/4 cup avocado1/2 teaspoon finely grated lime zest2 cups frozen mango (I used an entire 300g bag)Pure maple syrup, to taste (optional - I added a teaspoon)
Directions:
Add all of the ingredients into a high speed blender and blend on high for 30-60 seconds, until smooth and creamy. If using the Vitamix, you can use the tamper stick to get things moving. If the mixture seems too thick you can thin it with a bit more water.
Note: Tess says you can boost this smoothie with 1/2 teaspoon wheatgrass powder, 1 teaspoon chia seeds, and 1 teaspoon of flaxseed oil.
Comments (4) | Share on Facebook | Tweet | Pin It | Stumble© copyright 2015 Oh She Glows. All Rights Reserved.
August 1, 2015
How To Pack Food For A Weekend Away In An Hour! (Plant-Based)

We’re off to a wedding, a birthday party, my in-laws, and then to visit my grammy (Adriana gets to meet her Great-Grammy!) over the long weekend. This means we’re going to clock a ton of hours on the road, so I am coming prepared! Even though a lot of our meals will be made for us (such as dinner Saturday and Sunday night), I like to fill in the blanks by packing some light meals and healthy snack options to have on hand.
After I made the recipes Eric said, “Whoa, that didn’t take you long at all!” – and he was right, it took me just over 1 hour to prepare 4 recipes. Granted, I was going turbo mode, but still. I purposely selected quick and easy recipes (many are from the 2-day meal plan) which I also tend to have most of the ingredients for in my fridge and pantry. And if I don’t have all the ingredients I just improvise! So when Eric commented on how quickly the packed foods came together it struck me that this would be fun to share on the blog. I hope you’ll enjoy this glimpse into what I’m packing for a weekend away. (Keep in mind this isn’t intended to cover all of your meals – just to supplement when necessary. Feel free to tweak it as you see fit.)

What I made (click the links to the brought to the recipe!):
Chickpea Salad with butter lettuce “wraps”
Gazpacho (amazing for summer – no cook and super refreshing)
Energy bites – I’m still perfecting the recipe in the photo above so rather than sharing it before it’s ready, I recommend you try these amazing Dark Chocolate Cherry Energy Bites!
Vegan Overnight Oats (note: I doubled this recipe, plus added 2 extra tbsp chia seeds, and 2 small chopped bananas for more volume. If the mixture gets too thick, you can thin it with a bit of almond or coconut milk)
Not shown: I’m also packing a few of my Coconut-Cardamom Overnight Oat Parfaits for the car! If I had more time I would’ve also made a batch of my Lightened Up Summer Granola.
What else I packed:
Hummus, portable fruit, homemade maple cinnamon almond butter (or store-bought), my favourite crackers, food for Adriana. Eric says he’s bringing the Vitamix to make green monsters at his parent’s house. Who is this guy? I don’t know how we’re going to fit everything in the car…especially with a stroller, baby stuff, and my shoes for every terrain (rustic, outdoor wedding!). Should be interesting…
Tips:
– These are my go-to glass storage containers. Mason jars also work lovely!
– Pack several ice packs to ensure the food stays cool and fresh. You don’t want to arrive at your destination with room temperature food.
– Pack the energy bites on top so they don’t get squished.
– You can improvise with these recipes a lot. I make all kinds of versions of Gazpacho, the energy bites, and the chickpea salad. For this chickpea salad I didn’t have any celery so I just used a whole red bell pepper (diced) instead. It’s pretty forgiving so don’t worry!
– Pack the gazpacho in a thermos if you want to save room in the cooler. Otherwise a large 2-quart mason jar will hold the batch.

Ok, now I’m turning it over to you. Which foods do you like to pack for trips? Share your favs below!
Well guys…I seriously cannot believe it’s August 1st. *still in a 2015 time warp* I hope you are enjoying the dog days of summer. Soak it up and have a fun + safe weekend!!
Comments (7) | Share on Facebook | Tweet | Pin It | Stumble© copyright 2015 Oh She Glows. All Rights Reserved.
July 30, 2015
Coconut-Cardamom Vegan Overnight Oat Parfait with Blueberry Chia Seed Jam

Food photography has been sparse in my house these days (Now, if we’re talking baby photography on iPhones, well let’s just say I’m killing it.) Lately, I only have 15-20 minutes for food photoshoots, so I’ve learned to be super quick when it comes to snapping pictures. I used to be militant about using my tripod, but I haven’t pulled it out in months. I used to give photoshoots a bit of planning before diving in, but that rarely happens anymore. It’s taken me a while to realize that my expectations of how things should be done aren’t always practical for the stage of my life that I’m in. This applies to life in general too. I’m going to do what I can and try to be a bit easier on myself. Perfectionism kills creativity. It’s also the killer of fun! If I only have 10 minutes to snap some photos, so be it. I’d rather share a little bit than nothing at all.
I started off this photoshoot using this darker background – it’s a scratched up piece of metal signage I found at an antique market last year (the front of the sign says “DO NOT ENTER”). I thought it was going to work perfectly, but I actually found it to be too moody for this recipe. It just looks too dark for the light, summery mood I was going for.

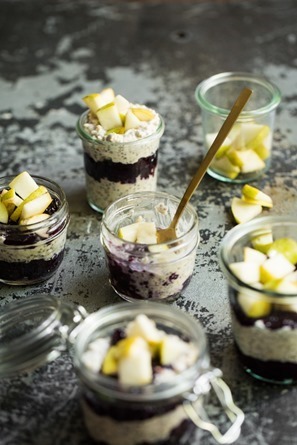
So I switched to my trusty slab of white quartz instead. It’s the surface I’ve used the most in the past year. It’s heavy as heck and I actually managed to dent the hardwood with it one day (*headsmack*). Anyway, I like this clean and fresh feel much better even though the lighting wasn’t the best because I shot at noon when the sun is overhead. The inspiration for the photo came from Ashley. She did a cool multi-jar shot with homemade milk for my cookbook. Too much fun!

In Lightroom, I made minor edits to the photo: increased clarity, exposure, whites, saturation, and removed blue and adjusted temperature. It took me about 30 seconds. There are things about the lighting I’m not super happy with and I probably blew it out too much, but oh well. Gotta pick your battles!
This is the same photo before editing…50 shades of grey!

So that’s where my head is at with photography lately. I’d love to spend more time on it again, but right now I’m rolling with doing it under a time crunch. I’m beyond excited that Ashley is shooting the photography for my next cookbook. I honestly can’t imagine doing over 100 photos again with a baby crawling at my feet (and stealing the food). You guys are going to be blown away by the photos in the next book. We’ll have to show you some sneak peeks!
Now, finally onto the food. This is my newest overnight oat parfait creation. Six to seven years later, I’m still making vegan overnight oats on the regular. I’ll often make a large batch that lasts 2-3 days in the fridge. Or sometimes I eat it all in one day because I just can’t help myself. It’s so easy, perfect for the summer, and endlessly customizable. Make it parfait-style in portable jars and you’ll have snacks for days. Toss it in your bag and run out the door. Bring one for your friend and he/she will love you even more.
If you haven’t tried overnight oats layered with chia seed jam, you really must. It’s divine. This would be great with granola on top too.

Coconut-Cardamom Vegan Overnight Oat Parfait with Blueberry Chia Seed Jam
Vegan, gluten-free, nut-free, oil-free, refined sugar-free, soy-free
Overnight oats are getting fancy up in here! Coconut milk, oats, and chia seeds are mixed with ground cardamom, cinnamon, and maple syrup, and then layered with blueberry chia seed jam and sliced pear. You’ll want to eat this for breakfast, lunch, snacks, and dinner! Chia seeds don’t lie. Also, can I just say how awesome a layer of vegan ice cream or banana soft serve would be in this?
Yield
4-6 small jars
Prep Time
15 Minutes
Cook time
25 Minutes
Total Time
40 Minutes
Ingredients:
For the blueberry chia seed jam:550g frozen blueberries (about 4 cups + 2 tablespoons)1/4 cup pure maple syrup, or to tasteDash fine sea salt3 tablespoons chia seeds1 teaspoon fresh lemon juice, or more to tasteFor the vegan overnight oats:1 (15-oz) can full-fat coconut milk (yes you can use light, but full-fat is super creamy and delish)1 cup rolled oats (use gluten-free if necessary)3 tablespoons chia seeds1 tablespoon pure maple syrup1/2 teaspoon ground cardamom , or more to taste1/4 teaspoon cinnamon, or more to taste1-2 small ripe pears, diced (for layering)
Directions:
Prepare the chia seed jam: In a medium pot, stir together the blueberries and maple syrup until combined. Add a dash of salt. Simmer over medium-high heat, uncovered, for about 8-10 minutes until softened (the berries will release a lot of water during this time). Add the chia seeds and stir until combined. Continue simmering and stirring frequently (reducing heat if necessary to avoid sticking) about 8-15 minutes longer, until most of the water cooks off and the jam reduces in volume. it will look thickened. Remove from heat and stir in the lemon juice. Transfer the mixture to a bowl, uncovered, and into the fridge until cool, for at least a couple hours. For a quicker cooling method, pop the jam in the freezer, uncovered, for 45-60 minutes, stirring every 15 minutes, until cool. For the vegan overnight oats: In a medium container (with a lid) or in a medium bowl, stir together the entire can of coconut milk, oats, chia seeds, maple syrup, cardamom, and cinnamon until combined. Cover and chill for 1-2 hours, or overnight, until the oats soften and the mixture thickens. Stir to combine before using. Layer the chia jam, overnight oats, and diced pear into small jars. Secure lids (or cover with wrap) and store leftovers in the fridge for up to 3-4 days. The chia seed jam will keep in an air-tight container in the fridge for up to 2 weeks. Also, leftover jam can be frozen in plastic baggies and it thaws beautifully.

PS – Thank you for your enthusiasm regarding my 2-Day Meal Plan! I’m so thrilled by your response and hope to do another in the future.
Comments (31) | Share on Facebook | Tweet | Pin It | Stumble© copyright 2015 Oh She Glows. All Rights Reserved.
July 22, 2015
Hit the Reset Button with this 2-Day Plant-Based Meal Plan!

I’m so excited for today’s post! Many of you have been asking me to put together some plant-based meal plans or menus – What does a full day of plant-based eating look like? How do I combine easy, healthy recipes into a full day of eating? It’s something I struggled with in the beginning too – and even now, on occasion – so I totally get it. With the summer season in mind, this 2-day meal plan below is filled with healthy, energizing, quick-to-prepare options. All of the recipes (except the avocado sauce and smoothies) can be made in advance and keep well in the fridge. Yes!
This post was also crafted for a selfish reason too; I tested cake and frosting all last week for the next cookbook. The end result turned out pretty mind-blowing, but to say I was looking for a bit of a “reset” is an understatement. I try my best to eat balanced, but that doesn’t always happen as a recipe tester. When the dessert chapter needs to be wrapped up, the dessert chapter needs to be wrapped up! So in an effort to bring back balanced meals, I came up with this easy, veggie-packed menu to get back on track. I think we can all relate to this desire now and then, especially after summer holidays and traveling. After just half a day, my energy levels returned and I had a kick to my step again! The power of plants. I hope you enjoy it too whether you follow it to a tee or just mix and match some recipes into your normal routine. If you are just making these for yourself, you’ll likely have leftovers that carry over into day 3…never a bad thing.
Note: All the recipes are linked in the chart below. From there, you can print the recipes if desired.
Oh She Glows 2-Day Summer Reset Button Meal Plan
Day 1
Day 2
Breakfast
Lemon water and/or White Tea (see tip)
Hidden Greens Chocolate Protein Smoothie
Lemon water and/or White Tea
Lunch
Chickpea Salad with
Endurance Crackers (or Mary’s Crackers)
Black Bean Quinoa Salad with Cumin and Lime
Snack
Sliced apple with almond or sunflower seed butter
Classic Green Monster Smoothie
Dinner
Black Bean Quinoa Salad with Cumin and Lime
15-Minute Creamy Avocado Pasta
Dessert
Basic Chia Seed Pudding with fresh berries
Basic Chia Seed Pudding with fresh berries
Tips:
– Lately I start my morning with white tea and I drink it until about 2-3pm. I find it gives me really consistent energy throughout the day (without the crash that coffee often gives me, but feel free to drink what YOU prefer). If I’m on the ball I will also try to have some warm lemon water (squeeze half a lemon into a couple cups of warm water – sweeten to taste if desired) first thing in the morning or I simply add lemon slices into a 1-litre mason jar filled with water and sip on it throughout the day. Between outdoor summer workouts and breastfeeding, it’s a constant effort for me to stay hydrated.
– See here for a printable grocery list!
– All recipes can be made in advance except for the smoothies (I always prefer those fresh as the flavours start to change as they sit) and Avocado pasta sauce.
– Be sure to try out my Hidden Greens Chocolate Protein Smoothie – it’s a new recipe to the site and is bursting with nutrients! Not to mention…chocolate for breakfast. You can thank me later.
– Please keep in mind that this meal plan is not intended to be a one size fits all plan; tweak and personalize it as you see fit! I often have a mid-morning snack such as hummus and crackers to get me through to lunch.
– You can serve the 15-Minute Creamy Avocado Pasta with whole-grain pasta or zucchini noodles. I use this spiralizer to make zucchini noodles. It’s a great summer option!
~~~
Well, this was a beast of a post to put together so if I’ve forgotten anything feel free to let me know. Do you like these kinds of posts? I’m open to your feedback as always.
Wishing you boundless energy this week and all summer long!
Comments (44) | Share on Facebook | Tweet | Pin It | Stumble© copyright 2015 Oh She Glows. All Rights Reserved.
June 30, 2015
Cherry-Strawberry Chia Seed Fool with Vanilla Bean Coconut Whipped Cream

My sister and family are here visiting this week and they brought us about 10 pounds of freshly picked cherries from my brother-in-law’s parent’s house (they have about 7 cherry trees…jealous!). It was like Christmas morning when this loot arrived. I’m eating these beauties by the fist full. Adriana is going wild over them. It’s a good, ahem berry good, week. We pitted and froze a bunch to make 1-ingredient cherry sorbet in the Vitamix (my nephews loved it) and I’m dreaming up other ways to use them before they go bad!


This gorgeous Cherry-Strawberry Chia Seed Fool is a festive dessert I came up with for Canada Day tomorrow. I actually thought of it in the middle of the night last night and by some stroke of luck I remembered the idea this morning. In lieu of heavy dairy cream, I used full-fat coconut cream and whipped it with a touch of cane sugar and vanilla bean powder. So incredibly simple and delicious. For the berry part, I made a cherry-strawberry chia seed jam with maple syrup (does it get anymore Canadian?), vanilla bean, fresh lemon juice, and a secret ingredient – a teaspoon of finely grated beet for a bolder red color (but that’s totally optional). It turned out so lovely layered in parfait glasses. Many traditional fool recipes that I came across fold the berries into the cream until it’s pretty uniform in color, but I prefer the layered look so I did it my way. Then you can swirl it all together as you eat it. Total bliss! I also added some toasted sliced almonds and flaked coconut on top for some crunch. A little lemon zest would be nice too.


Cherry-Strawberry Chia Seed Fool
Vegan, gluten-free, grain-free, oil-free, soy-free
A vegan twist on the classic berry fool! I used whipped vanilla bean coconut cream and paired it with a delightful cherry-strawberry chia seed jam with lemon and vanilla. This dish requires some advance preparation so be sure to put the cans of coconut milk in the fridge the day before so the coconut cream can solidify. The jam also requires cooling, so you'll need at least 2 hours to chill it in the fridge before layering the dessert.
Yield
6 parfaits
Freeze time
overnight + 3 hours
Prep Time
20 Minutes
Cook time
20 Minutes
Total Time
40 Minutes
Ingredients:
For the Coconut Whipped Cream2 (15-oz) cans full-fat coconut milk, chilled overnight2 tablespoons natural cane sugar, or to taste1/4 teaspoon pure vanilla bean powder or 1 vanilla bean, seededFor the Cherry Strawberry Chia Seed Jam (makes 2 1/3 cups)2 heaping cups fresh or frozen strawberries (hulled if using fresh)3 cups fresh or frozen sweet cherries (pitted if using fresh)3-4 tablespoons pure maple syrup, to taste2 tablespoons chia seedspinch fine sea salt1 teaspoon pure vanilla extract or 1/2 teaspoon pure vanilla bean powder1-2 teaspoons fresh lemon juice, to taste1 teaspoon peeled and finely grated red beet (I use a microplane lemon zester), adds bolder red hueOptional garnishes:Toasted sliced almondsCoconut FlakesLemon ZestFresh cherries
Directions:
Chill the cans of coconut milk in the fridge for 12-24 hours so the coconut cream can solidify before use. For the chia seed jam: Add the berries and maple syrup into a medium saucepan. Stir to combine. Increase heat to medium, and simmer until the berries release their juices and soften, about 10 minutes. After the berries release water you can increase the heat even more to cook off the water. Watch closely and stir frequently. When the berries look a bit soft, stir in the chia seeds. Keep cooking over medium heat until the chia thickens the mixture slightly, about 5-10 more minutes. Reduce heat if necessary to avoid burning. Remove from heat and stir in the salt, vanilla, lemon, and optional grated beet. Pour into a glass container and let it cool on the counter for at least 30 minutes before covering and chilling in the fridge for at least 2 hours, preferably longer. Chill a medium bowl in the freezer (this helps the coconut cream stay thick while whipping). Open the chilled cans of coconut milk and carefully scoop off the white coconut cream from each can and place it into a medium bowl. You should have 1.5-2 cups worth of cream. You can reserve the leftover coconut water for another use, such as a smoothie or you can freeze it into coconut water ice cubes (also great in smoothies). With electric mixers or a whisk, beat the cream and the cane sugar in the chilled bowl until smooth. Whisk in the vanilla. Layer the coconut cream and the chia jam in parfait glasses. Top with optional toasted sliced almonds, flaked coconut, lemon zest, and a cherry on top! Enjoy immediately or cover and transfer to the fridge until ready to serve. The chia seed jam will keep for up to a week in the fridge in an air-tight container, and I expect the coconut whipped cream will keep for at least 5 days.
Tip: If for some reason your chia seed jam didn't thicken enough after chilling (this might be the case if the water wasn't cooked off enough), stir in another tablespoon of chia seeds and chill it for another hour. That should do the trick!

I’m keeping this short and sweet today because I have a big cookbook deadline looming. Thank you so much for your patience with my infrequent blog posts lately. I am dying to get back into it!
Wishing my fellow Canadians a very happy Canada Day tomorrow. Also, happy 4th of July to our friends south of the border. (By the way, you can easily turn this into a red, white, and blue dessert by adding blueberries.) I hope you have a fun and safe week filled with all the goodness summer has to offer!
Comments (33) | Share on Facebook | Tweet | Pin It | Stumble© copyright 2015 Oh She Glows. All Rights Reserved.
Angela Liddon's Blog

- Angela Liddon's profile
- 134 followers

