
Angela Liddon's Blog, page 14
January 3, 2016
Daily Habits for Happiness: My Plan for 2016

The other day I had an epiphany while I was drying my hair. As usual, my thoughts were all over the place, jumping from personal reminders to work tasks to anticipated conversations to goal setting for 2016. I was debating whether I would make an official list of my goals for 2016, but as I mentally went through my list I realized that something was still missing.
After some careful thought, it hit me. I’ve focused so much on big, time-consuming goals and aspirations that I’ve forgotten about many of the simple, daily habits that create happiness in my life! In fact, life has felt a bit chaotic and unorganized for some time now, and it’s because I’ve let a lot of these daily habits slide. As I stood there blasting my hair, I realized I need to change my focus. What’s the point of setting goal after goal if the process itself doesn’t feel peaceful? Rather than plough ahead with tunnel vision locked only on the goals, this year I’m going to make room for the daily habits that bring me consistent joy – the ones that I haven’t allowed myself to make time for in a long while. I’m going to call these my “Daily Habits for Happiness”, and I truly believe that this approach can change my life.
What do I mean by daily habits for happiness? It’s anything that you can easily accomplish in your day to day life that makes you feel really good. These are often things that we brush off or let fall by the wayside because they aren’t given as much priority or importance as other things, but their potential to improve our quality of life is HUGE!
There are many things that I’m doing successfully each day (such as dedicated family time, exercise, etc), but there are many things that I can start doing to increase happiness quite easily. Here are some that I came up with. This list is a work in progress, and I’ll be adding to it as I see fit.
Make my bed each morning
I haven’t taken the time to make the bed consistently in the morning for umm….years? Since my mama told me to? In my defense, Eric doesn’t make it consistently either! The thing is, having my bed made in the morning makes me feel quite accomplished, but I’ve always told myself that other tasks are much more important and “I don’t have time”. Well, no more! It doesn’t actually take very long, but it sets the tone for the whole day and I feel like the reward outweighs any time spent on it. (I fear that I may fail miserably with this habit, but 3 days into 2016 I’m still on a killer bed making streak!!)
Shift workouts back to the morning
Speaking of convincing myself (or even bribing myself) – morning workouts! Because our schedule was so unpredictable last year (and still is at times), I shifted many of my workouts to the evening after Adriana went to bed. It seemed like the best time of the day for minimal interruptions (sleep regressions aside), but I started to really miss having restorative downtime at night. I recently started shifting my workouts back to the morning. I have Eric to thank for motivating me because he’s been rocking the early morning workouts with his buddy for a while. It’s challenging for me to workout first thing, but I always feel great when I do it. (If you’re curious – I’m doing a combo of running on my treadmill and online Barre workouts right now. I hope to add an in-person weekly barre or yoga class to my routine soon.)
Daily tidying
It’s amazing how much toys can take over our living room and kitchen area during the day (and how many times I manage to trip or hurt myself). We got into the habit of leaving the toys scattered all over the house because we were too tired to put them away before bed. But it really makes a huge difference to come out to a tidy room in the morning, rather than chaos. Now we do a quick tidy up after she goes down at night. It takes just a minute or two, but it makes me so happy to walk out in the morning and see a semi-tidy room (even if it doesn’t last!). The same goes for daily tidying other areas of the house…a quick vacuum in the kitchen and dining area does wonders for my mood.
Email management
Eric and I recently decided to disable the push notification setting on our Gmail accounts. I can’t take credit – it was his idea and I jumped on board. No longer will I be alerted every time an email pops into my inbox (which can feel disruptive and stressful – especially when it’s during the evening or on weekends). For years I’ve worked all hours of the day and on weekends. This year, email notifications are turned off and I’m checking email at dedicated times during working hours. Obviously, there will be times when I will have to break this rule, but I aim to make them far and few between.
I also find that staying on top of unsubscribing from emails and filtering out spam helps on the email front. I did it last year and it made a huge difference. I want to keep up with both of these daily habits this year.
Relaxed lunch + tea/coffee rituals
Adriana shifted from 2 naps to 1 nap a day in November. Now she goes down for her afternoon nap between 12-1pm each day. I used to eat my lunch while feeding her lunch, but I rarely got to enjoy my lunch before it got cold, or I just scarfed it down in record time without truly enjoying it. I can’t blame her though, I used to work through my lunches for years before she was born. Recently, I’ve started to make my lunch after she goes down for her nap. I find that it’s a lot more rejuvenating for me to have this downtime mid-day. I also aim to have a morning, afternoon, and evening coffee/tea/tonic ritual too.
Connecting with friends/family
This could be a lunch with a friend, a date with my coach, a late dinner at home with Eric, a girl’s get together, or a simple phone call. These connections increase happiness a lot, especially during the winter when it’s easy to hibernate.
~~~
I’m not forgetting about my big goals for 2016 because there are many that I’m super excited about. However, this year I’m making time for the “smaller” things that help me feel balanced, peaceful, and organized on a day to day basis. This is the year that the small becomes the big. I’d love it if you joined along with me!
Cheers to 2016, friends. I hope it’s off to a great start in your neck of the woods!
Photo credit: Sandy Nicholson
Comments (5) | Share on Facebook | Tweet | Pin It | Stumble© copyright 2016 Oh She Glows. All Rights Reserved.


December 30, 2015
My Favourite Hot Detox Tonic

I’m feeling particularly nostalgic at the end of this year, mainly because it was our first full year of parenting. This year Adriana blossomed from a 3 month old baby in January into a 15 month old hilarious, chatty, and very strong-willed toddler by December. The change!!! We witnessed first words, first crawls, first teeth, and first steps in 2015. My iphone filled capacity countless times (breathe…), but I still worried that I wasn’t capturing enough. The sheer amount of development, growth, and experiences that we’ve shared together in 2015 are enough to make my eyes well up with tears. Even though I know there were tough times in every area of life, right now I’m reflecting through rose coloured glasses. I hope the memories will stay a part of me in one way or another, even if I wasn’t so great at documenting everything like I did in the early months.
Like every year, I consumed more than my fair share of treats this month. After we got home from visiting family, I found myself at the grocery store stuffing my cart with produce galore and planning homemade plant-heavy meals in an effort to bring back the balance. The great thing about plant-based eating is that it only takes a day or two to get back on track and feel energized once again. I’m not someone who shuns sweets entirely at the start of a year (I love my dark chocolate way too much), but instead prefer to focus on what I’m adding to my diet. Celebrate that stuff!
I love, love, love experimenting with homemade hot tonics, and I’ve been tweaking my favourite concoctions for a few years now. I know anything detox is so cliche this time of the year, but this drink really does make me feel amazing after weeks of indulgences so I don’t even care. In the past, I’ve often used fresh turmeric, fresh ginger, cayenne, and sliced lemon (see my “Healing rooibos tea” on page 69 of The Oh She Glows Cookbook), which is awesome, but it requires a trip to the grocery store, and finding fresh turmeric can be hit or miss. Recipes need to be accessible so I came up with this delicious “pantry” version for those times when I want it now. It’s fast, there’s no grating/peeling involved (unless you opt for the fresh ginger version), and you can keep the ingredients on hand in your pantry (aside from the lemon, but I usually have those miracle workers on hand!) to enjoy any time the craving strikes. Yes, you will crave this drink…it’s that good. I know this is going to be my reset button drink all winter long.

Hot Detox Tonic
Vegan, gluten-free, grain-free, nut-free, oil-free, soy-free
Get ready to feel warm, energized, and ready to tackle the New Year! This is my new go-to hot beverage of choice when I want to hit the reset button, amp up my metabolism, and boost circulation. It comes together fast with ingredients that I tend to keep on hand. I love to drink this throughout the day, but it’s especially effective when consumed on an empty stomach after waking. I use a ginger tea bag for a quick option, but I provide a fresh ginger option below too. Just keep in mind that using fresh ginger produces a more intense and spicy tea. Also, if you ever have some kicking around, fresh mint is also an invigorating, tummy-soothing addition.
Yield
2 cups
Soak time
7-8 minutes
Prep Time
5 Minutes
Cook time
0 Minutes
Total Time
5 Minutes
Ingredients:
1 ginger tea bag or 1/2 teaspoon fresh grated ginger (see tip)2 cups boiling waterFew dashes cinnamon, to taste (I like Ceylon cinnamon)Few dashes ground turmeric, to tasteFew dashes cayenne pepper, to taste (use less if you don’t like heat)1 teaspoon apple cider vinegar1 small lemon slicePure maple syrup, to taste (I use 1 teaspoon)
Directions:
Grab an extra large mug or a small teapot (3 cup capacity). Place ginger tea bag inside. Boil 2 cups of water and pour all the water into the mug/teapot. Cover and steep the ginger tea for 7-8 minutes. Remove tea bag. Set aside the tea bag to cool. Once the tea bag has cooled a bit you can gently squeeze it into the pot to infuse the tea with even more ginger flavour. Add the cinnamon, turmeric, and cayenne. Whisk until combined. Add the vinegar and drop in the lemon wedge. Whisk to infuse the lemon. Add maple syrup, to taste, and whisk to combine. Serve immediately and enjoy!
Tips:
1) In lieu of the ginger tea bag, you can substitute a packed 1/2 teaspoon freshly grated ginger. This version is spicier than using a tea bag. Pop the fresh grated ginger into a tea ball or mesh tea steeper, and steep tea for about 6-7 minutes. Proceed as usual.
2) The spices tend to settle at the bottom of the mug/pot. Simply whisk it now and then to redistribute.

I’d like to wish you all a New Year filled with happiness, health, love, and your wildest dreams becoming reality! Thank you for all your support, comments, love, and encouragement in 2015. I can’t wait to share the fun things we have coming up in 2016.
Angela
Comments (16) | Share on Facebook | Tweet | Pin It | Stumble© copyright 2015 Oh She Glows. All Rights Reserved.
December 27, 2015
Bust a move

Hey everyone,
I’m pulling myself out of the post-holiday haze to let you know that we’re moving OSG to a bigger, badder server tomorrow (December 28th). By "we", I mean my favourite husband ever. This site has been on the same dedicated server for the past 4 years, but it’s time to upgrade for some exciting ventures in 2016.
We’re doing the move now because the last week of the year is always the slowest traffic wise. The site could be spotty for a day or two. If you’re planning on making any blog recipes this week, I recommend printing them now in case the site is down when you need them. That would be sad. PEEPS GOTTA EAT.
If you don’t hear from me again you can assume that the new server swallowed me whole. I’m hoping to be back with a post to close out 2015 though…big guy willing!
Cheers to the good kind of downtime this last week of the year. Enjoy,
Angela
Comments (6) | Share on Facebook | Tweet | Pin It | Stumble© copyright 2015 Oh She Glows. All Rights Reserved.
December 21, 2015
10-Spice Mix Gift Jars + Printable 10-Spice Veggie Soup Recipe!

If you’re looking for a lightening fast and cost efficient homemade holiday gift, I have just the thing for you!
I love to make homemade food gifts for friends and family around the holidays. It’s fun to give them and all, but mainly, I love having a reason to buy more glass jars. SEE ERIC, I ACTUALLY NEEDED THESE JARS. And cute tags…oh my goodness, the cute tags. I die.
I almost didn’t get a chance to make any homemade gifts this year because the past two weeks have been consumed with the cookbook photoshoot (behind the scenes one, two, three). So, we just started our Christmas shopping/gift planning on Saturday which was fun. Our tree is still not up yet, but it is what it is. We’re squeaking in at the last minute this year, and I’m just going to have to make peace with the fact that the holiday season is never “perfect”. Isn’t it so much better when you just accept that?
My motivation was running a bit low after the excitement of last week, but sometimes inspiration strikes when I least expect it. I got a text from my sister Kerrie on Friday night. She wrote:
“Mixing up your 10-spice mix and putting them in jars with your recipe attached! I’m giving some out for Christmas! How’s that for an idea?”
Then she attached a photo. Immediately, I knew I had to do this.
Then a short while later, I received another text from Kerrie:
“Do NOT touch your face when using the CAYENNE pepper!!!! OH MY GOODNESS!!”
I just about died laughing.
A short while later, another text:
“A frozen face cloth helps.”
She kills me, she really does.
So, a big thanks to Kerrie for this post’s inspiration (and hilarious personality). I love you.
Also, thanks to Eric for being my crafting partner in crime yesterday (he was the one who insisted we do this idea!) and for being the best hand model eva. If you are following me on snapchat, you saw the entire process (as well as the Crispy Almond Butter Cookies from my cookbook)! We had a blast.
The fine print: Do not attempt to use a mixing bowl this small. I only used it for the photo and then promptly transferred the spices into the biggest, baddest bowl I own (a bamboo Caesar salad bowl that could feed 25 people – 3 pics down).

10-Spice Mix Gift Jars
Vegan, gluten-free, grain-free, no bake/raw, nut-free, oil-free, refined sugar-free, soy-free
This 10-Spice mix takes just a few minutes to throw together, and it can be used in a variety of dishes, such as soups, stews, pastas, potatoes, salad dressings, and more! I love using it in my 10-Spice Vegetable Soup with Cashew Cream (also see: page 137, The Oh She Glows Cookbook) which is one of my most loved soups of all-time (and a reader favourite, too!) These spice jars make a quick and easy holiday gift that won't set you back much money. Just pair the spice mix with the soup recipe or, if they don't have it, The Oh She Glows Cookbook with the page bookmarked.
Yield
7 packed cups of spice mix
Prep Time
45 Minutes
Cook time
0 Minutes
Total Time
45 Minutes
Ingredients:
2 cups smoked paprika1 cup garlic powder1 cup dried oregano1 cup onion powder1 cup dried basil2/3 cup dried thyme1/2 cup ground black pepper1/2 cup white pepper (optional)1/2 cup fine sea salt1/3 cup cayenne pepper
Directions:
Gather 8-9 (3/4 cup/175 ml capacity) glass jars. Add all of the spices into an extra-large bowl (I used a huge Caesar salad bowl) for easier mixing. Whisk together all of the spices until thoroughly combined. It takes a while to mix it all together, but keep going until you don’t see any clumps or patches of spice. Divide the spice mix between small jars using a funnel. Secure lid, tag, and ribbon on each jar. Print off the 10-Spice Vegetable Soup recipe and give the recipe (or The Oh She Glows Cookbook) with the jar for a fun gift! Shake the jar before each use.
Tips:
1) To make the soup: If the gift recipient doesn’t have a high powered blender such as a Vitamix (which can get the cashew cream in the soup very smooth), I recommend making a note for them that they can substitute 3/4 cup of cashews for 1/2 cup of raw cashew butter. It’ll blend much easier.
2) I bought my spices in bulk at a bulk food store called Bulk Barn. I also found the jars there too. You can also find small jars for a good price at the Dollarstore.

p.s. – I have a couple exciting tidbits to share today!
– Pinterest selected The Oh She Glows Cookbook for their Pinterest 100 list which features the top trends and predictions for 2016! So cool and exciting. Thank you, Pinterest! Check out the top 100 trend predictions for 2016 here.
– The Oh She Glows Cookbook was selected by Publisher’s Weekly as one of the Top Cookbook Stories of 2015! You can read the article here.
– I’m hosting a big giveaway on Instagram this week! Up for grabs is a signed copy of my book and a $200 Amazon gift card! See the deets here.
p. p. s. – My jars are from Bulk Barn and they hold 3/4 cup of spice mix. The funnel is from Lee Valley (had it for years and so in love). Tags and ribbon are from Michael’s craft store.
Last but not least, I’d like to wish you all a very happy holiday! Merry Christmas to those of you celebrating later this week. I hope you can enjoy some downtime spent with loved ones, and lots of delicious food! We have a lot of exciting things in the works for 2016 and I can’t wait to share them with you. Thank YOU, as always, for your incredible support and encouragement this year. xo
Comments (12) | Share on Facebook | Tweet | Pin It | Stumble© copyright 2015 Oh She Glows. All Rights Reserved.
December 11, 2015
Homemade Nutella Hot Chocolate (vegan)

How is the holiday season treating you so far? Hopefully great. I honestly can’t believe it’s December 11th. What a whirlwind season. I just finished another round of book edits and now I’m currently in the midst of planning next week’s photoshoot for my next cookbook. Some of you might remember in The Oh She Glows Cookbook, we had various lifestyle photos throughout the book. Well, the second cookbook is going to have all new photos so I’ve been planning around 15 unique shots, all the recipes that will be featured (and what I have to prep in advance, what needs to be made the day of, etc), and everything in between (such as, what the heck am I going to wear). It’s been a bit of a hot mess around here, but I’m so excited for next week’s shoot! Hopefully it’ll all come together. My dear cousin Alannah is coming to help on the shoot days, and I couldn’t be more grateful to have her help.
In other news, you can now find me on Snapchat! I used to think Snapchat was just an app for sharing questionable content among teens, but apparently it can be used for other things too. New techy things intimidate me and “for dummies” tutorials confuse me so the fact that I’m currently using Snapchat (and loving the heck out of it) probably means it’s not even cool anymore. But, I love how easy-breezy it feels. (After I finally figured it out, that is.) Want to write all over the picture and make a hot mess? Sure. Want to snap some random, poor lit shot? Go for it. It’s feels fairly real as far as social media goes, and it’s fun to get snaps throughout the day of someone’s day to day life. Oh, and I somehow got my mom to follow me. She’s hip, I tell ya! I think she’s just holding out for more Adriana pics though…
So, if you are down for some “riveting” behind the scenes footage over at casa OSG, then follow along. My username is angelaliddon. I’ll be sharing day to day things, cooking videos (so fun – yesterday I did my homemade nutella), behind the scenes blog stuff, travel, as well as some blog/book/life sneak peeks. Odds are you will probably see it on Snapchat first because it’s just so fast to share things.
Here are a few random things I posted over the past week:

Like I said, hot mess.
Also, let me know if you are on it too!? I’m only following like 6 people right now which definitely makes me look a bit like a stalker. Ok, a lot like a stalker.
The second piece of news I have to share is to tell you that I’m back to shooting the photography on Oh She Glows! I know some of you have noticed this over the past month. The change is due to a couple reasons, one of which is that I miss shooting the photography greatly. I didn’t realize just how much I would miss this aspect of blogging after 8 years of doing the photography day in and day out. I still don’t have a proper photography set up and I rush through all my shoots since Adriana was born, but I hope to find a better system in the future. I will be bringing on a team member to OSG in the near future, and I hope that this will help me find a better balance with everything.
If you saw my snaps yesterday you probably spotted this hot cocoa in the making. It was all I could do not to bathe in this stuff, and it features my Homemade Mocha Nutella for a nutty twist on traditional hot cocoa! If you’re looking for a warming treat on a cold night, look no further.

Homemade Nutella Hot Chocolate
Vegan, gluten-free, grain-free, refined sugar-free
A nutty, plant-based twist on traditional hot cocoa. This recipe features my homemade nutella nut butter which makes this drink so creamy and decadent! I also love adding 55-60% dark chocolate into the mix for even more chocolate flavour. For a luxurious twist, try stirring in a bit of full-fat coconut cream into the hot cocoa, or serve it topped with some vegan marshmallows.
Yield
4 (1/2 cup) servings
Prep Time
25 Minutes
Cook time
5 Minutes
Total Time
30 Minutes
Ingredients:
2 cups unsweetened almond milk (homemade or store-bought)50 grams 55-60% non-dairy dark chocolate1-2 tablespoons pure maple syrup, to taste1 tablespoon unsweetened cocoa powder1/4 cup Homemade Mocha Nutella (recipe linked below)Dash fine grain sea salt, to taste
Directions:
Prepare the Homemade Mocha Nutella. Break up the chocolate into chunks. In a medium pot, add the almond milk and chocolate pieces. Increase heat to medium-low. Whisk occasionally until all of the chocolate is melted. Whisk in the maple syrup, cocoa powder, nutella, and salt until super smooth. If you can't get the hot cocoa smooth enough by whisking (this will depend in large part by how smooth your homemade nutella is) you can transfer it into a blender (with lid ajar) and blend until smooth. Adjust the sweetness to taste, if necessary. Serve and enjoy! Leftovers will keep in a sealed container in the fridge for 2 days or longer.
Tips: 1) For my Homemade Mocha Nutella recipe, see here. 2) For my Homemade Almond Milk recipe, see here.

Oh, and if you are interested in a impromptu video on me making my homemade nutella, check out this video I uploaded to Instagram.
If you are looking for all my holiday recipes, see this link!
Comments (10) | Share on Facebook | Tweet | Pin It | Stumble© copyright 2015 Oh She Glows. All Rights Reserved.
November 26, 2015
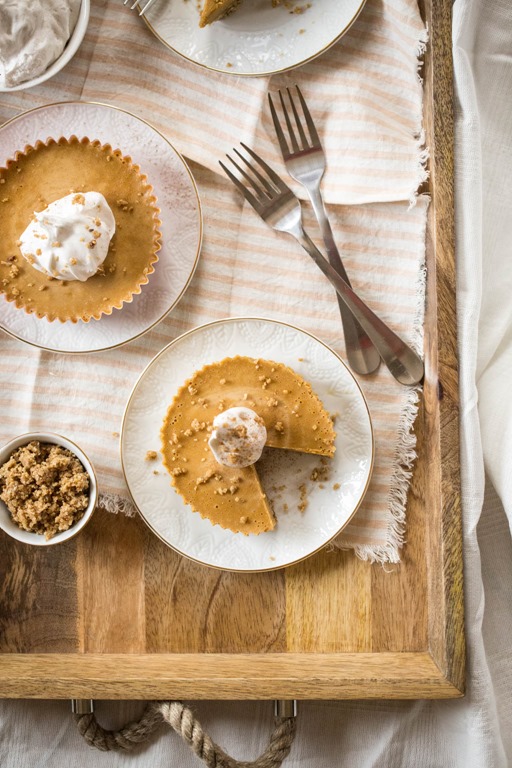
Mini Pumpkin Pie Tarts with a Sunflower Cookie Crust (Nut-free, Vegan)
A couple weeks ago, I received a reader recipe request. Let’s call him “Jason”. Jason asked if I could create a nut-free version of my Raw Pumpkin-Maple Pie with a Baked Oat Crust (found in my cookbook, page 247) because his wife can’t have cashews and pecans. Apparently, it was tormenting her not to be able to try this pie! He wants to surprise her next month with this dessert as a special thank you because “she’s the best wife and mom ever”.
He went on to write, “Angela, I have no clue where to begin and don’t want to mess this up like I usually do.”
I immediately knew that I had to step up to the (pie) plate on this one (no pressure, no pressure!) because the world needs more love. And pie. Plus, I’ve always wondered how I could make this recipe without pecans or cashews, and now I have a nice option to share with you all. I tested multiple fillings and there was a clear winner that I’m sharing below. Spoiler alert – a combo of super luxurious full-fat coconut cream and sunflower seed butter worked so well as a replacement for cashews! It tastes so awesome.
I also paired it with a new toasted sunflower seed and oat “cookie” crust that’s a wonderful, crunchy compliment to the creamy and cool pumpkin pie filling. Pie crusts should never be boring or flavourless, and I love that this one is an easy “press-in” crust.
I meant to have this recipe up on Monday, but I ended up testing this pie about 7 times this week! I can’t sleep at night unless I’ve tested all of my options. Better late than never, I say. I’d rather not rush a recipe just to get it out on time. Anyway, I made this pie as a contribution to our Thanksgiving dinner later today (we’re in the US currently), and I’m so looking forward to the spread at my mom and stepdad’s. I hope those of you celebrating have a happy, fun, and safe Thanksgiving! And if you can’t make this pie today or this weekend, I hope you’ll include it on your holiday baking list.
Well, Jason (you know who you are) I hope this works out for you. If it doesn’t, I’d prefer that you not mention my name.
I’m joking! It’ll work out. Promise.

Mini Pumpkin Pie Tarts with a Sunflower Cookie Crust (Nut-free)
Vegan, gluten-free, nut-free, refined sugar-free, soy-free
This is a luxurious and creamy nut-free version of my favourite Raw Pumpkin Pie from The Oh She Glows Cookbook. After many trials, I ended up using a combination of sunflower seed butter and full-fat coconut cream to replace the cashews in the original recipe, and it worked out so well! The pie has a light coconut flavour, but it's balanced out nicely by the earthy sunflower seed butter. As a bonus, this filling doesn’t use any whole nuts or whole seeds so you don’t need a Vitamix (or other high powdered blender) to get the filling super smooth. I used 4 tart-sized (about 4-inches diametre) "freestanding" baking cups which I found at Target, but you can also use a standard muffin tin lined with paper liners (or simply greased well) to make mini tarts. I'd imagine a 7-9 inch springform cake pan would work well too. The dough is a bit difficult to shape into a traditional pie crust (with high sides) so that's why I went with a flat crust for this recipe. If you don't mind fiddly things, then by all means take a stab at the regular pie crust. Also, the paper liners are easily removed if you remove them while the pies are frozen.
Yield
8-10 servings
Freeze time
24 hours (can of coconut milk) + 3-5 hours
Prep Time
30 Minutes
Cook time
12 Minutes
Total Time
42 Minutes
Ingredients:
For the crust:1/2 cup raw sunflower seeds1 3/4 cups rolled oats (use certified gluten-free if necessary)1/4 teaspoon fine sea salt1/4 cup coconut oil, melted*3 tablespoons pure maple syrup2 tablespoons smooth sunflower seed butter (pour off oil before measuring)2-3 teaspoons water, if needed to bind doughFor the filling:1/2 cup canned full-fat coconut cream**1 cup unsweetened pumpkin puree3/4 cup pure maple syrup1/2 cup coconut oil, melted*2 tablespoons + 2 teaspoons sunflower seed butter2 teaspoons pure vanilla extract1-2 teaspoons pumpkin pie spice, to taste***1/4 teaspoon fine sea saltFor serving:Coconut Whipped Cream (I used So Delicious Coco Whip here)
Directions:
Preheat oven to 350F. Grab four (4-inch diameter) baking paper cups, or 12 standard muffin paper liners and set aside. You can also use a 7-9 inch springform cake pan greased and lined with a circle of parchment paper. Add the sunflower seeds into a skillet and toast the seeds over medium heat for 5-8 minutes, until lightly golden and fragrant. Remove from heat. For the crust: Add the toasted sunflower seeds, oats, and salt into a food processor and process until finely chopped, resembling a coarse flour. Now, add the melted oil, maple syrup, and sunflower seed butter, and process until the mixture comes together into a heavy dough. The dough should stick together when pressed between your fingers very easily. If it's still a tad too dry, add the optional water and process again until it comes together. I find that I always need 2 teaspoons of water, but it'll depend on your ingredient's moisture content. Divide the dough equally between the liners, crumbling it all over each base. (Note: I reserved about 1/2 cup of the dough for sprinkling on the pies when serving.) Lightly wet your fingers. Starting at the centre, press the dough into the base to form a crust. If the dough starts to stick to your hands at any time, lightly wet your hands and shake off the excess water. Once the crust is all pressed in, poke the base with a fork about 2-3 times to allow the air to escape while baking. I place the 4 liners onto a baking sheet so it's easy to remove them from the oven. Bake the crusts for around 10-12 minutes until lightly golden around the edges. Place baking sheet on a cooling rack and cool the crusts for at least 15-20 minutes, or longer if you have the time. For the filling: Open the chilled can of coconut milk. Scoop off 1/2 cup of the white coconut cream only (not the water) and place it into a blender. (You can save the remaining contents of the can for a smoothie or other use.) Add the pumpkin puree, maple syrup, melted oil, sunflower seed butter, vanilla, pumpkin pie spice (to taste, I use 2 tsp), and salt. Blend, starting at a low speed and increasing the speed, until smooth. Divide the filling equally among the cooled crusts. Carefully, transfer the baking sheet (or muffin tin, if making 12 mini tarts) into the freezer on a flat surface. Chill until firm, about 3-5 hours. There's no need to cover it. After the tarts are solid, carefully remove the paper liners. Here you can transfer the pies to the fridge for a mousse-like texture, but I prefer the texture when frozen after sitting on the counter for 5-10 minutes before serving. Serve with coconut whipped cream on top, if desired. This pie filling softens a great deal at room temperature, so it's best not to leave leftovers on the counter. Return them to the fridge or freezer for best results.
Tips:
*A note about coconut: Health Canada classifies coconut as a "seed of a fruit" and not as a tree nut, however the U.S. FDA classifies coconut as a tree nut, so as you can see there is some confusion over classification when it comes to coconut. As always, if you think you might be allergic to coconut, be sure to talk to your doctor before consuming.
If you want to minimize the light coconut flavour in this pie, you can use refined (flavourless) coconut oil here rather than virgin.
**Be sure to chill a can of full-fat coconut milk for at least 24 hours before you begin this recipe. When ready, open the can and carefully scoop out 1/2 cup of the white coconut cream making sure not to use any of the coconut water.
***I used 2 teaspoons of Whole Food's 365 Pumpkin Pie Spice since I'm currently away from home. You can also try my homemade Pumpkin Pie Spice Mix.

Comments (2) | Share on Facebook | Tweet | Pin It | Stumble© copyright 2015 Oh She Glows. All Rights Reserved.
November 21, 2015
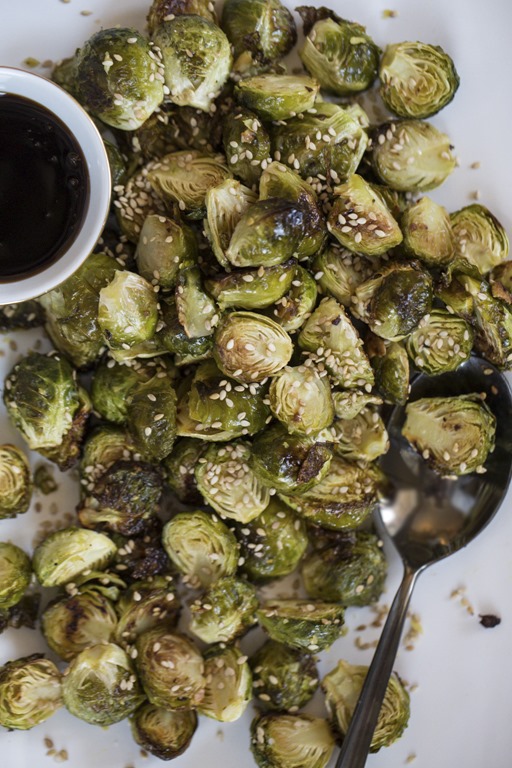
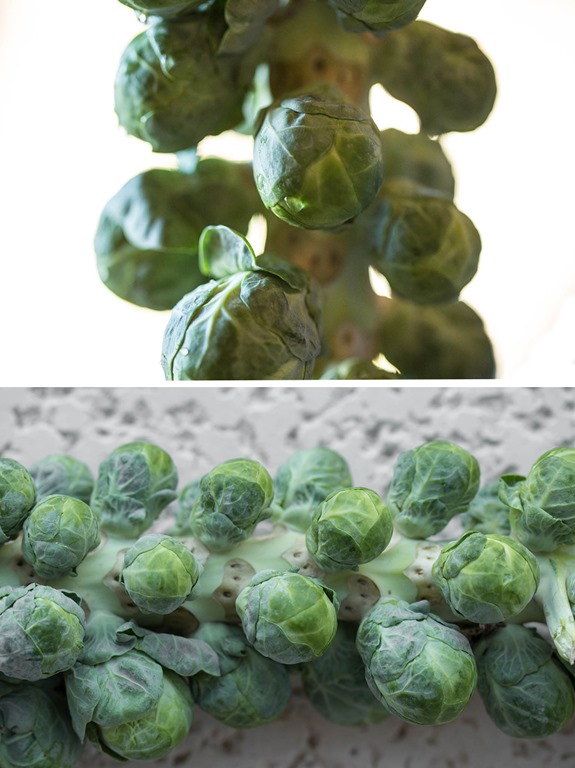
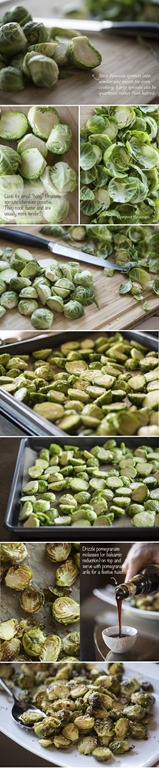
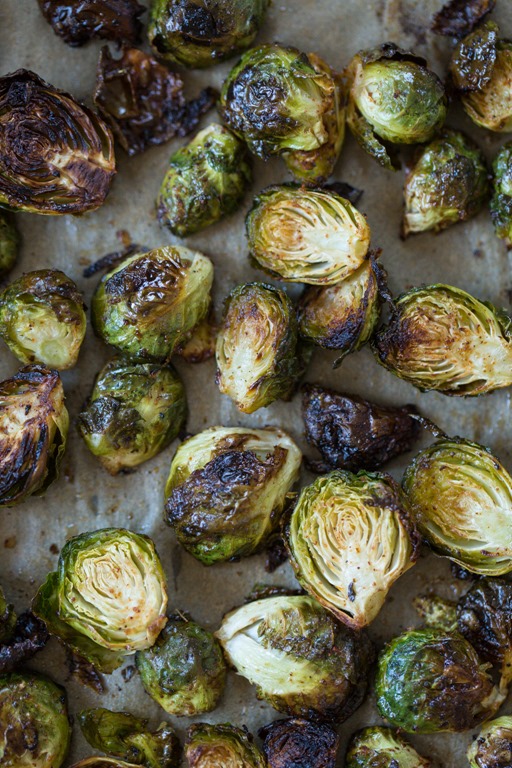
Mouth-Watering Crispy Brussels Sprouts (plus 7 ways to flavour them!)
Four words you don’t often see together: mouth-watering Brussels sprouts.
I can see it now, you’re raising an eyebrow and giving me the stink eye because your “b.s.” detector is going off. In fact, you probably didn’t even click on this post!?
*sings* I’m all by myself.
Or, maybe you share my excitement for this misunderstood vegetable. There are many of you out there! I know this based on my Instagram comments recently. In fact, one of you said the photo made your “mouth water” which served as inspiration for this recipe title!
I loathed these green, leafy orbs most of my life until that one glorious day when I roasted the heck out of them with some good oil and sea salt. I forgot to set the timer and consequently “over-cooked” them a bit, but as I stood there over the pan popping them into my mouth, one by one, I realized I hit the jackpot. Browned, almost caramelized bottoms, crispy, blackened leaves, and a tender yet “meaty” texture. Yes, I just said meaty texture. For a veggie, that is.
I also converted Eric into a Brussels sprouts fanatic with this method, and I’m sort of regretting it.
“I never thought I’d see the day when I’d eat an entire pan of Brussels sprouts.”
(That is a direct quote from Eric recently. What have I done?)
In this post I’ll divulge my go-to method for roasting these misunderstood sprouts, and I’ll share my favourite ways to flavour them. They really are the perfect canvas for creating all different kinds of flavours depending on your mood.
The elephant in the room: Brussels sprouts are a bit of a pain to prep (ok, I won’t sugar coat it, they are my nemesis!), however I timed it and 2 pounds takes me 10 minutes to trim so it could be worse?). You can’t go wrong coercing a helper to cut the prep time in half. Or why not just designate the entire task to your favourite relative? wink, wink. muhauha.
The Brussels prepared below are lovely as is, but I encourage you to try all kinds of different spices, glazes, dips, sauces, etc. Here are a few of my favourite flavours:
A drizzle of pomegranate molasses or balsamic reduction with pomegranate arils (very festive!) – you can skip the Harissa here.
Garlic infused – try minced garlic cloves, garlic-infused oil, garlic salt
Teriyaki sauce – pairs well with sesame seeds
Barbecue sauce (I’ve been known to use BBQ sauce as a dip!)
Coconut curry sauce or your favourite curry powder
Sriracha or other hot sauce
Hummus (we’re loving roasted red pepper hummus with these lately)
Ground toasted nuts or seeds like pecans or sesame seeds. I want to try hemp hearts too.
I really had fun with this photoshoot; I hope you enjoy! I thought it would be fun to start adding “glow tips” to some photos. Let me know what you think!
Mouth-Watering Crispy Brussels Sprouts
Vegan, gluten-free, grain-free, nut-free, refined sugar-free, soy-free
This is my current go-to method for preparing Brussels sprouts. I lightly coat them in melted coconut oil, season with sea salt and Harissa spice blend, and then roast until charred and crispy. Keep in mind that the amount of roasting time will vary depending on your oven and how fresh the Brussels sprouts are. It's best to keep an eye on the first batch. After roasting I love to drizzle the smallest amount of melted coconut oil on top and then toss them again - this just takes them over the top on the mouth-watering scale and it also rehydrates them after roasting. This recipe can be changed up so many ways too. For a festive twist, try drizzling Pomegranate molasses or Balsamic reduction on top (you can skip the Harissa for a more neutral flavour) and serve with fresh pomegranate arils. We also love dipping the sprouts in roasted red pepper hummus or a sweet Barbecue sauce.
Yield
4 side servings
Prep Time
20 Minutes
Cook time
30 Minutes
Total Time
50 Minutes
Ingredients:
2 pounds Brussels sprouts, trimmed, halved, outer leaves removed (6 cups prepped)2 tablespoons coconut oil, melted or olive oil*, plus more for serving1 teaspoon dry Harissa spice blend**3/4 teaspoon fine sea saltFreshly ground black pepper, to taste
Directions:
Preheat the oven to 400F and line a large baking sheet with parchment paper. With a paring knife, trim off the ends of the sprouts, then slice in half lengthwise, and pick off any loose outer leaves. Place the prepped sprouts into a large bowl. Add the oil onto the sprouts in the bowl and stir or toss with hands until throughly coated. Add the Harissa and salt, and stir until combined. Spread the Brussels sprouts onto the prepared baking sheet in a uniform layer. Garnish with freshly ground black pepper. Roast the sprouts for 20 minutes, then flip with spatula, and continue roasting for another 5-15 minutes until browned to your liking. I tend to "overcook" these because I like them crispy and charred (I usually brown mine more than the photos show). Smaller sprouts will brown faster than larger ones. Drizzle with a teaspoon or so of melted coconut oil and quickly toss to coat. This infuses with flavour and moistens them a bit after roasting. Sometimes I also sprinkle on toasted sesame seeds if I have some on hand. Taste and add another tiny pinch of salt, if desired, and serve immediately - the hotter the better.
*If using melted coconut oil, make sure that your Brussels sprouts are at room temperature before mixing in the oil. If the sprouts are chilled from the fridge, the oil will harden when mixing. Keep in mind that using virgin coconut oil will impart a very light coconut flavour. You can use flavourless refined coconut oil if you prefer.
**I found the Harissa spice blend at Whole Foods in the US (it’s the Whole Foods Market brand). It contains: paprika, caraway, chilis pepper, cayenne pepper, coriander, cumin, garlic, peppermint, sea salt. I’ve also been told that it can be found at Bulk Barn and Sobey’s in some Canadian locations. You can also find it online here.

Comments (9) | Share on Facebook | Tweet | Pin It | Stumble© copyright 2015 Oh She Glows. All Rights Reserved.
November 9, 2015
The Three Bears Superfood Porridge

I’m starting to get a taste of what toddlerhood is all about, and it’s humbling. Incredible in so many crazy ways, yet very, very humbling. Adriana yells more, squirms more, protests more, talks more, eats more, laughs more, and moves more by the day.*insert monkey covering eyes emoji* The baby stage is challenging in many ways, but an almost 14 month old with a strong will and a mouthful of about-to-pop teeth can be downright scary. I wouldn’t change it for the world though (ok, maybe the teething); I know we’ll look back on these days as some of the best.
Even though Adriana should win a gold medal in the food throwing/slingshotting olympics, she really does love to eat! I can always tell when she’s about to throw food because she warns us with a, “no… no…” as she whips the food off the tray. Then she leans her head over the edge and peeks at the food on the floor while saying “no, no…no, no”. It takes everything in me not to reinforce her hijinks because it’s pretty darn cute, if not grey-hair inducing. It’s usually a sign that she’s finished, or at least ready for a different food.
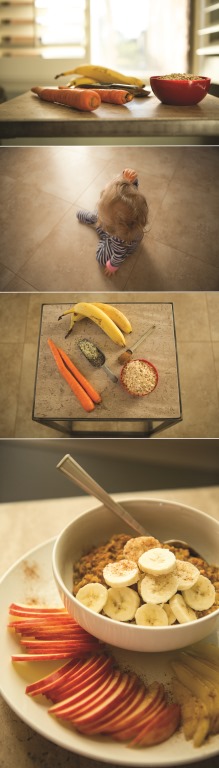
Lately, I’ve been experimenting with different breakfast ideas that we can share together in the morning. She really took to this oatmeal bowl (which I like to call porridge because it reminds me of Goldilocks and the three bears!), so I decided to share it on here since I’ve been asked so many times for easy baby/toddler foods. I love to use oatmeal as a vehicle for so many add-ins; in this recipe, finely grated carrots and zucchini bulk up the oats with energizing vegetable power, and hemp hearts and chia seeds boost the healthy fats, protein, calcium, fibre, etc. It really is a great start to the day. I don’t even measure it anymore, just throw in what I have on hand and thin as desired.
I was once told that a little one can need up to 30 exposures to a new food before they start to really take to it. Once I heard this, it relaxed me as I didn’t expect her to go wild over a new food right away. I now see it as a learning process for all of us, and it can take time before a food clicks with her tastebuds. This porridge was similar; the first time I gave it to her she was a bit unsure of it (full disclosure: she spit it right out with a dramatic face!), but the second time I offered it she ate a bit more. Now, she just inhales it and gets so impatient if she has to wait for it to cool down! Funny how things can change. Even though every little one is different, it can be reassuring to hear that persistence sometimes pays off. I also try not to get discouraged by an “off” day of eating – some days, for whatever reason, she’s just not into food compared to other days. I figure it all balances out in the end and try not to sweat it!
I’ve been making this breakfast every morning while we’re away, so I snapped a few quick photos for this post. Hope you enjoy!
The Three Bears Superfood Porridge
Vegan, gluten-free, nut-free, oil-free, refined sugar-free, soy-free
This thick and hearty porridge is naturally sweetened with mashed banana and finely shredded carrot, and it’s packed with superfoods like chia seeds and hemp hearts. I also love to stir in some finely grated zucchini to pack in even more vegetables. If I’m thinking ahead, I will mix the oatmeal together before bed so it can soften and thicken in the fridge overnight. Soaking cuts down the cook time drastically - all I do in the morning is throw it into a pot and reheat it. It’s unbelievably easy, and when you have a hungry toddler tugging your pants and screaming at your feet, fast is a necessity! Of course, you can prepare it from scratch in the morning too. I also serve Adriana this porridge chilled with great success (I think it feels soothing on teething gums!), so that’s a good option if it’s summer or if you just don’t have time to heat it up.
Yield
3 cups
Prep Time
15 Minutes
Cook time
15 Minutes
Total Time
30 Minutes
Ingredients:
2 large very ripe bananas, peeled and mashed well (heaping 3/4 cup)2 medium carrots, peeled and finely grated (lightly packed 3/4-1 cup)*1/2 cup finely grated zucchini, optional1 cup rolled oats, certified gluten-free if necessary2 1/4 cups water or milk of choice2 tablespoons chia seedsDash of pink Himalayan sea salt, optional1-1 1/2 teaspoons cinnamon, to taste (I use Ceylon)2 tablespoons hemp hearts
Directions:
In a medium bowl, mash the banana until almost smooth. Place it into a medium pot. Peel the carrots. Using the fine grate hole on a box grater, grate the carrots and measure 3/4-1 lightly packed cup. Place it into the pot along with the banana. Grate the zucchini (if using) using the fine grate hole and place it into the pot. Add the rolled oats, water or milk, chia seeds, and optional dash of salt into the pot. Stir well until combined. Increase heat to medium and cook the oats, uncovered, stirring frequently and reducing heat if necessary, for about 10-15 minutes until the oats are softened and the mixture thickens. (If you soaked the oatmeal overnight, simply heat it and serve.) At the end of cooking stir in the cinnamon to taste and all the hemp seeds. Serve and enjoy with your desired toppings (such as sliced banana, granola, nuts, etc). Leftovers will keep in the fridge in an air-tight container for up to 2 days. To reheat, add oatmeal into a pot on the stove-top and heat over medium heat, stirring in a splash of water or milk if necessary to thin out.
Tips:
*I like to use a full cup of shredded carrots, but feel free to use any amount you prefer!
**To save on cooking time, prepare this mixture at night before bed and let it soak in the fridge (covered). In the morning, simply stir and heat on the stove-top, adding more water or milk if desired.
This recipe yields a very thick oatmeal (and it thickens even more when chilled). Feel free to use more liquid if you prefer a thinner consistency.
Comments (8) | Share on Facebook | Tweet | Pin It | Stumble© copyright 2015 Oh She Glows. All Rights Reserved.
November 2, 2015
DIY Burrito Bowl

Hello from Scottsdale, Arizona! We’re here visiting for a little work and play. I’m so excited to be getting away for some downtime after a busy year. My mom and stepdad are arriving soon too, and Adriana is pumped to have lots of quality time with her Mimi and Papa. The last time we were here I was 6/7 weeks pregnant so it’s pretty amazing to be here with my girl this year. That trip, I could barely get off the couch due to 1st trimester nausea (I think I hiked a total of 1 mile, lol); it’ll be nice to feel normal again. I plan on making up for the last visit in many ways, especially on the food front! Any new plant-based restaurants pop up?
Our trip is off to a bit of a strange start – we had a series of odd events yesterday during our trek here, and then we woke up to an earthquake (!) last night. It felt like a truck slammed into the side of our bedroom. Luckily, it wasn’t too bad (4.1-mag), but it did give us quite a scare in the middle of the night. Aka…I screamed and then said a couple choice words. I immediately checked the baby monitor and Adriana didn’t even budge! Oh to sleep like a baby. Anyway, that was quite the welcome.
This hearty meal was thrown together last week and I loved it so much I knew I had to share it with you. Plus, I figured we could all use a balanced meal after the Halloween festivities.
I did a an informal poll on Facebook asking you – burrito (in a wrap) or burrito bowl? Most of you said BOWL….just give me the bowl! Here are a handful of your responses:
Katherine loves the versatility of a bowl. “I love both. But I think there are more options with a bowl, especially for creative rice substitutions that have more nutritional value than a tortilla. And I trust you to make it delicious AND healthy!” (side note: I used classic white rice here (no regrets!! gah, so good), but you can use any base you like – cauliflower rice, quinoa, shredded lettuce, etc.)
Others think a burrito bowl creates feelings of jealousy and envy. Stacy wrote, “With the tortilla! Otherwise, it’s a pile of ingredients merely wishing they were a burrito!”
Some of you thought outside the box bowl. Jaya said, “A nice compromise is actually baking the flour/rice/whatever kind of tortilla into a bowl shape, so you get a crispy bowl!” (hello, lover)
Others mentioned giving the option of a wrap by serving the soft tortillas on the side. Jodi wrote, “Bowl for me, but kids would chose burrito. Win win either way!”
So I went with a bowl for this post, but rest assured you can also stuff this into a big soft tortilla wrap. I absolutely love burrito bowls because you can make them as simple or as complex as you want. They can be as basic as plain black beans, sliced avocado, store-bought salsa, and rice, or you can load on a wide array of toppings to your heart’s content. I tried to keep this one simple, but also included some interesting components that make it fun and unique. I hope you love it as much as we do!

DIY Burrito Bowl
Vegan, gluten-free, nut-free, refined sugar-free, soy-free
This burrito bowl is so filling and healthy! The Spicy Black Beans are adapted from one of my favourite new cookbooks, Super Fresh: Super Natural, Super Vibrant Vegan Recipes by Jennifer Houston and Ruth Tal. The spicy black beans are to die for (or, to live for!). I’m already dreaming of the many ways I’m going to enjoy the beans-- in a wrap, sprinkled on a salad, or even as a dip with tortilla chips and guacamole. The Avocado-Lime Sauce is also a must-make. It yields about a heaping half cup so if you are a big avocado lover you can always double the recipe. To change up this recipe, stuff everything into a large soft tortilla wrap rather than enjoying it bowl style.
Yield
3 servings
Prep Time
25 Minutes
Cook time
20 Minutes
Total Time
45 Minutes
Ingredients:
For the burrito bowl:1 cup dry white long-grain rice (or rice of choice)1 tablespoon refined coconut oil or vegan butter*Salsa, as neededSliced green onion, for garnishSliced grape tomatoes, for garnish (optional)For the Spicy Black Beans:2 tablespoons refined coconut oil or extra virgin olive oil1 cup diced sweet onion4 medium garlic cloves, minced3/4-1 cup chopped fresh tomatoes1 teaspoon chili powder1 teaspoon garlic powder1 teaspoon dried oregano1/4 teaspoon cayenne pepper, optional1/2 + 1/8 teaspoon fine sea salt, or to taste2 1/2 tablespoons tomato paste1 (14-oz) can black beans, drained and rinsed1/2 cup unpacked cilantro, large stems removed and finely choppedFor the Avocado-Lime Sauce (makes heaping 1/2 cup):1 large garlic clove1 large avocado, pitted1 tablespoon fresh lime juice, plus more to taste1 tablespoon water1/4 teaspoon fine sea salt, or to taste
Directions:
For the rice: Add the rice and 1 tablespoon of oil or butter into a medium pot along with 2 cups of water. Increase heat to medium-high and bring to a simmer. Immediately reduce the heat to low-medium, and cover with a lid. Cook the rice until it’s tender and the water is absorbed. For white long-grain rice this will take 13-20 minutes, but please follow the directions on your specific package for best results. Meanwhile, prepare the Spicy Black Beans: In a large wok or skillet, add the oil and melt it over medium heat. Stir in the onion and garlic, along with a pinch of salt, and saute for about 5-6 minutes, until softened. Stir in the chopped tomatoes, chili powder, garlic powder, dried oregano, cayenne (if using), and 1/2 teaspoon of salt. Continue sauteing for another 3-5 minutes (increasing/reducing heat if necessary), until the tomato softens. Now stir in the tomato paste and drained and rinsed black beans. Cook for a few more minutes until heated throughout. Taste and add more salt if desired. Stir in the cilantro. You can leave the mixture over low heat until ready to serve or simply turn off the heat and reheat before serving. For the Avocado-Lime Sauce: Mince the garlic clove in a mini food processor (or use a regular size processor, if necessary). Now add the avocado flesh, lime juice, water, and salt. Process until smooth. Taste and adjust lime juice if desired. I usually add another teaspoon. When the rice is ready, reheat the bean mixture, if necessary. Divide the rice between 2-3 bowls. Top each with a couple scoops of the hot black bean mixture, and a large spoonful of both the salsa and the Avocado-Lime Sauce. Garnish with sliced green onion and optional sliced grape tomatoes. Serve immediately.
Tips:
* Why the use of refined coconut oil? Unlike virgin coconut oil, refined coconut oil doesn't have a light coconut flavour. I use it whenever I don't want a coconut flavour to come through. That being said, if you don't mind a bit of coconut flavour feel free to use the virgin kind.
Photography credit: Ashley McLaughlin Photography

I recently heard that Oh She Glows won “Favorite Blog” in the 14th annual Veggie Awards™. Even though I never feel quite deserving of such a title given the immense talent in our plant-based community, I’m so grateful for those of you who love what I do and take the time to vote. You guys inspire me to grow and improve in so many ways! My 7-year “blogiversary” was on Halloween (seriously, I can’t believe it has been that long!), and this blog would be nothing without YOU. My favourite part of blogging is that I’ve met so many incredible people over the years, so just know that if you’ve ever taken time to leave a comment or said hello in person, it’s not something I take lightly. Or, if you’ve made a recipe and enjoyed it with your family, even better!
Ps – Thanks for all your reviews on the Pumpkin Gingerbread Muffins! So glad you are enjoying them.
Comments (25) | Share on Facebook | Tweet | Pin It | Stumble© copyright 2015 Oh She Glows. All Rights Reserved.
October 28, 2015
Pumpkin Gingerbread Muffins (vegan)

I love to transform my favourite recipes into something new. Often, it’s not too far of a stretch to take a solid recipe base and create something different and fresh. Maybe I’m a baking nerd, but I just love the process of calculating measurements, swapping new ingredients for others, figuring out new baking times, and streamlining the method. My goal with recipe writing is to provide as many pertinent details as I can so you feel like I’m in the kitchen with you, but I also try to simplify and condense, too. It gives me great joy to refine and improve a dish and the written recipe itself over multiple trials.
Yup, I’m definitely a baking nerd. There’s no denying it.
My Pumpkin Gingerbread Loaf with Spiced Buttercream is a bit of a legend on this blog. I created the recipe for a blogging competition, Project Food Blog, five years ago (side note: my recipe writing style has clearly changed since then!). Despite being buried in the archives, this loaf has stood the test of time and remains popular during the fall and winter seasons. I’ve had requests for a muffin version – something a bit lighter and more wholesome that could pair with breakfast or an afternoon snack. (Wait a second. The original loaf with frosting doesn’t count as breakfast? I’ve been doing it all wrong.)
Joking aside, it’s a great idea. So maybe it’s a few years late, but I’m not a miracle worker! Ok, maybe I am. I made the original loaf more wholesome by using whole-grain spelt flour rather than all-purpose white flour. Despite using this heavier flour, I was astonished by how light and fluffy the muffins turned out! Spelt flour is incredibly tasty with a lightly sweet and nutty flavour that works so well in a muffin. Actually, I kept saying to Eric that these muffins taste a bit like a spiced bran muffin (in a very good way!). In just 1/4 cup of whole-grain spelt flour you’ll find 4 grams of protein and 4 grams of fibre, too. Look for whole-grain spelt flour in the natural foods or specialty section of grocery stores or you can find it online. Keep in mind that it’s not gluten-free so it won’t work for those with gluten allergies. You’ll also find pumpkin, blackstrap molasses (a great source of iron), pumpkin pie spice, maple syrup, and more. It’s like a big fall hug. Get ready, because your place is going to smell like a gingerbread house. No joke.

Pumpkin Gingerbread Muffins
Vegan, soy-free
Despite using whole-grain spelt flour, pumpkin puree, and molasses, these muffins rise beautifully and they are so light and fluffy! I think you’re going to love them. They are perfectly spiced (not too strong and not too light) and great for fall and winter baking. You won’t believe how incredible these muffins will make your house smell, too. Throw a batch in the oven before company comes over and your entire place will smell like a gingerbread house! This recipe is adapted from a reader favourite recipe: my Pumpkin Gingerbread loaf with Spiced Buttercream.
Yield
1 dozen
Prep Time
15 Minutes
Cook time
22 Minutes
Total Time
37 Minutes
Ingredients:
For the wet ingredients:1 tablespoon chia seeds3 tablespoons water1 cup unsweetened pumpkin puree*1/3 cup grapeseed oil or melted coconut oil**3 tablespoons pure maple syrup1/2 cup packed brown sugar1/4 cup blackstrap molassesFor the dry ingredients:1 2/3 cups whole-grain spelt flour***1 tablespoon pumpkin pie spice (see tips below for link to recipe)1 teaspoon baking soda1 teaspoon baking powder1/2 teaspoon fine sea saltHeaping 1/2 cup toasted chopped walnuts (optional)
Directions:
Preheat the oven to 350F. Line a muffin pan with large paper liners. (this is my favorite brand as they never stick!) In a mug or small bowl, whisk together the chia seeds and water. Set aside for a few minutes to thicken. In a large bowl, whisk together the dry ingredients (spelt flour, pumpkin pie spice, baking soda, baking powder, and salt). In a medium bowl, whisk together the wet ingredients until smooth (chia mixture, pumpkin puree, oil, maple syrup, brown sugar, and molasses). Add the wet mixture to the dry ingredients and stir until just combined. No patches of flour should remain. Be sure not to overmix the batter as spelt is a delicate flour. If using, stir in the chopped walnuts. You can also reserve some for garnish on top, like in the photos. Divide the batter equally between the 12 muffin liners. They should be about 3/4 full or a bit more. Add any reserved walnuts on top and gently push down (optional). Bake the muffins for 20-24 minutes until a toothpick comes out clean. Cool the muffins in the pan for 5-10 minutes, and then transfer each muffin onto a cooling rack until completely cool.
TIPS:
* If your pumpkin puree is a bit grainy, try throwing it into a food processor and processing it until smooth before making this recipe. Or you can beat it with electric beaters. This will simply prevent clumps in the dough.
** If using melted coconut oil, make sure that the rest of the wet ingredients are all at room temperature (do not use refrigerated milk, pumpkin, maple syrup, etc. as they will harden the coconut oil).
***I haven't tried these muffins with any other flour yet, but I expect that regular all-purpose flour will work (like in the loaf recipe). If you try any different flours please leave a comment with what you used and how it worked out!
Here is the Homemade Pumpkin Pie Spice Mix recipe
Make it nut-free: Simply omit the walnuts.

Photography credit: Ashley McLaughlin Photography
Comments (21) | Share on Facebook | Tweet | Pin It | Stumble© copyright 2015 Oh She Glows. All Rights Reserved.
Angela Liddon's Blog

- Angela Liddon's profile
- 134 followers

