
Justine Allen's Blog, page 15
August 8, 2024
Beyond Avatars: How Gravatar is Transforming Online Identity
Gravatar, short for Globally Recognized Avatar, is a powerful service from Automattic, the company behind WordPress.com. For over two decades, Gravatar has been the driving force behind billions of avatar views across the web. Beyond WordPress, you’ll find Gravatar powering user profiles on platforms like ChatGPT, GitHub, Slack, and many more.
But Gravatar is far more than just a profile pic that follows you around the web. Let’s dive into seven key features that make Gravatar an indispensable tool for WordPress users.
From a WordPress avatar to a profile for everywhere
When Gravatar was first integrated into WordPress way back in 2006, it solved two critical problems:
WordPress lacked native image editing capabilities.Most servers hosting WordPress sites struggled with image resizing and performance.Gravatar elegantly addressed these issues while offering users the convenience of uploading their avatar just once for use across multiple sites and blogs. Today, you’ll find Gravatar profiles integrated across the web.
It was, and still is, a win-win!
Put a face to a commentGravatar is what provides profile pictures on all the lovely comments on your blog. That simple addition—a photo where there might otherwise be a bland icon—dramatically increases reader engagement. Users with Gravatars are more likely to comment, and their contributions tend to be of higher quality. This can lead to more vibrant discussions on your blog, fostering a sense of community.
Increase engagement with hovercards
Hovercards are an often-overlooked feature that can also significantly enhance user interaction. When enabled, hovering over an avatar reveals a snapshot of the user’s profile information.
To activate hovercards:
Go to Settings > Discussion in your WordPress dashboardLook for the “Gravatar Hovercards” option and enable itNote: If you’re not on a WordPress.com hosted site, you’ll need the Jetpack plugin installedGet verified
Gravatar’s Verified Accounts feature lets you link your profile to services and social media platforms like Instagram, GitHub, TikTok, and Threads. This verification process confirms your ownership of these accounts, adding a layer of authenticity to your online presence and making your interactions more trustworthy.
Your link-in-bio solution
Did you know that Gravatar was the original link-in-bio service? Every Gravatar account comes with a free, customizable profile page that’s perfect for sharing:
Your bio and interestsImportant linksSocial media accountsPayment optionsContact informationIt’s a versatile hub for your online identity, all in one convenient location.
Own your name on the web
Instead of using gravatar.com/username, you can now have a custom web address that truly represents you. This personalized domain isn’t just for vanity; it opens up new possibilities, such as using it as your username on emerging platforms like Bluesky.
To kick off custom domains, we’ve partnered with .link to offer you a free domain for the first year. This limited-time offer lets you personalize your Gravatar profile URL, making it more memorable and shareable.
Here is a video about why you should own your name as a domain and what it can unlock.
More TLDs and domain options will be available in the months to come.
Innovate with profiles-as-a-service
For developers looking to enhance user experiences, Gravatar’s new REST API offers exciting possibilities:
Enrich customer profilesCustomize onboarding processesAdd delightful touches to user interactionsThe best part? It’s completely free to use.
WordPress site owners, keep an eye out for an upcoming WordPress plugin that will add even more Gravatar integrations to your site.
Get your free domain nowDon’t miss out on these powerful features and our exclusive domain offer. Visit the Gravatar blog to learn how to set up your custom domain and take control of your online identity.
Get your domain today

August 6, 2024
Clearer Writing at Your Fingertips: Introducing Write Brief with AI (Beta)
At WordPress.com, writing isn’t just a task. It’s how we think. Automattic is a globally distributed company, which means our work is almost always done asynchronously. For us, written communication is oxygen. But that communication is not built around email. Instead we use a homegrown internal blogging tool. Since every piece of our writing lives as a blog post that will stay published and searchable forever, we need to write clearly and succinctly.
The team at Jetpack AI started wondering if there was a writing tool that could help everyone at Automattic, from right inside the WordPress editor. Rather than search externally, we built one. And today we’re excited to share it with you. Say hello to Write Brief with AI from Jetpack.
Meet Write Brief with AIInternally, we called this tool Breve—Latin for “brief.” It started as a hack week project and caught on across the entire company. In fact, we saw just how useful and beloved it quickly became and decided to release it into the world. Write Brief with AI is available for free (while in beta) for all WordPress.com plans and users.
What can Write Brief with AI do? Measure readability. Check how readable your writing is with a simple grade score. Our research shows you should aim for a score of 8-12 for the highest readability. (The lower the number, the better.) The tool calculates your score as you type.Tell you about long-winded sentences. Long sentences tire readers. Write Brief with AI highlights those examples so you can break them down. You can even ask Jetpack AI to simplify them for you.Boost your confidence. Writing needs to be strong and clear. This tool highlights words that sound uncertain, like “possibly,” “might,” or “could.” Replace them with more assertive alternatives to make your point confidently. Or, ask Jetpack AI to remove them for you with one click.Simplify your vocabulary. Complex words can bog down your message. The tool highlights complex words like the ones found in plainlanguage.gov and suggests simpler alternatives, keeping your writing clear and direct. Seamless WordPress.com integration
Write Brief with AI works right within the WordPress editor, handling blocks, nested blocks, patterns, and more. It’s an editing tool built to streamline your writing process directly in your familiar workspace. Write, edit, blog, directly from WordPress.
Simply click the Jetpack icon on the top right of your screen, and Write Brief with AI will get to work based on what’s check or unchecked in the sidebar.
We’re just getting startedWe’re constantly improving and refining our platform based on your feedback. Write Brief with AI is just one step in our journey to make writing with WordPress even better. We’re excited for you to join us in this new chapter. Try it out in the post or page editor today and let us know what you think. Or click below to learn more.
Learn moreFor this release, Write Brief with AI is available exclusively in English. We’re working hard to expand language support in future updates.
August 2, 2024
Welcome to the Fediverse Files: What Is the Fediverse?
You’ve probably seen it on social media and in headlines around the web in the last few years: the fediverse. But what is it, really? A Boba Fett theme park? A Kevin Federline production? Some sort of cheese pun? In this first episode of our new YouTube series, the Fediverse Files, designer, illustrator, and fediverse expert Doc Pop explains exactly what the fediverse is so that you can jump in today to start building community and sharing content.
To kickstart your efforts, we’re giving you 25% off your first year on a Creator or Entrepreneur plan.
Get 25% off todayJuly 31, 2024
Building Studio in Public: Using WordPress Components and Tailwind CSS in our Local Development App
At WordPress.com, our goal is to provide the best tools for WordPress developers and agencies.
We built Studio for that reason. Our free local WordPress development environment launched a few months ago; it’s based on Electron and is currently available for Mac and Windows. Plus, we have big exciting updates coming for Studio users soon.
Download Studio for freeOne of the unique things about Studio is that it’s an open source tool, and it has been since day one. This directly aligns with the Automattic Creed, the driving force behind what we do at WordPress.com (and all of our other Automattic brands):
I know that Open Source is one of the most powerful ideas of our generation.
For this reason, we love building in public. In our new Building Studio in Public series, we want to share some of the learnings and insights we gained from building Studio, and our hope is that some of the lessons can help you build better products.
If you want more in-depth articles about why we chose Electron, why this is an open source project, or any other question you have about Studio, leave a comment below, and we’ll make it happen.
First up in this series, we’ll explore how we decided to use Tailwind CSS and the WordPress components that make up Studio and why that decision gave us extra flexibility for the future of Studio.
WordPress components everywhere
Components allow developers to create reusable pieces of code that can be composed together to build complex user interfaces. They encourage a modular and declarative approach of building UIs, where each component is responsible for a single piece of functionality or user interface element.
WordPress components are a great example of that. These components allow core and extender developers to create organized, separate, and interconnected parts of the WordPress admin interface. Not only do components make development easier and more streamlined, but they are also predictable and familiar across all WordPress users. To maintain a uniform look and feel across the entire wp-admin area, it’s recommended not to override the default styles of these components.
Do not confuse WordPress components with Gutenberg Blocks. While the latter are used to build WordPress frontend websites, the former are designed for building the admin interface of the WordPress site editor. They are React-based, making them versatile and applicable in any WordPress plugin or theme admin interface. They also come in handy for building different apps beyond WordPress; the only requirement is that the project uses React.
WordPress components offer a consistent style and behavior that match the WordPress admin interface out of the box, so using them in other projects outside of the WordPress ecosystem gives a familiar look and feel to the interface and user experience.
Not only that, the components are accessible and receive constant updates and improvements. They are implemented in JavaScript as React components, which means they can be integrated into any project. Plus, by using WordPress components in Studio, developers can more easily contribute back to this open source project because Studio is using a technology they’re already used to.
To quickly find the right component and experiment with them, you can use the WordPress Storybook, an open source tool for developing system designs and creating components in isolation. Storybook even gives you sneak peeks and allows you to interact with components from other npm WordPress packages like @wordpress/dataviews. The DataViews component is intended for future use in managing lists of posts, pages, and media uploads.
 Components in Studio
By integrating WordPress components into Studio, we ensure a familiar user experience for WordPress users––you’re building WordPress with a tool that looks and feels like WordPress.
Most buttons, dropdowns, and menus will be familiar to WordPress users, and because Studio is an open source tool, anyone with Gutenberg experience will find it much easier to understand Studio’s code and contribute if they are interested.
Even though Studio is a desktop application using Electron and not a WordPress site, we recommend not overriding the styles of WordPress components. We wanted to keep them as close to Core as possible from the design phase. This approach also reduces misalignments when updating WordPress dependencies. For styling our custom React components, we used Tailwind CSS.
Tailwind CSS is a popular, utility-first CSS framework that we use to customize the styles of our custom components and modify outer styles, such as the spacing of WordPress components, using only CSS classes.
Utilizing the power of WordPress components and Tailwind CSS future-proofs the Studio app; it’s easy to reuse these components for new features and app updates because they’re already imported into the project in a style that suits the app.
If a screen needs a new button, we already have loads of Studio-styled buttons to choose from; we don’t need to design from scratch each time a new button is needed.
Here’s how we used WordPress components and Tailwind CSS to build Studio (and how you can use them for your own projects, too):
Step 1: Set up Tailwind CSS and install WordPress componentsAfter setting up Tailwind in your project, you’ll need to install WordPress components. Simply run the following command:
npm install @wordpress/components –saveStep 2: Import WordPress component stylesYou’ll need to import WordPress component styles to inject the CSS that is built into the components by default. This speeds up the process of building your project’s interface.
In your main CSS file, import the Gutenberg component styles:
@import '@wordpress/components/build-style/style.css';Step 3: Customize React components with Tailwind CSSUse the className property to apply Tailwind CSS styles. Sometimes, the ! modifier is needed to mark the style as important and override existing WordPress styles.
Take Studio’s Header component, for example:

We’re using:
@wordpress/react-i18n for translations.@wordpress/icons to display the icons.To use Tailwind CSS in any component, you need to pass in the utility classes to style the elements into the className React prop. Occasionally, we needed to override the outer spacing of certain components, for which we used the exclamation mark (!).
 Step 4: Accessing nested elements for use across your project
With Tailwind CSS, you can use sophisticated selectors to target user interactions and nested elements within a component. This will allow you to dynamically change stylings across your project based on user and app behavior.
For example, in Studio’s Demo Sites area, we change the style of the nested element’s site name and badge to a grey color when the demo site expires.

To dynamically style this component, we use [&_.badge]:text-red, where & means current element and _ means any child element. You can apply specific styles to a direct child element by using the greater-than operator, like this: [&>div]:text-red.
 Ready to build?
By leveraging WordPress components and a few custom components with Tailwind CSS, you can significantly enhance your development process, providing a seamless and professional user experience.
This decision allowed us to create an app that looks and feels like the WordPress interface in a way that benefits users and speeds up our development time. That’s a win-win, in my book.
If you’re building WordPress sites, start developing your WordPress sites locally with the power of Studio today. It’s free, it’s open source, and it will effortlessly fit into your development workflow.
Download Studio for freeOnce you download Studio: Be sure to connect Studio to your WordPress.com account (free or paid) to access features like Demo Sites.
And if you want to help us build Studio, here are some GitHub issues that you can contribute to right away:
php_curl missing and curl_exec deactivatedTotal and free size of filesystem reported in sites doesn’t match actual values Permission issues using a theme that uses composerJuly 30, 2024
Why We’re Partnering With Perplexity
One of our key values at Automattic is that access to knowledge, software, and media is for everyone, not just the gatekeepers. That’s why we’ve built our company on the foundation of open source principles. And it’s why we’ve decided to partner with Perplexity, an AI-powered answer engine that lets you research on the web like never before. Think of it like a mashup of a search engine, online encyclopedia, and AI-powered conversation—an entirely new way of surfacing knowledge. When you type in a question, Perplexity searches the internet for answers in real time and provides results that include footnotes, live updates, and links to the original source.
Being part of Perplexity’s Publishing Partners Program means that knowledge from WordPress.com can now be included in the variety of answers that are served on Perplexity’s “Keep Exploring” section on their Discover pages. That means your articles will be included in their search index and your articles can be surfaced as an answer on their answer engine and Discover feed. If your website is referenced in a Perplexity search result where the company earns advertising revenue, you’ll be eligible for revenue share.
Here’s an example of how it might look:

Perplexity is partnering with select media outlets like TIME, Der Spiegel, Fortune, The Texas Tribune, and Entrepreneur. WordPress.com’s network of incredible content creators makes us a desirable partner for a cutting-edge answer engine. In addition to the revenue share, the partnership offers a great opportunity to drive traffic to your website.
We’ll share more details of how it works as this partnership evolves, including how we’ll be distributing revenue-share payments to those whose content qualifies. If you want to opt out, we already offer the ability to opt out of content sharing. And remember: We’re always experimenting. Building relationships with AI companies allows us to advocate on behalf of our customers; if we determine that the partnership isn’t a perfect match or doesn’t serve you, we’ll reevaluate what we’re doing, so that we stay true to our mission.
The first line of our company’s creed is “I will never stop learning.” That’s the spirit in which we’re exploring our partnership with Perplexity. If this works out the way we hope it will, both sides win—an exciting new answer engine will have a wide pool of quality content to serve people, and you’ll get to share in the success of their platform.
July 26, 2024
Automattic for Agencies x Endoh Collaborative: A Match Made in WordPress Heaven
Endoh Collaborative is blazing a unique and powerful trail as a queer-owned, feminist digital agency. Their aim is to create effective, engaging, and accessible websites and visual brands to help nonprofits, purpose-driven businesses, and progressive organizations. Ultimately, Endoh wants to empower their clients to grow, thrive, and make a lasting positive impact.
Aiding Endoh in their journey is Automattic for Agencies. With a unified dashboard—including site overviews and real-time monitoring—as well as a host of other client management tools, Endoh gained freedom and efficiency, allowing them to spend time on their clients rather than their infrastructure.
Become an Automattic partner and gain access to discounted pricing, commissions on referrals, premier support, and cutting‑edge tooling.
Learn moreJuly 24, 2024
Customizable Footer Credits Are Here
From the earliest days of WordPress.com, the bottom of every site on our platform has featured a default phrase in the footer credit area. Today, we’re handing the reigns over to you: every website using a block theme, on every plan, can customize the footer credit to say anything at all.
That footer space offers a small and potent opportunity to showcase your creativity and unique tastes. Whether you’re buttoned up or just plain silly or somewhere between, visitors will get a little hint as to the personality behind the brand.
Examples:
Made with love and WordPressBrought to you by the best minds on the planetHandmade with care since 2003 Bob Ross rocksOkay, that last one was my six-year-old daughter’s idea. But you get the picture: you have total freedom to display anything you want in the footer credit—or nothing at all. Of course we’d be honored if you still include WordPress.com in your footer, but no harm, no foul if not.
Not using a block theme? Make the switchThis new customization is only available on sites using block themes. These are themes that use blocks for every part of the site, whereas “classic” themes are still utilizing CSS and other coded elements.
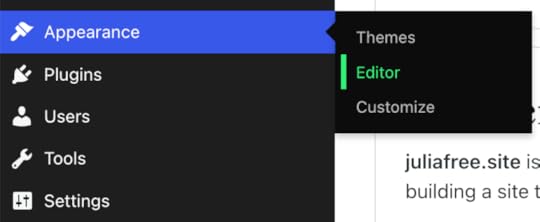
You can find out which type of theme your site is using by hovering over “Appearance” in the left-side menu of your dashboard. If you see “Editor,” you’re using a block theme. If you don’t, you’re using a classic theme.
We’re big advocates of using block themes, as these unlock the most powerful WordPress features available today. If you need help converting your theme, check out this handy guide.
How to customize your site’s footer creditIn about 30 seconds flat, you can have a custom footer credit:
Access your Site Editor from the “Edit Site” button in the top menu bar when on your website’s homepage. You can also find it from “Appearance” on the left-side menu of your main dashboard. (Click here if you need help finding it.) Scroll down to the footer credit (i.e. “Designed with WordPress”) Edit the text as you would in any other block on your site. Save your changes and you’re all set.Keep in mind that you can edit and add nearly any block in the footer area—text, social links, images, buttons, etc.
Just like that, you have more options at your fingertips. That’s what we’re always striving for at WordPress.com. If you’re not on a block theme yet, we strongly encourage you to make that switch. Choose one today:
WordPress.com Block ThemesLet us know in the comments what you think of this new feature and always feel free to drop in ideas for other things you’d like to see.
July 16, 2024
WordPress 6.6 Is Here
A few times a year, the WordPress open source software gets a major update, providing users with new capabilities, regular refinements, and important bug fixes. With hundreds of fixes and enhancements, WordPress 6.6 brings a new level of creativity, usability, and efficiency to your WordPressing.
Here’s a quick tour of what this latest update offers folks on WordPress.com, starting with some of the basics about WordPress 6.6.
Table of Contents
The basics More efficient views and navigation in the Site Editor Unified and updated publishing flow Override synced patterns with custom content Automatic plugin rollbacks New design elementsSite background image Negative margins All-new grid support Custom default shadow styles Section-specific stylesBlock Bindings API upgrades And more! The basicsWordPress 6.6 is available right now and has likely already landed on your WordPress.com site. You may notice that many of these new features have been available on your site(s) for a few weeks or even months; we often roll out updates in waves on WordPress.com to allow for early access, testing, and iteration before these major updates are more widely released.
Sites on WordPress.com are updated automatically. If you run into issues or bugs, always feel free to reach out to our expert Happiness Engineers at wordpress.com/help.
More efficient views and navigation in the Site EditorThe last couple major WordPress releases have dramatically reimagined the Site Editor experience. With 6.6 you’ll see a new side-by-side default layout when viewing and editing pages.
Pattern management has also been better integrated, ensuring more efficient navigation and fewer clicks to get where you want to be.
Amidst these bigger changes are a number of small enhancements to keyboard navigation, bulk editing actions, and the overall design and functionality of the Site Editor.
Unified and updated publishing flow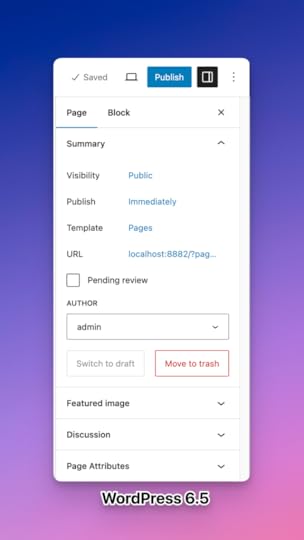
If you’ve spent time in the Site Editor, you’ll have noticed that it used to offer a fairly different experience from the page/post editor. WordPress 6.6 now offers a shared workflow for publishing, leading to smoother interactions when navigating between various elements of your site.
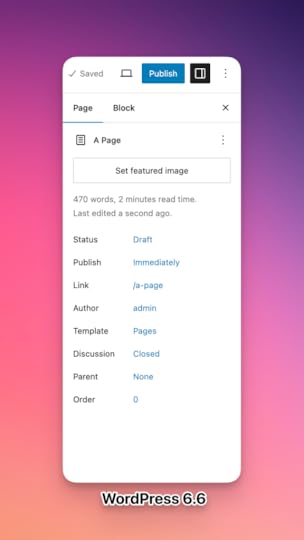
As part of this unification, there’s also an update to the layout and design of the publish flow with more prominent displays for the title, publishing status, and featured image.
For all the plugin and theme developers out there, this particular update also makes it easier to extend the editor. Both the post/page editor and Site Editor now use the same slots and extensibility APIs.
For users, this means a lot more plugins will be able to bring exciting features into the editor. For plugin developers, it means that it’s easier to implement your code to extend the editor’s capabilities.
Override synced patterns with custom contentThis new feature allows for editing specific blocks even when you’re utilizing synced patterns and styles. For example, if you have a pattern for a stylized button CTA, you can use this override feature to use different copy or even colors for different pages and button locations, while maintaining common elements.
You can “Enable Overrides” from the “Advanced” section of the Paragraph, Heading, Buttons, and Image blocks, with more block support planned for the future.
Automatic plugin rollbacksWhen it comes to plugin management, WordPress.com offers unparalleled reliability and redundancy. In addition to the scheduled plugin updates that we recently introduced, WordPress core now offers automatic rollbacks when a plugin update fails.
If you don’t utilize scheduled updates, your plugins will update automatically when new versions become available.
In the past, if a plugin update failed, WordPress would leave the plugin inactive, which might render some parts of your website unusable or broken. In WordPress 6.6, the plugin is rolled back to the previous version, ensuring continuity with your site until you can diagnose and fix the issue.
New design elementsWordPress 6.6 offers a handful of new customization options for designing and stylizing your site. Let’s explore the most impactful new features.
Site background image
Make an immediate visual splash with the new site-wide background image option in the Site Editor. Whether it’s a striking full-bleed photo or a whimsical graphic pattern, you have the freedom to choose size, position, and repetition.
Negative marginsYou can now set negative margins for any block, allowing for more granular margin control. This enables users to more easily create overlapping design elements. Note that negative values must be entered manually rather than with the slider.
All-new grid supportWith the Grid and Grid Layout blocks, you can quickly create professional-looking grids for your images, testimonials, videos, and more. The “Auto” option automatically generates mobile-responsive rows and columns while the “Manual” option provides more granular control.
Custom default shadow styles
From the Styles menu, you can now edit shadow effects, including changing the default shadow style for images, buttons, and more. You can also add your own shadow styles, giving your total control over this subtle and powerful design element.
Section-specific stylesHere’s one for the theme builders out there. With WordPress 6.6, you have the option to define style variations for specific sections of a site, not just the theme as a whole. To enable this, you’ll have to edit your theme’s theme.json file and declare the style variation (click here for instructions). Once that’s set up, you will be able to quickly modify the styles of several blocks for areas like headers, footers, content sections, and more.
As a bonus, section styles also work flawlessly with content imported from our public pattern collection.
Block Bindings API upgradesThis release makes Block Bindings easier to use and more powerful. Originally available since WordPress 6.5, this feature allows users to connect (or “bind”) the content of a block to the data of a custom field. Here’s how to create that in a post. WordPress 6.6 takes it one step further by enabling the option to edit custom field data by just updating the block in the editor.
And more!There are hundreds of updates to WordPress in the 6.6 release. What we’ve highlighted above is a just taste of the most notable and visible features. If you’re a developer and want to look under the hood a bit more, you can find the full slate of goodies in this WordPress 6.6 Field Guide.
Click below if you’re a developer and want to leverage the benefits of hosting your sites with WordPress.com:
Learn more*Photo and video credit: WordPress.org
July 11, 2024
How to Create a Beautiful and Functional Site for Your WordPress Meetup Group
A few weeks ago at WordCamp Europe we announced free sites for local WordPress meetup groups. This initiative aims to support the WordPress community by providing free world-class hosting to promote your local meetups.
Today we’re bringing you a set of easy-to-use templates, along with some ideas on how to customize your community site. Let’s dive in!
Building a WordPress community websiteWordPress.com offers a huge variety of themes, but if you’re looking for a place to start, you can’t go wrong with Twenty Twenty-Four. It’s a community project, comes with a professional, polished look, and offers plenty of built-in patterns that make site building a breeze. It also lends itself beautifully to customization.
Twenty Twenty-Four already has a lot going for it, but we decided to take it a step further and offer a couple of custom, community-focused page layouts to go along with it. Our stylish homepage and events page templates will seamlessly integrate with your site.
The homepage layout includes a welcome message, stats section, upcoming events, a blog, and a call for speakers. All of these are optional and can be removed or re-arranged as needed. Plus, you can supplement them with other patterns from the catalog, like social icons to promote your local group’s social media presence.
Let’s have a look!

 Getting started with templates
First, you’ll want to activate the Twenty Twenty-Four theme on your site. Next, follow these steps to set up your homepage:
Create a static page.In the “Add a page” modal select the “Events” category on the left, and pick the desired layout, following these steps. Set the page template to “Page No Title.”Set your custom page as the homepage in the Settings → Reading section following these steps.Repeat as necessary for the Events page, and any other page that you might want to add to your site, like About, Contact, or Blog.
The above page layouts can also be found in our pattern library in the Events category.
Customization optionsOnce you’ve applied a template, it’s time to make it your own. Customizing your site to match your group’s vision is easy. Don’t forget to grab official WordPress logos and other visual assets.
Change fonts and colorsExperiment with fonts and colors to make your design unique. Twenty Twenty-Four theme comes with six style variations that include different colors and fonts, and can be further adjusted as needed.
 Swap template parts
Use the power of Site Editor to change the header and footer of your site. Twenty Twenty-Four comes with a selection of built-in options for the site headers and footers, so take your pick!
Add links to social media profilesUse the Social Icons block to display logos that link to your social media profiles anywhere on your site.
Update your Meetup.com group pageOnce your local community website is ready, don’t forget to add the link to your group description and the “Find us” section on your official Meetup.com page.
Over to youWe are committed to providing the best tools and resources for the WordPress community. What other patterns or templates would be useful for your meetup site? Share your thoughts and suggestions with us—we’re here to help you succeed!
July 9, 2024
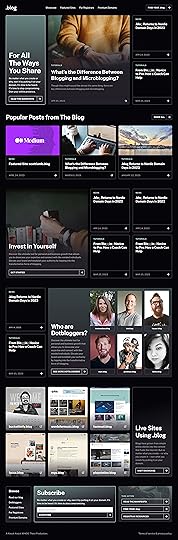
How We Built It: my.blog
When Automattic launched the .blog domain extension back in 2016, our in-house team built a shiny new website to go with it. The vibe of my.blog very much matched the era, featuring a simple layout, a generic color palette, and a “just the basics” approach to the content and overall messaging.
 The previous iteration of my.blog did its job well, but was due for a redesign.
 Eight years later, it was time for a refresh.
Our special projects team recently revisited my.blog, giving it a totally new aesthetic and approach, as well as some cool new features. In this post, we’re going to give you a peek behind the curtain about how this new site came to be. The fresh design beautifully showcases what’s possible with WordPress.
Take a look around my.blog and don’t forget to grab a .blog domain while you’re at it!
Design inspoThe first step for our team was to nail down a design motif. For any website project, starting here sets the tone for the entire site. What are the colors, styling, and typographical elements that speak to what you’re trying to get across?
Our design team presented two beautiful options, each with their pros and cons:

The fluid layout of the lighter version, codenamed Lemon Softness, really stood out, whereas the tile or card layout of the darker version, codenamed Starfield, looked nice, but felt like more of the same on today’s web.
On the other hand, the dark aesthetic of Starfield spoke a little more to our future-facing sensibilities.
Ultimately, we combined them. The layout of Lemon Softness is what you’ll see on my.blog today (including a few very cool scrolling animations), while the Starfield inspiration shows up in Dark Mode toggle (the moon/sun icon on the top right). Also check out the “glass morphism” effect in the header at the top of the site, which blurs the imagery just a bit so that you can clearly read and navigate the menu.
Blogger inspoOf course, it’s not all about the design. Along with the bold new look, our team included a few features that will inspire bloggers of all stripes and encourage getting back into the habit. After all, blogging is actually thriving in our social media world.
First, we wanted to ensure that “dotbloggers” (folks who use a .blog domain) were highlighted right on the front page. This carousel pulls posts from the “dotblogger” blog category:

Just a bit further down on the page, we decided to feature .blog sites; this carousel is actually populated dynamically from a .blog domain database.

Finally, the team wanted to emphasize how powerful blogging can be. Just as “the death of the novel” has been overblown for at least 100 years, “the death of blogging” is a regular fixture of online discourse. The reality is that more people than ever before are blogging and seeing the value of having a corner of the internet that’s all theirs. To this end, we spent time crafting a manifesto that speaks to this:
Resources for days
We hold this truth at the center of our mission and vision: content is valuable. When you publish online—whatever you publish—you are declaring your willingness to create and add something to our world.
Owning your domain means that you’re not at the whims of an ever-changing algorithm. It’s a claim of ownership and independence. A .blog domain is more than that—it’s a signal and a badge of authenticity that declares your particular corner of the internet as a space for stories, expressions, thoughts, and ideas. You’re an original.
A .blog domain is more than just the dynamic pillar of your online presence (though it is that too). It’s a stage for all of the utterly unique ways you share your story—in words, photographs, videos, podcasts, artwork, and more.
Beyond the glitz and glamor, the .blog website also needs to provide practical resources for both registrars and dotbloggers. On the registrar side, our team made it especially convenient to access promotional content and visual marketing assets. When it comes to bloggers looking for a domain, the search page provides real-time results for what’s available and where you can purchase it.
As a reminder, you can also buy a .blog domain directly from WordPress.com/domains—for just $2.20 for the first year, or for free if you purchase any annual paid plan.
Take a look for yourselfNo need to take our word on the great job our special projects team did with the new my.blog website. Head over, click around, grab your own memorable domain name, and start (or restart) blogging today.


