Nick Vulich's Blog, page 5
June 15, 2014
Show, Don't Tell
As writers we hear these words all the time.
Show, don't tell.
I heard the best example of it ever today in an ad on the radio. You've probably heard it, too. It's the Jimmy John's commercial, where the Jimmy John's delivery guys put out the fire.
For those of you who aren't familiar with it, I'll recap very quickly.
The Jimmy John's delivery guy pulls up at the house to deliver a sandwich. When the homeowner answers the door, he tells him, "Hey, did you know your house is on fire?"
The home owner responds,"Quick! Grab a bucket."
After this the Jimmy John's guy keeps calling the store telling his boss to send another sandwich.
As each of the delivery guys show up they say the same thing, "Hey, did you know your house is on fire?"
"Quick! Grab a bucket," is the reply.
Finally when the last guy knocks on the door, it's a fireman and the homeowner tells him to sit down and have a sandwich. The fireman says, "I've got just one question for you. Why didn't you call the fire department first?"
And, the homeowner replies, "I did."
................
They end the commercial with "Jimmy John's - Freaky Fast Delivery."
It's low key. It paints a perfect picture in your mind, and the best thing is - they don't beat a dead horse at the end by telling you how fast they are compared to the fire department. You're left to figure that out for yourself.
Next time you're trying to decide whether your writing shows, or tells, think of that Jimmy John's commercial. If you show the story unfolding, and, don't restate the obvious afterwords, you've probably got a keeper.
Hope that helps.


June 12, 2014
New Book: Author Bookkeeping Made Easy
 Here's a short preview of my latest book, Author Bookkeeping Made Easy. You can grab a copy on Kindle by visiting this link. (After you've had a chance to read it, please stop back to Amazon and leave an honest review. It will help me with my writing, and it will help other readers decide whether it can help them with their author bookkeeping needs.)
Why you need to read this book
Authors work with words. Accountants work with numbers. So what does bookkeeping have to do with writing, you may ask?
Good question.
The answer could mean thousands of extra dollars in your back pocket.
Too many authors get so excited about the money rolling in they never bother to add it all up to see if they’re making a profit. Not until it’s too late, anyway.
To run a successful writing business you need to make a profit. The more profit you make, the healthier your business is. Unfortunately, too many authors never stop to look at the big picture. They assume that because the money keeps flowing in, they must be making a profit.
I felt the same way the first year my books were on Kindle. I earned nearly ten thousand dollars in royalties that year, and I naturally assumed I was making money. Every time I turned around there was another deposit in my bank account. I had to be making money. The thing is when I totaled it all up at the end of the year I really only made a couple thousand bucks.
How could that be?
Simple answer: I spent more money than the royalties I received. The long answer was I kept spending money I should have socked away. I bought a new laptop, another iPhone, a Kindle, and don’t forget Fiverr. I commissioned 179 Fiverr’s over the course of one year – covers, infographics, videos, you name it.
Smart author’s tie their spending to their cash flow. If they project $10,000 in royalties, they determine they can spend a certain amount for research and goodies. If they project $25,000 in royalties they allow themselves to spend a few bucks more tracking down that last scrap of necessary research, designing one more alternate cover, or acquiring the latest greatest electronic gadget.
Of course, research expenses, covers, and computer equipment, are only a few of the ingredients involved in planning cash flow. Authors need to look at all of their expenses when they make cash flow projections.
A simple author’s budget would likely have many of the expenses listed below:
1) Research expenses2) Books3) Travel4) Review copies5) Art work (for covers, promotions, flyers, etc.)6) Gas and mileage for your car7) Advertisements to promote your books8) Google AdWords / Facebook Ads9) Equipment (computers, printers, etc.)
While not an all-inclusive list, this will give you an idea of the expenses you need to track. You also need to track your sources of income.
These are some of the income sources you’re likely to encounter:
1) Kindle royalties2) Create Space royalties3) Smashwords royalties4) Barnes & Noble royalties5) Google Play & Google Books royalties
What this book is going to do is help you take a better look at your income and expenses.
We’re going to examine several different methods of tracking your expenses. GoDaddy Bookkeeping (formerly known as Outlook) is an easy to use program that makes it more convenient for authors to record their earnings and expenses. Some authors prefer simpler methods, such as using an Excel spreadsheet or a paper journal.
Accounting solutions such as GoDaddy Bookkeeping can make things easier by automatically importing transaction information from your checking accounts and credit card accounts. It gives you the ability to set up separate income and expense accounts that make the program more flexible.
In my case, I set up separate income accounts for my Create Space, Smashwords, Barnes & Noble & ACX royalty payments so I could track that data alongside of my Kindle royalties. I will go into more detail on this later and show you how to do it.
Before I go any further let me tell you a little more about me, so you can understand why I’m the right guy to help you with your author accounting needs.Why Listen to Me?Hey there, Nick Vulich here.
Although I’m relatively unknown in the publishing world, it’s not for lack of trying. I’ve published more than thirty books over the last several years. Most of them are available as paperbacks, eBooks, and most recently as audio books.
What that means is I’ve been there, and done that. I know what it’s like to go to work every day, come home, spend time with the family, spend half the night working on your new book, and get up early the next morning to drag your ass through it all over again.
One thing you’ll discover is I’m not shy about telling you what I think.
I’ve run an online business selling on eBay and Amazon for the past fifteen years. Much of what I cover in this book is adapted from what I learned in those businesses. If I tell you about a tax deduction, tax credit, or computer program that can help you along the way, it’s because I use those programs and I know they work.
If I’ve just heard about something, but have never tried it, I’ll tell you that up front.Let’s get started
Don’t sweat it.
Modern accounting programs have simplified everything so you don’t need to know the difference between a debit and a credit.
If you can punch your sales and expenses into the right category these programs will work their magic and show you the final results – whether you made a profit or a loss.
Get Organized
The first thing you’re going to need is a system to organize and store your receipts and records. Some authors use a file cabinet. Some use expandable file folders. I like to use loose-leaf binders. I normally select a five inch binder, monthly divider inserts, and storage pocket inserts.
Storing everything this way keeps all of my business records readily accessible, and the binder fits neatly on my bookshelf. I can store fifteen years of business records side-by-side in a relatively small space.
Save Your Receipts
Get used to it now. You need to save all of your receipts.
When you buy something online, print out the invoice, punch it with a three hole punch, and store it in your three ring binder under the month of purchase.
Save all of your mortgage or rent receipts, utility bills, phone bills, cable bills, sewer bills, etc. Store them in a zipper pouch in your binder. You’re going to need them to file for the home office deduction. It’s going to save you thousands of dollars on your taxes every year.
If you purchase supplies at Walmart, Staples, Office Depot, etc. save your receipts in a No. 10 envelope. Label the envelopes by month and store them in a zipper pouch in your binder.
Start Writing Down Your Mileage
Go to Walmart, Target, or your office supply superstore and buy a mileage log. They cost about three bucks, and can save you close to a thousand dollars over the course of the year.
Starting today – You need to write down the beginning mileage on your vehicle. Every time you get in the car to run to the post office, check out a new fact, or anything related to your writing business – write it down.
You need to record your beginning and ending mileage. Jot down a quick note about where you went, or why you went there. It doesn’t have to be a novel or anything fancy. Post Office, bank, library – just something to leave a trail of how it was business related.
Save all of your auto related receipts as well. The government lets you deduct your actual travel related expenses, or the mileage deduction (56¢ this year), whichever is greater. To ensure the largest deduction you need to save your car payment stubs, insurance payment records, gas receipts, repair bills, oil change receipts, anything related to your car. Grab another No. 10 envelope for each month, and label it auto expenses.
Free Book June 13 - 17: Author Bookkeeping Made Easy
Here's a short preview of my latest book, Author Bookkeeping Made Easy. You can grab a free copy on Kindle June 13 - June 17 by visiting this link. (After you've had a chance to read it, please stop back to Amazon and leave an honest review. It will help me with my writing, and it will help other readers decide whether it can help them with their author bookkeeping needs.)Why you need to read this book
Authors work with words. Accountants work with numbers. So what does bookkeeping have to do with writing, you may ask?
Good question.
The answer could mean thousands of extra dollars in your back pocket.
Too many authors get so excited about the money rolling in they never bother to add it all up to see if they’re making a profit. Not until it’s too late, anyway.
To run a successful writing business you need to make a profit. The more profit you make, the healthier your business is. Unfortunately, too many authors never stop to look at the big picture. They assume that because the money keeps flowing in, they must be making a profit.
I felt the same way the first year my books were on Kindle. I earned nearly ten thousand dollars in royalties that year, and I naturally assumed I was making money. Every time I turned around there was another deposit in my bank account. I had to be making money. The thing is when I totaled it all up at the end of the year I really only made a couple thousand bucks.
How could that be?
Simple answer: I spent more money than the royalties I received. The long answer was I kept spending money I should have socked away. I bought a new laptop, another iPhone, a Kindle, and don’t forget Fiverr. I commissioned 179 Fiverr’s over the course of one year – covers, infographics, videos, you name it.
Smart author’s tie their spending to their cash flow. If they project $10,000 in royalties, they determine they can spend a certain amount for research and goodies. If they project $25,000 in royalties they allow themselves to spend a few bucks more tracking down that last scrap of necessary research, designing one more alternate cover, or acquiring the latest greatest electronic gadget.
Of course, research expenses, covers, and computer equipment, are only a few of the ingredients involved in planning cash flow. Authors need to look at all of their expenses when they make cash flow projections.
A simple author’s budget would likely have many of the expenses listed below:
1) Research expenses2) Books3) Travel4) Review copies5) Art work (for covers, promotions, flyers, etc.)6) Gas and mileage for your car7) Advertisements to promote your books8) Google AdWords / Facebook Ads9) Equipment (computers, printers, etc.)
While not an all-inclusive list, this will give you an idea of the expenses you need to track. You also need to track your sources of income.
These are some of the income sources you’re likely to encounter:
1) Kindle royalties2) Create Space royalties3) Smashwords royalties4) Barnes & Noble royalties5) Google Play & Google Books royalties
What this book is going to do is help you take a better look at your income and expenses.
We’re going to examine several different methods of tracking your expenses. GoDaddy Bookkeeping (formerly known as Outlook) is an easy to use program that makes it more convenient for authors to record their earnings and expenses. Some authors prefer simpler methods, such as using an Excel spreadsheet or a paper journal.
Accounting solutions such as GoDaddy Bookkeeping can make things easier by automatically importing transaction information from your checking accounts and credit card accounts. It gives you the ability to set up separate income and expense accounts that make the program more flexible.
In my case, I set up separate income accounts for my Create Space, Smashwords, Barnes & Noble & ACX royalty payments so I could track that data alongside of my Kindle royalties. I will go into more detail on this later and show you how to do it.
Before I go any further let me tell you a little more about me, so you can understand why I’m the right guy to help you with your author accounting needs.Why Listen to Me?Hey there, Nick Vulich here.
Although I’m relatively unknown in the publishing world, it’s not for lack of trying. I’ve published more than thirty books over the last several years. Most of them are available as paperbacks, eBooks, and most recently as audio books.
What that means is I’ve been there, and done that. I know what it’s like to go to work every day, come home, spend time with the family, spend half the night working on your new book, and get up early the next morning to drag your ass through it all over again.
One thing you’ll discover is I’m not shy about telling you what I think.
I’ve run an online business selling on eBay and Amazon for the past fifteen years. Much of what I cover in this book is adapted from what I learned in those businesses. If I tell you about a tax deduction, tax credit, or computer program that can help you along the way, it’s because I use those programs and I know they work.
If I’ve just heard about something, but have never tried it, I’ll tell you that up front.Let’s get started
Don’t sweat it.
Modern accounting programs have simplified everything so you don’t need to know the difference between a debit and a credit.
If you can punch your sales and expenses into the right category these programs will work their magic and show you the final results – whether you made a profit or a loss.
Get Organized
The first thing you’re going to need is a system to organize and store your receipts and records. Some authors use a file cabinet. Some use expandable file folders. I like to use loose-leaf binders. I normally select a five inch binder, monthly divider inserts, and storage pocket inserts.
Storing everything this way keeps all of my business records readily accessible, and the binder fits neatly on my bookshelf. I can store fifteen years of business records side-by-side in a relatively small space.
Save Your Receipts
Get used to it now. You need to save all of your receipts.
When you buy something online, print out the invoice, punch it with a three hole punch, and store it in your three ring binder under the month of purchase.
Save all of your mortgage or rent receipts, utility bills, phone bills, cable bills, sewer bills, etc. Store them in a zipper pouch in your binder. You’re going to need them to file for the home office deduction. It’s going to save you thousands of dollars on your taxes every year.
If you purchase supplies at Walmart, Staples, Office Depot, etc. save your receipts in a No. 10 envelope. Label the envelopes by month and store them in a zipper pouch in your binder.
Start Writing Down Your Mileage
Go to Walmart, Target, or your office supply superstore and buy a mileage log. They cost about three bucks, and can save you close to a thousand dollars over the course of the year.
Starting today – You need to write down the beginning mileage on your vehicle. Every time you get in the car to run to the post office, check out a new fact, or anything related to your writing business – write it down.
You need to record your beginning and ending mileage. Jot down a quick note about where you went, or why you went there. It doesn’t have to be a novel or anything fancy. Post Office, bank, library – just something to leave a trail of how it was business related.
Save all of your auto related receipts as well. The government lets you deduct your actual travel related expenses, or the mileage deduction (56¢ this year), whichever is greater. To ensure the largest deduction you need to save your car payment stubs, insurance payment records, gas receipts, repair bills, oil change receipts, anything related to your car. Grab another No. 10 envelope for each month, and label it auto expenses.
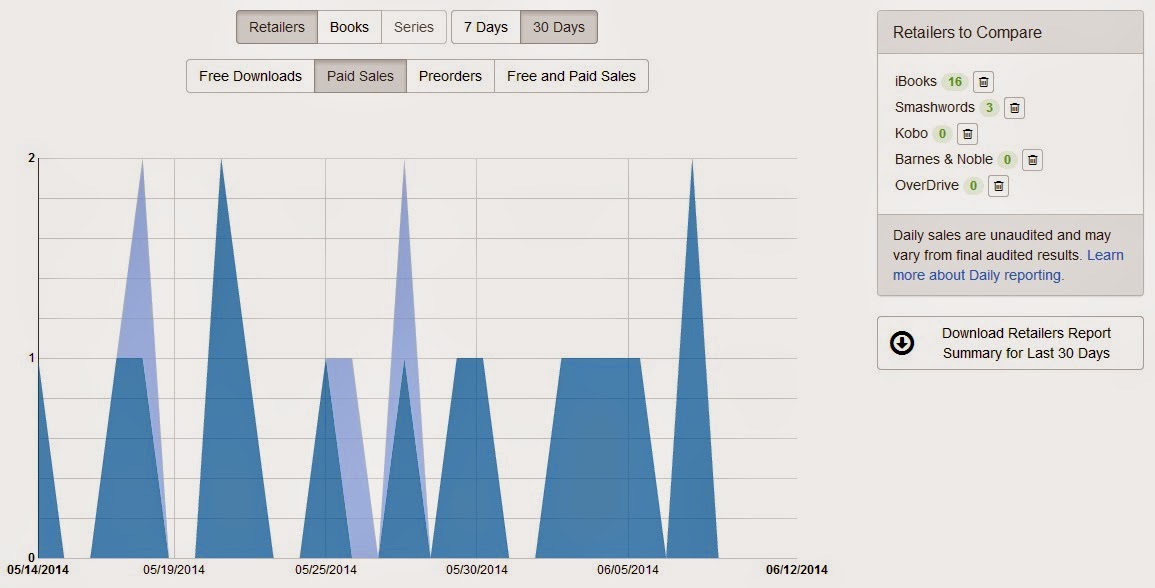
New Sales Tracking Tool for Smashwords Users
One of the most frustrating things about selling on Smashwords has always the lag time between making a sale, and having it reported in your sales dashboard. It used to take a month or two before you knew if your books were selling.
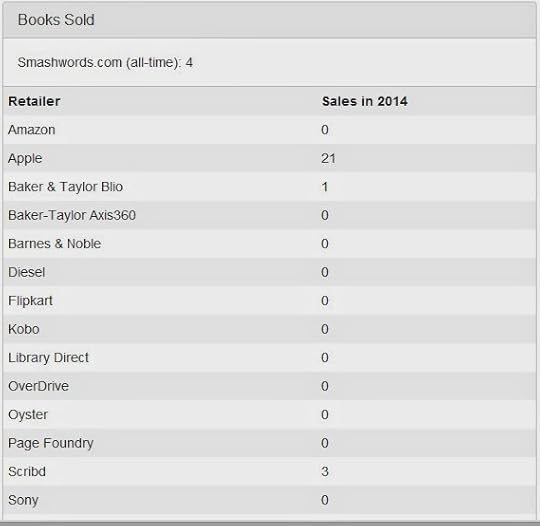
Yesterday (06/11) they came out with a great new tool that gives you daily sales updates for iBooks, Kobo, Barnes & Noble, and Smashwords. You can find it at the top of your dashboard in the sales reporting box. Click on daily sales, and it will take you to the page shown below.
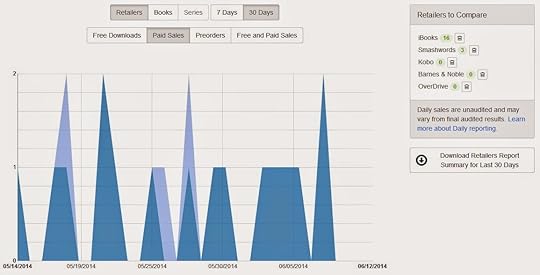
Yesterday (06/11) they came out with a great new tool that gives you daily sales updates for iBooks, Kobo, Barnes & Noble, and Smashwords. You can find it at the top of your dashboard in the sales reporting box. Click on daily sales, and it will take you to the page shown below.
June 6, 2014
Publishing Your Book to Smashwords - A Quick Tutorial
I have a love hate affair with Smashwords. Here’s the link to visit their website - https://www.smashwords.com/.
I’m happy for the opportunity to get my books on all of the sites they support, but I can’t for the life of me figure out how to configure a manuscript to get it through their “meatgrinder.” The good news is I don’t have to.
After a week of pulling out my hair and fighting urges to smash my laptop against the wall I found a guy on Fiverr who’ll do all the work for me for five bucks. His Fiverr id is Bookaholic, and he does the job in three days or less. If you want to check out his gig here’s the link.
http://www.fiverr.com/bookaholic/format-your-ebook-for-smashwords-to-pass-autovetter.
Here’s the least you need to know about Smashwords. They’re a third party aggregator that posts content on their own website, and on other eBook sites. Some of the sites they make your books available on include:AmazonAppleBaker & Taylor Blio Baker-Taylor Axis 360 Barnes & Noble FlipkartKobo Library Direct Oyster Page Foundry Scribd
The big three are Apple, Kobo, and Barnes & Noble.
Apple is the toughest nut for independent authors to crack on their own because Apple requires you to use their own eBook authoring software that only runs on – you guessed it – an Apple computer.
Publishing your book
Smashwords does all of the heavy lifting for you. When you submit a manuscript to them it gets run through their “meatgrinder.” This is what converts your manuscript into all the different formats they need to publish your book on other sites. In order to do this they have very specific guidelines your manuscript needs to conform to.
For the sake of my own sanity and this book I’m not going to cover their exact requirements. I suggest using the Fiverr gig by Bookaholic.
If you want to go it on your own you should check out the Smashwords Style Guide by Mark Coker. You can get your free copy here. http://www.smashwords.com/books/view/52.
Your cover art may also need some minor tweaking to work with Smashwords. They require your cover to be a minimum of 1400 pixels wide, with a height greater than the width. You can resize your cover using paint, or ask your designer to redo it for you.……….
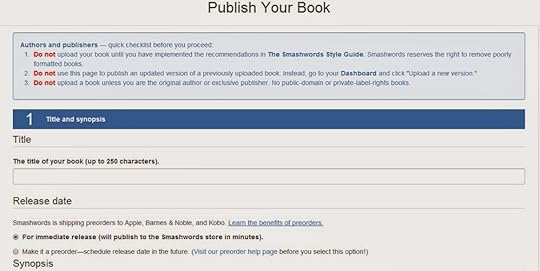
Once you have your manuscript and cover ready publishing on Smashwords is easy. Click on publish in the author dashboard. Most everything is self-explanatory.
The pricing and sampling section is different than on Amazon. You have the option to make your book permanently free on Smashwords. To do this select make my book free. Authors generally do this when they want to make their book permanently free on Amazon or other eBook sites. You’re also given the option to let my readers determine the price. If you’re feeling lucky give this one a try. Readers can pay whatever they think your book is worth. Keep in mind, if you use this option, Barnes and Noble won’t publish your book if you submit it through Smashwords. The final option is charge a specific price for my book. Use this section to set the price you want for your book.
The section immediately after this lets you to set up sampling. Amazon automatically sets sampling or the look inside feature to ten percent. Smashwords lets you select the sample size for your book. Twenty percent is the default setting. They suggest fifteen percent for full size books and thirty percent for short stories. Choose the preview amount you’re comfortable giving away.
Section 5 lets you select the eBook formats to make your book available in. By default all of the formats are selected. My suggestion is to leave it like that.
After you’ve completed all of the steps, select yes, I agree in Section 8 and Smashwords will begin to process your book.
Once you select yes, I agree your book goes into a queue waiting to be processed. When processing is completed you receive an email saying congratulations your book passed the vetting process, or you will receive a message that your book had issues going through the autovetter. If you had autovetter issues you can correct them, and resubmit your manuscript.

As soon as you receive the congratulations message your book goes on sale on the Smashwords site. It also goes into review for premium distribution, which means it is good to be sold on other sites like Apple, Kobo, and Scribd. Most often it takes about a week to review your book and get it set up for premium distribution.
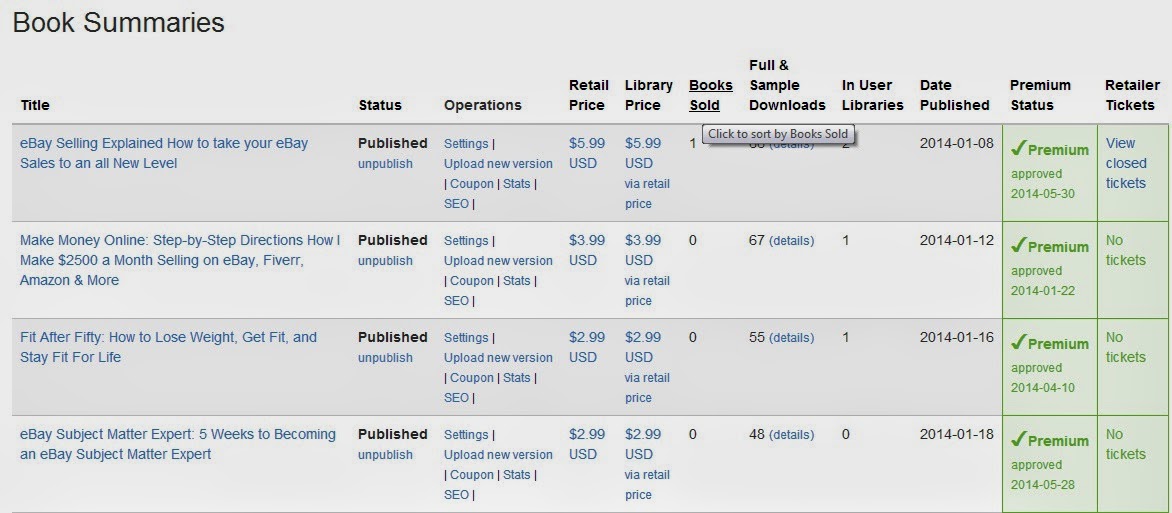
You can check the progress in your dashboard. The second to the last column at the far right of each book summary shows the premium status. When your book has been accepted it will show premium approved, and the date of approval. If there is an issue getting approved, you will be able to see the error code in the next column – retailer tickets. As soon as you correct the error you can resubmit your book.
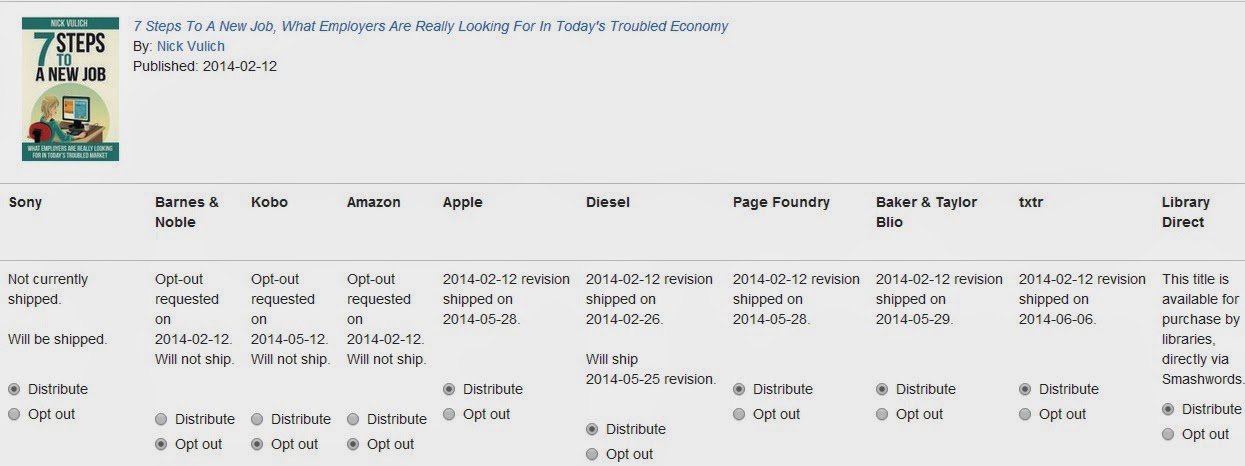
Selecting distribution channels
After you submit your book you have one last task to complete, you need to select your distribution channels. To do this select channel manager in the box labeled Marketing & Distribution Tools.
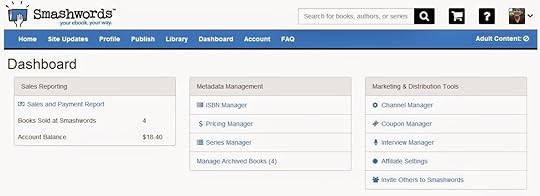
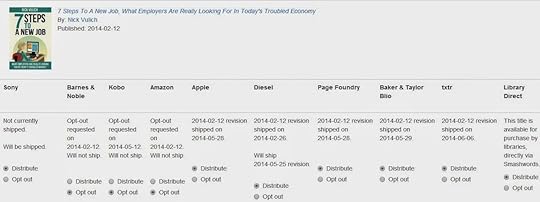
When you click into the channel manager the first thing you see is an explanation of the royalties paid selling your book on the different sites. To select your sales channels scroll further down the page until you see your first book cover. Smashwords shows you the different channels available and gives you the option to Distribute or Opt Out of each channel.
I list my books on Amazon, Barnes & Noble, and Kobo for myself so I choose to opt out of those three programs. This way I receive payment directly from both sites, and don’t have to pay a commission on those sales to Smashwords. Others authors prefer the convenience of doing it all through Smashwords and just having one distributor. You can always change your distribution options later, if you decide to publish to those channels on your own. I did this with Kobo when I discovered how easy it was to use their Writing Lifeinterface.
After you’ve selected your channels to sell on it normally takes anywhere from one to four weeks for your books to start selling on those sites.
As expected, Apple is the most difficult vendor to work with.
When you format your manuscript make sure to remove all of the links to other eBook sites. I know I missed this step on several of my manuscripts. I usually include a clickable bibliography with links to where readers can find those books on Amazon or Google Books. That’s a big no no with Apple, unless you change to links to books in the iStore.
Another area I’ve been caught with my pants down on was where I included a link to my book on Amazon to ask for a review. Apple will reject your book if you link to Amazon, or even if you just mention that readers should stop back to Amazon to ask for a review.
To make it easy on yourself thoroughly check your book for links to other eBook sites and remove all of them.
Payment
Payments are made quarterly on Smashwords. Authors can choose to receive payment by PayPal or check. The payment threshold for PayPal is $10.00, for checks the payment threshold is $75.00.
Payment dates are:January 31st (for sales in October, November, and December)April 30th (for sales in January, February, and March)July 31st (for sales in April, May, and June)October 31st (for sales in July, August, and September)
To check out Smashwords FAQs click this link - http://www.smashwords.com/about/supportfaq#Royalties.
I’m happy for the opportunity to get my books on all of the sites they support, but I can’t for the life of me figure out how to configure a manuscript to get it through their “meatgrinder.” The good news is I don’t have to.
After a week of pulling out my hair and fighting urges to smash my laptop against the wall I found a guy on Fiverr who’ll do all the work for me for five bucks. His Fiverr id is Bookaholic, and he does the job in three days or less. If you want to check out his gig here’s the link.
http://www.fiverr.com/bookaholic/format-your-ebook-for-smashwords-to-pass-autovetter.
Here’s the least you need to know about Smashwords. They’re a third party aggregator that posts content on their own website, and on other eBook sites. Some of the sites they make your books available on include:AmazonAppleBaker & Taylor Blio Baker-Taylor Axis 360 Barnes & Noble FlipkartKobo Library Direct Oyster Page Foundry Scribd
The big three are Apple, Kobo, and Barnes & Noble.
Apple is the toughest nut for independent authors to crack on their own because Apple requires you to use their own eBook authoring software that only runs on – you guessed it – an Apple computer.
Publishing your book
Smashwords does all of the heavy lifting for you. When you submit a manuscript to them it gets run through their “meatgrinder.” This is what converts your manuscript into all the different formats they need to publish your book on other sites. In order to do this they have very specific guidelines your manuscript needs to conform to.
For the sake of my own sanity and this book I’m not going to cover their exact requirements. I suggest using the Fiverr gig by Bookaholic.
If you want to go it on your own you should check out the Smashwords Style Guide by Mark Coker. You can get your free copy here. http://www.smashwords.com/books/view/52.
Your cover art may also need some minor tweaking to work with Smashwords. They require your cover to be a minimum of 1400 pixels wide, with a height greater than the width. You can resize your cover using paint, or ask your designer to redo it for you.……….
Once you have your manuscript and cover ready publishing on Smashwords is easy. Click on publish in the author dashboard. Most everything is self-explanatory.
The pricing and sampling section is different than on Amazon. You have the option to make your book permanently free on Smashwords. To do this select make my book free. Authors generally do this when they want to make their book permanently free on Amazon or other eBook sites. You’re also given the option to let my readers determine the price. If you’re feeling lucky give this one a try. Readers can pay whatever they think your book is worth. Keep in mind, if you use this option, Barnes and Noble won’t publish your book if you submit it through Smashwords. The final option is charge a specific price for my book. Use this section to set the price you want for your book.

The section immediately after this lets you to set up sampling. Amazon automatically sets sampling or the look inside feature to ten percent. Smashwords lets you select the sample size for your book. Twenty percent is the default setting. They suggest fifteen percent for full size books and thirty percent for short stories. Choose the preview amount you’re comfortable giving away.
Section 5 lets you select the eBook formats to make your book available in. By default all of the formats are selected. My suggestion is to leave it like that.
After you’ve completed all of the steps, select yes, I agree in Section 8 and Smashwords will begin to process your book.
Once you select yes, I agree your book goes into a queue waiting to be processed. When processing is completed you receive an email saying congratulations your book passed the vetting process, or you will receive a message that your book had issues going through the autovetter. If you had autovetter issues you can correct them, and resubmit your manuscript.
As soon as you receive the congratulations message your book goes on sale on the Smashwords site. It also goes into review for premium distribution, which means it is good to be sold on other sites like Apple, Kobo, and Scribd. Most often it takes about a week to review your book and get it set up for premium distribution.
You can check the progress in your dashboard. The second to the last column at the far right of each book summary shows the premium status. When your book has been accepted it will show premium approved, and the date of approval. If there is an issue getting approved, you will be able to see the error code in the next column – retailer tickets. As soon as you correct the error you can resubmit your book.
Selecting distribution channels
After you submit your book you have one last task to complete, you need to select your distribution channels. To do this select channel manager in the box labeled Marketing & Distribution Tools.

When you click into the channel manager the first thing you see is an explanation of the royalties paid selling your book on the different sites. To select your sales channels scroll further down the page until you see your first book cover. Smashwords shows you the different channels available and gives you the option to Distribute or Opt Out of each channel.
I list my books on Amazon, Barnes & Noble, and Kobo for myself so I choose to opt out of those three programs. This way I receive payment directly from both sites, and don’t have to pay a commission on those sales to Smashwords. Others authors prefer the convenience of doing it all through Smashwords and just having one distributor. You can always change your distribution options later, if you decide to publish to those channels on your own. I did this with Kobo when I discovered how easy it was to use their Writing Lifeinterface.
After you’ve selected your channels to sell on it normally takes anywhere from one to four weeks for your books to start selling on those sites.
As expected, Apple is the most difficult vendor to work with.
When you format your manuscript make sure to remove all of the links to other eBook sites. I know I missed this step on several of my manuscripts. I usually include a clickable bibliography with links to where readers can find those books on Amazon or Google Books. That’s a big no no with Apple, unless you change to links to books in the iStore.
Another area I’ve been caught with my pants down on was where I included a link to my book on Amazon to ask for a review. Apple will reject your book if you link to Amazon, or even if you just mention that readers should stop back to Amazon to ask for a review.
To make it easy on yourself thoroughly check your book for links to other eBook sites and remove all of them.
Payment
Payments are made quarterly on Smashwords. Authors can choose to receive payment by PayPal or check. The payment threshold for PayPal is $10.00, for checks the payment threshold is $75.00.

Payment dates are:January 31st (for sales in October, November, and December)April 30th (for sales in January, February, and March)July 31st (for sales in April, May, and June)October 31st (for sales in July, August, and September)
To check out Smashwords FAQs click this link - http://www.smashwords.com/about/supportfaq#Royalties.
Publishing Your Book to Kobo - A Quick Tutorial
Kobo is the easiest to use self-publishing site I’ve ever come across. You can access the site by following this link. http://www.kobo.com/writinglife
To read the Kobo user manual, click on this link. http://download.kobobooks.com/writinglife/Kobo/en-US/KWL-User-Guide.pdf
……….
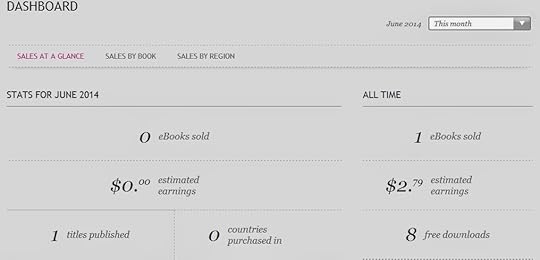
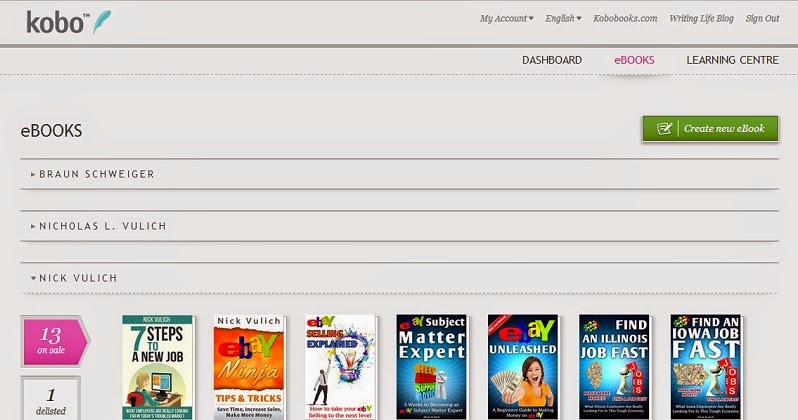
As soon asyou sign into Kobo you will be taken to your seller dashboard. The dashboard is the money center of Kobo. It shows you how many eBooks you’ve sold, and your estimated earnings.
At the top of this page, just below where it says Kobo you’ll see three tabs – dashboard, eBooks, and learning center. As we already talked about, dashboard highlights your sales and earnings. eBooks is where you set up new books for publication, and the learning center is where you turn for more help in listing your books and increasing sales on Kobo.
………..
To list your first book with Kobo, click on eBooks at the top of the page.

Select the green tab that says create new book. Listing your book is broken down into five steps. Describe your eBook Add eBook content Choose content rightsSet the pricePublish your eBook
The form is intuitive and easy to use.
Fill in your title, subtitle, and series name if your book is part of a series. Under author, list your name, or the pen name you write under. The great thing is Kobo sets up a separate section with the books published under each author name, so you can keep your books separated by each pen name you write under.
If you have your own publisher name or imprint you can list it. Towards the middle of the page there’s a section where you can list your ISBN number if you have one, otherwise leave it blank and Kobo will assign an identifier for your book.
Across from the ISBN information, there’s a spot where you can add categories for your book. Kobo lets you select three categories. Try to use all three of them.
At the very bottom of the page you enter your synopsis or book description. Kobo doesn’t allow you to use HTML, but they do have a formatting tool similar to MS Word where you can bold or italicize content. There’s also a tool to add bullet points or line numbering to your description.
Moving back up towards the top of the page, click on the cover box to upload your cover image.
Click next to move to the section labeled Add eBook content. This is where you upload your book file. Kobo accepts your manuscript in the following formats – .epub, .doc, .docx, mobi, and .odt. After you upload your book file you can check it out by selecting download and preview this eBook. If everything looks good, click on next to move to the next section.
Choose content rights lets you select your book rights. Digital Rights Management (DRM) protects your book from copying and pirating. Geographic rights helps Kobo determine where you have legal rights to sell your book.
Click on Save and next to move to the next section. This is where you set your prices. To receive the 70 percent royalty you need to price your book between $1.99 and $12.99 in U S Dollars. If you price your book under $1.99, or over $12.99 you will receive a 45 percent royalty. As you set your prices, Kobo shows the royalty percentage and dollar amount in the two far right columns. You can set all of your geographic prices based on the U S price, or you can set a separate price for each geographic area.
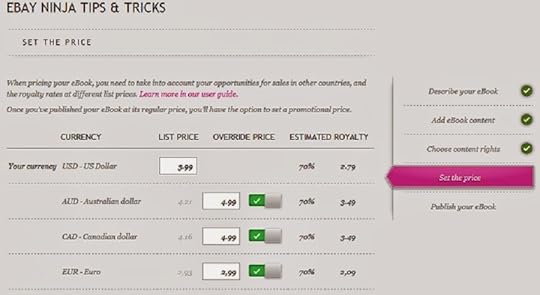
This section also lets you set special promotional prices. Click on Select promo price, and it brings up a new section to set up your promo prices. First off, you need to select the special promo price, and then choose the start and end dates for your promo. You can set up your special in all territories, or choose just one geographic area for your promo.
After you’ve finished setting up your pricing, click Save and next. This takes you to the final section where you publish your book. You can select the date you want your book to go live, or just click the green Publish button and your book will go on sale as soon as Kobo finishes reviewing your book (normally 12 to 24 hours).
……….
If you needto edit your book or change prices, go to the section labeled eBooks, and select the book you want to change. Make your changes, and when you’re finished click publish. Most changes filter through the system in under an hour, but it can take twelve hours or more.
……….
I’m new to Kobo so I really can’t give you any advice on what sales are like. I’ve heard people say their sales were good, especially in Canada. I will keep updating this as time goes by, and sales start rolling in.
To receive a 70 percent royalty you need to price your book between $1.99 and $12.99 in U S Dollars. If you price below $1.99, or over $12.99 you receive a 45 percent royalty. That’s ten percent higher than you get from Amazon for pricing books outside of their sweet spot. If you have a paperback version of your book, Kobo requires you to price the Kobo version at least 20 percent lower than the physical copy to receive their maximum royalty payment.
One other thing to keep in mind is Kobo deducts taxes from your royalties when books are sold in European countries. They take 20 percent for the VAT tax in Great Britain, and 3 percent for the VAT tax in countries within the European Union. As a result, it is suggested you mark your prices up by this amount when selling in these countries. The Kobo Writing Life UserGuide has more complete information on this.
Royalty payments are paid out monthly if your royalties are over $100 for the month. If you don’t reach the $100 level in a six month period, they will pay out what you have earned up to that point. Funds are deposited directly into the bank account you placed on file when signing up.

To read the Kobo user manual, click on this link. http://download.kobobooks.com/writinglife/Kobo/en-US/KWL-User-Guide.pdf
……….
As soon asyou sign into Kobo you will be taken to your seller dashboard. The dashboard is the money center of Kobo. It shows you how many eBooks you’ve sold, and your estimated earnings.
At the top of this page, just below where it says Kobo you’ll see three tabs – dashboard, eBooks, and learning center. As we already talked about, dashboard highlights your sales and earnings. eBooks is where you set up new books for publication, and the learning center is where you turn for more help in listing your books and increasing sales on Kobo.
………..
To list your first book with Kobo, click on eBooks at the top of the page.
Select the green tab that says create new book. Listing your book is broken down into five steps. Describe your eBook Add eBook content Choose content rightsSet the pricePublish your eBook
The form is intuitive and easy to use.
Fill in your title, subtitle, and series name if your book is part of a series. Under author, list your name, or the pen name you write under. The great thing is Kobo sets up a separate section with the books published under each author name, so you can keep your books separated by each pen name you write under.
If you have your own publisher name or imprint you can list it. Towards the middle of the page there’s a section where you can list your ISBN number if you have one, otherwise leave it blank and Kobo will assign an identifier for your book.
Across from the ISBN information, there’s a spot where you can add categories for your book. Kobo lets you select three categories. Try to use all three of them.
At the very bottom of the page you enter your synopsis or book description. Kobo doesn’t allow you to use HTML, but they do have a formatting tool similar to MS Word where you can bold or italicize content. There’s also a tool to add bullet points or line numbering to your description.
Moving back up towards the top of the page, click on the cover box to upload your cover image.
Click next to move to the section labeled Add eBook content. This is where you upload your book file. Kobo accepts your manuscript in the following formats – .epub, .doc, .docx, mobi, and .odt. After you upload your book file you can check it out by selecting download and preview this eBook. If everything looks good, click on next to move to the next section.
Choose content rights lets you select your book rights. Digital Rights Management (DRM) protects your book from copying and pirating. Geographic rights helps Kobo determine where you have legal rights to sell your book.
Click on Save and next to move to the next section. This is where you set your prices. To receive the 70 percent royalty you need to price your book between $1.99 and $12.99 in U S Dollars. If you price your book under $1.99, or over $12.99 you will receive a 45 percent royalty. As you set your prices, Kobo shows the royalty percentage and dollar amount in the two far right columns. You can set all of your geographic prices based on the U S price, or you can set a separate price for each geographic area.

This section also lets you set special promotional prices. Click on Select promo price, and it brings up a new section to set up your promo prices. First off, you need to select the special promo price, and then choose the start and end dates for your promo. You can set up your special in all territories, or choose just one geographic area for your promo.
After you’ve finished setting up your pricing, click Save and next. This takes you to the final section where you publish your book. You can select the date you want your book to go live, or just click the green Publish button and your book will go on sale as soon as Kobo finishes reviewing your book (normally 12 to 24 hours).
……….
If you needto edit your book or change prices, go to the section labeled eBooks, and select the book you want to change. Make your changes, and when you’re finished click publish. Most changes filter through the system in under an hour, but it can take twelve hours or more.
……….
I’m new to Kobo so I really can’t give you any advice on what sales are like. I’ve heard people say their sales were good, especially in Canada. I will keep updating this as time goes by, and sales start rolling in.

To receive a 70 percent royalty you need to price your book between $1.99 and $12.99 in U S Dollars. If you price below $1.99, or over $12.99 you receive a 45 percent royalty. That’s ten percent higher than you get from Amazon for pricing books outside of their sweet spot. If you have a paperback version of your book, Kobo requires you to price the Kobo version at least 20 percent lower than the physical copy to receive their maximum royalty payment.
One other thing to keep in mind is Kobo deducts taxes from your royalties when books are sold in European countries. They take 20 percent for the VAT tax in Great Britain, and 3 percent for the VAT tax in countries within the European Union. As a result, it is suggested you mark your prices up by this amount when selling in these countries. The Kobo Writing Life UserGuide has more complete information on this.
Royalty payments are paid out monthly if your royalties are over $100 for the month. If you don’t reach the $100 level in a six month period, they will pay out what you have earned up to that point. Funds are deposited directly into the bank account you placed on file when signing up.
Publishing Your Books On Google Play & Google Books - A Quick Tutorial
Google Play and Google Books offer another platform for authors to sell their books on.

Google Books is the world’s largest repository of out-of-print and current books. Readers can search through millions of books looking for information on a particular subject, and Google Books will show them the pages in your book that contain the search terms they are looking for. Every day readers, researchers, and authors turn to Google Books to find answers to their research questions.
When you list your book on Google Books it can open it up to an entirely new audience.
Google Play is Google’s version of Kindle or the iStore. They deliver books to readers who use their Android based platform. You can check out Google Play here https://play.google.com/store.
Getting started
To get started listing your books on Google go to https://play.google.com/books/publish/. If you’re not signed up for the Google Partners Program you will need to sign up for it first.
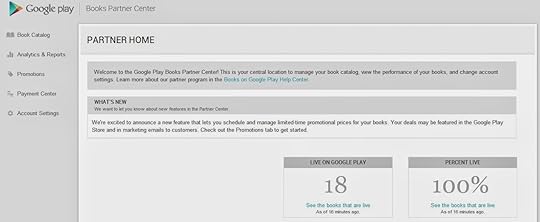
At the top of the browser page it says Google Play in the upper left corner. Below that you will see four tabs – Book Catalog, Analytics & Reports, Payment Center, and Account Settings.
Book Catalog is where you add new books. Select the Add Books tab, and follow the prompts. A pop up screen will ask you for a book identifier (ISBN). Type in your book’s ISBN. If it doesn’t have an ISBN click on the box below that. Click ok, and you will be taken to the next screen.
If Google can locate your book in its database it prepopulates all of the screens with the information available. If Google doesn’t find your book you will need to fill in all of the information. Where it asks for a biographical note, I paste in my Amazon author bio. Below that is a section labeled subjects. Use it to add categories for your book. Age groups lets you target different groups your book will appeal to.
If the description doesn’t pre-populate, copy and paste it from Amazon. When you are done filling in all of the info, click on save at the top of the page.
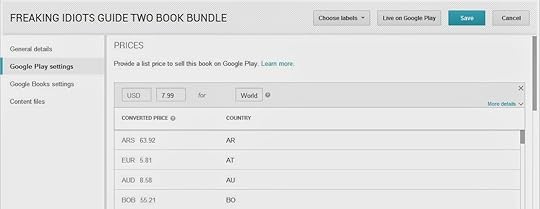
Click on Google Play Settings in the left hand column. The first thing you’re asked is to add a new price. Click on Add a new price. Type in the currency your book is priced in (For example US Dollars is USD). In the next box you need to type in the price (example 3.99). Finally, you’re asked to choose the location for that price. To make it easy, use “World.” If you have different prices for different locations, you would need to add each of them separately. Follow through the rest of the prompts on this page. If you are unsure how to answer hover your mouse over the question mark and it will guide you through answering the question. Click on save at the top of the page.
Click on Google Book Settings in the left hand column. The first question asks you to select the preview type, or the percentage of your book you want to make available to readers. Twenty percent is the default, or you can choose another preview amount from twenty to one hundred percent. If you have the book available for sale directly from your website, fill in the buy link text and buy link, otherwise leave these lines blank. The publisher link is the link to your publisher website if you have one, otherwise leave this line blank. You can also upload a publisher logo if desired. Click on save at the top of the page.
Click on Content Files in the left hand column. This is where you upload your book files. Your book file needs to be uploaded in PDF or epub formats. The cover should be uploaded as a JPEG. At the bottom of this page you have the option to upload a list of Quality Reviewers. To add someone as a quality reviewer they must have a Google account. Click on add, and enter their email address. Click ok, and continue doing this to add more reviewers. When you are finished click the save button at the top of the page. Your quality reviewers will be able to access your book on their PCs or on their reading devices.
Reports / Payment Center / Account Settings
I want to briefly outline the other three selections you see under Google Play in the far left column of your screen.
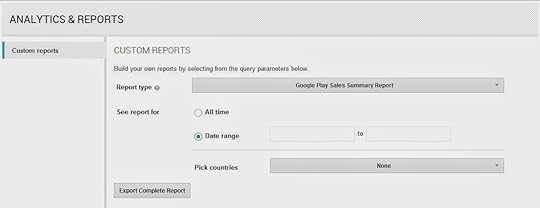
Analytics and reports lets you pull up reports regarding your book traffic and sales. The most irritating thing about Google is they don’t provide a sales dashboard where you can quickly review your sales and earnings. Each time you want to check sales you need to generate a new report and download it as an Excel spreadsheet. Can you say irritating? Hopefully the folks at Google will figure this one out and make it more “user friendly.”
The information in payment center needs to be completed before your books can go live on Google Play and Google Books. To get started, click on the payment center tab. Click on Add Payment profile. Give your payment profile a name, and fill in the information asked for – name, address, etc.
The first thing you need to do is set up your payment settings. By default you are set up to receive monthly payments with a $1.00 payment threshold. You can change your payment threshold to another dollar amount, or you can have Google hold your payments for a specified period (up to one year).
After you’ve completed this step, click on Add new bank account. Before you can finish setting up your bank account you need to wait for Google to make a test deposit to your account. When you see the deposit has been made to your account, click on Add new bank account again to verify the deposit amount.
Next you need to click on billing profile. Click on edit, and scroll down to tax profile. Enter your tax information in the online W9 form.
Scroll down to sales territories. Click on add a territory. Select a payment profile from the drop down menu. In the choose territories section most often you will type in “world.” If you only hold rights in certain areas, click on the question mark and it will tell you how to set up individual territories. If you’re subject to fixed pricing laws in any of the countries put a check mark in the box. If not, leave this box blank. Click on enable this region configuration, and select create territory.
The final section is Account Settings. Use it to ensure your contact information is correct, or to make any changes.
From signing up to verifying my account to listing my first books it took about seven days for my books to begin showing up in Google Play and Google Books.
Royalty rates and payments
I couldn’t find any mention of royalties in the Google Play FAQs. When I searched for it in their help section it said there were no help pages for that topic. I don’t know about anybody else, but that sort of scares me.
FYI: I sold my first book on Google Play three days after it went live. I set my list price at $4.99. Google discounted it to $3.60. They paid an after tax royalty based on a $3.00 selling price, so my royalty figured out to $1.56, or 52 percent. Lesson learned: Add at least $2.00 to your selling price to ensure you receive the royalty you were expecting. The end result is I made fifty cents less than I would have received selling the same book for $2.99 on Amazon.
The good news is Google pays thirty days after sales are made, not sixty days like Amazon and Barnes and Noble so you will receive your payments sooner. I made six sales my first month. My second month I sold twelve books so I’m not going to strike it rich, but over time as I move my bestselling books out of Amazon exclusivity I expect these sales to pick up.

Google Books is the world’s largest repository of out-of-print and current books. Readers can search through millions of books looking for information on a particular subject, and Google Books will show them the pages in your book that contain the search terms they are looking for. Every day readers, researchers, and authors turn to Google Books to find answers to their research questions.
When you list your book on Google Books it can open it up to an entirely new audience.
Google Play is Google’s version of Kindle or the iStore. They deliver books to readers who use their Android based platform. You can check out Google Play here https://play.google.com/store.
Getting started
To get started listing your books on Google go to https://play.google.com/books/publish/. If you’re not signed up for the Google Partners Program you will need to sign up for it first.
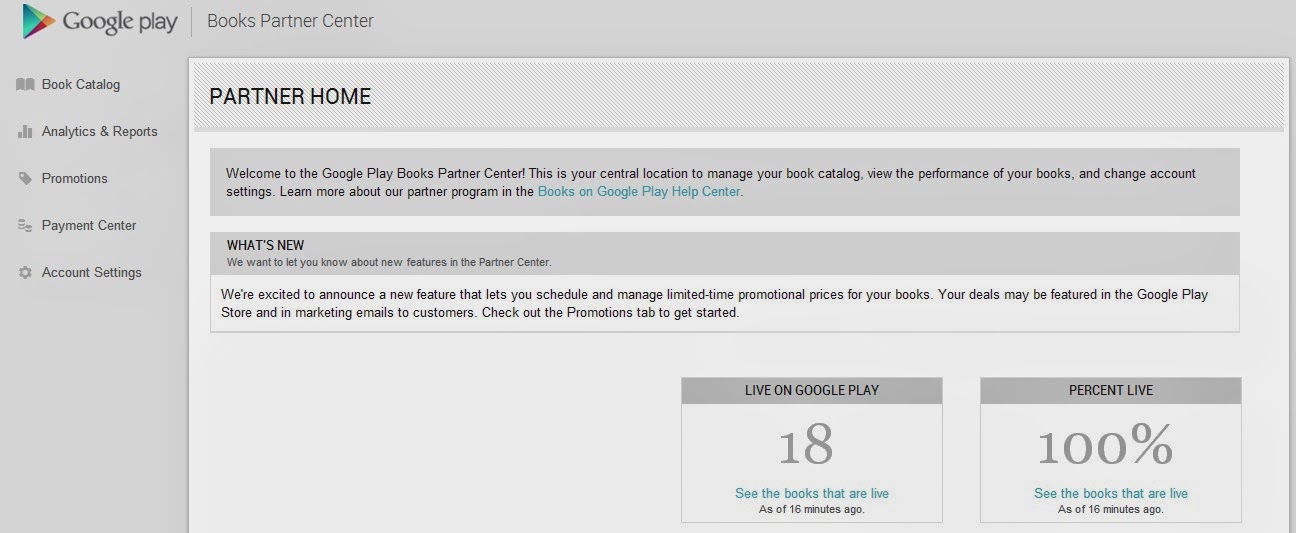
At the top of the browser page it says Google Play in the upper left corner. Below that you will see four tabs – Book Catalog, Analytics & Reports, Payment Center, and Account Settings.
Book Catalog is where you add new books. Select the Add Books tab, and follow the prompts. A pop up screen will ask you for a book identifier (ISBN). Type in your book’s ISBN. If it doesn’t have an ISBN click on the box below that. Click ok, and you will be taken to the next screen.
If Google can locate your book in its database it prepopulates all of the screens with the information available. If Google doesn’t find your book you will need to fill in all of the information. Where it asks for a biographical note, I paste in my Amazon author bio. Below that is a section labeled subjects. Use it to add categories for your book. Age groups lets you target different groups your book will appeal to.
If the description doesn’t pre-populate, copy and paste it from Amazon. When you are done filling in all of the info, click on save at the top of the page.
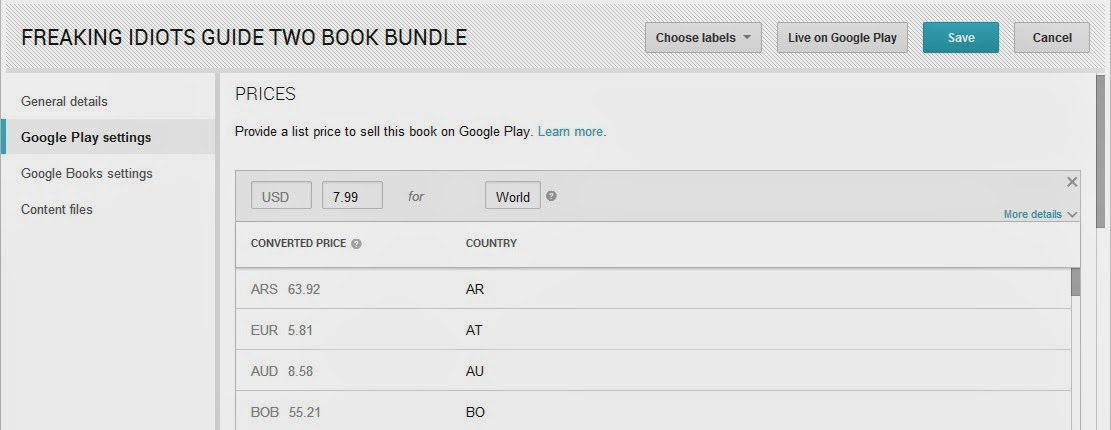
Click on Google Play Settings in the left hand column. The first thing you’re asked is to add a new price. Click on Add a new price. Type in the currency your book is priced in (For example US Dollars is USD). In the next box you need to type in the price (example 3.99). Finally, you’re asked to choose the location for that price. To make it easy, use “World.” If you have different prices for different locations, you would need to add each of them separately. Follow through the rest of the prompts on this page. If you are unsure how to answer hover your mouse over the question mark and it will guide you through answering the question. Click on save at the top of the page.
Click on Google Book Settings in the left hand column. The first question asks you to select the preview type, or the percentage of your book you want to make available to readers. Twenty percent is the default, or you can choose another preview amount from twenty to one hundred percent. If you have the book available for sale directly from your website, fill in the buy link text and buy link, otherwise leave these lines blank. The publisher link is the link to your publisher website if you have one, otherwise leave this line blank. You can also upload a publisher logo if desired. Click on save at the top of the page.
Click on Content Files in the left hand column. This is where you upload your book files. Your book file needs to be uploaded in PDF or epub formats. The cover should be uploaded as a JPEG. At the bottom of this page you have the option to upload a list of Quality Reviewers. To add someone as a quality reviewer they must have a Google account. Click on add, and enter their email address. Click ok, and continue doing this to add more reviewers. When you are finished click the save button at the top of the page. Your quality reviewers will be able to access your book on their PCs or on their reading devices.
Reports / Payment Center / Account Settings
I want to briefly outline the other three selections you see under Google Play in the far left column of your screen.
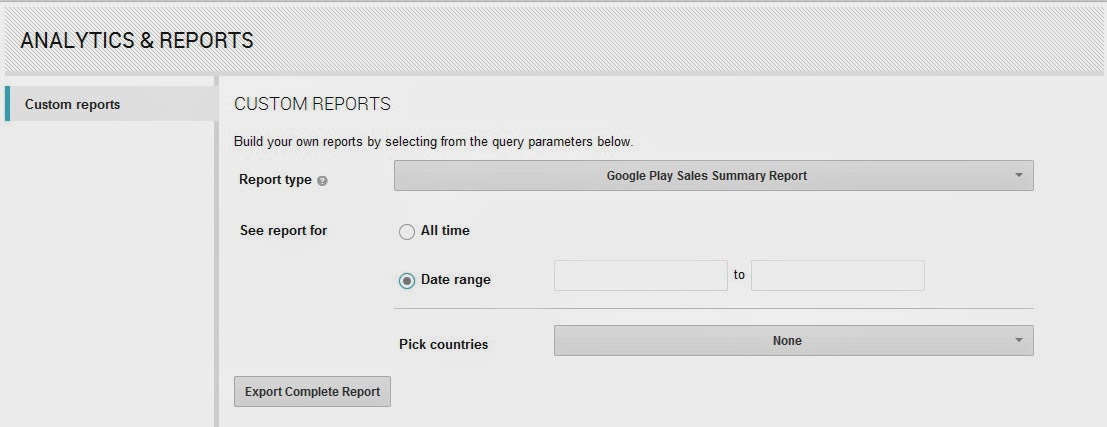
Analytics and reports lets you pull up reports regarding your book traffic and sales. The most irritating thing about Google is they don’t provide a sales dashboard where you can quickly review your sales and earnings. Each time you want to check sales you need to generate a new report and download it as an Excel spreadsheet. Can you say irritating? Hopefully the folks at Google will figure this one out and make it more “user friendly.”
The information in payment center needs to be completed before your books can go live on Google Play and Google Books. To get started, click on the payment center tab. Click on Add Payment profile. Give your payment profile a name, and fill in the information asked for – name, address, etc.
The first thing you need to do is set up your payment settings. By default you are set up to receive monthly payments with a $1.00 payment threshold. You can change your payment threshold to another dollar amount, or you can have Google hold your payments for a specified period (up to one year).
After you’ve completed this step, click on Add new bank account. Before you can finish setting up your bank account you need to wait for Google to make a test deposit to your account. When you see the deposit has been made to your account, click on Add new bank account again to verify the deposit amount.
Next you need to click on billing profile. Click on edit, and scroll down to tax profile. Enter your tax information in the online W9 form.
Scroll down to sales territories. Click on add a territory. Select a payment profile from the drop down menu. In the choose territories section most often you will type in “world.” If you only hold rights in certain areas, click on the question mark and it will tell you how to set up individual territories. If you’re subject to fixed pricing laws in any of the countries put a check mark in the box. If not, leave this box blank. Click on enable this region configuration, and select create territory.
The final section is Account Settings. Use it to ensure your contact information is correct, or to make any changes.
From signing up to verifying my account to listing my first books it took about seven days for my books to begin showing up in Google Play and Google Books.
Royalty rates and payments
I couldn’t find any mention of royalties in the Google Play FAQs. When I searched for it in their help section it said there were no help pages for that topic. I don’t know about anybody else, but that sort of scares me.
FYI: I sold my first book on Google Play three days after it went live. I set my list price at $4.99. Google discounted it to $3.60. They paid an after tax royalty based on a $3.00 selling price, so my royalty figured out to $1.56, or 52 percent. Lesson learned: Add at least $2.00 to your selling price to ensure you receive the royalty you were expecting. The end result is I made fifty cents less than I would have received selling the same book for $2.99 on Amazon.
The good news is Google pays thirty days after sales are made, not sixty days like Amazon and Barnes and Noble so you will receive your payments sooner. I made six sales my first month. My second month I sold twelve books so I’m not going to strike it rich, but over time as I move my bestselling books out of Amazon exclusivity I expect these sales to pick up.
Publishing Your Book to Barnes & Noble (Nook Press) - A Quick Tutorial
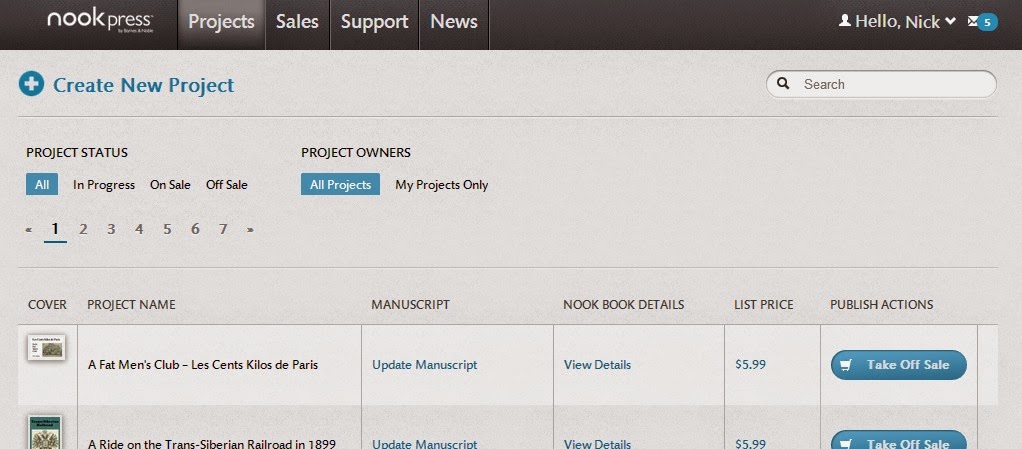
If you’re already publishing your books on Amazon, selling your books on Barnes & Noble is going to be an easy transition. To get started selling on Barnes & Noble you can follow this link https://www.nookpress.com/. Their self-publishing site is called Nook Press.
When I’m listing a new book I normally keep both sites open and cut and paste the required information from Amazon into Barnes & Noble.
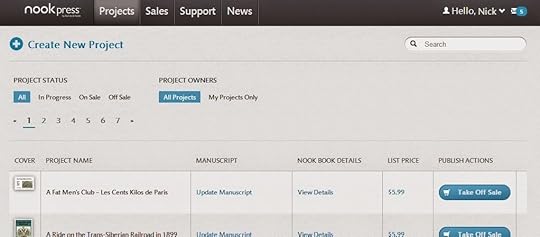
To list your book, click on Create new project. You’re asked to give your project a name. It can be the name of your book or another name you want to assign to it. The next screen that pops up asks you to upload your manuscript. You can use the same MS Word file you submitted to Amazon, just be sure to remove any references or links to Amazon in it.
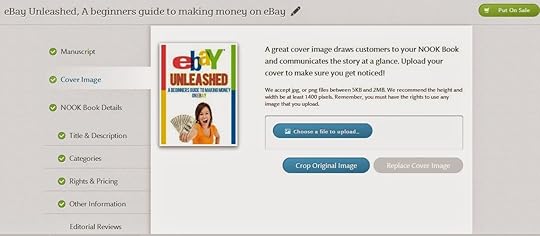
Once your manuscript has been uploaded, click on cover image to upload your book cover. After your cover has been uploaded you want to click on title & description. The first step is to update your title. Next you are given the option to include a publisher name. If you have your own imprint name put it here. If you don’t have your own publisher name leave this item blank.
Use contributors to include anyone who participated in creating your book – authors, co-authors, editors, illustrators, etc. Below this is a section for your book description. I paste mine in directly from Amazon. The next section lets you enter your author bio. Once again, I paste it directly from Amazon. The last question asks if you have an eBook specific ISBN. In most cases your answer will be no, and they will assign a free ISBN for your book. Be sure to click save and next at the top before you proceed, or you may lose all of your information.
After this you add categories. Barnes & Noble lets you select up to five categories, compared to only two with Kindle. Use all five categories if possible. Below this you are asked to enter keywords readers can search on to find your book. You are allowed 100 characters, and should separate each search term with a comma. At the bottom of this section you are asked to choose the appropriate audience for your book and the language your book is written in. Once again click on save and next at the top of the page.
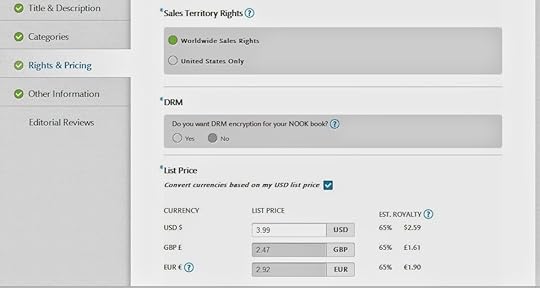
The next page asks for information on rights and pricing. Depending upon the rights you own select World sales rights or United States only. DRM lets you choose whether you want DRM encryption set up for your book. Finally, select your list price for the United States and the United Kingdom. When you are done entering this information click save and next.
The next section concerns book details. Answer these questions, and click on save and next.The final section allows you to enter editorial reviews. If you have some enter them here. If not click on save, and the publish button will turn green at the top. Click on it, and your book is ready to be published. One more screen pops up and asks you which version of your manuscript to use. The one you edited in the previewer (if you changed anything), or the original version you uploaded.After this, your book should be available for sale within eight to twelve hours.
Royalties and Payments
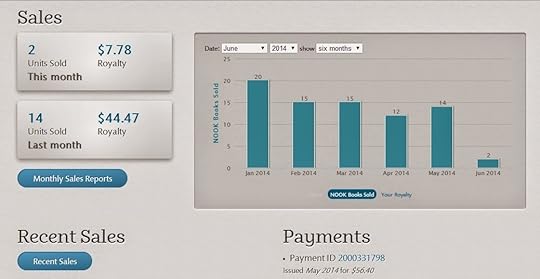
Barnes and Noble pay out royalties sixty days after they are earned. My experience is they are not as consistent with their payouts as Amazon. Some months the payment does not arrive until two or three days into the new month, so some months you won’t receive a payment.
Royalties are 40 percent for books priced under $2.98 or over $10.00. Royalties are sixty-five percent for books priced between $2.99 and $9.99.
My experience with Barnes and Noble has been mixed. I normally receive a forty to fifty dollar royalty payment, compared to a thousand or more from Kindle. Part of that may be that my four bestselling books are exclusive to Amazon, so it’s probably not a fair comparison. Over the next few months I plan on opting out of KDP and making all of my books available across all of the sites listed in this guide, so I will update my sales as things progress.
When I’m listing a new book I normally keep both sites open and cut and paste the required information from Amazon into Barnes & Noble.
To list your book, click on Create new project. You’re asked to give your project a name. It can be the name of your book or another name you want to assign to it. The next screen that pops up asks you to upload your manuscript. You can use the same MS Word file you submitted to Amazon, just be sure to remove any references or links to Amazon in it.
Once your manuscript has been uploaded, click on cover image to upload your book cover. After your cover has been uploaded you want to click on title & description. The first step is to update your title. Next you are given the option to include a publisher name. If you have your own imprint name put it here. If you don’t have your own publisher name leave this item blank.

Use contributors to include anyone who participated in creating your book – authors, co-authors, editors, illustrators, etc. Below this is a section for your book description. I paste mine in directly from Amazon. The next section lets you enter your author bio. Once again, I paste it directly from Amazon. The last question asks if you have an eBook specific ISBN. In most cases your answer will be no, and they will assign a free ISBN for your book. Be sure to click save and next at the top before you proceed, or you may lose all of your information.
After this you add categories. Barnes & Noble lets you select up to five categories, compared to only two with Kindle. Use all five categories if possible. Below this you are asked to enter keywords readers can search on to find your book. You are allowed 100 characters, and should separate each search term with a comma. At the bottom of this section you are asked to choose the appropriate audience for your book and the language your book is written in. Once again click on save and next at the top of the page.

The next page asks for information on rights and pricing. Depending upon the rights you own select World sales rights or United States only. DRM lets you choose whether you want DRM encryption set up for your book. Finally, select your list price for the United States and the United Kingdom. When you are done entering this information click save and next.
The next section concerns book details. Answer these questions, and click on save and next.The final section allows you to enter editorial reviews. If you have some enter them here. If not click on save, and the publish button will turn green at the top. Click on it, and your book is ready to be published. One more screen pops up and asks you which version of your manuscript to use. The one you edited in the previewer (if you changed anything), or the original version you uploaded.After this, your book should be available for sale within eight to twelve hours.
Royalties and Payments

Barnes and Noble pay out royalties sixty days after they are earned. My experience is they are not as consistent with their payouts as Amazon. Some months the payment does not arrive until two or three days into the new month, so some months you won’t receive a payment.
Royalties are 40 percent for books priced under $2.98 or over $10.00. Royalties are sixty-five percent for books priced between $2.99 and $9.99.
My experience with Barnes and Noble has been mixed. I normally receive a forty to fifty dollar royalty payment, compared to a thousand or more from Kindle. Part of that may be that my four bestselling books are exclusive to Amazon, so it’s probably not a fair comparison. Over the next few months I plan on opting out of KDP and making all of my books available across all of the sites listed in this guide, so I will update my sales as things progress.
June 5, 2014
Publishing Your Audio Book on ACX - A Quick Tutorial
 ACX is an Amazon company that sells books in the audio book format. They make audio books available on Audible, Amazon, and iTunes.
The least you need to know is audio books are still an emerging market. Compared to Amazon’s twenty-five million plus titles, Audible has just 150,000 audio books available. Over the next five years that number is expected to grow to over one million audio books. That puts audio books in the same position Kindle was in three or four years ago. Audio books are a growth market, and there’s plenty of opportunity for good books, producers, and narrators.
Getting started on ACX is easy for authors.
Visit ACX.com. Midway down the page you will see an address bar that asks you to enter your ISBN, book title, or author name. After you do this ACX will display your book, or a list of your books. To get started click on the This is my book tab, and you will be taken to the next step in the process.Select how you want to make your book available.
The choices are: I’m looking for someone to narrate and produce my audio book.I have this book in audio and I want to sell it. I will narrate my own book and upload it later.

The first option is what most authors should select. It will help you to find a qualified narrator to read and produce your book. When you select this option ACX shows you their book posting agreement. To proceed to the next step you need to read it over and click Agree & Continue.
On the next page you’re asked to fill in some general information about your book, and who it is directed at. The book description is prepopulated for you with the information from your Amazon book page. Where it asks for copyright information normally you are the copyright owner for the book and for the audio book. Fill this information in along with the year of copyright.
You’re asked if your book is fiction or nonfiction. Then you’re asked to select the one category that best describes your book.
Below that you need to answer some general questions about the ideal narrator’s voice you’re looking for. Try to be as specific as possible when you’re filling this section out. It will save you from listening to a lot of auditions that totally miss the mark on what you want.
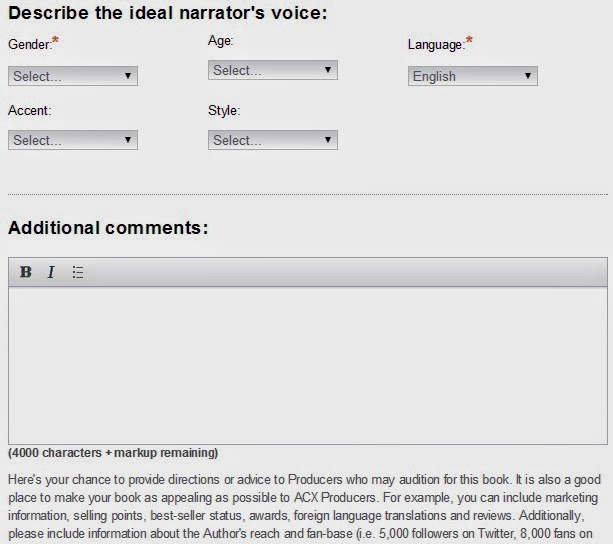
Use the additional comments section to list more information about your book, or about what you are looking for in a narrator. When I listed my books I talked about their ranking on Amazon, how many books I was selling monthly and weekly, and how I was promoting them. Producers told me this information was a big help to them in choosing my books because it helped them decide if the project would pay off for them or not.
I considered a few of my books marginal, meaning they were only selling a few copies a month in Kindle or paperback. I let producers know that, and explained to them the books were short, easy to produce, and while they might not make a lot of money on the project it could be fun. I think producers appreciated my honesty. All twenty-three of my projects were snapped up within a few days of listing them.
The last step on this page is to upload your audition script. You can upload a file, or link to a URL where you have the audition script located. ACX doesn’t give you a character length to use as a guideline. I generally upload three to five pages of text. Don’t just choose the first few pages of your manuscript. If your book is fiction, make sure it the section you upload has two or three different character voices so you can see how the narrator approaches them. If your book is nonfiction, include a section with quotes, to see how they voice them.
When I listen to the audition for this it gives me a good idea of what the final book will sound like.
After you’ve uploaded your sample click ok at the bottom of the page and you will be directed to the final page of information ACX needs to collect.
At the top of this page you’re asked to type in how many words are in your book. When you do this they estimate how many hours your final production will be.
Where it asks for territory rights put in the regions you hold the copyright for. The default response is world. If you only hold rights for one country or territory list that location instead.
The next section lets you choose how you want to pay for your production. There are two choices:Royalty share. The narrator / producer covers the entire cost of production, and does all of the work associated with it. When the audio book goes up for sale you split royalties 50 / 50 with them. ACX handles all of the details and pays each of you separately. Your only responsibility is to upload a book cover (2500 x 2500 pixels).Pay for production. You pay a narrator /producer to make the audio book for you, and in return you receive all royalties earned from sales of your audio book. If you choose this option you can enter the amount you are willing to pay per hour of finished audio. The going rate is $200 to $400 per finished hour, although I have seen some producers offering to work for as little as $50 per hour, and others listing their rates at $500 or more per finished hour.
After you select your payment method you are prompted to select the type of distribution you want. If you selected royalty share your only option is exclusive distribution through Audible, Amazon, and iTunes. Your royalty is 40%, and it is split 50 / 50 between you and the producer.
If you paid for the production of your audio book you can choose non-exclusive distribution. This lets you sell through Audible, Amazon, iTunes, and other methods of your choice. Your royalty this way is 25% and you keep all of it.
After you’ve made these selections, click Save & Continueto move to the final page. This page summarizes your information and gives you the option to post your information to ACX.
If you already have the book on audio and want to distribute it through ACX, chose the second option – I have this book in audio and want to sell it. Follow the prompts to list your book through ACX. You need to choose the territory you have rights for, select exclusive distribution through ACX (40% royalty), or non-exclusive (25% royalty). After you do this, you move to the next page and agree to ACX’s terms of service. The final page allows you to give information about your book, and post it for sale.
The last option is to record your own audio and upload your book yourself. If you choose to do this ACX offers a number of tips on how to do the best job possible. You may also want to check out How to Create an Audiobook for Audible by Rob Archangel and Buck Flogging. They explain the process in more detail and talk about the equipment you need to make a good recording.
……….
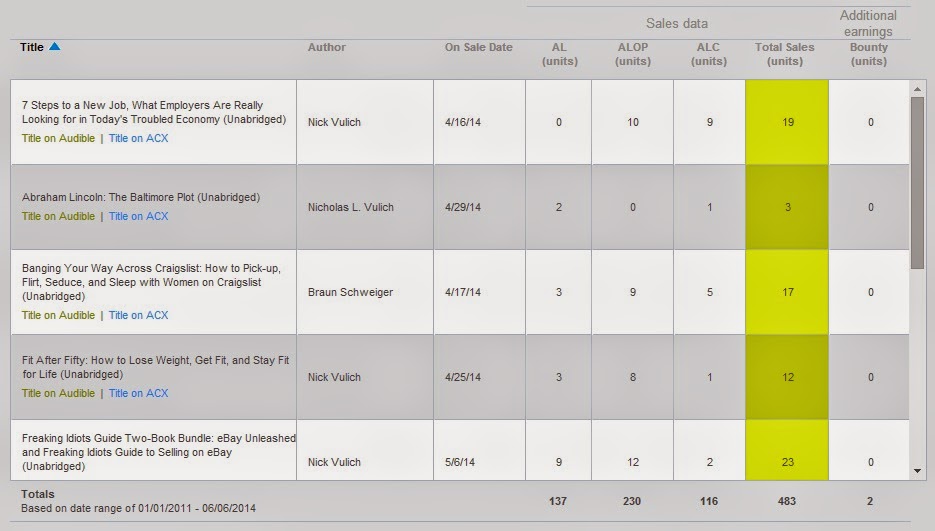
My experience with ACX has been amazing. Their interface is easy to use. You are prompted to include the proper information every step of the way so it’s unlikely you will mess anything up. Within hours of posting my books, I received dozens of auditions, many of them from producers with years of experience doing voiceover work and narrating eBooks. My first four books were ready and up for sale in less than three weeks. The first week my audio books were up for sale we sold fifty-eight copies.
The key to getting good results is to carefully listen to each of your auditions. Ask yourself if the narrator’s voice and tone matches your book. Most often I know within the first ten seconds of listening to the audition if the narrator is a good fit for my book. Trust your gut. If it sounds good to you, it will probably sound good to other listeners.
If you’re not sure about a narrator, pass on the audition. There are plenty of producers and narrators looking for good projects and they will find your book if you give them time.
Final thought. I listed twenty-three audio books for production in the same week. As a result I went with the royalty share option on all of them. It saved me money up front, and it allowed me to get all the projects going at the same time. If I had it to do again, I would cherry pick my books, and pay for the production of my bestsellers up front. Over the long haul I would probably make thousands of dollars more in royalties.
……….
ACX pays royalties a month after they are earned, so the money begins flowing in quickly. Payments are deposited directly into your bank account, and they mail out a printed earnings statement a week or two after royalties are paid out.
They pay a bounty on each book you sell that brings in a new subscriber. Bounties are $50 for the first purchase made by an Audible listener member. The qualifier is they must remain members for a minimum of sixty-one days. If your book is on a royalty share deal you receive $25, and the producer of your book receives $25 for each bounty paid out.
I’m currently getting one bounty for roughly every 200 sales. So that works out to between three and four bounty payments per month. As time goes on, hopefully that number will go up.
Audible has another unadvertised program to help boost your sales. They’ve sent me twenty-five free download codes for several of my books with a suggestion that you raffle them off on your website, blog, etc. to draw new readers. From my understanding you receive royalties for each book downloaded with the free code, and receive a bounty if the purchase is eligible for one.
Getting Started With Babelcube - A Quick Tutorial
 Babelcube connects writers with translators.
It's easy to use. Just post your profile, upload information about your books, and wait for independent translators to contact you. For authors, there's no cost up front. Babelcube handles all of the details and splits the profits between you, the translator, and of course, they keep a small cut for the house.
Commissions are based on how much revenue your books take in. Babelcube takes 15% for brokering the deal. Your split ranges from 30% to 75% depending upon how many copies your book sells and the revenue generated. You receive 30% of revenues for sales under $2,000, and 75% for sales over $8,000. Similar to Amazon, they pay sixty days after sales are made. One caveat, your payment needs to be $50.00 or greater to receive a payment for the month. To view the complete royalty schedule follow this link http://www.babelcube.com/faq/revenue-share.
I’ve inked deals to have eight of my eBay books translated into Spanish, Italian, and French by six different translators.
My personal thought is Babelcube is a great concept. They recently updated their user interface, but it’s still hard to work with.
……….
To get started you need to sign up at http://www.babelcube.com/register/.
At the top of your home page there are four tabs – profile, books, translations, and messages.

When you click on Profile you’re asked to provide all of your contact information. Fill in as much as you can. I posted my Amazon author bio, my picture, and included links to my website.
When you click on the Books section it gives you the option to Add Books. Follow the prompts and add your book details. I copied my book description and most of the other information from my Amazon book page. You can add just one book, or your entire catalog.

The Translations tab shows what offers you have received to translate your books, and a list of the translations you have in progress. Click on the book title and scroll down to the bottom of the page to get more information about your projects. This section shows a list of translations you have in progress, and names of the translators handling the project. At the bottom of the page there are three tabs – edit book, upload book material, and return.
Edit book lets you change your book description or upload a new cover. Upload book material lets you upload your book file, book description, and an author biography. Your translator will also translate your biography and book description when they prepare the book for publication. When you press Return it takes you back to your profile page.
The Messages tab holds all of your correspondence so you can send messages to your translators, and correspond back and forth with people wanting to translate your books.
……….
Babelcube will email you when you receive an offer to translate your book. You can check out the offer by logging into your Babelcube account and selecting translations.
The translations page is divided into two sections – Offers to translate your books, and books being translated.

All of your current offers will be grouped in the offers to translate your book section. Click on the offer details in the status column. It will contain a sample of translated text, and information on how soon the translator will complete your project. The first date shown is when you can expect the first ten pages of the project. The second date is the expected completion date when your entire book will be translated.
Most of the translators I’ve worked with offer to deliver the first ten pages within five to ten days, and the completed translation within twenty to forty-five days.
When you receive the first ten pages look the translation over if you are familiar with the language. If you’re not familiar with the language, ask a friend, a university professor, or someone familiar with the language to give it a once over to make sure everything sounds ok.
If everything is good, click the accept translation button to approve the translation.
At this point, I make a note of the title in the translated document and verify with the translator that this is the title they want to go with. After we’ve approved this I get with my cover designer to have the new cover made. In nine out of ten cases it’s a simple matter of swapping out the title, and leaving the basic design the same.
You’ll receive another email from Babelcube when the translation is completed.
To approve the final translation, return to the translations page. This time you’re going to look for your book in the books being translated section. Click on the publish tab in the status column, and it will walk you through getting your book set up for publication.

Publishing your book on Babelcube is a four step process that should take less than five minutes.
Upload your translated book cover. To upload your new cover click on the choose file box, and select your cover file. Ensure your name, and the name of your cover designer is correct.Check the word file. The translated word file is preloaded into the system by Babelcube. You can download a copy to your computer by selecting here, right after where it says download the file. As long as the first ten pages check out ok, I normally skip reviewing the entire document, and just assume everything is ok. If you make changes to the file, upload the revised document where it allows you to choose the new file to upload. Select next step at the bottom of the page to proceed to the next section.Review the final document. Check the I have reviewed this manuscript box to approve the document, and select next step to proceed to the final section.Set your book price. Babelcube lets you set the price of your book between 99¢ and $39.99. For best results they suggest you price your book between $2.99 and $9.99, which is in line with Amazon’s sweet spot for pricing.
At this point your book is set to go, and should start publishing to Babelcube’s partner sites within a few days. In my experience your books will show up on Kobo first, then Barnes and Noble. Amazon is normally the last site your book will show up on. Apple is iffy at best.
If you want your books to show up in the iStore you need to prepare your manuscript properly before you forward it to your translator. Remove all links to books on other book sites such as Amazon and Barnes & Noble. Make sure not to refer readers to check out any books on competing retailer websites, and if you ask readers to leave a review when they are finished reading, remove any references to specific book sites.
If there are any complications, Babelcube will email to let you know that changes to your manuscript are required. Trust me it’s easier to take care of these details when the manuscript is in your native language. I’ve had to look for problem areas in two translated documents and it’s time not fun.
FYI: If you need to make changes, download a copy of the document in step two of the publish process. Make any necessary changes, then upload the new file where it says upload file in this step. Continue through the publishing process to complete your changes.

If you decide you want to change your prices go to the translations page, select republish translation, and go to step three. Enter your new price, and continue to the next step to publish your document.
……….
Final thoughts. I currently have four books published through Babelcube. I have four more translations in the process. Not everything has gone smoothly. I had once translator working on three projects skip out on me, a few translators have missed their deadline by a day or two, but otherwise I think Babelcube is a decent site. Their customer service is top notch, and they normally answer questions within twenty-four hours.
For authors, there is very little downside. You can reach an entirely new audience with very little risk. Your only outlay is for a new cover, and that can be as little as five dollars if you use a designer from Fiverr.
Babelcube did just recently add a sales dashboard so you can check your sales results. To go to it you need to visit your translations tab. To the far right of each book you will see three tabs. Choose book sales to see your results.
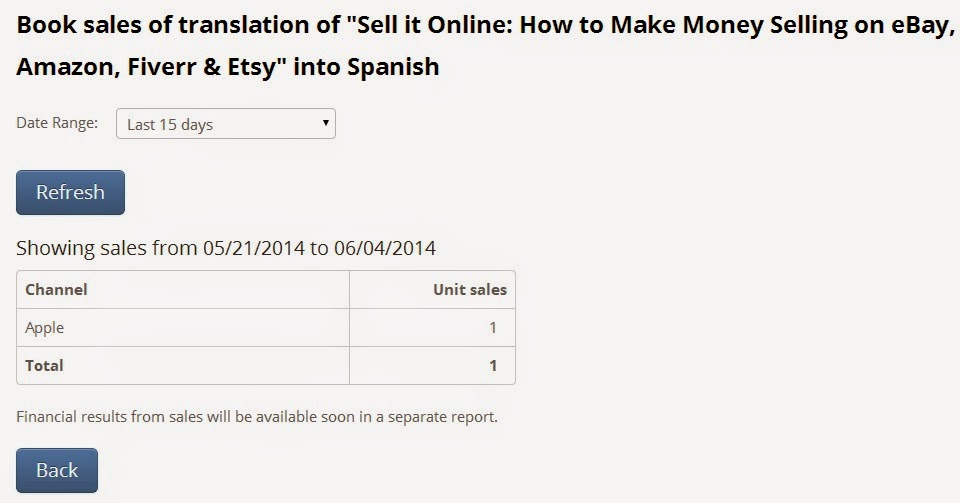
Babelcube has been growing quickly, and they appear to be adding new selections to the website every few weeks. Over time they could become a major force in e-publishing.