Marina Delio's Blog, page 5
October 27, 2017
Bat Snack Bags
Bat snack bags make an easy and fun Halloween treat for kids! This post is sponsored by Horizon Organic, though all opinions are my own. 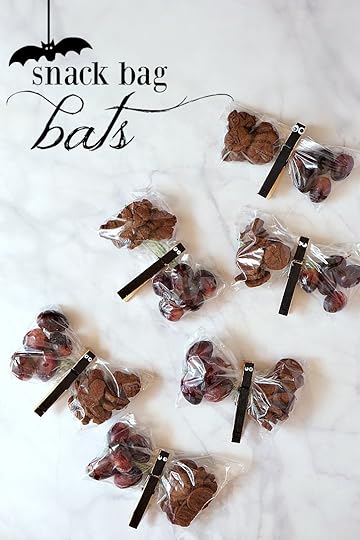
Halloween is upon us and our kids and their friends are bursting with excitement. Costumes are ready to go and festivities lined up. Our favorite Halloween movies have been playing on repeat. Hocus Pocus is my personal favorite. I never get tired of those three crazy witches.
For a Halloween play date this week the kids and I made bat snack bags. The pretty butterfly version of these snack bags is common as a school or post soccer game snack. I'm not sure who came up with the clever butterfly snack bag idea, unfortunately. They are easy to make and kids love them. Creating a spooky Halloween makeover for the butterfly bags was easy and we had all the supplies at home already. I wanted to share these with you in case you're looking for an easy last-minute Halloween treat.
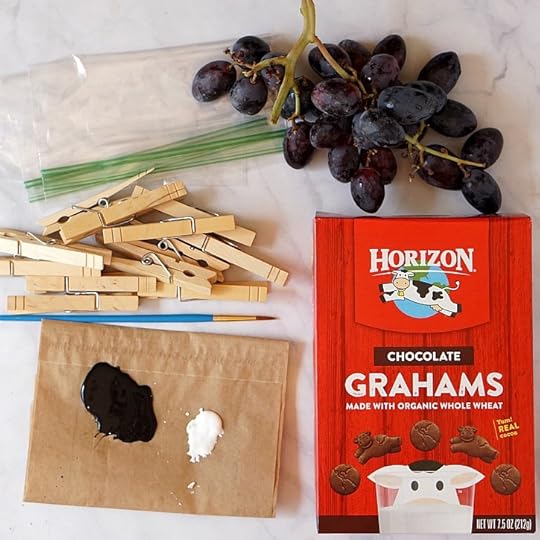
Snack bags take just a few minutes to assemble and can be filled with any dark foods you like. We used dark purple grapes and Horizon Organic chocolate grahams. Please note: young children should never be given whole grapes. They should be cut lengthwise into quarters as whole grapes pose a choking hazard. I still cut grapes for my 7 year old. For a special Halloween treat we used Horizon chocolate grahams. I love the rich chocolatey flavor in these little bite-sized cookies. I also like that they are made with organic whole wheat flour and cocoa. Other dark Halloween fillers could include: raisins, blackberries, blueberries, olives and seaweed snacks. Can you think of any others?
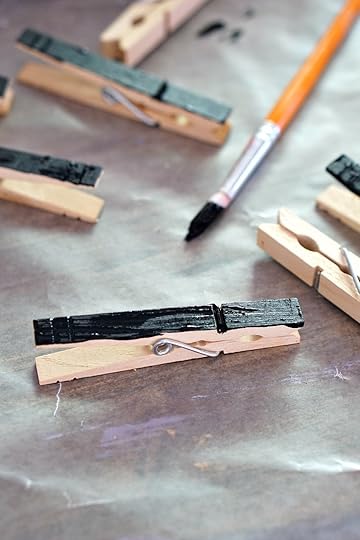
We used regular wooden clothespins for our bats' bodies, and painted them black. I think some black or silver glitter would make these even better! Some craft stores carry clothespins in a variety of colors, but we used what we already had in our craft supplies. For the bats' eyes we tried small google eyes as well as painted on eyes.
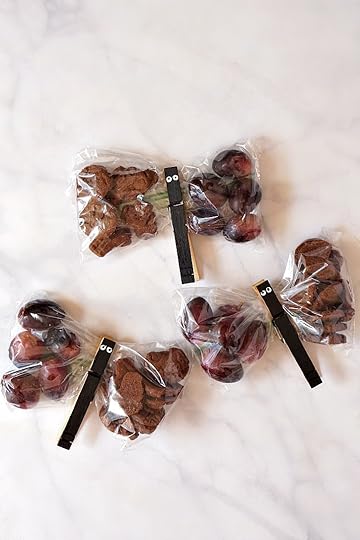
Aren't they cute? These bat snack bags are a fun craft for kids to help make and are just as fun to eat. Whether for a Halloween party or play date, or for a school party, these friendly bats are as kid-friendly as it gets.
Quick fact: a group of bats is called a colony or a cloud!
Want more wholesome Halloween snack ideas? Here a some of my favorites from the past: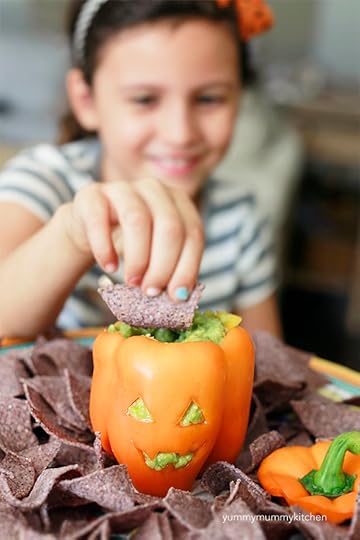
HALLOWEEN JACK-O-LANTERN FRUIT CUPS
MANGO GUACAMOLE IN JACK-O-LANTERN PEPPERS
HALLOWEEN MINI PIZZAS
Yield: about 12 batsAuthor: yummy mummy kitchenPrint Recipe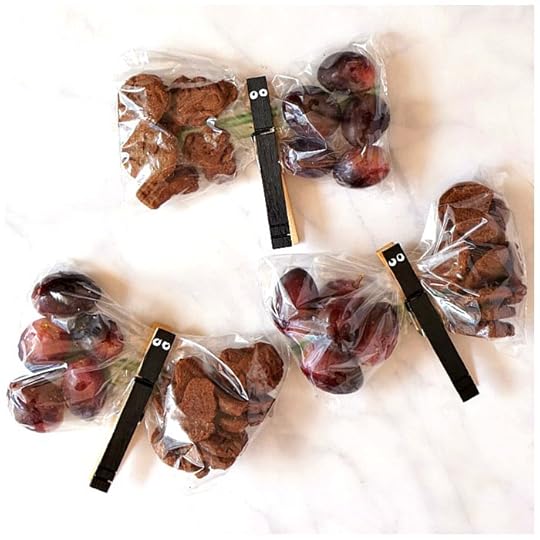 Bat Snack BagsThese cute black bats are the perfect edible craft for Halloween.prep time: 35 MINScook time: total time: 35 minsINGREDIENTS
1 box zipper snack bags12 clothespinssmall bottle of black craft paintsmall bottle of white craft paint (or small wiggle eyes and glue)1 bunch dark purple or black grapes (quartered for young children)1 box Horizon chocolate grahamsINSTRUCTIONS
To make the bat bodies, paint the clothespins black. You can paint one side if you're in a hurry, or both. Let the black paint dry. Use a small paintbrush or toothpick to paint white dots for the eyes. Let dry and then even smaller black dots for the pupils. Alternatively, you could glue small wiggle eyes on to the clothespins. Let dry.Fill the bags with about half way up with the snacks. One of the snacks goes on one side and the other on the other side. Use your fingers to separate them. Fold the zipper of the bag down the back and clamp with the clothespin. The first one may feel strange to make, but you'll get the hang of it!notesNotes: Make sure your grapes aren't too wet and the bats aren't assembled too far in advance or the grahams will get stale or soggy.http://www.yummymummykitchen.com/2017/10/bat-snack-bags.htmlCreated using The Recipes Generator.recipe-inner{text-align:left;max-width:620px;border:6px double #009BFF;padding:20px;background:#f2f2f2;margin: 40px auto;font-family:Lato, sans-serif;}#recipe .recipe-name{font-size: 21px;}#recipe .info{font-size:13px;text-transform:capitalize;border-bottom:2px solid #000;padding-bottom:7px;margin-bottom:20px}.info:after{content:'';display:table;clear:both}#recipe .info span:first-child{margin-right:30px}#printbutton{border:0;margin:0;color:#fff;float:right;background:#555; padding:5px;border-radius:3px;cursor:pointer}#recipe .time{text-transform:uppercase;font-size:12px;text-align:center;background:#fff;padding:15px 0;margin-bottom:20px}#recipe .time span:not(:last-child){margin-right:12px}#recipe .time span:not(:last-child):after{content:'';display:inline-block;height:10px;width:1px;background:#000;vertical-align:middle;margin-left:12px}#recipe .summary{line-height:1.7;font-style:italic}.ingredients{line-height:1.7;clear:both}.ingredients h3,.instructions h3{font-size:20px !important;margin-bottom:0;color:#000}.ingredients ul{margin:0!important;margin-top:5px !important;}.instructions li{margin-bottom:15px !important;line-height:1.6;text-align:left;}.ingredients li{text-align:left}#recipe .instructions{margin-top: 30px;}#recipe .instructions ol,#recipe .instructions ol li {list-style:decimal !important;}#recipe .instructions ol{padding-left:39px;margin:0!important;margin-top:6px !important;}.posturl{border-top:1px solid #ccc;padding-top:10px;}.ing-section{padding-left:20px;margin: 10px 0;}.ing-section > span{font-weight:700}.recipe-credit{display:none;font-size:13px;border-top: 1px solid #ccc;padding:10px;text-align:center;background:#ffffff;margin:-20px;margin-top:15px;}.recipe-credit a{color:blue;text-decoration:none;}.copyright-statement{font-size: 13px;font-style:italic;border-top: 1px solid #ccc;margin-top:15px;padding-top:15px;line-height:1.6;}.notes pre{ font-size: 15px; margin: 10px 0; padding-left: 20px; font-family: inherit; line-height: 1.7; white-space: pre-line; } .notes h3 { color: #000; margin: 0; text-transform: capitalize; font-weight: 700; }#recipe .info{position:relative}#recipe .image{text-align:center;margin:25px 0}#recipe .image img{max-width:100%;width:150px;height:150px;-o-object-fit:cover;object-fit:cover;border-radius:150px}#recipe .recipe-name{margin-top: 20px;text-align:center}#recipe .summary{margin:20px 0;clear:both;line-height:1.7;font-style:italic}#recipe .time{clear:both;border-top:1px dotted #000;border-bottom:1px dotted #000;border-right:0;border-left:0}
This is a sponsored conversation written by me on behalf of Horizon. The opinions and text are all mine.


Halloween is upon us and our kids and their friends are bursting with excitement. Costumes are ready to go and festivities lined up. Our favorite Halloween movies have been playing on repeat. Hocus Pocus is my personal favorite. I never get tired of those three crazy witches.
For a Halloween play date this week the kids and I made bat snack bags. The pretty butterfly version of these snack bags is common as a school or post soccer game snack. I'm not sure who came up with the clever butterfly snack bag idea, unfortunately. They are easy to make and kids love them. Creating a spooky Halloween makeover for the butterfly bags was easy and we had all the supplies at home already. I wanted to share these with you in case you're looking for an easy last-minute Halloween treat.
Snack bags take just a few minutes to assemble and can be filled with any dark foods you like. We used dark purple grapes and Horizon Organic chocolate grahams. Please note: young children should never be given whole grapes. They should be cut lengthwise into quarters as whole grapes pose a choking hazard. I still cut grapes for my 7 year old. For a special Halloween treat we used Horizon chocolate grahams. I love the rich chocolatey flavor in these little bite-sized cookies. I also like that they are made with organic whole wheat flour and cocoa. Other dark Halloween fillers could include: raisins, blackberries, blueberries, olives and seaweed snacks. Can you think of any others?
We used regular wooden clothespins for our bats' bodies, and painted them black. I think some black or silver glitter would make these even better! Some craft stores carry clothespins in a variety of colors, but we used what we already had in our craft supplies. For the bats' eyes we tried small google eyes as well as painted on eyes.
Aren't they cute? These bat snack bags are a fun craft for kids to help make and are just as fun to eat. Whether for a Halloween party or play date, or for a school party, these friendly bats are as kid-friendly as it gets.
Quick fact: a group of bats is called a colony or a cloud!
Want more wholesome Halloween snack ideas? Here a some of my favorites from the past:
HALLOWEEN JACK-O-LANTERN FRUIT CUPS
MANGO GUACAMOLE IN JACK-O-LANTERN PEPPERS
HALLOWEEN MINI PIZZAS
Yield: about 12 batsAuthor: yummy mummy kitchenPrint Recipe
Bat Snack BagsThese cute black bats are the perfect edible craft for Halloween.prep time: 35 MINScook time: total time: 35 minsINGREDIENTS1 box zipper snack bags12 clothespinssmall bottle of black craft paintsmall bottle of white craft paint (or small wiggle eyes and glue)1 bunch dark purple or black grapes (quartered for young children)1 box Horizon chocolate grahamsINSTRUCTIONS
To make the bat bodies, paint the clothespins black. You can paint one side if you're in a hurry, or both. Let the black paint dry. Use a small paintbrush or toothpick to paint white dots for the eyes. Let dry and then even smaller black dots for the pupils. Alternatively, you could glue small wiggle eyes on to the clothespins. Let dry.Fill the bags with about half way up with the snacks. One of the snacks goes on one side and the other on the other side. Use your fingers to separate them. Fold the zipper of the bag down the back and clamp with the clothespin. The first one may feel strange to make, but you'll get the hang of it!notesNotes: Make sure your grapes aren't too wet and the bats aren't assembled too far in advance or the grahams will get stale or soggy.http://www.yummymummykitchen.com/2017/10/bat-snack-bags.htmlCreated using The Recipes Generator.recipe-inner{text-align:left;max-width:620px;border:6px double #009BFF;padding:20px;background:#f2f2f2;margin: 40px auto;font-family:Lato, sans-serif;}#recipe .recipe-name{font-size: 21px;}#recipe .info{font-size:13px;text-transform:capitalize;border-bottom:2px solid #000;padding-bottom:7px;margin-bottom:20px}.info:after{content:'';display:table;clear:both}#recipe .info span:first-child{margin-right:30px}#printbutton{border:0;margin:0;color:#fff;float:right;background:#555; padding:5px;border-radius:3px;cursor:pointer}#recipe .time{text-transform:uppercase;font-size:12px;text-align:center;background:#fff;padding:15px 0;margin-bottom:20px}#recipe .time span:not(:last-child){margin-right:12px}#recipe .time span:not(:last-child):after{content:'';display:inline-block;height:10px;width:1px;background:#000;vertical-align:middle;margin-left:12px}#recipe .summary{line-height:1.7;font-style:italic}.ingredients{line-height:1.7;clear:both}.ingredients h3,.instructions h3{font-size:20px !important;margin-bottom:0;color:#000}.ingredients ul{margin:0!important;margin-top:5px !important;}.instructions li{margin-bottom:15px !important;line-height:1.6;text-align:left;}.ingredients li{text-align:left}#recipe .instructions{margin-top: 30px;}#recipe .instructions ol,#recipe .instructions ol li {list-style:decimal !important;}#recipe .instructions ol{padding-left:39px;margin:0!important;margin-top:6px !important;}.posturl{border-top:1px solid #ccc;padding-top:10px;}.ing-section{padding-left:20px;margin: 10px 0;}.ing-section > span{font-weight:700}.recipe-credit{display:none;font-size:13px;border-top: 1px solid #ccc;padding:10px;text-align:center;background:#ffffff;margin:-20px;margin-top:15px;}.recipe-credit a{color:blue;text-decoration:none;}.copyright-statement{font-size: 13px;font-style:italic;border-top: 1px solid #ccc;margin-top:15px;padding-top:15px;line-height:1.6;}.notes pre{ font-size: 15px; margin: 10px 0; padding-left: 20px; font-family: inherit; line-height: 1.7; white-space: pre-line; } .notes h3 { color: #000; margin: 0; text-transform: capitalize; font-weight: 700; }#recipe .info{position:relative}#recipe .image{text-align:center;margin:25px 0}#recipe .image img{max-width:100%;width:150px;height:150px;-o-object-fit:cover;object-fit:cover;border-radius:150px}#recipe .recipe-name{margin-top: 20px;text-align:center}#recipe .summary{margin:20px 0;clear:both;line-height:1.7;font-style:italic}#recipe .time{clear:both;border-top:1px dotted #000;border-bottom:1px dotted #000;border-right:0;border-left:0}
This is a sponsored conversation written by me on behalf of Horizon. The opinions and text are all mine.


October 26, 2017
Caramel Apple Slices
Apple rounds dipped into simple caramel sauce are a delicious and festive autumn treat! Made with natural ingredients like coconut milk and coconut sugar, this amazing caramel sauce is paleo and diary-free!
 If there's one thing (okay after Halloween candy) that my kids ask for during the autumn months it's caramel apples. I know they are cute and festive, but personally I've never really understood the appeal of the caramel apple. Caramel apples are traditionally just so sticky, sickeningly sweet, and kind of hard to sink your teeth into. These caramel apple slices served in lollipop form, or simply arranged on a platter, are just the right size and made without any refined sugar. Apples served with this caramel dip makes such a fun autumn party treat. This caramel apple dip would be perfect for any Halloween or Thanksgiving party.
CONTINUE READING THIS POST »
October 18, 2017
Trail Mix Peanut Butter Energy Balls
This is a sponsored post written by me on behalf of Back To Nature Foods. All opinions are 100% mine.
These delicious no-bake peanut butter energy balls are studded with crunchy nuts and dried cranberries.
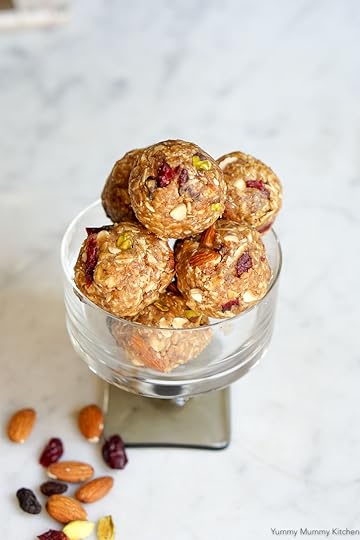
The back-to-school season is now melding into the holiday season. We are starting to make plans for Halloween, Thanksgiving, and even winter holidays. I absolutely adore the holiday season, but it can also mean extra cooking while hosting family and friends, and undoubtedly sugar overload. When our house is filled with tempting leftover Halloween candy or holiday cookies, energy balls are my better-for-you hack. If I have these sweet peanut butter energy balls in the fridge it's easy to resist less wholesome temptations. Before I found balance through a more nourishing diet, I had moments of binging on cheap Halloween candy, and always felt horrible afterward. I am so glad I realized that delicious sweet treats can be made with real foods that leave me feeling light and energized, rather than bloated and grumpy. Not only do these energy balls cure my sweet tooth, they are satisfying, unprocessed and filled with nutrition from nature. That's a win-win in my book!
CONTINUE READING THIS POST »


October 16, 2017
Slow Cooker Black Bean Soup
This hearty black bean soup is made the easy way - in the slow cooker crock pot!
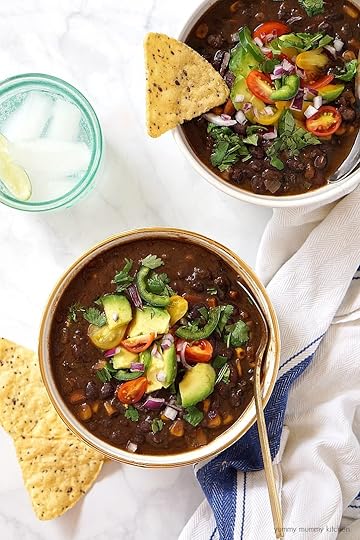
This black bean soup is made from scratch with beans, veggies, and spices. It's warm, cozy, hearty, filling, and nourishing. It's mild enough for kids, but easy to spice up if you like spicy foods. The slow cooker makes preparing this black bean soup easier than ever. Prepare it early, and come home to a warm dinner. Isn't that just the best after a long day? Loaded with colorful fresh toppings like avocado and jalapenos, and served with tortilla chips, this slow cooker black bean soup makes delicious Taco Tuesday soup.
CONTINUE READING THIS POST »
October 15, 2017
Chocolate Coconut Macaroons
These no-bake chocolate brownie coconut bites are sweet, satisfying, and delicious. When a chocolate craving strikes, you can have these little bite-sized lovers ready in minutes. They're vegan, gluten-free, and naturally sweetened. 
This easy treat recipe comes to us thanks to a reader request! I absolutely love when you guys tell me what you want to see here on the blog, so don't be shy! A visitor recently made my Chocolate Chip Cookie Dough bites that are a copycat of the delicious Hail Merry bites. She loved them, but wanted a chocolate version for her chocolate-loving boyfriend. How could I say no to that?! Yummy Hubby happens to love coconut macaroons, so I'm always up for making a batch. Coconut seems to be one of those foods that people either love or hate. Which side are you on? CONTINUE READING THIS POST »


This easy treat recipe comes to us thanks to a reader request! I absolutely love when you guys tell me what you want to see here on the blog, so don't be shy! A visitor recently made my Chocolate Chip Cookie Dough bites that are a copycat of the delicious Hail Merry bites. She loved them, but wanted a chocolate version for her chocolate-loving boyfriend. How could I say no to that?! Yummy Hubby happens to love coconut macaroons, so I'm always up for making a batch. Coconut seems to be one of those foods that people either love or hate. Which side are you on? CONTINUE READING THIS POST »
October 13, 2017
Fall Front Porch Ideas
From flowers and succulents to heirloom pumpkins, don't miss these easy and beautiful fall front porch ideas!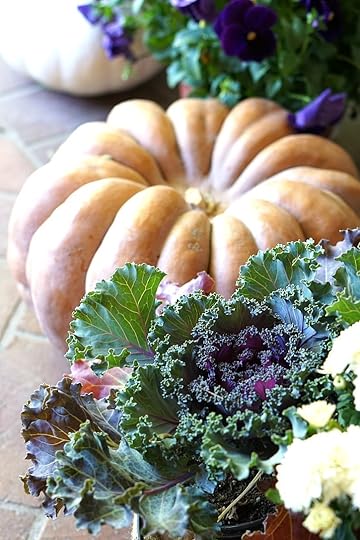 Oh fall... I just love this time of year. Over the weekend my family decided it was time for a mini makeover for our front porch. Though my fall front porch is far from perfect, it's definitely an improvement! We had so much fun shopping and decorating that I thought I would share a few fall front porch ideas. Though I usually go for muted neutral colors, this year's fall front porch is a bit more colorful. I love the purple and green kale the most, and the way it compliments the orange pumpkins. I mostly stick to recipes here, but I enjoy sharing and browsing these pretty home posts too - I hope you don't mind
Oh fall... I just love this time of year. Over the weekend my family decided it was time for a mini makeover for our front porch. Though my fall front porch is far from perfect, it's definitely an improvement! We had so much fun shopping and decorating that I thought I would share a few fall front porch ideas. Though I usually go for muted neutral colors, this year's fall front porch is a bit more colorful. I love the purple and green kale the most, and the way it compliments the orange pumpkins. I mostly stick to recipes here, but I enjoy sharing and browsing these pretty home posts too - I hope you don't mind
October 10, 2017
Vegan Pumpkin Pie
Classic pumpkin pie has gone vegan with this easy recipe! This delectable vegan and gluten free pumpkin pie is made with a dairy free, egg free, coconut milk filling and almond flour crust! It's easy enough for a weeknight dessert and tasty enough for Thanksgiving. 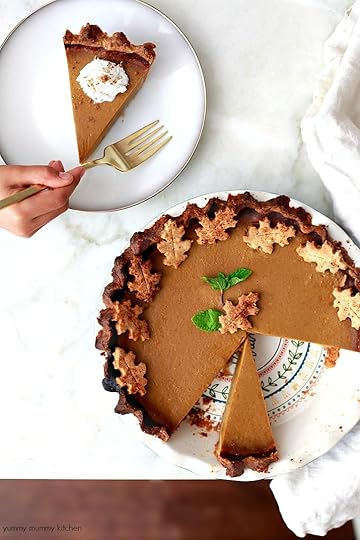 Canadian Thanksgiving just passed and seeing all of my Canadian friends' Thanksgiving delights made me so excited for the holidays. I know American Thanksgiving is not until next month, but for you planners, I'll just drop this sweet little pie here. Is pumpkin pie really just for Thanksgiving though? I think it should be enjoyed all fall long! Are you having or going to a Halloween party? It needs pumpkin pie!
I've posted a few pumpkin pie variations here in the past. These Mini Pumpkin Pies that I brought to our kindergarten Thanksgiving feast a few years ago, and this Vegan Pumpkin Cheesecake made with cashews. I've had some requests for a classic vegan pumpkin pie, so I accepted the challenge and got to work.
CONTINUE READING THIS POST »


Canadian Thanksgiving just passed and seeing all of my Canadian friends' Thanksgiving delights made me so excited for the holidays. I know American Thanksgiving is not until next month, but for you planners, I'll just drop this sweet little pie here. Is pumpkin pie really just for Thanksgiving though? I think it should be enjoyed all fall long! Are you having or going to a Halloween party? It needs pumpkin pie! I've posted a few pumpkin pie variations here in the past. These Mini Pumpkin Pies that I brought to our kindergarten Thanksgiving feast a few years ago, and this Vegan Pumpkin Cheesecake made with cashews. I've had some requests for a classic vegan pumpkin pie, so I accepted the challenge and got to work.
CONTINUE READING THIS POST »
October 9, 2017
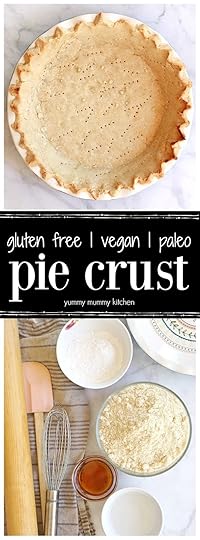
Gluten Free Pie Crust
This easy pie crust is gluten-free, vegan, and paleo! Made with natural ingredients like almond flour, this gluten-free pie crust perfect for everything from pumpkin pie to apple tarts. 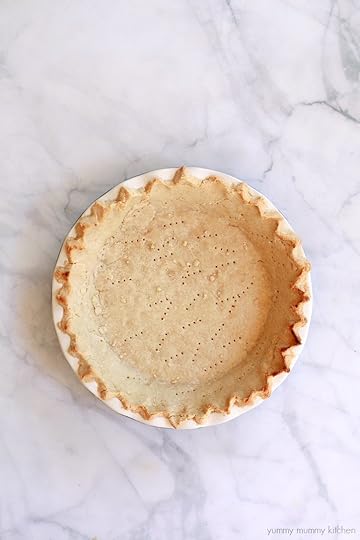
Pie season is here! Let the pie making commence! Pie is one of those things I grew up loving, but as an adult haven't been very fond of. As a teenager I would literally sit on my bed with a girlfriend and polish off an entire Marie Callender's pie. Oy vey! Pies taste great, but almost always leave me with a stomach ache. They're usually just too heavy, too butter laden, too sweet, with too much processed white flour for me to tolerate. We're going to change all that though, with a a couple of naturally vegan, gluten-free, and naturally sweetened pie recipes. I've been baking pies like crazy the past week and currently have three in my refrigerator. I'm so excited to share these pies with you, but first thing's first. We need a good pie crust recipe. I'll be linking to this gluten free pie crust when I post those pies.
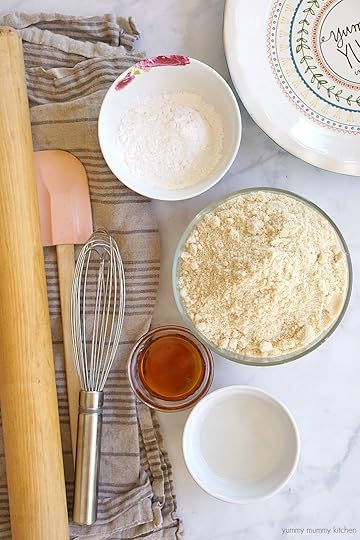
Traditional pie crust is made from just a few ingredients: white flour and butter with a little salt and sugar. It has a mild flavor that compliments many pie fillings. This gluten free pie crust is similarly simple, but with less processed, more nutritious ingredients: almond flour, coconut oil, and maple syrup. I've been really enjoying baking with almond flour. It's just blanched almonds that have been finely ground. Did you know it's the flour used in French macarons? Oui oui! I got the idea for this almond flour pie crust after baking these vegan, gluten-free chocolate chunk cookies and these little lemon tarts!
Check out a couple of the pies I've made with this gluten free pie crust!
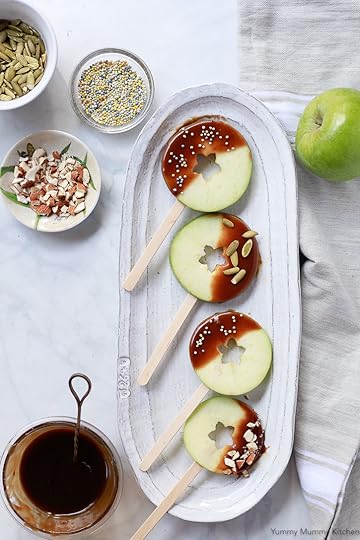
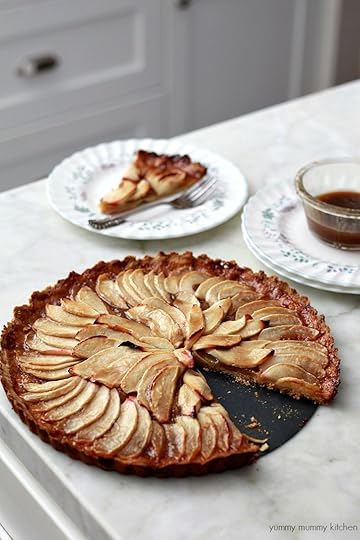 This Caramel Apple Tart is what autumn dreams are made of. I can't wait to share this recipe with you in the next few weeks! You're going to love it! I love the hearty flakey almond flour crust with the salty coconut caramel sauce and apples. This one may end up on our Thanksgiving table this year.
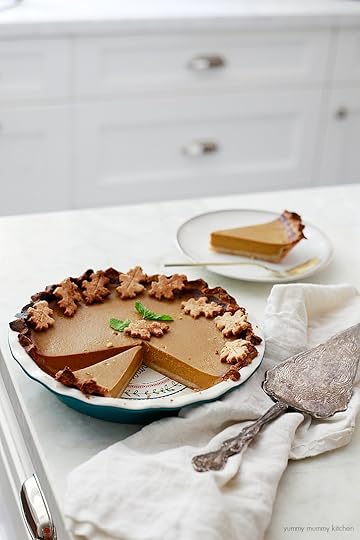
When I originally worked on this pie crust recipe it was for this Vegan Pumpkin Pie. I was so happy to find that this gluten free pie crust recipe rolls out beautifully and allowed me to cut out some leaf shapes to top my pumpkin pie. I wish I could hand you a slice through the screen because this pumpkin pie was so good.
Don't miss the short video so you can get a better idea of how to make this pie crust!
Yield: 1 pie crustAuthor: yummy mummy kitchenPrint Recipe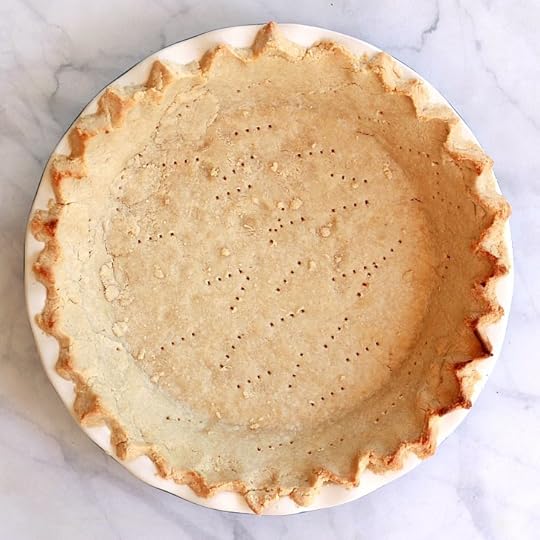 Gluten Free Pie CrustThis gluten free, vegan, paleo pie crust is perfect for pumpkin pie and many others!prep time: 5 MINScook time: 12 MINStotal time: 17 minsINGREDIENTS
2 cups almond flour (I used Trader Joe's)1/4 cup arrowroot starch (I used Bob's Red Mill)1/4 teaspoon salt3 tablespoons melted coconut oil1 tablespoon maple syrupINSTRUCTIONS
Add almond flour, arrowroot, and salt to a medium sized bowl. Whisk to combine. With a rubber spatula or spoon, stir in the coconut oil and syrup until the mixture is crumbly but sticks together when pressed. Add a little water if the mixture is still too dry, about 1 tablespoon should be plenty.Form a ball with the dough. Press into a tart or pie dish, or place on a piece of parchment paper and roll until about 1/8" thick and then place into your pie dish. Prick the bottom and sides of the pie crust with a fork to prevent bubbling, though I haven't noticed any bubbling with this recipe. Place the crust in the freezer for 5 minutes. For tarts like my caramel apple tart, this pie crust recipe does not need to be pre-baked. For pies with wet fillings like pumpkin pie, pre-bake for about 10 minutes to prevent it from getting soggy. For custard filled pies like chocolate cream, bake the crust completely, about 12-15 minutes and let cool before filling.http://www.yummymummykitchen.com/2017/10/gluten-free-pie-crust-vegan.htmlCreated using The Recipes Generator.recipe-inner{text-align:left;max-width:620px;border:6px double #009BFF;padding:20px;background:#f2f2f2;margin: 40px auto;font-family:Lato, sans-serif;}#recipe .recipe-name{font-size: 21px;}#recipe .info{font-size:13px;text-transform:capitalize;border-bottom:2px solid #000;padding-bottom:7px;margin-bottom:20px}.info:after{content:'';display:table;clear:both}#recipe .info span:first-child{margin-right:30px}#printbutton{border:0;margin:0;color:#fff;float:right;background:#555; padding:5px;border-radius:3px;cursor:pointer}#recipe .time{text-transform:uppercase;font-size:12px;text-align:center;background:#fff;padding:15px 0;margin-bottom:20px}#recipe .time span:not(:last-child){margin-right:12px}#recipe .time span:not(:last-child):after{content:'';display:inline-block;height:10px;width:1px;background:#000;vertical-align:middle;margin-left:12px}#recipe .summary{line-height:1.7;font-style:italic}.ingredients{line-height:1.7}.ingredients h3,.instructions h3{font-size:20px !important;margin-bottom:0;color:#000}.ingredients ul{margin:0!important;margin-top:5px !important;}.instructions li{margin-bottom:15px !important;line-height:1.6;text-align:left;}.ingredients li{text-align:left}#recipe .instructions{margin-top: 30px;}#recipe .instructions ol{padding-left:39px;margin:0!important;margin-top:6px !important;}.posturl{border-top:1px solid #ccc;padding-top:10px;}.ing-section{padding-left:20px;margin: 10px 0;}.ing-section > span{font-weight:700}.recipe-credit{display:none;font-size:13px;border-top: 1px solid #ccc;padding:10px;text-align:center;background:#ffffff;margin:-20px;margin-top:15px;}.recipe-credit a{color:blue;text-decoration:none;}.copyright-statement{ font-size: 13px;font-style:italic;border-top: 1px solid #ccc;margin-top:15px;padding-top:15px;line-height:1.6;}#recipe .info{position:relative}#recipe .image{text-align:center;margin:25px 0}#recipe .image img{max-width:100%;width:150px;height:150px;-o-object-fit:cover;object-fit:cover;border-radius:150px}#recipe .recipe-name{margin-top: 20px;text-align:center}#recipe .summary{margin:20px 0;clear:both;line-height:1.7;font-style:italic}#recipe .time{clear:both;border-top:1px dotted #000;border-bottom:1px dotted #000;border-right:0;border-left:0}


Pie season is here! Let the pie making commence! Pie is one of those things I grew up loving, but as an adult haven't been very fond of. As a teenager I would literally sit on my bed with a girlfriend and polish off an entire Marie Callender's pie. Oy vey! Pies taste great, but almost always leave me with a stomach ache. They're usually just too heavy, too butter laden, too sweet, with too much processed white flour for me to tolerate. We're going to change all that though, with a a couple of naturally vegan, gluten-free, and naturally sweetened pie recipes. I've been baking pies like crazy the past week and currently have three in my refrigerator. I'm so excited to share these pies with you, but first thing's first. We need a good pie crust recipe. I'll be linking to this gluten free pie crust when I post those pies.
Traditional pie crust is made from just a few ingredients: white flour and butter with a little salt and sugar. It has a mild flavor that compliments many pie fillings. This gluten free pie crust is similarly simple, but with less processed, more nutritious ingredients: almond flour, coconut oil, and maple syrup. I've been really enjoying baking with almond flour. It's just blanched almonds that have been finely ground. Did you know it's the flour used in French macarons? Oui oui! I got the idea for this almond flour pie crust after baking these vegan, gluten-free chocolate chunk cookies and these little lemon tarts!
Check out a couple of the pies I've made with this gluten free pie crust!
This Caramel Apple Tart is what autumn dreams are made of. I can't wait to share this recipe with you in the next few weeks! You're going to love it! I love the hearty flakey almond flour crust with the salty coconut caramel sauce and apples. This one may end up on our Thanksgiving table this year. When I originally worked on this pie crust recipe it was for this Vegan Pumpkin Pie. I was so happy to find that this gluten free pie crust recipe rolls out beautifully and allowed me to cut out some leaf shapes to top my pumpkin pie. I wish I could hand you a slice through the screen because this pumpkin pie was so good.
Don't miss the short video so you can get a better idea of how to make this pie crust!
Yield: 1 pie crustAuthor: yummy mummy kitchenPrint Recipe
Gluten Free Pie CrustThis gluten free, vegan, paleo pie crust is perfect for pumpkin pie and many others!prep time: 5 MINScook time: 12 MINStotal time: 17 minsINGREDIENTS2 cups almond flour (I used Trader Joe's)1/4 cup arrowroot starch (I used Bob's Red Mill)1/4 teaspoon salt3 tablespoons melted coconut oil1 tablespoon maple syrupINSTRUCTIONS
Add almond flour, arrowroot, and salt to a medium sized bowl. Whisk to combine. With a rubber spatula or spoon, stir in the coconut oil and syrup until the mixture is crumbly but sticks together when pressed. Add a little water if the mixture is still too dry, about 1 tablespoon should be plenty.Form a ball with the dough. Press into a tart or pie dish, or place on a piece of parchment paper and roll until about 1/8" thick and then place into your pie dish. Prick the bottom and sides of the pie crust with a fork to prevent bubbling, though I haven't noticed any bubbling with this recipe. Place the crust in the freezer for 5 minutes. For tarts like my caramel apple tart, this pie crust recipe does not need to be pre-baked. For pies with wet fillings like pumpkin pie, pre-bake for about 10 minutes to prevent it from getting soggy. For custard filled pies like chocolate cream, bake the crust completely, about 12-15 minutes and let cool before filling.http://www.yummymummykitchen.com/2017/10/gluten-free-pie-crust-vegan.htmlCreated using The Recipes Generator.recipe-inner{text-align:left;max-width:620px;border:6px double #009BFF;padding:20px;background:#f2f2f2;margin: 40px auto;font-family:Lato, sans-serif;}#recipe .recipe-name{font-size: 21px;}#recipe .info{font-size:13px;text-transform:capitalize;border-bottom:2px solid #000;padding-bottom:7px;margin-bottom:20px}.info:after{content:'';display:table;clear:both}#recipe .info span:first-child{margin-right:30px}#printbutton{border:0;margin:0;color:#fff;float:right;background:#555; padding:5px;border-radius:3px;cursor:pointer}#recipe .time{text-transform:uppercase;font-size:12px;text-align:center;background:#fff;padding:15px 0;margin-bottom:20px}#recipe .time span:not(:last-child){margin-right:12px}#recipe .time span:not(:last-child):after{content:'';display:inline-block;height:10px;width:1px;background:#000;vertical-align:middle;margin-left:12px}#recipe .summary{line-height:1.7;font-style:italic}.ingredients{line-height:1.7}.ingredients h3,.instructions h3{font-size:20px !important;margin-bottom:0;color:#000}.ingredients ul{margin:0!important;margin-top:5px !important;}.instructions li{margin-bottom:15px !important;line-height:1.6;text-align:left;}.ingredients li{text-align:left}#recipe .instructions{margin-top: 30px;}#recipe .instructions ol{padding-left:39px;margin:0!important;margin-top:6px !important;}.posturl{border-top:1px solid #ccc;padding-top:10px;}.ing-section{padding-left:20px;margin: 10px 0;}.ing-section > span{font-weight:700}.recipe-credit{display:none;font-size:13px;border-top: 1px solid #ccc;padding:10px;text-align:center;background:#ffffff;margin:-20px;margin-top:15px;}.recipe-credit a{color:blue;text-decoration:none;}.copyright-statement{ font-size: 13px;font-style:italic;border-top: 1px solid #ccc;margin-top:15px;padding-top:15px;line-height:1.6;}#recipe .info{position:relative}#recipe .image{text-align:center;margin:25px 0}#recipe .image img{max-width:100%;width:150px;height:150px;-o-object-fit:cover;object-fit:cover;border-radius:150px}#recipe .recipe-name{margin-top: 20px;text-align:center}#recipe .summary{margin:20px 0;clear:both;line-height:1.7;font-style:italic}#recipe .time{clear:both;border-top:1px dotted #000;border-bottom:1px dotted #000;border-right:0;border-left:0}

October 8, 2017
10 Delicious Vegan Spaghetti Squash Recipes
From roasted Italian spaghetti squash to Pad Thai, spaghetti squash is a great gluten free option! Check out all 10 of these delicious vegan spaghetti squash recipes!
 LENTIL BOLOGNESE STUFFED SPAGHETTI SQUASH
Have you noticed spaghetti squash popping up at the market or in your CSA boxes and wondered what to do with it? Spaghetti squash is a hard squash that's solid inside when it's raw, but once cooked the flesh breaks apart into spaghetti like strands. While I don't think you're going to fool anyone into thinking spaghetti squash is actual pasta, its mild flavor lends itself well to many flavors. From Pad Thai to Italian spaghetti, spaghetti squash is a great healthier option. I find spaghetti squash to be warm and comforting for autumn, but still light and healthy. If gluten is problematic for you, swapping spaghetti squash for pasta might be a great solution.
CLICK HERE TO LEARN THE BASIC METHODS FOR COOKING SPAGHETTI SQUASH
I asked my favorite vegan bloggers to share their favorite plant based spaghetti squash recipes with us. I hope you find some inspiration for your next spaghetti squash dinner!
CONTINUE READING THIS POST »


LENTIL BOLOGNESE STUFFED SPAGHETTI SQUASHHave you noticed spaghetti squash popping up at the market or in your CSA boxes and wondered what to do with it? Spaghetti squash is a hard squash that's solid inside when it's raw, but once cooked the flesh breaks apart into spaghetti like strands. While I don't think you're going to fool anyone into thinking spaghetti squash is actual pasta, its mild flavor lends itself well to many flavors. From Pad Thai to Italian spaghetti, spaghetti squash is a great healthier option. I find spaghetti squash to be warm and comforting for autumn, but still light and healthy. If gluten is problematic for you, swapping spaghetti squash for pasta might be a great solution.
CLICK HERE TO LEARN THE BASIC METHODS FOR COOKING SPAGHETTI SQUASH
I asked my favorite vegan bloggers to share their favorite plant based spaghetti squash recipes with us. I hope you find some inspiration for your next spaghetti squash dinner!
CONTINUE READING THIS POST »
October 5, 2017
Berry Cauliflower Smoothie
Find out the easy way I get my kids to eat cauliflower for breakfast! 
You guys, when it comes to veggie smoothies, cauliflower is the new spinach. People are adding this creamy cruciferous veggie to smoothies of all flavors, and it's kind of genius. As much as I love green smoothies, my kids are still put off by the color. Even when I call it something fun like a Tinkerbell or strong monster smoothie. Even when it tastes like a tropical drink. Spinach isn't the only way to add veggies to our smoothies though. Recently I've discovered another smoothie-friendly veggie - cauliflower! CONTINUE READING THIS POST »


You guys, when it comes to veggie smoothies, cauliflower is the new spinach. People are adding this creamy cruciferous veggie to smoothies of all flavors, and it's kind of genius. As much as I love green smoothies, my kids are still put off by the color. Even when I call it something fun like a Tinkerbell or strong monster smoothie. Even when it tastes like a tropical drink. Spinach isn't the only way to add veggies to our smoothies though. Recently I've discovered another smoothie-friendly veggie - cauliflower! CONTINUE READING THIS POST »