Marina Delio's Blog, page 4
November 29, 2017
Cauliflower Fettuccini Alfredo
Lighter (& Better That Way) Cauliflower Fettuccini Alfredo from the Fuss-Free Vegan cookbook is a satisfying, veggie-packed vegan dinner that's done in 30 minutes of less! It's easy to make gluten-free too. In the spirit of full disclosure, I received a free review copy of the cookbook, but all opinions are my own.

Cauliflower Fettuccini Alfredo has be on my to-do list for years. I've always hesitated though, worried it wouldn't be as satisfying as the rich and creamy dairy based pastas. And I'll tell you a secret... I'm not a big fan of cauliflower. I love almost all veggies, but good old cauli isn't one of them. I finally got around to trying Cauliflower Fettuccini Alfredo, and my only regret is that I didn't start making this years ago! I was so pleasantly surprised by just how creamy and satisfying this recipe turned out. It even has that addictive umami flavor that cheese has. This lighter cauliflower fettuccini Alfredo will satisfy and pasta craving without weighing you down. CONTINUE READING THIS POST »


Cauliflower Fettuccini Alfredo has be on my to-do list for years. I've always hesitated though, worried it wouldn't be as satisfying as the rich and creamy dairy based pastas. And I'll tell you a secret... I'm not a big fan of cauliflower. I love almost all veggies, but good old cauli isn't one of them. I finally got around to trying Cauliflower Fettuccini Alfredo, and my only regret is that I didn't start making this years ago! I was so pleasantly surprised by just how creamy and satisfying this recipe turned out. It even has that addictive umami flavor that cheese has. This lighter cauliflower fettuccini Alfredo will satisfy and pasta craving without weighing you down. CONTINUE READING THIS POST »


November 25, 2017
Freezer Fudge with Macadamia Nuts
This irresistible fudge is made with natural, real food ingredients. This recipe is vegan, paleo, gluten-free, and totally delicious. 
The holidays are here and that means treats galore! I have always loved making sweet treats and there is nothing quite like making a batch of cookies or fudge to get me into the holiday spirit. With holiday music playing on the kitchen Sonos, chocolate on my girls' noses, and a fun recipe being prepared, I am in my happy place.
Homemade fudge is such a holiday classic, isn't it? It's one of those treats that I love to have a little nibble of, but much more than that and I know I'll feel terrible. Fudge is traditionally made with heaps of white sugar, butter, and either milk, cream, or condensed milk. This healthier fudge recipe, though, doesn't have any of that. This fudge is made with natural ingredients like cashew butter, cacao, and maple syrup.
CONTINUE READING THIS POST »
November 21, 2017
How to Make Apple Cider
Have you ever wondered how to make apple cider from scratch? Homemade apple cider is so easy to make with just a few natural, everyday ingredients. Skip the added sugar by making apple cider at home.  Warm or cold, apple cider is the epitome of autumn comfort. Often after putting our girls to bed I come out and have a warm mug of apple cider in front of the fire. It doesn't get much cozier than that. I have been buying spiced apple cider for years, and it finally dawned on me, that I really could just make it myself. Since apples are naturally sweet, it surprised me that store bought apple cider can contain added sugar. There's just no need for it. It seems like every autumn we have friends bringing us more homegrown apples than we can eat. If I'm not making Slow Cooker Applesauce with them, I love to make homemade spiced apple cider.
CONTINUE READING THIS POST »


Warm or cold, apple cider is the epitome of autumn comfort. Often after putting our girls to bed I come out and have a warm mug of apple cider in front of the fire. It doesn't get much cozier than that. I have been buying spiced apple cider for years, and it finally dawned on me, that I really could just make it myself. Since apples are naturally sweet, it surprised me that store bought apple cider can contain added sugar. There's just no need for it. It seems like every autumn we have friends bringing us more homegrown apples than we can eat. If I'm not making Slow Cooker Applesauce with them, I love to make homemade spiced apple cider.CONTINUE READING THIS POST »
November 17, 2017
Baked Pumpkin Mac and Cheese
Pumpkin mac and cheese gets baked inside a pumpkin! This recipe is my take on the always fun dinner in a pumpkin.
This post is sponsored by Horizon Organic. A few weeks ago I posted on Instagram that my family had a little weekend getaway to the Santa Ynez Valley. On the way home we stopped at my favorite farm stand, Folded Hills Farmstead. The Farmstead is the most charming farm and shop with organic produce, local goods, and adorable animals. We picked a few beautiful pumpkins from the pumpkin patch and I have been so excited to cook with them.
I've always wanted to make dinner in a pumpkin. I wish I knew who came up with the idea, because it's so fun. Most of the stuffed pumpkin recipes I've seen, however, are made with ground beef. I asked my friends on Instagram for ideas for stuffing my pumpkins. Mac and cheese was requested and I though it was an excellent idea for a vegetarian take on dinner in a pumpkin. I used one larger heirloom pumpkin that was about 5 pounds. I think in the future I would try stuffing kobocha squash, also known as Japanese pumpkin, because the flesh is just so sweet and delicious. It's so fun to serve dinner out of an edible pumpkin bowl.
 Since we were baking our mac and cheese inside the pumpkin, it seemed fitting the mac and cheese be made with pumpkin puree. I love adding extra veggies either in whole or pureed form to our mac and cheese recipes. I've done pureed cauliflower and carrot, and baked in roasted Brussels sprouts. Sometimes I even wilt in some torn kale, which would be fantastic with this pumpkin mac and cheese. Using pumpkin puree in the base works well because it's naturally creamy, so you don't have to make a roux with butter and flour as is traditionally done with mac and cheese sauce. It's also naturally orange, so you can make a completely dye-free meal. I used Horizon organic shredded cheddar, which is my kids' favorite. I love that it's white and organic.
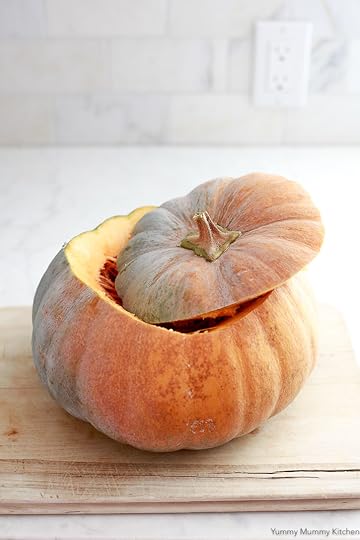
These gorgeous pumpkins take about an hour to cook through, so I partially bake them while I make the mac and cheese and then continue baking after they are stuffed. Let's just take a moment to admire that beautiful pumpkin.
 The easy pumpkin mac and cheese gets mixed up on the stove top. It's a good idea to taste it at this point and adjust the seasonings to taste. A sprinkle of salt, pepper, sage, or nutmeg can really enhance the flavor here. Thyme would be a delicious addition as well.

My kids' favorite part of homemade mac and cheese is the crispy topping. For this autumn pumpkin mac and cheese some sage seemed the perfect compliment. I absolutely love sage with pumpkin. Have you ever had pumpkin ravioli with buttery sage sauce? It's an utterly divine and decadent treat.
Yield: Serves 6-8Author: Yummy Mummy KitchenPrint Recipe Pumpkin Mac and Cheese Baked in a PumpkinThis pumpkin mac and cheese has a crispy panko topping. Bake in a pumpkin for an edible bowl. What a fun autumn dinner!prep time: 15 MINScook time: 60 MINStotal time: 75 minsingredients
1 cinderella pumpkin or a few kobocha squash 1 lb. macaroni pasta (gluten-free if desired)1 1/2 cups pumpkin puree (canned is fine) 4 tablespoons favorite butter, divided1 (6 oz.) bag Horizon organic shredded cheddar1 cup favorite milk1 tablespoon Dijon mustard or 1 teaspoon ground mustard 1/2 teaspoon nutmeg 1 teaspoon garlic powder6 sage leaves, sliced 1/2 cup panko breadcrumbs (gluten-free if desired) 1/4 cup Parmesan instructions
Preheat the oven to 400 degrees F (200 degrees C). Cut the top quarter of the pumpkin off, as you would a jack-o-lantern. Scoop out all the flesh and seeds. Season the inside of the pumpkin with salt and pepper. Place on a baking sheet and roast for 40 minutes. We want the pumpkin to be tender, but not falling apart. Reduce the temperature to 350 F. Meanwhile, cook the pasta to al dente in salted water according to package instructions. Drain and add back into the pot. To the pot of pasta, add the pumpkin, 2 tablespoons butter, cheese, milk, mustard, nutmeg, and garlic. Stir to combine and melt the cheese. Season to taste with salt and pepper. Adjust any seasonings. Transfer the pumpkin mac and cheese to the inside of the roasted pumpkin (or a casserole dish if not using a pumpkin). To make the topping, melt the remaining two tablespoons of butter in a frying pan over medium low heat. Add the sage and saute a couple of minutes. Add the panko and Parmesan and stir to coat with butter. Sprinkle the panko topping over the mac and cheese. Return the pumpkin to the oven and continue to bake until the topping has browned, about 20 minutes. Check halfway through to be sure the topping isn't burning. If it is getting too brown, cover with foil. notesGluten Free Option: Use gluten-free pasta and breadcrumbs.
Vegan Option: Use Silk unsweetened plain milk, dairy-free butter, and omit the cheese. Add 1/3 cup nutritional yeast to the pasta mixture.
You can use any edible pumpkin you like. Kobocha squash has deliciously sweet flesh, while the larger pumpkins make a beautiful container for the whole recipe. Mini pumpkins would be cute too! If you don't have any pumpkins, you can also bake this mac and cheese in a casserole dish.http://www.yummymummykitchen.com/2017/11/baked-pumpkin-mac-and-cheese.htmlCreated using The Recipes Generator.recipe-inner{text-align:left;max-width:620px;border:6px double #009BFF;padding:20px;background:#f2f2f2;margin: 40px auto;font-family:Lato, sans-serif;}.recipe-inner a{color: #4193f0;}#recipe .recipe-name{font-size: 21px;}#recipe .info{font-size:13px;text-transform:capitalize;border-bottom:2px solid #000;padding-bottom:7px;margin-bottom:20px}.info:after{content:'';display:table;clear:both}#recipe .info span:first-child{margin-right:30px}#printbutton{border:0;margin:0;color:#fff;float:right;background:#555; padding:5px;border-radius:3px;cursor:pointer}#recipe .time{text-transform:uppercase;font-size:12px;text-align:center;background:#fff;padding:15px 0;margin-bottom:20px}#recipe .time span:not(:last-child){margin-right:12px}#recipe .time span:not(:last-child):after{content:'';display:inline-block;height:10px;width:1px;background:#000;vertical-align:middle;margin-left:12px}#recipe .summary{line-height:1.7;font-style:italic}.ingredients{line-height:1.7;clear:both}.ingredients h3,.instructions h3,.notes h3{font-size:20px !important;font-weight:400 !important;margin-bottom:0;color:#000;text-transform: uppercase;}.ingredients ul{margin:0!important;margin-top:5px !important;}.instructions li{margin-bottom:15px !important;line-height:1.6;text-align:left;}.ingredients li{text-align:left}#recipe .instructions{margin-top: 30px;}#recipe .instructions ol,#recipe .instructions ol li {list-style:decimal !important;}#recipe .instructions ol{padding-left:39px;margin:0!important;margin-top:6px !important;}.posturl{border-top:1px solid #ccc;padding-top:10px;}.ing-section{padding-left:20px;margin: 10px 0;}.ing-section > span{font-weight:700}.recipe-credit{font-size:13px;border-top: 1px solid #ccc;padding:10px;text-align:center;background:#ffffff;margin:-20px;margin-top:15px;}.recipe-credit a{color:blue;text-decoration:none;}.copyright-statement{font-size: 13px;font-style:italic;border-top: 1px solid #ccc;margin-top:15px;padding-top:15px;line-height:1.6;}.notes pre{font-size: 15px;margin: 10px 0;padding-left: 20px;font-family: inherit;line-height: 1.7;white-space: pre-line;}.notes h3{margin: 0}.nutrition-info{font-size: 0;margin: 20px 0;padding: 10px;background: #fff;}.nutrition-info>div {display: inline-block;font-size: 14px;width: 20%;text-align: center;}.nutrition-info>div:nth-child(5) ~ div{margin-top: 20px;}.nutrition-info>div p{margin-top: 0;margin-bottom: 7px;}#recipe .info{position:relative}#recipe .image{text-align:center;margin:25px 0}#recipe .image img{max-width:100%;width:150px;height:150px;-o-object-fit:cover;object-fit:cover;border-radius:150px}#recipe .recipe-name{margin-top: 20px;text-align:center}#recipe .summary{margin:20px 0;clear:both;line-height:1.7;font-style:italic}#recipe .time{clear:both;border-top:1px dotted #000;border-bottom:1px dotted #000;border-right:0;border-left:0}
This is a sponsored conversation written by me on behalf of Horizon. The opinions and text are all mine.


This post is sponsored by Horizon Organic.
A few weeks ago I posted on Instagram that my family had a little weekend getaway to the Santa Ynez Valley. On the way home we stopped at my favorite farm stand, Folded Hills Farmstead. The Farmstead is the most charming farm and shop with organic produce, local goods, and adorable animals. We picked a few beautiful pumpkins from the pumpkin patch and I have been so excited to cook with them. I've always wanted to make dinner in a pumpkin. I wish I knew who came up with the idea, because it's so fun. Most of the stuffed pumpkin recipes I've seen, however, are made with ground beef. I asked my friends on Instagram for ideas for stuffing my pumpkins. Mac and cheese was requested and I though it was an excellent idea for a vegetarian take on dinner in a pumpkin. I used one larger heirloom pumpkin that was about 5 pounds. I think in the future I would try stuffing kobocha squash, also known as Japanese pumpkin, because the flesh is just so sweet and delicious. It's so fun to serve dinner out of an edible pumpkin bowl.
Since we were baking our mac and cheese inside the pumpkin, it seemed fitting the mac and cheese be made with pumpkin puree. I love adding extra veggies either in whole or pureed form to our mac and cheese recipes. I've done pureed cauliflower and carrot, and baked in roasted Brussels sprouts. Sometimes I even wilt in some torn kale, which would be fantastic with this pumpkin mac and cheese. Using pumpkin puree in the base works well because it's naturally creamy, so you don't have to make a roux with butter and flour as is traditionally done with mac and cheese sauce. It's also naturally orange, so you can make a completely dye-free meal. I used Horizon organic shredded cheddar, which is my kids' favorite. I love that it's white and organic.These gorgeous pumpkins take about an hour to cook through, so I partially bake them while I make the mac and cheese and then continue baking after they are stuffed. Let's just take a moment to admire that beautiful pumpkin.
The easy pumpkin mac and cheese gets mixed up on the stove top. It's a good idea to taste it at this point and adjust the seasonings to taste. A sprinkle of salt, pepper, sage, or nutmeg can really enhance the flavor here. Thyme would be a delicious addition as well.

My kids' favorite part of homemade mac and cheese is the crispy topping. For this autumn pumpkin mac and cheese some sage seemed the perfect compliment. I absolutely love sage with pumpkin. Have you ever had pumpkin ravioli with buttery sage sauce? It's an utterly divine and decadent treat.
Yield: Serves 6-8Author: Yummy Mummy KitchenPrint Recipe
Pumpkin Mac and Cheese Baked in a PumpkinThis pumpkin mac and cheese has a crispy panko topping. Bake in a pumpkin for an edible bowl. What a fun autumn dinner!prep time: 15 MINScook time: 60 MINStotal time: 75 minsingredients1 cinderella pumpkin or a few kobocha squash 1 lb. macaroni pasta (gluten-free if desired)1 1/2 cups pumpkin puree (canned is fine) 4 tablespoons favorite butter, divided1 (6 oz.) bag Horizon organic shredded cheddar1 cup favorite milk1 tablespoon Dijon mustard or 1 teaspoon ground mustard 1/2 teaspoon nutmeg 1 teaspoon garlic powder6 sage leaves, sliced 1/2 cup panko breadcrumbs (gluten-free if desired) 1/4 cup Parmesan instructions
Preheat the oven to 400 degrees F (200 degrees C). Cut the top quarter of the pumpkin off, as you would a jack-o-lantern. Scoop out all the flesh and seeds. Season the inside of the pumpkin with salt and pepper. Place on a baking sheet and roast for 40 minutes. We want the pumpkin to be tender, but not falling apart. Reduce the temperature to 350 F. Meanwhile, cook the pasta to al dente in salted water according to package instructions. Drain and add back into the pot. To the pot of pasta, add the pumpkin, 2 tablespoons butter, cheese, milk, mustard, nutmeg, and garlic. Stir to combine and melt the cheese. Season to taste with salt and pepper. Adjust any seasonings. Transfer the pumpkin mac and cheese to the inside of the roasted pumpkin (or a casserole dish if not using a pumpkin). To make the topping, melt the remaining two tablespoons of butter in a frying pan over medium low heat. Add the sage and saute a couple of minutes. Add the panko and Parmesan and stir to coat with butter. Sprinkle the panko topping over the mac and cheese. Return the pumpkin to the oven and continue to bake until the topping has browned, about 20 minutes. Check halfway through to be sure the topping isn't burning. If it is getting too brown, cover with foil. notesGluten Free Option: Use gluten-free pasta and breadcrumbs.
Vegan Option: Use Silk unsweetened plain milk, dairy-free butter, and omit the cheese. Add 1/3 cup nutritional yeast to the pasta mixture.
You can use any edible pumpkin you like. Kobocha squash has deliciously sweet flesh, while the larger pumpkins make a beautiful container for the whole recipe. Mini pumpkins would be cute too! If you don't have any pumpkins, you can also bake this mac and cheese in a casserole dish.http://www.yummymummykitchen.com/2017/11/baked-pumpkin-mac-and-cheese.htmlCreated using The Recipes Generator.recipe-inner{text-align:left;max-width:620px;border:6px double #009BFF;padding:20px;background:#f2f2f2;margin: 40px auto;font-family:Lato, sans-serif;}.recipe-inner a{color: #4193f0;}#recipe .recipe-name{font-size: 21px;}#recipe .info{font-size:13px;text-transform:capitalize;border-bottom:2px solid #000;padding-bottom:7px;margin-bottom:20px}.info:after{content:'';display:table;clear:both}#recipe .info span:first-child{margin-right:30px}#printbutton{border:0;margin:0;color:#fff;float:right;background:#555; padding:5px;border-radius:3px;cursor:pointer}#recipe .time{text-transform:uppercase;font-size:12px;text-align:center;background:#fff;padding:15px 0;margin-bottom:20px}#recipe .time span:not(:last-child){margin-right:12px}#recipe .time span:not(:last-child):after{content:'';display:inline-block;height:10px;width:1px;background:#000;vertical-align:middle;margin-left:12px}#recipe .summary{line-height:1.7;font-style:italic}.ingredients{line-height:1.7;clear:both}.ingredients h3,.instructions h3,.notes h3{font-size:20px !important;font-weight:400 !important;margin-bottom:0;color:#000;text-transform: uppercase;}.ingredients ul{margin:0!important;margin-top:5px !important;}.instructions li{margin-bottom:15px !important;line-height:1.6;text-align:left;}.ingredients li{text-align:left}#recipe .instructions{margin-top: 30px;}#recipe .instructions ol,#recipe .instructions ol li {list-style:decimal !important;}#recipe .instructions ol{padding-left:39px;margin:0!important;margin-top:6px !important;}.posturl{border-top:1px solid #ccc;padding-top:10px;}.ing-section{padding-left:20px;margin: 10px 0;}.ing-section > span{font-weight:700}.recipe-credit{font-size:13px;border-top: 1px solid #ccc;padding:10px;text-align:center;background:#ffffff;margin:-20px;margin-top:15px;}.recipe-credit a{color:blue;text-decoration:none;}.copyright-statement{font-size: 13px;font-style:italic;border-top: 1px solid #ccc;margin-top:15px;padding-top:15px;line-height:1.6;}.notes pre{font-size: 15px;margin: 10px 0;padding-left: 20px;font-family: inherit;line-height: 1.7;white-space: pre-line;}.notes h3{margin: 0}.nutrition-info{font-size: 0;margin: 20px 0;padding: 10px;background: #fff;}.nutrition-info>div {display: inline-block;font-size: 14px;width: 20%;text-align: center;}.nutrition-info>div:nth-child(5) ~ div{margin-top: 20px;}.nutrition-info>div p{margin-top: 0;margin-bottom: 7px;}#recipe .info{position:relative}#recipe .image{text-align:center;margin:25px 0}#recipe .image img{max-width:100%;width:150px;height:150px;-o-object-fit:cover;object-fit:cover;border-radius:150px}#recipe .recipe-name{margin-top: 20px;text-align:center}#recipe .summary{margin:20px 0;clear:both;line-height:1.7;font-style:italic}#recipe .time{clear:both;border-top:1px dotted #000;border-bottom:1px dotted #000;border-right:0;border-left:0}
This is a sponsored conversation written by me on behalf of Horizon. The opinions and text are all mine.
November 16, 2017
Farro Salad with Sweet Potatoes and Beets
This farro salad is perfect for autumn and winter months when beets and sweet potatoes are in season. It's hearty and colorful. For a gluten-free version substitute quinoa.  Last summer I discovered how much I enjoy farro. While in Tuscany, I noticed summery farro salads with tomatoes and basil in most cafes. You may remember I shared the recipe for an Italian farro salad here. Now that summer has gone, I wanted to share a version of farro salad that's perfect for autumn and winter. This farro salad is loaded with color.

This salad begins with roasted veggies. I love roasting beets and sweet potatoes in the winter. Both of my girls will happily gobble up these sweet veggies. Though I roasted red onion with these veggies this time, I personally prefer raw onions and would skip roasting them next time. I'll leave that up to you though.
While those veggies roast away in the oven, quick cooking farro cooks on the stove. There are several types of farro, but I use the quick cooking variety. You can find it at Trader Joe's, Whole Foods, and other grocery stores. It cooks in about the same time as cooking quinoa. Farro is an ancient whole grain that's high in protein and fiber, so it really fills you up. It's chewy and nutty and can be used as you would use rice or quinoa. It's delicious in soups, salads, and used in place of arborio rice in risotto. Keep in mind though, that farro is not gluten-free. If you are on a gluten-free diet, you can still use this recipe, but use cooked quinoa instead. This colorful farro salad is just so pretty. To add even more harvest flair I added roasted pepitas (shelled pumpkin seeds) and dried cranberries. A bed of arugula ads freshness. I love beets, but they do bleed their fabulous purple juices all over anything they touch. Add them last and toss lightly unless you don't mind the whole salad to turning pink.
 I like to dress this salad with a simple homemade apple cider vinaigrette. If you prefer a balsamic type of dressing, that would work too.
Yield: Serves 6Author: Yummy Mummy KitchenPrint Recipe Farro Salad with Sweet Potatoes and BeetsThis farro salad is perfect for autumn and winter months when beets and sweet potatoes are in season. It's hearty and colorful.prep time: 15 MINScook time: 25 MINStotal time: 40 minsingredients
2 cups peeled and 1/2" diced beets2 cups peeled and 1/2" diced sweet potato1 red onion, peeled, halved, and sliced 2 tablespoons extra virgin olive oil 1 cup quick cooking farro (quinoa for gluten-free version) 3 cups water3-5 oz. baby arugula1/3 cup roasted pepitas (shelled pumpkin seeds)1/3 cup dried cranberries 1 recipe apple cider vinaigrette instructions
Preheat the oven to 400 degrees F (200 degrees C). Lightly coat the beets, sweet potatoes, and onion slices separately with olive oil. I keep the beets separate from the other veggies so that they don't turn them all pink. Note: if you like raw onions, don't roast them here, but add in at the end. Season the veggies with salt and pepper. Roast until tender, about 20-25 minutes. They onions will cook more quickly, so you may want to remove them after about 15 minutes. Meanwhile, cook the farro according to package instructions. Drain off any excess water and let cool. Place a bed of arugula in a salad serving bowl or platter. Arrange the roasted veggies, farro, pepitas, and cranberries on top. When you're ready to eat, very gently toss the salad together or scoop directly onto plates. Don't toss the salad much or it will turn pink. Serve with the apple cider vinaigrette. http://www.yummymummykitchen.com/2017/11/farro-salad-with-sweet-potatoes-and.htmlCreated using The Recipes Generator.recipe-inner{text-align:left;max-width:620px;border:6px double #009BFF;padding:20px;background:#f2f2f2;margin: 40px auto;font-family:Lato, sans-serif;}.recipe-inner a{color: #4193f0;}#recipe .recipe-name{font-size: 21px;}#recipe .info{font-size:13px;text-transform:capitalize;border-bottom:2px solid #000;padding-bottom:7px;margin-bottom:20px}.info:after{content:'';display:table;clear:both}#recipe .info span:first-child{margin-right:30px}#printbutton{border:0;margin:0;color:#fff;float:right;background:#555; padding:5px;border-radius:3px;cursor:pointer}#recipe .time{text-transform:uppercase;font-size:12px;text-align:center;background:#fff;padding:15px 0;margin-bottom:20px}#recipe .time span:not(:last-child){margin-right:12px}#recipe .time span:not(:last-child):after{content:'';display:inline-block;height:10px;width:1px;background:#000;vertical-align:middle;margin-left:12px}#recipe .summary{line-height:1.7;font-style:italic}.ingredients{line-height:1.7;clear:both}.ingredients h3,.instructions h3,.notes h3{font-size:20px !important;font-weight:400 !important;margin-bottom:0;color:#000;text-transform: uppercase;}.ingredients ul{margin:0!important;margin-top:5px !important;}.instructions li{margin-bottom:15px !important;line-height:1.6;text-align:left;}.ingredients li{text-align:left}#recipe .instructions{margin-top: 30px;}#recipe .instructions ol,#recipe .instructions ol li {list-style:decimal !important;}#recipe .instructions ol{padding-left:39px;margin:0!important;margin-top:6px !important;}.posturl{border-top:1px solid #ccc;padding-top:10px;}.ing-section{padding-left:20px;margin: 10px 0;}.ing-section > span{font-weight:700}.recipe-credit{font-size:13px;border-top: 1px solid #ccc;padding:10px;text-align:center;background:#ffffff;margin:-20px;margin-top:15px;}.recipe-credit a{color:blue;text-decoration:none;}.copyright-statement{font-size: 13px;font-style:italic;border-top: 1px solid #ccc;margin-top:15px;padding-top:15px;line-height:1.6;}.notes pre{font-size: 15px;margin: 10px 0;padding-left: 20px;font-family: inherit;line-height: 1.7;white-space: pre-line;}.notes h3{margin: 0}.nutrition-info{font-size: 0;margin: 20px 0;padding: 10px;background: #fff;}.nutrition-info>div {display: inline-block;font-size: 14px;width: 20%;text-align: center;}.nutrition-info>div:nth-child(5) ~ div{margin-top: 20px;}.nutrition-info>div p{margin-top: 0;margin-bottom: 7px;}#recipe .info{position:relative}#recipe .image{text-align:center;margin:25px 0}#recipe .image img{max-width:100%;width:150px;height:150px;-o-object-fit:cover;object-fit:cover;border-radius:150px}#recipe .recipe-name{margin-top: 20px;text-align:center}#recipe .summary{margin:20px 0;clear:both;line-height:1.7;font-style:italic}#recipe .time{clear:both;border-top:1px dotted #000;border-bottom:1px dotted #000;border-right:0;border-left:0}


Last summer I discovered how much I enjoy farro. While in Tuscany, I noticed summery farro salads with tomatoes and basil in most cafes. You may remember I shared the recipe for an Italian farro salad here. Now that summer has gone, I wanted to share a version of farro salad that's perfect for autumn and winter. This farro salad is loaded with color. This salad begins with roasted veggies. I love roasting beets and sweet potatoes in the winter. Both of my girls will happily gobble up these sweet veggies. Though I roasted red onion with these veggies this time, I personally prefer raw onions and would skip roasting them next time. I'll leave that up to you though.
While those veggies roast away in the oven, quick cooking farro cooks on the stove. There are several types of farro, but I use the quick cooking variety. You can find it at Trader Joe's, Whole Foods, and other grocery stores. It cooks in about the same time as cooking quinoa. Farro is an ancient whole grain that's high in protein and fiber, so it really fills you up. It's chewy and nutty and can be used as you would use rice or quinoa. It's delicious in soups, salads, and used in place of arborio rice in risotto. Keep in mind though, that farro is not gluten-free. If you are on a gluten-free diet, you can still use this recipe, but use cooked quinoa instead.
This colorful farro salad is just so pretty. To add even more harvest flair I added roasted pepitas (shelled pumpkin seeds) and dried cranberries. A bed of arugula ads freshness. I love beets, but they do bleed their fabulous purple juices all over anything they touch. Add them last and toss lightly unless you don't mind the whole salad to turning pink.I like to dress this salad with a simple homemade apple cider vinaigrette. If you prefer a balsamic type of dressing, that would work too. Yield: Serves 6Author: Yummy Mummy KitchenPrint Recipe
Farro Salad with Sweet Potatoes and BeetsThis farro salad is perfect for autumn and winter months when beets and sweet potatoes are in season. It's hearty and colorful.prep time: 15 MINScook time: 25 MINStotal time: 40 minsingredients2 cups peeled and 1/2" diced beets2 cups peeled and 1/2" diced sweet potato1 red onion, peeled, halved, and sliced 2 tablespoons extra virgin olive oil 1 cup quick cooking farro (quinoa for gluten-free version) 3 cups water3-5 oz. baby arugula1/3 cup roasted pepitas (shelled pumpkin seeds)1/3 cup dried cranberries 1 recipe apple cider vinaigrette instructions
Preheat the oven to 400 degrees F (200 degrees C). Lightly coat the beets, sweet potatoes, and onion slices separately with olive oil. I keep the beets separate from the other veggies so that they don't turn them all pink. Note: if you like raw onions, don't roast them here, but add in at the end. Season the veggies with salt and pepper. Roast until tender, about 20-25 minutes. They onions will cook more quickly, so you may want to remove them after about 15 minutes. Meanwhile, cook the farro according to package instructions. Drain off any excess water and let cool. Place a bed of arugula in a salad serving bowl or platter. Arrange the roasted veggies, farro, pepitas, and cranberries on top. When you're ready to eat, very gently toss the salad together or scoop directly onto plates. Don't toss the salad much or it will turn pink. Serve with the apple cider vinaigrette. http://www.yummymummykitchen.com/2017/11/farro-salad-with-sweet-potatoes-and.htmlCreated using The Recipes Generator.recipe-inner{text-align:left;max-width:620px;border:6px double #009BFF;padding:20px;background:#f2f2f2;margin: 40px auto;font-family:Lato, sans-serif;}.recipe-inner a{color: #4193f0;}#recipe .recipe-name{font-size: 21px;}#recipe .info{font-size:13px;text-transform:capitalize;border-bottom:2px solid #000;padding-bottom:7px;margin-bottom:20px}.info:after{content:'';display:table;clear:both}#recipe .info span:first-child{margin-right:30px}#printbutton{border:0;margin:0;color:#fff;float:right;background:#555; padding:5px;border-radius:3px;cursor:pointer}#recipe .time{text-transform:uppercase;font-size:12px;text-align:center;background:#fff;padding:15px 0;margin-bottom:20px}#recipe .time span:not(:last-child){margin-right:12px}#recipe .time span:not(:last-child):after{content:'';display:inline-block;height:10px;width:1px;background:#000;vertical-align:middle;margin-left:12px}#recipe .summary{line-height:1.7;font-style:italic}.ingredients{line-height:1.7;clear:both}.ingredients h3,.instructions h3,.notes h3{font-size:20px !important;font-weight:400 !important;margin-bottom:0;color:#000;text-transform: uppercase;}.ingredients ul{margin:0!important;margin-top:5px !important;}.instructions li{margin-bottom:15px !important;line-height:1.6;text-align:left;}.ingredients li{text-align:left}#recipe .instructions{margin-top: 30px;}#recipe .instructions ol,#recipe .instructions ol li {list-style:decimal !important;}#recipe .instructions ol{padding-left:39px;margin:0!important;margin-top:6px !important;}.posturl{border-top:1px solid #ccc;padding-top:10px;}.ing-section{padding-left:20px;margin: 10px 0;}.ing-section > span{font-weight:700}.recipe-credit{font-size:13px;border-top: 1px solid #ccc;padding:10px;text-align:center;background:#ffffff;margin:-20px;margin-top:15px;}.recipe-credit a{color:blue;text-decoration:none;}.copyright-statement{font-size: 13px;font-style:italic;border-top: 1px solid #ccc;margin-top:15px;padding-top:15px;line-height:1.6;}.notes pre{font-size: 15px;margin: 10px 0;padding-left: 20px;font-family: inherit;line-height: 1.7;white-space: pre-line;}.notes h3{margin: 0}.nutrition-info{font-size: 0;margin: 20px 0;padding: 10px;background: #fff;}.nutrition-info>div {display: inline-block;font-size: 14px;width: 20%;text-align: center;}.nutrition-info>div:nth-child(5) ~ div{margin-top: 20px;}.nutrition-info>div p{margin-top: 0;margin-bottom: 7px;}#recipe .info{position:relative}#recipe .image{text-align:center;margin:25px 0}#recipe .image img{max-width:100%;width:150px;height:150px;-o-object-fit:cover;object-fit:cover;border-radius:150px}#recipe .recipe-name{margin-top: 20px;text-align:center}#recipe .summary{margin:20px 0;clear:both;line-height:1.7;font-style:italic}#recipe .time{clear:both;border-top:1px dotted #000;border-bottom:1px dotted #000;border-right:0;border-left:0}
November 15, 2017
Perfect Apple Cider Vinaigrette
This light and tangy apple cider vinaigrette recipe takes under 5 minutes to mix together and is absolutely delicious.  When you want to kick up your salad game, homemade dressings are the way to go. For years I took the lazy route and used store bought salad dressings. Finally I realized though, that those store bought dressings often contained funky ingredients and preservatives. Switching to homemade dressings was a game-changer. When we make salad dressings at home, they are less expensive, there's less waste, they taste better, and we get to control how much oil and sugar we include.
Earlier this year I shared this creamy Lemon Tahini dressing that is one of my very favorites. I also shared a Chickpea Greek Salad with an easy Greek red wine vinaigrette. Both of those recipes were such hits with you guys, that I wanted to share another one of my favorite dressings. This Apple Cider Vinaigrette is light, tangy, and compliments almost any salad. CONTINUE READING THIS POST »


When you want to kick up your salad game, homemade dressings are the way to go. For years I took the lazy route and used store bought salad dressings. Finally I realized though, that those store bought dressings often contained funky ingredients and preservatives. Switching to homemade dressings was a game-changer. When we make salad dressings at home, they are less expensive, there's less waste, they taste better, and we get to control how much oil and sugar we include. Earlier this year I shared this creamy Lemon Tahini dressing that is one of my very favorites. I also shared a Chickpea Greek Salad with an easy Greek red wine vinaigrette. Both of those recipes were such hits with you guys, that I wanted to share another one of my favorite dressings. This Apple Cider Vinaigrette is light, tangy, and compliments almost any salad. CONTINUE READING THIS POST »
November 10, 2017
Cranberry Chutney
This easy cranberry chutney recipe has flavors of orange, apple, and warm spices. Cranberry chutney is delicious on all your holiday dishes, cheese platters, and makes a lovely homemade gift. It's even great on Buddha bowls!  I can't believe it's almost Thanksgiving! I was just looking at my kids' school calendars and it seems there is very little school over the next couple of months. The holidays are here and will be whizzing past. I'm going to try my best to be mindful, grateful, and enjoy these special moments. If I'm not posting quite as consistently over the next couple of months it's because I've got another very special job to do
I can't believe it's almost Thanksgiving! I was just looking at my kids' school calendars and it seems there is very little school over the next couple of months. The holidays are here and will be whizzing past. I'm going to try my best to be mindful, grateful, and enjoy these special moments. If I'm not posting quite as consistently over the next couple of months it's because I've got another very special job to do
November 7, 2017
Spinach Artichoke Puff Pastry Wreath
A beautiful puff pastry wreath filled with spinach, artichoke hearts, and Mediterranean flavors. This post is sponsored by Alessi. All opinions are my own.

This puff pastry wreath is like spinach artichoke dip, only all dressed up for a holiday party. It's warm, rich, and hearty. With pesto, sun dried tomatoes, and capers, it's bursting with Mediterranean flavor. This pretty wreath is surprisingly easy to make with just a handful of simple ingredients. Make it as an elegant holiday appetizer, or just to accompany a cup of soup for a casual dinner at home. If you like spinach artichoke dishes, you're going to love this recipe! CONTINUE READING THIS POST »


This puff pastry wreath is like spinach artichoke dip, only all dressed up for a holiday party. It's warm, rich, and hearty. With pesto, sun dried tomatoes, and capers, it's bursting with Mediterranean flavor. This pretty wreath is surprisingly easy to make with just a handful of simple ingredients. Make it as an elegant holiday appetizer, or just to accompany a cup of soup for a casual dinner at home. If you like spinach artichoke dishes, you're going to love this recipe! CONTINUE READING THIS POST »
November 2, 2017
Tuscany Family Vacation
Join me on a virtual family holiday tour through Tuscany! 
I promised a follow-up post to my Postcard From Florence post in June. I've finally gotten a chance to sort through my pictures and share with you a taste of Tuscany. This is going to be a long, visual post, so go get yourself a cup of tea or Italian Prosecco if you prefer. I'll be here.
Once we left Florence, the drive to our farmhouse for the month was about 40 minutes. Word of warning: do not, I repeat, do not, rent a car and drive out of Florence. Florence was founded by Julius Caesar in 59 BC. It's OLD and the narrow cobblestone streets were not built to accommodate cars. One of the things I love most about Florence is that it's a walking city, but that becomes a huge challenge if you need to drive out to the countryside. Trying to get out of the city is like driving through a narrow corn maze.
We rented a 16th century restored farmhouse in the hills just south of Florence, about halfway between Florence and Siena. Let me show you around! CONTINUE READING THIS POST »
November 1, 2017
Zuppa Toscana
This copycat Olive Garden Zuppa Toscana soup is so hearty and comforting. Zuppa Toscana is packed with kale and potatoes and topped off with a creamy broth. I've given this recipe a healthy makeover so that it's vegetarian and vegan friendly. Zuppa Toscana soup is sure to warm you up on chilly nights! 
We've finally gotten the soup weather I've been longing for. I've got my chunky sweater on and soup on the stove. It feels like the holidays are upon us. I make a cozy pot of soup at least once a week and always love trying new ones. I love soup not only because it's so warming on cold days, but it's an easy one-pot meal that's easy to make healthy and inexpensively.
One soup the Internet has been going crazy over lately is Zuppa Toscana. Zuppa Toscana translates to "Tuscan Soup" in Italian. I don't think Zuppa Toscana is actually an authentic Tuscan recipe, however. Zuppa Toscana was created by Olive Garden and apparently has a huge fan base. I had to see what all the fuss was about so I checked out Olive Garden's ingredients and recreated a healthier version at home. CONTINUE READING THIS POST »