
Mark Sisson's Blog, page 25
May 13, 2022
New and Noteworthy: What I Read This Week—Edition 177

Research of the Week
Mask wearing, even at rest, appears to increase CO2 to excessive levels.
Eating more protein during weight loss staves off muscle loss and increases the overall quality of the diet.
In advanced stage kidney disease patients, a very low protein diet offers no benefit.
Vitamin B12 deficiency is disastrous for babies (and everyone).
More strength, less depression.
The more species you see at the coast, the better you feel.
New Primal Kitchen PodcastsPrimal Kitchen Podcast Episode 29: Childhood Behavior and Preconception Care with Pediatric Naturopathic Doctor, Ari Calhoun
Primal Health Coach Radio: Chandler Walker
Media, SchmediaLettuce is the most common cause of food poisoning.
Interesting Blog PostsWhy are we basing food policy on terrible, unknowable, often incorrect data?
Social NotesBecause it’s not about the environment.
Let kids be kids (and learn from them!).
Everything ElseIf you exercise, your blood is anti-cancer.
Things I’m Up to and Interested InArchaic revival: Tradition often gets things right.
Agreed: To truly fix diet-related disease, we must look inward.
Interesting thread: Population genomics in Ancient Eurasia.
I’d be surprised: The Dietary Guidelines committee may tackle ultraprocessed foods.
A tragedy on all fronts: Slavery didn’t even contribute to the rise of the American economy.
Question I’m AskingAre you weird?
Recipe CornerCrispy shallots and shallot oil: one method.One of the greatest salads in the world: laab.Time CapsuleOne year ago (Apr 30 – May 6)
How to Grill Everything—the Ultimate Guide—Grill it all.Habit Stacking Microworkouts (aka Working Out Without Having to Think About It)—Work workouts into your life.Comment of the Week
“I don’t like arrogant, cocky, narcissistic alpha people … unless they’re my surgeon!”
-Wise, PaleoProgressive.
(function($) { $("#dfHBupi").load("https://www.marksdailyapple.com/wp-ad..." ); })( jQuery ); 
The post New and Noteworthy: What I Read This Week—Edition 177 appeared first on Mark's Daily Apple.


May 12, 2022
Amber’s Keto Success Story
Today I’m sharing Amber’s story of making her way from vegan to pescatarian to keto—and, ultimately, to health!
Have you improved your health, tackled a fitness goal, or overcome obstacles with the help of the Primal Blueprint? Inspire others by sharing your success story with the MDA community. Contact me here.
 Hi, Mark! I wanted to share how putting the steps provided in your book into practice has changed my life. Thanks for reading.
I was already 20 pounds overweight when I gave birth to my son in 2016. During pregnancy I put on another 40 pounds, which put me in the obese category. I let myself indulge in every craving (mainly strawberry shortcake) and paid no attention to the scale. I was overly confident the weight would fall off after delivery, but when it didn’t, I started to think this was just my new normal.
Six months later I joined a gym. On day one I stepped on the scale, and when the number was displayed I was completely mortified. I had zero muscles in my abdomen, and they often had to create different exercises specifically for me as I could not participate in their regular classes. I was embarrassed but determined, and after 11 months I was down 30 pounds and feeling proud.
However, I was hungry most of the day. In an effort to drop the weight, I had “tinkered” with diets. At the time, I was on a vegan diet that quickly turned into a pescatarian diet. One day, my gym announced they were moving locations and could no longer provide daycare for my son. Just like that, my gym days were over. I tried to “will” myself to the gym at 5 a.m. but it NEVER went well. I could barely keep my eyes open let alone do a proper workout.
I let the membership expire and quickly noticed the weight coming back. I could not understand how this was happening. I thought I was making healthy meals. A normal day went like this:
One piece of sourdough toast with avocado and some juice.For lunch I would make vegan nachos comprised of a starch-like substance to substitute for cheese along with black beans, rice, lettuce, and tomato served over chips.For dinner I would make yet another dish with beans or fish with gnocchi.It went on like this for the next two years, and abruptly white wine enters the picture. Wine became a constant in my life and—surprise!—I started gaining even more weight. I was tired all the time; I went to bed at 8 and yet woke up exhausted.
At age 32 I thought for the first time that this was not any way to live life. I decided to address this extreme exhaustion with my doctor. She ordered labs, and when the results came back (sparing you the details) everything was elevated to “red” in EVERY category. I was shocked and ashamed.
My doctor explained a “new” diet she heard remarkable things about called keto. She said I should investigate it and recommended I lose the weight ASAP. I shrugged it off and told her I was a pescatarian and I would figure it out. I left and tried to be better. This means I had one less glass of wine and that was it.
At the time, my son was enrolled in a program that incorporated in-home visits from specialized teachers in the area. About a month after my visit to the doctor one of the teachers I had first met a year prior was coming over. She rang the doorbell and said, “Hello again,” which I thought was odd, as I did not recall meeting her. She then said, “I think we met last year,” to which I replied, “No, I don’t think so”—then it hit me! She was 90 POUNDS HEAVIER when we met. My jaw dropped and she said, “Yeah, I lost quite a bit”. As the session neared the end, I asked her how she did it and she replied “I did keto, you should try it”
Yet again, I rolled my eyes and said, “We are pescatarians, but I’m glad it worked for you.”
Looking back, I can see the pattern of little “nudges” pointing me in the right direction, but it wasn’t until a Joe Rogan podcast when one of the guests mentioned keto that I thought hmm… maybe there is something to this.
The guest mentioned your name and I quickly googled to find out more. I didn’t know if it was going to work, but I knew I had to try something different. My first step was to introduce the idea of a meat-centered diet to my husband—whom I had spent so long convincing to get rid of meat altogether. I found Butcher Box and explained how ethical their standards were and that if we went back to meat-eating, we would do it “the right way”.
I then purchased your book The Keto Reset Diet. I listened to every word and followed every suggestion. I downloaded a “keto” app that required me to add all the meals into it, then it would calculate my net carbs. I made the decision to make the change and did it. I bought a Peloton bike to exercise at home and stuck with it.

The first picture you see was taken on August 9th, 2019 the second was taken on April 1st, 2022. I am 5’9, and my starting weight was 193 and my end is 140. I have since bought two more of your books and countless Primal Kitchen food products. I am having no trouble at all keeping it off and maintaining a healthy weight thanks to your techniques. I have told friends and family about your books and encouraged them to try. I have now become one of “those” keto people.
Thanks so much, Mark!
You’re very welcome, Amber! I’m glad you found something that worked for you. And thanks for sharing it with all of us.
(function($) { $("#dfrGQPO").load("https://www.marksdailyapple.com/wp-ad..." ); })( jQuery );
The post Amber’s Keto Success Story appeared first on Mark's Daily Apple.

May 11, 2022
How to Use a Foam Roller
 Foam rollers are very popular these days. Places like Target and Walmart carry them. Grandmas and grandpas are foam rolling. Doctors are prescribing them. What began as a niche mobility tool used only by the most obscure fitness nerds has become commonplace. But if you want to get the most value out of your foam roller—and avoid doing any damage—you need to learn how to use it correctly. It’s not as simple as “rolling” on it. There’s an art to it. And a science.
But before we get into how to use a foam roller, let’s go over what a foam roller is actually doing (and not doing).
What Foam Rolling Does (and Doesn’t) DoFoam rolling is not physically breaking up knots or muscle adhesions.
Foam rolling is also not lengthening the tissue like you’re rolling out a slab of dough. Research shows that foam rolling doesn’t physically stretch or lengthen the muscle.https://www.ncbi.nlm.nih.gov/pubmed/2...
Instead, foam rolling seems to relax the nervous system. It works through neuromuscular connections rather than brute force physical modification. After foam rolling an area while moving that tissue, your nervous system has determined that this is the proper, safe range of motion for you. Foam rolling gives you a short opportunity to establish a new “safe” pattern. Rather than physical adhesions, it’s removing neuromuscular blocks and harmful patterns. You reset the system and reprogram it, or leave it open to reprogramming with better movement.
Foam rolling might also works through something called diffuse noxious inhibitory control, or DNIC. When a tissue hurts, it’s because your nervous system has decided that inhibiting movement in that area (through pain) is safer and better for you than allowing movement through that area. But sometimes, the nervous system decides to blunt the pain because it’s safer and better for you to move it than remain motionless. Consider a soldier taking a big wound in battle. He’s grievously wounded, but extreme pain would only prevent him from making it to safety. The nervous system blunts the pain so he can make it back alive. The foam roller may be doing something similar.
How to Use a Foam RollerRelax into the roller; don’t tense up.This can be tough to pull off because by its very nature, foam rolling is uncomfortable. Painful, even. But here’s what happens when you tense up: your body fights the healing effect the foam roller is supposed to have on you.
You should be able to breathe easily and normally. If you’re holding your breath, that indicates a stress response. You’re probably going too hard or being too tense.
Don’t grimace. Don’t grit your teeth. Try to smile, or at least maintain a neutral facial expression. Any outward expression of pain and discomfort will register with your nervous system. What you’re trying to do here is reassure your body that you can handle the pain, that the pain isn’t all that bad, and the tissue can start feeling better.
Stay at a spot until it stops hurting.If you’re rushing through your foam rolling session, skipping over areas because they “hurt too much,” you are missing the point. Instead of avoiding the pain, you need to seek out and sit with the pain. Once you find a tender spot, stay there for at least a minute or until the pain subsides.
Explore range of motion while sitting on a tender spot.When you roll your quads and find a tight, tender spot, stay on that spot and then extend and flex your knee through its full range of motion. This seems to make foam rolling more effective than if you were to just stay on the spot with zero movement through the knee.
Focus on one large area per session.You’re not going to effectively hit your entire body in a single session. There’s not enough time for that. Instead, focus on one large area— your legs, your glutes, your calves, your hamstrings, your pecs, your thoracic spine—and do a great job there. Be thorough and take your time. You can focus on another section during the next session.
Do not foam roll bones.Bones should not be foam rolled. It doesn’t help. It’s totally pointless. Foam rolling is intended for soft tissue application only.
Do not foam roll your spine.You can and should foam roll the lumbar muscles running on either side of your spine, but you should not roll the actual spinal column itself. As a bone, it doesn’t respond well to foam rolling, and it can actually irritate and hurt you.
Don’t foam roll the site of the pain; foam roll the tissues around it.
If your knee hurts, foam rolling the knee itself probably won’t help. If your calves hurt, foam rolling the calves isn’t the answer.
You need to go above and below the affected tissue. Keep rolling the tissues around the painful area, working your way above and below until you find the tender spot.
Use a lacrosse ball (or two taped together) for harder to reach areas.The foam roller doesn’t work as well on every muscle or tissue. Hamstrings, the TFL, the pecs, and specific points in the thoracic spine seem to respond much better to lacrosse balls. They offer more direct, targeted pressure and can really get deep in there.
Foam roll before workouts to increase range of motion.Foam rolling before your workout is better for range of motion and performance, especially if you take advantage of the open “movement window” and move.https://journals.lww.com/nsca-jscr/Ab... Foam roll, do some mobility drills to take advantage of the window, then get to training.
Foam roll after workouts to reduce muscle soreness and improve performance.Studies show that foam rolling after training reduces subsequent muscle soreness and maintains performance (where it would otherwise suffer).https://www.ncbi.nlm.nih.gov/pmc/arti... I can see foam rolling being very effective for athletes who need to quickly get back into training after a workout or competition.
But overall, if you keep all these concepts in mind, foam rolling is pretty easy to do and very versatile. Happy rolling!
(function($) { $("#dfMdgI2").load("https://www.marksdailyapple.com/wp-ad..." ); })( jQuery ); 
References https://www.ncbi.nlm.nih.gov/pubmed/26421244https://journals.lww.com/nsca-jscr/Abstract/2013/03000/An_Acute_Bout_of_Self_Myofascial_Release_Increases.34.aspxhttps://www.ncbi.nlm.nih.gov/pmc/articles/PMC4299735/
The post How to Use a Foam Roller appeared first on Mark's Daily Apple.

May 10, 2022
Want to Be More Productive Working from Home? Tap into Your Senses.
 Since working from home has solidified its place as the “new normal,” we’re chockablock with tips for work-from-home productivity: have a morning routine, maintain a consistent schedule, dress in real clothes (maybe not hard pants, but not pajamas either). We also know all about taking frequent work breaks, utilizing a sit-stand desk, and incorporating microworkouts.
Those things are all important, to be sure, but routines or work breaks aren’t the only keys to being more productive. Your physical environment also affects productivity for better or worse. One of the big advantages of working from home is having total control over your workspace. Even if you’re taking over half the dining table or squeezing into a closet (which can be nicer than it sounds!), you can spruce up your workspace and tailor it to your preferences. After all, it’s part of your home, so you want to like being there.
Most of us probably aren’t paying enough attention to the sensory environment—what we see, hear, and smell while we work. Easy, inexpensive touches can increase both happiness and productivity. Here’s where to start.
The Eyes Have ItYou might feel like you spend all day looking at a computer screen, but that’s not really the case. The rest of your visual field can significantly impact productivity and stress levels. Consider the following.
LightingIt’s hard to get good work done in a dark, dreary space. Stanford neuroscientist Dr. Andrew Huberman stresses the importance of getting bright light in the first nine hours after waking. Specifically, he recommends strong overhead lighting and having lights directly in front of you. These stimulate the release of dopamine, epinephrine, and norepinephrine to increase alertness and focus.https://hubermanlab.com/optimizing-wo... Morning light is also a powerful zeitgeber—a cue that regulates circadian rhythm, which promotes optimal daytime energy and nighttime sleepiness.
Ideally, the sun provides this morning light, so set up your desk by a window if possible. Research shows that people who work in windowless offices get poorer sleep than their colleagues who get daylight in their workspaces.https://www.ncbi.nlm.nih.gov/pmc/arti... You can also use artificial white lights overhead and/or supplement with lamps if your workspace isn’t well lit naturally. Don’t make it so bright that you have to squint or get headaches or eyestrain, but otherwise, turn up those lights.
Nature is CallingIdeally, your home office contains a window that lets in the light and allows you to see some nature—trees, a garden, a neighborhood park. If you can’t be near a window, or your window faces a concrete jungle, bring some nature indoors with houseplants. Heck, get some houseplants even if your home office looks out onto a lush garden. Studies show that indoor plantshttps://pubmed.ncbi.nlm.nih.gov/25068... https://journals.ashs.org/hortsci/vie...
Increase your ability to concentrateReduce tension and anxietyImprove mood and increase happinessBoost attention and productivityLower stress levelsReduce sick leavehttps://journals.ashs.org/hortsci/vie... workplace satisfactionIf you’re one of the rare people who didn’t pick up a few—or a few too many—plants while stuck at home in 2020, now’s a great time to test your green thumb. Grab a peace lily, ivy plant, spider plant, or chrysanthemum, which are thought to have superior air-purifying benefits. Select some succulents if you have trouble remembering to water your potted friends.
Still make an effort to go outside as often as possible. Abundant evidence confirms that time in nature elevates mood, improves focus and attention, lowers stress, and promotes creative thinking. Have walking meetings during the day. Take your laptop to a local park. Eat lunch in the sun. No matter how nice your home office space is, try to get out of it every day.
Use Color to Set the ToneWhile many studies have examined the effect of room color on cognitive performance, no hue seems to consistently enhance or detract from productivity. Color preferences are apparently quite idiosyncratic.
You can still use color to your advantage, though. Pick a color scheme for your home workspace that feels best. If your work lends itself to being in a calm, relaxed state, you might want to start with blues, greens, or perhaps shades of yellow. On the other hand, if you work better in a more heightened state of arousal, you might like more saturated red tones. Some people like to be surrounded by white because they find it less distracting, while others find it boring and energy-sapping.
If you don’t want to commit to an entire office makeover, start with a few colorful accessories. Or paint one accent wall and see if you’re more or less inspired to work.
Using Sound to Increase ProductivityThe acoustic environment in which you work is very important. Sounds can be distracting and stress-inducing, or they can help your brain focus and improve your mood during your workday.
MusicResearch suggests that music enhances cognitive performance and happiness during the workday—if it’s music you like.https://pubmed.ncbi.nlm.nih.gov/21508... At home, you have complete control over the playlist; but if you’re returning to an office environment where you’re subjected to coworkers’ questionable music taste, you might want to invest in noise-canceling headphones to optimize your productivity. Music with lyrics and sad (minor key) music can interfere with attention and performance, so opt for upbeat instrumentals.
Nature soundsNature sounds like birds and running water tend to reduce stress and increase productivity, even in the presence of human sounds like voices or traffic noise. On the other hand, mechanical sounds like air conditioners or boilers have the opposite effect.Open that window or download an app to provide the sweet sounds of nature.https://www.pnas.org/doi/full/10.1073...
Binaural beatsWith binaural beats, tones are transmitted to your left and right ear at slightly different times. The mismatch stimulates certain brainwave patterns and, depending on the frequency, produces effects like relaxation and stress relief. Some binaural beats can bolster learning and memory, promote divergent or creative thinking, and enhance cognitive flexibility.https://www.frontiersin.org/articles/... https://www.frontiersin.org/articles/... They do this in part by stimulating dopamine release which, again, heightens focus and attention. Dr. Huberman recommends starting with binaural beats at a frequency of 40 hertz, which has been shown in studies to have the greatest effect on work-related cognitive functions. He suggests listening to binaural beats for 30 minutes before starting work to prime the pump, so to speak.
Overall, as with color, people’s sound preferences are highly individual. Some people work best in quiet environments, while others prefer music, white noise, or even more cacophonous spaces like coffee shops. If you’re like me, your preferences change from day to day or task to task. Sometimes you need total silence to concentrate, and other times you crave some background noise. Thus, the best course of action is probably to go by feel, tailoring your acoustic environment to what resonates in the moment (no pun intended). Any noise, even a pleasant one, can be distracting if it is too loud, so watch the overall volume level.
What’s That Smell?Don’t forget your olfactory environment. The way your workplace smells can increase focus, memory, and goal setting. Specific odors may also reduce stress and put you in a better headspace for getting good work done.http://studia.mundi.gtk.szie.hu/sites...
Peppermint, cinnamon, and rosemary are generally considered beneficial for productivity. Lavender, vanilla, and sandalwood can be relaxing, which might be good or bad depending on what you need. As with everything else we’ve discussed here, scents are personal. Certain ones may have strong positive or negative associations for you based on prior learning. Maybe a beloved teacher always smelled like roses, or you were in a terrible car accident in a vehicle that smelled like pine. Those odors will probably always evoke specific feelings for you, so pick ones you like.
More generally, fresh air is always preferable to stale, stuffy air, which is yet another reason to open that window. You might also consider investing in an air purifier to remove unpleasant odors and improve air quality.
Small Changes, Big Impact on Productivity?Your environment directly affects how happy, motivated, and productive you are. The goal is to create a space where you feel comfortable, focused, and ready to tackle your workload each day.
Each of the modifications suggested here requires a low investment in time or money, but they could definitely pay off in terms of getting better work done. Rather than prescribe a specific office set-up, I’d encourage you to pay close attention to how your environment makes you feel. Energized and alert? Expansive and creative when the situation calls for it, and focused and task-oriented when that’s appropriate instead? Irritable or calm? Happy or dejected? High energy or low?
If there’s one thing to take away from this post, it’s that everyone’s needs and preferences are different. My best advice is to optimize for optionality and flexibility. Start with a well-lit, quiet, and comfortable workspace. Connect to nature through windows and/or plants. Then use sound and scents to fine-tune on a day-by-day or project-by-project basis.
And, if something isn’t working one day, change it! Go outside or hit up a coffee shop. Light a candle. Blast some tunes. Take a nap. Take full advantage of the freedom afforded to you by working at home!
What say you? What are the best (or worst) things you’ve done to make working from home more enjoyable and effective? Tell your fellow readers in the comments below.
Related posts from Mark’s Daily Apple10 Productivity Hacks That Really Work
10 Ways to Make Your Workplace Healthier and More Productive
How to Get Organized and Stay Focused in a Modern World
15 Tips for Standup Workstation Users
(function($) { $("#df6BNYx").load("https://www.marksdailyapple.com/wp-ad..." ); })( jQuery );
References https://hubermanlab.com/optimizing-workspace-for-productivity-focus-and-creativity/https://www.ncbi.nlm.nih.gov/pmc/articles/PMC4031400/https://pubmed.ncbi.nlm.nih.gov/25068481/https://journals.ashs.org/hortsci/view/journals/hortsci/40/5/article-p1354.xmlhttps://journals.ashs.org/hortsci/view/journals/hortsci/42/3/article-p581.xmlhttps://pubmed.ncbi.nlm.nih.gov/21508527/https://www.pnas.org/doi/full/10.1073/pnas.2013097118https://www.frontiersin.org/articles/10.3389/fnhum.2013.00786/fullhttps://www.frontiersin.org/articles/10.3389/fpsyg.2016.01287/fullhttp://studia.mundi.gtk.szie.hu/sites/default/files/upload/studia/2018-vol5-no4/studia_mundi_vol_5_no_4_9.pdfThe post Want to Be More Productive Working from Home? Tap into Your Senses. appeared first on Mark's Daily Apple.

May 7, 2022
Creamed Spinach Recipe
 Creamed spinach gets a bad rap because the version many of us grew up with was too often overdone and underwhelming. It’s a shame because cooked spinach can and should be bright and delicious!
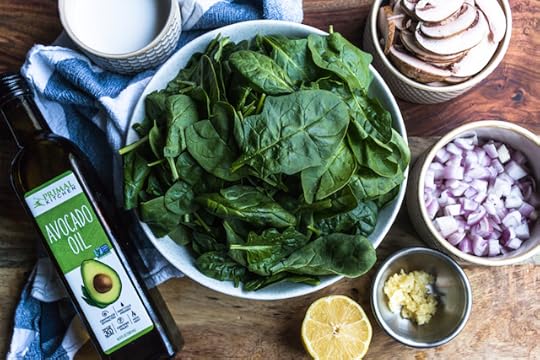
This recipe will show you how to make creamed spinach that retains its appealing taste and texture in the final dish. Sautéed mushrooms and shallots add nuance, and since this creamed spinach is made without cream cheese, it’s not too heavy. If you omit the parmesan, the recipe is even dairy-free!
We love this spinach served with a juicy beef roast. Cheese lovers should try adding some Parmigiano Reggiano or pecorino at the end for a nice finish.
How to Make Creamed Spinach (the Right Way)Serves: 4
Time in the Kitchen: 20 minutes
Ingredients:
1 ½ Tbsp Primal Kitchen® Avocado Oil or butter½ cup chopped shallots2 cups sliced cremini mushrooms5 cloves grated garlic1 lb baby spinach½ cup coconut milk2-3 tsp coconut flour½ tsp salt5 Tbsp coconut cream2 tsp lemon juice¼ tsp black pepperOptional: parmesan cheese
Instructions:
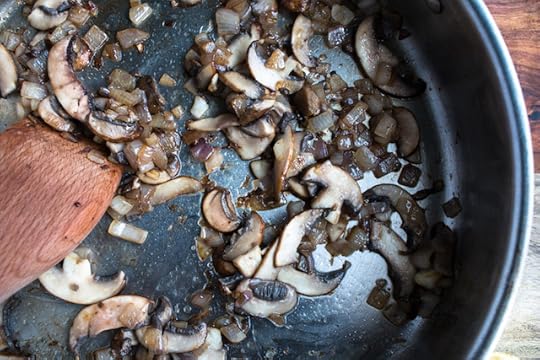
In a large pan, sauté the shallots in the avocado oil over medium heat for about 3 minutes. Once the shallots have softened, add the sliced mushrooms and a pinch of salt. Once the mushrooms begin to soften, stir in the garlic and cook until it is fragrant.
Add the spinach to the pan in batches, one large handful at a time. Stir, allowing the first batch to wilt before adding the next. Once the spinach is wilted, drain any excess liquid from the pan.

Add in the coconut milk, black pepper, coconut flour, and another pinch of salt. Stir until combined and the coconut flour begins to thicken the sauce.
Add in the coconut cream and lemon juice and stir until a sauce forms. If you’d like your sauce to be thicker, you can either remove the spinach from the pan using a slotted spoon and cook the sauce down, or place the pan into a 350 degree Fahrenheit (175 degree Celsius) oven for about 10 minutes.
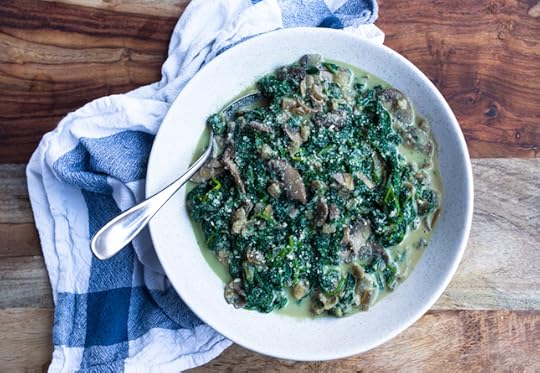
Taste and adjust seasoning. Optionally top with grated parmesan cheese. Serve this creamed spinach with your favorite protein, like a nice steak or piece of chicken.
Nutrition Information (¼ of recipe):
Calories: 195Total Carbs: 14 gramsNet Carbs: 10 gramsFat: 14 gramsProtein: 5 grams (function($) { $("#dfsUSgm").load("https://www.marksdailyapple.com/wp-ad..." ); })( jQuery ); Print.tasty-recipes-print-button{background-color:#667;border:none;display:inline-block;padding:.5em 1em;text-decoration:none}body:not(.tasty-recipes-print-view) .tasty-recipes-print-button.tasty-recipes-print-above-card{color:#fff;display:none}body:not(.tasty-recipes-print-view) .tasty-recipes-print-button.tasty-recipes-print-above-card:hover{background-color:#b2b2bb;color:#fff;display:inline-block;padding:.5em 1em;text-decoration:none}.tasty-recipes-image-button-container{display:flex;flex-direction:column;flex-wrap:wrap;float:right;margin-left:10px}body.tasty-recipes-print-view .tasty-recipes-buttons{display:none}.tasty-recipes-image-button-container .tasty-recipes-buttons{margin-bottom:10px;margin-top:10px}.tasty-recipes-image-button-container .tasty-recipes-button-wrap{box-sizing:border-box;margin-bottom:10px}.tasty-recipes-image-button-container .tasty-recipes-buttons a{background-color:#f9f9f9;border:1px solid #aaa;border-radius:0;color:#aaa;display:block;font-size:16px;font-weight:700;line-height:16px;margin-top:0;padding:8px;text-align:center;text-decoration:none;text-transform:uppercase}.tasty-recipes-image-button-container .tasty-recipes-buttons .button:hover{background-color:#aaa;border:1px solid #aaa;color:#fff;opacity:1}.tasty-recipes-image-button-container .tasty-recipes-buttons a:hover{background-color:#979599;text-decoration:none}.tasty-recipes-image-button-container .tasty-recipes-buttons svg{display:none}.tasty-recipes-yield-scale{border:1px solid #979599;border-radius:2px;color:#979599;font-size:.7rem;margin-left:3px;padding:0 4px}.tasty-recipes-units-scale-container{display:flex;flex-wrap:wrap}.tasty-recipes-convert-container{padding:0 1em 1em 0}.tasty-recipes-convert-container .tasty-recipes-convert-label{align-self:center;color:#979599;font-size:.6rem;text-transform:uppercase}.tasty-recipes-convert-container button{background:transparent;border:1px solid #979599;border-radius:2px;color:#979599;letter-spacing:0;margin-left:5px;min-width:34px;padding:2px 4px;text-align:center}.tasty-recipes-convert-container button.tasty-recipes-convert-button-active{border-color:#353547;color:#353547}.tasty-recipes-convert-container button:focus{outline:none}.tasty-recipes-scale-container{display:flex;padding:0 0 1em}.tasty-recipes-scale-container .tasty-recipes-scale-label{align-self:center;color:#979599;font-size:.6rem;text-transform:uppercase}.tasty-recipes-scale-container button{background:transparent;border:1px solid #979599;border-radius:2px;color:#979599;letter-spacing:0;margin-left:5px;min-width:34px;padding:2px 4px}.tasty-recipes-scale-container button.tasty-recipes-scale-button-active{border-color:#353547;color:#353547}.tasty-recipes-scale-container button:focus{outline:none}.tasty-recipes-ingredients-header{margin:1em 0}@media only screen and (min-width:520px){.tasty-recipes-ingredients-header{align-items:center;display:flex;flex-wrap:wrap;justify-content:space-between}}.tasty-recipes-ingredients-header .tasty-recipes-ingredients-clipboard-container{align-items:baseline;display:inline-flex}.tasty-recipes-ingredients-header h3{margin:0 10px 10px 0}.tasty-recipes-ingredients-clipboard-container .tasty-recipes-copy-button{background:transparent;border:none;color:#353547;height:24px;padding:0;position:relative;width:24px}.tasty-recipes-ingredients-clipboard-container .tasty-recipes-copy-button:hover{opacity:.5}.tasty-recipes-instructions-header{align-items:baseline;display:flex;flex-wrap:wrap;justify-content:space-between;margin:1em 0}.tasty-recipes-entry-content .tasty-recipes-instructions h3{margin:0 0 1rem}@media only screen and (min-width:520px){.tasty-recipes-entry-content .tasty-recipes-instructions h3{margin:0}}button[name=tasty-recipes-video-toggle]{background:#979599;border:#979599;border-radius:2px;display:inline-block;font-size:14px;height:30px;line-height:20px;margin:0;padding:0;text-align:center;vertical-align:middle;width:86px}button[name=tasty-recipes-video-toggle] span{padding:0 4px;pointer-events:none}button[name=tasty-recipes-video-toggle][aria-checked=false] :last-child,button[name=tasty-recipes-video-toggle][aria-checked=true] :first-child{background:#fff;border-radius:2px;color:#979599;padding:2px 4px}button[name=tasty-recipes-video-toggle][aria-checked=false] :first-child,button[name=tasty-recipes-video-toggle][aria-checked=true] :last-child{color:#fff}label[for=tasty-recipes-video-toggle]{color:#979599;font-size:.6rem;line-height:30px;padding-right:8px;text-transform:uppercase;user-select:none;-moz-user-select:none;-ms-user-select:none;-webkit-user-select:none;-o-user-select:none;vertical-align:middle}.tasty-recipe-responsive-iframe-container{margin:10px 0}.tasty-recipes-equipment{display:flex;flex-wrap:wrap;justify-content:space-evenly}.tasty-recipes-equipment>h3{flex:0 0 100%}.tasty-recipes-equipment .tasty-link-card{flex:0 0 50%;padding:1.5rem 1rem;text-align:center}@media screen and (min-width:500px){.tasty-recipes-equipment .tasty-link-card{flex:0 0 33%}}.tasty-recipes-equipment .tasty-link-card p{font-size:1em;font-weight:700;margin-bottom:0}.tasty-recipes-equipment .tasty-link-card p a{color:initial}.tasty-recipes-equipment .tasty-link-card span{font-size:.9em}.tasty-recipes .tasty-recipes-nutrition ul{list-style-type:none;margin:0;padding:0}.tasty-recipes .tasty-recipes-nutrition ul:after{clear:both;content:" ";display:block}.tasty-recipes .tasty-recipes-nutrition li{float:left;list-style-type:none;margin-bottom:0;margin-left:0;margin-right:16px}.tasty-recipes-plug{align-items:center;display:flex;flex-wrap:wrap;justify-content:center;margin-bottom:1em;text-align:center}.tasty-recipes-plug a{box-shadow:none;text-decoration:none}.tasty-recipes-plug a img{display:inline-block;height:auto;margin:5px 0 0 8px;width:150px}.tasty-recipes-footer-content{padding:1.5em;text-align:center}.tasty-recipes-footer-content .tasty-recipes-footer-copy{margin-left:0}.tasty-recipes-footer-content img,.tasty-recipes-footer-content svg{width:60px}.tasty-recipes-entry-content .tasty-recipes-entry-footer h3{font-size:1.25em;margin:0 0 .25em;padding:0}.tasty-recipes-entry-footer p{font-size:.75em;margin:0}.tasty-recipes-entry-footer p a{border-bottom:none;box-shadow:none;text-decoration:underline}.tasty-recipes-flash-message{background-color:#fff;border-radius:4px;box-shadow:0 .3px .4px 0 rgba(0,0,0,.024),0 .9px 1.5px 0 rgba(0,0,0,.05),0 3.5px 6px 0 rgba(0,0,0,.1);color:#313135;display:inline-block;font-size:13px;letter-spacing:0;line-height:1.2em;margin-left:10px;padding:4px 10px}@media screen and (min-width:500px){.tasty-recipes-flash-message{padding:4px 10px}}.tasty-recipes-flash-message p{margin:0;padding:0;text-transform:none}@media screen and (min-width:500px){.tasty-recipes-footer-content{align-items:center;display:flex;justify-content:center;padding:1.5em 0;text-align:left}.tasty-recipes-footer-content .tasty-recipes-footer-copy{margin-left:.8em}}@media print{.tasty-recipes-no-print,.tasty-recipes-no-print *{display:none!important}}[data-tr-ingredient-checkbox]{cursor:pointer;list-style-position:outside;list-style-type:none!important;margin-left:0!important}[data-tr-ingredient-checkbox] .tr-ingredient-checkbox-container{position:relative}[data-tr-ingredient-checkbox] .tr-ingredient-checkbox-container input[type=checkbox]+label{display:inline-block;position:relative;vertical-align:middle}[data-tr-ingredient-checkbox] .tr-ingredient-checkbox-container input[type=checkbox]{clip:rect(1px 1px 1px 1px);clip:rect(1px,1px,1px,1px);height:1px;overflow:hidden;position:absolute!important;width:1px}[data-tr-ingredient-checkbox] .tr-ingredient-checkbox-container input[type=checkbox]+label:before{border:1px solid;border-radius:2px;content:"";display:inline-block;height:20px;margin-right:10px;position:relative;width:20px}[data-tr-ingredient-checkbox] .tr-ingredient-checkbox-container input[type=checkbox]:checked+label:after{border-bottom:2px solid;border-left:2px solid;content:"";display:inline-block;height:6px;left:4px;position:absolute;top:4px;transform:rotate(-45deg);width:12px}[data-tr-ingredient-checkbox] .tr-ingredient-checkbox-container input[type=checkbox]:focus+label:before{box-shadow:0 0 8px #5e9ed6;outline:1px solid #5d9dd5}[data-tr-ingredient-checkbox=checked]{opacity:.8;text-decoration:line-through}/* Bold recipe card styles. */ .tasty-recipes{border:5px solid #667;margin-top:6em;margin-bottom:4em}.tasty-recipes.tasty-recipes-has-plug{margin-bottom:1em}.tasty-recipes-plug{margin-bottom:4em}.tasty-recipes-print-button{display:none}.tasty-recipes-image-shim{height:69.5px;clear:both}.tasty-recipes-entry-header{background-color:#667;color:#fff;text-align:center;padding-top:35px;padding-bottom:1.5em;padding-left:2.5em;padding-right:2.5em}.tasty-recipes-entry-header.tasty-recipes-has-image{padding-top:0px}.tasty-recipes-entry-header .tasty-recipes-image{float:none;text-align:center;transform:translateY(-115px);margin-bottom:1em;/* Decide if we need this */}.tasty-recipes-entry-header .tasty-recipes-image img{-webkit-border-radius:50%;-moz-border-radius:50%;border-radius:50%;border:5px solid #667;height:150px;width:150px;display:inline-block;object-fit:cover}.tasty-recipes-entry-header h2{font-size:2em;font-weight:400;text-transform:lowercase;margin-bottom:0;text-align:center;color:#fff;margin-top:0;padding-top:0;padding-bottom:0}.tasty-recipes-has-image .tasty-recipes-entry-header h2{margin-top:-115px}.tasty-recipes-entry-header hr{border:1px solid #b7bbc6;background-color:#b7bbc6;margin-bottom:1em;margin-top:1em}.tasty-recipes-entry-header div.tasty-recipes-rating{text-decoration:none;border:none}.tasty-recipes-entry-header .tasty-recipes-rating:hover{text-decoration:none}.tasty-recipes-entry-header div.tasty-recipes-rating{font-size:1.375em;display:block}.tasty-recipes-entry-header .tasty-recipes-rating p{margin-bottom:0}.tasty-recipes-entry-header span.tasty-recipes-rating{margin-left:0.25em;margin-right:0.25em;color:#fff}.tasty-recipes-entry-header .rating-label{font-style:italic;color:#b7bbc6;font-size:0.6875em;display:block}.tasty-recipes-entry-header .tasty-recipes-details{margin-top:1em}.tasty-recipes-entry-header .tasty-recipes-details ul{list-style-type:none;margin:0}.tasty-recipes-entry-header .tasty-recipes-details ul li{display:inline-block;margin-left:0.5em;margin-right:0.5em;font-size:1em;line-height:2.5em;color:#fff}@media only screen and (max-width:520px){.tasty-recipes-entry-header .tasty-recipes-details .detail-icon{height:0.8em;margin-top:0.4em}.tasty-recipes-entry-header .tasty-recipes-details ul li{font-size:0.875em;line-height:1.75em}}@media only screen and (min-width:520px){.tasty-recipes-entry-header .tasty-recipes-details .detail-icon{height:1em;margin-top:0.6em}.tasty-recipes-entry-header .tasty-recipes-details ul li{font-size:1em;line-height:2.5em}}.tasty-recipes-entry-header .tasty-recipes-details .tasty-recipes-label{font-style:italic;color:#b7bbc6;margin-right:0.125em}.tasty-recipes-entry-header .tasty-recipes-details .detail-icon{vertical-align:top;margin-right:0.2em;display:inline-block;color:#FFF}.tasty-recipes-entry-header .tasty-recipes-details .author a{color:inherit;text-decoration:underline}.tasty-recipes-entry-content{padding-top:1.25em}.tasty-recipes-entry-content .tasty-recipes-buttons{margin-bottom:1.25em;margin-left:1.25em;margin-right:1.25em}.tasty-recipes-entry-content .tasty-recipes-buttons:after{content:' ';display:block;clear:both}.tasty-recipes-entry-content .tasty-recipes-button-wrap{width:50%;display:inline-block;float:left;box-sizing:border-box}.tasty-recipes-entry-content .tasty-recipes-buttons a{text-transform:uppercase;text-align:center;display:block;color:#fff;background-color:#667;font-size:1em;line-height:1.375em;padding-top:1em;padding-bottom:1em;font-weight:bold;margin-top:0;border:none;border-radius:0;text-decoration:none}.tasty-recipes-entry-content a img{box-shadow:none;-webkit-box-shadow:none}.tasty-recipes-entry-content .tasty-recipes-buttons a:hover{background-color:#979599;text-decoration:none}.tasty-recipes-entry-content .tasty-recipes-buttons img{vertical-align:top}.tasty-recipes-entry-content .tasty-recipes-buttons .svg-print,.tasty-recipes-entry-content .tasty-recipes-buttons .svg-pinterest,.tasty-recipes-entry-content .tasty-recipes-buttons .svg-heart-regular,.tasty-recipes-entry-content .tasty-recipes-buttons .svg-heart-solid{height:1.25em;margin-right:0.375em;margin-bottom:0;background:none;display:inline-block;vertical-align:middle}@media only screen and (min-width:520px){.tasty-recipes-entry-content .tasty-recipes-button-wrap:first-child{padding-right:0.625em}.tasty-recipes-entry-content .tasty-recipes-button-wrap:last-child{padding-left:0.625em}}@media only screen and (max-width:520px){.tasty-recipes-entry-content .tasty-recipes-button-wrap{width:100%}.tasty-recipes-entry-content .tasty-recipes-button-wrap:nth-child(2){padding-top:1em}}.tasty-recipes-entry-content h3{text-transform:uppercase;font-size:0.75em;color:#979599;margin:1.5em 0}.tasty-recipes-ingredients-header,.tasty-recipes-instructions-header{margin:1.5em 0}.tasty-recipes-entry-content h4{font-size:1em;padding-top:0;margin-bottom:1.5em;margin-top:1.5em}.tasty-recipes-entry-content hr{background-color:#eae9eb;border:1px solid #eae9eb;margin-top:1em;margin-bottom:1em}.tasty-recipes-entry-content .tasty-recipes-description,.tasty-recipes-entry-content .tasty-recipes-ingredients,.tasty-recipes-entry-content .tasty-recipes-instructions,.tasty-recipes-entry-content .tasty-recipes-keywords{padding-left:1.25em;padding-right:1.25em}.tasty-recipes-entry-content .tasty-recipes-description h3{display:none}.tasty-recipes-entry-content .tasty-recipes-description p{margin-bottom:1em}.tasty-recipes-entry-content .tasty-recipes-ingredients ul,.tasty-recipes-entry-content .tasty-recipes-instructions ul{list-style-type:none;margin-left:0;margin-bottom:1.5em;padding:0}.tasty-recipes-entry-content .tasty-recipes-ingredients ul li,.tasty-recipes-entry-content .tasty-recipes-instructions ul li{margin-bottom:0.625em;list-style-type:none;position:relative;margin-left:1.5em;line-height:1.46}.tasty-recipes-entry-content .tasty-recipes-ingredients ul li:before,.tasty-recipes-entry-content .tasty-recipes-instructions ul li:before{background-color:#667;-webkit-border-radius:50%;-moz-border-radius:50%;border-radius:50%;height:0.5em;width:0.5em;display:block;content:' ';left:-1.25em;top:0.375em;position:absolute}.tasty-recipes-entry-content .tasty-recipes-ingredients ol,.tasty-recipes-entry-content .tasty-recipes-instructions ol{counter-reset:li;margin-left:0;padding:0}.tasty-recipes-entry-content .tasty-recipes-ingredients ol>li,.tasty-recipes-entry-content .tasty-recipes-instructions ol>li{list-style-type:none;position:relative;margin-bottom:1em;margin-left:1.5em;line-height:1.46}.tasty-recipes-entry-content .tasty-recipes-ingredients ol>li:before,.tasty-recipes-entry-content .tasty-recipes-instructions ol>li:before{content:counter(li);counter-increment:li;position:absolute;background-color:#667;-webkit-border-radius:50%;-moz-border-radius:50%;border-radius:50%;height:1.45em;width:1.45em;color:#fff;left:-1.25em;transform:translateX(-50%);line-height:1.5em;font-size:0.6875em;text-align:center;top:0.1875em}.tasty-recipes-entry-content .tasty-recipes-ingredients li li,.tasty-recipes-entry-content .tasty-recipes-instructions li li{margin-top:0.625em}.tasty-recipes-entry-content .tasty-recipes-ingredients li ul,.tasty-recipes-entry-content .tasty-recipes-ingredients li ol,.tasty-recipes-entry-content .tasty-recipes-instructions li ul,.tasty-recipes-entry-content .tasty-recipes-instructions li ol{margin-bottom:0}.tasty-recipes-entry-content .tasty-recipes-equipment{padding-left:1.25em;padding-right:1.25em}.tasty-recipes-entry-content .tasty-recipe-video-embed~.tasty-recipes-equipment{padding-top:1em}.tasty-recipes-entry-content .tasty-recipes-notes{padding:1.25em;background-color:#edf0f2}.tasty-recipes-entry-content .tasty-recipes-notes ol{counter-reset:li;margin-left:0;padding:0}.tasty-recipes-entry-content .tasty-recipes-notes ul{margin-left:0;padding:0}.tasty-recipes-entry-content .tasty-recipes-notes p,.tasty-recipes-entry-content .tasty-recipes-notes ul,.tasty-recipes-entry-content .tasty-recipes-notes ol{background-color:#fff;padding-left:1.5625em;padding-right:1.5625em;padding-top:1.25em;padding-bottom:1.25em;margin-bottom:1.5em;position:relative;-webkit-clip-path:polygon(20px 0,100% 0,100% 100%,0 100%,0 20px);clip-path:polygon(20px 0,100% 0,100% 100%,0 100%,0 20px)}@media only screen and (min-width:520px){.tasty-recipes-entry-content .tasty-recipes-notes ul,.tasty-recipes-entry-content .tasty-recipes-notes ol{margin-left:2em}.tasty-recipes-entry-content .tasty-recipes-notes p,.tasty-recipes-entry-content .tasty-recipes-notes ul li,.tasty-recipes-entry-content .tasty-recipes-notes ol li{padding-left:2.5em}.tasty-recipes-entry-content .tasty-recipes-notes ul li,.tasty-recipes-entry-content .tasty-recipes-notes ol li{position:relative;list-style:none;padding-top:1em;margin-left:0;margin-bottom:0}.tasty-recipes-entry-content .tasty-recipes-notes p:before,.tasty-recipes-entry-content .tasty-recipes-notes ul li:before{content:'i';display:block;background-color:#667;-webkit-border-radius:50%;-moz-border-radius:50%;border-radius:50%;height:1.3em;width:1.3em;font-size:0.75em;line-height:1.3em;text-align:center;color:#fff;position:absolute;left:1.167em;top:1.9em}.tasty-recipes-entry-content .tasty-recipes-notes ol>li:before{content:counter(li);counter-increment:li;position:absolute;background-color:#667;-webkit-border-radius:50%;-moz-border-radius:50%;border-radius:50%;height:1.45em;width:1.45em;color:#fff;left:2em;transform:translateX(-50%);line-height:1.5em;font-size:0.6875em;text-align:center;top:2em}}.tasty-recipes-entry-content .tasty-recipes-notes p:last-child{margin-bottom:0}.tasty-recipes-entry-content .tasty-recipes-other-details{background-color:#edf0f2;padding:0 1.25em 1.25em}.tasty-recipes-entry-content .tasty-recipes-other-details ul{color:#667;display:flex;flex-wrap:wrap;font-size:0.85rem;list-style:none;margin-bottom:0}.tasty-recipes-entry-content .tasty-recipes-other-details ul li{margin:0 0.5rem;list-style:none}.tasty-recipes-entry-content .tasty-recipes-other-details ul li .tasty-recipes-label{font-style:italic}.tasty-recipes-entry-content .tasty-recipes-other-details .detail-icon{color:#667;vertical-align:top;margin-right:0.2em;display:inline-block}@media only screen and (max-width:520px){.tasty-recipes-entry-content .tasty-recipes-other-details .detail-icon{height:0.8em;margin-top:0.4em}.tasty-recipes-entry-content .tasty-recipes-other-details ul li{font-size:0.875em;line-height:1.75em}}@media only screen and (min-width:520px){.tasty-recipes-entry-content .tasty-recipes-other-details .detail-icon{height:1em;margin-top:0.8em}.tasty-recipes-entry-content .tasty-recipes-other-details ul li{font-size:1em;line-height:2.5em}}.tasty-recipes-entry-content .tasty-recipes-keywords{background-color:#edf0f2;padding-bottom:1em;padding-top:1em}.tasty-recipes-entry-content .tasty-recipes-keywords p{font-size:0.7em;font-style:italic;color:#979599;margin-bottom:0}.tasty-recipes-entry-content .tasty-recipes-keywords p span{font-weight:bold}.tasty-recipes-nutrifox{text-align:center;margin:0}.nutrifox-label{background-color:#edf0f2}.tasty-recipes-nutrifox iframe{width:100%;display:block;margin:0}.tasty-recipes-entry-content .tasty-recipes-nutrition{padding:1.25em;color:#667}.tasty-recipes-nutrition .tasty-recipes-label{font-style:italic;color:#b7bbc6;margin-right:0.125em;font-weight:400}.tasty-recipes-nutrition ul li{float:none;display:inline-block;line-height:2em;margin:0 10px 0 0}.tasty-recipes-entry-footer{background-color:#667}.tasty-recipes-entry-footer img,.tasty-recipes-entry-footer svg{color:#FFF}.tasty-recipes-entry-content .tasty-recipes-entry-footer h3{color:#fff}.tasty-recipes-entry-footer{color:#fff}.tasty-recipes-entry-footer:after{content:' ';display:block;clear:both}/* Print view styles */ .tasty-recipes-print-view .tasty-recipe-video-embed,.tasty-recipes-print-view .tasty-recipes-other-details,.tasty-recipes-print .tasty-recipes-entry-header .tasty-recipes-details .detail-icon,.tasty-recipes-print .tasty-recipes-entry-content .tasty-recipes-notes p:before,.tasty-recipes-print .tasty-recipes-entry-content .tasty-recipes-notes ul li:before,.tasty-recipes-print .tasty-recipes-entry-content .tasty-recipes-ingredients ul li:before,.tasty-recipes-print .tasty-recipes-entry-content .tasty-recipes-ingredients ol li:before,.tasty-recipes-print .tasty-recipes-entry-content .tasty-recipes-instructions ul li:before,.tasty-recipes-print .tasty-recipes-entry-content .tasty-recipes-instructions ol li:before,.tasty-recipes-print .tasty-recipes-entry-content .tasty-recipes-notes ol>li:before,.tasty-recipes-print .tasty-recipes-entry-footer img{display:none}.tasty-recipes-print-view{font-size:11px;background-color:#fff;line-height:1.5em}.tasty-recipes-print{padding:0}.tasty-recipes-print-view .tasty-recipes{margin-top:1em}.tasty-recipes-print-view .tasty-recipes-entry-content h3{font-size:1.2em;letter-spacing:0.1em;margin:0 0 10px 0}.tasty-recipes-print-view .tasty-recipes-ingredients-header,.tasty-recipes-print-view .tasty-recipes-instructions-header{margin:0}.tasty-recipes-print-view .tasty-recipes-ingredients,.tasty-recipes-print-view .tasty-recipes-instructions{padding:1.25em}.tasty-recipes-print .tasty-recipes-entry-header{background-color:inherit;color:inherit;padding-bottom:0;padding-left:1em;padding-right:1em;padding-top:1em;text-align:left}.tasty-recipes-print .tasty-recipes-entry-header .tasty-recipes-image{float:right;transform:none}.tasty-recipes-print.tasty-recipes-has-image .tasty-recipes-entry-header h2{margin-top:0;text-align:left}.tasty-recipes-print .tasty-recipes-entry-header h2{color:inherit;margin-bottom:0.5em}.tasty-recipes-print .tasty-recipes-entry-header hr{display:none}.tasty-recipes-print .tasty-recipes-entry-header span.tasty-recipes-rating{color:#000}.tasty-recipes-entry-header div.tasty-recipes-rating a{text-decoration:none}.tasty-recipes-entry-header div.tasty-recipes-rating p{margin-top:4px}.tasty-recipes-print .tasty-recipes-entry-header .tasty-recipes-details ul{padding:0;clear:none}.tasty-recipes-print .tasty-recipes-entry-header .tasty-recipes-details ul li{line-height:1.5em;color:#000;margin:0 10px 0 0}.tasty-recipes-print .tasty-recipes-entry-content img{max-width:50%;height:auto}.tasty-recipes-print .tasty-recipes-entry-content .tasty-recipes-ingredients ol li,.tasty-recipes-print .tasty-recipes-entry-content .tasty-recipes-instructions ol li{margin-bottom:0.5em;line-height:1.1;list-style:decimal;line-height:1.5em}.tasty-recipes-print .tasty-recipes-entry-content .tasty-recipes-ingredients ul li,.tasty-recipes-print .tasty-recipes-entry-content .tasty-recipes-instructions ul li{margin-bottom:0.5em;line-height:1.1;list-style:disc}.tasty-recipes-print .tasty-recipes-entry-content .tasty-recipes-notes{background:none!important}.tasty-recipes-print .tasty-recipes-entry-content .tasty-recipes-notes ul,.tasty-recipes-print .tasty-recipes-entry-content .tasty-recipes-notes ol{background:none!important}.tasty-recipes-print .tasty-recipes-entry-content .tasty-recipes-notes ol li{padding:0;clip-path:none;background:none;line-height:1.5em;list-style:decimal}.tasty-recipes-print .tasty-recipes-entry-content .tasty-recipes-notes p{padding:0;clip-path:none;background:none;line-height:1.5em}.tasty-recipes-print .tasty-recipes-entry-content .tasty-recipes-notes ul li{padding:0;clip-path:none;background:none;line-height:1.5em;list-style:disc}.tasty-recipes-print .tasty-recipes-source-link{text-align:center}.tasty-recipes-entry-content .tasty-recipes-ingredients ul li[data-tr-ingredient-checkbox]:before{display:none}
  Creamed Spinach Recipe Author: Mark's Daily Apple
  Total Time: 20 minutes
  Yield: 4 servings [image error] Print Recipe [image error] Pin Recipe Description
 This bright, flavorful creamed spinach features mushrooms and shallots, and it is dairy-free!
Ingredients1½ Tbsp Primal Kitchen® Avocado Oil or butter
½ cup chopped shallots
2 cups sliced cremini mushrooms
5 cloves grated garlic
1 lb baby spinach
½ cup coconut milk
2–3 tsp coconut flour
½ tsp salt
5 Tbsp coconut cream
2 tsp lemon juice
¼ tsp black pepper
Optional: parmesan cheese
InstructionsIn a large pan, sauté the shallots in the avocado oil over medium heat for about 3 minutes. Once the shallots have softened, add the sliced mushrooms and a pinch of salt. Once the mushrooms begin to soften, stir in the garlic and cook until it is fragrant.
Add the spinach to the pan in batches, one large handful at a time. Stir, allowing the first batch to wilt before adding the next. Once the spinach is wilted, drain any excess liquid from the pan.
Add in the coconut milk, black pepper, coconut flour, and another pinch of salt. Stir until combined and the coconut flour begins to thicken the sauce.
Add in the coconut cream and lemon juice and stir until a sauce forms. If you’d like your sauce to be thicker, you can either remove the spinach from the pan using a slotted spoon and cook the sauce down, or place the pan into a 350 degree Fahrenheit (175 degree Celsius) oven for about 10 minutes.
Taste and adjust seasoning. Optionally top with grated parmesan cheese. Serve this creamed spinach with your favorite protein, like a nice steak or piece of chicken.
Prep Time: 5 minutesCook Time: 15 minutes Category: Side dish Nutrition Serving Size: 1/4 of recipe Calories: 195 Fat: 14g Carbohydrates: 14g Fiber: 4g Protein: 5g Net Carbs: 10g
 Keywords: Spinach, vegetable, side dish
 Did you make this recipe?
 Share a photo and tag Mark's Daily Apple — we can't wait to see what you've made!
The post Creamed Spinach Recipe appeared first on Mark's Daily Apple.

May 6, 2022
New and Noteworthy: What I Read This Week—Edition 176
Research of the Week
Ethnic differences in type 2 diabetes—pathology and treatment options.
Feeding dogs once a day linked to healthier dogs.
Mesolithic inhabitants of the Baltic region got around, ranged far from home.
Early farmers got shorter.
The rise of dairy in the steppe.
New Primal Kitchen PodcastsPrimal Kitchen Podcast Episode 28: Dr. Siggie Shares Solutions for Screentime, Communication, and Managing Emotions
Primal Health Coach Radio: Maiya Keeling
Media, SchmediaWorld’s longest hopscotch course.
Fixing agriculture policy is better than lab meat.
Interesting Blog PostsIt was a good idea.
Social NotesThe French are drinking much less wine than ever before.
Everything ElseOrganic overhaul goes poorly in Sri Lanka.
Things I’m Up to and Interested InArchaic revival: The paw-paw, ancient American fruit.
That’s a shame: Oatly posts a big loss.
As I’d expect: Social isolation increases mortality.
Gorgeous: Ice caves in the Canadian Rockies.
Go green: Living near green areas protects cognitive function.
Question I’m AskingGot any summer adventures planned?
Recipe CornerWhole chicken in the air fryer.Whole chicken in the Dutch oven.Time CapsuleOne year ago (Apr 30 – May 6)
Ways to Get Your Electrolytes (That Aren’t Sports Drinks) — How to get them.A Fresh Look at High Protein— Protein good.Comment of the Week
“I’m in Portland Oregon and i took up dragon boat paddling on the Willamette river as it’s the cheapest year round team sport in Portland and a fantastic full body workout.
$23 a month and the club provides life jackets, paddles, boats, coaches, clinics, other off water training like hikes and snowshoeing and it’s fun and a great way to make friends as an adult ?”
-Sounds awesome, Jennifer.
(function($) { $("#df3R9Mc").load("https://www.marksdailyapple.com/wp-ad..." ); })( jQuery ); 
The post New and Noteworthy: What I Read This Week—Edition 176 appeared first on Mark's Daily Apple.

May 5, 2022
Ask a Health Coach: Primal Starter Pack and Snacks for Long Hauls
Hey folks, Board-Certified Health Coach, and Primal Health Coach Institute’s Coaching & Curriculum Director, Erin Power is here to answer your questions about getting started with Primal and eating on the go. Whether you’re new to Primal or scouting new snacks, we’ve got options! Have a question you’d like to ask our health coaches? Leave it below in the comments or over in the Mark’s Daily Apple Facebook group.
Mel asked:
“I want to go Primal but get overwhelmed by the rules. What’s in my Primal Starter Pack?”
 Welcome, Mel! You’re in the right place! If you haven’t checked out our Primal Beginner’s Guide, start here. It covers the 10 Primal Blueprint Laws plus Primal Eating 101.
When we say “laws,” we’re talking about parameters that just make sense: eating, moving, sleeping, and living in ways that are natural and help us thrive. That, more than strict “rules,” is the Primal foundation.
Once you’ve given the Beginner’s Guide a read, head to a grocery store or local farmer’s market to stock up on staples. So long as you’re choosing real, whole food, the options abound. Here are the basics to get you started:
Meat, poultry, and seafood: Working within your budget and availability, prioritize quality over quantity. Products from pasture-raised animals are ideal, along with sustainable seafood options. Organ meats, while much less expensive than prime cuts, are among the most nutrient-dense foods on the planet. With all those nutrients, a little goes a long way.
Eggs: Here, too, look for the highest quality that makes sense for you. Even the priciest, pasture-raised eggs are a steal, considering how much protein and other nutrients are packed in a carton. That said, even conventional eggs count as whole food and are a decent option.
Veggies and fruits: When possible, choose local and seasonal. Farmer’s markets are a stellar source. When shopping in stores, look for organic, play with a variety, and pick the produce that looks and feels freshest.
Healthy fats: Getting high-quality, healthy fats is an essential part of eating Primal and an essential ingredient in body-mind health. Steer clear of highly refined seed and vegetable oils (e.g., canola, corn, soybean, safflower, sunflower), opting instead for avocado oil, olive oil, coconut oil, and animal fats. Fats from foods such as avocados, coconut products, fish, and meat count too. Same goes for nuts, seeds, and full-fat dairy, which brings us to…
Moderation foods: If you tolerate them well, nuts, seeds, and full-fat dairy fall within Primal parameters. Generally, though, you’ll want to consume these in moderation—all the more so if you notice they cause unwanted symptoms. Same goes for Primal-approved, very dark chocolate.
Condiments: These days, there are many ready-made paleo, Primal, and Keto options! Just make sure to read your labels and question all claims. Of course, Primal Kitchen® is a trusty starting point and one-stop shop for mayo, sauces, salad dressings, and — my favorite — ketchup.
As a Primal Health Coach, I encourage you to keep it simple: Choose real, whole food as much as possible, and don’t stress about perfection.
That said, I also advise making a list before hitting the store. It helps to keep your shopping trip intentional and productive. Having your Primal parameters on paper is an easy way to counter overwhelm when surrounded by overly processed (non-Primal) food and marketing.
Another thing to keep in mind: While food’s important, it’s not all about food. Primal living includes moving your body, getting outside, connecting with loved ones, being curious, and having fun!
When it comes to what’s on our plate or how we’re spending our days, choose what makes you feel good in the moment… and the day after.
Dawid asked:
“How about health snacks for long-haul truck drivers? Any ideas?”
 So many ideas! You’re not alone in asking this question. Whether traveling for work, traveling for leisure, or sticking close to home, healthy snacks can easily be on the menu.
Of course, there is a whole train of thought around whether or not we actually need to snack… For many, eating nutrient-dense, Primal meals cuts the need to snack altogether. That said, it’s far better to prep healthy snacks than to reach for sub-par options amidst changing routines and limited access to staples.
When it comes to staying healthy and making things easier, a little planning offers big support. For those, like Dawid, who are on the road for the long haul, here are a few portable, healthy snack options:
Canned fish: This is a fantastic, non-perishable source of healthy protein. Just make sure to choose varieties packed in water, not oil. Think: tuna, salmon, mackerel, and sardines.
Hard-boiled eggs: This requires a bit more prep. Make a big batch at home and and bring them along. Seem boring? Pack avocados and sea salt to go with. (You’ll want to pack these perishable whole foods in a cooler if you’re going more than a day or two.)
Nuts and olives: Hurray for finger foods and healthy fats! Nuts can be an excellent way to stay curb snack attacks and achieve some between-meal satiety. Nut and olive combos deliver good fat plus antioxidants, fiber, iron, and copper.
Veggies, alone or with supportive dips: Pick veggies that are hardy and stand up well to travel. Alternatively, grab fresh veggies on the road, but bring nut butter or avocado oil-based dips and dressings for dipping.
Low-carb protein bars: Choose carefully here, as not all protein bars are healthy or Primal approved. Look for ones with minimal ingredients featuring meat or nuts and seeds.
Dehydrated goodies: I know dried fruits, veggies, and meats might not sound the most appealing, but trust: High-quality dehydrated snacks are tasty staples with an ancestral track record. Choose ready-made options or try making your own. If you’re buying store bought, maybe from a gas station along the interstate in a pinch, try to steer clear of extra sugars, inflammatory oils, and other non-Primal additives. It’s actually not terribly hard to find relatively clean options at even the dingiest of service stations in even the most remote parts of the country.
When making pit stops on the road, remember the Primal basics and choose real, whole food whenever you can. Staying 100 percent Primal at all times isn’t necessarily the goal. Make it a challenge, choose the best possible choice, and you’ll feel better during your long travels on the road and—even better—once you get back home.
These suggestions are just that: suggestions. Every person is different and your healthiest snacks and optimal eating plan will vary, depending on individual factors, goals, and lifestyle.
For support in that, consider working with a health coach! It’s more accessible than you might think, and we can help you get clear on what diet and lifestyle practices are best for you. Visit myprimalcoach.com to check it out and get started!
Have travel plans this Summer? Or plans for a staycation? Drop your go-to snack options or other questions for me in the comments!

The post Ask a Health Coach: Primal Starter Pack and Snacks for Long Hauls appeared first on Mark's Daily Apple.

May 4, 2022
Rounded Shoulders: Causes and Fixes
 Look at the average person walking around the average industrialized nation and you’ll notice something:
Their shoulders are rounded inward.
Look down at yourself right now reading these words and you’ll probably notice something:
Your shoulders are rounded inward.
Older kids, teens, grownups, athletes, powerlifters, grandmas, moms, dads, students, baristas, almost everyone. It’s rare to see someone with neutral shoulders—shoulders that sit in their sockets as nature intended, rather than rolled and rounded inward in perpetual internal rotation.
Why is this?
The Problem with Rounding Your ShouldersFirst, let’s explore why rounded shoulders are bad.
First principles tell us that that which is intrinsic and natural to our skeletal structure is ideal and optimal. Our natural state is not to rest in the rounded shoulder position. It is to have neutral shoulders, shoulders that sit in their sockets, neither externally nor internally rotated. Shoulders that simply are. Young kids tend to have these stable, neutral shoulder positions, mostly because they are closer to their natural state and less altered by the trappings and designs of modern society.
But let’s get more specific with the issues that emanate from rounded shoulders:
Promotes forward head tilt, which places a ton of stress on your neck and impairs your breathing and reduces your lung capacity.Begins pulling the rest of your torso forward as well—hence the hunchback that’s so prevalent in people who are too young to have any business having it.When shoulders are perpetually rounded, the supraspinatus tendon tends to get pinched against the boney bridge running from your clavicle to your shoulders, particularly if you’re lifting overhead or pressing. This can cause pain, wear and tear, and degeneration.It’s unattractive. This might seem inconsequential, but it’s an important signifier. Aesthetics in many respects represent utility, form, and function.To get an exaggerated sense of what rounded shoulders are doing to your shoulder function, try fully protracting your shoulder blades (rolling your shoulders as far forward as possible by spreading your shoulder blades). Now, try lifting your arms directly over head, like you were performing an overhead press or setting up for a dead hang pullup. You can’t do it comfortably. Your shoulders are out of place. Do the opposite: retract and set your shoulder blades back, then lift your arms overhead. It should be a lot easier. That’s how shoulders are supposed to work.
What Causes Rounded Shoulders?Excessive laptop and computer usageSitting plus typing plus intensely focusing on a screen a few inches below and in front of us has created a nation of slumped shoulders, protracted scapulas, unstable shoulder joints, and tight pecs. It gets worse when you lean on your elbows and forearms to work, because then you’re turning that rounded shoulder position into a rest position—into the “baseline” your body comes to expect.
Too much time on the phonePick up your phone and look at it. How’d you do it? Did you hold it up at eye level with externally rotated shoulders, or did you hold it at belly height and look down with internally rotated/rounded shoulders? Now do that for 6 or 8 hours a day.
You might find that one shoulder is more problematic than the other—rounds forward more than the other one, hurts more during training, is stiff when you wake up. In my experience, this is almost always caused by too much time on the phone using the one hand over the other.
Sadness and lack of spiritThis is going to be controversial, but it’s true in my experience. Extreme sadness, melancholy, lack of direction, and depression all cause you to “look downward” and revert to the rounded shoulder position. And it goes both ways. Being in that consistently rounded shoulder position promotes looking downward and prevents you from seeing the beauty, from looking up and forward, from moving toward your purpose. You look down and you’re going to move down, both literally and figuratively.
They support each other in a vicious cycle.
Too much pressing and pushing, not enough pullingPeople, especially fitness beginners, tend to focus primarily on the “pushing” muscles with push-ups, bench presses, overhead presses, and dips. The ones that you can see in the mirror. The ones you can hit with some quick pushups whenever you feel like it. They neglect the pulling exercises: pull-ups, bodyweight rows, bent over rows, and all the other permutations. Pushing exercises easy to do anywhere and they’re effective, but they’re also good at tightening the pecs and promoting a rounded shoulder position without sufficient balance from pulling exercises.
Lack of frequent movementMost people’s shoulders are in stasis. They are locked in position. They don’t move or explore their natural range of motion.
The fact that the “locked” position is an internally rotated one taking place in front of a computer or smartphone doesn’t help, but the biggest piece is the immobility. If you were to move your shoulders through their range of motion throughout the day, it wouldn’t matter that you spent hours at a computer. You’d get away with it. It’s the stasis, not necessarily the position.
Combine the lopsided push/pull ratio with the aforementioned computer and phone overuse, and you end up with a recipe for perpetually rounded shoulders.
How to Fix Rounded ShouldersConsciously pull your shoulders backSet a reminder to check your shoulder position every hour. Are you rounding? Pull your shoulders back. Stay on top of it and eventually it should become unconscious. Now, this doesn’t mean you should overcorrect in the other direction. The ideal scapular plane in relation to your torso is about 30 degrees. That’s “neutral.” Not flat, not retracted, and certainly not rounded all the way forward.
Dead hangsYou’ll need something to grab onto overhead, like a branch or a pull-up bar. Grab the bar, relax and let the stretch develop slowly, gradually, over three seconds or so. Relax into the hang. This will stretch just about everything that interacts with the shoulder girdle—lats, pecs, biceps, and delts—while opening up the space through which your shoulder connective tissues pass. Move your hands out a bid wider than shoulder width once you’re comfortable enough to increase the stretch.
If you feel a pull in your pecs, this indicates tight pectorals and a bad shoulder rounding habit. This means you really need to hang. Hang from the bar for at least 5 minutes a day, broken up into manageable chunks. More than 5 minutes is fine and may help even more.
More pulls than pushesWhile pushes and presses are important for strength and fitness, they also bias you toward shoulders rolling inward if you don’t balance them out with pulls and rows. In my book, you should be pulling about twice as many reps as you push. If you bench press 30 total reps, do 60 total rows. If you do 20 dips, work toward doing 40 pull-ups or bodyweight rows. Keep that ratio as close to 2:1 as you can. The balance should arise over the course of days, not within workouts.
Use a standing workstationA standing workstation makes you stand up tall. When you’re standing, you’re less likely to slouch forward, lean on the table, rest on your elbows, and roll your shoulders inward.
You can also adjust the height of most standing workstations so that the computer is closer to eye level so you aren’t looking down all day.
Frequent breaks from computer and device usagePart of breaking up the stasis at the root of rounded shoulders is not doing the things that bias you toward that shoulder position. At some level, if you’re using the computer or device, your shoulders will default to an inopportune position. That’s very hard to escape, no matter how many times you remind yourself to keep your shoulders back.
Just stop using the devices so much and if you must use them, take frequent breaks.
Hold your phone at eye levelThis is a simple fix that takes practice. It’s so easy and feels so normal to hold the phone at the waist and look down upon it. You might feel a little silly holding your phone up at eye level, but just do it because it will prevent your shoulder from rolling inward. If it keeps you from using your phone too often, all the better.
Frequent movement with lots of shoulder activityThrow balls for your dog or play catch with your kid. Throw rocks into lakes. Practice javelin throws. Swing your arms around like Chinese grandmas walking early mornings at the local park. Just move your body and especially move your shoulders through their full range of motion.
Take a cue from kids. Kids will run while helicoptering their arms around for no reason at all except that it’s fun to do. It’s certainly not “efficient.” Or maybe it is?
Do shoulder dislocates every dayTake breaks to do shoulder dislocates using a flexible band, a broomstick, a piece of rope, a ribbon, a sedate pet snake, or even a dog leash. Hold both ends with straight, locked arms. Starting at your hips, bring the band (or whatever you’re using) behind your head until you reach your hips on the other side while keeping those arms straight. At this point, you can go back the way you came and repeat. It may be uncomfortable or “tight.” Just avoid pain, whatever you do.
If this all sounds like a lot to take in, it’s really not. Most of these tips for fixing rounded shoulders support and encourage each other. Do some, and the others become much easier.
Let me know what you think down below. If you have any other suggestions or fixes that worked for you, add them to the comment section. Take care, everyone.
(function($) { $("#dftU0bI").load("https://www.marksdailyapple.com/wp-ad..." ); })( jQuery );
The post Rounded Shoulders: Causes and Fixes appeared first on Mark's Daily Apple.

May 3, 2022
Posture Correctors: Helpful or All Hype?
 Posture seems to be on everyone’s mind right now thanks to the uptick in work-from-home jobs, coupled with the fact that practically everyone has a mobile device to stare at. Cue my usual laments about the sedentary nature of the modern lifestyle. Not only do we sit too much and move too little, many folks alternate between hunching forward over a keyboard and looking down at a phone or tablet all day, every day.
The result? Widespread poor posture and growing concerns about what this means for public health. Forward head posture (aka “tech neck“), rounded shoulders, and slouched, rounded spines all contribute to:
Soreness and pain throughout the bodyMuscular weaknesses and imbalances that lead to dysfunctional movement patternsBreathing issuesHeadaches and migrainesPoor posture also affects your mood and how you respond to stressful events. The field of embodied cognition examines how physical states affect thoughts, emotions, and memory. Slumping or slouching saps your energy, biases you towards negativity, and can even decrease self-esteem.https://pubmed.ncbi.nlm.nih.gov/25222... https://pubmed.ncbi.nlm.nih.gov/30261... People also respond to you better when you hold yourself upright.
As more people are talking about this problem, interest in posture correcting devices is increasing. The question at hand today is whether they work and if you might want to try one out for yourself.
Types of Posture CorrectorsI’m focusing today on wearable devices intended to correct forward head posture, rounded shoulders, and slouching/rounding through the midback and lower back—devices that you can buy at any store. Pneumatic traction devices and doctor-prescribed orthopedic devices designed to correct scoliosis are separate topics.
These devices come in a few different varieties:
You’ve got cross-back braces, which are harnesses that wrap around the front of your shoulders like backpack straps and cross in between your shoulder blades. They can be made out of elastic tubing or more rigid fabrics. They’re designed to retract the shoulders and pull them more in line with the spine instead of rounding forward.
Posture bras look like a typical bra or sports bra, but they have a cross-back brace built into the fabric.
Longline posture braces look like cross-back braces at the top, but they extend all the way down the spine and connect to a lumbar belt that wraps around your waist and supports the lower back.
You can also buy a lumbar support belt separately, as well as neck braces meant to correct forward head posture.
The newest innovation on the scene for tech lovers is electronic posture devices that you strap on or stick to your back. The wearables vibrate when they sense slouching, prompting you to fix your posture. Some electronic devices connect to an app on your phone, allowing you to track posture throughout the day and see your progress.
Which one is best for you? It depends on:
What you’re trying to fix, where you’re experiencing discomfortWhen and how you intend to wear it – over or under clothing, only while sitting at a desk or also while exercising and going about your dayFit and comfortPrice point – posture correctors range from around 10 dollars for a simple cross-back brace to ten times that or more for more elaborate set-upsDo Posture Correctors Work?First let’s talk about how they supposedly work. Rigid braces hold your back in proper alignment. But for the most part, the posture correctors that are so popular on social media provide light mechanical support and, more importantly, a physical reminder to straighten up. The mechanical support helps pull your shoulders into a more desirable retracted position. This physical reminder, or proprioceptive feedback, helps you establish better habitual body position on your own.
Proprioceptive feedback, by the way, is probably one reason that kinesiology tape (KT tape) works, too. It brings awareness to parts of the body that may be weak or vulnerable and reminds the nervous system to provide appropriate internal support. KT taping can also be used to establish better posture.https://pubmed.ncbi.nlm.nih.gov/28282...
As for whether posture correctors do what they are supposed to do, a handful of studies confirms that posture correcting devices can bring the head, neck, shoulders, and back into better alignment. So in that sense, yes, they work. At least, the ones that have been tested work. The data is really pretty limited here.
Moreover, there’s almost no evidence that they provide the downstream effects we ultimately want—decreased pain, better mobility, and so on. One study of 32 women with neck pain did find that wearing a compression shirt with built-in bracing for three months improved posture and reduced pain better than exercising.https://www.ncbi.nlm.nih.gov/pmc/arti... Other than that, there’s not much to go on.
So Should You Try One?It seems that posture correctors do what they claim to do on the most basic level: help correct posture. If you have 20 bucks lying around and want to try one, it seems fairly low risk. There are also instructions online for rigging up a DIY device with materials you probably already have lying around.
That said, you shouldn’t rely exclusively on devices like these to fix bad posture. You’ll also want to work on strengthening your postural muscles. These include your core muscles, naturally, but correct posture is really a whole-body activity. Yet another reason why it’s important to vary your position throughout the day, move frequently through a full range of motion, and include resistance exercise (insert shameless plug for the Primal Essential Movements here) and balance exercises that improve your proprioception.
Pretty much all strengthening exercises can promote better posture, provided you do them with good form. The catch-22 here is that if you already have bad posture, you’re likely exhibiting that same bad posture during exercise. Focusing on proper form and exercising in front of a mirror can help. For folks already suffering from neck, shoulder, or back pain, a physical therapist can identify specific weaknesses and recommend a customized program.
In tomorrow’s post, I’ll also discuss how to specifically target the rounded shoulders that are so typical among people who work at a computer, play a lot of video games, or stare at a device in their laps. (So, most people.) Breathwork is another great tool, so I’ll link some relevant MDA posts below.
How to Get StartedAim for the minimum effective dose. Start with a basic elastic band or strap style rather than jumping into a hard-core pneumatic device or full-back brace. The goal is to do as little as possible externally while also working on developing internal postural strength and balance.
Try wearing it for a couple hours per day for a few weeks. See how you feel. You may need to start smaller, 20 or 30 minutes, and work up to an hour or two. I wouldn’t wear it more than that unless your physiotherapist told you to do so. It’s theoretically possible to provide too much passive stretching to the chest muscles. And obviously, if you have ongoing shoulder or chest injuries (torn muscles, nerve impingement, broken bones, recent surgery, or unexplained acute pain), talk to your doc before strapping in.
Let me know how it goes!
Breathwork posts from MDA:Why You Should Practice Deep Breathing (and How to Do It)
3 Breathing Exercises to Improve Vagal Tone and Reduce Stress in a Flash
References https://pubmed.ncbi.nlm.nih.gov/25222091/https://pubmed.ncbi.nlm.nih.gov/30261357/https://pubmed.ncbi.nlm.nih.gov/28282792/https://www.ncbi.nlm.nih.gov/pmc/articles/PMC8553007/
(function($) { $("#dfQGebQ").load("https://www.marksdailyapple.com/wp-ad..." ); })( jQuery );
The post Posture Correctors: Helpful or All Hype? appeared first on Mark's Daily Apple.

May 2, 2022
How to Make Gluten-free Roux
 Roux (pronounced “roo”) is a thickening agent that chefs add to sauces, soups, and stews to give them a more pleasing texture. It is a staple of French cooking, though in the U.S. we typically associate it more with Cajun or Creole staples like gumbo.
Roux is made by cooking one part fat and one part flour together to form something resembling smooth gravy. White flour is a no-go when eating Primally, but never fear, you aren’t doomed to a lifetime of thin, runny étouffée, moussaka, and scalloped potatoes!
Today, I’ll show you how to make a traditional roux and how to swap in Primal-friendly ingredients for a gluten-free option.
How to Make a Roux (Traditional and Gluten-free Options)For a basic roux that will thicken around 2 cups of liquid, you will need:
Ingredients:¼ cup fat¼ cup flourDirections:Heat your fat in a skillet or saucepan over medium heat. Once the fat is melted, slowly stir in your flour or starch while stirring. (See below for options)
Continue stirring and reduce the heat a little until a sauce forms. As you stir, the sauce will begin to thicken and eventually turn from white to tan to brown. A white or blonde roux takes about 1 to 3 minutes to cook, although this may vary slightly depending on the type of flour or starch you use. A dark brown roux can take 30 minutes or longer.
Continue cooking until the roux reaches your desired depth of color. After the roux is finished cooking to the color of your liking, remove the pan from the heat and allow it to cool for a bit before adding it to whatever dish you are using it for.
Important things to note:A light colored roux is ideal for cream sauces or cheese sauces, like for mac and cheese. A darker tan or caramel colored roux will take longer to cook and is ideal for different types of hearty stews, soups, gravies, and gumbos.A couple of tablespoons of roux can thicken up to 1 cup of liquid, but this will depend on the color of the roux. A dark-colored roux tends to thicken up dishes less than the white or blonde varieties. I find this to be especially so when using alternatives to flour like arrowroot or tapioca starch.While the roux is cooking, you want it to be slightly bubbling but not boiling. Cooking the roux at too high of a temperature can often result in a gritty sauce at the end.Roux FAQsWhat ingredients can I use to make my roux gluten-free and Primal/paleo?Flour is the go-to choice for making a roux, but there are many alternatives. Try a gluten-free flour blend, tapioca starch, arrowroot powder, or cornstarch. To keep it Primal/paleo, use tapioca or arrowroot starch. I find that starches like arrowroot and tapioca tend to perform better in light-colored roux.
There are many options for the fat in a roux, too. Ghee or clarified butter are the ideal choices. They have a nutty flavor, and the milk solids have been cooked out, which helps reduce the risk of burning. In lieu of ghee, you can use butter, animal fat like beef tallow, or even oil like avocado oil. Keep in mind that if you use oil, the roux will most likely separate if you store extra for later.
To thicken a sauce without fat at all, make a slurry by whisking together a few tablespoons of flour/starch and double or triple the amount of any type of milk (cow’s milk, nut milk, coconut milk, etc.). You can whisk this slurry into whatever dish you want to thicken.
How do you prevent your roux from forming lumps?Take care to not heat the fat at too high of a temperature. Stir the flour into the fat a little at a time, and stir the roux frequently. This will help break down any little clumps of flour and also helps it cook evenly and not burn.
If you’d like, you can also use a flour sifter to sift the flour into the fat.
How can you tell if your roux is burnt, and what should you do if that happens?You may notice your roux smelling a bit burnt or developing little black flecks in it. If this is the case, your best option is to toss the roux and start again, as the burnt flavor will permeate whatever dish you put it in.
What’s the best way to store a roux to use later, and how long will it last? How can you reheat it?It’s never a bad idea to make a little extra roux, as it can always be stored for later! Pour the extra roux in an air-tight container and store in the refrigerator. You can keep it in the fridge for a few weeks, or freeze it for 3 to 6 months.
The easiest way to portion out roux for the freezer is to measure it out into ice cube trays, freeze the trays, and then pop the roux cubes into an airtight bag or container. Let the roux come to room temperature and give it a stir before adding it to a dish.
If you could offer one tip to a first-time roux maker, what would it be?Cooking is all about experimenting and trying new things. If you’re not happy with your roux the first time, troubleshoot and try again! Experiment with cooking your roux for different lengths of time and using it in different dishes. You’ll quickly see how easy and versatile it is!
(function($) { $("#dfzudhG").load("https://www.marksdailyapple.com/wp-ad..." ); })( jQuery ); 
The post How to Make Gluten-free Roux appeared first on Mark's Daily Apple.

Mark Sisson's Blog

- Mark Sisson's profile
- 199 followers

