
Andrew Skurka's Blog, page 10
August 11, 2021
Book review: From the River to the Sea || The railroad war that made the West
From the River to the Sea: The Untold Story of the Railroad War that Made the West, by John Sedgewick, was released in June and published by Avid Reader Press. I’m uncertain why I was sent a media copy, as I’m not a prolific reader or book reviewer.
But I’m thankful that I was. I rolled through its 300+ pages in just a few days while camping in the upper San Luis and Rio Grande valleys, where (and near where) most of the storyline takes place. In fact, multiple times on the drive west from Alamosa I crossed the old Denver & Rio Grande Railway Company line, and I had dinner about 50 yards from the original depot in Creede, where the railway arrived in 1891.
The book is primarily about two railway men from the late-1800’s who competed for all-or-bust dominance in undeveloped Colorado and the southwest. General William Jackson Palmer owned the Denver & Rio Grande (and also founded and plotted Colorado Springs, and built the famed 33,000-square-foot Glen Eyrie in Manitou Springs). William Barstow Strong was general manager and eventually president of the Atchison, Topeka, and Santa Fe Railroad.
From the River to the Sea is the second book I’ve read in recent years about railroads and the West, the other being Nothing Like It in the World, by Stephen Ambrose, which focuses on the first transcontinental railroad and the competition between the Union Pacific and Central Pacific. Sedgewick was more successful in developing his characters, and I also appreciated that he took regular tangents into other related and interesting matters like the Leadville mining boom, the growth of Los Angeles, and the business maneuvers of other railroad barons like Jay Gould and Collis Huntington. If you enjoy reading about the history of railroads, business tycoons, Colorado, or the American West, both books are up your alley.
The impact of railroads in the West cannot be understated. They enabled the relatively rapid movement of people, goods, and communication. They also put the United States on a collision course with Native Americans, an issue that is still very pertinent more than a century later.
Disclosure. I strive to offer field-tested and trustworthy information, insights, and advice. I have no financial affiliations with or interests in any brands or products, and I do not publish sponsored content
This website is supported by affiliate marketing, whereby for referral traffic I receive a small commission from select vendors like Amazon or REI, at no cost to the reader.
The post Book review: From the River to the Sea || The railroad war that made the West appeared first on Andrew Skurka.


August 9, 2021
Long-term review: CalTopo || My go-to mapping & GPS navigation platform
Let me sound old for a minute. When planning the Sea-to-Sea Route in early-2004, I relied on USGS 30- x 60-minute paper maps at 1:100,000 scale to plot, measure, and follow a 700-mile route across North Dakota and Montana to link the North Country and Continental Divide Trails. Two years later, when planning the Great Western Loop, I was thrilled to discover the relatively high-tech National Geographic TOPO! software, in which I could digitally create another 700-mile route between the Grand Canyon and Pacific Crest Trail and then print custom maps of stitched-together USGS 7.5-minute quadrangles. Rounding out my navigational toolkit was an altimeter watch and magnetic compass.
(If I was a real old-timer, I could tell you about mail-ordering quads or sifting through drawers of them at my local outdoor retailer, or even using a sextant, but I just missed out on that.)
With paper maps and TOPO!, I was able to get it done. But by comparison the modern backpacker has a bounty of more user-friendly and more feature-rich mapping and navigation technologies, including Gaia GPS, AllTrails, Guthook, Backcountry Navigator, and others.
Long-term review: CalTopoMy own platform-of-choice has become CalTopo, and I think it’s now the clear winner for those who have similar needs.
At home, I use the CalTopo website to plan personal and guided trips — specifically, to measure distances and vertical, insert helpful annotations, and draw in unmapped trails and routes;Also at home, I use the website’s print feature to export multi-page print-ready PDF’s that I carry into the field; and,In the field, I use the CalTopo app to help me navigate (via GPS) and as a backup map library.The website and app are synced in real-time (or when the phone has a connection again). So when I edit an existing map or create a new map on one device, it updates to the other. I need not export GPX files (or similar) between platforms — it’s an all-in-one solution, desktop and mobile.
A subscription is required, ranging from free to $100 per year, with most users probably being content with the Mobile ($20/year) or Pro ($50/year) levels. Personally, I have a Pro account, and if I dropped down I’d miss the printing options (11×17 paper and 300 dpi) and Sentinel satellite imagery, plus the parcel data during hunting season.
In full disclosure, CalTopo provides me with this Pro membership, and it also offers free two-month Pro memberships to my guided clients so that we can teach participants how to plan routes at home and to use a GPS app in the field. I wouldn’t get too skeptical based on this admission though — I use CalTopo nearly everyday, and if it wasn’t top-shelf it’d have to offer a lot more than “free” to get my endorsement.
CalTopo desktopI transitioned to CalTopo in about 2013. TOPO! had been discontinued and was not compatible with the newest version of Windows, and I was increasingly comfortable with cloud-based services like Gmail and Google Drive.
At the time, CalTopo was just a website, and it was functionally comparable to TOPO!. But founder Matt Jacobs was constantly making upgrades — more tools, more map layers and overlays, and an improved file-saving and file-sharing system. It felt like a better product nearly every time that I logged on.
 Screenshot of our “guide map” for Grand Staircase-Escalante, which is loaded with information about routes, water sources, camps, and archaeological sites. I give each guide a printed version of this map for field use, and have them download the GeoJson file into their own app.
To plan custom routes and create custom maps, I add objects like markers and lines (both available in dozens of colors and styles), and organize these objects in folders. Lines can be snapped-to existing trails or created off-trail; distances and vertical profiles are available.
I can toggle between multiple map and imagery layers. Most often I use USGS 7.5-minute scans, the FS Topo 2016 map, and Landsat. But in the early-season, I’ll look at the Sentinel satellite imagey for current snowpack; during the fire season, I turn on the Fire Activity overlay; and just for fun, I like looking at historical topographic maps from the early-1900’s.
Once I’m happy with my map, I create a print-ready multi-page PDF of it using CalTopo’s print function, then upload the file to FedEx Office. Refer to my exporting and printing specs for more details.
 Paper maps of the Brooks Range, marked up in and exported from CalTopo, and then printed by FedEx OfficeCalTopo app
The CalTopo app was released in 2018, but until last season I continued to use Gaia GPS. CalTopo lacked aesthetic refinement and was missing important features, and I also just hadn’t taken the time to learn it.
But the CalTopo app has arrived — it now offers all the functionality that I need from a GPS tool, and it has a very intuitive system for downloading maps for offline use. Sealing the deal is its convenience: I can load and edit my maps at home on a desktop computer, in the field on my smartphone, or on my couch using a tablet.
 My “guide map” for Escalante, pulled up in the CalTopo app
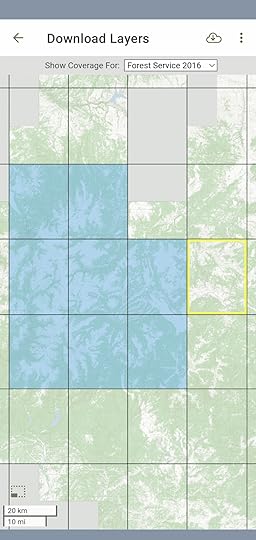 An intuitive system for downloading map tiles for offline use.CalTopo versus Gaia GPS
My recommendation for many years was to use CalTopo at home and Gaia GPS in the field, and have the platforms talk to each other by exporting and importing GPX files between them. The comparative strengths of each platform reflected their histories — CalTopo started as a website and later launched an app, and Gaia GPS started as an app and later built out its website.
However, I’ve now migrated fully to CalTopo for home and the field.
For route planning at home, the Gaia GPS website is functional. However, its print feature is a deal-breaker for me — it exports one-page PDF’s only. For those who use their phone exclusively in the field, this may be an acceptable ommission. But each year I print hundreds of paper mapsets between two and twenty pages, and it’d take hours to manually combine one-page maps into multi-page sets before sending them over to FedEx Office.
Less importantly, I’m not a fan of Gaia’s folder-based organizational system. I always struggle to create a dedicated map for an area or route that doesn’t get polluted by waypoints and tracks that I’ve created previously for other projects.
Lastly, I’ll add that I’m concerned about the future of Gaia GPS. In February 2021 it was acquired by Outside (formerly Outdoor Pocket Media), which also has purchased Backpacker, Trail Runner, Warren Miller, and VeloNews. Gaia will be part of its Outdoor+ subscription ($99 per year); for now it’s still available as a standalone app.
Will Gaia GPS remain focused, nimble, and innovative? Or will it fade into oblivion if its team is gutted (founder Andrew Johnson has already resigned), if its new owners fail to understand marketplace changes caused by new technologies or the competition, or if the parent company encounters financial difficulties.
CalTopo versus OnX BackcountryThis year OnX Backcountry has made a play for the outdoor market, partly by buying the loyalty of outdoor influencers.
Let me save its marketing team some time: Don’t bother contacting me. I’ve looked at the product, and it does not fulfill my needs. Also, I find it mystifying why multi-sport users (e.g. a hiker that also hunts, like me) need to buy subscriptions to multiple apps to get all the data that we want. In comparison, CalTopo and Gaia offer everything in one package.
CalTopo versus Guthook GuidesFor popular (and, now, even not-so-popular) long-distance trails, Guthook Guides is the way to go. It offers trail-specific information like data charts, real-time water reports, and town services, whereas CalTopo has none of that (and no plans to add any of it).
If and when a thru-hiker graduates to more unique and adventurous DIY itineraries, which are not supported by Guthook, he or she should check out CalTopo.
CalTopo versus AllTrailsAround the same time that National Geographic discontinued TOPO!, it partnered with AllTrails, leading me to think that it had settled on a replacement.
But AllTrails had a different vision. It’s not a platform for power users who want to create custom routes and maps like TOPO! was and CalTopo is. Instead, its an extensive database of user-submitted hikes that other users can replicate, review, post comments about, and share photos of. AllTrails is a good resoure for beginner-level hikes and overnights, but it’s not optimized for endeavors more involved than that.
The post Long-term review: CalTopo || My go-to mapping & GPS navigation platform appeared first on Andrew Skurka.
July 12, 2021
Blowdowns & wildfires: Pfiffner Traverse conditions update
Several sections of the Pfiffner Traverse were significantly impacted by wildfires and storms in fall 2021, including both on- and off-trail portions, and both the Primary Route and Section Hikes.
These events caused an official area closure by the National Park Service and de facto closures on NPS and US Forest Service lands because of downed trees. I was last on the route in early-August 2021 and I’ve not witnessed the impacts first-hand.
The post Blowdowns & wildfires: Pfiffner Traverse conditions update appeared first on Andrew Skurka.
July 7, 2021
Toilet paper-less: My evolution in butt cleaning
When I began backpacking nearly twenty years ago, I used toilet paper exclusively for cleaning my butt after pooping, just like I did at home.
I’ve pooped outside thousands of times since then, and now prefer to do the exact opposite: I use no toilet paper at all. Instead, I rely on natural materials, a water bidet, and either soap or hand sanitizer.
My motivation for switching was partly environmental, as I no longer leave behind toilet paper in the backcountry (or have to pack it out, where required by land managers). But, mostly, I find that this approach is in my own best interests: my butt is substantially happier without toilet paper.
My personal journeyOn my earliest trips I learned that toilet paper alone could not keep my anus area sufficiently clean: feces lingered, hair and sweat collected, and toilet paper shards stuck around (“dingleberries”). So regularly my butt would itch uncomfortably, smell unpleasantly, and chafe severely (“monkey butt“).
To get more graphic, I attribute my lack of cleanliness to a horrific case of folliculitis in August 2002 while I was finishing my Appalachian Trail thru-hike, when every hair follicle on my undercarriage became a painful white-headed pimple. I’ll spare you the photographic evidence. Thankfully that happened only once, but on my next long trip I recall feeling like a dog with bad fleas because I was scratching my ass so often.
So to supplement the toilet paper, I added baby wipes to my poop kit. They helped, though not completely, and I remained curious about better solutions.
Environmental considerationsAll this time, I wasn’t thinking much about the impact of my toilet paper or baby wipes on the NPS, USFS, BLM, and state lands where I was backpacking. But in hindsight it was another unfortunate aspect.
I’m certain that some of my toilet paper became “Charmin blooms,” grossing out future visitors. And the plastic content of my baby wipes probably remains non-degraded in my catholes across North America from my Sea-to-Sea Route, Great Western Loop, and other hikes.
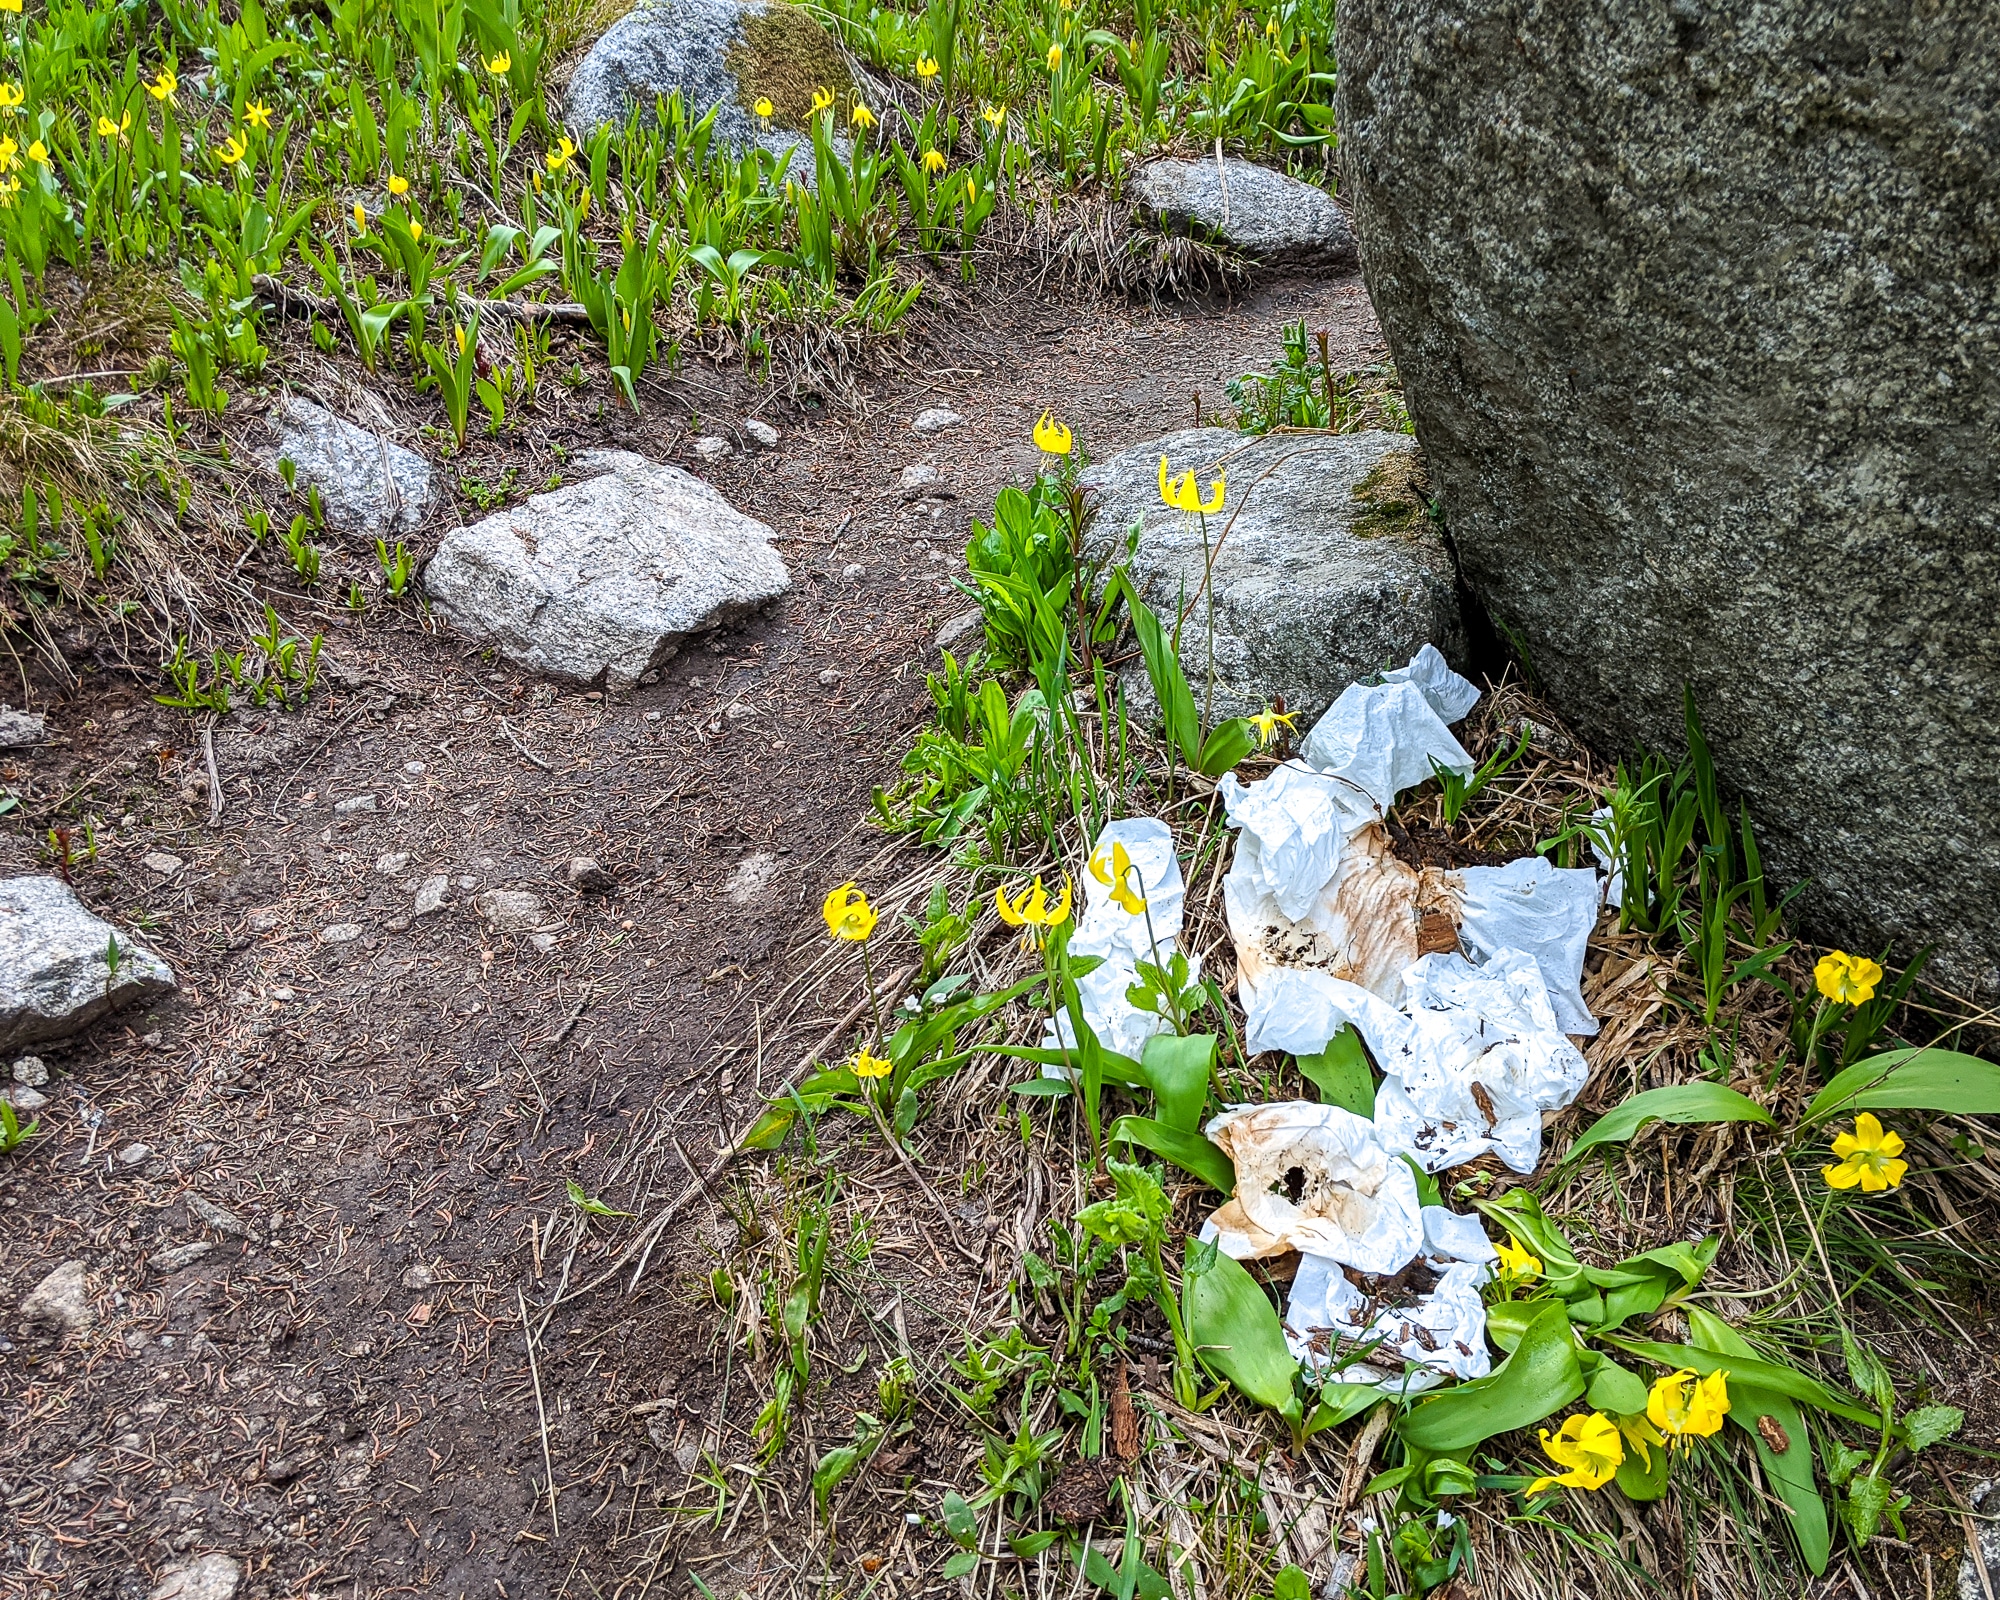 A disgraceful attempt to hide poop and toilet paper near Crater Lake in the Indian Peaks WildernessDiscovery: The backcountry bidet
My backpacking experience was transformed by the backcountry bidet, which I learned from a young Scott Christy while on a NOLS instructor course in 2007. The itching, chafing, and odors decreased dramatically by washing my ass with soap and water, exactly like I would do in the shower at home. This was the missing ingredient to my cleaning routine.
But until last year the bidet was a standalone event for me, performed every day or two — it was not something that I did immediately after pooping. To wipe, I used natural materials and then 1-2 squares of toilet paper, a system that I found quick and fairly clean (and that had a relatively low environmental impact).
It was Flyin’ Brian Robinson who sold me on replacing toilet paper with the bidet. If the bidet achieved a better clean than toilet paper, and if the bidet is better for our backcountry areas, then why was I using toilet paper?
I couldn’t argue with his logic, and we agreed that squeamishness was not an acceptable justification. If I can wash my ass with my bare hand using water and soap in the shower, I can wash my ass with my bare hand using soap and water in the backcountry, too.
Plan B
As a backup, I still carry some toilet paper — “some,” as in about ten tiles for a week-long trip. It’s convenient for when I must poop but don’t have enough water (either for a bidet or to drink), on cold mornings when my hands would hate me for dousing them with ice water, and if my nose starts to bleed. But my goal is to finish the trip without using my stash — and I do, more often than not, making me wonder if I’m just packing my fears.
If you opt to carry toilet paper, please be responsible about it. Minimize your usage by supplementing it with natural materials (see Step 1 below), and plan to pack it out unless local land agencies have approved the burying or burning of it (increasingly uncommon).
Four steps to a toilet paper-less cleanReady to take the plunge, or at least willing to try? Follow these steps:
Prerequisite: PoopRead Part 1 and Part 2 of an older tutorial for more in-depth instructions. To summarize:
Wander far away from any spot where another hiker might want to camp, take a break, or even poop;Confirm that you are far from water (generally, at least 200 feet); Dig your hole in soft, biologically rich ground; and finally,Squat, aim, and squeeze. This sign near Upper Calf Creek Falls is meant for all the lazy poopers out there, who don’t wander far enough from water or from areas where others may want to rest or camp.Step 1: Wipe with natural materials
This recommendation may sound really crunchy, but it’s also very effective. Nature provides us with some fantastic options, and they are essentially in infinite supply out there.
Natural materials probably get my butt 90 percent clean, leaving very little feces for the water bidet in Step 2.
By natural materials, I mean:
SticksRocksLeavesMossPine conesSnow Sphagnum moss, Brooks Range
 River rocks, Brooks Range
Materials vary in their quality and also in their geographic and seasonal availability, and could probably be the subject of another post. For example, in Colorado one of my favorites is corn lily (featured in the header image), which has durable and mildly textured leaves. But it’s found only in riparian areas through early-summer, so other times I rely on sub-alpine fir cones, river rocks, and dead sticks at the base of lodgepole pines.
The ultimate natural material is snow, because it’s a twofor: it wipes and bidets at the same time. The snow composition must be conducive to making snowballs — blower powder does not work.
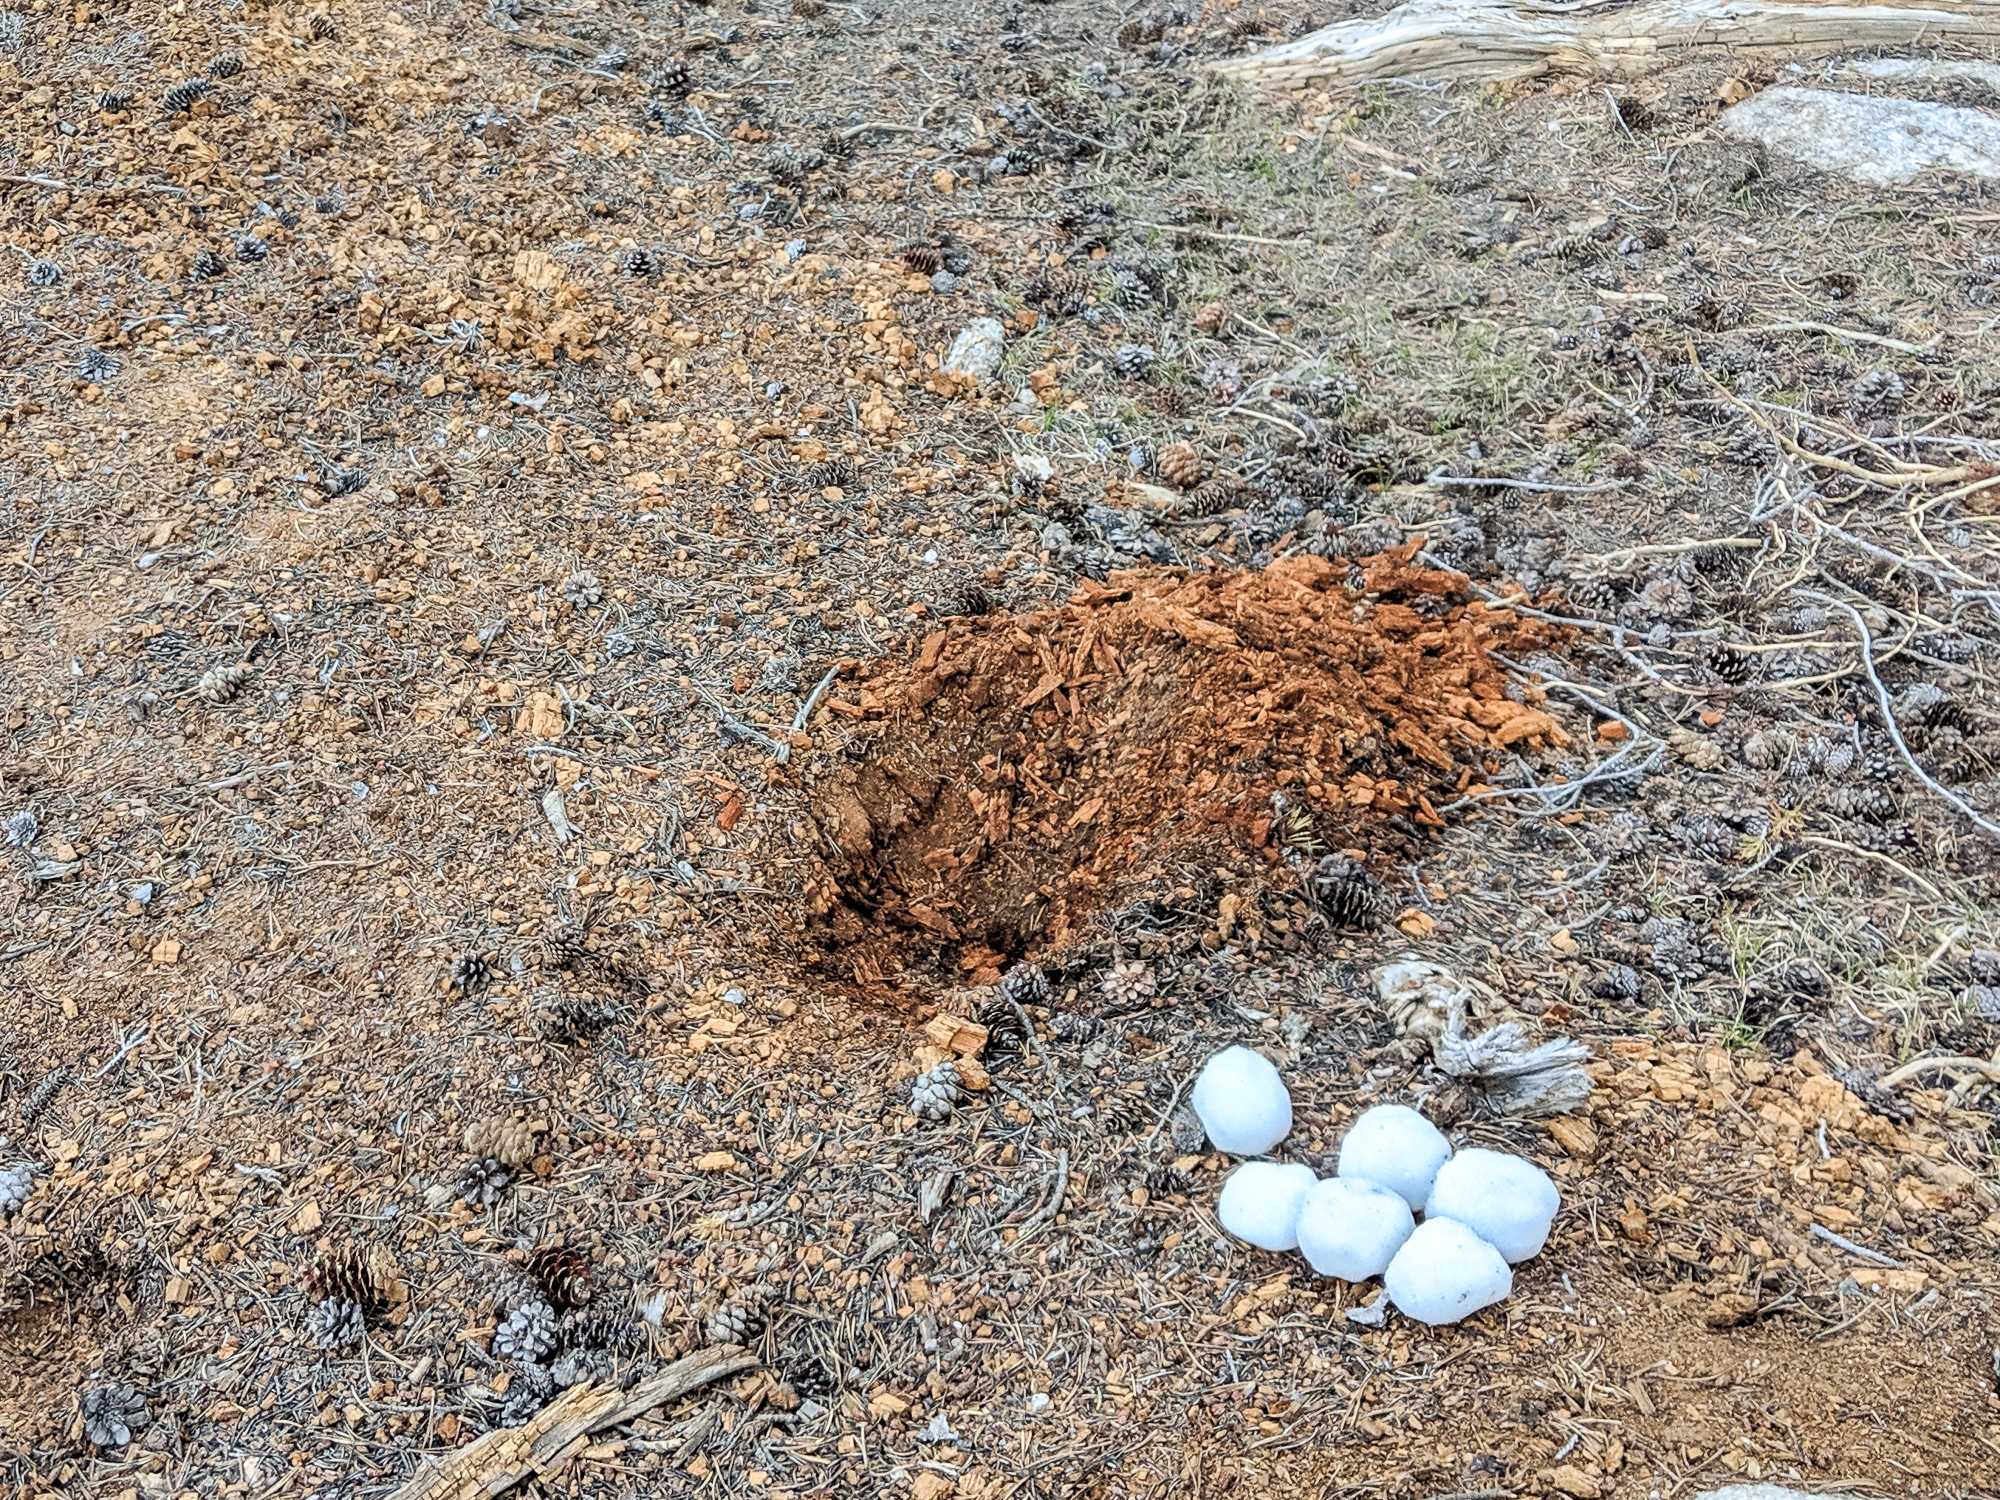 My cathole (in a composting log) and natural materials (a half-dozen snowballs) in Yosemite National Park
More tips about natural materials:
Avoid materials that are allergenic or spiky, like poison ivy or devils club. Duh!Try to avoid materials that will leave behind an abrasive, like grit-covered rocks or sticks with flaky bark. The water bidet should clean this out, but it’s an unnecessary risk. Sharp-edged materials like freshly broken rocks or pointy sticks need not be avoided, but greater care must be taken — don’t jab, just graze.What to do with poop-covered materials?Materials used for the first wipe or two should be buried with your poop. If your cathole is big enough you can bury the later materials, too, but I typically toss them around the area — they have very little feces on them, not enough to contaminate a faraway water source or to get a passerby’s attention.
 Dead and de-barked sticks plus the water bidet and soap/sani.Step 2: Perform the backcountry bidet
I’ve embedded two videos in this post that will give you an idea of how it’s done. Exact styles and preferences vary, and even my technique has changed some since the 2015 video, below. Specifically:
Step away from the hole so that you don’t step in your poop or trip.Budget 16 ounces of water (half a quart, or about half a liter) for the bidet and hand-washing.Get your shorts or pants out of the system by either removing them or by wearing them around your knees.Instead of taking the cap off your bottle, simply loosen it, so that water can flow through the threads.I find bidet attachments (like this one) unnecessary, and they’re less effective than direct scrubbing.
Soap is not a necessary part of the backcountry bidet, but some may enjoy the additional freshness. I’d recommend peppermint Dr. Bronner’s — it’s super concentrated and leaves the skin tingling.
Differences for women
The back-to-front nature of the water bidet poses UTI risks for women. So my female guides recommend:
Squatting extra low to prevent contamination; and,Finishing with a wet wipe that was leftover from a face-wash the night before. This wet wipe must be packed out.Step 3: Clean your handsAt the end of the bidet, you have a dirty hand and a clean hand. Before reaching for your trail mix, get both hands clean:
One-hand wash your dirty hand with just water.Using your clean hand, pour hand sanitizer (good) or soap (best) into your dirty hand, and continue one-hand washing.Again using your clean hand, pour more hand sanitizer or soap into your dirty hand, and then two-hand wash. To get water into the system, place your water bottle between your knees, loosen the cap, and let water dribble out.Step 4: Tell everyone you know how great it isDon’t like finding toilet paper everywhere you go backpacking? Then educate your hiking friends to do it better. Pitch it as primarily being in their best interests, and secondarily as good for the environment.
Also, if anyone has a contact at The New York Times, I think this could be a provocative column.
The post Toilet paper-less: My evolution in butt cleaning appeared first on Andrew Skurka.
June 8, 2021
Bear spray: Three proper carrying methods
Our Brooks Range trips start next week, so both clients and guides are in the final stages of their preparations. One question that hit my inbox this morning was:
What is your recommended method of carrying bear spray?
This is a great question to ask before a trip, because your options may be limited or sub-optimal if they’re not considered until at the trailhead.
ObjectivesMethods to properly carry bear spray should (in order of priority):
Reduce or eliminate the risk of the spray being dropped and lost; Keep the spray easily accessible;Not interfere with basic mechanics, like walking, buckling your hipbelt, and moving your head.ConsiderationsI don’t think there is a single best way to carry bear spray, as it depends on factors like:
The design, size, and features of your backpack (e.g. daypack versus multi-day pack, traditional shoulder pack versus waist pack); The chances of you needing it, which is a factor of where you are (i.e. bear density, visibility) and whether you are solo or in a group.So select a method that works for you.
Recommended methods of carrying bear sprayI recommend carrying your bear spray using one of these methods:
On a shoulder strap,On a hipbelt, orIn a side pocket.Method 1: Shoulder strapOn a shoulder strap, the spray is easy to keep track of and easy to access. It’s more “in the way” here, but it’s not intolerable.
To carry bear spray on a shoulder strap, your backpack will need either:
Good: Fixed elasticized loops with cinch locks;Better: Aftermarket pocket;Best: Permanently attached pocket. Permanently attached shoulder pocket
 Fixed elasticized loops with a cinch locksMethod 2: Hipbelt
Some brands of bear spray (including but not limited to UDAP) come with a holster that can be threaded through the hipbelt. Like with the shoulder strap, in this location the spray is easy to keep track of and easy to access. But it can mildly interfere with your stride, and the holster can slide off the hipbelt when you’re putting on or taking off the pack.
 On the hipbeltMethod 3: Side pocket
The side pocket can be a poor choice for carrying bear spray:
Many backpackers lack the dexterity to easily access these pockets, and Many side pockets are poorly designed and inherently difficult to access.Moreover, it’s difficult to keep track of the bear spray when it’s in a side pocket — if it were “stolen” by brush or if it slipped out while scrambling or crawling, you might not notice that it’s gone until it’s too late. So, if you use this method, I highly recommend installing a tether using accessory cord. Attach this tether to the spray using a bowline or figure-8, and to your shoulder strap using a girth hitch.
The chief benefit of storing bear spray in a side pocket is that it’s completely out of the way. If you’re not in prime grizzly habitat, if you have expansive views, or if you’re in a large group, it’s reasonable to let your guard down some.
 In a side pocket. If you use this method, I strongly recommend using a tether made out of accessory cord.Have questions about carrying bear spray? Or do prefer another method? Leave a comment.
The post Bear spray: Three proper carrying methods appeared first on Andrew Skurka.
June 7, 2021
A 7,000-mile hike || The Earth Beneath My Feet
Like millions of people – like you perhaps? – I grew up in the sprawling suburbs of a city. I spent my childhood with carpet and concrete underfoot, not the wild earth. But from the second I saw my first mountain at the age of fifteen the city faded into insignificance.
Trouble was, the city was where I lived, and it was a hard place to escape. In my early twenties I had little money, no qualifications for mountain work, and worse: I’d been brain-washed to follow a safe and predictable path. But I loathed the suburbs. They were crowded. Alien. Life there lacked purpose and meaning. What I craved was a life of simplicity and adventure, but such a life seemed impossible to attain.
But then, by blind luck, I fell down a mountain in Switzerland, and the fall woke me up. Nearly dying does that. Afterwards, life seemed far too precious to waste.
In May 1997, despite lacking adequate funds, I left my London home and traveled to Calabria, Italy. Once there, I turned north and began walking. My destination, the North Cape at the top of Norway, lay unimaginably far away.
Of course, I wasn’t hiking to reach a destination, or to follow a fixed route – I was hiking to live life to the full, and to lose myself in the wild. And I succeeded. I lost myself (often literally) in the Apennines – a fascinating mountain range that few outsiders ever know. And I lost myself in the Alps in winter, and in the dark forests of Central Europe, and in the vast northern wildernesses of Arctic Norway. I lost myself within a hidden wilderness Europe that most people miss.
And I found myself too. The journey brought hardships and struggles, pushed me to my limit, but ultimately led to unimaginable rewards. As you may know, a six-month hike can change a life. My eighteen-month hike profoundly changed mine.
 A cold camp in Arctic Norway as winter arrives in OctoberA different kind of journey
Twenty-three years after finishing the journey I’ve written a book about it. Why such a long delay? Well, the hike taught me many things, and one of them was to live in the moment. After all, what is better: writing about life or going out and fully living it?
Plus, I needed distance, perspective. And that only comes with time. When finally I began I saw that I wasn’t only writing a book about a long hike, or about a continent’s hidden natural treasures, but also a book about overcoming an un-natural upbringing, about finding connection with the earth, about making choices and taking control, about living the life I most wanted to live.
I was writing a book about soaring mountains… AND soaring freedom.
The Earth Beneath My Feet was published on June first. Of course, I don’t know if it will sell. Some folk simply don’t accept that Europe can be wild. But Chris Townsend, experienced backpacker and author of over 30 hiking books, is reading it as I write this, and he recently blogged that it is now one of his three favorite backpacking books, placing it alongside Colin Fletcher’s The Man Who Walked Through Time. But still, I don’t know if anyone else will be interested.
Are you interested? Do you love books about travel? Foreign countries? Mountains? Long hikes? Do you want to read about hidden places that few people know? Are you intrigued by the idea of giving up work, leaving everything that is safe and familiar, and striding out alone in freedom? Are you looking for a summer read that will take you on a journey?
If ‘yes’, The Earth Beneath My Feet may well be the book for you.
Thanks for reading!
The Earth Beneath My Feet can be found on Amazon as a paperback and ebook, and will soon be available through your local bookstore.
For further details, visit Andrew Terrill’s blog.

The post A 7,000-mile hike || The Earth Beneath My Feet appeared first on Andrew Skurka.
May 28, 2021
Review: Somewear Global Hotspot || 4.0 oz with seamless messaging
For years Garmin has dominated the satellite messaging category with its family of inReach devices. But competitors have emerged, thankfully, and it’s helping to keep prices down, drive product innovation, and perhaps improve customer service.
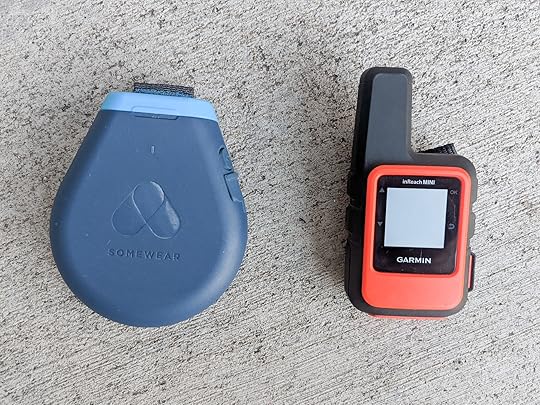
For nearly three weeks this spring I used the Somewear Global Hotspot ($280, 4 oz/113 grams), one of these newer devices, while guiding trips in southern Utah, giving me an opportunity to test its reliability and features, and to better understand how it compares to other units like the inReach Mini, Zoleo, Spot X, Spot Gen4.
 When paired with the Somewear Mobile App, the Hotspot is a two-way satellite messenger. The app also transmits over cell and wifi, making for a seamless messaging experience when bouncing in and out of the backcountry.Review: Somewear Global Hotspot
At its core, the Somewear Global Hotspot is a two-way satellite messenger, capable of both sending and receiving texts in areas without cell service.
The device uses the Iridium network, which has truly global coverage. A subscription is required. I found the messaging experience to be remarkably zippy — when I had good signal strength (conveniently displayed by the app in the upper-right corner), messages were sent and received with a short delay, usually seconds, sometimes a few minutes. It felt significantly faster than my inReach Mini, which I was using simultaneously for inReach-to-inReach conversations with other guides who were in the field.
Two types of messages can be sent with the Hotspot:
SOS, using a physical button on the device; andCustom, by pairing your smartphone to the device with the Somewear Mobile App.The Somewear Mobile App also transmits texts over cell service or WiFi, making for a seamless messaging experience (and also saving money, because this data is run through your phone provider, not against your Somewhere service plan). When bouncing back and forth between civilization and the wilderness, as you might do on a thru-hike and as I do while guiding, text conversations do not get disjointed when the connection changes.
As a standalone unit, the Somewhere is physically appealing, being palm-sized and only 4.0 oz (113 grams). However, its sole capability is sending an SOS message; it must be paired with a smartphone to type, send, receive, and read text messages. Moreover, the device gives little indication about its operations — it doesn’t beep or vibrate, and it has just one external white-only LED light that blinks when the device is on or in pairing mode.
The Mobile App has some weather and mapping features. But, honestly, I recommend that you get this data from elsewhere. The weather forecasts are pulled from Dark Sky, which is an Apple product that poorly predicts mountain weather. And for your mapping, I highly recommend instead the Gaia GPS or CalTopo apps.
 As a standalone unit, the Hotspot has limited functionality. It can send SOS messages, but nothing more — it lacks a display or other physical buttons. The single LED is white-only and has two blinking patterns (“on” and “pairing”).The Hotspot against the competition
How does the Somewear Global Hotspot compare to other satellite messengers?
Somewear Hotspot versus Spot Gen4 and Spot XThe SPOT Gen4 is a one-way device, capable of only sending messages. Its technology was groundbreaking in 2008 when it was released but is now obsolete.
The SPOT X is a two-way messenger with a physical keyboard. But it’s heavier and clunkier than the Somewear Hotspot, and does not offer seamless messaging.
Conclusion: The Somewear Hotspot is a clear winner over both SPOT devices.
Somewear Hotspot versus Garmin inReach, specifically the MiniThe Mini is marginally smaller and lighter (by a half-ounce, or 15 grams), and as a standalone device it has more functionality — like the Somewear, it can send an SOS message; but messages can also be read and typed out (albeit painfully slowly) using its small screen and virtual keyboard.
The Somewear device has one physical advantage. When it’s laid flat on the ground, as it’s designed to, its antenna points at the sky. It doesn’t need to be propped up with a rock or piece of gear, as with the Mini.
Somewear offers seamless messaging; the inReach does not. This is a major omission by inReach, which is vulnerable to disjointed text conversations when you come back into cell/wifi range (or get back out of it).
The Hotspot is less expensive — $280 retail versus $350 for the Mini. Though the real cost of these devices are in the subscription plans (for Somewear, go here; for inReach, go here). The plans are not directly comparable, but overall the Somewear is less expensive to operate, in addition to being less expensive to buy. For example:
For $15 per month, the Somewear includes 20 messages, whereas the inReach includes only 10;And the unlimited plan costs $50 per month for Somewear and $65 for the inReach.Conclusion: If you expect to regularly carry the device but not a smartphone, which is the case with very few people, the inReach is the better option. Otherwise, the Somewear is more attractive: its seamless messaging and cost-savings more than offset the 0.5-ounce weight penalty and its slightly larger size.
 The Mini is marginally smaller and lighter, and offers more standalone functionality because of its display.
 Somewear Hotspot versus Zoleo
The Somewear has a single advantage over the Zoleo: it’s 1.3 ounces lighter, and also smaller.
Both offer seamless messaging, over satellite, wifi, and cell.
Otherwise, Zoleo has more going for it:
$200 retail price, versus $280900-character limit when the recipient also has the Zoleo app (versus the more standard 160-ish);Dedicated phone number and email address, making it extremely easy for a Zoleo owner to be contacted;The device has an “Okay” message button, plus multiple lights with different colors and blinking patterns; and,More economical service plans, like $35 per month for 250 messages, versus 75 messages for $30 with the Somewear.Conclusion: If size and weight is a big priority, go with the Hotspot (or maybe the Mini). But if you’re willing to carry a heftier device for more functionality and to save some money, the Zoleo is the better pick.
Questions about the Somewear Global Hotspot, or have an experience with it? Leave a comment.The post Review: Somewear Global Hotspot || 4.0 oz with seamless messaging appeared first on Andrew Skurka.
May 18, 2021
Wanted: Permanent home for Esme, 7 year-old foster cat
Esmerelda (“Esme”), our 7-year-old foster cat, really likes it here, and we really like her, too. But it’s time to find her a more permanent home — we achieved our goal in getting her out of a high-stress setting with a toddler and dog, but we’re not ready yet for a “foster fail” after losing our 17-year-old feline fur baby Oden in early-March.
Esmerelda basics“Es-may”Currently homed in Boulder, Colo7 years-oldFemaleExclusively indoorStrong and solid build, maybe about 15 poundsJet black fur and electric green eyes, a textbook “Halloween cat”Healthy; comes with some vet recordsEats mostly hard food with some occasional canned foodUses her litter box and her scratching postPlayful for her ageHighly vocalAffectionate and loves laps, but always on her termsIn the right home, will probably become a very lovable and loyal companion[image error]Ideal homeThis is Esme’s fourth home, and she has done really well here. It’s low-stress and low-stimulus, with:
No dogsNo other catsNo young children, or loud older childrenEsme is not a “starter cat,” and we would like to find someone who understands her background and will be patient with her as she adjusts to her forever space.
 What we love about Esme
Esme has blossomed here, becoming more comfortable each week. Initially, she spent most days and nights in our basement; nowadays, she goes downstairs only use her litter box and to sleep at night, though recently she’s been spending a few hours in our bed.
In the morning and evening she is obsessed with watching the finches, chickadees, and nuthatches at our backyard feeder, plus the squirrels that come to the door expecting a hand-out from Amanda. This is hours of entertainment for her, and would be a winning feature at a prospective new home.
She is playful for her age and enjoys catnip.
During the day she takes a long siesta in our bed, typically about noon through dinnertime.
On her terms, Esme is an affectionate lap-cat, mostly when I’m working at my desk or when we’re watching TV. But it’s normally short-lived, as she seems more comfortable by herself nearby than cuddled up with one of us. We don’t try to pick her up and we don’t force her to spend time with us — when she wants to, she will and does.
This girl is vocal! She meows loudly when she wants something and when she’s excited. She purrs prolifically when she’s in an affectionate mood. And she makes a handful of other quirky sounds that are endlessly cute if you’re into that kind of thing.
In the long-term, we think she will make for a great companion. In just six weeks with us, she has made huge strides and is very loveable. In six months, she’ll probably be a full-on BFF, always wanting to talk with you, to be on your lap, and to be loved by you. She’d be a great addition to the right home.
View this post on InstagramInterested?A post shared by Andrew Skurka (@andrewskurka)
If you would like to meet Esmerelda, please contact me.
The post Wanted: Permanent home for Esme, 7 year-old foster cat appeared first on Andrew Skurka.
April 7, 2021
Livestream with Stringbean, April 9: New Arizona Trail FKT
On Friday, April 9, 2021 at 6pm MDT, I will be hosting a livestream with Joe McConaughy (“Stringbean”), who earlier this week set a new supported Arizona Trail FKT in 13+ days, averaging 60-70 miles per day. If you were following his journey on Instagram, Strava, or YouTube, it already probably struck you as pretty epic.
The livestream will be broadcast here, through my YouTube channel. If you join us live, you can ask questions; if you miss it, it’ll be available on YouTube.
After Joe set a new unsupported Long Trail FKT in 2020, we hosted a similar event, available here. He and I worked together on a daily basis on the guided trip program and Plan Like A Pro course, and have established a good rapport. Helping to moderate the conversation will be Katie Gerber, one of our new guides and instructions for 2020 who will bring an expert nutritional perspective to the conversation.
I have a long list of questions that I’d like to ask Joe, but tell me what interests you most by leaving a comment below.
The post Livestream with Stringbean, April 9: New Arizona Trail FKT appeared first on Andrew Skurka.
March 22, 2021
Tutorial: How to store, clean, and repair backpacking gear
Once you find the right gear for you (based on your objectives) and spend your hard-earned money on it, you’ll want to make sure it serves you for as long as possible. You can help by
Storing it properlyKeeping it clean, and Knowing how to repair it when something inevitably happens to it.At some point, you may even venture into the exciting world of DIY, or MYOG: making your own gear.
Storing GearThere are lots of ways to store your gear and stay organized. I find it’s helpful to have a dedicated gear closet or ‘area’ where you keep all of your stuff. Ideally, you’ll have a system of organization that works for you. Here are some things to keep in mind:
Rooftop storage containers are great. You can keep a lot of gear in them year-round without cramming it all into a closet. Storing down is something you’ll want to develop good habits with. Storing synthetic bags and clothing is a little less fussy, but the same general rules apply. Sorting things by type will make your life easier. Example: Keep your shelters in one duffel bag, hang all your down in one place, use separate packing cubes for your base layers, mid-layers, puffy things, shells, gloves, etc.Crates/Shelves are great for garage/basement storage. Duffel Bags work very well for car/travel. Packing cubes are a great way to stay organized. Cleaning Gear
 It’s good practice to keep your gear clean, and it will prolong its useful lifespan. Wash your shelters after your use them, clean your zippers, clothes, and dry your things to keep them mildew-free. There are lots of resources on the internet on how to wash down and raingear too.
 Don’t be afraid of washing down and other technical fabrics yourself. Repairing Gear
Things happen. At some point, you’ll probably want to repair a small hole in your tent, patch a rip in your jacket, or something even more technical. Before these things happen, it’s prudent to have some idea how to fix them and also to have the materials on hand to do so.
Some of the most common issues involve:
Fixing zippers Replacing buttonsAdding/replacing zipper pullsPatching holes in sleeping padsRepairing broken tent polesReplacing broken plastic buckles Fixing a tear in your tents bug-nettingFixing small holes in expensive DCF shelters caused by campfire embers or puncturesReplacing broken hardware/buckles. Using Seam Grip to repair shoes or to make new ones more durable. Improvising all manner of repairs with duct tape, etc.If fixing your gear is simply beyond your skill set, you can hire a local seamstress, or use a site like RainyPass.com. You can even send it back to the manufacturer if it’s covered under warranty. Sometimes, companies may even opt to just send you a new item instead of repairing what you’ve sent in. Winner!
 Off the rack repair kits at REI are usually better than the ones that come with products.Modifying Gear
Sometimes, you may want to modify your gear a little bit. Usually, this is to make it more durable, perform a little better, or add some features specific to what you want to do, based on where you’re planning on going, etc.
Some common modifications are:
Beefing up your trail runners to perform better and be more durableAdding down to your sleeping bag to make it warmer, or to replace lost loftAdding load lifters to *some* frameless packsHelping your sleeping pad to stop slipping aroundKeeping your pillow on your sleeping padAdding shock cord webbing to the back of your pack to hang layers or dry wet clothing while you hike. Making your existing clothing semi-bug proof instead of buying dedicated bug clothing by sending it to InsectShield A DIY rock plate made out of plastic. Photo + Idea: Justin SimoniMYOG: The Final Frontier
 Eventually, it might serve you to learn about different fabrics, how to sew, and to go down the MYOG rabbit hole. Once you know how to fix, modify, and make your gear, it opens up a whole new world of possibilities. Every cottage manufacturer around today started in a basement with an idea and a sewing machine.
CONFESSION: I’ve made and modified quite a bit of stuff, and it’s a double-edged sword. On one hand, it’s incredibly liberating to conceptualize your own designs and see them come to life. On the other, it’s a LOT of work, and prone to error. Sometimes it costs more in materials alone and almost certainly ends up being WAY more expensive when you factor in all the time it takes. That said, if you have the skills, the time, and the desire, it can be very rewarding.
Common MYOG projects include:
QuiltsTarpsBackpacksJackets and vestsHammocksPot cozys to keep your food warmer in winterBottle cozys to keep your water from freezing Alcohol stovesThere are endless MYOG resources on the internet, but some of the ones I’ve used are:
Ripstopbytheroll.comThru-Hiker.comLearnMYOG.comdiygearsupply.comdutchwaregear.comDISCLAIMER: Don’t get discouraged if your first MYOG project doesn’t stack up to a professional level product It takes time, practice, and patience.
 A custom partial solid inner I made for my MLD Duomid for winter use. It’s great, but…
TOTAL COST: 15 hours + $145 in materials. Worth it? Parting ThoughtsHere’s the best tip you’ll ever get: Take care of your stuff. Most high-end gear is simply not designed to be thrown down on a pile of sharp rocks. Get in the habit of cleaning your gear regularly.Think of your gear closet as a garden you need to tend to. Organization is key. Figure out a storage system that you will stick with.MYOG is not for everyone. It usually makes more sense to do your research and find an off-the-rack or cottage manufacturer’s product that is close enough to what you want.What tips and tricks do you have for storing, cleaning, modifying, making, and repairing gear?
The post Tutorial: How to store, clean, and repair backpacking gear appeared first on Andrew Skurka.


