
Quinn McDonald's Blog, page 43
March 19, 2014
Being Enough
If you have friends, you have been sent one of the TED Talks of Brené Brown, the story-teller researcher who works on slippery topics–vulnerability, shame, being enough.
Here’s what I learned when I explored Brown’s ideas of being enough.
 When my coaching clients tell me they have no dreams, no goals, no ambitions they often present it as a fact that has always been true and will always remain true. When I peg that as the “I’m enough” baseline, they get nervous. Unhappy. Because they often feel they aren’t enough. What would it take to be enough?
 We often allow other people to determine who we are. Among our friends, winning is getting the envious looks at the size 4 figure, the Prada bag, the BMW, the wealthy spouse. We define ourselves in the eyes of others. Nothing wrong with the Prada and the BMW, as long as you know they aren’t you, and that if you lost them, you would still have the essential you. (Reality check: if you lost the Prada, the spouse, the BMW, would your friends stay?)
 It’s easy to lose sight of, then forget, our own values, our own dreams, our own goals. We replace what our heart yearns for with the prize we want right now.
 The harder truth to cope with is that we are enough every day. Everyone fails, everyone does dumb things, everyone wishes they could take something back. The real success stories belong to the people who brush off their values and won’t allow rationalization to tarnish them. Who push themselves to grow every day. To be enough every day.
 Your “enough” can grow. That’s the point. A real trick is to allow your friends to be Enough today and grow to be Enough tomorrow, too. Not your Enough, their Enough. If last week’s Enough feels tight, you have outgrown it. Luckily, Enough can grow with self-awareness.
–Quinn McDonald is a life and creativity coach who helps people deal with change and re-invention. In other words, who helps people grow into their personal “Enough.”
Filed under: Coaching, Inner Hero/Inner Critic Tagged: creativity coaching, personal growth


March 18, 2014
Patience, Failure and Angry Birds
OK, I’ll admit it: I still play Angry Birds. And I still like it. Unlike some games, which require only luck, or only persistence, Angry Birds has taught me some interesting thinking patterns that apply to daily life.
 1. What’s the point, here, really? Different game sections in Angry Birds demand different strategies. Some require using the least number of birds to complete the game, others give more points for collapsing more of the scenery. You won’t get three stars until you figure out the underlying winning factor.
That’s also true of clients and your supervisor at work. Different supervisors (or clients) have different goals and ways they like to tackle goals. Your star will rise and fall based on your ability to figure out if you are being asked to think like the leader or supply a coordinating tactic.
 2. Practice is similar to failure, and it’s a step to winning. Part of the thrill of Angry Birds is figuring out how to use each bird to its best advantage. That isn’t always obvious. Sometimes firing the bird at the closest object seems to make sense. Other times, topping a structure in the middle causes a collapse of all the surrounding structures more effectively. But you don’t know that unless you try. In Angry Birds, failure is a step in success. It’s a learning step, and in real life we call it practice.
Practice is almost non-existent in the business model, except in a few industries such as software development and science). For creative folks, it’s an absolute necessity. If one thing doesn’t work, it’s important to figure out why and try something else. Problem solving can’t be left to computer models alone. Computer models are programmed with what we already know.
 3. You have to know what the bird does to use it. The little round red birds don’t do much, but they can weaken a structure. The yellow ones get a burst of speed when you tell them to, but timing is everything. The orange ones expand, which is useful only if they are in a tight spot. The Tucan-like ones reverse course, but often not the way you want them to.
Use your strength in the right way. If you hate any type of confrontation, you may not be best at negotiating. If you are very intuitive, you may not be good at research to prove your points. It’s good to learn what you don’t know, of course, but half of being smart is knowing what you are bad at and not leading with that.
—Quinn McDonald learns slowly, so she learns anyway she can.
Filed under: Coaching, Creativity, Life as Metaphor, Links, resources, idea boosts Tagged: angry birds as teacher, learning from games


March 17, 2014
Tutorial: Bag Journal for Looseleaf Pages
Yesterday, I posted a tutorial for a box for your loose-leaf journal pages. Today, your journal is going to be made from a paper handle bag–the kind that better stores use. This tutorial will use two different bag, but the style is the same.
 Here is a photo of the outside of the completed journal. Below is the first steps, using a different kind of bag.
 Start by looking at the size of the bag. There are two ways to approach the bag journal. First, you can measure and cut all of our pages ahead of time. I did that with this one. Second, you can use this method to bind a variety of page sizes as long as two sheets (four pages) are the full size of the journal.
The first step is to fold the bag flat, so the bottom portion is flat against the sides of the bag.
 Next, crease the bottom of the bag, along the center of the bottom. This will become the spine of the book. If the bag has paper handles, trim them off carefully. If the bag has ribbon handles, detach them.
 Cut along the sides of the bag, top to bottom, in the center crease, as shown. Cut down both sides of the bag.
 (Now I’m switching bags). Fold open the bag, making sure you fold the edges down neatly.
 You will now have the journal cover. The center spine will be a mountain fold that faces you. Strengthen the inside of the bag (now the front and back covers) with a layer of decorative paper.
This is the time to measure the bag for page size. Measuring before this stage allows too much stage for error (at least for me). Wait until the bag is fully cut, trimmed and the cover is complete. The mountain fold allows you to place a signature on each side. It also allows for pages with a lot of inclusions and attachments, if you like that style.
 Fold the pages so that like-size pages all are folded down the middle. Pages that aren’t the same size can be folded with a stub (one side shorter) or down the middle. In either case, line up all the creases, and nest the pages together in the order you like.
 Flip through the pages to make sure you have them all oriented correctly and in the right sequence. (I mess this up frequently. This is a good time to fix it.)
Open up the signature (group of nested pages) you plan on stitching into the back of the journal (right side of mountain fold). This will be a 5-stitch pamphlet. Mark five dots in the crease: one in the center (top to bottom) of the page. This is #3. The ones above and below the center mark (#2 and #4) should be the same distance from the center. Marks #1 and #5 (the top and bottom of page) should be the same distance from the mark nearest to them.
 Use an awl to make holes in the pages and cover at the same time. Measure a length of 4-ply waxed linen twice the height of the book. The above diagram is taken from Design Sponge, which has an excellent 5-hole pamphlet stitch tutorial.
In the first signature, I put the knot on the inside of the pages.
 Repeat the same stitching for the other signature. This time, I made the knot on the outside, and tied the signature stitching together. This keeps the center fold from opening.
 Glue the ties to the inside of the book, allowing them to dry completely before continuing.
 Cut the ties in half, and repeat the gluing process on the other side. Tie a square knot to hold the journal closed.
 A look inside the completed journal. There is no writing because this is a sample for the tutorial.
 Another inside spread, showing the center of the book. The spine looks like a stub page, part of the charm of shopping bag journals.
I love making different journals with different bags. Some bags have colorful lining already in them. Others have cut-out handles, and some elegant black bags can be changed with bright ribbons. You can also paint or stencil the bags, but I like using bags with writing or logos on them and leaving them recognizable as recycled shopping bags.
—Quinn McDonald is an art journaler and creativity coach. She is teaching journal-making classes at the Minneapolis Center for Book Arts (April, 2014) and at Madeline Island School of the Arts (June, 2014).
Filed under: Art in Progress, Journal Pages, Links, resources, idea boosts Tagged: art journaling, making a journal, tutorial for loose-leaf journal pages


March 16, 2014
Loose-Leaf Journal Box
Loose-leaf journaling is practical and fun; I’ve talked often about why. But when you make loose-leaf journal pages, you need a place to gather them.
 Some weeks ago, I found a lovely box of stationery. The box was well designed and sturdy. Once the stationery was gone, the box was the perfect size for 5-inch x 7-inch loose-leaf pages.
 Using a piece of lavender ribbon, I glued it to the back, long side of the box and about one-third of the way across the bottom of the box, leaving the rest unglued.
 Once the ribbon was dry, I placed the loose-leaf pages into the box. This happens to be a group of inner hero cards from the last month.
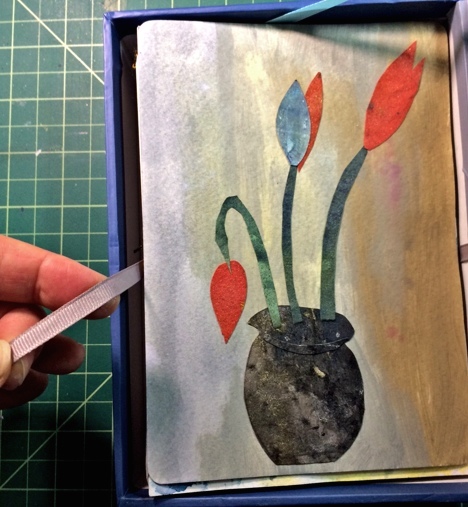 The ribbon, because it is not glued to the entire bottom of the box, allows me to lift up all the cards easily. One or all can be lifted out without wearing down the corners or breaking a nail. It’s an easy way to carry the cards and a sturdy way to store them.
—Quinn McDonald has an ever-growing collection of inner heroes.
Filed under: Art in Progress, Inner Critic, Inner Hero/Inner Critic, Journal Pages Tagged: containers for loose leaf journals, inner hero cards, loose-leaf journaling


March 15, 2014
Saturday Creative Stroll (3.15.14)
Time for some creative leaps around the world. Today is the day the turkey vultures return to Hinkley, Ohio. They have come back on March 15 every year since 1957. No one is certain why the buzzards come back or how they know when to come back. But they do.
Crows are birds that can learn tricks. They are also tool users and problems solvers. Here’s an amazing video of a crow that learned eight different steps to solve a tool-using problem:
Natsuo Ikegami has a big imagination and creates characters that seem to live in dreams or worlds that we have yet to discover.

Images by Natsuo Ikegami
These two are from a series called “To A New Land.”
A variety of artists work with books. The resulting art keeps books out of landfills.
 Atelier Bom Design creates lamps. Maybe because books are such bright ideas?
Gowri Savoor is an artist who uses seeds as an art medium. As someone who wears a silver seedpod as a totem necklace, this collection fascinated me.
 Savoor experiments with mixed media, fabric and wood, but the seeds inspire her. Born in Leicester, England, she now lives in Vermont.
[image error]
“Blackbird”
The sculptures are largely geometric, but the series becomes more and more complex.
[image error]
“Seascape” is made of pinecone seeds.
Savoor says, ““In themselves they’re very fragile. No matter what I do, the pieces will continue to decay. There’s a human sadness as well, that everything will eventually die.” (via junk-culture)
Have a creative weekend!
–Quinn McDonald is fascinated by artistic invention.
Filed under: Links, resources, idea boosts, Nature, Inside and Out Tagged: book art, seeds as art, smart crow


March 14, 2014
Tip: Use Highlighter tape

Highlighter tape comes three to a pack.
Sure, you can use it in your art journal, or your plain journal, but highlighter tape is saving the training side of my business this week.
Earlier this week, I was teaching a business writing class. There were students of different levels, and more material in the book than I could cover sensibly. On Day2 of the class, I had to choose what had to be covered, what could be covered if I had enough time, and what I could skip.
The instructor’s manual is heavily written in, and one more insert or note was going to get lost. How to make the material sound smooth and well prepared? Highlighter tape to the rescue.

Goes on easy, comes off clean. No, that’s not the workbook, it’s a copy of Raw Art Journaling.
I purchased the tape from The Container Store in Scottsdale, Arizona. It comes in a small square case containing three transparent colors–green, yellow, orange, so I can color coordinate– green for items I must cover, yellow for items I can mention if I have time, but can also skip if a discussion or exercise runs long, and red for portions that can be skipped entirely if time doesn’t allow for a closer look.
The tape sticks to a page, but can be lifted off cleanly, without a residue. It’s as wide as a line of type, so I can pinpoint material. Each tiny roll has a cutter in the box, so I can tear off as much as I need.

Three fluorescent colors make it easy to navigate the page.
It’s brightly fluorescent so I can find it easily. It doesn’t damage coated or uncoated pages and won’t peel off color or ink. It’s a great tool. All I have to do is make sure I peel off all the evidence before I return the instructor’s manual.
The tape has no manufacturer’s name on it, other than highlighter tape, and the item number 128.
I recommend it highly for other uses as well–cookbooks, sewing/knitting/crocheting patterns, weaving instructions, sheet music (to mark your part), library reference books, as well as design elements on cards and gift wrap.
If you want to use it in art journaling, I’d suggest putting it down, rubbing it with a bone folder, then covering it with matte medium, so it doesn’t curl up over time.
The tape was an impulse purchase, but every time I use it, I save time. When you don’t know how many questions are going to be asked, it’s also great for speeches that have a time limit.
–Quinn McDonald is an instructor who always wants to add just one more idea. Sometimes that impulse needs to be stopped.
Filed under: Art/Freelance Biz, Product Review Tagged: fluorescent tape, highlighting tape, ideas for using highlighting tape, saving books, speech tips


March 12, 2014
Drafts: Zero to Three
The client was terse. “Your copy did not hit the mark, I will write the copy myself.” And she did. I suppose she was unhappy because the first draft didn’t mimic her own ideas. Or maybe she had forgotten my request that a first draft would be a start, and her feedback would be a way to get to the heart of the matter.
 “If you can’t get it right the first time, you aren’t much of a writer,” she said. I thought about how that would look if we applied it to the rest of life.
To a toddler: “Just one step? If you don’t get up and run 26 miles, you aren’t much of a marathoner.”
To a calf: “You are still drinking milk? If you can’t produce milk yourself, you aren’t much of a cow.”
To a seedling: “Just one leaf? If you can’t produce an apple, you aren’t much of a tree.”
Writing is an art of iteration. Of drafts. Of writing long and cutting it down. I’ve never seen a first draft that was perfect. I’ve seen lots that aren’t very good but that get better with each draft. It’s funny that clients think that if you need more than one try, you aren’t talented. Thomas Edison tried 6,000 different materials until he found one that worked as a light bulb filament. James Michener’s boss told him to quit thinking he was a writer, instead, he should keep his eye on doing his job as an editor or he’d be fired. This was months before Michener won the Pulitzer Prize for South Pacific. He went on to write 40 other titles, including Hawaii, Chesapeake, and The Drifters. Each one went through several drafts.
Julia Child cut up piles of onions before she felt competent wielding a knife. Chesley “Sully” Sullenberger had been flying airplanes for more than 30 years before he put the U.S. Airways flight 1549 in the Hudson so that all 150 passengers could stay alive. Bet he couldn’t have done that the first time he stepped into a plane.
So, alas, I lost a customer. I did not shed a tear or spend more than two deep breaths mourning the loss. Good writing takes drafts. Good writing takes cutting and feedback. And if you don’t think it does, you’re getting bad copy.
–Quinn McDonald is a writer and coach. She has a practice and loves practicing.
Filed under: Creativity, The Writing Life Tagged: drafts, iterations, practice


March 11, 2014
Criticism and Creativity
You’ve started your creative project. You are happy with it, for the most part. You decide to ask for a critque. Perhaps someone gets too enthusiastic. No one stops the critique which amps up into harsh criticism. You defend your project, then begin to believe the crticism. Then there is no more project.
The next time you start a project, you create your own criticism and the project never gets started.

My Inner Critic. PittPen on watercolor paper. © Quinn McDonald, 2012
Criticism is hard to handle right, and harder to survive. Martha Beck wisely says, ”Criticism is an alluring substitute for creation, because tearing things down, unlike building them up, really is as easy as falling off a stump. It’s blissfully simple to strike a savvy, sophisticated pose by attacking someone else’s creations, but the old adage is right: Any fool can burn down a barn. Building one is something else again.”
If you want opinions, don’t ask for “feedback,” or a “critique.” Don’t open your creative work for random, unfiltered opinions. Don’t ask “tell me what you think,” or “what’s missing?” You really don’t want to know what otheres think. Instead, be specific. Even if you are the only one critiquing, be specific with your thinking.
What do you want the outcome to be? A next step? Ask, “What’s my next step to complete this landscape?” Not sure of your color balance? Ask, “Do I need to lighten the shadows to make this less gloomy?” Once the conversation starts, you can switch from closed-ended questions (those answered with one or two words) to open-ended questions (those that require a thoughtful answer or open a conversation.)
If you are asked to lead a critique, ask the artist what specifically she would like to know about. Color? Technique? Composition? Ask a few questions about what the artists was thinking and planning before you say anything. Listen to the intent, then work on content.
Building a barn is hard work. Contribute to the hard work, or step away.
—Quinn McDonald has a lot of torn down lumber for new creative projects.
Filed under: Creativity, Inner Hero/Inner Critic Tagged: critique, inner hero


March 10, 2014
The Subtle Art of Suminagashi
With most of my art supplies still traveling back home, I tried something simple and satisfying this weekend: suminagashi. It is a Japanese-style marbling done in black ink. It’s subtle and beautiful. And I’ll be teaching it March 22 at Arizona Art Supply in Phoenix. (Details and registration)
 Using black sumi ink and brushes, suminagashi is created with patience and care. It’s a meditative art work: slow, careful and fun.
What you’ll need:
A non-reactive pan. I used an enamel palette (formerly a meat tray)
Tap water, not distilled.
Black sumi ink in a small cup
Olive oil in a small cup
paint brushes, size 4 to 6
Watercolor paper, 90-lb weight
Fill the pan with about an inch of water. Dip the smaller (size 4 ) brush in olive oil and hold it in your non-dominant hand. Dip the larger brush (size 6) into the black sumi ink and hold it in your dominant hand.
 Touch the tip of the brush vertically into the water. A large black circle will spread across the surface of the water, turning gray as it disperses.
 Touch the tip of the oil-brush into the center of the circle. The surface tension of the oil will push the ink away.
Repeat the process at least five times in the same circle. Ink brush, oil brush. You will have a series of concentric circles that will move on the surface of the water.
Gently blow on or fan the surface of the water to create movement.
 When the ink pattern is interesting, place a sheet of watercolor paper on the water by “rolling” it across the surface. Let the paper drop completely onto the surface of the water. Immediately pick it up by one edge, and place it, wet side up, on a sheet of newspaper to dry.
 Once the papers are dry, use Tombow or Koi dye markers (not alcohol markers) to add subtle color to the page.
You can use the dried sheets as journal pages, backgrounds for photos or photo mats. The first print will be more dramatic. If you are going to write on the pages and want to have the patterns be lighter, take two or three impressions before adding more ink.
Join me at Arizona Art Supply in Phoenix to take the class on Saturday, March 22, 2014.
—Quinn McDonald is preparing looseleaf pages. She’s on the road to Texas.
Filed under: Art in Progress, Tutorials Tagged: Japanese marbling, marbling paper, suminagashi


March 9, 2014
The Other Side of the Camera
Returning home after filming the DVDs was a bit strange–many of my go-to supplies would not arrive home for a week or so, and the constant pressure to practice one more time had vanished. Making the DVDs was an exhilarating experience–scary, fun, exhausting, and awkward. So far out of my comfort zone, the horizon was a faint line in my emotional landscape.

I don’t like being in front of TV cameras. Luckily for me, North Light put one of the editors, Amy Jones, into the DVD with me, so there could be live interaction instead of droning lecture.
But it is hard to work on an art project and look natural with three giant TV cameras in front of me. I was, however, grateful for the lights, which kept the studio warm.

Phil, checking details before filming starts. The bookcase was carefully decorated with pieces from the book and some props to create color and height.
It’s good to be out of your comfort zone, that’s where the real creativity comes in. I had forgotten a few basics, and had to take a deep breath and ask for help. I was amazed at how reluctant I was to ask for tape or gloves. I was reminded again that asking for help gives other people a chance to be generous an to offer help.
The projects went well, and the DVDs will be offered on the North Light shop in a few weeks. (And yes, there will be a giveaway here on the blog.)

There was time for coffee; Amy Jones from North Light waits for the go-ahead to start again.
The first one demos Monsoon Papers in the latest version–made inside, without a water hose, in a small container. Just as vibrant, just as fun. Much less mess.
The second DVD covers several ways to carry loose-leaf journal pages: boxes, 3-ring binders, folders. It was fun making them all. Of course I still have regular journals, but the loose-leaf versions have so many advantages, I’ll be using them for a while.
There were several projects I didn’t have time for, which was a relief. Better to have too much than not enough. I’m creating some step by steps for those to put on my website as extras.
Some tips I learned for making DVDs:
Show the finished project first.
Start with an interesting fact instead of introducing yourself
Get to the project quickly, add background when the viewer knows what is happening.
Wear solid colors. They are less distracting and create a better background for your art.
Wear comfortable shoes, a DVD that lasts an hour takes 8 hours to film.
Don’t fret so much what you look like. It’s who you are and the DVD is about your art, not about the fact that your nose is shiny and you broke two nails going through the TSA line.
Have fun. Filming doesn’t last long, but relationships do.
I’m glad to be back where it’s warm. Temperatures far below freezing don’t hold the charm they did when I owned cross-country skis.
-–Quinn McDonald is glad to have stretched out of the comfort zone and glad to be back in it.
Filed under: Art in Progress, Links, resources, idea boosts Tagged: Inner Hero Art Journal, making a DVD


![[image error]](http://quinncreative.files.wordpress.com/2014/03/blackbird.jpg)
![[image error]](http://quinncreative.files.wordpress.com/2014/03/pinecone_seedscape1.jpg)