
Ali Edwards's Blog, page 52
March 28, 2023
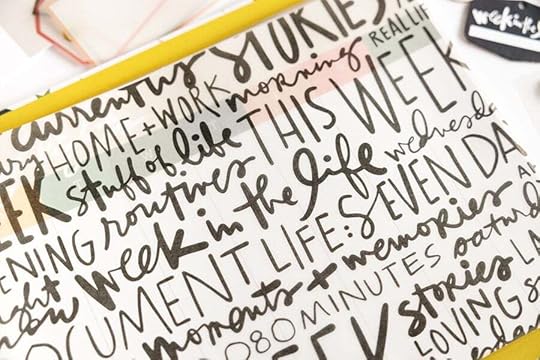
Story Play | Day In The LIfe™ | Documenting Set Up
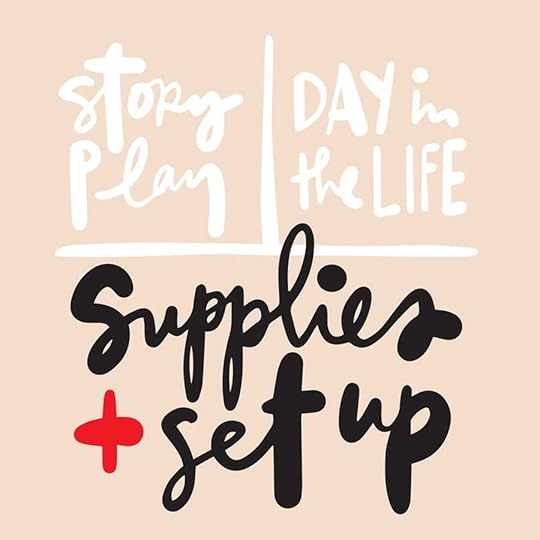
Welcome back to Story Play 2023 | Day In The Life™!
Today I'm sharing my simple set up + approach for documenting color on Saturday. I'm going really straightforward with this particular project in order to keep the focus on the color treasure hunt piece. I love how the products invite and directly support the story I'm wanting to tell.
Let's dive right into the simple set up video:
And here's a look at my design formula:

I'm using the striped vellum page + three of the chipboard tags as my title page for this project. I plan to add all of the Story Play adventures into this album over the course of the year.

On the back of the intro page I'll cut three small close up photos to the size of the chipboard tags and adhere on this side. This both covers up the backs of the chipboard and is a fun peek into the colorful photos to come.
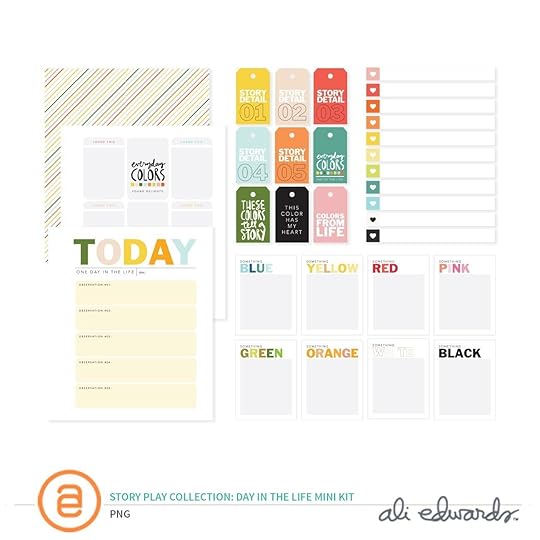
I'll open my documenting with five observations from the day. These might be color related or they might be about the general life flow right now. Simple observations.

On the back of that full page of prompts I'll be adding one photo from my day or I'll add a collage of photos (this will depend on how many photos I take overall and how I feel when it comes to bringing it all together).
For each color I'm planning to include a 3x4 photo and a 4x6 photo and then keep a running list of "blue" things I see on Saturday.
And then repeat that same formula for each color:


I'll finish off my documenting with the "found delights" prompt page. Currently I think I'll be adding photos to those spaces and then write some final reflections in the bottom "details" section.
Miss out on the physical kit? Grab a digital kit and/or look in your stash for supplies to support your storytelling for Saturday.
Remember This 6x8 Album Day In The Life™ Story Play Kit (digital available) 6 Hole Punch Rolling Date Stamp Staz On Ink INTERNATIONAL SPELLING
If you spell color using a different spelling we've got a download for you here (this is also included in the digital kit).


March 27, 2023
Story Play | Day In The Life™ | Kick Off + Reason Why
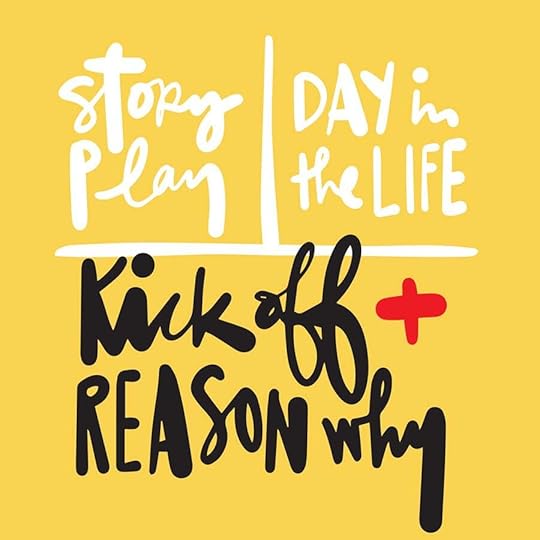
Welcome to our first Story Play week of this year!
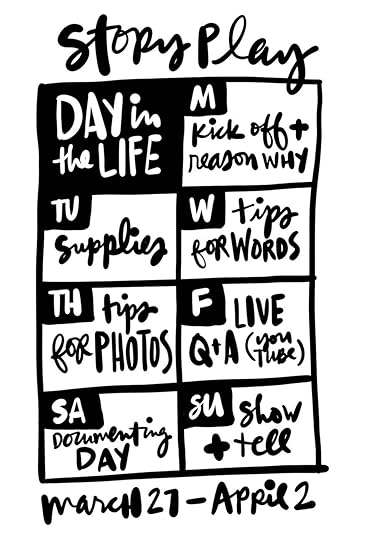
For our first Story Play adventure we'll be documenting a Day In The Life™ this coming Saturday, April 1st. Each day this week I'll be sharing a video of tips + ideas related to using the lens of color as a way to tell the story of our day.
Here's a look at our schedule this week:
TODAY: Kick Off + Reason WhyTUESDAY: Supplies + Set UpWEDNESDAY : Tips For WordsTHURSDAY: Tips For PhotosFRIDAY: Live Q+A on YouTube at 11am Pacific (you can sign up here to be notified when I go live // this will be recorded + shared on the blog after it's completed)SATURDAY: Documenting DaySUNDAY: Show + Tell THE LENS OF COLORFor Day In The Life™ this year I wanted to do a different lens than we've done in the past to mix things up and bring in a little more creative play to the process.
I'll be using the kit (digital available) we released earlier this year to hold the photos and words from my day. I'll share more about my set up + documenting plan in tomorrow's video and more about the words on Wednesday and the photos on Thursday.
Let's dive in to today's kick off video:
Here's a link to the walkthrough of past Day In The Life™ projects mentioned in the video above.
Check out the archive of all past Day In The Life™ posts here.
March 24, 2023
In Case You Missed It | March 24
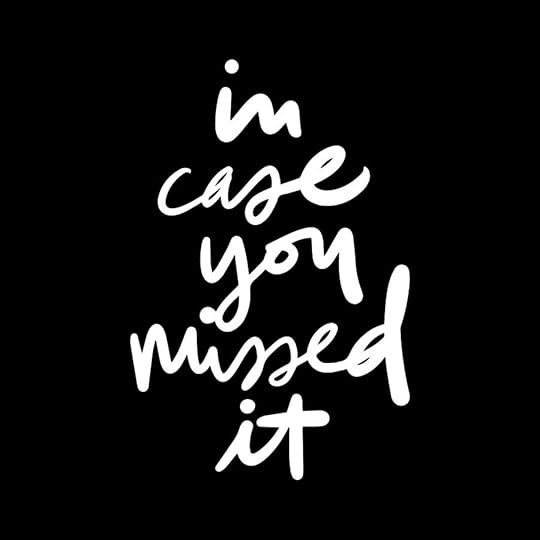
Happy Friday, friends! Welcome to the latest
In Case You Missed It. Just a reminder that this is a quick post that will happen every Friday afternoon with all the updates and links that have happened throughout the week. So, let's get to it:
On Monday we'll be kicking off our first Story Play Week featuring the Day In The Life™ project (with the actual documenting day happening on Saturday, April 1st). Each day during the week leading up to the documenting day Ali will be sharing a video on YouTube and the blog with some ideas and inspiration related to Day In The Life™. This year we are using the lens of color as a way to tell the story of our day. Here's the plan for the week: Monday | Kick Off + Reason Why Tuesday | Supplies Wednesday | Tips For Words Thursday | Tips For Photos Friday | Live Q+A On YouTube Saturday | Documenting Day Sunday | Show + Tell
2023 WEEK IN THE LIFE™ PRODUCTS AVAILABLE
The all new Week In The Life™ products for 2023 are now available! We have two new albums, our journal, a gorgeous main kit, an incredibly fun themed mini kit, and a collection of coordinating Week in the Life™ products. All of the products are in the warehouse and ready to ship! Shop the collection here.
WEEK IN THE LIFE™ DOCUMENTING WEEK
Ai will be documenting her week beginning Monday, April 24th. Consider yourself invited! Stay tuned for more content around documenting coming soon!
WEEK IN THE LIFE™ PREP DAY
Week In The Life™ Prep Day is also available for registration, happening April 15th. We'll have more details for your soon! Register here.
WEEK IN THE LIFE™ DIGITALS
Our collection digitals for Week In The Life™ will be available on Friday, April 7th. Layered templates will be coming to the shop closer to the documenting day. We will have 10x8 and 6x8 layered templates again this year. Layered templates are .PSD files. Main kit journal cards and papers will be available as separate file. The kraft pages will be available with a white and transparent background and we will also have album art available. SVG files, which can more easily be manipulated in CANVA, will be included when possible, consistent with previous digital releases.
40% OFF SELECT DIGITALS + CLASSES
Use promo code SPRING40 to get 40% off select digitals and classes all month long!
IMPORTANT SUBSCRIPTION UPDATES
Since January, we’ve seen incredible growth in our subscriptions! As always, we are extremely grateful for your support and thrilled by your enthusiastic response to the changes we’ve implemented. As a result, we are currently on a waitlist for both new Stories By The Month™ and Story Kit™ subscribers. Now is the time to subscribe or jump on the waitlist if you’ve been considering a subscription to either of these products. If you are interested in receiving one of these subscriptions when they become available, it’s important to sign-up for our waitlist now as it helps our team anticipate future quantities.
As always, we’re so grateful to have you all as members of this community! Thanks for joining me today and have a great weekend!
March 17, 2023
Week In The Life™ 2023 | Crafting Live With Krystal 03
Hi friends, Krystal here! With the launch of the Week in the Life 2023 collection this week, I’m excited to bring you a three day mini-series where I will be sharing sneaks and ideas for how to use the new collection to document your stories this year.
This mini-series is composed of a daily Live video on the Craft the Story Facebook Group.
Today, we are taking a deep dive into the collection and discussing how the products can work inside of the WITL Notebook. If you missed the live video, you can check that out below.
Let’s take a closer look at the ideas we discuss in the Live video:
1. Transparencies, Kraft 7x8.25 Pages & Main Kit
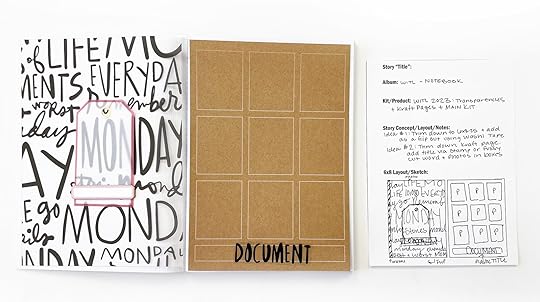
When working in a notebook album, the key to making everything fit is keeping your dimension/embellishments to a minimum. However, that doesn’t mean you can’t find ways to still include LOTS of flat embellishments. One easy product to add to a notebook page that packs a big punch are the transparencies or designed pattern papers. Here are some ways to add those in to the WITL Notebook:
Trim down the 10”x8” transparencies to 6”x8.25” (you will want to trim off the hole punches). Then, using washi tape, create a flip out by adhering the edge of your transparency to the edge of a photo/pattern paper. Then, stick this onto a page in your notebook.
The kraft page is very easy to trim a little off each side and place into the notebook. You could fussy cut a title (or a few) from the transparencies and use one as the title for this page. Then, fill the boxes with words, photos, stuff of life, etc. This would be such a fun page to add to each of the daily sections.
2. Main Kit - Plastic Circles & Vellum Tags
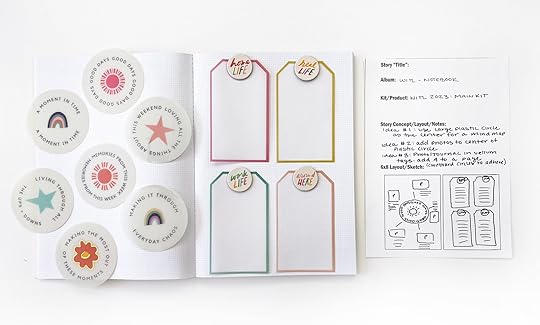
Try using the large plastic circles as the centerpiece for a mind map page. Draw lines coming from the circle and branching out to photos/words related to the plastic piece.
Add a bunch of the plastic circles to a single page and cover up the middle icons with circle shaped photos. The titles would form a ring around your photos and create a pretty neat pattern for the page.
Attach four of the vellum tags to one page using the circle chipboard. You can remove a few layers of the chipboard backing to create an even thinner embellishment. Then, use the tag as a space for some photos, or journal using a slickwriter pen.
3. Main Kit - 4x4 Cards, Layered Stickers, Kraft Pockets
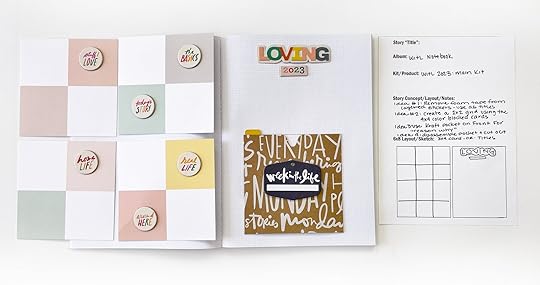
Cut apart the 4x4 cards into 2x2 sections. Then, layer 6 to 12 of these on a page to create a grid layout. You can place embellishments, photos, or words into the twelve sections.
Remove both layers of foam tape from the layered sticker titles and then adhere back together so they become flat. Even without the foam, there is still a funky/dimensional look to them. Use these, paired with a tiny phrase sticker or similar product, as a title or jumping off point for your journaling.
The kraft pockets are one of my favorite items in this year’s collection, but a little difficult to use in the notebook because of their thickness. While you could get away with adding a few to your notebook, I would caution against using them all. Maybe start the album with a pocket and add your reason why inside! You can also disassemble the pocket and trim down to a 2x2 square, 3x4 card, or fussy cut words that could be used as titles.
4. Main Kit - 6x4 Cards & Chipboard
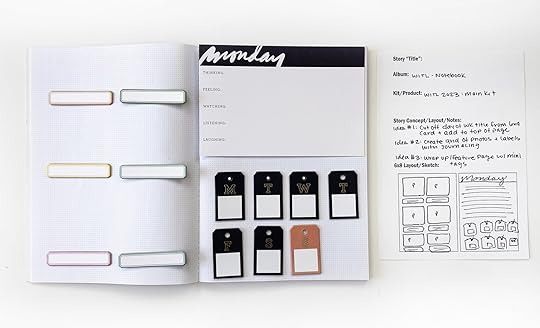
Create a grid of photos (6-squares) and add the smaller label chipboard underneath for space to journal in.
Create an ending page/weekly wrap up using the small chipboard tags. To make the rows of four even, you could create a video that shows snippets of your week and link to it using a QR code placed in the final empty spot.
In terms of the 6x4 journaling cards, if you trim the top header portion off, you can re-adhere just that section to the top of a full page, then use the area below that for words or photos.
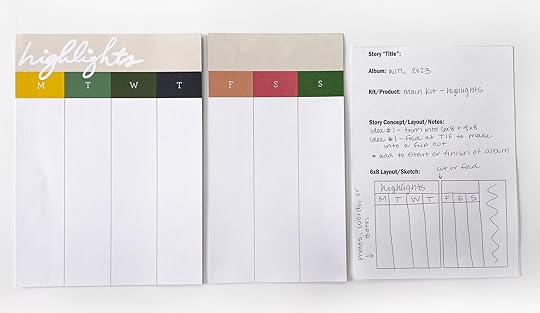
5. Main Kit - Papers
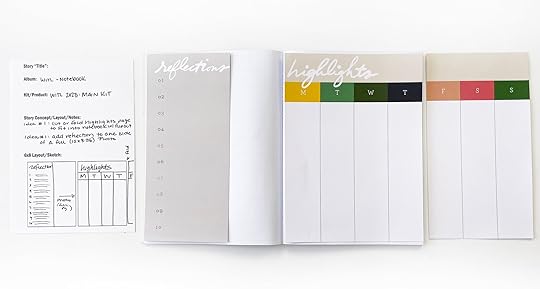
Using the highlights paper, trim (or fold) in-between the Thurs and Fri sections. Add the larger section to your notebook and let the other section flip out. OR, add the two sections across from each other in the notebook and finish the page with a strip of photos.
Create a journaling feature on top of a full page (12x8.25) photo by adhering the “reflections” page at one of the ends. Fill out ten reflections - on the day or on the week.
6. 3x8 Die Cut Inserts & 10x8 Cards
Add the 3x8 die cut insert directly to a page in your notebook and have it included as part of a grid layout. You could also add some plastic behind the cut out and some vellum confetti (made by hole punching color vellum) to create a “shaker pocket” look.
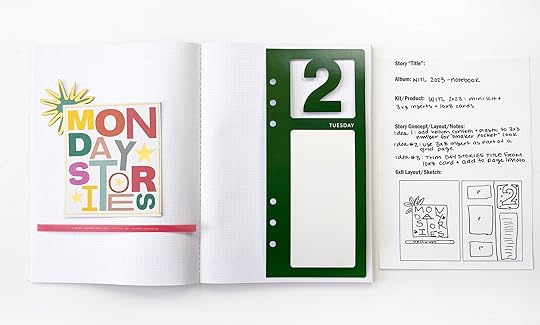
Using the 10x8 Stories cards, trim off the portion with the title inside (i.e. “Monday Stories”). Add this to a page or to a photo as an embellishment. This could also become a thin pocket of sorts.
7. Mini Kit - Moon/Star Plastic Title & Chipboard Titles
Similar to an earlier idea for using the sun and moon plastic pieces, these would also look great in the notebook paired with additional sun/star elements. These would become fantastic places to add photos or words.
While I would caution you against using all of the chipboard titles from the mini kit in your notebook (unless you are planning to cut the notebook apart and bind it in a different way), you could still include a few on some special pages. Most of the titles will fit horizontally on the page. A few will need to be turned on their side.
8. Mini Kit - Plastic Words & Die Cuts
The gold foil titles are perfect for adding to your notebook! They are flat but also offer a different texture/look, creating interest on your page. Layer these with a chipboard label (after removing some chipboard to make them flatter, if desired), and create your own designed pages for journaling. I love the idea of adding the puffy sticker suns or moons down the page and journaling next to them.
In a similar way, you could use the die cut starbursts as “bullet points” for journaling as well. With these, I think it would be fun to add alpha stickers for the initials of different people in your family.
9. Plastic Circle Bundle & Alpha Stickers
Pull out the Mon-Sun plastic circles from the bundle, along with a sentiment (i.e. This Week). Then, add four to one page and four to the other. You can intermix with journaling or photos, and create a recap of your week.
Using the half colored circles, create a 2x2 grid space with the circles - added in rainbow order. The circles can become homes for embellishments, titles, photos, or words.
Using the pie chart circles, place four in a column and create a grid journaling page (similar to the die cut start bursts above).
10. Large Numbers & Stamps
The large chipboard numbers are another product I would caution against using throughout the notebook because of their thickness. However, you could certainly get away with using a few. I like the idea of adding the 2 and 3 to my cover to designate this as my WITL album for 2023.
As mentioned, the key to documenting a full week in a notebook is keeping things as thin/flat as possible. The absolute BEST product to use, in my opinion, are stamps. The collection this year comes with so much variety in terms of potential titles and/or ways to embellish the page. Definitely check out the 2023 WITL stamps if you’re planning to document in a notebook… and don’t forget to check your own stash as well!
This concludes our video series of ideas for using the WITL 2023 collection to document your life this April! I hope you enjoyed talking through a bunch of ideas and seeing these sketches come to life. Thank you so much for stopping by today and please let me know if you have any questions. If you have more ideas for ways to use the supplies discussed today, let us know in the comments below. Until next time, let’s tell stories together!
In Case You Missed It | March 17
Happy Friday, friends! Welcome to the latest
In Case You Missed It. Just a reminder that this is a quick post that will happen every Friday afternoon with all the updates and links that have happened throughout the week. So, let's get to it:
2023 WEEK IN THE LIFE™ PRODUCTS AVAILABLE
The all new Week In The Life™ products for 2023 are now available! We have two new albums, our journal, a gorgeous main kit, an incredibly fun themed mini kit, and a collection of coordinating Week in the Life™ products. All of the products are in the warehouse and ready to ship! Shop the collection here.WEEK IN THE LIFE™ DOCUMENTING WEEK
Use code WITL2023 for FREE domestic shipping ($20 international flat rate) on Week In The Life category when you spend $75+. Offer valid until 3/22 at 11:59pm ET. Cart must include a minimum subtotal of $75 from the Week in the Life™ shop category to qualify. Digitals do not count towards the shipping minimum. All of the products are in the warehouse and ready to ship!WEEK IN THE LIFE™ SHIPPING
Use code WITL2023 for FREE domestic shipping ($20 international flat rate) on Week In The Life category when you spend $75+. Offer valid until 3/22 at 11:59pm ET. Cart must include a minimum subtotal of $75 from the Week in the Life™ shop category to qualify. Digitals do not count towards the shipping minimum. All of the products are in the warehouse and ready to ship!WEEK IN THE LIFE™ PREP DAY
Week In The Life™ Prep Day is also available for registration, happening April 15th. We'll have more details for your soon! Register here.WEEK IN THE LIFE™ DIGITALS
Our collection digitals for Week In The Life™ will be available on Friday, April 7th. Layered templates will be coming to the shop closer to the documenting day. We will have 10x8 and 6x8 layered templates again this year. Layered templates are .PSD files. Main kit journal cards and papers will be available as separate file. The kraft pages will be available with a white and transparent background and we will also have album art available. SVG files, which can more easily be manipulated in CANVA, will be included when possible, consistent with previous digital releases.CRAFTING LIVE WITH KRYSTAL WEEK IN THE LIFE™ SERIES
This week on the blog we’re sharing a summary and recording of all three pf Krystal’s Week in the Life 2023 collection LIVE mini-series. For this series, she’s sharing sneaks and ideas for how to use the new collection to document your stories this year. Check them out now here.
40% OFF SELECT DIGITALS + CLASSES
Use promo code SPRING40 to get 40% off select digitals and classes all month long!
IMPORTANT SUBSCRIPTION UPDATES
Since January, we’ve seen incredible growth in our subscriptions! As always, we are extremely grateful for your support and thrilled by your enthusiastic response to the changes we’ve implemented. As a result, we are currently on a waitlist for both new Stories By The Month™ and Story Kit™ subscribers. Now is the time to subscribe or jump on the waitlist if you’ve been considering a subscription to either of these products. If you are interested in receiving one of these subscriptions when they become available, it’s important to sign-up for our waitlist now as it helps our team anticipate future quantities.
As always, we’re so grateful to have you all as members of this community! Thanks for joining me today and have a great weekend!
March 16, 2023
Week In The Life™ 2023 | Ali's Album Setup
Today is the day! The all new Week In The Life™ products for 2023 are now available!
We have two new albums, our journal, a gorgeous main kit, an incredibly fun themed mini kit, and a collection of coordinating Week in the Life™ products. All of the products are in the warehouse and ready to ship! In celebration of release day, Ali was LIVE in our Craft The Story Facebook Group earlier today sharing her album set-up for 2023.
Check out the recording below:
Just a heads up that Ali will do another post within the next few weeks where she includes images of her design formula. Stay tuned!
This year Ali will be documenting her week beginning Monday, April 24th, 2023. Week In The Life™ Prep Day is also available for registration, happening April 15th. Stay tuned for details on Ali's new Storytelling With Week In The Life™ class, coming soon!
Our collection digitals for Week In The Life™ will be available on Friday, April 7th. Layered templates will be coming to the shop closer to the documenting day.
SHIPPING DETAILS: Use code WITL2023 for FREE domestic shipping ($20 international flat rate) on Week In The Life category when you spend $75+. Offer valid until 3/22 at 11:59pm ET. Cart must include a minimum subtotal of $75 from the Week in the Life™ shop category to qualify. Offer subject to change.
March 15, 2023
Week In The Life™ 2023 | Crafting Live With Krystal 02
Hi friends, Krystal here! With the launch of the Week in the Life 2023 collection this week, I’m excited to bring you a three day mini-series where I will be sharing sneaks and ideas for how to use the new collection to document your stories this year.
This mini-series is composed of a daily Live video on the Craft the Story Facebook Group. The final live will take place on Wednesday, March 15th at 12:00PM ET.
Today, we are taking a deep dive into the mini kit components and discussing how they, along with some of the shop products, can work inside of the 10x8 album. If you missed the live video, you can check that out below.
Let’s take a closer look at the ideas we discuss in the Live video:
1. 7x8.25 Vellum Quote Page (Mini Kit)
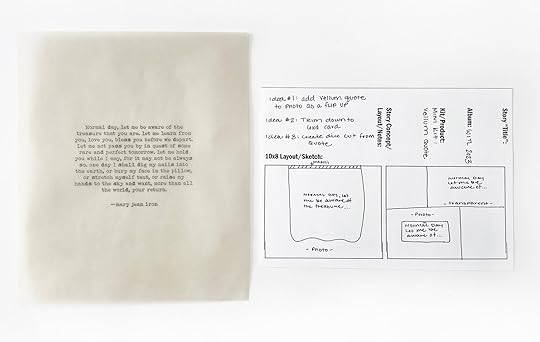
This quote gave me goosebumps as I read it. I can’t wait to find a way to include this piece in my album this year. Looking for some ways to make it work in your album? Here are a few ideas of how to the vellum page in your project:
Attach the vellum page to the top of a full page photo with washi tape. This allows the quote to stand out against the photo… but also lets you flip the vellum page up and gives you the full view of the photo underneath.
Trim down the quote page to a 6x4 filler card. You can slip this into a pocket page as a transparent element, or add on top of a photo/journaling card.
Fussy cut the quote from the page, or trim into a smaller rectangle, leaving only the quote with a very small border. Then, use the piece as an embellishment.
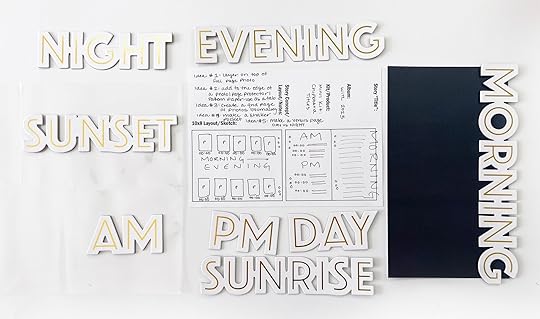
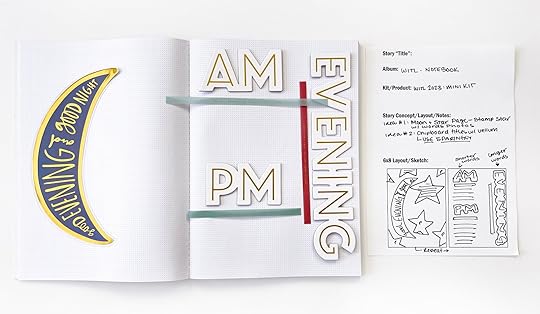
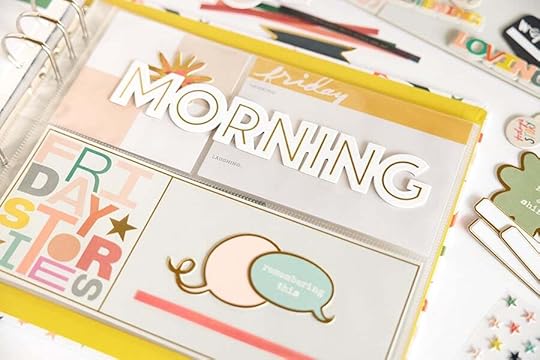
These titles are SO fun and give you a ton of great journaling jumping off points for your Week in the Life album. One of my favorite things about them is you get the opposites for each word: i.e. Morning/Evening, AM/PM, Etc. Here are some fun ideas for adding these to your album:
Layer the title piece on top of a full page photo. (For example, add the Sunrise title on top of a sunrise photo.)
Add a title to the side edge of a smaller photo/page protector. The word can act as both a title and a tab, of sorts. This would work great for a 6x8 page or 3x8 page.
Create a grid page using photos/journaling to represent the title. I.e. add “Morning” into the center of a 10x8 page. Then, place five photos above and below the word, with small bits of journaling for context.
Add a title into a page protector pocket. Turn into a shaker pocket by adding sequins and sealing the pocket shut with washi tape or a fuse tool.
Create a versus page: morning vs. evening, AM vs. PM, Day vs. Night, etc.
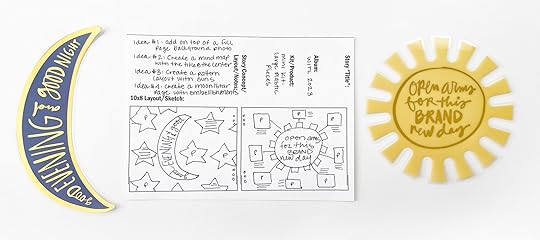
The large sun and moon plastic embellishments are a super fun product with a lot of ways to potentially use them. The large graphic nature of the embellishments will make any layout with them look bold and fun. Here are some fun ways to use these pieces:
Add the large plastic sun/moon to a full page background photo as an opener or closer to a day.
Create a mind map with the plastic title at the center. I.e. add the sun into the middle of your page with branches off to photos from your morning and journaling for context (or time stamping).
Create a pattern of suns to document a day. Pull out (or create) any sun embellishments you may already have in your stash. Layers these onto a full page for a fun designed look. Then, add photos/words to the centers of the suns.
Same as #3, but with the Moon title and stars. Add photos, journaling, etc into star shapes to give your page the “night sky” look.
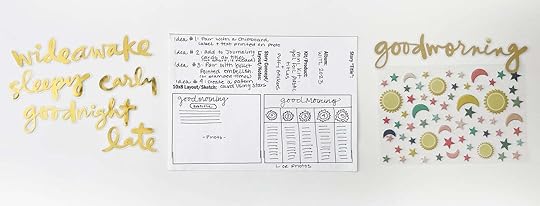
These gold foil titles give us another medium for telling stories this season. The plastic material makes them perfect for adding to a flatter project as well. Here are some ideas for how to use the gold foil titles in your album:
Pair with a chipboard label and pre-typed/printed journaling on a full page photo. These could be really pretty places in the dark sky space of a photo from the morning or evening.
Add titles to journaling cards (cutting them apart to fit onto smaller cards, if desired), and use the titles as story prompts.
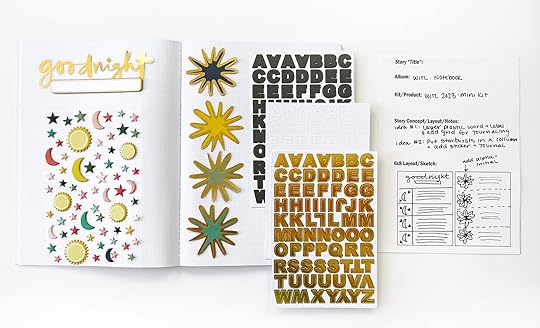
Pair with puffy stickers to create a grid page/bullet pointed journaling page.
Create a pattern using the puffy star stickers.
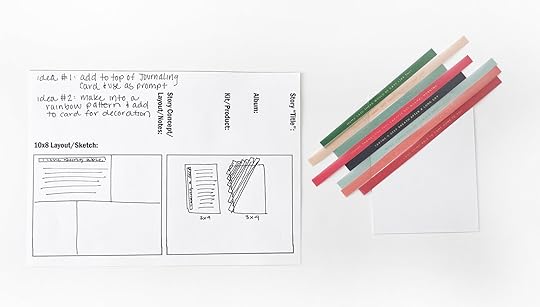
While there are not any tiny phrase stickers in the collection this year, the vellum word strips are a great alternative! Simply add these to any space you would normally add a tiny phrase sticker. OR, here are some other ideas:
Add word strip to the top of a journaling card/page and use it as a prompt for storytelling.
Make into a rainbow pattern and add to a blank journaling card as a design aspect.
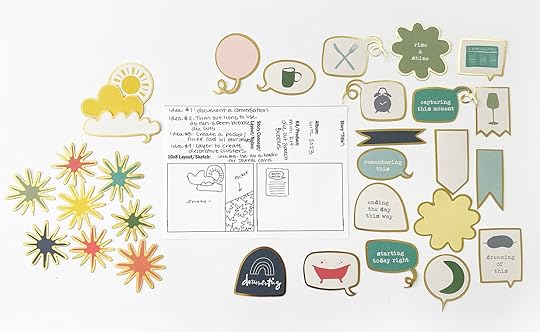
In the die cut pack, there are a whole host of different shaped pieces. From whimsical speech bubbles, to wonky banners, to shaped embellishments and graphic starbursts - this pack is jammed! Here are some fun ways you might want to incorporate these into your layouts:
Use the speech bubbles to document a conversation.
Trim the icons out of the die cuts to use as just the image (alarm clock, newspaper, etc.)
Create a pocket/filler card using the starburst to make a pattern.
Layer the pieces to create embellishment clusters (i.e. clouds and sun).
Use as headers on journaling cards + as journaling prompts.
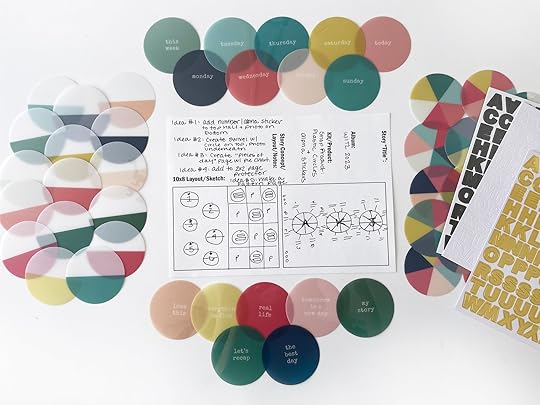
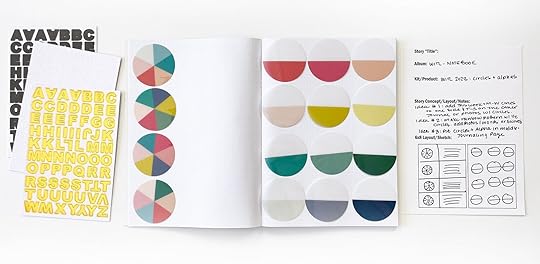
These are another favorite product for me this year. I’m OBSESSED with the pie designs on many of the circle pieces and can’t wait to see these in action. Here are some ideas for using the plastic circles to consider:
Add a number or alpha sticker to the top half of the divided circles. Then, use the blank bottom half to add a small photo.
Create a swivel feature by placing the plastic circle on top of a circle photo/journaling spot. Attach with a brad so the plastic can move and the underneath can be fully seen.
Create a layout to document “pieces of your day” using the pie designed circles.
Add to the 2x2 page protector and intersperse with photos/journaling.
Make a pattern page by using many/all of the circles. A full page with all of those pie shapes would be SO fun!
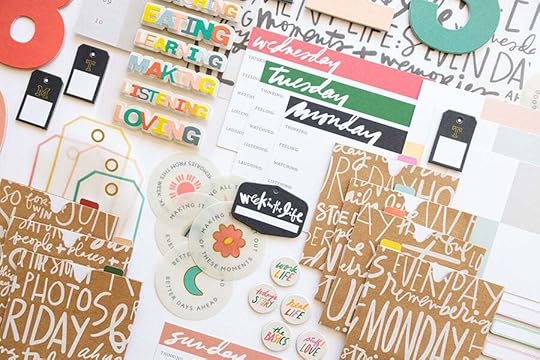
Per the request of a few in our community, I also put together images that feature all of the products by day. These are all of the items from the full collection (main kit, mini kit, shop items) that have the day of the week printed/displayed on the item in some way. This photo can help you see how each day consists of a plethora of colors and gives you a wide variety of colors to work with and more flexibility in choosing which products to use in your album as a whole.
This concludes our second set of ideas for using the WITL 2023 collection to document your life this April! I hope you enjoyed talking through a bunch of ideas and seeing these sketches come to life. Thank you so much for stopping by today and please let me know if you have any questions. If you have more ideas for ways to use the supplies discussed today, let us know in the comments below. Don’t forget to tune in on Wednesday, March 15th at 12PM ET to see ideas for the WITL Notebook. Until next time, let’s tell stories together!
March 14, 2023
Week In The Life™ 2023 | Crafting Live With Krystal 01
Hi friends, Krystal here! With the launch of the Week in the Life 2023 collection this week, I’m excited to bring you a three day mini-series where I will be sharing sneaks and ideas for how to use the new collection to document your stories this year.
This mini-series is composed of a daily Live video on the Craft the Story Facebook Group. The next live will take place on Wednesday, March 15th at 12:00PM ET. And today’s live will be posted here tomorrow.
Today, we are taking a deep dive into the main kit components and discussing how they, along with some of the shop products, can work inside of the 6x8 album. If you missed the live video, you can check that out below.
Let’s take a closer look at the ideas we discuss in the Live video:
1. 10x8 Transparencies
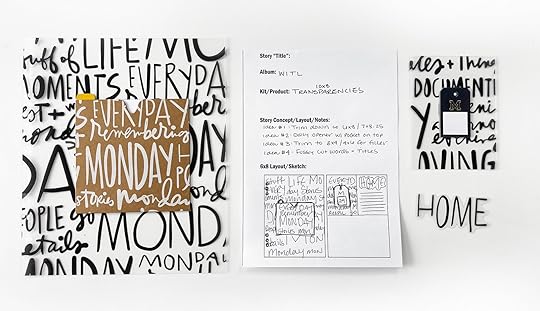
These text based transparencies are SO fun! While they are designed to fit outside the page protector in a 10x8 album, they can also be cut down and used in any of the album sizes offered this year! Here are a few ideas of how to use these in your project:
Trim the transparency down to fit your album - 6x8, WITL Notebook, Travelers Notebook, and more. Add a tab to the top to make finding each day of the week quick & easy.
Open each day of your weekly documenting with the transparency and a kraft pocket adhered on top. The contrast of the kraft and bold black in white is so striking!
Trim the transparencies down even further to create filler 3x4 or 6x4 cards. This gives you a fun peek-a-boo effect in your album AND can serve as a home for some fun embellishments.
Fussy cut titles from the transparencies to create your own plastic word titles. The transparencies include SO many sentiments that can be used as story prompts. Some examples include: Home, Stories, People + Places + Things, Stuff of Life, Thankful, Etc.
I absolutely love a paper that gives us space for direct storytelling. The 10x8 Highlights paper would be the perfect way to start or finish a WITL album. If you’re working in a size smaller than 10x8, you can still use this paper by trimming it down or creating a folded flipout. Then, fill the columns with words, photos, or both!
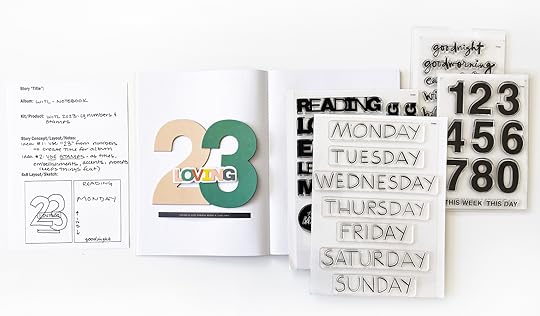
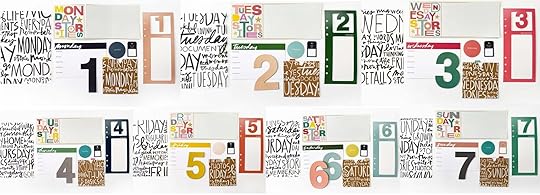
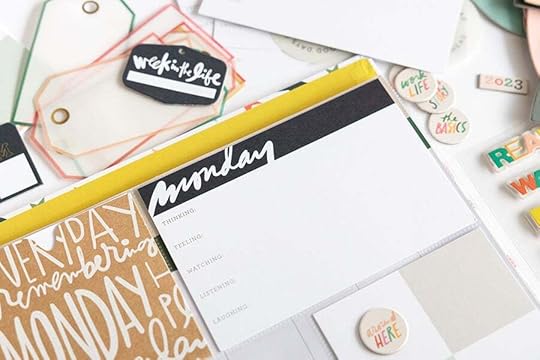
3. 6x4 Journaling Cards
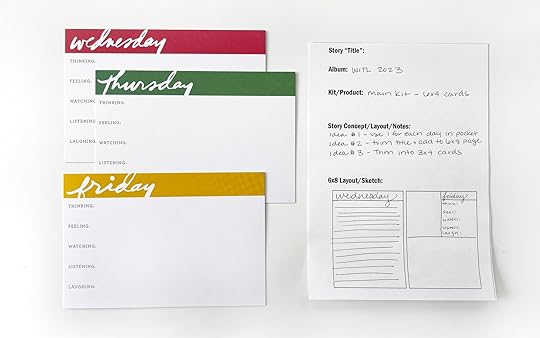
The main kit comes complete with a set of seven days of the week 6x4 cards. These feature sections to fill out your currently -ing activities: thinking, feeling, watching, listening, laughing. Aside from sticking these straight into a 6x4 pocket, here are some additional ways to use these cards:
Trim off the top header portion of each 6x4 card and re-adhere the daily titles to the top of a 6x8 page of journaling.
Trim each 6x4 card in half so the title and prompts become a 3x4 card. Use the second half to stamp a different title/prompt OR simply add journaling into the blank section.
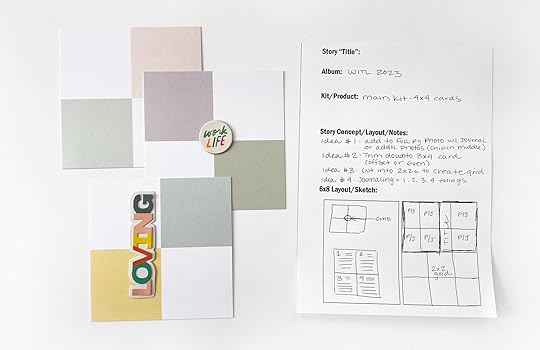
With a little bit of trimming, these square color-blocked 4x4 journaling cards can totally work in a 6x8 album. The mix of colors also adds a nice colorful touch to the daily documenting. Here are some ideas for incorporating these cards into the 6x8 album format:
Add the full square directly to a full page photo or to patterned paper. Adhere on three of the four sides to make the square into a pocket.
Use the squares as homes for words or photos.
Trim down to 3x4 journaling cards - either by evening removing .5” from each side (making the rectangles even), or 1” from a single side (making the square sizes offset).
Trim the color squares into 2”x2” sections and add into a 2x2 page protector, or onto plain white cardstock - intermixing photos throughout.
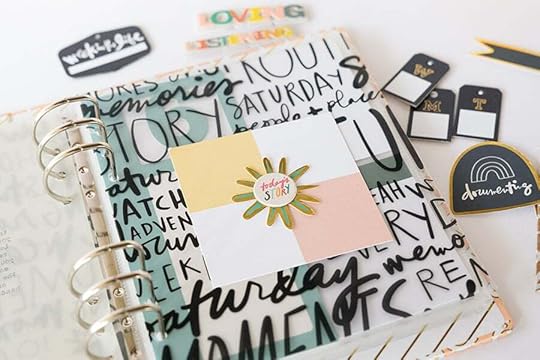
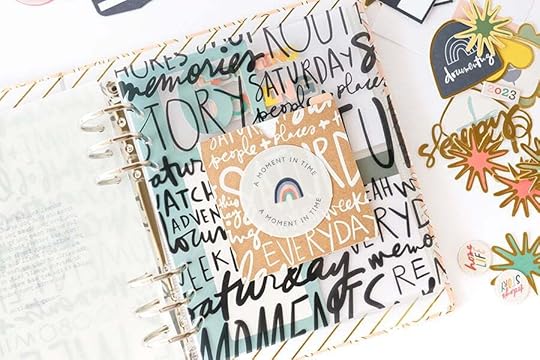
Using the layered stickers and circle chipboard, create journaling prompt titles to help guide writing. With four sections, there’s lots of opportunity to tell four details of a single story.
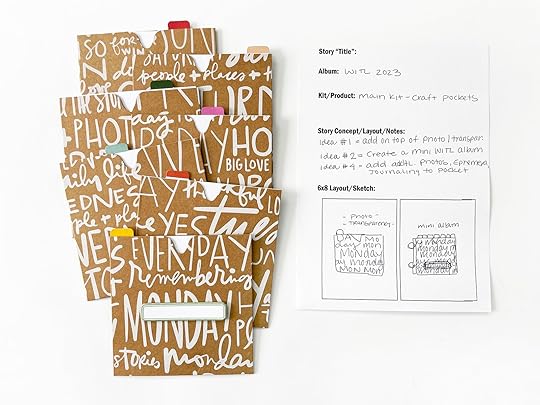
These kraft pockets add such a fun textured element to the collection this year. The contrast of the kraft with plain cardstock is gorgeous. Here are some ideas for these pockets:
Add on top of a full page photo (one that is just a background-type photo) or on top of a transparency (backed with additional journaling/photo).
Add attacher strips to the back of the left side, add into the album as a small insert OR put onto rings and create a small mini WITL album.
Use the pockets to store additional photos, ephemera, journaling, etc.
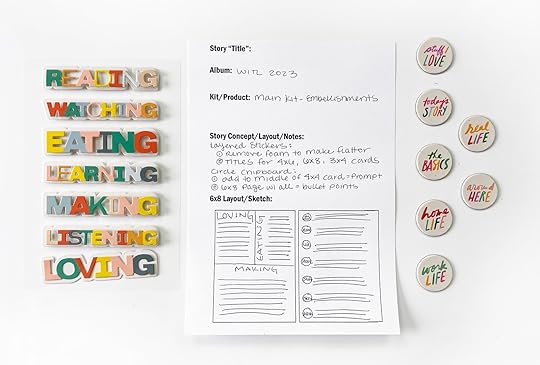
The chipboard and layered stickers are SO FUN! I can’t wait to see how these are used by the community in the WITL project this year. Here are some ideas to think about for ways to use the layered stickers and chipboard circles from the main kit:
Remove the foam tape from the layered stickers to create a flatter embellishment - good for keeping the bulk down or using in a flatter project altogether.
Use the layered stickers at titles/journaling prompts on 3x4, 6x4, and 6x8 journaling cards/pages. For a pop of contrast, consider placing a black tiny phrase sticker or strip of washi in-between the title and the journaling text.
Add a circle chipboard to the middle of the color-blocked 4x4 card. Use the sentiment to help guide your journaling and tell four things related to the prompt.
Use all seven circle chipboards as journaling prompts for a 6x8 bulleted list.
Create a mind-map using the circle chipboard. Include “today’s story” in the middle, then branch out to the other six prompts, and branch from there to journaling/photos/stamps/etc.
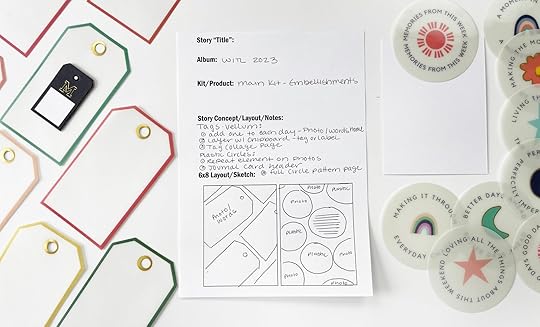
The final two embellishments included in the main kit add two more textures into the mix: vellum and plastic. Here are a few ideas for these pieces:
Add one vellum tag to each day, placing on top of a photo, transparency, patterned paper, etc. Use the space as a home for a photo, some journaling (slickwriter pen recommended), or an embellishment.
Layer the chipboard tags and vellum tags (or vellum tag and label chipboard) for a formulaic way to designate the day on your layout.
Create a patterned tag collage page using the full set. Add photos, journaling, or embellishments into the various spots.
Use the plastic circles as a repeat element throughout your album.
Use an older circle nested chipboard as a frame around the plastic circle, giving the page more texture & dimension.
Cut the circles in half and use them as a journaling card title header.
Create a circle patterned page using the full collection.
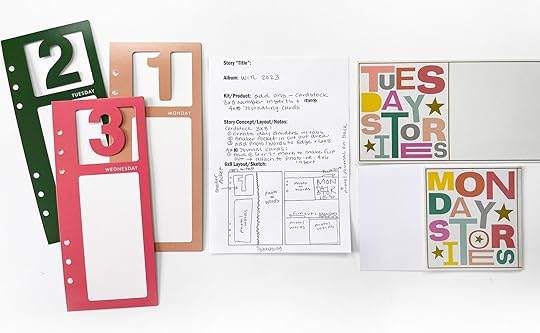
Last, but not least, we have two fun shop products to consider this year. These are two of my top favorite components of the WITL collection for the whole release! Between the cardstock cutout number inserts and the 10x4 journaling cards, the colors are so fun and make me want to jump right into documenting. Let’s talk ideas for how to use them in your 6x8 album:
Create smaller dividers using the cardstock number inserts. Adhere a tab to the top of the frame so you can easily find your place for each day in the album.
Make the window portion into a shaker pocket, using all the colorful sequins to match the collection.
Add a 3x8 photo or page of journaling next to the cardstock number inserts and stitch the pieces together to form a full 6x8 layout.
Fold the 10x4 journaling cards to create a flip out component. Attach into the album with an attacher strip. Include journaling/photos on the inside and back of folded card.
And with that - we have the first set of ideas for using the WITL 2023 collection to document your life this April! I hope you enjoyed talking through a bunch of ideas and seeing these sketches come to life. Thank you so much for stopping by today and please let me know if you have any questions. If you have more ideas for ways to use the supplies discussed today, let us know in the comments below. Don’t forget to tune in on Tuesday, March 14th at 12PM ET to see ideas for the 10x8 album AND additional ideas from the mini kit and shop products. Until next time, let’s tell stories together!
Week In The Life™ 2023 | Collection Preview + Date Announcement

Welcome to the preview post for our
Week In The Life™ 2023 Collection.
These products will be available on
Thursday, March 16th at noon Eastern/9am Pacific. This collection is in stock and ready to ship.
Read below for lots of details regarding the schedule for this project and surrounding community events.

This year
Ali will be documenting her week beginning Monday, April 24th.
Is this your first time learning about Week In The Life™?
Check out more details on this project that Ali started in 2005 here.
Use code WITL2023 for FREE domestic shipping ($20 international flat rate) on Week In The Life category when you spend $75+. Offer valid until 3/22 at 11:59pm ET.
PREP DAY: Mark your calendar for Saturday, April 15th for our Week In The Life™ Prep Day. Registration to come.
STORYTELLING WITH WEEK IN THE LIFE™: This year Ali is putting together a brand-new workshop which walks you through the basics + heart of this project. Fashioned after the popular Storytelling With December Daily® and Storytelling With Project Life® workshops, Ali will take you on a journey back through her past projects and share ideas, tips, and inspiration for approaching this project (mindset, prep, etc), what to do during the documenting week, and tips on putting it together after the week is over.
Registration for this workshop will start during our Week In The Life™ Prep Day on Saturday, April 15th.
We will be offering most of these products digitally on Friday, April 7th. New layered templates will be released before the documenting week (date to come).
WEEK IN THE LIFE™ COLLECTION VIDEO OVERVIEW
Here is an overview video of this year's collection:
Here is a look at the products via images:
Ali will be using this album for her 2023 project. Includes 21 page protectors in three styles.


Includes 21 page protectors in three styles.


Our 2023 Main Kit includes the following:
7, 4x6 inch single-sided Journal Cards7, 4x4 inch single-sided Journal Cards1, 10x8 inch Vellum Pattern Paper1, 10x8 inch Highlights Pattern Paper1, 3.75x8.25 inch Reflections Journal Card1, 6x8 inch Non-Adhesive Chipboard Sheet7, 3 inch Dimensional Ing Word Stickers10, 4 inch Chipboard Numbers8, 2.25x3.88 inchVellum Tags7, 4x4 inch Kraft Envelopes with Tabbed Story Cards9, 2.5 inch Plastic Circles
Here are some ideas to get your creative documenting juices flowing:

If you are using a 6x8 album you can fold this Highlights Pattern Paper to create a fold out in your album.

And our Main Kit in the 6x8 album:

The 2023 Morning + Evening Mini Kit includes:
1, 7x8.25 inch Vellum Quote Paper1, 4x6 inch Non-Adhesive Chipboard Label Sheet1, 4x6 inch Puffy Sticker Sheet8, .25 inch Long Skinny Vellum Phrases8, 1.5 inch tall Chipboard Words8, 2.25 inch to 6.3 inch Plastic Shapes/Words30, 2-3 inch Die Cut Pieces

Here are some ideas to get your creative documenting juices flowing:


These can be used together or separately.

Here's a few images of the kit + journal so you can see the scale:


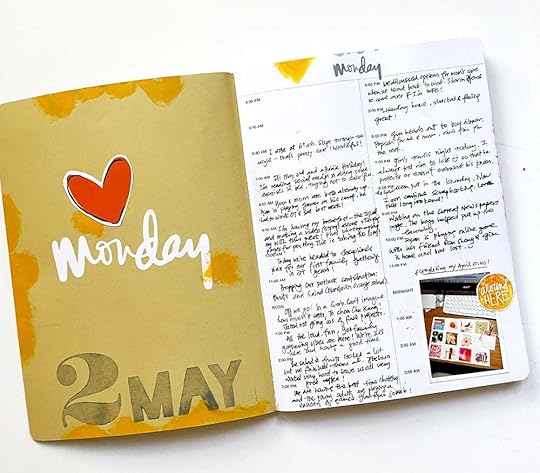
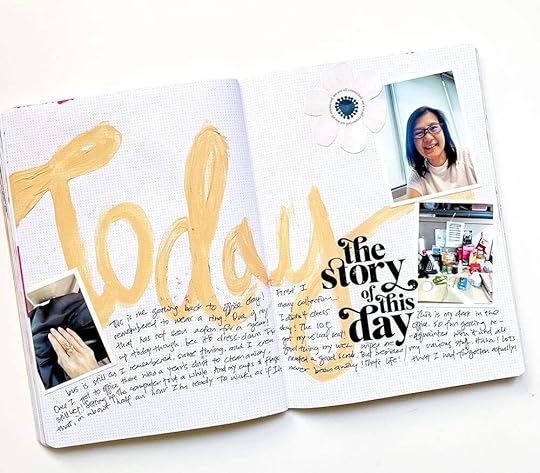
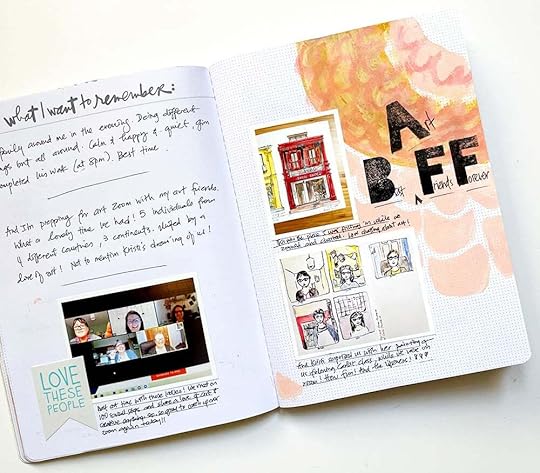
Last year we introduced a new journal option for Week In The Life™. Some people used it for note-taking/story collection during the documenting week and others used it for their entire project. We love that it brings additional options for people to tell their stories.

This is the same size as the One Little Word® Journal (6.25 x 8.5 approx).


There are also two blank spreads in between each day.
Our friend Yin used the notebook for her project last year. She put together a whole blog post sharing what she did - totally worth checking it out if you are considering going in this direction this year. Here are a few images from her project:
10x8 TRANSPARENCY DIVIDERS | $9.99


Here's a look at these in use:

These can be cut down to fit into the 6x8 album:

PLASTIC CIRCLE PACK | $9.99

Here's a look at these in use (so fun added into the 2x2 pockets):

3x8 NUMBER + JOURNALING INSERTS | $7.99

Here'a a look at these in use:


6x8 Kraft Documenting Pages | $7.99
This is a set of seven pages sized outside the page protector (7x8.25) perfect for holding photos, words, embellishments, or any other stuff of life you might want to document this year:

10x4 Journal Cards | $7.99
These fit into the page protectors in the 10x8 album:

Here's a look at those in an album:


4x6 Alpha Sticker Bundle | $3.99


Here's a short overview of Ali stamping each of the stamp sets from this year's collection:
Week In The Life™ Days Of The Week 6x8 Stamp Set | $28.99


Week In The Life™ Phrases + Circles 6x8 Stamp Set | $28.99


Week In The Life™ Numbers 4x6 Stamp Set | $19.99


Week In The Life™ Morning + Evening Phrases 4x6 Stamp Set | $19.99


This year we are trying something new which is a limited number of "Buy All" button packages. We've seen requests for this in the past when we release collections like this so we wanted to test it out with Week In The Life™. As this is the first time doing this we anticipate we'll learn some things as we go through the process of offering it.
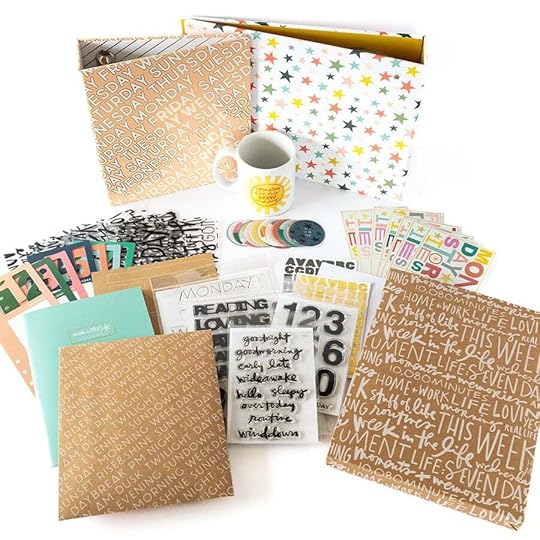

People who choose the "Buy All" option will also receive this exclusive mug that has the sun + moon designs on it from the Week In The Life™ Mini Kit.
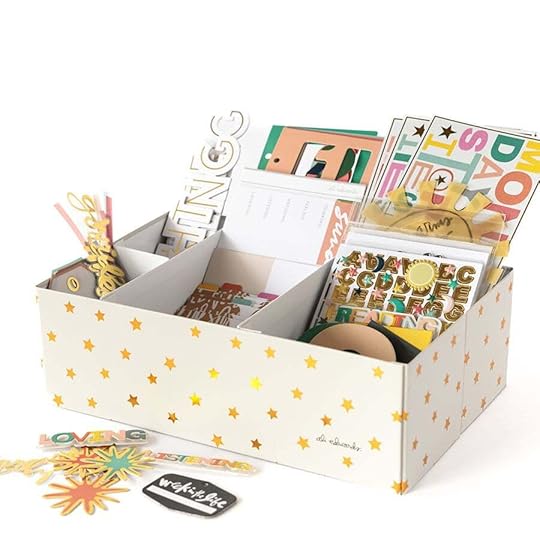
In addition to the products featured above we'll have a variety of basics available under the Week In The Life™ category, including page protectors, inks, and this organizational box (not included with the "Buy All" option).
March 13, 2023
Story Play | Day In The Life™ Details
Mark your calendar for our first Story Play Week featuring our Day In The Life™ project (with the actual documenting day happening on Saturday, April 1st).
Each day during the week leading up to the documenting day I’ll be sharing a video on YouTube + my blog with some ideas and inspiration related to Day In The Life™. This year we are using the lens of color as a way to tell the story of our day. I’ll share how I’m setting up my project + my documenting approach during the video on Tuesday during the Story Play Week.
If you missed out on the physical kit you can grab the digital version here or use your stash!
You can see our complete Story Play Collection here.


