
Ali Edwards's Blog, page 155
November 13, 2017
Story Kit™ + Story Stamp™ | Give

In the Story Classroom this month we are focusing on stories related to the theme of Give.
Here are a few thoughts about this particular theme:
We give and receive gifts that are both tangible and intangible throughout the course of our lives. Some are hilarious, some are meaningful, and some are passed on to others. This month we are telling stories about giving and the ways in which that word (and it’s meaning) is a part of our lives.
Initial story ideas for the Give theme include:
What are your favorite ways to “give” of yourself to the people who matter most to you? Tell a story by making a list and literally giving thanks for the stuff of your life right now. What are your favorite gifts to receive from others? Tell a specific story about one of your most meaningful gifts.
If you are new to the Story Subscription program, check out all the details here.
If you are already a subscriber the content in the classroom will be available to you on the 15th.
Here's a look at
the
Story Kit™ contents for Give:

ADD ON OPTIONS | Current and new subscribers can select + purchase Add-On's via your new drop-down menu access under your user name in the top right corner of the site. If you subscribe to more than one you will have a Box for each subscription and the ability to purchase Add-On's for each one. Depending on product availability subscribers may be able to purchase the Add-On's after the Add-On period has ended and regular shop shipping rates will apply because they will ship separately from the kit.
Here are the optional Add-Ons for subscribers of the Give Story Kit™ theme. All three of these products are exclusive to subscribers at this time (but may be added to the shop in the future). Some months we will have only new theme-based products as part of the Add-On selection and other months we might include a staple item from the shop.

Here's a video overview of the Story Kit™ and Add-On options this month:
STORY STAMP™
The Give Story Stamp™:

The
Story Stamp™ also has Add-On options available to subscribers:

Here's a video overview of the
Story Stamp™ and Add-On options this month:

There is also a
Digital Story Kit™ subscription available that includes access to the classroom content.
Your digital kit and the classroom and any Add-Ons purchased will be available to you on the 15th once your card has been charged for the month. Here's a look at what's included for Give (which also shows all the designs for the journal cards included in the printed version of the kit): Digital Story Kit™ subscribers also have five Add-On options available (if you subscribe to both the Story Kit™ and the Story Stamp™ these should also be available to you for purchase):


**LARGE GOLD FOIL TAGS
And a couple peeks at the layouts I created with the kits this month in addition to the one featured at the top of this post ( full details, including process videos and how-to handout, are included with subscription):


Again, thanks so much for subscribing and/or considering my
Story Subscription program! If you have any questions about this program please let me know below in the comments.


November 12, 2017
AE Creative Team | Best Digital Story Kit™

Happy Sunday!
We're so happy to share the projects created by our awesome Creative Team using the
Time Digital Story Kit™. Today is the last day left to start a subscription to receive this current theme.

A big thank you to our awesome team for sharing the stories of their lives and crafting it so beautifully!


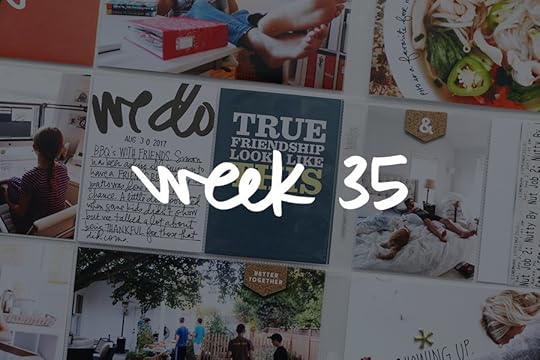
Project Life® 2017 | Week Thirty-Five
Today I'm sharing the last of the six Project Life® spreads I put together last weekend. I hope this series of posts helps you get motivated to fill in those pockets with the images and stories of your life.
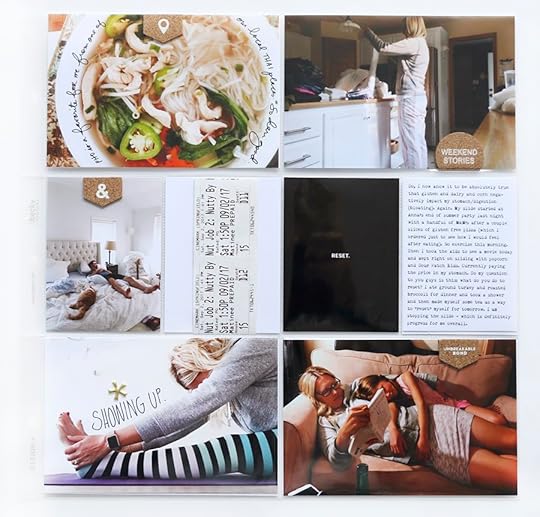
Here's a look at Week Thirty-Five:
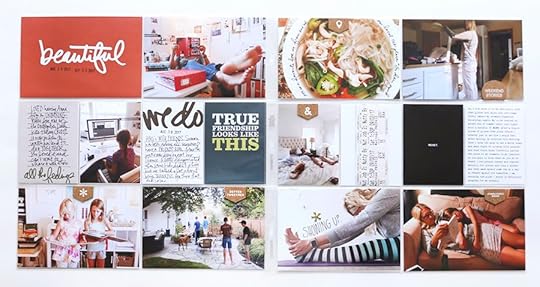
My "bring-it-all-together" embellishment this week was a set of cork shapes from a past Story Kit™ (I love these shapes and have used them in other spreads in the past). I did include one circle chipboard piece ("weekend stories") from the Summer Embellishment Variety Pack.
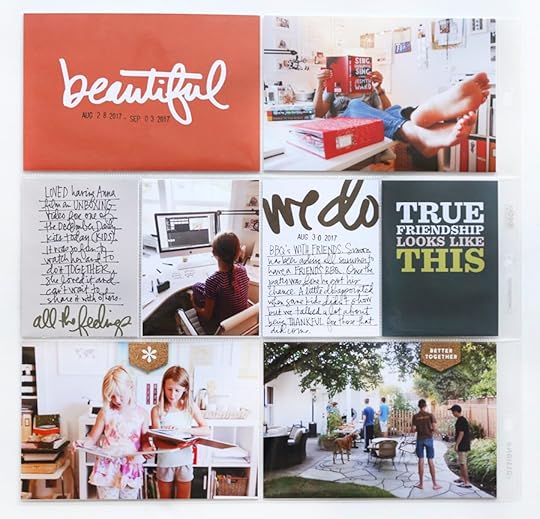
The main "beautiful" card is from the Season Of Fall Journal Card Set. The "we do" card is from the new Family Journal Cards Set (such a great, universal set for all kinds of stories that pop up in Project Life®).
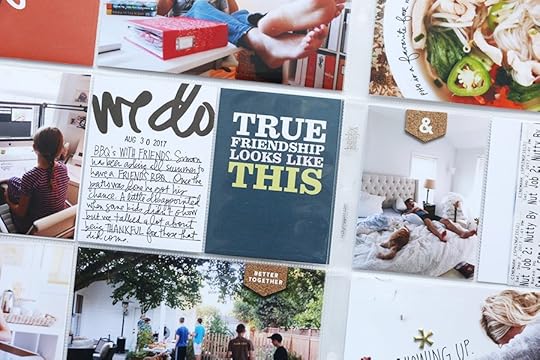
The "true friendship" card is from the Friends Journal Card Set (available digitally here).
Project Life Design A Page Protectors Project 52 Fresh Core Kit (anything with rounded corners - often title cards) Past Story Kits™ Rolling Date Stamp 12x12 Project Life® / Heidi Swapp / Black & White Album Week By Week Word Art Gratitude 3x4 Notepad AED Precision Pen
You can see all my past Project Life® blog posts here. For more information about my overall process make sure to check out my self-paced Storytelling With Project Life® workshop.

November 11, 2017
Project Life® 2017 | Week Thirty-Four

Welcome back to another week of Project Life® for 2017. This week I've been sharing the six spreads that I finished up last weekend as I work towards catching up before December begins. You can see all my past Project Life® posts here.
Here's a look at Week Thirty-Four:

This week I didn't use a particular embellishment to create cohesion across the spread and instead just used a few things here and there. I like both approaches - the other is such a great way to use up your product vs. saving it for the "perfect" spread or project.

Here's my question to you today: in what ways are you making this process more complicated than it needs to be?
I think for me most of the time I think in my head that I need to make it more "done" vs. just keeping it simple.

The "memories" cork piece is from the Summer Embellishment Variety Pack.
Acrylic heart is from a past Story Kit™.

The two chipboard pieces on this side of the spread are from the Summer Chipboard Shape Variety Pack. The "friends" card is from the Friends Journal Card Set (available digitally here).
The last 3x4 card here is journaling taking from an Instagram post. Sometimes it's fun to mix it up and print white on black.

Project Life Design A Page Protectors
Project 52 Fresh Core Kit (anything with rounded corners - often title cards)
Past Story Kits™
Rolling Date Stamp
12x12 Project Life® / Heidi Swapp / Black & White Album
Week By Week Word Art
Gratitude 3x4 Notepad
AED Precision Pen
You can see all my past Project Life® blog posts here. For more information about my overall process make sure to check out my self-paced Storytelling With Project Life® workshop.

November 10, 2017
Project Life® 2017 | Week Thirty-Three

Welcome back to my week of sharing
Project Life® spreads.
Here's a look at Week Thirty-Three:

My unifying element this week are the large plastic letters from the
Week In The Life™ 2016 Kit (no items are date specific within the kit). The 2017 kit also had large white abbreviations for the days of the week.

On top of the pattern card (from the Brave New Day Journal Card Set) I added one of the Fall Label Stickers - these are available in a bundle and are my favorite set of label stickers that are so great for adding to pattern cards and photos.

I loved adding in these
large plastic letters - it was a fun, graphic way to add something to my spread that unifies the entire week. I added a word/phase sticker (from the past Brave Story Kit™) to the top of each stapled letter.

Journaling again copied and pasted from an Instagram post.

This was also the week that holds my
second Day In The Life™ for 2017. You can see my post about that documentation here.
Project Life Design A Page Protectors Project 52 Fresh Core Kit (anything with rounded corners - often title cards) Past Story Kits™ Rolling Date Stamp 12x12 Project Life® / Heidi Swapp / Black & White Album Week By Week Word Art Gratitude 3x4 Notepad AED Precision Pen
You can see all my past Project Life® blog posts here. For more information about my overall process make sure to check out my self-paced Storytelling With Project Life® workshop.

November 9, 2017
Project Life® 2017 | Week Thirty-Two

Continuing today sharing the Project Life® spreads I completed this past weekend in an effort to get closer to having my pockets filled before we hit December.
Here's a look at Week Thirty-Two:

As you might have noticed with the last two spreads I shared one of the things I focused on when filling the pockets as using one or two embellishments repeated throughout my week to create cohesion. In this spread I used some circle stickers that were a past Story Stamp™ Add On option. I simply added them to the edge of each of my 4x6 photos and fold them over.
On top of each circle I used the rolling stamp from the Day In The Life™ Mini Kit No. 4 (includes the following words: currently, around here, eating, watching, listening, reading, buying, wearing, trying, wanting, feeling, loving) along with a small silver star rub on from my stash.
I've loved including the Project 52 Cards as title cards every few weeks in my album this year.

The "you got this" card is from the Brave New Day Journal Card Set. The photo next to it was one I shared on Instagram (on my wellness account) and I copied and pasted the text from that post directly onto the photo. Love how that turned out.

The chipboard piece with the "heart today" is from the Summer Chipboard Shape Variety Pack.

Sometimes we might not have a lot of words and that's totally okay. Remove the pressure you might have on yourself to tell EVERY SINGLE STORY or feel like you must remember every detail. What I continue to love about this project is that it's the sum of all these stories that's the most magic (I'm going to keep saying that over and over again). Some of my weeks have a lot of words and some have a lot less - that's totally okay.

Project Life Design A Page Protectors
Project 52 Fresh Core Kit (anything with rounded corners - often title cards)
Past Story Kits™
Rolling Date Stamp
12x12 Project Life® / Heidi Swapp / Black & White Album
Week By Week Word Art
Gratitude 3x4 Notepad
AED Precision Pen
You can see all my past Project Life® blog posts here. For more information about my overall process make sure to check out my self-paced Storytelling With Project Life® workshop.

November 8, 2017
Project Life® 2017 | Week Thirty-One

This week I'm sharing a bunch of Project Life® spreads I finished up last weekend.
Again, keeping it simple is totally the way to go for me when I'm wanting to capture "pieces of the whole" of my life.
Here's a look at Week 31:

This week I went with two different embellishments to create cohesion across the spread. The first are the small gold puffy hearts from Freckled Fawn and the second are chipboard circles from past Story Kits™ and the Summer Chipboard Shape Variety Pack.

The "let's be adventurers" card is from the Travel Journal Card Set and the green quote card is from the Season Of Fall Journal Card Set.
The long journaling on the first card was simply copied and pasted from an Instagram post. This is seriously one of the best ways to get stories told and be able to go back to them months later to add them to your album.

The "here we go" is from a paper pad in a past Story Kit™.

Small chipboard circles + the chipboard banner can be found in the Summer Chipboard Shape Variety Pack. Look for shapes within your photos and pair embellishments that mirror those shapes.

Project Life Design A Page Protectors Project 52 Fresh Core Kit (anything with rounded corners - often title cards) Past Story Kits™ Rolling Date Stamp 12x12 Project Life® / Heidi Swapp / Black & White Album Week By Week Word Art Gratitude 3x4 Notepad AED Precision Pen
You can see all my past Project Life® blog posts here. For more information about my overall process make sure to check out my self-paced Storytelling With Project Life® workshop.

November 7, 2017
Project Life® 2017 | Week Thirty

This past weekend I took some time to add words and embellishments to the photos I've been keeping up with in my 2017 Project Life® album. I was able to get six weeks completed and I'll be sharing those one spread at a time over the next six days.
My process when I'm going back in time and wanting to get a bunch of weeks completed is to keep it simple and just fill the pockets. You'll see a lot of repetition of embellishments because that's one of the easiest ways I've found to "finish up" my weeks. I also found myself going to my Instagram account often to copy and paste the story I'd added to my photos from both my @aliedwards and @ae_wellness accounts. I love taking the time to tell the story when I share the photo and then being able to simply copy and paste that story onto a 3x4 card and slip it into a pocket.
Bring on the simple.
I think it's so important to remember that it's the sum of all these stories vs. any one particular week that is the most magic for me. I'm super excited that I'm farther along in my 2017 Project Life® album than I've been in most recent years. I think so much of that has to do with not making it more complicated than it needs to be and not feeling like I have to keep adding more and more to my weekly spread before I consider it done.
Here's a look at Week Thirty:

My unifying embellishment I used for this week are the flag stickers from my Summer Sticker Variety Pack - these are everyday life themed stickers. Simply identifying one product to use to bring the entire spread together is also such a great way to use product you have on hand.

"Seek with eyes open" journal card is from my Travel Journal Card Set. The "Yes" card and the stripe pattern cards are both from the Brave New Day Journal Card Set. All my shop Journal Card Sets include two of each card design so you are able to use both the front and the back design.

Each of the 4x6 photos got one of the banner stickers added on top + a staple from the Tiny Attacher. Today's Adventure card is from the Travel Journal Card Set and the "start where you are" card is from the Brave Journal Card Set. The "Here's The Story" pad is from a past Story Kit™.

The "loving" circle sticker is from a past Add-On Story Kit™ option.
SUPPLIES USED REGULARLY IN PROJECT LIFE® 2017Project Life Design A Page Protectors Project 52 Fresh Core Kit (anything with rounded corners - often title cards) Past Story Kits™ Rolling Date Stamp 12x12 Project Life® / Heidi Swapp / Black & White Album Week By Week Word Art Gratitude 3x4 Notepad AED Precision Pen
You can see all my past Project Life® blog posts here. For more information about my overall process make sure to check out my self-paced Storytelling With Project Life® workshop.

November 6, 2017
Day In The Life™ | November 2017 Completed Project

Wrapping up my
Day In The Life™ projects for 2017 with this fun take focusing on counting things throughout the day.
Check out my previous Day In The Life™ projects from this past year here: June 2017 and August 2017. I have loved including these projects into my Project Life® album throughout the year and plan to continue doing that next year.
One of the things that I really have been trying to do when designing products is give you a jumping off point for telling stories - intentional memory keeping products are my goal. I thought this angle was a really fun and different take on documenting a day in our lives (vs. trying to capture everything or doing an hourly photo). You'll see below that I didn't use all the cards included in the kit - I just used the ones that made sense or were relevant to my actual day. You might have used different cards or more cards or less cards and you might have taken more photos - all good any way you choose to do it.
This project is such a great reminder that all the stories we tell and the projects we embark on don't have to be complicated.
I decided to focus less on the photos this time and just make sure that I counted some of the things over the course of my day. This worked out just right since I ended up working for 10 hours on this day!

For my story this time I worked with 6x8 page protectors including the full page 6x8 pocket and the 4-pocket (3x4) page protector. I cut the first 4-pocket page protector in half after counting up the number of cards I planned to include in my story and I liked the way it looked alongside my enlarged photo.
The Day In The Life™ Fall 2017 Mini Kit includes the cards and stamp and word/phrase strips I used in my project. The number stamps in the kit are the perfect size to respond to the prompts on the cards. I used Black Butte Crafters Ink for stamping my numbers on my cards.

I took four photos for this day - I told you I took a lot less than normal! Because of that I decided to enlarge two of them and slipped those two into the one pocket 6x8 page protector. On the top of the photo of me (which is completely representative of my entire day - coffee and candy and all day at my desk - I added a plastic circle from the Summer Embellishment Variety Pack, a circle hashtag/number sticker, and a circle stamp from the Best Story Stamp™.
I added the two of the perforated words/phrases inside the Avery Index Tab.

My second enlarged photo shows my Get To Work Book™ (new planners are coming to the shop this week for 2018) and I added one of the perforated strips on top.

So simple and easy. Just count, stamp and write.
Here's a look at this project inside my Project Life® album:

Enjoy your week and thanks so much for playing along this year! Let's tell more stories again together next year.

November 2, 2017
December Daily® 2017 | Foundation Pages + Video Overview

Let's get this party started!
Today I'm sharing my December Daily® "starting place" with you for 2017. My "starting place" - what I also call "foundation pages" - often includes some numbered pages, some story ideas/story sparks, some product play, and just generally laying out an initial flow for my album.
Do I know what every single story and day will become? Nope. Does that stop me from playing before December and taking some time to set myself up for storytelling success? Nope. Will I move things around during the month and change things up from how they look right now? Probably. Are there December Daily® rules? Nope.
As I worked on my foundation pages this year I found myself thinking about a few things:
1. I still LOVE this project. After all these years now it's still so fun to embark on the season. I love focusing on ONE STORY PER DAY which is what I'll be doing again this year. I do not approach this project in the same way I approach Week In The Life™ - I am not trying to document everything or even most things we do daily during December. What has worked for me is looking for, capturing, and then documenting one story each day from December 1 to December 25.
2. So much of what I love about this project are the photo enlargements I end up including throughout the month. I'm looking forward to doing that again this year using the Canon Pixma MG7720 for printing my 6x8 photos onto 8.5x11 photo paper. This is also the printer I use for printing out digital products.
3. My intention/reason why this year has everything to do with being + creating "coziness." You can read more about this below.
4. Every year I find myself getting "looser" with my foundation pages. I have fewer things stuck down which allows me to focus on the story I may want to tell for any given day. I still love having something in the pockets - having something gives me a starting point. Some days it simply gives me a direction to head vs. a completely blank slate. I totally get that some people love working ahead and other people don't - again, as always - find what works for you (and really, you won't know if one way or the other works better for you until you actually try it).
5. I am totally loving creating a bunch of pages outside of my page protectors. It's such a nice reminder that there are lots of options for how this project can come together for each one of us based on what we'd like to play with and create this year.
6. This is not a competition or an opportunity/invitation for you to get trapped in any kind of comparison game. Own your own story. Own your own way of documenting this season. My story will look different than your story and that's part of what is beautiful about telling our own stories.
Here is a look at what's inside my December Daily® album before December begins:

First page of my album is one of the 6x8 Transparent Pages. I added one small gold sequin star to the "i" in "brightly."
You can get this design digitally and print onto an ink jet transparency or onto vellum as well.

For the last few years I've been starting my albums with either an "intentions" or a "reason why" page. This year I designed a "reason why" page and included it with the December Daily® 6x8 Layered Template No. 4 set and created it to go along with the cards included with the 2017 Main Kit.
You can access past years download for "intentions" here and "reason why" here.
My "reason why" for 2017 is as follows:
A very big warm & cozy welcome to December 2017. Emphasis on the word cozy. In fact, I think that’s what I want to focus on this year as my reason why. Cozy moments around the fire in the living room. Cozy moments around the table. Cozy moments doing stuff together like watching Christmas movies and drinking hot cocoa and playing games and doing puzzles. Cozy moments creating and celebrating the magic of the season. Cozy moments enjoying old traditions and creating new ones. Cozy moments around the twinkle lights of the tree. Cozy moments embracing who we are right now and not wishing anything away for some other experience. Yes. That sounds just about right for our second year all together as a family of seven. I’m so thankful for our life here in this house - this life that we get to share together. I want us to enjoy one another and find our own rhythm for this season in our lives. Bring on these simple joys.
Around the edges of the page I added some of the gold glitter chipboard stars.

Behind my "reason why" page I slipped in one of the 1/2 circle pieces of paper (Main Kit item) with a cork #1 adhered on top. Most likely I'll be filling this pocket with an enlarged photo. Across I've added in the "peace and joy" 4x6 card and that will either be an extension of Day 1 or Day 2 depending on the stories I'm telling.

I am super excited about these 1/2 circles and plan to add them to photos, pattern paper, etc. They are a great home for numbers or journaling.

Next I added one of the large tags that were a Main Kit bonus item this year. Everyone that purchased the December Daily® Main Kit this year also received these as a digital file and you can find that under your My Digitals section under your User Name in the top right corner. I'll probably add something on top when I tell my story.

For Day 3 I created a fun page playing with hearts + transparencies + small heart embellishments. I'll most likely pair this with an enlarged photo and/or journaling on the back of the large tag.
Full details about this page and a cut file is included in my Product Play workshop (registration open into December).

Day 4 happens on a weekend so I used that opportunity to add in the "weekend stories" card from the Main Kit. I also added a large white #4 sticker to the pocket as a place holder - I cut around the sticker sheet to add it here and will stick it on something once I know the story.

For now I just slipped one of the black chipboard numbers into the pocket.
Something new I decided to play with this year was creating interview tags for each member of my family. Last year I had everyone write out a wishlist on the back of a tag and slipped all those together into a pocket. This year I decided to make everyone a tag again but this time I would spread them throughout the album and I would have specific things for them to answer.

Download the PDF of the tag template here. The PDF includes 2 of these tags for you to print as many as you might need for your family.

After printing out the interview portion I adhered them to pattern papers from the Main Kit and from the December Daily® 6x8 Pattern Paper Pack.

I used this 6-hole punch to punch holes in these tags so that they would fit in the middle of the 6-ring configuration of the album. This paper punch works great with papers, cardstock, and vellum.

For the title on each tag I printed out everyone's name and then used a heart punch to create the heart shape.

After punching out the hearts I ran each one through my sewing machine with red thread and then stamped and embossed (using Ranger gold embossing powder) "stories" from the December Daily® Weekly December Stamp Set. After that I just adhered each heart to the pattern paper side of the tag, added some ribbon/trim from my stash and spread them out throughout my album.
I love that each person will be highlighted. I don't plan that each one of these will take the place of a story (but some might). I'd like to pair these tags with a current photo of each person as well.

After Anna's tag I took one of the 4-pocket page protectors and cut it in half (love doing this for page size variety) and added an Avery Index Tab along the edge. Most likely this will hold stories to go along with my page design for Day Six.

Playing with vellum circles + messy stitching for Day 6. The background cardstock is simply cut to the same size as the page protectors.
More details about this page is included in my Product Play workshop.

Most likely I'll cover up the back of that circle page with a full page photo or maybe I'll use those circles as a jumping off point for a page.
Next up is Isaac's tag (again following the same formula outlined above).

For Day 7 I decided to add in the "on repeat" card from the Main Kit - love the invitation to document what I'm listening to and/or watching in December.

For the number on this page I simply cut a piece from one of the page protectors (you can easily use the ones you cut in half or cut down for this purpose) and stapled one of the rubber wreaths on top and added one of the white number stickers from the Main Kit.

Love having see-through options.

I slipped the cork 8 into the pocket as a holding place.
Next up is another page from my Product Play workshop playing around with a strip of hearts. On this day I'll be writing down a few things from the morning, afternoon, and evening. Such a simple way to document little things I loved about the day.

Audrey's tag. These are making me so happy.

After Audrey's tag I added in the tree transparent page followed by one of the 2x2 inch page protectors. For now I just added in a cork 10 plus one of the 2x2 gold foil squares.

"Choose Joy" is a half-circle page idea + cut file that's included with the Product Play Workshop. This page opens up to create a full circle page and the workshop includes PNG and PSD files for masking photos into a 1/2 circle and easily journaling on the opposite side of the 1/2 circle.

Next page is currently holding one of the felt hearts from the Main Kit + a 12 cork number (not adhered just yet) and a "bring on the merry" card.

I slipped in the number 13 black cork number into the 4x6 pocket.
And a tag for Aaron.

Next up is a full 6x8 page protector and I just added all the diamond plastic shapes from the Main Kit as a reminder to play with those in some fashion to go along with whatever story I decide I want to tell on this day.

I'm looking forward to playing with those!

Next up is an enlarged heart adhered to a full page transparency.

My process for creating the heart "storybook" is included in the Product Play Workshop.

Day 16 will be a story about our tree this year. Slipped into the pockets are a cork number, a wood star, and the twinkle tree transparency.

Just sliipped in a 3x4 card on the back.
Next up I added in another one of the large gold foil tags. This time I punched the holes on the other side so that the gold foil "stories" would be facing the pocket page.

I'd like to play with using one of the 1/2 circles on the pocket page. I'm not sure yet what kind of stories/things I'm going to include in there. Might be our Christmas card. Might be more tags. Might be photos. All kinds of options.

For the next day I added in the "story" card from the Main Kit + the 2017 transparent from the December Daily® Paislee Press Mini Kit + another one of the rubber wreaths stapled onto a piece of page protector cut and slipped into the pocket. I'll add more white stickers for the date when that's established.

Simon's tag.

I cut up another one of the 4-pocket page protectors and slipped in the "19" black chipboard piece and a card from the Main Kit. I also added an Avery Index Tab along the edge and will fill that with a title once my story is established.

Using repeated shapes to create other shapes is another thing that's covered in my Product Play Workshop. I'll most likely be telling the story of something I love about right now on this day.

Next up is a stitched star list - creating homes in advance for stories in December is a great way to play with your products in November.
The large stitched star is something I was just messing around with and now I want to find a way to include it in my album. Right now I just have it sitting in a 4x6 pocket.

Another page that's included in Product Play. On this day I'll be documenting something about our everyday life December routines and will add some additional circles and potentially an insert that includes words and photos.

Elliott's tag.

A pocket created to hold some gratitude tags. The full how-to for this page is included in Product Play.

For Day 24 I added in a full page 6x8 page protector and slipped in the cork merry and a "24" black chipboard piece.

Bring on the photos and the stories.

My tag.

Another one of the large gold foil tags added in here on Christmas day. I can't wait to add a photo or words to the back of that tag.

And for now I've just slipped in the 4x6 Merry Christmas card from the Main Kit. I'm just keeping additional page protectors in the back right now and will pull them out if I need them and remove them in the end.
VIDEO OVERVIEWI'll be back with daily posts starting on December 1st as I document my days.
SUPPLIESDecember Daily® 6x8 Layered Templates No. 4December Daily® Star PackDecember Daily® Large Number Sticker Sheet - Set Of 26-Hole PunchHeart PunchEmbossing Supplies: Embossing Ink, Embossing Powders, Heat GunDecember Daily® Weekly December Stamp SetPower Punch (single hole punch)December Daily® 2017 Main Kit // Digital version available here. December Daily® Chipboard BundleDecember Daily® Digital 2017 Transparency PackVellumSilhouette Cameo


