
Heather Solos's Blog, page 68
January 22, 2012
Why Should We Wash Our Sheets Regularly
Dear Home-Ec 101,
Could you please explain to my 14 year old daughter why it's important to wash sheets regularly?
Signed,
Skeeved in Skokie
 Heather says:
Absolutely, I'll even do it in video so she doesn't have to take the time to read, just stick it in her YouTube queue.
Here's what it comes down to. Human beings are nasty creatures, we shed skin cells, sweat, and drool. When you're in bed, you're doing all of those things in one place for eight hours or so, creating a dust mite buffet. All things that eat also excrete, so you can choose to wash your sheets regularly or hang out with your new eight legged friends and their waste.
Changing your pillow case regularly can also help clear up acne as you'll no longer be wallowing in the oil and bacteria you left behind the night before. Just make sure to use white pillow cases if you're using any topical acne medication. Many acne medications bleach fabric dyes, it's much less noticeable if you use a white case.
Good luck, hope this helps your daughter see the light.
Click here to leave a comment on Why Should We Wash Our Sheets Regularly . We'd love to hear your say.This is a post from: Home-Ec101 ©Home-Ec 101.com 2007 - 2011


January 21, 2012
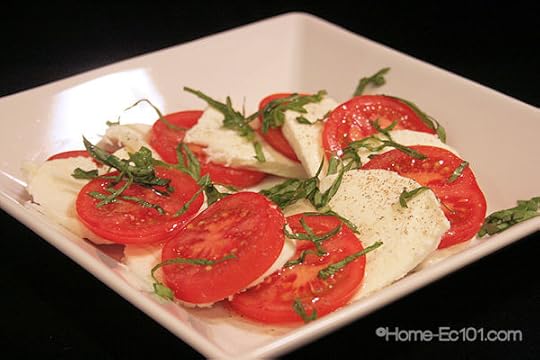
Caprese or Sliced Tomato & Mozzarella Salad
Heather says:
Sometimes recipes are so basic, so simple, so easy, that I forget to include them here on Home Ec 101. Insalata caprese is one such recipe. This recipe shines in the summer, when tomatoes are at their peak, but sometimes it just beckons in the depth of winter. If it's not tomato season, spend extra on the premium, locally grown, hothouse tomatoes. If you live where those aren't available, just hang on, the tomatoes have to shine or it's wasted money.
Insalata caprese is a perfect dish to bring to someone's house, especially if they are having an Italian meal. It's also great for summer potlucks or hors d'oeuvres. Concerned that you don't know how to chiffonade basil? Don't worry it's just a fancy word, even the newest cook can handle it and Bobbie wrote a tutorial on basil chiffonade.
Enjoy!
: Simple, Sliced Salad
Tomatoes, slicedFresh Mozzarella, slicedFresh Basil, cut into chiffonadeOlive OilSalt to tasteFresh ground pepper* to tasteOptional** Balsamic VinegarInsalata Caprese DirectionsAlternate tomato slices and mozzarella to fill the serving plate.Sprinkle with the basil chiffonade.Salt, pepper, and drizzle with olive oil.Drizzle with balsamic vinegar if desired.*do not reach for that pre-ground stuff, I'll smack your hand
**balsamic vinegar is not optional in my world.
Preparation time: 5 minute(s)
Cooking time: 0 minutes
Diet type: Vegetarian
Diet tags: Gluten free
Culinary tradition: Italian
Pin ItClick here to leave a comment on Caprese or Sliced Tomato & Mozzarella Salad . We'd love to hear your say.This is a post from: Home-Ec101 ©Home-Ec 101.com 2007 - 2011


January 20, 2012
Winter Foods, A Friday Free for All
Heather says:
We haven't done a Friday Free for All in a few months and it's January 20th, winter is in full swing -in most of the country, we've been pretty lucky here. When the weather is miserable it's time to break out your favorite comfort food recipes.
Yesterday I picked up all of the ingredients to make a double batch of my lasagna recipe, which we'll have tonight along with caprese. Hush about the season, a friend of mine runs a hydroponic farm. I just need to swing by and pick them up. If I have any sauce leftover I'll freeze it, as it's pretty close to my spaghetti sauce recipe and works quite well.
So on the comfort food track, later this week I plan on making stewed chicken, leek and potato soup, and maybe creamy chicken and wild rice soup. Of course there's the chance I'll decide it's finally time to get around to sharing a recipe for tortilla soup or I'll maybe I'll bring back one of our favorites taco soup.
Currently my inbox is loaded with legume recipes from frequent commenter deneicer1 and I'll be adding those to the site as time and energy permit.
This year I also hope to add a few more recipes for winter vegetables and I will happily take on requests as a cooking challenge. (Sometimes I need a kick in the pants, too.)
Since it's a free for all Friday, I'd love to hear what's on your mind, just keep it family friendly. Can't think of anything specific? How about follow my lead and share a link to your favorite winter comfort food.
Happy Friday.
Click here to leave a comment on Winter Foods, A Friday Free for All . We'd love to hear your say.This is a post from: Home-Ec101 ©Home-Ec 101.com 2007 - 2011


January 19, 2012
The Dangerous Comparison Game
From a recent comment here on Home-Ec 101,
I have one child that lives at home and a teenager that moves in and moves out lol, and also another child that is with me every other weekend. When I get my house clean, it stays that way for a couple of days then it's dirty again. I am also a single stay-at-home-mom and I homeschool my youngest child.
How can I organize the chaos?
Sometimes I seem to have it together and there are times I want to pull my hair out!
I see so many moms that always look like their house is clean, and their make up is fresh, but not me! I'm the one you see in the store with my hair just tied up in a messy knot, and if you come to my home I have to move something so that you can sit down. lol
ANY ADVICE ?????
Signed,
Frustrated
Heather says:
The first thing to do is STOP comparing yourself to other people.
You are only seeing the face they want you to see. They aren't inviting you over when their house is a wreck, you aren't seeing them when they first tumble out of bed in the morning, and you certainly aren't seeing them when their kids have the flu and they've been under a deadline and and and and.
You cannot compare your life where you see every moment, good or bad, with someone else's best foot forward.
It's not a fair comparison and if you convince yourself it is, you will never measure up to your own expectations and you will be miserable.
To be perfectly honest, I stress myself out all the time with this stuff, because I have put myself out there as a resource on this subject. I feel as though my house has to be company ready at any moment. This also makes me feel like a hypocrite at times. It's all just that internal critic having a field day.
People are more concerned about themselves than they are about you.
I know this on the rational level, I'm still working on convincing that little voice to take a hike. Does it make you feel a little better to know you aren't the only one?
I also have to say this. I am not a licensed therapist nor am I a doctor; if you constantly feel overwhelmed, you NEED to talk to a licensed professional about your feelings.
Still convinced you're alone? Read this post: Feeling Desperate
[image error]My friend Angela England and I did a presentation at BlogWorld Expo in October on Professionalism and Productivity and while some of the tools and tips won't apply to your situation, you may pick up a few nuggets and tools that will help you. Ang and I are also both homeschooling parents. And we both fully admit there are times that are rougher than others. If I ever tell you everything is absolutely hunky dory all the time, I'm lying, and I want you to call me on it.
As far as getting your house in order, understand that it's not a sometimes thing, it's a constant process. Once you adjust to the fact that maintaining a home requires constant, low-level upkeep, it will begin to feel a lot less work intensive.
It's easier to quickly wipe down your bathroom every day than it is to give it a thorough scrubbing after the dirt and other nastiness has time to accumulate and adhere to the calcified toothpaste blobs.
As far as actually gaining a little control over the chaotic nature of your life, there are lots of things you can do to bring a little order into your home. Don't attempt to do them all at once.
Finally some specific tools you may find useful:
See that yellow sticky note in the upper right of this post? (click through to the site if you're reading via email) Click it, it'll take you to a weekly chore chart, print it out and start following it.
Alternately, if you want LOTS of email reminders and encouragement, maybe FLYLady is more your style.
Cozi – calendar / organization, it has smart phone apps available
Google Calendar – calendar
SayMmm – meal planning tools You'll find many Home-Ec 101 recipes on SayMmm.com
SavingDinner.com – complete meal plans and grocery lists. I used Leanne's mailer while I was adjusting to life outside the traditional workforce, back in '03 or '04 (long before I started Home-Ec 101) and I'm happy to see she's still going strong.
Home-Eccers, what tools make your life easier? What do you recommend to Frustrated?
Submit your questions to helpme@home-ec101.com.
Click here to leave a comment on The Dangerous Comparison Game . We'd love to hear your say.This is a post from: Home-Ec101 ©Home-Ec 101.com 2007 - 2011


Cooking Homemade Frozen Foods
Dear Home Ec 101,
I'd like to make some thing to keep in our freezer to help us avoid the convenience foods at the hectic dinner hour. Do you have a rule of thumb for what freezes well without losing much quality/texture? What's the best way to thaw and bake things that have been frozen?
Signed,
Chilled in Chi-Town
Heather says:
In the past here on Home-Ec 101 we have talked about how to freeze food. We have also talked about how to thaw food safely, ad nauseum I'm sure, but here we go.
Thaw food in the refrigerator or a water bath. If you are absolutely in a time crunch, use your microwave. Do not thaw food on your kitchen counter. Bacteria multiplies quickly at "room temperature" in fact the entire range from 41°F to 140°F (4°C – 60°C) is known as the danger zone. (Who else now has images of Top Gun zipping through their imagination, raise your hand)
So now that we have safety covered, let's talk about preserving the quality or frozen foods.
It all comes down to texture, surface area, and water content.
The prepared food companies have amazing freezers that can flash freeze much faster than we can at home. Unless you're my friend Aliza who lives in Tok, AK. All she has to do is put it on her back porch (Aliza, I'm not suggesting you actually do this, just noting it's possible). The faster a food goes from cool to frozen the better the quality of the final product, it has to do with how much damage the expanding water molecules can wreak.
If food is supposed to be mushy, do what you want as long as it follows the safety guidelines we have discussed. If it's soupy, stirring gently during the cooking process will speed things up.
If you have a giant pan of lasagna thawing overnight will speed up the cooking process.
Do not cook roasts or turkeys from frozen *unless it has been specifically created for that purpose, I know Butterball has a pre-stuffed turkey that can be cooked from the frozen state* In general, the outside will be overcooked long before the heat can be transferred to the center of the food.
With individual frozen things like homemade chicken fingers / nuggets, egg rolls, lentil patties, calzones, pizza etc go ahead and cook from the frozen state. These items are all small enough that the surface area to volume ratio doesn't matter. In fact most of these may become soggy and unappetizing if allowed to thaw prior to cooking.
Here's the easiest way to decide whether to thaw or cook from frozen:
Take a quick trip to the grocery store and walk down the frozen food aisle. Look for the food you want to make and read the package directions. Whatever they recommend will work for your homemade version.
In general with baked goods (these are doughy products not meaty foods with a coating) I tend to prefer a par-baked product, especially with calzones. I want the dough set but not all the way browned, I let the final run through the oven do the last browning. With pizzas, I find par-baking the crust helps prevent sogginess.
What about you Home-Eccers, how do you handle cooking homemade foods?
Submit your questions to helpme@home-ec101.com.
Click here to leave a comment on Cooking Homemade Frozen Foods . We'd love to hear your say.This is a post from: Home-Ec101 ©Home-Ec 101.com 2007 - 2011


January 17, 2012
Light Bulb Socket Lubricant?
Dear Home-Ec 101,
Why does Tim say "Do not attempt to lubricate either the socket or the bulb with any household products like WD-40, petroleum jelly, or mineral oil?" in the post How to Remove a Broken Light Bulb?
I have done that before with no problems.
Thanks,
I like my sockets slick
Heather says:
There are several reasons to not use most household products to lubricate the light bulb socket or the threads of a light bulb.
1. If the lubricant chosen is a conductor and gets on the contact you could cause a short.
2. Petroleum jelly is dielectric and acts as an insulator. If you get any of the petroleum jelly on the contact it can cause the bulb not to function.
3. Lubricants can trap dirt in the threads causing another stuck light bulb.
4. Some lubricants will dry over time and either corrode or create a "glue" making the bulb difficult to remove. The heat from the socket can also increase the viscosity of the lube to the point of tackiness and I'm not talking about mixing plaids and stripes.
There are specific lubricants available, but these are not run of the mill household products. The lubricants for electrical applications are generally for instances such as outdoor signage where light bulbs would be exposed to the elements and vibration, situations that make corrosion and sticking more likely.
Simply wiping the light bulb and socket before insertion, in general, is enough to prevent a light bulb from sticking in the socket.
Since most standard lightbulb bases are aluminum, and being such are covered in aluminum oxide which is stable and unlikely to corrode.* That being said, it's still possible to have a bit of corrosion in present in a socket, usually in outdoor situations, leading to problems inserting or removing a bulb. Turn off the power to the light fixture, preferably at the breaker. Use a wire (bronze) brush to clean up the socket or you could also use a Scotchbright pad.
Let me emphasize this point: Do NOT clean a light socket without first turning off the power.
*Now if you want to get picky and technical and I know some of you do. Yes, aluminum oxide IS corrosion, however it forms almost instantly and creates a non-reactive, protective barrier insulating the rest of the aluminum from further contact with oxygen which would cause more corrosion. Carry on.
For the TL/DR crowd: There are very few reasons to lubricate your light sockets and plenty of reasons not to.
Now all of you should be quite proud of me, I made it through four hundred words without any off-color jokes about sockets and lube.
Or not.
Submit your questions to helpme@home-ec101.com.
Click here to leave a comment on Light Bulb Socket Lubricant? . We'd love to hear your say.This is a post from: Home-Ec101 ©Home-Ec 101.com 2007 - 2011


January 16, 2012
Teachable Moment: Copyright
*UPDATE* 1:08PM Eastern 1/16/2012 The offending site is being altered. This is all I wanted.
If you are dealing with content issues please read the site I reference below for how to handle what you're specifically dealing with.
Heather says:
Over the weekend I received quite a nasty surprise. There is a woman in Ocala, FL copying the premise of Home-Ec101.com. I have filed a DMCA takedown, been in contact with my publisher, and the next step, if she does not comply within 72 hours, is to contact her hosting provider. (If you ever have questions about how to handle content theft, copyright infringement, and plagiarism, PlagiarismToday is my favorite resource).
Over the past few years I've dealt with a few issues of copyright violation. It's part and parcel of working on the Internet where many people assume there is no copyright and that all content and ideas published on this medium are fair game. This is simply not true.
All of the work here on Home-Ec101.com is original and the rights belong to me or in some cases, my writers.
Point of clarification regarding copyright and recipes.
Recipes are sort of touchy. You cannot copyright a list of ingredients and basic instructions. Original narrative is copyrightable, as are pictures and collections of recipes. When I find someone has re-published one of my recipes with my pictures and narrative I generally politely contact them and ask for the work to be altered, removed, or properly credited.
I also don't mind if someone is inspired by my work. I do not own the concept of education in the home economics field. It's perfectly ok to start another website on this topic. I have contacted people in the past to let them know, it may be difficult to brand their work with the name Home-Ec 101, since I've been using it, in this context since 2007, and as a traditionally published work since March of 2011.
My personal opinion on image use:
If someone has done something called "hotlinking" I will occasionally replace the original picture with a very tacky image that says this content has been stolen from Home-Ec101.com. Serving images is not free; please, host them yourselves.
I also, and this is my personal opinion others' may differ, don't mind if someone uses one of my pictures in a post publicizing my work. Meaning, if you liked a recipe and want to tell your readers about my recipe, I don't mind one bit if you use my picture to say "Hey, I made this, check out Home Ec 101 for the recipe." This is also how Pinterest works. I love that so many of you like the pictures and help spread Home Ec 101 around the web. Pinterest helps me learn what people really like on this site.
There are thousands of homemaking websites out there; I love the writers who want to help adults better themselves in this field. We each differ in how we present the same knowledge. There are only so many ways to describe scrubbing a toilet; about this I have no illusions. What makes us unique are our voices.
Here's why I felt compelled to write about copyright.
Adding one word to Home Ec 101 Skills for Everyday Living is not creating a unique brand or voice.
Advertising Home Ec 101 classes on a tacky site based on my concept? That's even worse.
I can't decide what I'm angrier about; the blatant copying or the fact that she cheapened the Home Ec 101 brand and made it look tacky. Here's a screenshot, so you don't have to visit modernhomeec101.com.
[image error]Click for full-size
This is not the case of a new blogger not knowing any better. This is someone who is attempting to make money off of my years of work. Additionally, there will be people out there who may assume that this concept has my approval.
This is also an opportunity for me to help those considering blogging as a hobby or job, develop a deeper understanding of copyright.
If you want to teach home economic / life skills courses in your area, by all means go ahead. Kudos to you for having the drive and initiative to do the work. Just take the time to come up with your own branding and voice.
Thank you,
Heather Solos
Founder of Home-Ec101.com and author of Home Ec 101 Skills for Everyday Living.
Click here to leave a comment on Teachable Moment: Copyright . We'd love to hear your say.This is a post from: Home-Ec101 ©Home-Ec 101.com 2007 - 2011


January 13, 2012
How to Use Acetone to Remove Grease Stains
Dear Home-Ec 101,
I read in your book about using acetone to remove grease or oil stains from clothes, but it just mentions it in a list of items one might use. Can you please elaborate on this? I am forever ruining knit shirts with food stains, as is my son (although, in his case he can still wear them. I think teaching with a big oil spot on my blouse looks pretty hideous.) Oftentimes I don't realize it until after I've washed and dried them, so the cornstarch idea seems irrelevant at that point. Would you put acetone right on the fabric or is there a special way to do this?
Signed,
Greasy in Great Lakes
Heather says:
Remember the Home-Ec 101 Code of Stain Removal – Always test in an inconspicuous area.
Acetone is a solvent and is excellent for getting out grease stains on some colorfast fabrics. However you must never use acetone on modacrylic, acetate or triacetate. Acetone will dissolve these materials, sure you won't have a stain, but you won't have much of a garment left, either. Use caution when using acetone on silk, wool, and other natural hair fibers as these can be damaged by the solvent.
Please keep in mind that acetone is flammable. I know we all need a little more romance in our lives, but save the candle-lit stain removal session for another time. Acetone can also be an irritant, so keep it out of your eyes and don't stand around huffing the fumes.
If the stain is just oil, you may be able to remove the stain with acetone. Unlike protein stains whose structure changes after heating, oily stains can occasionally be removed by bringing them into solution and convincing that solution to take a hike. How do we move that grease stain along?
It's easy.
Grab an absorbent rag, acetone, and your stained garment. Now find a well-ventilated area. Fold your rag to create a thick pad and place it on your work surface. Turn your garment inside out* and place the stained area over the absorbent pad. Drizzle the acetone over the stained area. You may need to do this several times as the oil has worked itself deep into the fibers. You may not be able to remove all of the oil stain, but you should notice an improvement.
Follow up your efforts with normal laundering.
Where do you find acetone to use for stain removal?
Acetone is often sold as nail polish remover and can be found in the health and beauty aisle of most stores, just be sure you get straight up, plain acetone. you don't want to get anything with conditioners or other ingredients that could leave a new stain. Need to know what you're looking for? Here's an example of acetone nail polish remover from Amazon.
We're just trying to solve our problem, not create new ones.
*Unless of course you were wearing the shirt inside-out, then by all means turn it right side out. The key is to work from the reverse side of where the staining occurred.
Send your household questions to helpme@home-ec101.com.
Click here to leave a comment on How to Use Acetone to Remove Grease Stains . We'd love to hear your say.This is a post from: Home-Ec101 ©Home-Ec 101.com 2007 - 2011


January 12, 2012
The misunderstood herb: How to use Bay Leaves
Dear Home Ec 101:
A friend told me that bay leaves are poisonous, and that's why you remove them before serving. Isn't it kind of…insane to cook with a poison plant?
Signed,
Is it safe?
 Bobbie says:
You know, that never made sense to me, either. My reasoning was "If it's true, the poison gets into the food during the cooking process, so the removal of the leaf a moot point. And if it's not true – why are we supposed to remove it?" So, I finally looked into it, because I wanted to feel comfortable using them. And not die much.
Without getting into the technical terms I came across in my research (sesquiterpene lactone, anyone?) let me assure you that the bay leaves sold for cooking are not poisonous, and are perfectly fine to cook with. The herb commonly referred to as "bay leaf" comes from an evergreen shrub or tree (depending on where it's grown) called bay laurel, also known as Laurus nobilis or sweet bay, and its leaves are non-toxic in reasonable quantities.
The confusion regarding whether or not bay leaves poisonous may come, in part, from the fact that other laurels are toxic, and the leaves look similar. If you aren't 100000% certain the tree you want to pick a leaf from to toss into your stew is the right kind, then DON'T. Just stick with bay leaves sold for cooking and you'll be fine.
Did you notice I said "reasonable quantities"? Too much of a good thing can be bad, and that includes bay leaves. Don't worry though — in order to get a toxic effect from bay leaves, you'd need to eat at least several quarts of packed leaves. Who, in their right mind, is going to do that? (Of course, some people are allergic to certain plants, and should avoid them. That doesn't mean they're poisonous. My dad was allergic to basil. Very sad.)
But why should I "remove bay leaf" before serving?
Those leaves are tough!
Even all-day simmering in a soup or stew does not disintegrate or them. They'll be leathery at best, and the edges can be a little sharp. Besides being downright unpleasant, a bay leaf can scratch your throat, stomach or intestines. In my research I found mentions in a medical journal of individuals who had inadvertently swallowed a whole bay leaf, which then became lodged in their digestive tract, causing extreme pain. The leaves had to be surgically removed. So…keep the leaves WHOLE when adding to the pot, and when removing, count to make sure you've gotten them all.
Do bay leaves really make a difference?
Yes. Next question.
Just kidding. Yesterday, I mentioned to a friend that I was going to write about bay leaves. She said she never understood the point of them, since the recipes always say to take them out anyway, so she's always omitted them. As we talked, I tried to convey what she was missing, and by the time we parted ways, she was excited that I am going to bring her some of my stash when next we meet.
When I was newly married and teaching myself to cook things that didn't require mixes, any attempt at making beef stew came out wrong. Not that it was horrible, but it didn't taste like mom's stew, which was simply the best I'd ever had. Same with vegetable soup, and pot roasts. They even smelled wrong when they were cooking. After talking with her, I figured out that what I'd been missing was the bay leaf. Like my friend, I'd dismissed them as not that big a deal, not realizing that they were the very thing that made the aroma of mom's vegetable soup so comforting.
Yes, comforting. Relaxing. Soothing. I've even simmered a few bay leaves in a pot of water simply for the aroma. (Weird? Yeah, okay. I already know.) Give me that savory fragrance over a sweet, cloying candle or air freshener any day. But, as much as I love them the words to describe the flavor bay leaves bring to a dish are elusive. It's nothing overt. Subtle. Woodsy comes to mind. Slightly bitter. Pungent?
As the French say, it has a certain je ne sais quoi.* (Because they don't know, either.)
Okay, fine….. so, what can I do with 'em?
Oh, tons…here's a few ideas to get you started. Even if your recipe doesn't call for bay leaves, you can use them in:
Roast beast. Try pot roast Here's my standard method for beef or pork roasts: add 2 or 3 bay leaves (depending on size of roast), a few peppercorns, garlic, and onion. Then I add about ¼ cup of either white wine vinegar or the liquid from a jar of pepperoncini if I have some. Cook all day on low. Make a roux to thicken the juices that cook out to make gravy that will stun the diners. (Not like a phaser. A good stun.)
Stews of any kind: beef, pork, poultry, or vegetarian. Add at the beginning of cooking and let the long simmer add a depth to your favorite recipe.
Braising. Any meat that is cooked in liquid is fair game. Like Heather's Beef Short Ribs. Or Chicken Bog. Oh, you MUST make this Wine Braised Pot Roast.
Stocks and soups. Add bay leaf when making stock. Bay leaf does wonders for anything tomato-based, including spaghetti sauce and chili. They're in my pea soup recipe, which you've already tried, right?
Baked potatoes: cut scrubbed potato in half, put a bay leaf between the halves, reassemble and wrap in foil, then bake. The flavor permeates the potato flesh as it bakes. (Remove leaf, add butter or olive oil, salt, pepper as desired)
Making mashed potatoes? Add a leaf to the boiling water. Remove before mashing.
Add to any bean or lentil dish. Red beans and rice. Baked beans. Or add a couple leaves to the water when cooking dried beans.
Make pickled peppers, which are delicious on a roast beef sandwich, or served alongside pork or beef roast. These are a fresh pickle, not preserved. Pack sliced green peppers in a sterilized pint jar, along with 2 or 3 cloves of garlic (cut in half), 2 bay leaves, and ½ teaspoon salt. Fill jar with equal parts of boiling water and vinegar. Seal and let cool, then refrigerate at least overnight before using. Store in refrigerator up to 2 weeks.
Quick Beef and Cabbage skillet – cheap, simple, quick and tasty: brown ½ pound ground beef and 1 medium onion, chopped. Stir in 1 pound of cabbage (washed and thinly sliced) a couple shredded carrots, ½ teaspoon salt, ¼ teaspoon pepper and 1 bay leaf. Cover and cook over low heat until cabbage is cooked. Remove bay leaf and serve with crusty bread. (Simple food, but I could eat this at least once a week.)
Did you know Old Bay Seasoning contains ground bay leaves? (I can't stand the stuff, but I know some people who would still eat it even if it bay leaves were toxic.)
Do you have a favorite way to use bay leaves?
*translates to: "I don't know what"
Points to anyone who caught my movie reference and can name the actor who said the line. You win the internet.
__________
Bobbie Laughman is an elder caregiver, writer and introvert who is bad at small talk, but occasionally gets on a soapbox about one thing or another, and feels embarassed about it when she comes to her senses. Contact her with questions or feedback at Bobbie@home-ec101.com
Click here to leave a comment on The misunderstood herb: How to use Bay Leaves . We'd love to hear your say.This is a post from: Home-Ec101 ©Home-Ec 101.com 2007 - 2011


January 11, 2012
Honing v. Sharpening
 Bran says:
Honing your blade is one of the main aspects of good knife care. But it often gets confused with sharpening, even though they're not the same thing.
To break it down to first principles, sharpening is taking away material, and honing isn't. Instead, honing is straightening out the edge of an already-sharp blade.
That's it. That's the difference.
Never mind that some people call the stick-with-a-handle stuck in your knife block a "sharpening steel". Some others call it a "honing steel", and that's far more on-the-mark. Mind you, it's also a "honing steel" if it's made from ceramic, but we'll get back to that later.
One of these things is not like the other.
As I said, to sharpen a blade you take away material, often by grinding. Some chefs say you should send your knives out to be sharpened by a pro, and Heather talks about how to sharpen your knives here if you don't want to send them out, but whichever way you slice it (I'm so sorry) sharpening only needs to be done every 6-12 months, depending on use and your knife.
Honing, on the other hand… People smarter than I suggest that you hone your knife each time you take it out to use it. Hone, wash, use. Why?
When you use a knife, the edge will eventually be knocked microscopically to the side, curled over, out of alignment. Out of "true". That nice straight edge you had when it was freshly-sharpened isn't so straight anymore, and that will reduce its effectiveness as a cutting implement, and will cause your blade to become dull quicker.
Honing isn't sharpening, remember, so you're not removing material. What you are doing is pushing that edge true again, back into alignment, so when you cut you're using the nice sharp edge instead of the wibbly-wobbly, curled-over travesty you might have been using before.
Why should I bother?
A sharp knife is a safe knife, because accidents happen when you have to push so much harder to get the knife through the food. You push hard, something slips, and there's blood.
Even a nicely-sharp cheap blade is better than an expensive blade that's dull. If you like the way your $25 IKEA full-tang knife feels in your hand, keep it sharp and honed and use it. Save your money and use it to replace that glass cutting board that's ruining your blade. (Or you could use it to pay bills. Whatever shakes your boat.) The benefit to a high-quality knife is in the steel it's made from—good quality material will stay sharp longer. But it still needs to be honed.
So what am I doing, here?
Honing is super-easy, and safer than the crazy chefs on television make it look. Forget about waving steel in the air like an extra in a 1970s Kung Fu film. Think safe, sane, controllable.
Place the tip of the honing steel on your countertop and hold it vertically. Grasp your knife comfortably in your hand, the way you do when you're cutting something, and slowly draw the knife down the steel from heel of blade to tip, in one, smooth, movement, angling the blade toward the steel at about a 20-degree angle.
(If you don't want to pull out your protractor, just get a sheet of paper with a 90-degree corner, like a sheet from your printer. Fold it in half, to make a 45-degree angle, then fold that again. Now you have a 22.5-degree angle, which should give you an idea of the angle at which you should be honing your blades. If you don't want to be too fussed, just pretend you're cutting off a wee thin slice of your honing steel, and you should be close to the correct angle.)
Do that about five times on one side, five times on the reverse side, then twice on each side again. Don't push—just let gravity do the work for you. There. You should have a nice, honed, edge. Easy-peasy.
Now wipe down your steel and wash any metal grit off your knife, and you're good to go.
What if I don't have a honing steel?
If you've purchased your knives piecemeal, or if you inherited your knife set from Great Aunt Goodwill, you might not have a honing steel. That's not a problem. Amazon has a selection for you, ranging from the less-expensive steel or ceramic ones to those coated in diamond grit. Choose a steel that at the very least matches the quality of your knife, and is as long as (or longer than) your longest knife. Some chefs recommend good quality diamond grit steels from reputable companies, saying that they are worth the price because, being of such hard material, they may take off a little bit of material and so sharpen slightly as well as hone. If you're going to go with one of those, be absolutely sure you're honing at the right angle or you could ruin your knife's edge. Ceramic steels are becoming more popular as well, but remember that ceramic steels can't be used to hone ceramic blades. And if I were you, when choosing a steel I'd weigh price and material over the customer reviews; most of them seem to need to read this blog post to learn the difference between sharpening and honing.
Click here to leave a comment on Honing v. Sharpening . We'd love to hear your say.This is a post from: Home-Ec101 ©Home-Ec 101.com 2007 - 2011


Heather Solos's Blog

- Heather Solos's profile
- 12 followers


![[image error]](http://static.home-ec101.com/wp-content/uploads/2012/01/blogworld-expo-heather-angela-speaking.jpg)
![[image error]](http://static.home-ec101.com/wp-content/uploads/2012/01/honing-vs-sharpening.png)