
Heather Solos's Blog, page 67
February 2, 2012
How to Clean a Very Dirty Toilet
Dear Home Ec 101,
How do I clean a really gross toilet? It has all that yellow and brown crud inside that just won't come off. I heard that pumice stones scratch the porcelain and only make it worse.
Please HELP!
Signed,
Skeeved in Skaneateles
 Heather says
Since people searching for how to clean a really dirty toilet may have a completely different type of dirt or filth in their heads, I'm going to give you the lowdown on cleaning a grimy toilet top to bottom, even though I know Skeeved is mainly interested in removing mineral deposits from the bowl. It's also possible that the yellow brown build-up inside the bowl is actually urine scale from *ahem* splashing. Either way the remedy is the same.
Pumice stones do work, but since they have the potential to scratch vitreous china (the finish of your bowl) it is a LAST resort and not your first choice for cleaning, even serious mineral build-up.
Since Skeeved is having serious problems with mineral build-up in the bowl of the toilet, I am going to suggest a stronger acid than my usual household cleaner white vinegar. Go ahead and buy actual toilet bowl cleaner. If you purchase toilet bowl cleaner from the store, read the label very carefully to ensure the active ingredient is an acid. Chemistry is our friend when cleaning house, but unintentional reactions are no fun and can be deadly.
Longtime readers of this site know I often recommend dilute white vinegar for cleaning, but over the years I'm finding I'm relaxing my stance on that. In the past 5 years, more and more environmentally acceptable cleaners are becoming more readily available. If I have some on hand, great, if not just mix up vinegar and water in a 50:50 ratio for general cleaning.
Chlorine bleach is great for disinfecting, but will do NOTHING to help with mineral deposits. Since we are using acid based cleaners to clean the toilet, bleach shouldn't even be in the same room. You do NOT want to mix chlorine bleach and acidic cleaners.
So let's get started with cleaning a very dirty toilet.
Gather:
a toilet scrub brushgloves (recommended)acid based toilet bowl cleaner (Method. toilet cleaner uses lactic acid)a bucket of watera spray bottle of dilute vinegar or your favorite all purpose cleaner*paper towels or rags – I use paper towels for toilet cleaning, it's a personal choice, reallydistracting music*If you use all purpose cleaner, this is VERY important, only spray the toilet with the lid closed
Empty a bucket of water into the toilet bowl to trigger flushing without refilling the bowl. What we're doing is allowing the acid that we're going to use to work on the stains without dilution. If you are using the kind of toilet cleaner that you squirt up under the rim do so with a generous application. Use the scrub brush to spread the cleaning agent evenly all over the inside of the toilet bowl, you are NOT scrubbing at this point, just applying. Try not to dip down into the water in the bottom of the bowl and then add a little extra squirt to the water in the bottom.
Now close the lid to the toilet and set aside the brush for the moment. We are going to give that cleaner time to work thirty minutes or so.
Spray your cleaner of choice onto your rag or paper towel. Now work from the top of the tank down. Wipe down the top of the toilet tank, the handle, and then the front and sides of the tank. Then wipe the top of the lid, the under side of the lid, the top of the seat, and scrub the heck out of the under-side of the seat.
I generally have to switch to fresh paper towels or rinse and reapply cleaner to a rag at this point.
Now wipe the rim of the toilet and under the hinge of the seat and that aggravating place between the seat and the tank where hair just loves to collect. Ugh.
Now wipe down the sides of the bowl and don't forget the little ledges where the bolts attach to the flooring. At this point I generally give the flooring around the bowl a spray of cleaner and wipe it down, too.
Now clean something else in the bathroom. How about the sink or mirrors? How is your tub looking? Exactly. Just give that toilet bowl cleaner some time to work. If you leave the bathroom, be sure to let other household members know that there are chemicals in the toilet and to not use it.
Whenever you are ready -twenty, thirty minutes later. Revisit that toilet and scrub it with the brush. Don't forget to get that area up under the rim.
Finally, flush the toilet, allow the bowl to fill, and step back and admire your handiwork.
If you still see mineral deposits, repeat the acid treatment one more time. (Remember you only need to repeat the steps pertaining to the inside of the bowl) If the stains still remain, it may be time to give in and use a pumice stone.
Have, umm, fun?
Submit your questions to helpme@home-ec101.com
Click here to leave a comment on How to Clean a Very Dirty Toilet . We'd love to hear your say.This is a post from: Home-Ec101 ©Home-Ec 101.com 2007 - 2011


February 1, 2012
How to Clean Yellowed, Vintage Linens
Dear Home Ec 101,
I have some vintage linens that are a bit stained from time. . . I'm talking things like hankies, towels, fabrics, etc that are yellowed with age. I inherited them from my grandmother (and various other relatives). I'd like to clean them up, but not knowing what kind of fabric they are (although I suspect most are cotton, linen, or a cotton blend) or what has caused the yellow/brownish tint to them, I don't know what to use. I don't want to ruin them (obviously). I'd really appreciate some help.
Maybe we could start the help with my excessive use of parenthesis. 
Signed,
Yellow in Yuma
Heather says:
Your plan of attack with stain removal on vintage linens will depend highly on just how attached to the items you feel and whether or not these items will be relegated to everyday use or simply kept on display or for sentimental reasons. I also invite Home Eccers with more experience in handling delicate textiles to chime in.
Your stain removal methods will also depend highly on the actual age of the garment. I don't know your age, so the age of your grandmother's linens could vary quite widely. The suggestions below assume that the linens are cotton or linen, not silk or wool.
If you plan on bringing the towels into general use, an overnight soak in a sodium percarbonate solution may help get rid of the yellowing. Typically Oxiclean is the most familiar brand of sodium percarbonate. Your bathtub or a storage tote (without holes in the bottom, check first, ask me why I suggest that step) can work for soaking, if you struggle with soaking in a front load washer.
You can also try Oxiclean on the hankies and items like pillowcases, but I would recommend a more gentle approach, first.
Many people who work with fabrics from the 50s recommend Biz, an enzymatic laundry booster.
Still others recommend soaking in a Borax with Woolite or a very gentle detergent like Dreft.
And finally there is a detergent specifically sold for this purpose called Restoration – I have NO experience with this product, so I cannot vouch for its effectiveness, but I have seen it recommended here and there over the years.
Do NOT hang vintage fabrics in sunlight to remove yellowing. This is apparently a major no-no in the fabric restoration field as it can make yellowing worse in older fabrics and can significantly damage the fibers.
Whatever tactic you try, remember that rinsing is probably the most important stage of dealing with vintage fabrics. You want to be sure not to leave any residue behind which could further damage the fabric.
For your most delicate items, hand washing is the rule, do not spin the items. Place the item flat on an absorbent towel and gently roll up the towel to absorb as much water as possible and then hang dry. Press the items before they are fully dry. If there is any lace and the item is extremely sentimental, I suggest consulting a professional.
If you want more information on handling vintage fabrics the Smithsonian Institute has some great tips for handling antique textiles. (Although I suspect your items are more likely from mid-20th century, right?) The article is very interesting and you can learn some great techniques.
And don't ask about to quit parenthetical abuse, I'm just as guilty.
Send your questions to helpme@home-ec101.com
Click here to leave a comment on How to Clean Yellowed, Vintage Linens . We'd love to hear your say.This is a post from: Home-Ec101 ©Home-Ec 101.com 2007 - 2011


January 31, 2012
What Causes Spots on Clothing?
Dear Home-Ec 101,
I saw your email reply to someone who was asking about why they were getting grease like stains on their clothing after washing them. Your reply said it was from liquid fabric softner. The problem is I don't use fabric softner and I get these grease like spots on my clothing quite regularly. I cannot tell you how many shirts have been ruined from these spots. I try to get them out by putting stain removers on them and nothing helps so once again I end up tossing out another shirt. It's very frustrating. Is there any suggestions you have for me? I do use liquid laundry detergent could this be the problem? If so then how do I prevent it from happening? Should I all together quit using liquid detergent? I appreciate your help!
Signed,
Spotted in Spokane
Heather says:
Let me set a scene for you. I'm at a social event -rare enough occurrence for me, but that's another story- and naturally the topic of "What do you do?" comes up.
I explain that I run a website called Home Ec 101 which teaches life skills to adults. Typically there's a slight head tilt and a quizzical look. I generally elaborate that it's sort of an advice column that focuses on food and household problems.
"Like Dear Abby for domestic stuff"
"Exactly that"
At this point people almost always decide that it's time to play grill Heather on bizarre stain situations. Actual example, "Three months ago my kid ate hot dogs and red kool aid and then threw up on my rug. I can't get the stain out, what do I do?" I stood there, drink in hand and blinked slowly, complete with the slight head tilt and quizzical look. Was I really being asked about kid vomit at a party? I decided it's a hazard of the job (I have a friend who is a comedian and people ask him to "be funny" at social events, so I guess I get it).
Possible answers for that one include: Try an enzyme cleaner, rearrange the furniture, replace the carpeting. (Kool-Aid is notoriously evil at staining and stomach acid can bleach some carpeting, so the stain may very well be permanent)
Solving stain issues is a little like playing detective. In today's reader question, the reader had done some research, trying to figure out why clear stains were showing up on her clothing. She had found my post on how sometimes fabric softener can leave spots on clothing, but she didn't use fabric softener.
In medicine there is a phrase "Don't look for zebras when you hear hoof beats" it implies that the most common reason is probably the cause of a symptom.
While fabric softener can cause clear stains on clothing, clear stains on clothing are generally caused by oil or grease.
How do you determine what caused the stain?
Just like in real estate it's all: Location Location Location!
Spotted and I exchanged several emails and I finally concluded that the stains were isolated to the front of shirts and the lap area of pants.
Unless zebras are loose in the washing machine, these stains are occurring from grease drips and splatters through normal life. A drip here, a spatter there, grease stains occur over time and because they are clear, it's really hard to notice them until after they are set.
So how do you deal with grease stains?
Pre-treating is the best way to handle grease and oil stains.Before loading the washer inspect each item of clothing, look for grease spots and if you find them rub a small amount of liquid detergent directly into the spot and allow it soak in for a little while. Spray stain treatments like Shout Advanced and Charlie's Soap Laundry Pre-Spray both are great for this. Some of you may prefer the gel you rub in. The whole point is to just make sure some detergent is applied directly to the stain.
You may also find it useful to keep something like Shout Wipes or a Tide Stain Pen in your purse or car to treat food stains as they occur.
Wash the garment in the hottest water approved by the manufacturer. (The heat helps make the oil and detergent more water soluble, which helps it wick out of the fabric and into the wash water where it can be rinsed away)
Do not dry the garment until you are sure the grease stain has been completely removed.
If you have an old grease stain, acetone may be used provided it's safe for the material.
Bobbie sent me a quick note to let me know her mother always used Lestoil and that it also works well for old grease stains, too. (Be sure to test the fabric for colorfastness, first, but you knew that, right?)
So the takeaway?
The best way to prevent difficult stains on your clothing is to treat the stains as soon as possible.
Send your questions to helpme@home-ec101.com.
Click here to leave a comment on What Causes Spots on Clothing? . We'd love to hear your say.This is a post from: Home-Ec101 ©Home-Ec 101.com 2007 - 2011


January 28, 2012
Roast Pork Tenderloin with Winter Greens and Caramelized Onions
Heather says:
Here's another recipe from the National Pork Board's Good and Good for You Challenge. This roast pork tenderloin with winter greens and caramelized* onions comes together quickly and would make a great weeknight meal. With a little creativity and the right sides, like this morning's Hasselback potatoes, it'd be good for a healthy, simple company dinner that doesn't have a huge time investment.
[image error]
: Roast Pork Tenderloin with Winter Greens: Recipe courtsey of the National Pork Board
[image error]1 pork tenderloin ~ 1 lb1/4 tsp salt, dividedfresh ground pepper2 cloves garlic, minced4 teaspoons olive oil, divided1 medium onion, thinly sliced.1 lb kale or other winter greens, tough stems removed1/2 cup chicken stock or low-sodium chicken broth1 TBSP red wine vinegar Roast Pork Tenderloin with Winter Greens DirectionsPreheat the oven to 425F.Heat a large, heavy skillet over medium heat. If your skillet is thin, do not heat until after the tenderloin is ready.Line a baking sheet with aluminum foil and rub the pork tenderloin with 1/8th tsp salt, fresh ground pepper, and the minced garlic.Add 2 tsp of olive oil and then the pork to your hot skillet and brown on all sides (3 – 4 minutes).Remove the pork tenderloin from the pan and place it on the baking sheet. Place the baking sheet in the 425F oven and cook until the tenderloin reaches 145F ~ 12 minutes.[image error] Add the onions and remaining 2 tsps of olive oil and the sliced onions to your hot skillet. Cover and cook until the onions soften and just start to brown. Add the kale, chicken stock, and 1/4 teaspoon of salt, and some fresh ground pepper. Cover and cook, stirring occasionally, until the kale is tender, about 5 minutes.
[image error] If after 5 minutes there is lots of liquid in the pan, cook uncovered until most of the liquid has evaporated. Stir in the 1 TBSP red wine vinegar and remove from the heat.When the pork tenderloin reaches 145F, cover loosely with foil and allow to rest for 3 – 5 minutes.Slice the pork tenderloin into medallions and serve with the kale and onions.
Preparation time: 15 minute(s)
Cooking time: 15 minute(s)
Number of servings (yield): 4
Culinary tradition: USA (General)
Calories: 240
Fat: 8 grams
Protein: 29 grams
Enjoy!
*Generally when the term caramelized is used in association with onions it implies a long, slow cook over low heat. The onions in the recipe aren't so much caramelized as cooked.
This post was sponsored by the National Pork Board, I was provided with recipes and compensated for the purchase of ingredients. All opinions are my own.
Click here to leave a comment on Roast Pork Tenderloin with Winter Greens and Caramelized Onions . We'd love to hear your say.This is a post from: Home-Ec101 ©Home-Ec 101.com 2007 - 2011


Hasselback Potatoes
Heather says:
I don't remember when I first stumbled upon the idea of Hasselback Potatoes, I do believe I was wandering around Pinterest. The idea may have come from from PurpleFoodie's Hasselback Potato Post, as the images look familiar, but I can't be sure. Variations on this recipe / technique can also be found on most major recipe sites, but it sounds like Hasselback potatoes derive their name from a restaurant in Sweden. I didn't dig too deeply to trace the tradition, I could totally be perpetuating an Internet myth. Whatever. They are tasty and look fancy enough for guests.
And thanks to @carnellm I'll forever call these Hasselhoff potatoes!
These baked potatoes are a little labor intensive, I'd put them under the heading "great for company, but probably a little fussy for most weeknight meals." This recipe for Hasselback potatoes should serve as a framework rather than something you follow to the letter. You can use Parmesan cheese as I did in the photo, but don't feel limited, try Romano, or skip the cheese altogether. You could place thin slices of garlic between the slices as PurpleFoodie suggested or try sprinkling the potatoes with herbs that complement your main dish. All that's important with this recipe is that you follow the general instructions.
I have more pictures of the process below the recipe. Enjoy!
[image error]
: Hasselback Potatoes4 Yukon Gold Potatoes2 TBSP melted buttersalt / pepper to taste Hasselback Potato DirectionsScrub the potatoes thoroughly.Boil potatoes for 10 – 15 minutes depending on their size.Preheat the oven to 425°F.Carefully slice the potatoes with a sharp knife, but do NOT slice all the way through the bottom. Some people recommend cradling the potato in a large spoon, I just recommend working slowly. I also found a utility knife to be more useful than a chef knife in this case.Arrange the potatoes on a small baking pan or sheet.Brush the potatoes with about half of the melted butter.Bake at 425°F for 35 minutes. Remove from the oven, brush with the remaining butter and sprinkle with cheese, if desired. Bake an additional 15 – 20 minutes until desired browning and crispness is achieved.You can skip the boiling step, but this will increase the baking time by 20 – 25 minutes depending on the size of the potatoes
Preparation time: 20 minute(s)
Cooking time: 55 minute(s)
Diet type: Vegetarian
Diet tags: Gluten free
Number of servings (yield): 4
When potatoes come out of boiling water, they are quite hot. Prepare accordingly.
[image error]
[image error]
Finally, see how they turn this rather plain pork and green dish into something more attractive?
[image error]
Pin It
Click here to leave a comment on Hasselback Potatoes . We'd love to hear your say.This is a post from: Home-Ec101 ©Home-Ec 101.com 2007 - 2011


Baked Pork Egg Rolls
Skip right to the recipe for baked pork eggrolls.
Heather says:
I was recently contacted by the National Pork Board and Publix to see if I was interested in participating in a campaign to help promote the Good and Good for You Challenge. The National Pork Board is asking people to take a pledge to eat healthy throughout 2012. This week the campaign is focusing on pork tenderloin.
What is a pork tenderloin, you ask?
 Just like with beef tenderloin the tenderloin of a pig comes from a muscle along the central spine which is exceptionally tender as it's really only used only for posture rather than exercised through movement. (The more you exercise a muscle, the tougher it gets, the phrase "tough old bird," came about for a reason) It's a lean cut that while tender isn't exactly the most flavorful, your best results will come from cooking this cut with rubs, marinades, or serving with sauces.
I've got two more recipes for pork tenderloin this weekend, so hang tight (Pork tenderloin with winter greens and onions and pork tenderloin sliders with three sauces).
For more ideas follow the National Pork Board on Twitter @allaboutpork.
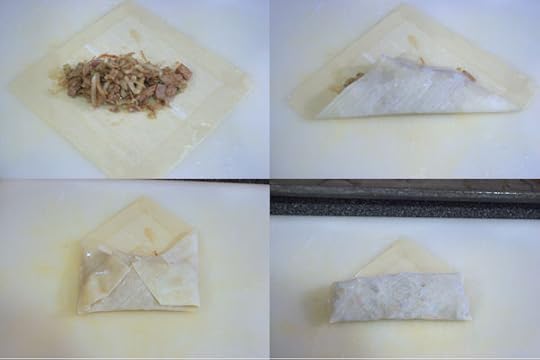
These baked pork egg rolls are not quite as crispy as their deep fried counterparts, but they do not lack flavor and would serve well as an appetizer or hors d'oeuvre.
[image error]Fold the bottom edge of the wrapper toward the top, over the filling. Fold the two side corners in toward the center, you'll have what resembles an envelope. Now roll the egg roll toward the top. Place the finished egg roll seam side down on the baking sheet and cover with a clean, damp kitchen towel. (If you're proficient at rolling covering may not be necessary, it's to prevent the wrappers from drying out)Lightly spray the egg rolls with cooking spray.Bake at 425°F for 8 minutes or until the bottoms are golden brown. Turn the egg rolls over and bake an additional 3 – 8 minutes longer. (I like them more well done, personally)Preparation time: 20 minute(s)
Cooking time: 16 minute(s)
Number of servings (yield): 12
Calories: 100
Fat: 1 gram
Protein: 9 grams
Enjoy!
[image error]
This post was sponsored by the National Pork Board, I was provided with recipes and compensated for the purchase of ingredients. All opinions are my own.
Pin ItClick here to leave a comment on Baked Pork Egg Rolls . We'd love to hear your say.This is a post from: Home-Ec101 ©Home-Ec 101.com 2007 - 2011


January 27, 2012
Baked Pork Egg Rolls a Recipe from the Pork Board
Skip right to the recipe for baked pork eggrolls.
Heather says:
I was recently contacted by the National Pork Board and Publix to see if I was interested in participating in a campaign to help promote the Good and Good for You Challenge. The National Pork Board is asking people to take a pledge to eat healthy throughout 2012. This week the campaign is focusing on pork tenderloin.
What is a pork tenderloin, you ask?
Just like with beef tenderloin the tenderloin of a pig comes from a muscle along the central spine which is exceptionally tender as it's really only used only for posture rather than exercised through movement. (The more you exercise a muscle, the tougher it gets, the phrase "tough old bird," came about for a reason) It's a lean cut that while tender isn't exactly the most flavorful, your best results will come from cooking this cut with rubs, marinades, or serving with sauces.
I've got two more recipes for pork tenderloin this weekend, so hang tight (Pork tenderloin with winter greens and onions and pork tenderloin sliders with three sauces).
For more ideas follow the National Pork Board on Twitter @allaboutpork.
These baked pork egg rolls are not quite as crispy as their deep fried counterparts, but they do not lack flavor and would serve well as an appetizer or hors d'oeuvre.

 Fold the bottom edge of the wrapper toward the top, over the filling. Fold the two side corners in toward the center, you'll have what resembles an envelope. Now roll the egg roll toward the top. Place the finished egg roll seam side down on the baking sheet and cover with a clean, damp kitchen towel. (If you're proficient at rolling covering may not be necessary, it's to prevent the wrappers from drying out)Lightly spray the egg rolls with cooking spray.Bake at 425°F for 8 minutes or until the bottoms are golden brown. Turn the egg rolls over and bake an additional 3 – 8 minutes longer. (I like them more well done, personally)
Preparation time: 20 minute(s)
Cooking time: 16 minute(s)
Number of servings (yield): 12
Calories: 100
Fat: 1 gram
Protein: 9 grams

Enjoy!
This post was sponsored by the National Pork Board, I was provided with recipes and compensated for the purchase of ingredients. All opinions are my own.
Pin ItClick here to leave a comment on Baked Pork Egg Rolls a Recipe from the Pork Board . We'd love to hear your say.This is a post from: Home-Ec101 ©Home-Ec 101.com 2007 - 2011


January 26, 2012
How to Clean a Grimy Bathtub and Surround
Dear Home-Ec 101,
I have a 25 year white tub surround that has accumulated a darkened tint due to left over scum even after cleaning it often enough for this very busy mom and full time art teacher. What is fast and quick and odorless, green, effective, etc. Seems that I am also very good at damaging our home, as I tend to be impulsive when it comes to cleaning.
Help me please, thanks.
Signed,
Grimy in Gridley
Heather says:
Before I explain how to clean a tub surround, I thought I'd explain exactly what a tub surround is for those who may be unsure. In some bathrooms the shower and tub are one unit. The walls that extend upward from the tub toward the ceiling are known as the surround and can be made from different material including tile and acrylic. The joints are often sealed with caulk or in the case of tile, grout (which also needs to be sealed).
Over the years caulk, if it becomes moldy, will need to be replaced. Our bathroom has poor ventilation and consequently I have spent more time than I care to admit scraping and re-caulking our shower. If I had been consulted, I would demand that in shower pans all ledges should have a steep enough angle to prevent puddling. Unfortunately no one thought to ask and I spend time wiping ledges and replacing caulk.I contacted "Grimy" and asked about her particular surround. Her tub surround is acrylic which means if she ever used harsh chemical cleansers over the years, it's quite possible that the acrylic surface was chemically etched or scratched.
Dirt and grime accumulates in these tiny scratches and is then sealed- in by soap scum and minerals which are hard to scrub away and just leave a dirty look.
You can find BKF on Amazon and in most big box stores.
Bar Keepers Friend is one of my favorite cleaning products in these situations. As you requested, it is environmentally friendly. Now because it is an acid, you will want to wear gloves or at the very least not get it on your hands or in your eyes. Keep in mind that vinegar or lemon juice wouldn't be pleasant in your eyes, either. Oxalic acid is only a bit stronger than either of these and as BKF it arrives in a much more convenient form.
Since cleaning a tub surround involves removing accumulated grime on a vertical surface I would suggest the liquid version of the product. The powder version of BKF will work, but it will be a little more annoying to apply.
To clean the tub surround, apply the the liquid BKF to the shower walls and allow it to sit for a few minutes, to give the oxalic acid time to work on the soap scum. Then use a damp sponge or rag to wipe the walls clean and follow with a thorough rinse.
If you're using the powder version of BKF wipe the walls with a damp rag, sprinkle BKF on the rag and apply to the walls. Again, give it time to work before removing. The point isn't to use BKF as an abrasive cleaner, but rather to take advantage of the acidic nature of the product.
It may take a second application, since as you've noted, this grime has taken a long time to accumulate, it's not going to come off easily.
To keep the clean look of your scrubbed tub surround, you can apply a protective coating of wax, yep just like you'd use on your car. Whatever you do, do NOT wax the floor of your tub. Can you say broken hip? I knew you could. To keep it environmentally friendly, use a carnuba wax.
Submit your questions to helpme@home-ec101.com.
Click here to leave a comment on How to Clean a Grimy Bathtub and Surround . We'd love to hear your say.This is a post from: Home-Ec101 ©Home-Ec 101.com 2007 - 2011


January 25, 2012
Are Appliance Bulbs Safe for Ovens?
Dear Home-Ec 101,
Does "appliance bulb" mean any appliance?
My oven light bulb went out. The previous home owners did not leave the manual, and I've had no luck finding one on the internet.
My Lowe's sales clerk was "almost positive" that the bulbs that include "appliances" in the list of recommended uses would be safe because of the thick glass cover that goes over the bulb. I also found the following statement:
As the bulb I took out was labeled 40 watt appliance bulb, I suspect that I am fine using the Sylvania 40 watt appliance bulb that I bought (I cannot find any information on whether there are special appliance bulbs for ovens on the company's website).
But, I could start a fire here. So I thought I would ask Home-Ec 101.
Signed,
Burnt-Out in Berkeley
Heather says:
 Yes, appliance bulbs are simply the standard size for most appliances. Glass has a ridiculously high melting point and the tungsten filament burns hot. An oven designed for residential use, even with the self-cleaning setting, is not going to come anywhere close to the design threshold of the light.
The only time you could possibly approach this temperature would be in a kiln or blast furnace and at that point, lighting is the least of your worries.
The thick glass cover has nothing to do with protecting the light bulb from heat, it simply protects the the appliance light bulb from impact and food spatter. It is possible that if food spatter landed directly on the glass of a hot, bare bulb, the temperature differential could possibly, maybe cause the bulb to shatter.
Don't stress, your appliance bulb is just fine to use in your oven.
Submit your questions to helpme@home-ec101.com.
Click here to leave a comment on Are Appliance Bulbs Safe for Ovens? . We'd love to hear your say.This is a post from: Home-Ec101 ©Home-Ec 101.com 2007 - 2011


January 24, 2012
Why Did My Sweater Pill?
Dear Home-Ec 101:
It's cold! Well actually it's 68 right now – but yesterday it was in the 40's and I wanted to wear my nice, warm, fluffy white wool sweater. It has not seen the light of day since last winter (February-ish). I pulled it out of the dry cleaner bag and it is covered with little white balls, I guess they are lint balls? Anyway I did a quick once over with a lint brush and it didn't' seem to make much difference so I put it away and wore my fleece jacket most of the day at work. Last night I did a more through 'de-linting' and I still can't get rid of the balls. I also tried using some packing tape but that did not help either.
Any suggestions?
Signed,
Pilled in Pillager
Heather says:
You are describing a phenomenon known as pilling. The yarn used to create your sweater is comprised of fibers of various lengths twisted together. Over time the weaker fibers break and tend to twist back onto themselves creating tiny balls or fabric pills anchored to the material by unbroken fibers. The threads anchoring the pills to your sweater are the reason the usual lint brush or packing tape trick didn't work.
Fabric pilling happens, it's a normal result of wear and is most noticeable after cleaning, as the pills form when the broken fibers stretch and shrink during the cleaning process.
Don't store your clothing in dry cleaner bags. Dry cleaning does involve moisture and leaving your clothing in the bag can cause damage over time.Transfer your sweaters to a padded hanger, wire hangers often create weird little lumps in the shoulder of your garment. If you want to prevent dust from landing on the shoulders of the garment, cut the bottom off of the bag to allow air to circulate. White garments will often yellow if left in dry cleaning bags for too long.
I do have good news, wool fabrics tend to pill less over time as the shorter and weaker fibers work their way out of the yarn. So hopefully you still have a lot of life left in your sweater.
To fix the problem you'll need one of a few items:
A razor – only good if your sweater isn't very textured
A fabric shaver – you can also find these at almost any big box or fabric store
A Sweater Stone sweater stone - this is a pumice stone that will snag the pills more firmly than tape or a lint brush and break the anchoring fibers.
If you choose to shave your sweater with a razor, it's very important to use a light hand or you risk cutting the undamaged fibers and creating more wear or a hole. Fabric shavers have a guard over the blade to help prevent damaging the rest of the material. Sweater stones should also be used with a fairly light hand, as you don't want to create unnecessary wear, which leads to a vicious cycle of further pilling.
There's really no way to completely prevent pilling and other than storing in the plastic bag, it sounds as though you have taken excellent care of your garment.
With washable garments, you can help reduce pilling by turning the item inside out before laundering.
Good luck!
Submit your questions to helpme@home-ec101.com.
Click here to leave a comment on Why Did My Sweater Pill? . We'd love to hear your say.This is a post from: Home-Ec101 ©Home-Ec 101.com 2007 - 2011


Heather Solos's Blog

- Heather Solos's profile
- 12 followers


![[image error]](http://static.home-ec101.com/wp-content/uploads/2012/01/145-and-Done.jpg)
![[image error]](http://static.home-ec101.com/wp-content/uploads/2012/01/Kale.jpg)
![[image error]](http://static.home-ec101.com/wp-content/uploads/2012/01/Brush-with-butter.jpg)
![[image error]](http://static.home-ec101.com/wp-content/uploads/2012/01/Baked-Pork-Egg-Roll1.jpg)