
Heather Solos's Blog, page 66
February 15, 2012
Can I Mix [cleaning product] with Bleach
Dear Home Ec 101,
I love your site! Love the 50′s look!
I want to mop with bleach once a month to help keep our grout white, but mopping with bleach and water does not seem to clean the floor well. Your site came up when I googled which cleaners/soaps can safely be mixed with bleach? In other words, can I mix chlorine bleach and Fabuloso or Pinesol or Simple Green?
Signed,
KABOOM
 Heather says:
No.
Never mix chlorine bleach with other general purpose household cleaners.This is a practice that can have deadly results; I cannot emphasize this enough. Chlorine bleach is a fantastic disinfectant and has many safe and useful applications around the house, but you must use good judgement.
You may mix chlorine bleach with laundry detergent or dish detergent, but neither of these are great for your purposes.
Why?
Cleaning action is created through four different mechanisms:
Heat – the hotter your solution the more dirt can be in the solution -think of how salt dissolves better in hot waterAgitation / Physical – scrubbing (yay) removes dirt particles from the surface they were stuck toChemical – different chemicals can increase the amount of particulates that can be suspended in a solutionTime – chemical reactions are not always instantaneous and sometimes different solutions need time to work. Keep in mind that this can be both your friend and your enemy. For example, if you soak a stain in a detergent, the chemicals can do their job on the stain, but if given too much time they may also damage fibers and not just the stain.Chlorine bleach is great for disinfecting and of course bleaching. However as you have noted, it's not that great at cleaning. Bleach can clean, but the molecules are quickly used up if the solution is used to remove organic matter -a nice way of saying dirt and filth.
Sometimes cleaning is best done in a two-step process.
This two-step process is crucial if you are looking to sanitize or disinfect a surface, such as with cutting boards and food preparation areas in the kitchen. First you want to get rid of the organic matter (dirt) by washing and then you want to deal with the stains or possible lingering bacteria.
I also want Home Ec 101 readers to understand that bacteria does not have magical abilities to cling to surfaces. If a surface has been thoroughly washed, it's usually not necessary to go back and disinfect, unless we're discussing a food preparation surface or dealing with compromised immune systems.
As far as your specific question about tile:
While sealed ceramic tile will generally not be damaged by MOST household cleaners, the grout is more easily damaged. Grout and the sealant that protects it from staining can be damaged by acidic or caustic (like bleach) cleaners.
If your grout is stained, clean it thoroughly and then stain and reseal your grout. The sealant will protect your grout from future stains.
Related posts:
What Can You Do to Fix Stained Grout
How to Use Chlorine Bleach Safely
Good luck, be careful and thank you for the compliment!
Submit your questions to helpme@home-ec101.com.
Click here to leave a comment on Can I Mix [cleaning product] with Bleach . We'd love to hear your say.This is a post from: Home-Ec101 ©Home-Ec 101.com 2007 - 2011


February 14, 2012
Vegetable Beef Soup Recipe – Like Mom Used to Make
 Bobbie says:
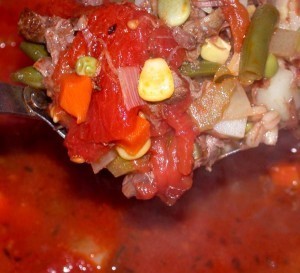
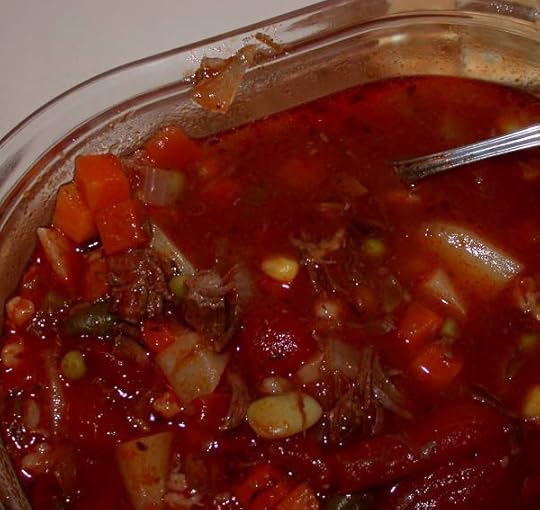
Have you ever caught a whiff of an unexpected scent that suddenly sent you back in time? Figuratively speaking, of course. The sense of smell is a huge memory trigger, and if there's a smell that says "home" to me, it's the comforting aroma of simmering Vegetable Beef Soup the way our mom used to make it. Packed with veggies and beefy bits, it's a hearty full-meal soup perfect for cold winter days. Serve it alone, or paired with fresh-baked bread, it's sure to warm the spirits as well as the tummies.
I didn't get recipes for all the dishes my parents and grandparents used to make, but I'm thankful this is one I made certain to get written down before my chance had passed. When I asked her for the recipe, Mom said she'd give it to me next time she prepared it, because she didn't think she'd remember everything unless she was doing it. So, she made the soup, telling me everything she did, so I could write it down. Some amounts were approximations, so I've had to work at it to get it to taste right. Mom always made it the day after we had a big pot roast, saving the leftover meat and all the meat juices to throw in the soup – which pretty much explains the nearly complete lack of beef gravy in family meals of our childhood. Chicken gravy? Yes. Beef? No. The meat stock always got saved for soup. But that's okay: this soup is totally worth the trade-off.
To allow for room to stir and also to reduce the chance of boil-overs, I would suggest a 6 to 8 quart pot with a heavy bottom*. Thin bottomed pots will cook unevenly and are more likely to scorch and ruin your soup. (I make the mistakes so you don't have to – just a public service I provide. Oh, and don't try to pass off the burned soup as "Smokey Vegetable Beef Soup" – that doesn't work, either.) I prepare this in my 8 quart Tramontina stock pot, which I use for practically everything. Crockpot directions are also given, but if your slow cooker won't hold at least 4 1/2 quarts, you'll need to make a smaller batch.
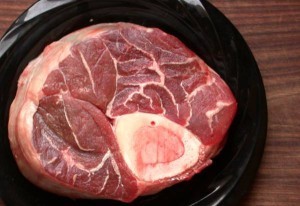
When I was working to standardize this recipe, so it could be made as a standalone, rather than as a follow-up meal after pot roast, I decided to use beef shank cross-cuts, because I could obtain them at a fair price, and they're great at yielding a lot of flavor, if you cook them right. Some stores label these "soup bones." Feel free to use whatever cut of beef is cheapest – the long, slow cooking of soup-making is a great use for tough cuts of meat.
: Vegetable Beef Soup Recipe: Traditional Vegetable Beef Soup for the Stove or Slow Cooker
2 to 2.5 pounds beef shank cross-cuts, or any cheap cut of beef, preferably something with marrow bones2 quarts cold water2 bay leaves2 teaspoons salt1/2 teaspoon black pepper1 large can whole, peeled tomatoes (about 4 cups worth)1 clove garlic, peeled and minced1 teaspoon dried thyme leaves1/2 teaspoon dried marjoram1 teaspoon whole celery seed2 tablespoons pearled barley (not quick-cooking barley)1 large onion, diced2 ribs celery, sliced1 1/2 cups peeled, cubed potatoes16 ounce bag frozen mixed vegetables (the one I used had green beans, peas, corn, carrots and lima beans – 4 cups worth. Use fresh veggies, if you prefer.) Vegetable Beef Soup InstructionsSet your soup pot over medium heat.

Culinary tradition: USA (Traditional)
Bobbie Laughman is a leaf on the wind. Watch how she soars. Or, just send her an email at Bobbie@Home-Ec101.com
Click here to leave a comment on Vegetable Beef Soup Recipe – Like Mom Used to Make . We'd love to hear your say.This is a post from: Home-Ec101 ©Home-Ec 101.com 2007 - 2011


February 13, 2012
Spots on a Smooth Top Range
Dear Home Ec 101,
I have a glass (or maybe ceramic?) range that came with our house. It was new in June when we moved in. I have never had one before and am puzzled by some strange markings which have appeared on it. I use a ceramic cooktop cleaner on it about every other week; the rest of the time I just wipe it down with soapy water. I think the culprit may be my (used-to-be nice) pots which recently started leaking water from the handle/where the handle is riveted onto the pot. They spurt liquid whenever I use them and now there are odd spots on the range. They look kind of like normal stains, but the cooktop cleaner doesn't touch them. Are they burnt into the stovetop? Am I doomed to have a marred surface on my less-than-a-year old stove? Thanks!
Signed,
Crusty in Cranston
Heather says:
No, you're not doomed to have a spotted range forever, but I do want you to know that no matter how careful you are, at some point your smooth top range will no longer be pristine. Today is not that day.
The next time you're in a big box or home improvement store find yourself a razor scraper. Depending on the brand or where you find it, this tool should be well under 10 bucks or if you're an Amazon Prime member go ahead and toss it in your cart. Easy peasy (dangerously so!), In all seriousness every home needs at least one razor scraper and some spare razor blades for tasks like cleaning a smooth top range and removing paint from window panes and I'm sure you can find other uses for this thing.
To use a razor scraper on your smooth top range hold the blade at a 45° angle to the surface of your stove. You'll need to apply pressure and scrape pushing down toward the surface your stove and push forward starting at the edge of the spot.
NOTE: Do not slide the razor from side to side like you're trying to slice something with the blade, that's a great way to permanently scratch the surface of your appliance.
I know the idea of using a razor blade on your new-ish smooth top range can be a little scary at first, but give it a try. Soon enough you'll keep one of these handy things in the kitchen tool drawer and find great satisfaction in removing the remnants of a spillover.
As far as your pots and pans go, it's definitely time to invest in a new set, but remember cast iron is not a good choice for a smooth range. If you're torn on what type of cookware to purchase read
Send your questions to helpme@home-ec101.com
Amazon links are affiliate.
Click here to leave a comment on Spots on a Smooth Top Range . We'd love to hear your say.This is a post from: Home-Ec101 ©Home-Ec 101.com 2007 - 2011


February 10, 2012
Cubed Indian Pork with Sweet Onions and Bell Peppers (Deconstructed) #Publix4Pork
Heather says:
This recipe for pork cubes with sweet onions and bell peppers is a modification of another recipe for the National Pork Board's Good and Good for You Campaign. I had to modify this recipe (which was supposed to be for kebabs) because skewers and small children do not mix. I swear I stored the skewers in the highest cabinet, but still they were all destroyed in the name of sword fighting or spell casting a la Harry Potter. Who knows. However, I'm pretty much certain mine isn't the only household that has a baking dish, but lacks skewers.
This week Publix and the Good and Good for you Campaign are featuring sirloin pork roast. Roast simply means a large cut of meat and the loin part refers to the cut coming from the loin (behind the shoulder, along the upper part of the back). It's not as tender as the tenderloin but will still fall apart with a long, wet cook (like braising) so it's not the best choice for the slow cooker. Baking, roasting, and indirect grilling work well for this cut.
This recipe is fantastic for a busy night. The marinade is simple to make and everything can be assembled first thing in the morning. The pork cubes cooks in just about the same time it takes to make a pot of rice and a side of frozen vegetables. Easy peasy lemon squeezy. I love curry, and it's a wonderful change of pace from our usual repertoire.
For more recipe ideas visit PorkBeInspired.com and follow them on Twitter.
: Recipe Courtesy of the National Pork Board
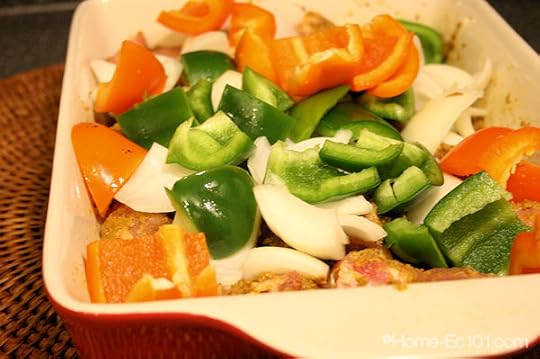 1 bone-in sirloin pork roast, about 4lbs, boned and cut into 1 – 1.5 inch cubes2 large bell peppers (red, orange, or yellow preferred)1 large sweet onion, cut into 1 inch chunks
Indian Spice Paste4 large garlic cloves2 TBSP curry powder1 TBSP kosher salt1 TBSP ground cumin1 TBSP coriander1/4 tsp cayenne (optional)1/2 cup lemon juice2 TBSP olive oil2 TBSP water InstructionsPlace all of the Indian Spice Paste ingredients in a food processor and pulse until combined.Place pork in a large zippered, plastic bag or a shallow, covered container. Stir spice paste in with the pork cubes and refrigerate for 2 – 4 hours.Preheat the oven to 425F.Place the pork cubes in a 9 x 13 baking pan and add the bell peppers and onions. Stir to combine.Bake for 20 – 30 minutes, stirring once. Remove from the oven when the pork measures 145F.Serve over rice
If you choose to prepare these as kebabs, assemble and grill directly over a medium hot grill. 10 – 12 minutes, turning to cook evenly.
Preparation time: 15 minute(s)
Cooking time: 30 minute(s)
Diet tags: Gluten free
Number of servings (yield): 8
Calories: 225
Fat: 10 grams
Protein: 27 grams
Enjoy!
This recipe was sponsored by Publix and the National Pork Board, all opinions including my dismay over skewers and impromptu weapons are my own.
Pin ItClick here to leave a comment on Cubed Indian Pork with Sweet Onions and Bell Peppers (Deconstructed) #Publix4Pork . We'd love to hear your say.This is a post from: Home-Ec101 ©Home-Ec 101.com 2007 - 2011


February 9, 2012
Quick Beef and Cabbage Skillet Recipe – Hearty Winter Fare
Bobbie says:
Winter was almost ignoring us here in south central Pennsylvantia: not too frigid and hardly any snow, and heck, I even wore shorts last week. Well, indoors, at least. Then that stupid groundhog saw his shadow on February 2, signalling six more weeks of winter. And then, someone must have passed the message along to Winter, because it started paying attention again. Now everything's completely white, and it got cold. I hate groundhogs and I hate cold weather and snow, but hey, at least the food's good. Perfect for a cold winter's day, Quick Beef and Cabbage Skillet is hearty and filling, but still budget friendly. Oh, and delicious.

To be honest, the first time I cooked this combination of ingredients, I was being kind of selfish: I love cooked cabbage, and I thought I was kind of alone in that. At least, I knew my husband hated cabbage rolls, and although this has no rice or tomato, and is almost completely unlike cabbage rolls in any way, aside from the cabbage and meat, I still felt as if I was throwing caution to the wind. I was amazed. My husband kept saying how much he liked it, so he could be sure I' make it again. Talk about win-win. And cheap-cheap, too. Cabbage was recently as low as 49 cents per pound at my favorite store, and even when it's not "on sale" it's still one of the best deals in the produce department. Learn to love cabbage and your budget will love you.
Quick Beef and Cabbage Skillet Recipe1 pound ground beef1 large onionan approximately 2 pound head of green cabbage2 large carrots1 teaspoon salt1/2 teaspoon pepper 2 bay leavesChoose a large, heavy skillet or pot with a lid with a capacity of at least 6 quarts. I used my 8 quart stock pot, which gave me plenty of stirring about room. Set it over medium heat, and add the ground beef.
Peel and coarsely chop the onion, and add it to the meat, stirring it up a bit with a sturdy spoon. Stir the meat and onions occasionally while you prepare the cabbage and carrots.
Using a large chef's knife, cut the head of cabbage in half from the top, through the core, then cut each half again, so you have 4 pieces approximately equal in size. Carefully slice away the core and discard. (If you don't get all of it, don't worry. It's perfectly safe to eat – it's just a bit tough 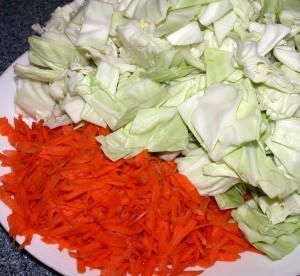 sometimes.) Roughly chop the cabbage – neatness doesn't count, cleanliness does, so keep it off the floor. I usually cut the cabbage into approximately one-inch chunks, which works pretty well.
If you have a box grater or other tool for shredding foods, use that for the carrots. Otherwise, just use the chef's knife and finely chop them. Sometimes, I leave them out if I'm in a huge hurry, or just don't have carrots.
Once the meat is browned, stir in the salt, pepper, and bay leaves (these are NOT optional – their flavor is essential to the results), then add the carrots and cabbage. Stir to mix well. Cover and turn heat to low. Cook until  cabbage and carrots are tender, about 20 minutes, stirring occasionally. (You shouldn't need to add any liquid – the juices that cook out of the meat and vegetables should be sufficient, but if it seems dry, add up to 1/4 cup of water. ) Remove bay leaves and discard.
Makes 4 generous servings.
Serve Quick Beef and Cabbage Skillet with mashed potatoes or some crusty rolls and butter for a simple, comforting meal.
Bobbie Laughman is an elder caregiver, writer and Generally Shy Person, Except On The Internet. She lives and breathes and tries to keep warm and sane in Gettysburg, PA. If you've a mind to, contact her at Bobbie@Home-Ec101.com
Click here to leave a comment on Quick Beef and Cabbage Skillet Recipe – Hearty Winter Fare . We'd love to hear your say.This is a post from: Home-Ec101 ©Home-Ec 101.com 2007 - 2011


February 8, 2012
White Chicken Chili for the Slow Cooker or Crockpot®
Heather says:
Last month Deneice, a member of the Home Ec 101 Community*, shared several of her recipes with me, including a recipe for white chicken chili. This simple recipe is easily adaptable to use what is in your refrigerator and pantry. Deneice's recipe called for lima and cannellini beans, but as I had neither I just doubled the amount of great northern and navy beans. If you have them available, experiment with different bean varieties to provide more flavor and texture or just use 2lbs of one kind of dried, white bean, it's really up to you.
*The Home Ec 101 Community has incredibly stringent membership requirements including: lurk or comment from time-to-time.

: White Chicken Chili suitable for the slow cooker
½ pound dry Great Northern beans½ pound dry navy beans½ lima beans½ pound cannellini or white bean———- As long as you have 2lbs of dried beans total, you're golden1/4 cup olive oil1 chopped onion4 cloves minced garlic2-4 chicken (uncooked) boneless skinless breasts or thighs, cut in small pieces
OR2 – 3 cups shredded, cooked chicken2 tsp cumin1 tsp oregano1 tsp white pepperfresh ground black pepper1 can of green chilies½ tsp cayenne pepper (to taste)1 quart chicken stock**Water if needed to cover beans
**If using homemade stock, you will need to add salt (2 tsp or so) to the slow cookerWhite Chicken Chili Instructions:Soak the beans overnight or follow the quick soak directions. Drain the soaking water, rinse the beans and add to crock pot.In a skillet over medium heat, cook the onions and garlic in the 1/4 cup olive oil until the onion just begins to soften. Add the seasonings, including the green chilies to the skillet.If using uncooked chicken, brown the chicken in the skillet. Then add the contents of the skillet to the slow cooker
OR
Dump everything in the crock pot, including the cooked and shredded chicken.Add the liquids to crock pot.Cook on low until the beans are tender (6 – 8 hours depending on your slow cooker)If you'd like a thicker chili use an immersion blender to whir some of the beans shortly before serving. Alternately, a pastry cutter or potato masher could accomplish this task.Garnish with cheese and something colorful
Diet tags: Gluten free
Culinary tradition: USA (Southwestern)
Serve with sweet cornbread.
Enjoy!
Pin ItClick here to leave a comment on White Chicken Chili for the Slow Cooker or Crockpot® . We'd love to hear your say.This is a post from: Home-Ec101 ©Home-Ec 101.com 2007 - 2011


February 7, 2012
Use the Water Test to Determine When Your Stainless Pan Is Hot Enough to Cook
Dear Home Ec 101,
I've been reading your site for a long time now, and I love it. You've answered a lot of questions I didn't even know that I had, but one thing has been bothering me lately: I don't know how to sear a piece of meat or fish without making a horrible mess of my skillet. I'm talking about recipes that say heat up olive oil till it's very hot, and then throw in, say, a tuna steak, to cook it really quickly on both sides. Inevitably, I have burnt-on disgusting plasticky oil left in the bottom of my pan, and burnt-on oil splatters all over the sides that I have to clean with steel wool and/or (everybody's favorite) Bar Keeper's Friend. I thought maybe it's because olive oil's smoke point is too low so it's not really appropriate for this type of cooking, but I have the same problem with other oils too. Does searing demand this mess, or am I doing something wrong?
Signed,
Sticking in Stillwater
Heather says:
The reason your oil is polymerizing (turning into that plasticky mess) is your pan is not hot enough. I know this sounds counter intuitive, but hang with me for the explanation.
There is a very simple trick to learning when it's time to add the oil and then the meat to your stainless steel pans. The water test will tell you when your stainless steel pan is hot enough to add the oil, immediately followed by the meat you intend to sear.
Sometime before you need to sear your next cut of meat take the time to conduct this little experiment.
Gather:
a stainless steel saute pan
1/8th teaspoon measuring spoon
a cup of water
and your stove
Place the pan on the stove over medium high heat and add 1/8th teaspoon of water to the pan. Observe how it just sits in the bottom of the pan and then eventually evaporates.
Add another 1/8th teaspoon of water to the pan. This time it may bubble shortly after it's added. You're going to keep repeating this process until the water no longer sits in the pan but begins to disperse into tiny beads of water that roll around the bottom of the pan. It is very important to understand that this point is past when it sizzles right after dropping, so keep letting the pan heat. When you reach the point where an 1/8th teaspoon of water stays in a single ball and rolls around your pan (thanks to the Leidenfrost effect ) your pan is finally at the perfect temperature to add a good quality extra virgin olive oil.
Swirl the pan, look for the oil to shimmer a tiny bit and then add the meat. That really cool Leidenfrost effect is what keeps your meat (and oil) from sticking to the pan. It takes practice to really get the hang of keeping your pan in this narrow temperature window and you should keep in mind that you'll probably need to reduce the heat of the burner to prevent from overheating your pan.
The exact amount you'll need to reduce the heat depends on your pan and your burner. So get in your kitchen and begin experimenting, after awhile cooks get a good sense of this point and no longer need the water test to know when their pan is ready to sear meat.
Remember cooking is a craft and everyone needs practice to get the hang of some of the best practices.
Best of luck!
Send your questions to helpme@home-ec101.com.
Click here to leave a comment on Use the Water Test to Determine When Your Stainless Pan Is Hot Enough to Cook . We'd love to hear your say.This is a post from: Home-Ec101 ©Home-Ec 101.com 2007 - 2011


February 6, 2012
Will Silk Continue to Shrink After Washing?
Dear Home Ec 101,
I washed, but did not dry, my 4 year-old's dress that says it's dry clean only – who makes dry clean only clothes for 4-year-olds, anyway? I didn't even think to check. It is 100% silk. It shrank quite a bit and while it was still wet I was able to stretch it back out a little (but not all the way).
The polyester lining of the dress now is longer than the dress. (It actually is cute that way, so we will probably still be able to use it even if I have caused irreparable damage to the dress)
Anyway, is there any way to fix it, or do I need to bust out the sewing machine and shorten the lining?
Also, now that I've washed it, will more damage be done if I wash it again, or should I take it to the dry cleaners in the future, in which case, it will probably never be worn again.
Signed,
Shrunken in Shreveport
Heather says:
Silk can be made into different fabrics depending on how it is woven. These different weaves have slightly different properties.
Chiffon, China Silk or habutai, habotai, pongee, Crepe de Chine, Charmeuse -traditional silk-, Jacquard, Duoppioni, Noil, Raw silk, Tussah, and Shantung
I'm betting your daughter's dress is silk chiffon or charmeuse. From researching and you fabric junkies can feel free to correct me, these fabrics will shrink about 8%. It's possible that gentle pressing (use a cloth between your iron and the fabric on the lowest steam setting) to reverse some of the shrinkage.
It seems as though this is a common complaint with lined silk dresses for kids, either the lining shrinks or the silk does which is why these outfits are labelled dry clean only. I'm pretty sure that you've done all the damage you're going to do to the dress. If the lining is cute, as you said, just let your child wear it a few more times, and then wash it again before you decide whether or not to go to the trouble of shortening the lining.
And if you don't bother to shorten the lining at all? Well your kid is in good company, my four year old's favorite dress has the exact same problem. There's no way I'm going to go to all that trouble for something she'll grow out of in a few short months. I just filed it under live, learn, and remember to read the label.
Send your domestic questions to helpme@home-ec101.com
Click here to leave a comment on Will Silk Continue to Shrink After Washing? . We'd love to hear your say.This is a post from: Home-Ec101 ©Home-Ec 101.com 2007 - 2011


February 3, 2012
Thai Lettuce Wraps with Satay Pork Strips
Skip to the Thai Lettuce Wrap Recipe
Heather says:
I have another recipe from the National Pork Board to share with you and I have to say that these Thai Lettuce Wraps with Satay Pork Strips were worth EVERY single bit of hassle I put up with to make them. Have you ever had one of those weeks where life is just a comedy of errors?
That was this week.
You see, I'm not home. I'm currently in Orlando with the kids staying with a good friend in her timeshare. Here's what no one will tell you about a timeshare with a "fully equipped kitchen" it's not actually equipment any sane cook would want to use. I mean, you're supposed to be on vacation in a timeshare and who actually cooks on vacation? Yeah, that'd be me. I now understand why some people hate cooking, if you don't have the right tools it's a downright pain in the butt. Do not get me started on the serrated chef knife, the warped cutting board -none of the little feet actually touch the counter, it's kind of absurd-, or the paper thin cookware. (Have I told you how important sturdy, cookware is?) Remind me in the near future to do another post on the bare minimum kitchen set-up.
Don't let my rant deter you, I'm just cranky, these Thai lettuce wraps would have been easy as pie, at home with a good knife and a cutting board that didn't make me want to fling it out of the window in frustration. Let's just say that the fresh ginger wasn't so much minced as it was shredded into a sullen, pathetic mass. My poor friend got to hear some of my kitchen language that I've worked so hard to stop using over the past few years. Side note, my friend just commented from the other room, "It's not like I worried I was actually in any danger, that knife isn't sharp enough to hurt anyone, even if you went on a rampage."
So do not let my frustration deter you from the deliciousness that awaits below.
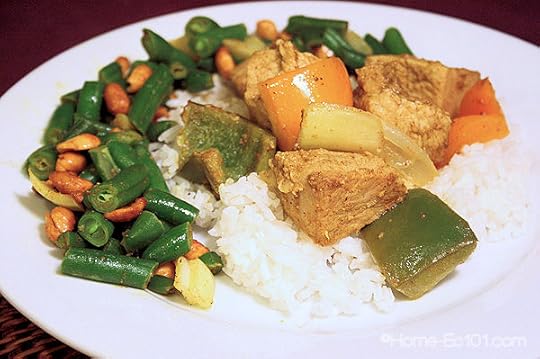
As part of the Good and Good for You Challenge, this week we're featuring top loin pork chops, which are also known as center cut chops and come from the upper portion of the loin, closer to the head. They aren't quite as tender as the tender loin (last week's cut) but are still tender enough for a variety of cooking methods including braising, sauteing, and grilling (or broiling). Don't forget to check out PorkBeInspired.com for more information on a variety of pork cuts and how each cut should best be prepared. For lots of great tips and recipes fan the National Pork Board on Facebook.
[image error]
Marinade:1/2 cup hoisin sauce1/4 cup soy sauce2 TBSP honey2 TBSP sesame oil1 TBSP fresh ginger root, minced1 TBSP garlic, minced1/2 tsp freshly ground pepper
Wraps:3 large heads butter (or Boston) lettuce, leaves separated2 medium carrots, peeled and cut into 2″ matchsticks1 English cucumber cut into 2″ matchsticks2 oz bean thread (Asian cellophane noodles -optional because the store was out and they turned out just fine), soaked for 15 minutes in hot water, then drained16 sprigs fresh cilantro
Sauces:1/4 cup corn syrup (I used honey)3 TBSP fresh, cilantro chopped1 TBSP lime juice1/4 tsp salt1/4 cup Thai sweet chili sauce1/4 cup Thai peanut saucePlace chops in a gallon zippered plastic bag; combine marinade ingredients in small bowl and pour over chops. Seal bag and refrigerate 1 – 4 hours. Remove from the refrigerator 30 minutes prior to grilling.Grill directly over medium high heat 3 – 4 minutes per side and then finish over indirect heat, removing from heat with the chops reach 145F (about an additional 5 minutes). Transfer to cutting board and let rest for 5 minutes before slicing.If serving company: arrange a stack of large lettuce leaves attractively on a large serving platter. Place the carrots, cucumber, bean thread, and cilantro leaves in small dishes and arrange on serving platter. Place the Thai peanut sauce and Thai sweet chili sauce in small serving bowls or ramekins. In a small bowl combine the corn syrup (or honey) 3 TBSP minced cilantro, 1 TBSP lime juice and 1/4 tsp salt.Cut pork into thin slices. Lay 3 medium-sized leaves of lettuce leaf on the platter and arrange the sliced pork on the leaves.Guests should assemble their rolls with their choice of ingredients and sauces.Alternately prepare the rolls ahead of time and serve pre-assembled.
Preparation time: 20 minute(s)
Cooking time: 15 minute(s)
Number of servings (yield): 8
*NOTE: My friend can't eat whole cuts of meat so I also prepared 1 lb of ground pork sausage with the marinade. I let it marinate for an hour then browned the pork in a skillet. It was quite tasty and would make for a quick variation.
Enjoy!
This post was sponsored by the National Pork Board and Publix as part of the Good and Good for You Challenge. All opinions (and this week's frustrations) are my own. 
Click here to leave a comment on Thai Lettuce Wraps with Satay Pork Strips . We'd love to hear your say.This is a post from: Home-Ec101 ©Home-Ec 101.com 2007 - 2011


How Long Should I Cook Chicken Stock?
Dear Home Ec 101,
Thank you for making your lovely page about the French and Asian methods of cooking chicken stock. I have a question: If I have a long period of free time, can I cook the stock longer than four hours. I'll often have up to seven hours at a time. Is there any benefit to cooking longer? It seems like it would give more time for vegetable and chicken goop to turn into liquid, but I'm not sure if this is really true.
Signed,
Simmering in Cincinnati
Heather says:
As long as you remember the difference between boiling and simmering and keep your chicken stock simmering, a long simmer is just fine. Chicken stock with a long, slow simmer does tend to have a richer quality to it. Since I work from home, it's no big deal for me to throw the bones and vegetables in the stock pot first thing in the morning and check on it occasionally, but not everyone has that luxury.
If you have tested your slow cooker's temperature range, it's perfectly fine to use, as well. I'm just weird and prefer using the stove.
Alton Brown's recipe for chicken stock suggests simmering for 6 – 8 hours. When I shared the recipes for chicken stock, my intent was to make the concept seem as simple as possible without compromising results. Many people would look at a recipe with a 6 – 8 hour simmering time and write it off as impossible. You know and I know that simmering does not mean you have to hover over the pot, but there are those who don't. My goal, here on Home Ec 101, is to take the intimidation factor out of the kitchen. Cooking is both a craft and an art, anyone can become competent in the kitchen, but there are also those who have a gift.
 I digress, back to the question:
If you want to make chicken stock with an extended simmering time, you may find it necessary to add water during the process. It's really no big deal, just keep an eye on it and if the water level drops below the bones, simply add enough hot water to get everything submerged again.
Now, something to consider, if you want a clear stock, skip the vegetables if you want a long, slow simmer. Personally, I don't care about clarity, but some people do.
Enjoy!
Send your questions to helpme@home-ec101.com.
Click here to leave a comment on How Long Should I Cook Chicken Stock? . We'd love to hear your say.This is a post from: Home-Ec101 ©Home-Ec 101.com 2007 - 2011


Heather Solos's Blog

- Heather Solos's profile
- 12 followers

