
Heather Solos's Blog, page 25
June 5, 2016
Organizational Sunday Challenge Week #23
 Heather says
I almost let the day get completely away from me, sorry about that! This week’s challenge is still in the bedroom, your goal is to clear off the dresser.
As with most horizontal surfaces, dressers tend to become a catch-all. Put any stacks of clothing away and deal with the receipts, loose change, etc. If you are holding on to ticket stubs or other ephemera for scrapbooks, it’s time to figure out a place for them to live while they await preservation.
If you tend to empty your pockets onto your dresser, you may find something called a valet tray useful to corral these items.
Hopefully this week’s challenge is a quick one for you. Have a great week!
Playing catch-up? Here’s what we’ve done so far:
Week One
The Coat Closet
Week Two
The Entry Way
Week Three
The Linen Closet
Week Four
Your Clothes Closet
Week Five
The Laundry Round-Up
Week Six
The Pantry / Cupboards
Week Seven
The Refrigerator
Week Eight
Food Storage Containers
Week Nine
Kitchen Counters
Week Ten
The Junk Drawer
Week Eleven
Daylight Savings – clock change
Week Twelve
Medicine Cabinet Clean-Out
Week Thirteen
break
Week Fourteen
Take Stock of Personal Your Finance
Week Fifteen
Organize Bill Payments
Week Sixteen
Begin Menu Planning
Week Seventeen
Organize Your Schedule
Week Eighteen
Get Rid of Book and Magazine Clutter
Week Nineteen
Check for Financial Leaks
Week Twenty
Bathroom Counter / Vanity
Week Twenty-One
Hair and Body Product Declutter
Week Twenty-Two
The post Organizational Sunday Challenge Week #23 appeared first on Home Ec 101.


June 4, 2016
Lemon Shake-Up Recipe — A Refreshing Summer Drink
 Bobbie says:
Ah, summer. The scorching heat, the overwhelming humidity. Fun times. Well, when life hands you lemons, shake things up a bit and make Lemon Shake-Ups. Depending where you live, you may have had these treats at a local fair or carnival. For the uninitiated, a Lemon Shake-Up is basically a freshly made, individual lemonade. At the fairs where I’ve had them, it’s a big production: One person operates a big press to squeeze the bejeebers out of a lemon, into a tall, heavy glass. Another person adds sugar, ice, and some water. A paper cup is turned upside down over the glass, and someone else shakes it all up to dissolve the sugar. The whole lot is dumped into the paper cup, water is added to fill, et voila – a Lemon Shake-up is served. You’d have to pay four or five dollars for this refreshing beverage and the opportunity to see it being freshly made in front of you.


I’d been reminiscing about this unofficial beverage of state and county fairs, but not about the hassle of actually going to a fair and the expense of paying several dollars for one beverage. For the cost fair admission and ONE Lemon Shake-Up at the fair, I could buy enough lemons to make shake-ups for the whole neighborhood.
Making Lemon Shake-Ups at home means I can choose my own sweetener. Most of the time, I use a stevia-based sweetener such as Truvia or Pure Via. (I like my lemonade on the tart side, so I usually use 3 packets.) Honey and lemon is a great flavor combination, but getting honey to dissolve well in the ice water is difficult, so it’s best to first melt the honey in a small amount of very hot water. Once the honey melts into the water, add the ice and lemon and proceed. (As always, do not give honey or anything prepared with honey to infants under one year of age.)
Whatever sweetener you choose, use an amount equivalent in sweetening power to ¼ cup sugar.

Lemon reamer
Personally, I prefer this handheld wooden kind,because I find I’m able to get more juice out of each lemon or lime. I used to have one made of shiny black plastic, which looked gorgeous but was too slippery to get a good grip, so I could hardly squeeze anything out of the fruit. That tool wore out its welcome almost immediately.
 One-quart jar with lid
If you use a wide-mouth jar, you can put the lemon halves right in for a more authentic shake-up. If not, you can cut the lemon into smaller pieces after you’ve juiced it thoroughly. Make sure it has a leak-proof lid. This replaces the potential disaster of the tall-glass-and-large-paper-cup shaking method used in the carnival and fair production.
Lemon Shake-Up Recipe
1 lemon
¼ cup sugar OR 3 tablespoons honey, maple syrup or agave nectar (OR equivalent amount of a sugar substitute – read package to determine amount – remember to dissolve thick syrupy sweeteners in a little hot water first)
1 cup ice (crushed or cubes)
Cold water
Wash the lemon, and cut it in half. Juice the lemon into the jar using your method of choice. If you prefer your drink to be slightly less “authentic” you can remove the seeds.
Add the lemon halves to the jar. If you wish, you can cut these into smaller pieces first, but it’s not
necessary. Add the sugar or sweetener, ice and about a cup of water. Cover tightly and shake until the sugar is completely dissolved. Remove the lid and add enough ice and water to make 16 ounces. Pour into a tall glass, or just drink it straight from the jar. I won’t tell.

Bobbie Laughman is a freelance writer who thinks she’s normal. Don’t try to tell her otherwise.
The post Lemon Shake-Up Recipe — A Refreshing Summer Drink appeared first on Home Ec 101.


CommentsWhat a great idea! I love those when I see them at fairs. Now I ... by Ode to Mrs. Katz CohnThank you for posting this — it brought back memories of ... by jeddahgalThey make it like this at the corndog stand in our mini-mall's ... by EricaMueller@Bobbie Laughman We're cut from the same cloth. Milk out of ... by HeatherSolos@HeatherSolos If you really want to know, I have wide-mouth ... by Bobbie LaughmanPlus 9 more...
May 31, 2016
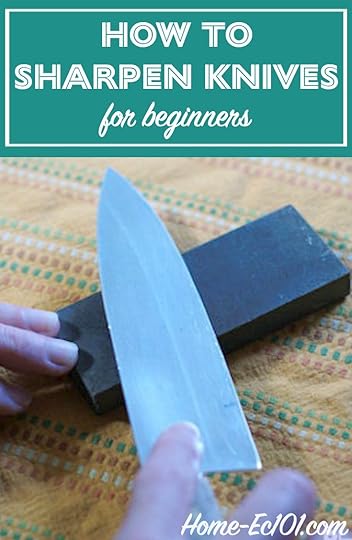
How To Sharpen A Kitchen Knife
 Heather says:
Without any more procrastination or delay here is the Home-Ec101.com Knife Sharpening Tutorial. I talk about knife skills and the importance and safety of having sharp knives, but how do you get and keep your knives sharp?
First, let’s start off with a little anatomy of a knife.

This is my favorite knife, it’s a 6″ chef knife, it’s not very expensive, I just like the feel of it, which is the second most important aspect when buying a knife? Why? Because if you don’t like the way a knife feels you won’t use it.
What’s the most important feature when choosing a knife? The tang of the blade should run through the handle. Do not buy a knife without a full tang.
 The third most important factor when choosing the knife is the type of metal. Look for stainless steel or high-carbon stainless steel. Avoid carbon steel, yes they can be honed to an edge easily, but they lose that edge easily AND can discolor some foods and may impart a metallic taste. Got it?
Finally, don’t waste your time with serrated chef knives. They usually aren’t sharp to start with and shred or mash some foods rather than cutting, once they lose what little edge they had.
So, now you have a knife, how do you sharpen it?
Knife Sharpening Tutorial
Remember you knife sharpening pros, this tutorial is for the beginner, with beginner equipment. If they want to get fancy there will eventually be Home-Ec101 Extra Credit or 201.
Get yourself a sharpening stone and a ceramic rod which can be found at box stores like the great, dreaded (heh) Walmart or cooking specialty stores. You don’t have to get fancy or spend a lot of money. You’ll also need a steel.
How to use a sharpening stone
Lubricate the stone with water, dish soap, or food grade oil. Just make sure to wash the stone thoroughly if you use vegetable oil to prevent it from going rancid.
The most important aspect of sharpening a knife is ensuring that the angle at which the knife comes in contact with the sharpening stone or ceramic rod stays consistent. This means if there is a 20-degree angle, it stays a 20-degree angle the length of the blade.

You can move the blade in a circular pattern from the tip the handle or it can be drug straight from the tip to the handle. The blade must stay at the same angle to the stone.

This is just an alternate view to better demonstrate the angle.
What ever you do to one side it must be repeated on the other side or the edge won’t be sharp. The angle of honing should be the same for both sides of the knife.

Keep the blade between a 15 and 30-degree angle. Remember the angle is less important the consistent application of said angle. It’s better to have a consistent 30-degree angle than an inconsistent 15 – 25. Got it?
How to use a ceramic rod for knife sharpening
After using the stone evenly on both sides, it is time to look carefully at the edge, lengthwise. Look on each side for dips, chips, and flat spots. If there are still imperfections work the knife on the stone a little longer. If you don’t see any and the angle of the edge looks consistent, it is time to step up to the ceramic rod.This is a lot like doing wood work and stepping to higher grade sandpaper for finer details.
There are a couple of options for holding the ceramic rod, it can be held firmly on a surface.

Or the ceramic rod can be held like a steel.
 Remember to keep the angle to the rod consistent on both sides of the blade.
This step removes the scratches that may have been introduced by the stone. Check the blade. Does it look even, free of scratches? Great!
How to use a sharpening steel
The last step is to use the steel. This steel rod is included with many knife blocks or can be purchased separately. It does not remove metal like the previous two steps, it simply reshapes the edge, removing the burr from the edge of the blade.
The burr is a tiny, thin curve to the edge of the blade. This curve presents a dull edge to the cutting surface and needs to be removed.
Hold the knife in your dominant hand and the steel in your off hand. Run the edge of the knife at the same angle as the previous two steps along the steel. Always move from the heel of the blade to the tip or in the reverse direction in one smooth motion. Don’t stop and start. Finally, always work both sides of the blade evenly.

This step should also be done between knife sharpening sessions to restore the edge of your knife after use.

Click the picture for more tips!
*Edit* Don’t forget to wash the knife after sharpening to remove any metal bits. -Thanks @imabug for the reminder. I do that; I just forgot to note it.
Questions?
Send your domestic queries to helpme@home-ec101.com.
Learn more:
Cutting Board Care
How To Know If A Cut Is Serious Enough To Go To The ER
Knife Skills Refresher
The post How To Sharpen A Kitchen Knife appeared first on Home Ec 101.


CommentsYou can make a handle for almost nothing all you need is a ... by Wadethank you for the article this is something i've always ... by Phillip Guyton Jr.Thank you, this helps so much! I have been looking for a visual ... by MikeI know someone who has rehandled his knives, so it can be done. ... by mom, againTypically they are carbide wheels and tear up a blade. They ... by HeatherSolosPlus 9 more...
Knife Sharpening Tutorial
Heather says:
Without any more procrastination or delay here is the Home-Ec101.com Knife Sharpening Tutorial. I talk about knife skills and the importance and safety of having sharp knives, but how do you get and keep your knives sharp?
First, let’s start off with a little anatomy of a knife.
This is my favorite knife, it’s a 6″ chef knife, it’s not very expensive, I just like the feel of it, which is the second most important aspect when buying a knife? Why? Because if you don’t like the way a knife feels you won’t use it.
What’s the most important feature when choosing a knife? The tang of the blade should run through the handle. Do not buy a knife without a full tang.
The third most important factor when choosing the knife is the type of metal. Look for stainless steel or high-carbon stainless steel. Avoid carbon steel, yes they can be honed to an edge easily, but they lose that edge easily AND can discolor some foods and may impart a metallic taste. Got it?
Finally, don’t waste your time with serrated chef knives. They usually aren’t sharp to start with and shred or mash some foods rather than cutting, once they lose what little edge they had.
So, now you have a knife, how do you sharpen it?
Get yourself a sharpening stone and a ceramic rod which can be found at box stores like the great, dreaded (heh) Walmart or cooking specialty stores. You don’t have to get fancy or spend a lot of money. You’ll also need a steel.
Remember you knife sharpening pros, this tutorial is for the beginner, with beginner equipment. If they want to get fancy there will eventually be Home-Ec101 Extra Credit or 201.
Lubricate the stone with water, dish soap, or food grade oil. Just make sure to wash the stone thoroughly if you use vegetable oil to prevent it from going rancid.
The most important aspect of sharpening a knife is ensuring that the angle at which the knife comes in contact with the sharpening stone or ceramic rod stays consistent. This means if there is a 20-degree angle, it stays a 20-degree angle the length of the blade.
You can move the blade in a circular pattern from the tip the handle or it can be drug straight from the tip to the handle. The blade must stay at the same angle to the stone.
This is just an alternate view to better demonstrate the angle.
What ever you do to one side it must be repeated on the other side or the edge won’t be sharp. The angle of honing should be the same for both sides of the knife.
Keep the blade between a 15 and 30-degree angle. Remember the angle is less important the consistent application of said angle. It’s better to have a consistent 30-degree angle than an inconsistent 15 – 25. Got it?
After using the stone evenly on both sides, it is time to look carefully at the edge, lengthwise. Look on each side for dips, chips, and flat spots. If there are still imperfections work the knife on the stone a little longer. If you don’t see any and the angle of the edge looks consistent, it is time to step up to the ceramic rod.This is a lot like doing wood work and stepping to higher grade sandpaper for finer details.
There are a couple of options for holding the ceramic rod, it can be held firmly on a surface.
Or the ceramic rod can be held like a steel.
Remember to keep the angle to the rod consistent on both sides of the blade.
This step removes the scratches that may have been introduced by the stone. Check the blade. Does it look even, free of scratches? Great!
The last step is to use the steel. This steel rod is included with many knife blocks or can be purchased separately. It does not remove metal like the previous two steps, it simply reshapes the edge, removing the burr from the edge of the blade.
The burr is a tiny, thin curve to the edge of the blade. This curve presents a dull edge to the cutting surface and needs to be removed.
Hold the knife in your dominant hand and the steel in your off hand. Run the edge of the knife at the same angle as the previous two steps along the steel. Always move from the heel of the blade to the tip or in the reverse direction in one smooth motion. Don’t stop and start. Finally, always work both sides of the blade evenly.
This step should also be done between sharpening sessions to restore the edge of your knife after use.
*Edit* Don’t forget to wash the knife after sharpening to remove any metal bits. -Thanks @imabug for the reminder. I do that; I just forgot to note it.
Questions?
Send your domestic queries to helpme@home-ec101.com.
The post Knife Sharpening Tutorial appeared first on Home Ec 101.
CommentsYou can make a handle for almost nothing all you need is a ... by Wadethank you for the article this is something i've always ... by Phillip Guyton Jr.Thank you, this helps so much! I have been looking for a visual ... by MikeI know someone who has rehandled his knives, so it can be done. ... by mom, againTypically they are carbide wheels and tear up a blade. They ... by HeatherSolosPlus 9 more...
May 30, 2016
Menu Monday Week #22, Memorial Day 2016 and some Transparency
Heather says
If you’re out grilling, boating, or otherwise enjoying this long holiday weekend, please don’t forget to take a moment to thank and acknowledge those who gave their lives so we could have this privilege.
Some of you may have noticed that it has been very quiet around here. There are a bunch of reasons for that, most of them quite boring:
Work – Spring is conference season which means I’ve been in and out of town, getting ready to leave, or hanging out at the airport, as one does.

Site problems – this is a large website, which I launched it back in 2007. There are thousands of posts, links, and images. Google gets cranky if your site isn’t super fast, so I made some changes to make Google happy, but I made a mistake. This error resulted in many, many broken links or links pointing to things that don’t exist. That mistake made Google unhappy because of course it did.
When Google is unhappy, we have to fix things, pronto. While the mistake was automated, the fix was manual. I’m sorry, Jendi! (Jendi started helping with website and social media a little over a year ago. She’s saved my sanity and is an all around lovely person, too.) This giant project is also why if you’ve sent in a question you probably haven’t heard from me. It’s on my list.

Minions – we have four, in three schools in three different districts. The end of year activity, let’s celebrate all the things, has gotten a bit out of hand. We are very proud of them, now please go outside and play.
In a way, I’m quite glad that it is rainy and miserable out for the third day in a row, thanks to the tropical depression formerly known as Bonnie. Maybe I’ll manage some catch-up. Please stop laughing.
Trying to get back on track includes getting back to meal planning. One less decision to make after a long day can help. I’m also hoping to photograph some of these older recipes… Yes, you’ve read that before. You’ll probably read it again.
Monday – Garlic and Soy Chicken Thighs, Curried Potatoes, Steamed Broccoli
Tuesday – Lentil Casserole, Sauteed Zucchini, Rice
Wednesday – Fake’n’bake pork chops, slow cooker baked apples, green beans with almonds

Thursday – Clean Out the Refrigerator Night
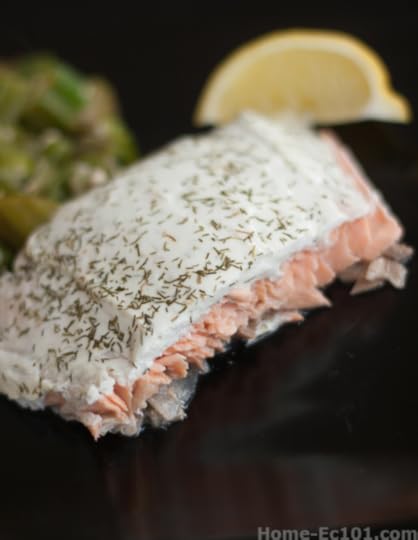
Friday – Dilled Salmon, Baked Sweet Potatoes, Caesar Salad
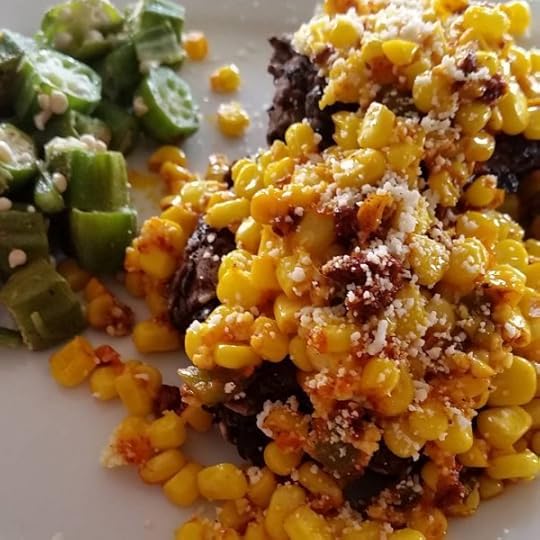
Saturday – Chorizo Tacos, Refried Beans, Street Style Skillet Corn (recipes to come)
Sunday – At home date night – Marinated Skirt Steak over ridiculously large salads.
What are you having this week? Here’s a printable to help you with your meal planning. Here’s to a great, hopefully, more productive week.
The post Menu Monday Week #22, Memorial Day 2016 and some Transparency appeared first on Home Ec 101.


May 29, 2016
Organizational Sunday Challenge Week #22
Heather says:
We’ve spent the last two —figurative, I hope— weeks in the bathroom. This week, we’re going to begin organizing the bedroom(s). If you have older kids, you may wish to tell them to get started on their own rooms. If you have young children, you’ll want to lend a hand to ensure the mess doesn’t just get moved from one spot to the other.
This week your mission is to clear the nightstand(s). If you keep yours clear, just go ahead and feel smug, while the rest of us get rid of the accumulation.
While we are speaking about bedrooms, there’s something I’d like to bring up.
If you have children, consider adding a charging station to your bedroom. After a certain hour, all devices that belong to the kids or teens in the house are turned off and plugged in.
It doesn’t have to be fancy, it can just be a power strip.
The important part is that the station is in your room.
I’m speaking as the goody-two-shoes. The child who didn’t get into trouble. . . as far as my parents and teachers knew.
I found quiet, insidious—now that I’m and adult and think about it— trouble to get into. I used to get up in the middle of the night and play on the precursor to the internet. I’d stretch that long phone cord out and try to muffle the screech of the modem and I was never caught. My parents never knew, but that doesn’t mean it was harmless.
How much easier could a kid like me get into trouble now? Reduce the opportunity.
Just make sure that you turn off the notifications so their friends with fewer boundaries don’t keep you up.
See you next week!
The post Organizational Sunday Challenge Week #22 appeared first on Home Ec 101.


May 22, 2016
Organizational Sunday Challenge Week #21
Heather says:
This week, we’re heading right back into the bathroom. This time, instead of focusing on the vanity, we’ll be focusing on hair and body products.
Are all of the open shampoos, conditioners, body washes, etc. in active use? If you don’t like the one that you’ve opened, and it’s just hanging out in the bathroom waiting to develop that lovely pink scum, do something about it and get rid of it. If you can’t bear the thought of tossing out unused soap, put away the ones you like more and save them for the reward for finishing off the less favored.
If it bothers your skin or just doesn’t work for you, it’s okay to dispose of it. No one wants your opened bath products, and there’s no point hanging on to them. Let it go.
If you are lucky enough to have multiple showers and tubs, do the kids’ guests’ bathroom today, too.
Not having to look at things that you know you should take care of every day can go a lot way toward reducing that feeling of overwhelm.
Have a great week; we’ll see you next Sunday!
The post Organizational Sunday Challenge Week #21 appeared first on Home Ec 101.


May 20, 2016
Simple Chunky Blue Cheese Dressing and Dip Recipe
Note from Heather: When I updated the images on this recipe, I added 3 green onions, chopped, used fresh ground black pepper, and used *gasp* bottled lemon juice. Don’t tell Bobbie 
May 15, 2016
Organizational Sunday Week 20
Heather says
Today we’re going to the bathroom.
Okay, well, umm, I hope that is something that happens every day or that you and your gastroenterologist have had long, heartfelt conversations and are comfortable with things.
Today when you enter your bathroom you are going to take a long, hard look at your vanity. When is the last time you replaced your toothbrush? Not recently? Fix that.
Empty tubes of toothpaste? Toss them.
Makeup? Take a good long look at each item and decide if it’s still sanitary? No? Toss it. Your eyes are worth it.
Find your grocery list and add the items you need to replace: dental floss, mouthwash, etc
How about hand soap?
If you’re feeling like over-achieving how are those hand towels looking?
The post Organizational Sunday Week 20 appeared first on Home Ec 101.


May 8, 2016
Organizational Sunday Week #19
Heather says
This week’s challenge will be done mostly online unless you don’t use online banking. In that case, you’ll need to grab your bank statement.
Look through your last few statements and look for recurring items.
Do you belong to a gym you don’t visit? Find out their cancellation protocol and follow through.
If your family cut cable service, how many platforms like Hulu or Netflix are you using?
If you have cable, are you signed up for the correct package?
How about your internet package? Does your service require you to use their equipment or are you paying a rental fee for a modem you could buy from any store like Walmart, Target or Amazon? The recurring rental fee will add up over time to significantly more than buying your own, outright.
Spending 15 – 20 minutes locating these budgetary leaks can save you a lot of money over time.
Good luck!


Heather Solos's Blog

- Heather Solos's profile
- 12 followers

