
Heather Solos's Blog, page 22
November 8, 2016
Serving Dishes and Large, Company Meals -Countdown to Turkey Day 2016
 Heather says:
I hope you had a great weekend.
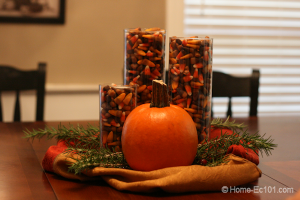
The holiday craziness kicks off in two weeks. I’ve noticed that many schools are out for the entire week of Thanksgiving this year. When did that start?
So far in our Countdown to Turkey Day we have:
Decided when and where
Located the dining room table and extension(s)
Reserved chairs and place settings, if necessary
Created our Soft Thanksgiving Menu Plan
Begun working on getting the house company ready by paying attention to daily / weekly chores
Today, depending on how your house and kitchen are organized may be simple or quite the dive into storage.
Grab your Thanksgiving menu plan and at the very least your mental inventory of serving-ware. If you have moved, held a yard sale, or gone on a donating / purging binge, I do recommend that you lay eyes on each piece you plan to use.
Next to each menu item assign a serving dish AND the appropriate serving utensil.
Do not forget your cranberry sauce, gravy, butter, and if you put out crudites or antipasti before the meal, don’t forget those items need a dish, too.
If you find yourself short on serving-ware – begin looking.
If you have lots of storage in your home, check out your local thrift stores for cookware; you still have a little bit of time to find a bargain. If storage is at a premium, go ahead and use disposable/ recyclable roasting pans. Just be careful with this option if you are sitting at a table and passing dishes rather than serving from a buffet. You really don’t want Grandma to end up with a lap full of cornbread dressing.
Got it? One dish for each item + one serving utensil.
See, we’re getting there with this year’s Thanksgiving preparation. How are your plans coming along?

The post Serving Dishes and Large, Company Meals -Countdown to Turkey Day 2016 appeared first on Home Ec 101.


Serving Dishes and Large, Company Meals -Countdown to Turkey Day 2014
Heather says:
I hope you had a great weekend.
The holiday craziness kicks off in two weeks. I’ve noticed that many schools are out for the entire week of Thanksgiving this year. When did that start?
So far in our Countdown to Turkey Day we have:
Decided when and where
Located the dining room table and extension(s)
Reserved chairs and place settings, if necessary
Created our Soft Thanksgiving Menu Plan
Begun working on getting the house company ready by paying attention to daily / weekly chores
Today, depending on how your house and kitchen are organized may be simple or quite the dive into storage.
Grab your Thanksgiving menu plan and at the very least your mental inventory of serving-ware. If you have moved, held a yard sale, or gone on a donating / purging binge, I do recommend that you lay eyes on each piece you plan to use.
Next to each menu item assign a serving dish AND the appropriate serving utensil.
Do not forget your cranberry sauce, gravy, butter, and if you put out crudites or antipasti before the meal, don’t forget those items need a dish, too.
If you find yourself short on serving-ware – begin looking.
If you have lots of storage in your home, check out your local thrift stores for cookware; you still have a little bit of time to find a bargain. If storage is at a premium, go ahead and use disposable/ recyclable roasting pans. Just be careful with this option if you are sitting at a table and passing dishes rather than serving from a buffet. You really don’t want Grandma to end up with a lap full of cornbread dressing.
Got it? One dish for each item + one serving utensil.
See, we’re getting there with this year’s Thanksgiving preparation. How are your plans coming along?
The post Serving Dishes and Large, Company Meals -Countdown to Turkey Day 2014 appeared first on Home Ec 101.
November 4, 2016
Countdown to Turkey Day – Time to Practice
 Heather says
Today is pretty short and sweet; you have a few things to make sure you’re on track for Thanksgiving:
PRACTICE
Take your soft menu plan from Thursday and go over it. Are there any recipes you haven’t tested? Is there a cooking technique in one that you haven’t tried? Have ever even roasted a chicken? Please try a chicken before you go for the turkey. (There’s a lot less to use up when you start with a chicken if you’re unhappy with your first attempt)
If the answer is yes to any of these, pick a day this week or weekend and practice. Don’t stress yourself out on Thanksgiving itself. You have enough to think about without worrying if a recipe will come out well or not.
If you’ve never mashed potatoes before, serve that as a side on Sunday.
How well do you know your oven?
If you’ve just moved and you don’t know your oven very well, do the toast test and get used to it. (I learned this from Nathalie Dupree, and it makes a lot of sense. You buy a cheap loaf of white bread and arrange the pieces in a single layer on a baking sheet. Preheat your oven to 350 and place the baking sheet on the center rack. Then observe the bread as it toasts. What zone gets brown first? Which areas take the longest to toast? These clues let you get to know your oven’s hot and cool zones. Take a picture of the toast to help you remember and tape it to the inside of a cabinet door near your oven in for a reference the next time you bake something.
It’s completely okay to spend $2 or $3 on a loaf of bread to ensure you won’t ruin a future meal and if you’re really worried about the cost of that bread? Make croutons. (Wow, I still need to take new pictures of that.)

If you’re trying a gluten-free version of something you’ve only ever made with wheat flour, please give it a trial run, especially gravy and if you’re testing a gluten-free gravy make sure you’re using the same alternative flour you’ll have on hand on Thanksgiving day. Why? The thickness will vary wildly from mix to mix and it’s frustrating to run out of turkey stock 10 minutes before the food is supposed to be on the table.
MAKE ROOM
Throw away, recycle, or donate three – five things that are just taking up space in your house. (And if it’s a set it only counts as one, no cheating.) Why? You’re going to have guests and the holidays are coming, you’ll appreciate the extra space.
Do you have enough containers for leftovers?
START CLEANING
How is that dining room table looking? Is it serving as a landing place for all the odds and ends, piles of mail and homework? Guess what; it is “later;” start putting that stuff away. You’re going to need that table soon.
Are you getting excited for Thanksgiving 2016?
The post Countdown to Turkey Day – Time to Practice appeared first on Home Ec 101.

 Related StoriesCountdown to Turkey Day – Time to Practice
November 3, 2016
Countdown to Turkey Day The Soft Menu Plan
 Heather says:
To make creating your Thanksgiving Menu Easier, I have a handy Thanksgiving Menu Printable. This printable has three columns, one for your ideal Thanksgiving menu, a second for your planned guests’ ideal menu -I assume you have some idea of what the people you will be serving expect- and the third column is the great compromise that will be your Thanksgiving holiday menu.
Got it?
Do your holiday meals feel well put together or do they more often seem to resemble a potluck mishmash of flavors?
While you are sitting down to plan your Thanksgiving menu try to keep a specific palette of flavors on your table rather than grabbing any old recipe just because it looks good.
My usual Thanksgiving menu has a Southern / Cajun theme which you can find on this Google Spreadsheet:
The Cajun seasoning of the turkey also appears in the sausage of the cornbread dressing. The sausage is also used to flavor the collard greens. I swapped out the usual pecans for almonds in the apple, sage, cranberry dressing to tie it with both the broccoli salad and the green beans. Cranberries are in the cranberry sauce -surprise!- the apple, sage, cranberry dressing, and in the broccoli salad. Now keep in mind that this flow of flavor works best if there is a variety of textures in the menu. Crisp turkey skin contrasts with soft dressing, or crisp tender green beans next to the soft-baked, rich feel of the apples in the other dressing
Here are some of our favorites:


Roast Turkey if you brine your bird, skip the initial hot blast or you’ll end up with a very dark turkey.
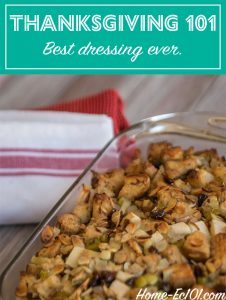
Cornbread and Andouille Sausage Dressing
You’ve got your mission, your printable, and now it’s time to go for it. What will you be serving for Thanksgiving 2016?
The post Countdown to Turkey Day The Soft Menu Plan appeared first on Home Ec 101.


November 2, 2016
Countdown to Turkey Day 2016
 Heather says
Thanksgiving is my absolute favorite time of the year. It’s no secret that I love food and I love to cook for others, and Thanksgiving Dinner is my Superbowl of company dinners. It’s a chance to gather with friends and family and indulge in the traditional and the exceptional.
Are you planning on hosting your first Thanksgiving dinner? Are you a seasoned pro, but ready to take some of the headaches out of hosting Thanksgiving? Well, you’re in luck, it’s time for this year’s Countdown to Turkey Day. (Psst, it’d be awesome if you’d share this series with your friends or family who may be hosting for the first time, too.)
Before the crap year that was 2013**, I hosted an early Thanksgiving Dinner each year. I know they say that grief takes about 3 years to work through, but until you’re coming out the other side, it’s easy to say, “I’m fine” even if you aren’t.
I used to look forward to the day of cooking at least as much as the real deal. Partly because I had the chance to experiment freely with recipes, but also because sometimes I really, really miss working in a commercial kitchen. (Don’t worry, Phil, I’m not heading back to food and bev, I don’t miss enough about it to ever really consider making the switch).

I am happy to say that this year, I was able to restart the tradition. We had a lot of fun, and I’ve been working to update the images on the website. My youngest also got in on the action. She was handed a point and shoot camera, and it is so fun to go through the pictures from her 9-year-old point of view. Life isn’t actually edited Pinterest Picture Perfect. Yes, you do see store bought desserts on the table. Everything else we made for Thanksgiving was gluten-free. I didn’t want to risk the cross-contamination for my friends, and it was also a time-saving decision, too.

This year is another year with an early Thanksgiving, and we’ve got just over three weeks to plan. This year Thanksgiving falls on November 24th and since I was on an airplane yesterday, I forgot to post the kickoff. (There I go with that dang being human thing again).
This means it is time to get our acts together and get started. We’re kicking off with a few, hopefully, easy tasks.
TODAY
1. Decide – When and Where
Sit down with pen and paper and decide where and what time dinner will be served. Create a tentative guest list that notes any allergies or dietary restrictions. It’s easier to plan around a gluten or nut allergy than it is to rework a menu.
2. Figure Out – Seating and Serving
Before things get crazy, look at your guest list. Do you have enough chairs and place settings? Are you serving a casual enough meal that sitting on the floor and using Chinette works? No? Party rental stores often allow chair, china, and glassware rental in lots much smaller than you’d imagine. I’ve rented as few as ten chairs in the past for parties. Reserve what you need ASAP.
3. Find the dining room table.
Yes, I’m not kidding about the last one. Our dining room table has become both my fiance and I’s office. He’s great about putting his work away at 5 pm. Me? Well, we’re not going to talk about that pile of steno pads, scratch paper, and pens*.
Well Home Eccers, will you be playing along this year? Have you hosted Thanksgiving dinner before? Are you trying it for the first time? What are you looking forward to and what are you dreading about the holiday?
I hope you join in on the fun.
*Complete and total tangent, but I finally have a favorite pen thanks to one of my awesome co-workers. She is quite possibly one of the most organized people I know. She was working from my home one day, and I grabbed one of her pens to take a quick note and fell in love.
**For those not in the know that was a year of death and divorce. The latter is hard enough on its own, even when everyone acts like grown-ups.
The post Countdown to Turkey Day 2016 appeared first on Home Ec 101.


October 31, 2016
How to Get Rid of That Mildew Smell When You Can’t Wash on Hot
Dear Home-Ec 101,
I have special, red guest towels. I really love their bright color, but they sat in the washer too long one day and now have that mildew smell. How can I get rid of the musty odor without losing the bright color of these towels that can’t be washed on hot?
Thanks,
Musty in Muskogee Heather says:
You really don’t want a faceful of mildew odor or to have mildew stink clinging to your hands. If your guest towels have any detergent residue, this will cause the mildew odor to hang around a lot longer. Detergent residue is sticky and makes rinsing away the microorganisms responsible for the smell a bit more difficult.

When we have talked about mildewed and musty odors in towels in the past, we discussed the types of energy to use to get those towels clean.
Types of Energy Used in the Laundering Process
thermal – the heat of the water
physical – the agitation of the machine
chemical – the detergent
Even warm water has some thermal energy and while your tap water in your area may be chilly, it will still help. It just won’t be hot enough to fade the towels.
In this case of the smelly guest towels, it’s likely that some detergent residue is contributing to the issue.
First, unless you have a lot of guests, your towels should only comprise a small load. If you do have a lot of guest towels, divide them into two small loads of laundry. Wash them on the largest load setting, on the longest cycle your washer provides. This will give the towels plenty of room and time to agitate and plenty of water to rinse away the funk.
Removing that mildew smell:
You may have to wash the towels twice, with only borax in the wash cycle and a cup full of vinegar in the rinse. Yes, you will have to pay attention to the washer. Both of these chemicals alter the pH of the water helping the extra detergent work its way out of the towel fibers. If you see any sudsing in the rinse cycle of the wash, repeat the process.
Once the spin cycle is through, give the towels a good sniff. No odor? Happy day! All of the sticky detergent molecules have been washed away. Your next step is to thoroughly dry the towels according to their label directions.
Do not even think about folding them if they are even slightly damp and placing them in a linen closet. You’ll just invite your mildew buddies back over for a party in the guest towels.
If the towels still have a bit of odor to them, wash them one final time with a scant (tiny) amount of detergent. The mildew may have worked its way deep into the fibers and not just be hanging on to the detergent residue. Again for this load, you want to use the amount of detergent you’d use for the smallest load your washer runs and run the clothes washer on its largest load and longest cycle settings.This will let the detergent do its job without sticking around after the rinse cycle starting the process over.
Dry your towels thoroughly.
If you really want to up your fresh smelling towel game store them in the linen closet with a sachet.
Submit your questions to helpme@home-ec101.com.

 More tips on washing with cold water and dealing with mildew.
The post How to Get Rid of That Mildew Smell When You Can’t Wash on Hot appeared first on Home Ec 101.


October 25, 2016
Sweet Cornbread Recipe
 Heather says:
This is a very basic, dense, slightly sweet cornbread recipe. It is not to be confused with cornbread cake which, as one may imagine, is even sweeter and more cake like. Corncakes usually contain flour to lighten the batter. The recipe as written below is safe for those on a gluten-free diet as long as you ensure that you use plain corn meal and not corn meal mix when buying your ingredients.
This cornbread is one of our favorite sides, it is made from household staples and is simple to prepare. I also like that it’s low cost and pairs well with many meals. The kids love it drizzled with just a touch of honey for a breakfast treat.

Ingredients
2 cups plain yellow cornmeal
1/3 cup sugar
3 tsp baking powder
1 egg
1 1/4 cups milk
3 TBSP vegetable oil or melted bacon fat
1 tsp salt
Technique:
This is so basic we’re skipping the step by step pictures. First, crank the oven to 475F. In a medium bowl stir together the cornmeal, sugar, salt, and baking powder. In another small bowl, whisk the egg into the milk.
Place your cake pan (9x9x2) or muffin tin (12) in the oven for three to five minutes.
Add your liquid ingredients to the dry ingredients and stir until combined. There’s no need to break out the stand mixer, a quick stir by hand is fine.
You want to work quickly to prevent once the liquids have been added to the dry ingredients to allow the baking powder to do its work while the batter is setting.
Remove your pan from the oven, grease it with a light coating of your favorite cooking spray.
If you really want to get back to your roots, grease your pan with the 3 TBSP of bacon grease. Simply put the grease into the pan before it is heated in the oven. Watch it carefully because it will burn quickly. Take the pan out of the oven and tilt it to be sure it’s well coated. The pour the excess into your batter. Just remember it’s 3TBSP total, not in addition to the 3TBSP mentioned in the ingredient list.
Pour your batter into the hot baking pan and immediately place in the oven with the rack at the middle setting. If your rack is too close to the heating element it may burn on the bottom or top before the middle has set.
Bake for 15 – 20 minutes, a toothpick inserted into the center should come out clean. Remove from the oven and place the cake pan on a rack to cool.
That’s it.
Enjoy.
The post Sweet Cornbread Recipe appeared first on Home Ec 101.


CommentsYou can, I'd probably also switch to baking soda since the ... by Heather SolosPlace a sheet pan on the lower rack of the oven and bake the ... by Heather SolosSince you're at high altitude experiment with adding more milk. ... by Heather SolosI've been looking for a simple and slightly sweet flourless ... by Meena RehanaI do not write a ton of responses, however i did a few ... by GluteraPlus 23 more...
October 24, 2016
Simple Mushroom Risotto
 Heather says:
This recipe for mushroom risotto is about as simple as risotto can get. You see, while risotto is rice, it’s a needy rice. It’s rice that needs a little nurturing and love, but then when it’s ready to serve? It brings the awesome. If you really want to make this recipe company worthy -holiday worthy even- then, I highly suggest you use homemade stock. Want to bring on the wow? Use this stock made from roast turkey necks.
Arborio rice is key to obtaining the proper consistency. The short grains and the way Arborio releases starch as it cooks gives risotto its classic, creamy texture. Yes, Arborio rice isn’t the cheapest out there, but as this dish takes a bit of effort, it’s worth the splurge to have the best results.
Have you made risotto before? I chose to stick to a common mushroom like portobello, as they are easy to find in even small towns. If you want to use fancier mushrooms, by all means, go ahead. If you choose to use dried mushrooms, soak them in the stock to rehydrate before chopping (and to flavor the stock).
Are you willing to try now?

: Mushroom Risotto
: Simple mushroom risotto made with baby portobello mushrooms
8 cups chicken or turkey stock
10 oz baby portobello mushrooms, sliced
1/4 cup unsalted butter
2 tablespoons olive oil
2 large, yellow onions, chopped
3 garlic cloves, minced
1 1/2 cups Arborio rice
2/3 cup dry, white wine (cooking wine will do in a pinch, but not for company dinner)
2/3 cup freshly grated parmesan (not the stuff in a green can, unless you’re just in the mood for this and can’t be bothered to go to the store, just don’t tell me about it)
Salt and pepper to taste
Small handful of fresh parsley, chopped (optional)
Heat the stock gently either in the microwave or in another pan on the stove. The stock you add to the rice MUST be hot. It doesn’t need to be boiling, but to create the creamy texture of a nice risotto, it should be hot.
Melt the butter over medium heat in a large skillet or a pot with a HEAVY bottom – using a pot with a thin bottom is asking to scorch the risotto you’re going to a lot of trouble for. Proceed at your own risk.
Add the olive oil.
Add the onions to the skillet, cook until they just start to become translucent, then add the rice.
Stir frequently to toast the rice for a few minutes (3ish). Add the wine to the pan and continue cooking (stirring frequently, still) until the liquid is absorbed.
Add 1 cup of the hot stock, stir continuously until the liquid is absorbed (see, I told you this dish was needy).
Add the mushrooms, and the garlic, and another cup of stock. Cook and stir until absorbed.
Guess what, add another cup of stock, cook and stir until absorbed.
Continue in this manner until your rice is just tender and creamy – you may not use all 8 cups of stock. The goal isn’t to make a runny dish, just creamy and beautiful.
Stir in the parmesan, taste, adjust the seasoning with salt and freshly ground pepper. Stir in the parsley and serve.
Enjoy!
The post Simple Mushroom Risotto appeared first on Home Ec 101.


CommentsIs there something else to use other than mushrooms? We don't ... by DeneicerGreat point, John. by Heather SolosI think it's important to point out that, for a recipe like ... by John Carney
Collard Greens
 Heather says:
The new year will be here before long, and in the Lowcountry, that means it’s time to cook up some greens. Collards are a traditional New Year’s dish eaten to bring wealth in the coming year. Their peak season is from January to April, and they are packed with calcium, iron, and vitamins A and C.
Finally, I should note that collards have an extremely high water content and lose a lot of volume in the cooking process. If you don’t have a huge pot, just add the collards a handful or two at a time as they begin to shrink.
If you don’t have sausage, consider using bacon. If you are vegetarian or vegan, consider sauteing some onion in several tablespoons of olive oil before adding the collards to the pot.
Be aware that collards have a somewhat funky odor. I would only buy them the day before or the day of preparation. Crumpled newspaper added to the crisper drawer will help by absorbing the funky smell.
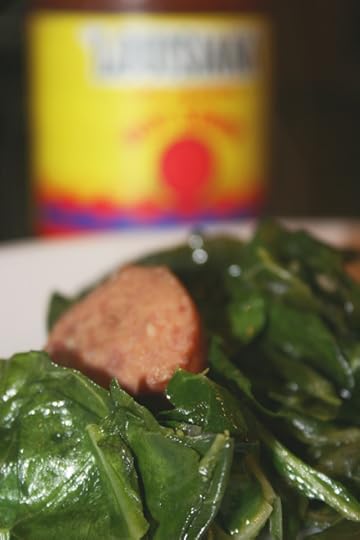
How To Make Collard Greens
Ingredients:
1 lb sausage (smoked, Andouille or kielbasa) cut into coins
2 large bunches of collards
salt and pepper to taste
Directions:
Rinse the collards three times. Three shalt be the number thou shalt rinse, and the number of the rinsing shall be three. Four shalt thou not rinse, nor either rinse thou two, excepting that thou then proceed to three. Five is right out. Once the number three, being the third number, be reached, then. . .
Sorry, I got carried away. Once the collards have been rinsed tear the leaves from the main stem and then into bite sized pieces. Discard the tough woody stems.
In a large pot heat the sausage, until browned. Add the collards. Cover, occasionally stir until they have reached their desired tenderness. Season to taste.
I like mine with hot sauce. . . Lots of Louisana hot sauce.

Easy. Peasy. Done.
Enjoy.
Want to try making some more delicious vegetables? Try these!
Roasted vegetables as a simple side dish
Easy grilled vegetable foil packets
Vegetable stuffed cabbage rolls
Recipes for the Farmer’s Market Summer Produce and Seasonal Eating
The post Collard Greens appeared first on Home Ec 101.


CommentsHm. I might have to try this. Now if I can FIND collards around ... by Jo-LynneSmoked turkey wings or legs are a great substitute for pork in ... by karenI usually leave a window open if i'm going to have a large pot ... by BrambleWell, I was pestering Heather to talk about how she cooks them ... by MargolisWe like our collards with ham hocks. Mmm. by Mrs.WPlus 5 more...
October 17, 2016
Menu Monday Week #42 of 2016 –
Heather says
This is one of those weeks where having a menu plan for the week is critical to our staying on budget. Most weeks, when I’m not traveling for work, I time shift. In other words, instead of working the standard 9 am – 5 pm, I am on 6 am – 2 pm. I usually don’t exactly clock out at two, but my colleagues know I am much less likely to be immediately available. With four kids, this helps us keep our sanity.
This week I’ll be working a normal, if less convenient 9 am – 5pm and I am also planning to hold my used-to-be-annual pre-Thanksgiving photoshoot. It’s where I prepare the recipes I plan on posting in November. The last three Octobers have been filled with a lot of change, but we’re finally ready to do this. I do use all of the tips I share in the annual Countdown to Turkey Day, which help a lot.
If you need a printable to help with menu planning, here you go.
This week we’ll be having mostly quick meals to keep the evenings as free as possible for the preparation and kid activities.
Monday – Taco Skillet, Salads

Tuesday – Chicken Bog, Collard Greens (doubling to take to friends who could use a meal)

Wednesday – Chicken Caesar Salads
Thursday – Italian Sausage, Peppers, and Onions, (I’ll probably add a few handfuls of kale and call it a day)

Friday – Tuna Cakes, Cheese Grits, Sauteed Green Beans

Saturday – Clean Out Refrigerator Night
Sunday – pre-Turkey Day – Everything you expect on Thanksgiving Day, plus a few variations. It’ll be a lot of fun. We’ll be sending leftovers home with guests
Have a great week!
The post Menu Monday Week #42 of 2016 – appeared first on Home Ec 101.


CommentsI was looking at the wrong picture – same problem though – ... by Michael CarnellUm, chicken bog is supposed to have rice, not noodles!
Heather Solos's Blog

- Heather Solos's profile
- 12 followers

