Tim C. Taylor's Blog, page 16
February 23, 2012
Bare-breasted Minoan bull leapers… patented!
I took a day off yesterday to work in Bedford Library on edits to the second book in my series: The Reality War – City of Destruction. In a heated exchange of dialogue (in my book, not in the library), I decided it would make sense for one of the characters to draw reference to the famous bull leapers of the Minoan civilisation. We're talking around 1,400BC on the island of Crete. The most notorious aspect of bull-leaping is the bared torsos of the young athletes performing the leaps, and, yes, the bare breasts rule applies to the female athletes too.

Bronze Age fresco from palace of Knossos
Naturally, I looked this up on the internet when I got back. I had the notion that the emphasis on bare-breasted girls was possibly more a reflection on the interests of the original (male) archaeologists, and that the evidence of what actually went on was altogether more ambiguous. Turns out I was right (for example, see this article from — of all places — Strange Horizons).
The questioning of the accuracy of history is a theme that appears repeatedly in book2. After all, the characters are waging a reality war; they have time machines, which they use to reduce the probability of rival realities coming into existence. The character mentioning the scantily clad leaping girls comes from a human timeline obsessed with remembering the past in an attempt to anchor it. Shame they don't always get their history correct.
The astonishing find for me was to discover that someone has applied for a US patent for a Modern Minoan Bull Leaping Game. I'm not making this up! You can see a pdf of the patent application here.
All credit to the patent applicant (I can't quite bring myself to write inventor here). I'm not knocking the guy for having a go and registering this.
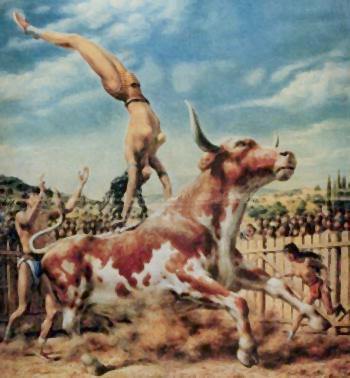
Even the bull is unclothed!
I'm still shaking my head in disbelief about this. But I have a smile on my face. Here are a few reasons why:
When I worked for ICI, a major British chemical company, I sat at the same desk as our patent expert. The language she used was very formal legalese, as you would expect. The language in the bull leaping patent is very different, and refreshingly so: a mix of purple prose, clear English, and the sort of laddish informality that you might expect when guys get together to watch the game over a few beers.
I studied UK patent law at university. This is a US patent application, and boy, is it different. This would never be granted in the UK. Where's the 'inventive step' as UK patents require? The whole point is it's doing something that maybe people did thousands of years ago. The differences from the Minoan original (or a supposition of what that might have been like) are that modern Minoan bull leaping features advertising, and TV coverage (which would not pass the 'non-obvious' requirement.)
Actually, there is a genuine difference, although it was so vague I didn't think it actually had any meaning. The applicant argues that his Modern Minoan Bull Leaping teaches us about sacrificial love (agape), and is not sullied by money (except for the patent applicant and event organiser) or by competition (except that the patent is designed to prevent competition).
The applicant reveals his true clothes (sorry, mate, couldn't resist that) when the patent encourages the audience to wear diaphanous clothing, which would be 'fair game for broadcasting (claim 10). And finally, of course, all participants in the game must expose their 'naked torsos at all times' (claim 18).
I said I'm not knocking the guy who is trying to patent is invention, and I meant it. Here's why: I'm actually intrigued to see what this would look like on my TV screen. Let's hope his patent is approved.


February 18, 2012
Tips on formatting your print book for Createspace and Lulu: Part5 – Styles
[click on images to see a larger version]
Tip #7 Introducing styles
Styles are a means to define a set of formatting instructions, that you can then apply to parts of the document that you select. Suppose you decide you want your chapter headings to be Arial, 14 point, bold, small caps, spaced 12 points above, 6 below, and centered. You don't have to use styles at all. You could simply select each chapter heading paragraph, and repeat the set of formatting instructions.
What, though, if you have ninety chapters? Do you really want to repeat those instructions ninety times? Are you sure you could do that without making a mistake? Picture yourself banging your head against the fridge door because you forgot to apply small caps to chapter sixty-one.
Here's what I would do. Create a style — perhaps call it 'ChapterHeading' or maybe 'Heading 2' — and define the style as Arial, 14 point, bold, and all the other things we said earlier. Instead of applying the formatting to each chapter heading directly, apply the style instead. All the formatting comes with it for free.
And here's the real kicker… Perhaps when you get to upload your manuscript to Createspace, there's a problem embedding the font, or you realize you need a larger paragraph spacing for the chapter headings of the hardback edition, or you decide the font size should be larger… or any one of dozens of formatting instructions you want to change. With styles you change the style definition once; instantly, your change is applied to every paragraph set to follow that style. Without styles you have to find every location and change that paragraph individually; and you have to get it right every time. Using styles isn't just about saving you time: it's about producing books that are formatted consistently. And in this context, consistent and professional are synonyms.
Tip #8 Don't start from here! Start formatting as you write your book
You can save yourself a lot of grief later by picking the styles you will use and applying them as you write. If you don't use styles in your writing then now's the time to start. Also dividing the book into sections as you go, and setting headers and footers will save a little time too. By the way, this is even more true for eBooks, which have a habit of revealing subtly inconsistent formatting that is difficult or impossible to spot.
Don't worry about locking yourself down to a particular font or size, because you can modify the style definition at a later stage. Concentrate on becoming familiar with a set of styles, and apply them as you go. Microsoft Word has the Style Set concept, which is perfect for this.
The most important thing to know about styles is that it is worth investing your time to learn how to use them well.
It's a little like keeping your paperwork tidy and up to date as the year progresses, so that filing your tax return is no big deal. If you don't, and your records are scattered, lost, or plain wrong, then not only will you take far longer to do your tax return, but it will be more painful, and — crucially — you are far more likely to make mistakes.
Don't risk making mistakes with your printed book. Do yourself a favor and learn to use styles properly. After all, as I'm sure you'll agree, the biggest difference between your book layout and your tax return is that your book is far more important.
And if you're formatting eBooks as well as printed ones, that's doubly true.
Tip #9 Defining Styles
Don't worry, I am going to explain how to define styles. But whatever I write here will become out of date, because every time Microsoft release a new version of Word, they fiddle with the user experience for styles (because Microsoft realize how vital styles are). And if you're using InDesign or Open Office then the concept of styles remains the same, but the implementation will be slightly different.
In other words, read these sections I'm giving you about styles, and then look at the detailed guidance in the help for your product. For Word 2007, Microsoft give their introductory guidance here.
Let's take a look around Word 2007 styles with a screenshot.
What I've done here is click on the little arrow at the bottom-right of the Styles area of the ribbon. That launches the Styles window (which you see on the right, listing styles). I've then clicked on Options… at bottom-right of the Styles window, which has brought up the dialog box called Style Pane Options.
By default, Select styles to show (which tells Word what to show in the Styles Pane on the right) gives you every style defined in the current document. Most of the time, that's not what you want. So in the screenshot I'm about to change that to all styles In use in the current document.
I'm going to pause before going further. I've just blasted through a whole list of dialogs, windows, buttons, and options. If you aren't comfortable with styles, then yes, this will take a little while to get the hang of. Read my tips, but if you feel you only sort-of understand after the first read, open up your online help and browse through the topics I'm covering. Then have a play with a real (backed-up) Word document. It doesn't matter if it takes a few goes to get the hang of styles. The time you're investing will pay you back well.
So, back to our example we're running through. As you can see, I'm examining styles for the document you're reading. In the Style Pane Options dialog I chose to select styles to show in use, and I also de-selected Font formatting to leave only Paragraph level formatting. Once I've made these changes, the Style Pane looks like this…
My style pane now looks a lot less messy, and that's where you need to be. I would feel happier if all the styles in the Styles Pane were ones I created and I knew I was using. Right now I'm bothered by the one that labeled: Left: 0.01", First Line: 0". When you see a style with a name like that, you can be sure it is direct formatting and not formatting from a style. Here I've clicked on the little button on the right of the style name in the Styles Pane and selected: 'Select All n Instance(s)'.
This shows me where this style is appearing. In this case, as with almost every example, this strange formatting is a mistake. I changed the style to Body (by clicking on Body in the Styles Pane), which gets rid of this Left: 0.01", First Line: 0" forever.
Tip #10 Defining Styles#1 — direct formatting into styles
If you've already started formatting your document, you can use it to generate styles automatically. You select a paragraph of text with formatting you want to reuse, and define a new style that will automatically copy across the formatting from your selected paragraph.
In the screenshot below, I've selected a paragraph (make sure you select the entire line) and then
Right-click | Styles… | Save Selection as a New Quick Style…
Quick Styles, by the way, are the style buttons on the ribbon that I've ringed in red.
You can do something similar with earlier versions of Word, but you'll need to look up Creating Styles in the online help. In fact, here's an online course to help you.
That's it for the current run of posts on book formatting. If you want to find out more, drop me a comment, or try my book Format YOUR Print Book with Createspace, which has plenty more guidance on styles and many other topics.
Click here for part 4 of this series
 This post is an extract from the book Format YOUR Print Book with Createspace, available as a Kindle eBook at a special launch price of…
99cents – amazon.com | 77p – amazon.co.uk
Coming soon in paperback.


February 17, 2012
How you can read my novel for free with Read! Review! Repeat!
 Over at Greyhart Press, there's a promotion called Read! Review! Repeat! Basically, if you're one of the first 100 people to post a review of a Greyhart Press book on Amazon, Goodreads or similar, you can claim your next Greyhart eBook for free.
Not all of my books are published through Greyhart Press, but my new time travel series (The Reality War) is.
If you're cunning, you might pick up one of the free Greyhart Press titles and review your way through as many books as you like, without paying for any of them.


February 9, 2012
My debut novel published today on Kindle: 99c/ 77p launch price!
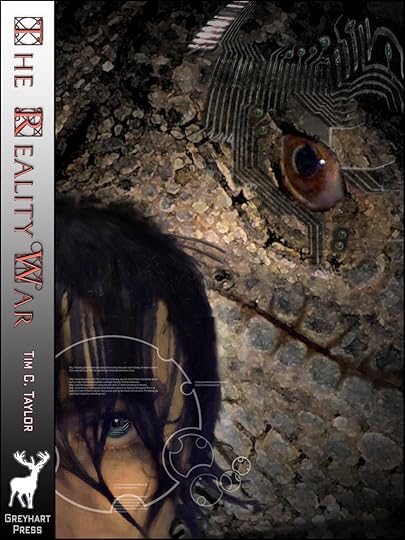
Book1: The Slough of Despond
My time-travelling science fiction series The Reality War launches today with Book1: The Slough of Despond.
This is first and foremost science fiction adventure, but there's also light-touch allegory inspired by The Pilgrim's Progress. If you liked novels by Stephen Baxter, Alastair Reynolds, or Peter F. Hamilton, I think you will enjoy my series.
I wrote the first part of this book in the local reference section of Bedford Central Library, surrounded by books about or by John Bunyan. The Pilgrim's Progress quickly began influencing my plotting, though my future and alternate versions of Bunyan's home village of Elstow would be unrecognisable to him.
The first book is out now for Kindle at amazon.com and amazon.co.uk at a special price of 99c/ 77p, and includes instructions on how to download a free copy of the second book, which will be published at Easter. US and UK paperback editions will be available in the spring.
Click here for more information, including interviews and background articles about The Pilgrim's Progress, time travel, and Elstow.


February 6, 2012
Formatting your print book: what else would you like to know?
A few weeks ago, I started writing up notes on print formatting so I would have a reference to work with when doing formatting work for clients. Why not add some screenshots, I thought, and post them to my blog?
That led to my series of Writing Tip posts, which will conclude in a few days with a post about using styles. That completes my original intention of sharing the notes I was making to help me format consistently well.
I'm thrilled — and a little surprised — that several people have taken the time to leave a comment saying they found this little series helpful. That got me thinking that maybe I should invest the time to develop this series a little further into a small and modestly priced eBook, and possibly print book too.
So I'm canvassing opinion. Would you be interested in an eBook or print version, and is there anything I've not covered that you would like me to add?
By the way, I'm not going to take down the posts on my blog. They will remain freely available indefinitely.
Thanks,
Tim


February 2, 2012
Tips on formatting your print book for Createspace and Lulu: Part4 Page Numbers
[click on images to see a larger version]
We've talked a lot about headers and footers, but there are a few specifics to do with page numbers. Word 2007 introduced a new way to add page numbers and a new way to format them. I suggest you use them both as they are a big improvement.

Page Number
Users of earlier versions of Word have to approach page numbers differently, so I'll show how older versions do it too.
For Word 2007 users, the simplest way is to open up the header/footer design menu on the ribbon (by clicking on the header or footer area of the page) and clicking on the Page Number button as in this screenshot.
Selecting the Top of Page or Bottom of Page options will give you a variety of pre-formatted page number field options in the header or footer respectively. Now, when I write page number field, what you are doing here is inserting a special field code that shows the number of the current page. In other words, when you view or print a page, Word works out which page you're on and substitutes that page number for the field code.
As for the other options: Page Margins offers fancy stuff, not recommended for straight fiction; Current Position puts a page number field where you currently have the cursor. You need to use this if your page number needs to share its header/footer with something else. For example, if you want book name and page number to both be on the header, you need to do something like this…

Inserting page numbers at the current position
In this example I've created a new header using the 'Blank (three columns)' option we saw in an earlier tip. On the left placeholder (where it says [Type Text]) I've put the book name.
I selected the right-hand placeholder.
I then select Page Number | Current Position This inserts a page number field into the right-hand placeholder.
The reason I've given this example is that if, instead, I had set up the three column header and then added page numbers using Page Number | Top of Page, Word would have deleted the rest of the header and left me with just the page number.
Make sure you have entered page numbers for ALL your headers/footers
It's easy to forget this. Say your header has different first page, odd page, and even page; now you want to add the footer and make it the same for all pages (except the blank ones). As far as Word is concerned, you still have three different footers (first page, odd, even) and you need to define each one separately.
One gotcha in my example novel of Andrew Cyrus Hudson's Drift, is that the opening chapters were short. So short that there weren't enough pages to show an even numbered page. I found the best approach was to add blank pages — just so I had enough to define all three headers and footers — and then delete the extra pages.
Formatting page numbers
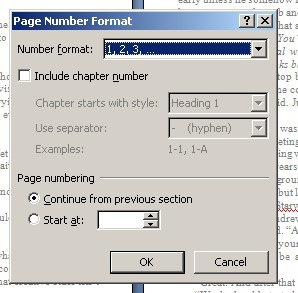
On the Page Number ribbon button we've just been looking at, one of the options is Format Page Numbers… which brings up the following dialog.
It does more than merely format the page number, as you can see. Go create a header or footer with a page number and play with this dialog until you're happy using it. It's quite obvious but I'll add a couple of tips:
In this dialog you are setting options for the current section. As we saw earlier, the best approach is to set up your headers and footers, and other section options, for the section at the start of the main body of your text, and then use link to previous to copy your settings throughout the remainder of the book.
Front matter is all the stuff that goes before the main text of your book: copyright, title, preface, introduction, acknowledgement, dedication, foreword… that sort of thing. It is standard book design practice that if you choose to number the pages of the front matter, then do so using lower case Roman numerals. For example, 'i', 'ii', 'iii', 'iv' and so on. If you number front matter pages this way, then once you get into the main body of your book, start with Arabic numerals, beginning with page '1'. Most fiction books don't bother with numbering the front matter pages, simply starting with page '1' when the main body starts.
Working with page numbers in earlier versions of Word
In earlier versions you had to deal directly with the concept of fields. In fact, Word 2007 uses fields in exactly the same way; it's just that the approach I've just described does all the hard work for you so you don't need to know what a field is.
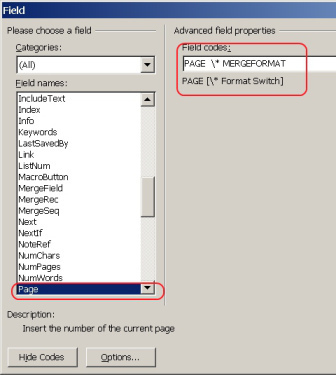
With the earlier versions you need to find the place where you want the page number in the header or footer and then select from the main menu Insert | Field. (You can also bring up this dialog using ALT + I, F)
You will see a list of fields you can insert at this point (see screenshot below).
Scroll down and pick the field name, 'Page'.
Click on the Field Codes button, and enter 'MERGEFORMAT', as I've done in the example screenshot below. The 'MERGEFORMAT' option tells Word to start counting its page numbers where it left off at the end of the previous section. If you don't, Word will start numbering each section at page#1.
Adding the page fieldcode in Word 2003
If you're using Word 2007 or later, Word will do this 'mergeformat' malarkey for you automatically.
Of course, there may be places where you want Word to start numbering from page 1, most likely as you move from front matter to the main part of your book. In this case, you can change the field code option by clicking on the page number in your header or footer, and then Right-click | Edit Field.
For Word 2007 users, this is all so much easier. You can set the starting page number for the current section with the Page Number Format dialog we saw earlier in this tip.


January 31, 2012
Presidential Candidates or Twenty-one Stooges: guest post by Kennesaw Taylor

Kennesaw Taylor
I'm delighted to host Kennesaw Taylor today (no relation, least that I'm aware of) who writes humor columns online and for several Georgia papers. Basically, he makes fun of anyone and or their mothers, if they aren't fast enough to get out of the way.
Here Kennesaw gives a sober, respectful, and thorough analysis of potential candidates in the US Presidential Election.
The Twenty-One Stooges
Kennesaw

Sorry, not this time.
Do I really want to start the day making fun of other Americans? You bet your sweet, southern, rear end, I do. I'm just poking fun, but at least its bi-partisan poking and no that does not mean Bill Clinton is running again. The idea that buying for next Christmas starts before the turkey and ham are gone is enough to make you sick. The idea that the next election cycle begins before the last one is over, is worse. It has taken less than three years to narrow it down from 313 million Americans to twenty-one.
Well that's not completely accurate, there are twenty-one viable or not so viable candidates, it's according to how you look at it. A least five are average Americans who have taken it upon themselves to save our country, they have a snowballs chance. The worst part, they will be beaten by several write in candidates which appear, every cycle.
The most successful write in, to date, Mickey Mouse? Not bad for an eighty year old rodent whose inappropriate behavior is well documented. The only write in to ever beat Mickey, Hillary Clinton? In the 2008 election she and the fifteen different ways her name was misspelled, beat him for the first time in history. Got to love us Americans, we ignore the possible Americans who might actually represent, we the people and vote for cartoon characters.
George Washington and Abraham Lincoln continue to get votes. If you turned the TV on during their address the nation you'd need to check the guide to make sure you weren't watching, Tales from the Crypt reruns. "Hehehehehehe, I dig what you've done with the capital, love those cherry trees. I did not have axual relations with that tree." What could a guy who has had all his organs, including his brain removed, get done? It appears to me, we'll find out.

Vote Nugent!
So once we get done laughing at the fifteen Americans who have less chance of being president than Chuck Norris or seventies, rocker Ted Nugent, we must turn our attention to those few who actually have the money to buy the presidency, Oh, sorry I misspoke, I meant get elected. Wait, before I go on let's not dismiss the real possibility of Ted becoming president. Teds platform, kill it, cook it, stuff it and hang it on the wall. If he'd have been president, Saddam and Bin Laden would have been smiling down from the walls of his Michigan ranch in the late eighties, eliminating the need for our boys to leave the country at all.
Alright back to the true contenders. We are faced with the following choices, Barack, Mitt, Newt or Ron. My grandfather always told me, to never trust a man with two first names. Ron has three. Ronald Ernest Paul, what happened here, is he trying to hide something, for the love of Pete, get a last name? Ron would you like to buy a vowel or perhaps a last name? I'd like Ronald Ernest Pauline Jones, it has a certain ring to it, don't you think?

Newt Gingrich
I am continually mortified that Newton Leroy Gingrich is from Georgia, every time someone points it out, I cringe, imagine my relief to discover he is actually from Pennsylvania; I was relieved, but not surprised. Who would name an innocent child Newton Leroy? What long lasting, troubling effects could pop up later? I mean, the only thing that would be worse is to shorten it to Newt, dog gone it, too late. Will we end up in world war three because someone calls him Leroy?
Now to Willard, who would name their child Willard Mitt or the bigger question, once it was done, why would they call him Mitt? All these guys were picked on as children; I guarantee it, leaving them with only two options, one going into law enforcement or two politics. How can a man who has made 42 million in the last two years have any connection with a man who falls short a hundred bucks, a month on his bills? Or a single mother who that same hundred bucks causes to pay ninety bucks in late fees which compounds her problems monthly? He's concerned with compound interest while most Americans are more concerned with compound poverty.

The funniest candidate?
I refuse to get started on our current president who has the funniest name of all, but if the name fits? I'm not saying these guys won't make good presidents and in fact, I'm just horsing around. I try to get serious every election cycle and it usually lasts about ten minutes. Then I laugh, giggle, snort, burp, poot and blow whatever I'm drinking through my nose as I write stuff like this. We as Americans have learned two things, it's better to laugh than cry and it's easier to smile than ask why.
About Kennesaw Taylor
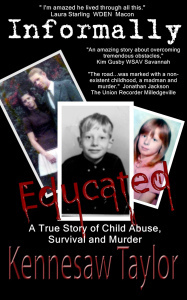 Kennesaw is an advocate against child abuse and his first book, Informally Educated, was about his childhood or the lack thereof. He spends much of his time speaking and trying to make some small difference in the outrageous amounts of child abuse in our country.
He also writes a humor column in several Georgia papers, where he basically makes fun of anyone and or their mothers, if they aren't fast enough to get out of the way. As Kennesaw puts it: 'I write stupid shit for a living, it ain't bad work when you can get it. Never underestimate how hard it is to be stupid and come up with stupid shit on a regular basis.'
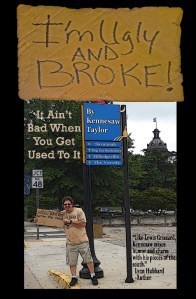 Kenessaw's been compared to Lewis Grizzard, which he's happy about. He's had two books published which contain my columns from 2009, I'm Ugly and Broke and 2010, I've Got the South in my Mouth. His 2011 columns are due out soon; it's named, I've Fallen and My Names Not Chuck.
Kennesaw's books on Amazon
Child Abuse Blog
Blog about everything else
my main webpage
Kennesaw's funny bones
The Redneck cooker
Join Me on Facebook


How to plot a time travel novel
I wrote a guest article for thriller author Jeremy Bates about my experiences in plotting the time travel aspects of The Reality War. Jeremy's done a great job with the layout, and plenty of people are commenting. Why not take a look at the article, and have your say too.


January 28, 2012
The Reality War
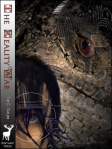
Book1: The Slough of Despond
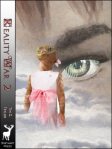
Book2: The City of Destruction
A new time travel, action-adventure series begins with The Reality War Book1: The Slough of Despond, published February 9th 2012. Click here for further details.


Tips on formatting your print book for Createspace and Lulu. Part3: Sections
We've seen a lot about sections in the past few tips, but let's finish the job in this tip. In these tips, we're looking at using Microsoft Word to layout books to send to a printer, such as Createspace. In that context there's really only two reasons for using sections:
To allow us to set headers and footers
To auto-generate blank pages if we want chapters or parts to begin on an odd-numbered page.
In other words, we need to put in sections to make possible the book layout plan we've been looking at in previous tips.
Before we jump in and start creating sections, I'll add two more things:
Smashwords — you might also want eBook editions of your book published through Smashwords. Current Smashwords guidelines say you shouldn't use section breaks; I've just told you that you must use section breaks. At the end of this tip, I'll give some Smashwords-specific tips.
Changing margins — Word does give you the option to choose different margins for each section. I would avoid doing that for book layouts for reasons of simplicity and robustness. If you really wanted to play with a variable margins then that's up to you. The Createspace interior reviewer is supposed to fix margin errors, so hopefully it won't let you stray too far.
What's a section?
Sections are a way of breaking your document into parts, well… okay, sections. There are two things you need to know:
Each section can be given its own value for a set of attributes. Of interest to us are: header & footer definition, section start property (whether the section has to start on a facing page), page number format, and the page number to start counting from.
We can set the first page of the section to have a different header/footer, and we can force the first page of the section to start on a facing (odd-numbered) page. According to the book layout approach we're following, that means we need to start a new section for every part and for every chapter.
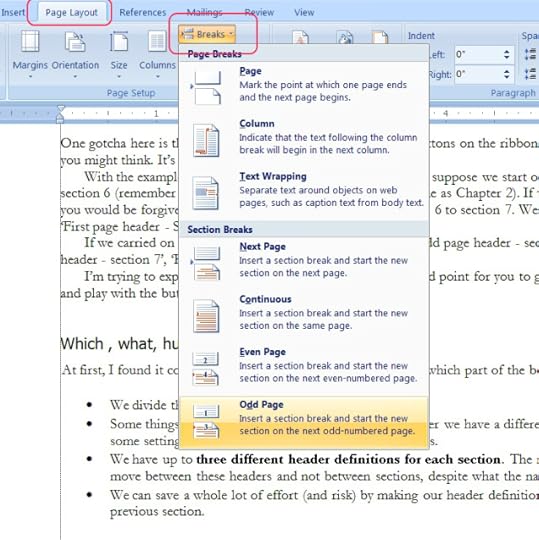
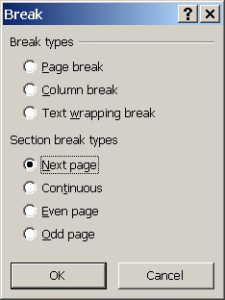
To insert a break in Word 2007, you can do so through the ribbon as follows:
Here I've selected the section break that corresponds to the odd page section start. We use this to begin a new part or new chapter on a facing (odd) page, telling Word to insert a blank page if it needs to.
Let's suppose you are at the end of part 2 of your book and want to start on part 3. On the last page of part 2, insert a odd page section break and then add your part 3 title text to the next page. With Word 2007 and earlier, you won't see any blank pages until you print them or (very important, this) you create the pdf. Don't forget to test your pdf to check blank pages are inserted at the right point.
If, on the other hand, you are coming up to a new chapter, but you don't want to force it to begin on a facing page, then you insert a section break with a next page section start.
If you have an older version of Word, or you want a faster way to insert breaks quickly, you can use the keyboard shortcut 'ALT+I' , followed by 'B'.
This dialog does exactly the same as the ribbon dialog.
Have a play creating section breaks with a backed-up document. Then bring up the Page Layout | Page Setup dialog we saw in earlier tips:
All the settings on all the tabs of this dialog are properties of each section. You can set different values for each section if you wanted to. But you don't want to, so don't do it.
Pay close attention to the section start value in this dialog. I've come across strange behavior where I've tried deleting a section break in print layout view and then adding a new one of a different type. My change reverts back to the old section type when I'm not looking. Most mysterious!
If that happens, look at the section start setting in the page setup for the preceding section. Your inserted section break will probably be reverting to the value here, in which case change the setting in the page layout dialog first, and then insert your section break.
There's some general guidance from Microsoft on sections here.
Smashwords, Kindle editions, ePub and section breaks
This only applies if you want to create eBooks, especially if you upload a Word doc to Smashwords. The Smashwords style guide (which you would be wise to follow) says you shouldn't use section breaks. I've told you that you must use section breaks for the print layout, and if you are creating a Kindle edition yourself, that accepts section breaks with no problem.
When I create books, I often create a Kindle, ePub, Smashwords, and print edition. My approach is to keep to a single version for as long as possible and then break out into giving each version its tweaks at the last moment. (Using Style Sets makes this much easier… see a later tip).
So for a more general approach for managing multi-edition documents, here's what I do
Write, tidy, edit your document in print layout as you go. Keep in that format as long as possible.
If, like me, you do editing on a Kindle or other eReader, it is simple to swap to a different style set (see later tip) and then create the ebook for your own purpose. Section breaks and headers/ footers won't be a problem at this stage.
When you get to finalize your Smashwords doc, take these additional steps:
First, remove all section breaks. Use the find and replace dialog (see screenshot below). Use the 'Special' button to Find 'Section Break' and replace with 'Manual Page Break. It really is as simple as that. [Note that this only works one way. You cannot automatically find page breaks and replace with section breaks.]
Remove all headers and footers. Do this after removing all the sections. Make sure you remove all the headers and all the footers. Don't be caught out by that different first page footer you'd forgotten about. If you leave any footers in, you won't get into the Smashwords Premium Catalog.
Next time, we'll see a little more about page numbers before looking at styles and style sheets.
Click here to read the previous post in this series.


