
Lorraine Pascale's Blog, page 10
September 16, 2014
Grilled peach, burrata and basil salad with Dijon dressing
Buratta is becoming increasingly popular in restaurants and is an insanely decadent cheese – made from mozzarella and cream wrapped in more mozzarella. Parma ham would be a nice addition to this if you fancied it.
INGREDIENTS
For the dressing
3 tbsp extra virgin olive oil
1 tbsp balsamic vinegar (not a syrupy one)
1 tsp Dijon mustard
flaked sea salt and freshly ground black pepper
For the peaches
2 tsp olive oil
4 peaches, almost ripe but not too soft, quartered and stoned
To serve
200g/7oz ball buratta, drained and torn into chunks (or 2 x 125g/4½oz balls mozzarella)
70g/2½oz bag rocket
1 bunch of basil, leaves only, roughly torn
PREPERATION METHOD
1. For the dressing, lightly whisk all the ingredients together in a small bowl. Season to taste and set aside.
2. For the peaches, lightly grease a griddle pan or barbecue with the oil and then get it nice and hot. You may have to work in batches, depending on the size of your pan. Place the peach quarters, cut-side down on the griddle pan or barbecue for 1-2 minutes to give a nice chargrilled mark on them.
3. Use a metal fish slice to help lift them up so as not to leave the chargrilled marks behind. Turn them onto their other cut side for another minute (don’t cook on their skin side). The charring will add to the flavour. You can also use a frying pan to cook them, but obviously you won’t get the char-grilled lines on them. Sit the peaches cut side up on a large serving platter as you go.
4.Arrange the buratta chunks (or mozzarella) around the peaches and scatter the rocket and basil leaves over. Scatter a little salt and pepper on top. Quickly whisk up the dressing again if necessary, drizzle it over and serve.


September 15, 2014
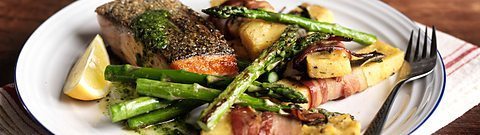
Crispy skin-on salmon with polenta chips

When buying salmon look for the MSC label, which means that the salmon is from a sustainable source. Polenta (cornmeal) is rather strangelooking stuff and the instant kind, when boiled up, looks rather like mash potato.
However, when set into a square and cut into ‘chips,’ it starts to turn into something rather special.
EQUIPMENT
20cm square tin
POLENTA CHIPS
900ml good quality vegetable or chicken stock
200g instant polenta
1 stalk of fresh rosemary, leaves
finely chopped (to give about 1 tbsp)
20 large fresh sage leaves
20 slices of pancetta
2 tbsp olive oil
GREMOLATA
4 garlic cloves (can use more or less depending on your taste), roughly chopped
Handful of fresh parsley, roughly chopped
50ml olive oil
Finely grated zest of 1 lemon
CRISPY SKIN SALMON
1 tbsp olive oil
4 sustainably caught salmon steaks, with the skin scored
ASPARAGUS
1 tbsp olive oil
250g asparagus spears
SAUCE (OPTIONAL)
50g unsalted butter
Small handful of fresh parsley leaves, finely chopped
Juice of 1 lemon
Flaked sea salt and freshly ground black pepper
1 lemon, cut into wedges, to serve
Line a 20cm square tin with baking parchment or heatproof cling film. Bring the stock to the boil in a large saucepan. Reduce the heat to a fast simmer and, using a silicone whisk or rubber spatula, gradually stir in the polenta. Add the rosemary and season with salt and pepper. Cook for 4–5 minutes, stirring constantly, until large volcanic-like bubbles form. The polenta will swell and become really thick. Don’t leave for a minute or it could become lumpy. Pour the mixture into the prepared tin and smooth the surface with the back of a spoon. Leave aside to cool for 20 minutes.
Meanwhile, make the gremolata. Place the garlic, parsley and lemon zest in a pestle and mortar and pound the mixture to a mash so all the flavours mix together. Then stir the oil through. Alternatively, blend everything
together in a mini blender until as fi ne as possible. Either way, spoon into a small serving bowl and set aside.
Line a large baking sheet with baking parchment. Once the polenta is firm, pull it up out of the tin, place on a chopping board and carefully remove the paper or cling fi lm. Cut the slab into 10 x 2cm wide strips and then cut them in half across to give twenty chunky chips. Being careful not to break the chips, wrap a sage leaf around the middle of each one, followed by a slice of pancetta. Arrange on the tray as you go. These can be prepared to this stage a day ahead of time, in which case, cover with cling film and keep in the fridge.
Preheat the oven to 110°C, (fan 80°C), 225°F, Gas Mark 1/4.
Heat two large frying pans on a medium to high heat and drizzle a tablespoon of oil into each one. Fry ten polenta chips in each pan for about 1–2 minutes on each side. Use a small fish slice to carefully turn them over to avoid breaking them. Arrange them back on the baking sheet once cooked and pop them in the oven to keep warm. Wipe out the frying pans with kitchen paper and return both to a medium to high heat with a tablespoon of oil in each one. Season the salmon with salt and pepper and once the oil is hot, place the fi sh skinside down in one pan and leave to cook for about 3–4 minutes. Meanwhile, saute the asparagus in the other pan for 3–4 minutes, tossing occasionally.
If you want to make the sauce, simply melt the butter in a small saucepan, add the finely chopped parsley and lemon juice and season to taste. Once the fish has had its time, flip it over and let it cook for 4 minutes on the other side.
Meanwhile, remove the polenta chips from the oven and arrange five on each serving plate. Divide the asparagus up evenly among them also. Once the salmon is cooked to your liking (either a little pink in the centre or cooked completely through) remove from the heat and arrange one on each serving plate. If you made the optional sauce, pour this over now. Serve at once with the gremolata and lemon wedges.
Discover many more dishes like this in Lorraine's How To Be A Better Cook.
September 12, 2014
Win with Lorraine's How To Be A Better Cook

Lorraine’s stunning new cookbook How To Be A Better Cook has finally hit the shops, packed full of delicious, quick and easy recipes to get you inspired. Tune in to BBC Two tonight at 8.30pm to watch some of the recipes in action in the first episode of Lorraine’s new series.
The series is all about helping people to conquer their cookery challenges… so now it’s over to you! Do you fancy cooking along with the show and being in with a chance of winning a cookery course for two at Leiths plus a hotel stay in London?
All you need to do is cook something to do with this week’s theme and post it on Instagram or Twitter with #howtobeabettercook.
This week’s challenge is to show us some ‘wow!’ Whether it’s your go-to dinner party dish, a treat for someone special or a delicious dessert, Lorraine wants you to show her something with a little bit of style. So get in the kitchen and give it a go!
You can find out more here including an exclusive recipe to get you inspired.
Good luck!

Meet Tony: "Lorraine, I need your help!"
Tony Sartori, from London, has only dish he prepares in the kitchen: cheese on toast.Lucky for him, Lorraine's on hand to guide him on being a better cook.
In this episode, can Tony master a delicious Mediterranean-inspired menu? Grilled peach and burrata salad, crispy salmon with polenta chips and grilled asparagus await, and a dessert with real wow factor.
With plenty of deceptively easy recipes and fantastic tips, Lorraine shows people with no kitchen confidence how to pull off an impressive meal for friends and family.
The first in the series starts Friday 12th September at 8:30pm on BBC Two.
August 28, 2014
Blog: Tea, cake and jewels

Last week I had the lovely task of launching the new PANDORA ESSENCE COLLECTION at their flagship store on London’s busy Oxford Street. It was a great afternoon full of tea, cake and a brand new selection of gorgeous, meaningful charms inspired by some very important personal values – all making for some delicious Instagramming!
At the launch I was thrilled to announce that I would be an ambassador for the PANDORA ESSENCE COLLECTION, which characterises the individual woman. The collection is a personal symbol for expressing your perception of life and your true values.
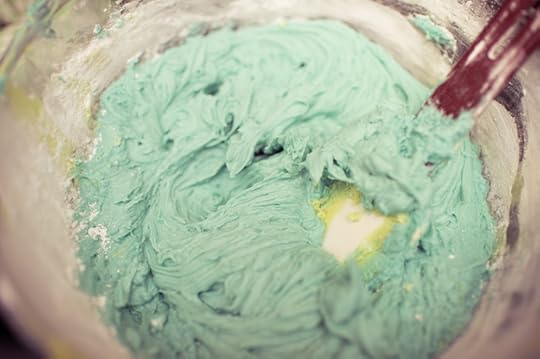
After a question and answer session on the new range, hosted by the fabulous hostess-with-the-mostest Cherry Healey, things got culinary with a cup-cake decorating demo.
Stunning @lorrainepascale demonstrates the art of cake decoration at the #PANDORAessenceAW14 launch pic.twitter.com/hH0ng29t7U
— PANDORA Jewellery UK (@PANDORA_UK) August 21, 2014
The idea was for everybody to ice their cakes based on one of the Pandora Essence charms, reflecting their own qualities creatively – and we had some really impressive icing action!
Three values close to my own heart are Belief, Caring and Dedication, and I think this range is a wonderful way of expressing yourself alongside our everyday thoughts and actions.
As we discussed each important sentiment I explained how Caring is really important to me because of the work that I do in fostering and adoption with young adults.

They've sometimes been shipped to so many different places and thrown around from family to family, and often they have a voice inside telling them that they're not good enough.
So I try and teach them that it’s important to care for themselves, to tell yourselves you’re lovable, that you're worthwhile, that you're important and that you deserve to be here.
That caring voice inside them is so, so important.

For more information on my work with Pandora and the PANDORA ESSENCE COLLECTION range of charms…
Visit http://www.pandora.net/
Follow @PANDORA_UK
Pinterest: www.pinterest.com/officialpandora
YouTube: www.youtube.com/user/TheOfficialPandora
Instagram: @theofficialpandora
#PANDORAessenceAW14
August 16, 2014
How To Be A Better Cook cover revealed!
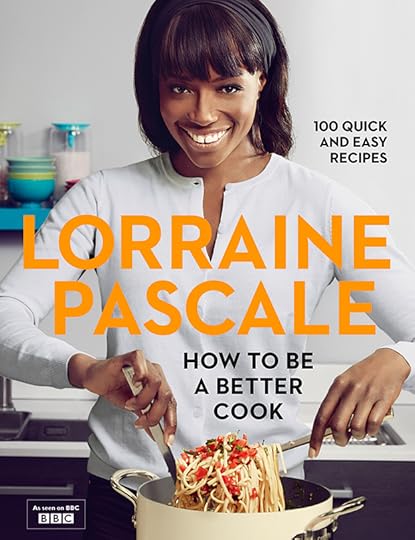
"Tada... and here it is! I’m so excited to unveil my new book #HowToBeABetterCook! Time for some kitchen confidence..."
As a lover of Instagram, Lorraine took to the App to reveal her exclusive cookbook cover for the first time, with each post sampling a taster of the great recipes as an Insta-vid...
...and when put together, all the dishes showed the finished product!

Take a look on Lorraine's Instagram account to discover just some of the delicious new recipes in Lorraine's brand new book #HowToBeABetterCook.
Out 11th September 2014.
August 7, 2014
Satisfy your literary appetite with Lorraine
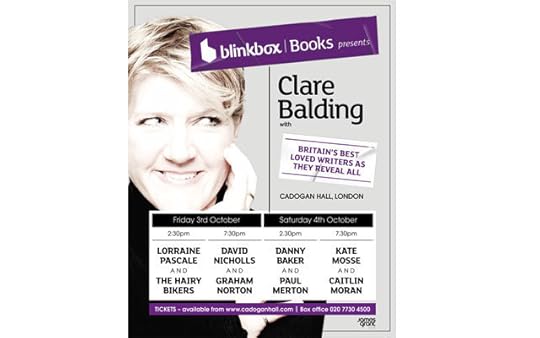
Find out what lies between the pages of Lorraine’s recipe books as she joins Clare Balding at a unique literary event with blinkbox Books.
Lorraine will be live on stage at Cadogan Hall, London, on October 3rd to talk food, cooking and travel with Clare and cheeky chaps the Hairy Bikers.
It promises to be a lively discussion, with the audience also invited to pose their own questions to the panel.
The event is part of a series of four blockbuster shows taking place this October and featuring top cookery writers, popular novelists and the crème of high profile TV presenters.
Tickets for each event will include the 2 hardcover copies of the authors books and Clare’s latest novel on ebook from blinkbox Books.
Find out more and get your tickets here.
July 18, 2014
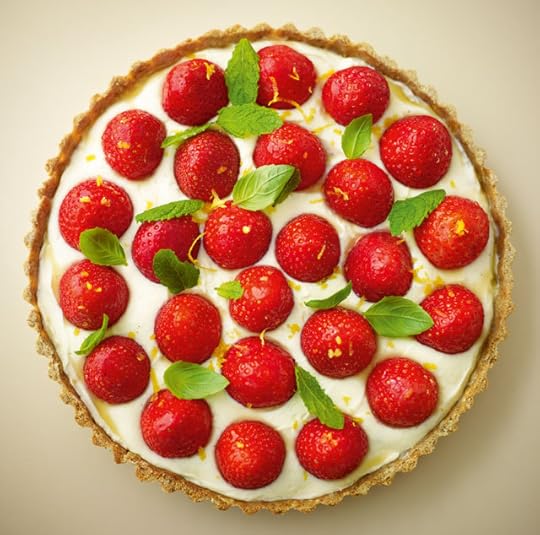
Strawberry open tart with lemon & vanilla ‘cream’ served with basil & mint
This is one of my favourite recipes in the book. I think it became that because it was such a massive challenge to get it right. Initial attempts resulted in a filling which was splitting and not setting, and it was tough to pull away from my patisserie routes and not just add loads of sugar to get it right. After much trial and error I present to you a tasty tart which looks very pretty on the plate.
Serves 6
Equipment
20cm round, loose-bottomed straight-sided tart tin, 31⁄2cm deep
Pastry
Spray oil
A little flour for dusting
425g Oaty Almond and Vanilla Pastry
‘Cream’ filling
200g low-fat Greek yogurt
200g low-fat cream cheese
25g icing sugar
Finely grated zest of 1 unwaxed
lemon
Seeds of 1 vanilla pod or 1 tsp
vanilla extract
Strawberries
2 tbsp honey
400g medium-sized strawberries, hulled or just chop the green bit off
To serve
Finely grated zest of 1⁄2 unwaxed lemon
Few fresh basil leaves
Few fresh mint leaves
Preheat the oven to 180°C, (Fan 160°C), 350°F, Gas Mark 4. Grease the inside of a 20cm round, loose-bottomed, straight-sided tart tin that is 3½cm deep with a little spray oil and set aside on a baking sheet.
Lightly dust a clean surface with flour and roll the pastry out to the thickness of a £1 coin. Lift the pastry up carefully and drape it over the rolling pin to help lay it into the prepared tin, leaving the excess to hang over. Pinch a little of the excess pastry off, roll it into a ball and then push it down gently into the ‘corners’ of the tin, so that when the tin is removed after baking, the edges are nice and straight. Trim the excess pastry off with a sharp knife.
The pastry will probably now be a bit soft, so put it in the fridge for about 20 minutes or so or until it is nice and firm. Take a large square of baking parchment, scrunch it up and then open it out to line the pastry with it. This just makes it a little easier to stay sitting in. Then fill the paper-lined pastry with dried beans or ceramic baking beans and bake it for 15 minutes until just firm to the touch and beginning to turn golden. Lift the paper and beans out and return the pastry case to the oven to bake for 5 more minutes. This should dry the bottom out and make it a bit more evenly golden. Then, remove from the oven and leave to cool.
Meanwhile, mix the yogurt and the cream cheese together in a medium bowl until smooth and well blended. Sift the icing sugar over, add the lemon zest and vanilla seeds or extract and really beat it together well so there are no lumps. Cover and refrigerate until ready to use.
Also, prepare the strawberry glaze by simply mixing the honey with 1 tablespoon hot water in a small bowl and setting aside.
Once the pastry case is completely cool, carefully remove it from the tin and place it on a serving plate. Spoon the cream filling into the centre and spread it out with the back of a spoon to fill evenly. Then arrange the strawberries hulled side down all over the top, so the pointy ends are sticking up all over the tart. Of course I do have a problem with this looking messy and need to do it in neat and perfect rows or circles, but throwing them on any way you wish is fine.
Brush the strawberries all over with the honey glaze. Scatter the lemon zest, basil and mint leaves over and serve at on
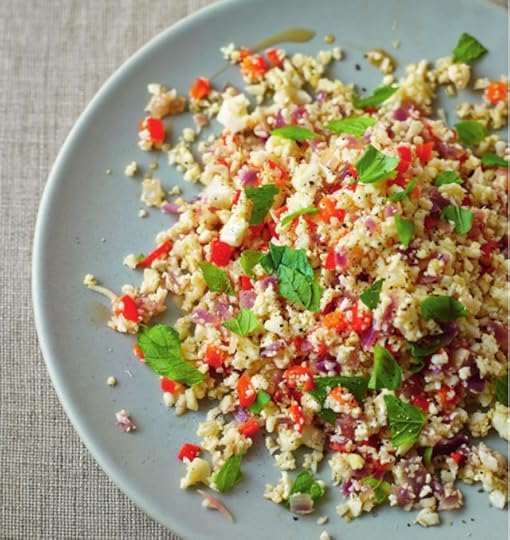
Cauliflower ‘couscous’ with chilli, sesame & mint
This is not baked, not in any way, shape or form, but I wanted to include it in the book (A Lighter Way to Bake) as an interesting alternative to couscous (the comparison recipe is regular couscous). It is much lower in carbohydrates than regular couscous and you can add whatever bits and pieces you fancy to make it your own tasty, almost guilt-free accompaniment. The sugar content comes from the natural sugars in the onions, cauliflower and red pepper.
Serves 4 (or 6 as an accompaniment)
Equipment
Food processor
Ingredients
1 large cauliflower
Spray oil
2 large red onions, very finely chopped
2 big garlic cloves, finely chopped
1 red pepper, very finely chopped
2 red chillies, deseeded (if you like it less hot) and very finely chopped
4cm piece of fresh ginger, peeled and very finely chopped
100ml good chicken stock
Juice of 1 lemon
Drizzle (about 1–2 tsp) of sesame oil (optional but really, really good)
Salt and freshly ground black pepper
To serve
Small handful of fresh mint leaves
Small handful of fresh basil leaves
Remove and discard the woody stem and outer leaves from the cauliflower. Chop it up into rough chunks and then blitz it in a food processor using the pulse button, until it resembles couscous then set this aside.
Put a really large frying pan on a medium heat and add a spray of oil. Gently fry the red onion for 3–4 minutes until softened, but not coloured. Then add the garlic and cook for a further minute. Next, add the red pepper, chilli and ginger and cook for a couple of minutes. Tip in the cauliflower and stock and continue to cook for about 10–12 minutes until the cauliflower is just tender and its raw taste has gone. Finish with the lemon juice and season with a little salt and pepper.
Remove the cauliflower mixture from the heat and spoon into a large serving dish. Drizzle over the sesame oil, if using, then rip over the mint and basil leaves and serve.
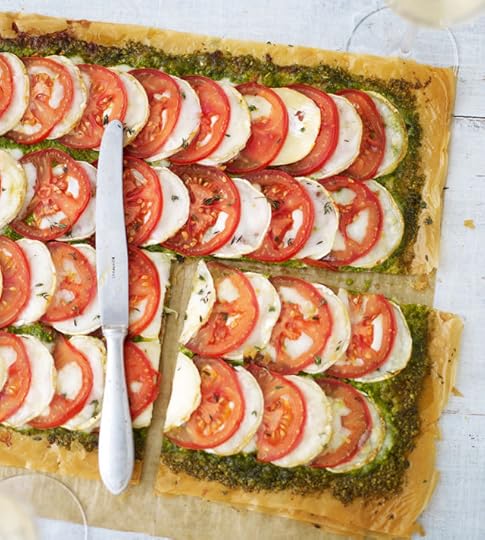
Extra thin & crispy goat’s cheese tart with spinach & thyme pesto
This is really a posh pizza minus the time spent on making a real bread base. Making a crunchy crispy filo base in this way has been a very useful item in my foodie repertoire and toppings such as bananas with toffee sauce, four cheeses with some chopped fresh herbs or caramelised onions with mozzarella and basil have all seen their way through my kitchen. For something even more different before baking, cut the filo into circles or heart shapes for individual portions.
Serves 6
Ingredients
½ x 270g packet of filo pastry (preferably not frozen; you can freeze the leftover pastry for use later)
1½ handfuls of fresh thyme leaves, plus extra for sprinkling (optional)
50g melted butter or light olive oil spray
1 large tomato, finely sliced
200g goat’s cheese log, cut into 2.5mm-thick slices
Spinach pesto
Handful of spinach leaves
Handful of pine nuts, toasted (I found some pretoasted at the supermarket, or pan-fry them for 3 minutes, until toasted)
1 clove of garlic, peeled
20–30ml extra-virgin olive oil
60g Parmesan cheese (or use vegetarian Parmesan-style cheese)
Salt and freshly ground black pepper
Preheat the oven to 200°C (400°F), Gas Mark 6. Lay one filo sheet on top of a flat (preferably non-stick) baking tray, sprinkle with a little thyme, if using, and place another filo sheet on top. Dab a little melted butter roughly over the tart, especially at the edges since they are prone to burning, and sprinkle with more thyme, if using. Repeat until you have four layers of pastry. Place another flat baking tray on top of the pastry and cook in the oven for 10–15 minutes, keeping a close eye on it.
Meanwhile, make the pesto by blending the spinach, pine nuts, garlic, olive oil and Parmesan together in a food processor. Season to taste.
Take the pastry base out of the oven. If the edges look like they are getting too dark, brush them with a little more melted butter, then spread the pesto over the pastry, leaving a 2cm border. Place the tomato and the goat’s cheese slices in alternate layers, sprinkle with a little more thyme, if using, and bake in the oven for about 15 minutes, or until the goat’s cheese begins to melt.
Take the tart out of the oven. I find that the bottom of the tart can get a little oily, so to combat this, I cut a slice of the tart and before serving put it on some kitchen paper to soak up any oil. Serve straight away with a
large green salad and a chilled Italian white wine
Lorraine Pascale's Blog

- Lorraine Pascale's profile
- 33 followers

