
Lorraine Pascale's Blog, page 9
September 29, 2014
Quick linguine with prawns, clams, garlic and chilli
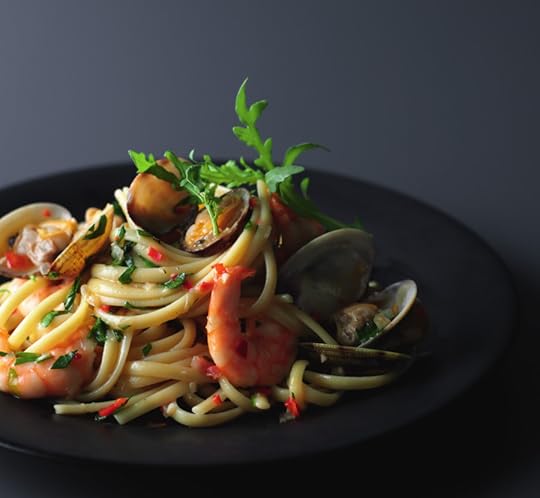
People often tell me that cooking with shellfish is something which they find intimidating. It is really a case of just bunging the shellfish into the pan, then standing back and letting the hob do the work for you.
INGREDIENTS
350g/12oz dried linguine or spaghetti pasta (regular or wholewheat)
3 tbsp extra virgin olive oil, plus extra for drizzling
2 large banana shallots, finely diced
3 garlic cloves, very finely chopped
2 red chillies, seeds removed (if you like less heat) and finely chopped
400g/14oz raw, peeled tiger prawns, deveined (about 600g/1lb 5oz frozen weight)
400g/14oz clams in their shells, washed thoroughly (ideally soaked them in cold water for an hour), discard any that remain open when tapped
1 glass white wine (about 150-200ml/5-7fl oz)
1 small bunch parsley, roughly chopped (about 3 tbsp chopped)
flaked sea salt and freshly ground black pepper
70g/2½oz rocket
1 small lemon, cut into 4 wedges
METHOD
1. Cook the pasta in a large saucepan of boiling water according to the packet instructions, adding salt to flavour and some oil to stop the pasta sticking if desired.
2. Meanwhile, put the oil in a large saucepan (that has a tight-fitting lid) over a medium heat. Add the shallots and gently fry for 8-10 minutes until softened, stirring from time to time. Add the garlic and chillies and cook for a couple of minutes.
3. Add the prawns and cook for one minute, stirring. Add the clams and white wine, bring to the boil and then cover with a lid. Allow to cook for 4-5 minutes, or until the clam shells have all opened (discard any that don’t) and the prawns have turned from grey to pink.
4. Once the pasta is cooked, drain well, tip it in on top of the shellfish and mix together well. Stir the chopped parsley through and season to taste with sea salt and black pepper.
Pile into serving bowls, drizzle with an extra bit of olive oil, scatter the rocket over, top with a good grinding of black pepper and serve each bowl with a wedge of lemon.


Simple tortilla pizza bites
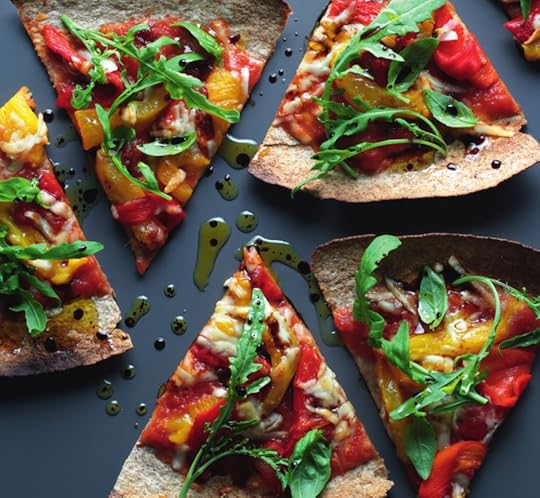
These tasty tortilla pizza bites are just the trick for an easy cheat’s pizza!
INGREDIENTS
spray oil
4 wholewheat, plain flour or corn tortillas (about 19cm/7½in diameter)
1 small garlic clove, peeled and halved
400g/14oz can chopped tomatoes (preferably with herbs)
¼-½ tsp chilli flakes (optional)
125g/4½oz pecorino cheese (or a mature cheddar), coarsely grated
285g/10oz jar roasted red and yellow peppers, drained (about 175g/6oz of actual peppers)
70g/2½oz rocket
small handful fresh basil leaves (optional)
flaked sea salt and freshly ground black pepper
2-3 tsp balsamic vinegar (optional)
2-3 tsp extra virgin olive oil (optional)
METHOD
1. Turn the oven ideally as high as it will go, making sure two shelves are in place - about 240C/450F/Gas 8 (220C fan). Spray a bit of oil on two large baking trays and place two tortillas on each. Spray a little more on top of the tortillas and then rub the cut side of the garlic all over the tortillas - this gives the pizza extra flavour.
2. Divide the chopped tomatoes evenly between the four tortillas, spreading them out but leaving a 1.5cm/¾in border. Scatter over the chilli flakes, if using, and divide the cheese and peppers evenly over the top. Pop both trays into the oven to bake for about 4-6 minutes (depending on how hot your oven is), or until the cheese has melted and the tortillas are crisp and golden-brown on their edges. Swap the trays around on the shelves half way through for even cooking.
3. Remove the tortillas from the oven and slide onto serving plates. Top with the rocket and basil (if using). Season with a little scattering of salt and pepper, then drizzle with balsamic vinegar and some extra virgin olive oil, if you fancy it.
Baked cheesecake with blackberries, blueberries and figs

Previously I have always done no-bake cheesecakes. Partly due to laziness and partly because I was unsure of the taste. But I finally succumbed and this is a stunning cheesecake with so much rich, creamy flavour. I believe I am now a baked cheesecake expert!
Equipment and preparation: you will need a 23cm/9in springform cake tin.
INGREDIENTS
For the base:
50g/1¾oz unsalted butter, melted
200g/7oz gingernut biscuits (about 20 biscuits)
For the filling
450g/1lb full-fat cream cheese
250g/9oz ricotta
150g/5½oz double cream
3 medium free-range eggs
125g/4½oz caster sugar
2½ tbsp cornflour
1 vanilla pod, seeds scraped out
For the topping
125g/4½oz fresh blueberries
125g/4½oz fresh blackberries
2 figs, each cut into 6 evenly-sized wedges
2 tsp icing sugar, sifted
handful fresh mint leaves (optional)
METHOD
1. Preheat the oven to 170C/325F/Gas 3 (150C fan).
2. To make the base, melt the butter in a medium saucepan over a low heat (or a bowl in the microwave). Line the base of a 23cm/9in springform cake tin with baking parchment, brushing a little of the melted butter on the base to help the paper stick. Break up the gingernut biscuits in a food processor to give fine crumbs. Mix well into the melted butter and then tip into the bottom of the prepared tin. Press the mixture well into the bottom so it is packed tight and level. Place in the fridge to set for 20 minutes or so while you get on with the filling.
3. For the filling, put the cream cheese, ricotta, cream, eggs, sugar, cornflour and vanilla seeds into a large bowl and beat like mad for a few minutes until everything is combined and smooth. An electric mixer fitted with the whisk attachment will make this easier than by hand. Once the biscuit base is set, remove the tin from the fridge and pour this mixture in on top.
4. Sit on a baking tray and pop into the oven for 40-45 minutes. The cheesecake should be just set with a little wobble. When it reaches this stage, turn off the oven and leave to cool in there for about an hour. This (usually) stops the cheesecake from cracking. Also avoid moving the cheesecake around at this stage to help prevent cracking. However, don’t worry if it does crack as it will still taste delicious and will be nicely decorated.
5. Once it has had an hour of cooling, remove the cheesecake from the oven. The cheesecake may still be a little bit warm, so you can either eat it like this or wait and eat it when it is completely cool. Arrange the berries and figs on top, dust with icing sugar and scatter over the mint leaves if using, and serve. The cheesecake will keep for a couple of days, covered in the fridge.
Baked courgette fritters with marinara sauce

These baked courgette fritters are really rather good and make a change from chips. Kids will enjoy preparing the breadcrumb topping and dripping the fritters into the garlic dip.
INGREDIENTS
For the roasted garlic skinny dip:
1 tsp extra virgin olive oil
1 large garlic bulb, with the top sliced off
200g/7oz low-fat cream cheese
3 tbsp low-fat Greek yoghurt
½ bunch chives, finely chopped
For the marinara sauce:
2 tbsp olive oil
1 large red onion, finely chopped
2 garlic cloves, finely chopped
400g/14oz can chopped tomatoes
2 sprigs thyme, leaves finely chopped (about 1 tsp chopped leaves)
pinch caster sugar (optional)
flaked sea salt and freshly ground black pepper
large handful fresh basil leaves, roughly torn
For the courgette fritters:
3 medium free-range eggs
50g/1¾oz wholemeal or plain flour
125g/4½oz dried natural breadcrumbs
2 packed tbsp finely grated parmesan cheese (or a similar vegetarian hard cheese)
2 springs rosemary, leaves finely chopped (about 2 tsp chopped leaves)
2 medium courgettes (as straight as possible)
spray oil
To serve:
1 small lemon, cut into wedges
METHOD
1. For the roasted garlic skinny dip, preheat the oven to 220C/425F/Gas 7 (fan 200C). Drizzle the oil in the centre of a 20cm/8in square of aluminium foil and sit the garlic, cut-side down on top. Wrap up loosely, sit on a small baking tray and pop in the oven straight away (even if the oven is not hot enough) to cook for about 50-55 minutes, or until very soft.
2. For the marinara sauce, heat the oil in a medium pan over a low heat. Add the onion and cook for about 6-8 minutes, or until beginning to soften, stirring regularly. Add the garlic and cook for a further minute. Stir the tomatoes, thyme, sugar (if you think it needs a little sweetening) and some salt and pepper. Turn down the heat so that the mixture is just simmering and leave to cook for 15-20 minutes, or until the sauce has thickened and the flavours have intensified.
3. Meanwhile, make the courgette fritters. Line two large baking trays with baking parchment. Beat the eggs in a large shallow bowl. Put the flour into another and stir in a couple of large pinches of salt and lots of pepper. Divide the breadcrumbs, parmesan and rosemary evenly between two large shallow bowls and set aside.
4. Trim the courgette ends and slice one lengthways into three evenly-sized slices. Cut each slice into three long, evenly-sized strips and then in half across their width to give 18 chips. Repeat with the second courgette to give 36 chips in total. Each one will be about 1.5cm/¾in wide and 7-8cm/3in long, depending on the size of your courgettes.
5. Working with a few at a time, toss the courgette batons in the flour until well coated - this will help the egg to stick in the next stage. Toss through the beaten egg and, after allowing the excess egg to drip off, roll them around in one of the batches of breadcrumbs to stick all over evenly. Arrange in a single layer on the baking trays as you go. Repeat until all of the courgettes are coated, using the second batch of breadcrumbs once the first has been used up.
6. The marinara sauce will probably be nice and thick at this stage. If it's too thick to pour, stir in a little water. Remove from the heat, season to taste with salt and pepper, add the basil leaves and cover to keep warm until ready to serve.
7. Spray the courgettes with the oil and place in the oven for 20 minutes. If tight on space, nestle the garlic parcel onto one of the courgette trays. Half way through cooking time, remove the courgettes, turn them over, give another spray and pop them back in the oven - this time on the opposite shelves to what they were already on. Once cooked, they should be lightly browned and very crisp all over.
8. Once softened, remove the garlic from the oven and, when cool enough to handle, unwrap it and squeeze the garlic cloves from their papery skins into a bowl. Mash lightly with a fork and then add the cream cheese, yoghurt and chives and stir everything together really well. Season to taste and spoon into a serving bowl.
9. Spoon the marinara sauce in a serving bowl. Pile the courgettes onto a serving platter and serve with the lemon wedges.
September 26, 2014
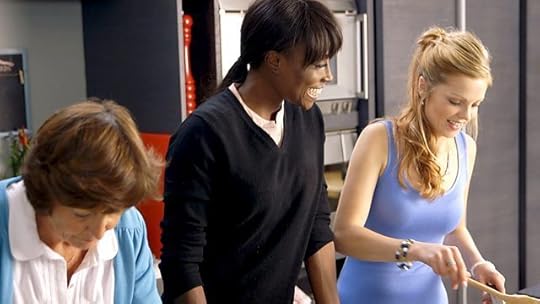
Can 'can't cook' Sonia get kitchen confident?
With plenty of deceptively easy recipes and fantastic tips, Lorraine shows people with no kitchen confidence how to pull off an impressive meal for friends and family.
In this episode she helps Sonia Harwood, a mother of three and foster carer, who would love to create homemade family meals but ends up relying on frozen food. Lorraine shows her how easy cooking with fresh ingredients can be, demonstrating recipes including courgette fritters, a quick seafood linguine and an impressive baked ricotta cheesecake.
Meet Sonia
"When I was growing up my mum and dad cooked everything from scratch and food always tasted so delicious. My dad put a lot of Italian influence into pretty much everything he cooked and we used to have really tasty Italian food at my grandparents house when we visited them.
Now I have a family of my own, my other half David does all of the cooking as I just never had the confidence to be able to. I can throw together things from the freezer for the children, but they do get bored by chips/pizza/nuggets and so do I.
As well as having our own three children we are both full time foster carers and have lots of different children staying at our house. I suppose I have always found it easy to rely on David to cook as I always felt I needed peace and quiet in the kitchen for me to cook as I used to get so stressed whilst doing it.
When I saw the advert for the Lorraine show, I jumped at the chance to get some help. Mainly I think I needed my confidence boosting, to make me feel it was alright to have a go and learn as I went along. It has definitely opened my eyes as to how much fun I can actually have cooking and I really enjoyed the experience.
Since the show I have started to offer to cook, something David is still getting used to. I would say David still does the lions share of the cooking but I am getting there as my confidence grows. I made a cake recently which went down well, and was great because for some reason David doesn't seem able to bake so that made me smile.
I have also started doing a meal plan for the week, finding simple recipes that don't look too scary and then trying to add my own touch to them. It is work in progress, but I am improving all the time. It does give me a huge amount of satisfaction to see the children clear their plates when I have made the dinner. Thank you so much to Lorraine and the team."
Catch the episode, Friday 26th September, 7:30pm on BBC Two.
September 22, 2014
Blog: Tea, cake and jewels

Recently I had the lovely task of launching the new PANDORA ESSENCE COLLECTION at their flagship store on London’s busy Oxford Street. It was a great afternoon full of tea, cake and a brand new selection of gorgeous, meaningful charms inspired by some very important personal values – all making for some delicious Instagramming!
At the launch I was thrilled to announce that I would be an ambassador for the PANDORA ESSENCE COLLECTION, which characterises the individual woman. The collection is a personal symbol for expressing your perception of life and your true values.
After a question and answer session on the new range, hosted by the fabulous hostess-with-the-mostest Cherry Healey, things got culinary with a cup-cake decorating demo.
Stunning @lorrainepascale demonstrates the art of cake decoration at the #PANDORAessenceAW14 launch pic.twitter.com/hH0ng29t7U
— PANDORA Jewellery UK (@PANDORA_UK) August 21, 2014
The idea was for everybody to ice their cakes based on one of the Pandora Essence charms, reflecting their own qualities creatively – and we had some really impressive icing action!
Three values close to my own heart are Belief, Caring and Dedication, and I think this range is a wonderful way of expressing yourself alongside our everyday thoughts and actions.
As we discussed each important sentiment I explained how Caring is really important to me because of the work that I do in fostering and adoption with young adults.

They've sometimes been shipped to so many different places and thrown around from family to family, and often they have a voice inside telling them that they're not good enough.
So I try and teach them that it’s important to care for themselves, to tell yourselves you’re lovable, that you're worthwhile, that you're important and that you deserve to be here.
That caring voice inside them is so, so important.

For more information on my work with Pandora and the PANDORA ESSENCE COLLECTION range of charms…
Visit http://www.pandora.net/
Follow @PANDORA_UK
Pinterest: www.pinterest.com/officialpandora
YouTube: www.youtube.com/user/TheOfficialPandora
Instagram: @theofficialpandora
#PANDORAessenceAW14
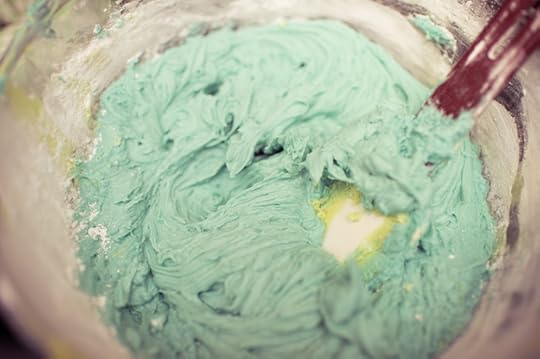
Coconut kisses with ginger filly Chantilly and a strawberry slice
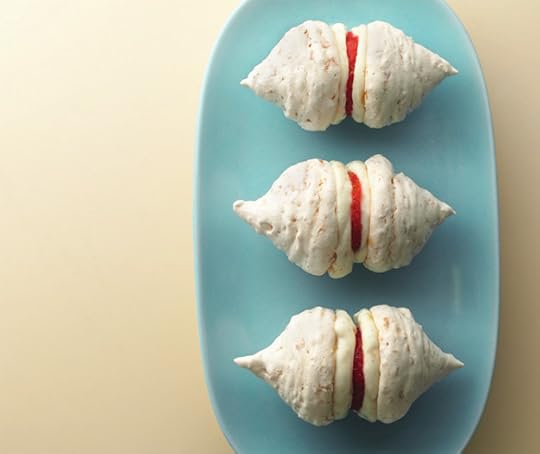
Lorraine's simplified version of French macaroons is sure to impress and they look just as pretty as the real thing.
Equipment and preparation: you will need a piping bag fitted with a 1½cm/¾in plain nozzle.
INGREDIENTS
For the meringues
100g/3½oz desiccated coconut
200g/7oz caster sugar
4 free-range egg whites
For the ginger filly Chantilly
200g/7oz low-fat cream cheese
2½ tsp icing sugar
1 vanilla pod, seeds only
2 knobs stem ginger (from a jar in syrup), really finely diced, plus 1 tbsp of the ginger syrup
8 medium-large strawberries, hulled, pointed ends trimmed and each one cut into 3 discs
Preparation method
1. For the meringues, preheat the oven to 110C/225F/Gas ¼ (80C fan). Line two large baking trays with parchment paper and set aside.
2. Heat a large frying pan (without any oil in it) over a medium heat and toast the coconut for a few minutes until golden-brown and toasty. Tip into a bowl and set aside.
3. Meringues can be made by hand but it does take a long time. Using a hand whisk or a freestanding mixer makes the whole thing far more enjoyable. Put the sugar and one of the egg whites into a clean bowl and whisk for about 30 seconds on a high speed. Add another egg white and whisk for about two minutes more. The mixture will start to become quite thick. Add the remaining egg whites, one at a time beating really well between each addition. Whisk until the mixture is really, really stiff, white and shiny. It should become so stiff that if you turned the bowl upside down the meringue would not come out! It does take slightly longer to whisk it this way and it is a backward way of making meringues but the beauty of it is you cannot over-whisk this mixture even if you went off and left it for 15 minutes or so, so this method seems to work well for me! Finally, gently fold in the coconut until well combined.
4. Using a large spoon, scoop the mixture into a piping bag which has been fitted with a 1½cm/¾in plain nozzle. Pipe out 48 blobs spaced apart on the baking trays with each one measuring 3-4cm/1¼-1½in wide and with a little peak on the top (to be about 2cm/¾in in height). Bake for around 1 hour 30 minutes, or until the meringues are crisp on the outside but still a little soft on the inside. Swap the trays around on the shelves half way through the cooking time to ensure even cooking.
5. When the meringues are cooked, take them out of the oven and set aside to cool down. As they cool, make the ginger filly Chantilly. Mix all of the ingredients, except the strawberries, together well in a bowl and spoon the mixture into a piping bag fitted with a 1½cm/¾in plain nozzle. Pop into the fridge until ready to assemble.
6. Once the meringues are completely cool, pipe a small blob of the ginger filly on the bottom of two meringue pieces. Place a slice of strawberry on one of the filly Chantillys and then sandwich it together with the other meringue. Repeat with the remaining meringues and filling to make 24 in total, arranging them on a large platter as you go. Serve straight away.
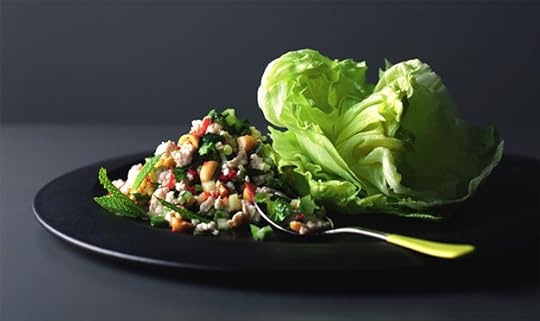
Nice and spicy Thai minced chicken salad (Larb Gai)
I know it is so simple to buy the already minced up chicken but the problem is you do not know what you are getting and it often has loads of fat and a bit of gristle in it. Buy your own and then mince it up yourself.
Ingredients
1 tbsp sunflower oil
2 large, boneless, skinless chicken breasts (about 225g/8oz each), minced up in a food processor
flaked sea salt and freshly ground black pepper
2 tbsp fish sauce
1 lime, juice only
1 tsp caster, granulated or soft light brown sugar
3 spring onions, finely chopped
¼ cucumber, finely diced
1-2 red chillies, finely sliced, seeds removed for less heat if preferred
1cm/½in piece fresh root ginger, peeled and finely chopped
½ bunch coriander, leaves and stalks roughly chopped (about 2 tbsp)
½ bunch mint, leaves only, ripped
1 handful salted (but not dry roasted) peanuts (about 50g/1¾oz)
12 largish crisp iceberg lettuce leaves (cup-shaped are best)
Preparation method
1. Drizzle the oil into a large frying pan over a high heat. Add the minced chicken with salt and pepper and cook for 4-5 minutes, stirring regularly and breaking it up as you do so, until it turns from pink to white. Cut a piece open to check it is cooked and then tip the chicken into a colander set over a bowl. Leave to cool for five minutes (so it doesn’t cause the herbs to wilt) while also allowing any excess liquid to drain off, if necessary.
2. Pour the fish sauce and lime juice into a large bowl and stir in the sugar until dissolved. Add the spring onions, cucumber, red chilli, ginger, coriander, all but a small handful of the mint leaves and the peanuts and stir together well. Tip the chicken in and toss it through. Taste it and check to see if it needs a little bit more of anything to get it just to your liking.
3. Arrange three lettuce leaves on each of four serving plates and place a couple of spoonfuls of the mixture into each one. Scatter the remaining mint leaves over to garnish and serve. The best way to eat these is to simply just pick a cup up with your hands and bite in.
September 19, 2014
Can Bryony be a Better Cook?
With plenty of deceptively easy recipes and fantastic tips, Lorraine shows people with no kitchen confidence how to pull off an impressive meal for friends and family.
In this episode, Lorraine helps 26-year-old Bryony, who admits to passing shop-bought food off as her own, but now she's been tasked with hosting her best friend's hen party. So Lorraine creates an inspiring canape menu for her, including Thai larb gai, bite-sized chocolate napoleons and delicate coconut meringues filled with ginger cream.
"The day started with breakfast as usual in my kitchen with a bowl of cereal and a cup of tea in my hand…but this time, the room was rigged with bright lights, cameramen checking filming angles through windows, and Lorraine Pascale standing there having her make up done! I knew it wasn’t going to be an ordinary day.
After a quick chat Lorraine made the dreadful mistake of asking me to cook something for her. There and then I chose to cook a poached egg. 'Easy, can’t go wrong' I naively told myself. I couldn’t have been more wrong! The egg fell apart in the pan, I burnt the toast, used a sieve to get it out and in the end fed it to the dog who didn’t even eat it!
Fortunately Lorraine took control from there on in and taught my mum and I chorizo and lemon grass scrolls, and feta cucumber bites. Simple and tasty! Ready for something more adventurous… larb gai! This wasn’t so easy and highlighted my terrible cutting skills. But we got there in the end and they tasted delicious.
By making dishes that are ‘assembled’ and served cold, it eliminates the risk of ‘burnt offerings’ to my friends.
The next day was all about drinks with a surprise trip to the London Cocktail club. JJ, the owner, gave me a mixology class and chatted about flavour combinations. After having a go I was left with the task of making a signature cocktail for my friend Katie. I’m not sure how much I’d taken on board from JJ as I came up with a weird mix of coconut water, grapes and vodka!? Strangely it actually worked or maybe I’d just tasted too many mojito combinations beforehand.
On the day of the surprise party, Lorraine, Mum and me spent the day prepping everything. Coconut kisses with ginger chantilly cream took up most of the time but were well worth it. The girls arrived excited and in their Little Black Dresses and fetched Katie who was in a nearby pub. When she walked in it was obvious by her face she had no idea about what had been going on.
After a quick intro to Lorraine Pascale and an explanation of why the BBC were there she quickly relaxed and it wasn’t long before you couldn’t hear anything apart from girly chit chat and laughter. Fortunately everyone seemed impressed with what I’d made and I didn’t see anyone spitting into napkins.
I can’t say I’m much of a cook but I am looking forward to hosting some Christmas canapé and cocktail parties!"
See how Briony gets on, Friday at 8:30pm on BBC Two.
September 16, 2014
Vanilla and yogurt panna cotta with pomegranate jelly
I love the contrast of the white and the red (my favourite colour) in this recipe. But after you have tried this recipe once, if you fancy it, mix up the fruit the next time using mango or even blackberries for a different flavour. Link to the video clip to see how to set your panna cotta on a slant.
Equipment and preparation: you will need 6 x 200ml/7fl oz pretty glasses for this recipe, a large tray or trays that will easily fit in the fridge, and if you wish to set your panna cotta on a slant either egg cartons, crumpled tea towels or some modelling clay to help prop the glasses up.
INGREDIENT
For the panna cotta layer
3 gelatine leaves
100ml/3½fl oz double cream
100ml/3½fl oz full-fat milk
100ml/3½fl oz caster sugar
1 vanilla pod, seeds only
300g/10½oz Greek yoghurt
For the jelly layer
135g/4¾oz pack raspberry jelly, cut into cubes
300ml/10fl oz pomegranate juice
For the topping
½ pomegranate, seeds only
Preparation method
For the panna cotta, put the gelatine in a bowl of cold water and leave to soak for five minutes.
Place the double cream, milk, sugar and vanilla seeds into a small pan and heat though gently, just enough for the sugar to dissolve, stirring from time to time.
Meanwhile, put the yoghurt in a large jug, stirring to loosen it up and set aside. Remove the creamy mixture from the heat once ready.
The gelatine should be soft by now, so lift it out of the water and squeeze the excess water out. Drop the gelatine into the creamy mixture and stir until dissolved. Leave to cool to body temperature for about 10-15 minutes.
Meanwhile, prepare your glasses. You will need 6 x 200ml/7fl oz pretty glasses for serving, but as the layers are set at a slant, the glasses will need to be propped to one side. Depending on the shape or type of glass, you may find egg cartons or even crumpled tea towels perfect to help prop the glasses. They could also tilt perfectly sitting in individual ramekins. Whatever you use, set them on a large tray or trays that will easily fit in the fridge.
Once cool, pour the creamy mixture over the yoghurt and then gently whisk everything together.
Carefully pour the mixture into the six glasses, dividing it evenly, without allowing any to spill out. Carefully place the tray in the fridge and leave to set for 1-2 hours, or until nice and firm. To start the setting process off quickly, you can always put them in the freezer for 20 minutes or so before popping them in the fridge to finish setting.
Meanwhile, for the jelly layer, place the raspberry jelly into a measuring jug. Pour over 200ml/7fl oz of just-boiled water and stir until the jelly dissolves. Stir in the pomegranate juice, then leave the liquid to cool to room temperature - make sure it is really cool so as to not melt the panna cotta on impact.
Remove the set panna cottas from the fridge and stand the glasses upright, removing any props. Pour the cool jelly over each one, dividing it evenly. Return the glasses back to the fridge for about two hours, or until the jelly is set firm.
When you are ready to serve, top each panna cotta with pomegranate seeds and sit on a serving plate with a small spoon. These will keep for a few days in the fridge.
Lorraine Pascale's Blog

- Lorraine Pascale's profile
- 33 followers

