
Rinku Bhattacharya's Blog, page 63
May 22, 2016
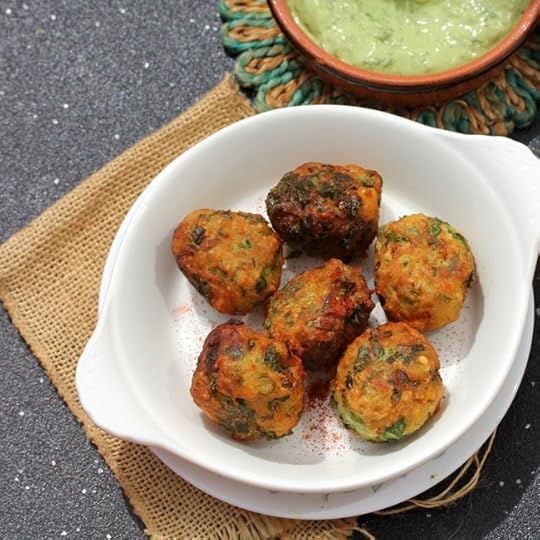
Seasonal Bacalao (Salt Cod) Fritters
Friday was anything but an ordinary day! After surviving the craziness, that was the Grand Central stampede (at least I know what racks up steps on my fitbit), we got ready for the next round of the FLL Robotics challenge.
 The seasonal Bacalao (Salt Cod) Fritters were the perfect thing to put together as we got things together and packed for a very special trip. We were headed to Fayetteville, AR. I am officially what they call a FLL mom.
The invitational event known as the Razorback Invitational hosted by the University of Arkansas, was the last leg of the year-long FLL season. I was excited to be going along with my son’s team the Hotshot Hotwires. A little bittersweet that our daughter Deepta was a little bit out of sorts, however not be outdone she had volunteered to make sure that she got her space with robots and ended up seeing some very interesting ideas in action. As I sort through my pictures I will share more about the event and fun that we had. Who knew that I would end up spending 4 days in Fayetteville, AR and love the experience?
Back to our seasonal fritters, this is an adaptation of the classic Spanish style tapas – their signature Bacalao or Salt Cod fritters. In this seasonal variation depending on the season I add in a whole bunch of seasonal veggies and on Friday I threw in finely chopped asparagus, fresh cilantro and some corn. Shaped into tiny balls and fried they offered a great snack to pop and eat as we packed and got our act together. I had served these we a truly simple and flavorful avocado aioli, a vegan rendition that was surprisingly good! So, you can tell what the next post will feature.
PrintSeasonal Bacalao (Salt Cod) Fritters
Prep Time: 24 hours
Cook Time: 20 minutes
Total Time: 24 hours, 20 minutes
A seasonal rendition of salt cod fritters, with a touch of spice and a nice dose of spring vegetables.
Ingredients
1 pound of salt cod pieces4 medium sized Yukon Gold Potatoes, boiled
½ teaspoon red cayenne pepper
½ cup finely chopped asparagus
¼ cup fresh corn
3 tablespoons finely chopped cilantro
½ cup all-purpose flour
1 egg beaten
Oil for frying
Instructions
Soak the salt cod in plenty of water, for 18 to 24 hours. Change the water at least twice to get rid of the excess salt.Drain and cook the fish in the microwave for 2 minutes.
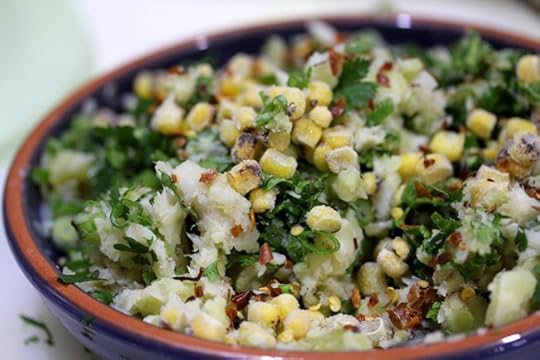
Place in a mixing bowl, add in the potatoes and the cayenne pepper and mash well.
Add in the chopped asparagus, corn, chopped cilantro and all-purpose flour and the egg and mix well.
Shape into small balls and refrigerate for about 30 minutes.
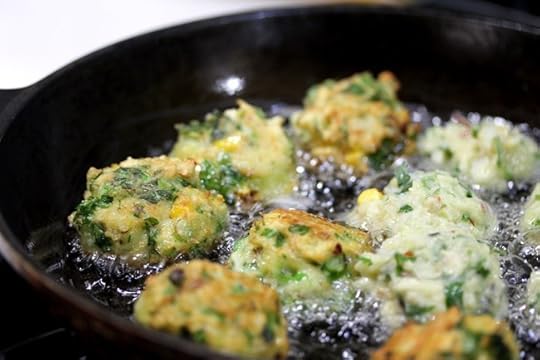
In a large skillet, heat about 2 inches of oil and carefully add in the balls in batches.
Add about 3 to 4 at a time, depending on the size of the skillet and fry until golden and turn. Fry the second side until golden, turn and remove with a slotted spoon.
Drain on paper towels and serve hot.
Notes
Most of the prep time is for soaking the cod. This can be made with any seasonal vegetables of your choice.
3.1http://www.spicechronicles.com/seasonal-bacalao-salt-cod-fritters/An InLinkz Link-up
The post Seasonal Bacalao (Salt Cod) Fritters appeared first on Spice Chronicles.


May 20, 2016
Chicken Tikka – Boneless Tandoori Spiced Chicken Kebabs and Tandoori Masala
 Chicken Tikka is sometimes a rather confusing concept, however it is actually an extremely versatile recipe from my kitchen, I used these tandoori spice marinated morsels for almost anything that I can think of, chicken salad, tacos, and of course we enjoy this wonderful kebab for just what it is, a lovely succulent piece of deliciousness. I usually make my own tandoori masala and have shared the recipe with you below, however, I have also had good results with commercial brands, SWAD, tends to be a favorite.

Ever had one of those mornings when you just did not want to get out of bed, or actually you get out of bed but then want to kind of progress about doing everything else in this super slow and lazy manner. Maybe it’s the rainy weather we have been blessed with most of spring, (I am one of those few people who actually do not mind the rain, although I love the spring sunshine, too!), or maybe it’s just keeping up with the early mornings that I end up with keeping tandem with my son.
Speaking of my son, his new favorite recipe is what he calls red lemon chicken – this is nothing other than the bright red tandoori chicken one finds in Indian restaurants our neck of the woods. I make this at home with my own mixture, the color is unfortunately not quite as bright as he would like however he is usually happy since I usually make chicken tikka ( boneless tandoori chicken) and he gets extra-lime that he gets to squeeze himself. While this kid does not share our late sleeping habits, he does inherit our love for garlic and lime/lemon.
Along with the recipe, check out the video for making chicken tikka,
PrintChicken Tikka – Boneless Tandoori Spiced Chicken Kebabs
Prep Time: 4 hours
Cook Time: 25 minutes
Total Time: 4 hours, 25 minutes
Yield: Serves 4
A classic recipe for boneless tandoori chicken, or chicken tikka, which is one of the best ways to enjoy grilled chicken.
Ingredients
1 cup low-fat yogurt1 large piece (about 1 inch piece peeled)
3 cloves of garlic
2-3 green chilies
1 tomato (optional)
1 tsp dried fenugreek leaves (kasuri methi) (optional)
4 tablespoons tandoori masala (see recipe)
2 teaspoons salt
2 lbs boneless, skinless chicken thighs
Cooking oil or spray
To garnish
Sliced onions
Sumac
Lemon or Lime Wedges
Instructions
Place the yogurt, ginger, garlic, chilies, tomato, fenugreek, tandoori masala and salt in a blender and grind into a paste.Mix with the chicken and tandoori marinade prepared above and set aside for 2-3 hours to marinade (the flavors improves with longer marination).
Skewer the chicken onto bamboo skewers.
Place a grill pan on the the stove (this is what I use on weeknights, a regular grill or broiling works well as well) and spray evenly with the cooking spray.
Place the chicken on the pan and cook for 7-8 minutes and turn (the chicken should have golden brown spots across the chicken.
Cook for another 5-7 minutes.
Add in the sliced onions and toss for 2-3 minutes till the onions are slightly sauteed.
Sprinkle with sumac and serve with lemon or lime
3.1http://www.spicechronicles.com/chicken-tikka-boneless-tandoori-spiced-chicken-kebabs-tandoori-masala/
Tandoori Masala Recipe
Makes 3/4 cup
Ingredients
3 tablespoons coriander seeds
3 tablespoons cumin seeds
4 dried red chillies (optional)
2 tablespoons sweet paprika
1 teaspoon carom seeds
2-3 sticks cinnamon
10 cloves
10 cardamoms
Method of Preparation
Lightly toast the spices for 2 minutes.
Grind to a powder in the spice mill or coffee grinder.
Store in a cool dry place and use as needed.
The post Chicken Tikka – Boneless Tandoori Spiced Chicken Kebabs and Tandoori Masala appeared first on Spice Chronicles.
May 15, 2016
Tawa – A Dining Experience
 Even until a few years ago, to find innovative Indian food, we had to travel to New York City, while some of the best Indian food still does, reside in the city, the suburban food scene is changing…
This is in no small part to innovative chefs such as Kausik Roy, who are ready to leave the big city and try to forge a food identity more locally. Despite, the hustle and bustle of the past few weeks, I was happy to stop by and check Tawa – a beautiful spot in Glenbrook, CT. Done in colors of white and orange, as you step in you will find yourself staring that beautiful photographs, set against earth toned walls.

Displays, with spices and lentils all creating visions of a tastefully done home, which is not a coincidence given the chef’s desire to create the simple flavors of home through his menu.

A well sourced wine list and a few fun signature cocktails will get you into the mood for most things fun and flavorful. Mango lassi lovers, will like the mango cocktail, cleverly named Madrastini.

The tandoori chicken and avocado salad, is very typical of the chef’s penchant for mixing the old with the new. The balsamic cumin dressing was light and refreshing against the creamy soft avocado and gently seasoned chicken.

Next up, was the paneer tikka chaat, this amazingly well done dish brought every note of the classic Delhi style chaat home and will probably be what will bring me back.

The seared scallops were served over a mint and coconut chutney with crispy okra. The scallops were perfectly seared and were a match made in culinary heaven with the okra. They might have gotten a little too generous with the mustard seeds, while they worked visually I am not sure about the combination.

A lovely salmon tikka served over comforting spinach rice, with a dollop of tikka masala sauce, a classic done right. After all sometimes, we should mess with the tested and tried.

The aptly named fireball kebab, will do a mambo on your palate and have you reaching out for the chaat masala dusted cucumber slices.
All these amazing flavors and then some, will have me crossing the border for more. So, for all your readers (you know who you are…)who keep asking me for Indian restaurant suggestions here is a new one for you.
Tawa
487 Glenbrook Road
Stamford, CT 06906
The post Tawa – A Dining Experience appeared first on Spice Chronicles.
May 11, 2016
Sheet Pan Masala Egg Pizza
 I was out of the house for a few days and had made this impromptu sheet pan masala egg pizza, and deemed it to be the absolutely perfect brunch or brinner dish. It is something that I plan on making tomorrow with the kids, and hope that you whip up maybe for father’s day.
I have procrastinated much for this post and finally am getting this going, after resurrecting this recipe again with the two young ones in the house. My reflections on motherhood are many, and can be best summed up in wondering constantly, always and forever where does all the time go? Here is to the most rewarding, exhausting and infuriating job in the world…

I am however one of those people, who have concluded my life would be imperfect and incomplete without my children. I realize it might not be for everyone, but definitely worth a try for the right person, in fact, you might just be a believer.

It will change you perception, and make you realize that the best flowers are those thriving unfettered in nature rather than the ones that are given to you in a bouquet. It will also make you realize that it is indeed important to call mom, even if it means less sleep to brace yourself for Monday.
After all, you realize it takes plenty of late nights and then some to raise children, and then wonder where they are all gone.

My brand of motherhood is however much like today’s recipe – practical, comforting, full of color, flavor and mostly loaded with a healthy touch of irreverence. There is no real case of perfection and possibly not worth searching for this elusive concept. This recipe, is special and something that I love making with the kids. Here they are giving this a try for mother’s day, waiting for me to join in the fun.
Give this a try, and chances are it will become your next lunchtime favorite. All the cheesy goodness marrying red onions and the eggs, a happy marriage part made in masala heaven.

PrintSheet Pan Masala Egg Pizza
Prep Time: 3 hours
Cook Time: 30 minutes
Total Time: 3 hours, 30 minutes
A comforting sheet pan version of a spiced egg pizza, a marriage of naan, masala eggs.
Ingredients
For the base1/2 cups all purpose flour
1 cup whole flour or atta
1 teaspoon salt
2 tablespoons olive oil
1 teaspoon freshly ground black pepper
1 teaspoon minced rosemary
1 tablespoon chopped cilantro
1.5 tablespoons rapid rise yeast water as needed
Toppings
1 large yukon gold potato
1 small tomato diced
2 tablespoons diced red bell pepper
1 teaspoon powdered cumin
1 Serrano pepper, minced
Extra olive oil
1 medium red onion, thinly sliced
1/2 cup grated parmasan cheese
4 eggs
1 tablespoon chopped cilantro
Instructions
Place the flour flours, salt, olive oil, black pepper, cilantro in the base of a food processor and mix until well mixed.Add the yeast and mix again, you should get a crumbly dough the texture of breadcrumbs.
Add enough water to form a soft smooth dough and remove from the food processor and place in a large mixing bowl. Knead a little and let the mixture rest for at least 2 hours until doubled. Knead again and let it rise another hour. This dough is optimum for cold overnight rising in the refrigerator, if you have time.
Pre-heat the oven to 450 degrees. Prepare a sheet pan a 8 by 12 sheet pan for baking,
Roll out the the dough and stretch to reach the sides of the pan.
Place in the oven and bake for about 8 minutes.
Peel and thinly slice the potato. Soak in water for half an hour. Drain and pat dry. This can done while the dough is rising.
Remove the sheet pan from the oven. Layer with the potato.
In a separate bowl mix the chopped tomatoes, peppers, cumin and Serrano chili and scatter over the potato.
Drizzle with the olive oil.
Scatter the onion over the pizza
Crack the eggs over the vegetable mixture. Top with the cheese and the sliced mixture.
Put the mixture back in the oven and bake for 20 minutes until the dough is crisp and the veggies are cooked through.
Garnish with cilantro, cut into squares and serve with green chutney if desired.
Notes
Make the pizza base the day before and let it rest overnight.
3.1http://www.spicechronicles.com/sheet-pan-masala-egg-pizza/The post Sheet Pan Masala Egg Pizza appeared first on Spice Chronicles.
Seared Scallops in a Ginger Blueberry Sauce with Basil

The beauty of seasons is that they come back, sometimes a little more refreshed and different that their original self, and sometime just the same. Today, I returned home early and took some time to revisit an old favorite from the Spices and Seasons cookbook – Seared Scallops in a well Seasoned Ginger Blueberry Sauce.
As I updated the recipe, I took time to add some more tweaks to it, to reflect my mood today – more spice with the sauce, a smoky paprika finish, all leading to a happy light dinner.
On the family front, I received some more bad news from home. I realize that I have probably reached that stage in life, when a lot of the friends I grew up with have parents that are passing on. In my own family, it has been challenging with my own father and then this week my uncle passing on.

I did tell you that it was not all bad, the book project has reached a new milestone. Also, loosely adapted from my spicy Sunday on the blog, is a column called Spices and Seasons that I shall be doing for Small Bites.One of the first things that I have learned from this exercise is how to plan for lulls in blogging and if I ever get caught up, I shall definitely try to apply my new found knowledge on this site. I am excited to see how that turns and this Monday, I shall be supporting the library for their Books and Cooks event.
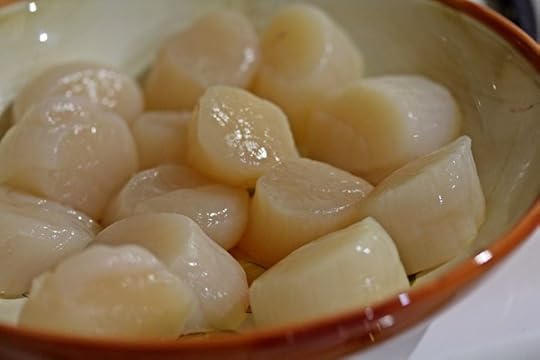
I am not sure where I picked up a pack of fresh and fruity organic blueberries. I used them for a sauce for some medium sized scallops that I had picked up. All of the dish was put together in a very short period of time. I baked the sauce, while I seared the scallops and then combined them together with some finely chopped basil. I have used medium sized scallops and then remade them with the large scallops and naturally recommend the large variety.

Before, I leave you to work on this very simple recipe, I do want to leave you with a few pointers on cooking scallops. First and foremost, less is more making them great for summer. The scallops should be patted very dry, do not pre salt as they tend to be very salty, and when I say sear, I mean sear – a very hot dry pan, use something like coconut oil and cook for 2 minutes on each side. The scallops should slide off and turn very easily.
PrintSeared Scallops in a Ginger, Blueberry Sauce
Prep Time: 10 minutes
Cook Time: 20 minutes
Total Time: 30 minutes
A simple and flavorful recipe with scallops tossed in a ginger, blueberry sauce.
Ingredients
For the scallops1 pound of medium or large scallops
1 teaspoon sumac
½ teaspoon raw cane sugar
1 tablespoon coconut oil
1/4 tablespoon red cayenne pepper
Smoked paprika to finish
For the Blueberry Sauce
½ cup fresh blueberries
2 teaspoons freshly grated ginger
½ teaspoon raw cane sugar
¼ teaspoon salt
¼ teaspoon ground coriander
1/2 teaspoon red cayenne pepper
To garnish
1 tablespoon finely chopped basil
Instructions
1. To prepare the scallops, make sure that they are very dry, I was them and blot them out on a lot of paper towels. I shall definitely tell you that paper towels are one of my non-green vices, but they work.2. Toss the scallops in the sumac and the sugar.
3. In an oven proof dish add the blueberries, ginger, cane sugar, salt and the ground coriander, red cayenne pepper and toss lightly.
5. Heat the oven to 400 degrees and place the dish in the oven and cook for about 15 minutes, until the sauce is all bubbly. If you wish you can do this on the stove top.
6. Heat a heavy bottomed skillet and add the coconut oil and heat until almost smoking.
7. Carefully place the scallops on one side in a single layer with some space between each scallop.
8.Cook for 3 minutes and turn and repeat on the other side for about 3 minutes on the other side.
9. The scallops should turn easily and be gently golden.
10. Check on the blueberries, which should have popped and have formed a bubbling sauce.
11.To serve spread the sauce on the place and place about 5 scallops per person. This should be about 3 to 4 scallops if using the large variety. Sprinkle the scallops with the smoked paprika
12.Sprinkle with basil leaves before serving.
3.1http://www.spicechronicles.com/seared-scallops-ginger-blueberry-sauce/
The post Seared Scallops in a Ginger Blueberry Sauce with Basil appeared first on Spice Chronicles.
May 6, 2016
Chicken with Arugula, Fenugreek and Black Pepper or Methi Kali Mirch Murgh
 This is also true for the several regulars that I encounter, when I take my evening walk. I know Dobby the dog and his owner, who combines dog walking with his evening smoking and I also know Ms. Wong, who tends carefully every evening to her well manicured flower garden. I do not see her in winter, since like our backyard there is not much action from her garden. I usually walk later in the evening, after the kids have eaten. It is a time that is my own, outside the kitchen, away from work and outside the home. A time to think, refresh and re energize my body mind and soul. I do not carry an anything, except on occasion my camera. About a month ago, I met Mark, who also decided to make the 7 pm his walking time. It turns out, that he had heard about my cooking classes and general interest in food. I was rather intrigued, since I would not have pegged him to be the culinary sort.

We met and chatted a couple of consecutive days and he asked me if I minded him occasionally tagging along with me, mostly because he wanted to talk to me about his food related questions. I warned him about my slow pace of walking, (but was otherwise game). Mark, unlike my immediate neighbors is no stranger to this hamlet. He has lived here for over 30 years and raised his children through the village schools, even volunteered as a baseball coach in his day. Our neighborhood in Valhalla,NY is a quite place. Activities that are highlights of this little hamlet are the annual Christmas tree sale, the mother’s day plant sale both organized by small volunteer fire department. Spring and summer cluster around little league games, almost half the parents including myself are active in and enjoy the PTA.
 It is however not the place where one would expect to find inspiration for innovative cooking, certainly not the kind featuring staples of my Indian kitchen and yet, my 30 minute Indian chicken recipe is born right here, in association with a neighbor.
Over the past five years, there has been a lot more movement into the neighborhood, even the property next to us has been sub-divided we have two new neighbors both with little children even younger than Deepta and Aadi. Like most of our other neighbors these are people we say hello to when we see them, chat with them when we are in the garden, I even included Juliana across us in my annual cookie and card list this year, but we do not actively socialize with them.
gradually learned that Mark’s wife Mary used to do all the cooking in the house and in particular, made a big effort on Sundays when the family (including their two children, who lived away from them) joined them with their spouses. Her Sunday suppers were elaborate and eclectic, when she often tried food from different parts of the world. She had died a year back.

Mark did his own cooking now, but also kept the Sunday ritual alive. It was important to him and to his children to have this sense of continuity. He also felt that it was his way of showing regard for something that was so important to his wife. In fact, his daughter had volunteered to take on this chore and continue the dinners at her house, but Mark still felt that he would like them to continue doing them in his house. It was important to continue this long standing tradition of connecting and reuniting the family in his home.

He found some of the exotic spices especially some of the Thai and Indian spices that his wife used confusing. He jokingly mentioned that he should join one of my classes. I felt that it might be more spontaneous and useful for him to spend time just watch me cook. My everyday cooking is relatively simple but still offers someone an insight to using and working with spices. Last evening, he joined us for dinner and he was pleasantly surprised by this simple recipe. He had asked me for the recipe, it was a spur of the moment creation but his request came me the incentive to write it down. This is a nice medley of greens, grape tomatoes and chicken with black pepper and ginger as seasoning. It makes a balanced one dish item, complete with protein and vegetables. Fenugreek, is a winter green that can be obtained in a ethnic grocery store this time or the year, it has a light maple flavor and mildly bitter taste. I also use arugula in this recipe, since that is easier to procure. It tastes great with toasted bread or a serving of rice.
PrintChicken with Fenugreek, Black Pepper and Grape Tomatoes
Prep Time: 10 minutes
Cook Time: 20 minutes
Total Time: 30 minutes
A healthy colorful and tasty chicken dish that gets done in under 30 minutes. The dish gets its flavors mostly from the addition of freshly ground black pepper.
Ingredients
4 tablespoons oil1 small red onion, halved and thinly sliced
1 teaspoon coarsely crushed cumin seeds
1 teaspoon ginger paste
1 tablespoon minced garlic
1 and a ½ pounds of boneless, skinless chicken cut into small cubes
1/2 teaspoon turmeric
1 teaspoon salt
1 tablespoon freshly ground black pepper
3 tablespoons fresh lemon juice
1 and ½ cups of chopped fenugreek or arugula
1 cup grape tomatoes halved
Instructions
Heat the oil on medium heat for about 1 minute.Add in the red onion and cook till the onion is soft and begins to turn translucent, this takes about 3 minutes.
Add in the ginger paste and the garlic and sauté lightly. Add in the chicken and cook on medium heat for about 4 minutes to allow the chicken to sear and turn pale brown.
Add in the salt, turmeric, black pepper and the fresh lemon juice and cover and cook for another 7 to 8 minutes. Note, I use the pepper mill and keep grinding in fresh black pepper until the mixture is well coated with black dots.
Add in the chopped fenugreek or the arugula and cook for 3 to 5 minutes
Stir in the tomatoes and cook till the tomatoes soften a little, about 2 minutes.
Garnish with the cilantro and serve.
3.1http://www.spicechronicles.com/chicken-fenugreek-black-pepper-grape-tomatoes/
The post Chicken with Arugula, Fenugreek and Black Pepper or Methi Kali Mirch Murgh appeared first on Spice Chronicles.
May 3, 2016
Dheki Shaag – Fiddleheads Cooked with a Bengali Seasoning

Here we are with this momentous update of a post merging and meshing a few aspects of my life – I had first heard of Fiddle head Ferns from my friend Shapna, who helped with the Bengali recipes for Fiddleheads in the Bengali Five Spice Chronicles. Yes, believe it or not BouDaga Shag is a true blue Bengali vegetable called Dhenki or Bou (bride) Green or fern. I first picked these up from the Briarcliff Manor Farmer’s Market.
As for meshing an merging current life issues, I shall save that for a later day, a more decent hour!

Fiddle heads to me are a this very local specialty and one that is a harbinger of spring. They grow in the forests spontaneously, in fact, like most things found in the wild they need a little care while cooking. They are said to contain a mildly toxic substance which if not cooked properly can cause a bad stomach for some people. Fear not, they withstand a relatively long cooking period with grace and so all that is needed is a little bit of boiling prior to cooking.
I had made a couple of pasta dishes, my favorite being this one. When I had posted this on my facebook page, I was surprised to learn from one of the comments that said,
“Hi Rinku, Thanks for the recipe now I know one more way of cooking fiddleheads. Fiddlleheads also called dheki saag is a staple in the hill regions of Northeast India, often paired with panta bhaat(fermented rice). My husband who is from …Chittagong introduced me to it(sans panta bhaat) when we were living in Montreal. Every spring we foraged for it in the Laurentian Mountains with our children when we went sugar shacking. You can cook this exquisite vegetable with kalo jeera, shukno lonka phorun in a bit of desi ghee and lightly fry the boiled greens and serve with hot rice, simple and nourishing.”
Actually, I have since learned from, Chitrita Banerjee’s Life and Food in Bengal, that it is also called boudoga shaag, essentially bride’s edge green, named because of its bowed head which is the hallmark of a new Bengali bride.
PrintIndian French Toast
Prep Time: 10 minutes
Cook Time: 25 minutes
Total Time: 25 minutes
Yield: Serves 2
A simple Bengali rendition of fiddlehead ferns or dheki shaag.
Ingredients
1 cup fiddlehead ferns (about ½ a pound), trimmed3 cups water
2 teaspoons salt
1 and 1/2 tablespoon mustard oil
½ teaspoon nigella seeds
2 medium russet or Idaho potatoes (peeled and diced)
½ teaspoon turmeric
½ teaspoon red chili powder
1-2 green chilies
1 dried red chili
1 teaspoon ginger paste
11/2 teaspoons ghee
Instructions
Place the fiddlehead ferns and the water with about 1 teaspoon salt on the fire. Bring to a boil on medium heat. Simmer for about 10 minutes. Place in a colander to drain.Heat the mustard oil on medium high heat for about 1 minute and add in the nigella seeds and wait for them to sizzle. The oil should be hot enough to begin this right away.
Add in the potatoes with the turmeric and chili powder and continue cooking the potatoes for about 5 minutes until the potatoes are golden and crisp. They need to be stirred frequently through this process.
Once the potatoes are crisp and a nice golden brown color add in the remaining salt, green chilies and red chili with the ginger paste and saute for another minute.
Add in the drained fiddle heads with the ghee and cook for another 2 minutes.
Serve with a nice serving of steamed white rice and a simple dish of lentils like this
3.1http://www.spicechronicles.com/dheki-shaag-fiddleheads-cooked-bengali-seasoning/
This surprised me, but then again as said here, Bengali cuisine is indeed an organic cuisine in that it seems to have uses for almost all of natures edibles. So I essentially listened to her directive and came up with a very interesting dish. As with some of my evening creations, I did not like the darker shades of the photographs, so I had hesitated about posting. Last evening, I was cleaning out my pictures, it has been a process to organize my pictures as it always tends to be after any trip and just when in my son’s words I feel “all caught up” it is time for the next.
The post Dheki Shaag – Fiddleheads Cooked with a Bengali Seasoning appeared first on Spice Chronicles.
May 1, 2016
Egg and Chickpea Tikka Masala
 Indian cooking depending on your sense of perception, can be simplified in many ways – planning ahead, skipping out a couple of steps here and there, but really what we cannot truly compromise on is the freshness of spices and ingredients. I often keep a handful of pantry staples around – curry sauces in jars, home cooked chickpeas and other beans frozen in bags, home made broth and sometimes hard boiled eggs. Some of these happily came together to make this comforting and reasonably easy variation of tikka masala.
This was our dinner this Friday evening, made with homemade garam masala and done in less than 30 minutes.

I can tell that it might just be a while before we are ready to hit the grill in Hudson Valley, but curries and spices are going to be our friends this year while the weather has been consistently cold.

Last evening, we finished off the remainder as I marinated chicken for Sunday family dinner. I miss writing for the good old Lohud blog, but understand that every thing has a time, place and reason. I have a few classic recipes and post that I eventually want to find a time and home for here.

The last picture for this is featured on my favorite plate/bowl, it even has a chip to prove its long lasting relationship with me. It often graces my table on Friday evenings, to me it is the perfect way to end a long week, it fits right into my life it is perfect alongside my souvenir wine glasses.
By the people, chances are there is still not a lot of action in terms of vegetables, so this shall be on the menu for my Classic Indian Cooking class coming up in a couple of weeks at Hilltop Hanover Farm.
Here is to a great week ahead, love ending the week cobbling up the best of the weekend cooking, hectic have the days have been there has still been enough in the kitchen to be thankful about.
PrintEgg and Chickpea Tikka Masala
Prep Time: 10 minutes
Cook Time: 25 minutes
Total Time: 40 minutes
An easy no cream rendition of tikka masala using chickpeas and eggs. Perfect for a busy weeknight evening.
Ingredients
2 tablespoons oil (olive or grapeseed oil)1 teaspoon whole cumin seeds
1 medium sized red onion, diced
2 cloves of garlic, chopped
1/2 tablespoon freshly grated ginger
1 teaspoon salt or to taste
2 cups fresh diced tomatoes or a 14-ounce can
1/2 cup of whole Greek yogurt or light sour cream
1 teaspoon sugar
1 cup cooked chickpeas
4 to 6 hard boiled eggs, (can be halved)
1 tablespoon dried fenugreek leaves (kasuri methi)
1 teaspoon fresh garam masala
Chopped cilantro to garnish
Additional butter or clarified butter if desired
Instructions
Heat the oil and add in the whole cumin seeds and wait until the seeds begin to sizzle. Add in the whole diced onion and saute until the onion is soft and wilted.Add in the garlic and the ginger and mix well.
Stir in the salt and the tomatoes and cook the mixture for about 8 minutes if working with fresh tomatoes and 5 minutes if working with canned or jarred tomatoes.
Cool slightly.
Place the mixture in the blender with the Greek yogurt or light sour cream and a half cup water and the sugar and puree until smooth.
Return the mixture to the cooking pan, add in the chickpeas and bring to a simmer and add in the eggs. Stir in the dried fenugreek leaves.
Gently cook the mixture for 3 to 5 minutes. Stir in the garam masala and add the chopped cilantro and the optional clarified butter if desired. Serve with steamed fresh basmati rice for a practical dinner.3.1http://www.spicechronicles.com/egg-chickpea-tikka-masala/
The post Egg and Chickpea Tikka Masala appeared first on Spice Chronicles.
April 25, 2016
Chard and Cilantro Pesto with Pecans and first farm class
 I had a bit of hard time taking a picture of this recipe for Chard Pesto with Pecans , but had to share and keep it for posterity because it was such a hit at the bread class this weekend at the farm.
Now, interestingly, I accidentally stumbled upon a milder variation because I had forgotten garlic, so I subbed red onions and used a lot less cilantro. The wild card element is that I used green apples – something I discovered when we had all the green apples from our tree. The result is a cross between a pesto and a chutney, this is particularly true with this spicy variation which has a decent amount of cilantro in it. Currently, the farm has loads of cilantro and chard and this is a great way to use up a fair amount of both these ingredients. But can I please also share some moments from the picture perfect day and the class.

It is amazing when you visit this spot many times a year to see how nicely the landscape changes with the seasons.

Even the towers look so much brighter against the backdrop of the clear blue sky. It is amazing how the same backdrop looks different at different times of the year.

While the outdoor plants were still small, the green house had plenty of chard plants, along with some amazingly fragrant rosemary and cilantro. The cilantro in our backyard is also out and about. But for today, let me share farmer Max’s baby.

I know, this is a lot of fuss, over a simple pesto recipe, but, let me tell you with this pesto in your refridgerator, you can be a weekend warrior, after all isn’t that what this blog is all about. I whipped up a pretty cool pasta (promise to share later this week) in about 20 minutes flat, in between fielding calls from the boss all with the help of this pasta.
PrintChard and Cilantro Pesto with Pecans and first farm class
Prep Time: 25 minutes
Total Time: 25 minutes
Yield: Makes 1 cup of pesto
A gently spiced simple and fresh tasting pasta with an unusual touch of freshness from the green apples.
Ingredients
3 cups of chopped fresh chard (about 1.5 pounds)1/2 pound chopped cilantro
1 fresh Serrano or jalapeno
1 teaspoon salt
1/2 cup pecans
1/4 cup walnuts
1/2 cup extra virgin olive oil
2 small or one large green tart apples cored (peel on)
Instructions
Place the chard and cilantro in the bowl of a food processor. Add in the salt, pecans and walnuts. Add in the extra virgin olive oil and the apples.Run the food processor on low speed for about a minute, remove the lid and scrape down the sides and run again, repeating this process until a smooth grassy mixture is formed.
Use this as you wish as a dipping sauce, condiment or for your favorite pasta dish.3.1http://www.spicechronicles.com/chard-cilantro-pesto-pecans/
The post Chard and Cilantro Pesto with Pecans and first farm class appeared first on Spice Chronicles.
Tri-Colored Matzoh Ball soup
 There are so many ways to make a classic Matzoh ball soup, which really at the end of the day about good spongy dumplings made with Matzoh meal, simmered in broth and maybe a few vegetables.
While popular in most New York, especially in winter and now during the week of Passover, this comforting hug in a bowl is perfect to soothe your woes at the end of a long day. This weekend I wanted to make some for our Sunday dinner and then decided to play on the “balls” to create these tri-colored balls. The colors created with natural elements do not really impact the taste significantly. Of course, someone like me loves all things bright and visual so, this tri-colored version works. As for another variation, you might want to try my friend Maria’s ramped up version.

Now, I have to confess that after years of striving for soft floating balls, I was surprised to learn that some people prefer the so called sinkers that are harder and chewier.

So, here is a quick primer on the two varieties, please note I have not tasted or worked with every possible variation. For a slightly chewier version, refrigerate longer and reduce the moisture just a little. Note, in this recipe since the balls get some natural moisture from the vegetable, I add less water.

But as you can see from above, my family is one of floaters. The yellow balls in fact were a tad chewier than the others and they were given the thumbs halfway. I made these in my homemade broth, this soup relies heavily on the broth, so take care to use a good quality flavorful rich broth.

As will all things, I had planned on getting this up and about last week but here it is today, and maybe it can fit into your food routine on one of these cool spring days. I have one of those errand packed days waiting for me today and a week that follows suit, what does your week look like?
PrintTri-Colored Matzoh Ball soup
Prep Time: 1 hour
Cook Time: 35 minutes
Total Time: 1 hour, 35 minutes
A colorful take on the classic matzo ball soup, this colorful version will add spark to your table.
Ingredients
For the matzo balls1 and ¼ cup matzoh meal
3 tablespoons rendered chicken fat or oil (Note, I reserve the fat when skimming off the broth and supplement the rest using oil)
4 eggs
1 teaspoon salt or to taste
1 and ½ tablespoon chopped spinach
1 and ½ tablespoons pureed tomatoes
½ teaspoon turmeric
Additional water as needed
For the soup
6 cups good quality chicken broth
1 cup thinly sliced carrots
Chopped Dill or Chives
Instructions
Prepare a baking sheet by lining it with parchment paper.Place the matzo meal in a bowl, and add in the chicken fat or oil. Beat in the eggs and the salt.
Divide the mixture into 3 bowls.
Add in the chopped spinach to the first portion and add in a little water and shape into balls. Note, you will get a fairly wet dough. Shape roughly into balls and place on the parchment sheet. These can be reshaped into neater balls after refrigerating. Also, shape the balls smaller than what you want them to end up being as they will absorb the broth and become larger.
Continue the other 2 portions with the pureed tomatoes and turmeric. The mixture will turmeric will need a little more water.
Refrigerate the balls for 30 to 45 minutes, remove from the refrigerator and reshape if needed.
In a large pot bring the soup to a simmer, add in the carrots and carefully add in the matzo balls and simmer for 20 minutes. The balls should gently float to the surface and get soft and large.
Place into serving bowls, allowing at least one ball of each color. Garnish with chopped dill or chives and serve.h
3.1http://www.spicechronicles.com/tri-colored-matzoh-ball-soup/
The post Tri-Colored Matzoh Ball soup appeared first on Spice Chronicles.


