
C.E. Grundler's Blog, page 23
October 7, 2010
Ebook pricing, sales and the value of readers…
Yes, folks, I cut the price on Last Exit In New Jersey. Oh did I cut the price, all the way down to $0.99!
Why? At $2.99, which isn't high by any measure, sales had been respectable, steady and building. But I'd gotten to thinking, and decided to try a bit of an experiment. My costs are no different no matter the price I set. However, based on Amazon's royalties structure if I set my price below $2.99 my royalties would drop from 70% to 35%. Translated, that means at $0.99 it takes 5.8 sales to equal the royalties of one sale at $2.99. Still, if the lower price attracted more readers I had the potential to gain more fans who might just tell some friends about this new book they enjoyed. So long as my sales rose at least six to one, I would still come out ahead in the long run.
The flip side of this is the 'perceived value' issue. There are many authors out there who insist they've offered up their hearts, souls, blood, sweat and tears, years of their lives, relationships, sanity, you name it, to the altar of their craft. Their writing is the embodiment of all they have sacrificed. Surely this is worth more than the price of a cheeseburger on the value menu and readers will respect that. Moreover, readers, seeing a bargain-priced book will automatically assume the author lacked confidence in their work. It had crossed my mind that readers might get that impression, but as I said, this was just an experiment. I'm extremely confident in my book. The cover (first impression) is sharp and the title memorable and unique. The blurb (second impression) is professional and intriguing, and the book itself (final impression) delivers a story filled with great characters, genuine dialog and a plot that doesn't let up from page one to the end, all well written and precisely edited. It's not to say I didn't put my heart and soul etc. into my work, but in my opinion the best writing in the world is nothing if no one ever reads it. Readers (at least my potential readers) aren't judging books based upon the level of suffering that went into their creation – they're looking to be entertained. I'd love to see my writing career take off and pave the way for future books and limitless cruising time, but that has to start somewhere and for now I'll be happy to see my book sales buy some boat parts. The bottom line: Nothing is set in stone. I'd see how things went and then decide whether this was a win or fail. I could always change the price back.
I'm happy to report that it didn't take long to see results. In fact, literally overnight my sales increased to more than ten times what they'd been. Ten to one. The math is easy. Ten times more exposure to new readers, ten times more potential fans, ten times more chances for word of mouth to spread. That easily makes up the difference in per-book royalties and then some. My rank on Amazon skyrocketed, which in turn makes it easier for more readers to find my book in the first place. It's fun seeing the sales number rise, knowing there are so many more people out there reading my work. In making my book more affordable to readers I've gained a larger audience and, in the end, higher overall earnings. I think it's a win-win for everyone. Might some of those readers still bought my book at the higher price? Perhaps. But it's just as likely others might not. They'd be missing out on a great book and I'd be missing out on a potential new fan.
I was discussing this in a forum last night, and Lexi Revellian, a writer from the UK, reported seeing much the same results after trying the same thing with her novel, REMIX. She said it perfectly when she wrote: "Readers are taking a chance on a new author. Let's make it less of a decision for them."
My choice in pricing doesn't mean I put any less value on my work, only that I put greater value on my readers.


October 1, 2010
And the winner is…
Yes, folks, today's the big day. The day I go to Random.org, type in the total number of entries I've had for my "Only In New Jersey" Kindle Cover giveaway, hit the 'generate' button, and announce the lucky winner!
I'm delighted to report this month I've had record traffic on my blog. I've also had my best month so far, sales-wise, for Last Exit In New Jersey. As my daughter would put it, I'm one happy panda. However…. due to underwhelming interest, I've received a total of… brace yourselves… THREE entries.
I guess a cover made of convertible roof fabric and a New Jersey license plate isn't exactly everyone's cup of tea. But for three of you it is, and what great odds! So, with no further ado, here it is…

Here's a closer view…

There you have it. Entry number three. Congratulations Lindsay! I'll be emailing you directly, and thank you all for participating!


September 16, 2010
Graves beneath the Garden State Parkway?
Heading north or south along the Garden State Parkway exists a stretch between exits 144 and 145 that carries with it an ominous bit of urban folklore. You can't help but notice as the Parkway appears to cut straight through the middle of Holy Sepulchre Cemetery. As a kid, every class trip to Great Adventure down in Jackson involved the entire busload of us collectively holding our breath as the wheels passed over the blacktop cutting between the rows of headstones, the whole while praying there'd be no brake lights to slow us and then gasping for air once we were past.
Holy Sepulchre is a vast necropolis, covering over 20 square blocks. Half the cemetery, including the main office, is located in East Orange, but half of the cemetery lies in Newark. As with any cemetery dating back to the mid 1800s, it is brimming with fascinating history. But what it is most known for to most travelers passing along the Garden State Parkway is how this main artery splits the cemetery in two, with some graves (and their occupants) resting mere feet from the shoulder of the roadway. This had led to much speculation as to the fate of the departed who had been laid to rest beneath where tires now roll. Were there once graves there, and if so, were they moved, (a gruesome thought) or worse yet, were they merely paved over like some highway version of Poltergeist. Is that length of Parkway just waiting to be sucked under by vengeful souls fed up by the sounds of Honda Civics and SUVs ruining their eternal slumber?
Well, kind traveler, not to fear! The truth is no bodies lie beneath the asphalt, nor did they ever. In its early days the cemetery occupied only up to what had been Laurelton Road, where the Parkway was eventually built. It wasn't until after the Parkway had been constructed that the land on the other side was purchased and the cemetery expanded, creating the appearance that the Garden State Parkway cuts straight through the center.
Now you know.


September 8, 2010
Fun and affordable things to do in New Jersey…
Years ago I discovered a fun and surprisingly cheap way to spend a day, one that has left my family with years of memories and a few rather durable souvenirs. This was back when my daughter was smaller and all things prehistoric fascinated her beyond compare, and while she enjoyed museums I knew she might enjoy something a bit more 'hands-on'. That's when I discovered an amazing but little known detail about certain regions of New Jersey: they're brimming with Late Cretaceous era (that's roughly 67-74 Million Years Old) fossils! And not 'bake in a desert with picks and brushes' fossils, but wade in shady ankle deep brooks and pick them right up fossils. Yes, readers, it's true. Spots such as Big Brook, Ramanessin Brook and surrounding brooks in Monmouth County, right off the Garden State Parkway, will provide small (and not so small) children more fossils than they'd ever imagine. The majority of these fossils are shark teeth and other marine fossils exposed as the brooks and creeks cut down into the fossil beds, revealing an ever-changing layer. It's a wonderfully cool way to spend a hot summer day, peaceful and tranquil aside from the squeals of "I found another one!" and I can promise it will become a favorite tradition, one your children will remember even after they're grown.
The only 'tools' we brought were plastic colanders picked up in the grocery store and large serving spoons for scooping river gravel into the colanders. Half the time we didn't even need them, we spotted fossils right in plain view. As with sea-shells and beach glass, the rule was we would each only take our five favorite treasures home, the rest were returned to the brook. Do use caution as some areas of these streams can become deep… just stick to the shallows, that's where you'll find the most. Bring a small first aid kit, there are overhanging branches and there can be sharp bits in the gravel and an occasional, unfortunate piece of broken glass. My advice: Wear comfy old sneakers you don't mind mucking up, jeans to protect your legs and a tee shirt. Don't forget your bug spray, some towels and a change of dry clothes for the trip home.
There are a number of resources online to guide you both in where and how to look and to identify what you've found.
For more information, here's a start:
http://www.njfossils.net/cover.html
http://www.fossilguy.com/sites/bbrook/body.htm
http://digsfossils.com/fossils/nj_shark_navesink.html


September 1, 2010
It's the "Only in New Jersey Kindle Cover" Contest!
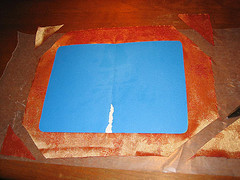
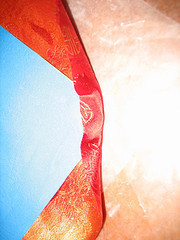
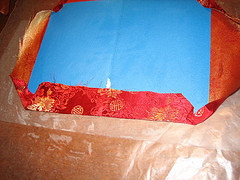
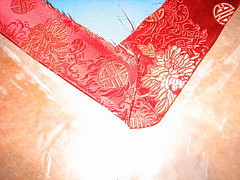
Straight from the highways of New Jersey, it's the coolest, most unique Kindle cover out there! Take the tough, durable black sailcloth from the convertible roof of one genuine Garden State pedigree Ford Mustang; hinge it with the extraordinarily strong webbing from that very same convertible. Line it with luxurious red satin brocade, add one genuine state of New Jersey license plate, and you've got a Kindle cover that's been down the road and back! Not only will the N.J. Mustang Kindle Cover protect the precious contents within; it's a Kindle cover you won't find anywhere else!
[image error]
click on image for larger picture
[image error]
click on image for larger picture
There's only one thing: it's not for sale! The only way to get one of these amazing covers is to enter the "Only in New Jersey" Kindle cover contest! It's fun, it's easy, and there's no purchase necessary! Simply email me the name of the song Annabel is singing along to in the beginning of Last Exit In New Jersey — it's not all that far into the free sample – and you'll be entered into a drawing for your choice of the amazing Mustang Kindle cover. If you prefer a more subtle style, the N.J. Mustang Kindle Cover is also available in an 'Unlicensed' version.
[image error]
click on image for larger picture
[image error]
click on image for larger picture
For anyone wondering what keeps the Kindle in, it's secured by Command strips to a smooth plastic panel within the cover. This keeps the Kindle attached firmly, yet leaves it completely removeable with not a mark left behind.
All entries must be received by September 30th. Send your answers to: cegrundler(at)gmail.com; be sure to put "Only in New Jersey" into the subject line. Emails will be numbered in order of receipt and I'll email you back with your entry number confirmation. On Friday, October 1st a random number will be selected though Random.org http://www.random.org/ I'll post a screen-shot by 12 noon and announce the winner.
But WAIT! There's more!
If you are the lucky winner and you also emailed me which song is playing in Stevenson's Mercedes, (yes, you do have to read beyond the sample for that one) you'll also receive a special bonus prize. And finally, if you're the lucky winner and you ALSO posted a review and/or mentioned Last Exit In New Jersey on your web-site or blog, you receive TWO bonus prizes!
Note: The actual New Jersey license plate the winner receives may vary; the one pictured here once graced a former car of mine. Your cover will be made for you and you alone to fit your specific Kindle, whatever the model. No Mustangs were harmed in the making of this cover. In fact, the Mustang that generously donated its top to this contest is now sporting a new roof and looking fine.


August 31, 2010
COMING SOON – The first "Only in New Jersey" Contest!
Free stuff is cool! Free stuff from New Jersey is double-cool! So bookmark this blog because over the coming days I'll be announcing the rules and prizes for an exciting give-a-way, including an amazing 'only in New Jersey' Kindle Cover Contest!


August 26, 2010
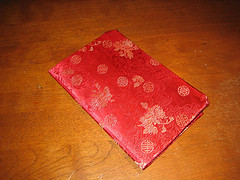
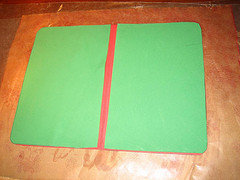
Fun, easy-to-make SUPER BEAUTIFUL padded Kindle cover for under $7
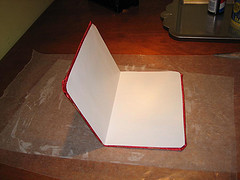
Pretty, isn't it? It wasn't very hard to make: all it takes is some basic skills most of us learned in Kindergarten.
A little while back I threw together a super easy, super cheap cover for my Kindle, which you'll find further down this page. It was working perfectly for me; however, as is my way, I immediately began to consider how I could improve it. First off, as some of you suggested, padding would afford the Kindle more protection. And second, I wanted something that felt a bit less… well… plastic. I wanted something a touch more elegant, something people would admire when they saw it, something more befitting my dear Kindle. I'd watched an interesting show recently that showed how leather-bound hard-cover books were made, and I realized I could incorporate a number of those steps into creating a new cover.
There is NO sewing required. Don't get me wrong, I love to sew; over the years I've acquired several vintage Singers dating from 1916 through to 1962, though my favorite is a 1930 Model 101, which I've used to sew everything from clothing to upholstery and boat canvas. But I know not everyone has access to sewing machines and I wanted to keep this a strictly scissors and glue kitchen table project.
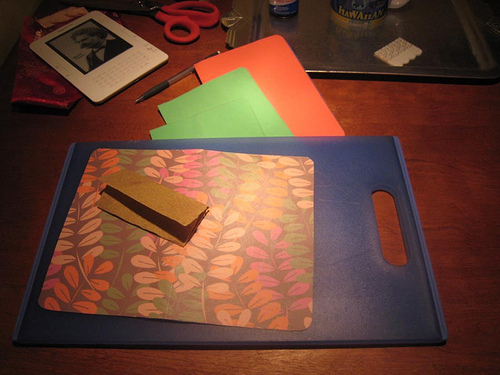
So here are all the components you'll need:
1. Rubber cement: $1.79
2. One Poly (plastic) 2 Pocket folder: $1.99
3. One paper folder: $0.25
4. One sheet of 'Foamy' craft foam: $0.99
5. Four Command adhesive strips: $0.76 (out of a 16 pack)
6. One adequate size scrap of pretty fabric from the remnant bin: $0.99
7. Pencil, Scissors, Wax paper: (surely you have these around the house!)
8. One small piece of medium sandpaper: (I have much of this around my house)
9. One cup containing the hot caffeine beverage of your choice: Vital
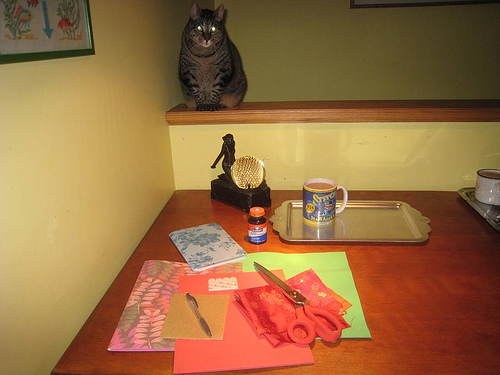
10. One feline supervisor: Costly though not essential – likely to interfere at wrong times
11. A clean kitchen table: Priceless
UPDATE: READ THE COMMENTS READERS HAVE OFFERED. THERE ARE SOME EXCELLENT SUGGESTIONS FOR OTHER APPROACHES USING MATERIALS I WAS NOT FAMILIAR WITH, INCLUDING SCRAP-BOOK ADHESIVES. (I know, it may come as a shock but I don't scrapbook!)
While I am aware this collection of materials visually clash, in the end the only parts you'll see will be one side of the poly folder and the fabric of your choosing. So long as you can fold the fabric over your Kindle with an inch border on the top, bottom and side, it's big enough.
You could use any fabric from a pretty remnant to some faded denim cut from an old pair of jeans. Everything else shown here is structural and won't show once the cover is completed. I recommend you read through all steps first before starting.
Note: I don't specify any measurements because your Kindle may be a different model than mine, but the same process applies no matter the size. I could probably just trace the old one, but for demo purposes I'll start fresh.
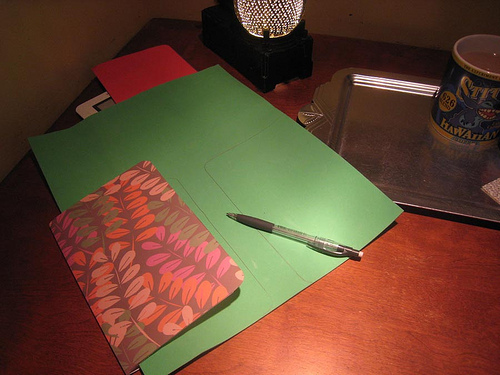
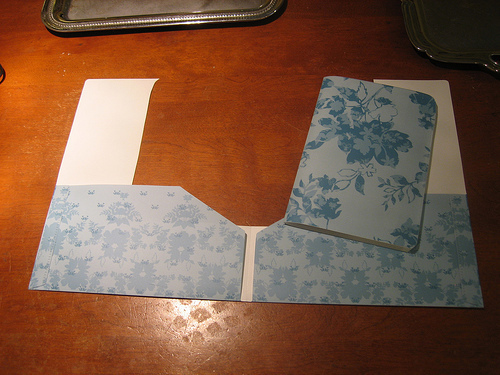
Got everything together? Great. To begin, place the Kindle along the folded edge of the folder. Trace around your Kindle with the pencil onto both folders. On the paper folder trace wide and on the poly folder keep the line closer to the actual edge of the Kindle.
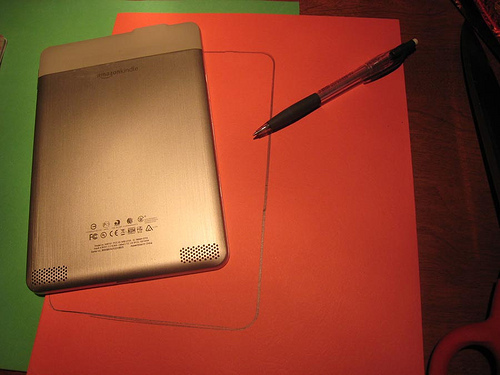
The goal is for the paper folder to be slightly larger than the poly one. For demo purposes you can see on the paper folder how I've outlined the Kindle. On the poly folder I lined the Kindle with the upper edge; it's one less side to cut. On the outer corners I like to round the curve, but leave it straight along the crease of the folder. However you approach it, be sure to ADD ½ INCH TO ALL OUTER EDGES to allow for the thickness of your Kindle. Once you cut each folder out you'll have two kindle sized folders, and again, the paper one should be the slightest bit larger than the poly one. The Kindle should fit inside with a nice edge around the outside to protect it. Take the poly folder and trace it 2 times onto the foamy. Cut that out as well.
Choose which side you'd like on the poly folder as the visible interior. This pattern is pretty but clashes with the fabric so I'll go with the plain white as my exposed interior. Now, SAND whichever side you WILL NOT see when you open the cover.
The reason for this step is that rubber cement does not adheres well to smooth plastic. Once sanded, the rubber cement will stick like…well, you know. Do this over a cutting board or work bench, not your 70 year old kitchen table, then wipe everything clean.
RUBBER CEMENT TIME
Warning #1: One key ingredient in rubber cement is acetone, which keeps things in a liquid form until the acetone evaporates. Acetone is also a key ingredient in various solvents including nail polish remover. In other words it can really mess up your manicure, so wear gloves if that matters, and cover any surface you're working over lest you damage the finish on your dining room table. Work over some wax paper; keep that on hand as you'll also be use it to keep the glue-coated pieces separated.
Warning #2: Work in a well ventilated space. One whiff of rubber cement takes me right back to grammar school art class where we were all given little brown tubs of it for projects. But that familiar, flashback-invoking odor is not something you should breathe too much. Perhaps excessive rubber cement exposure explains why I was rotten in math class. Rubber cement is also fairly flammable, so use proper precautions.
So, do you remember how this stuff works? It's messy, slimy, looks like snot, (both when wet AND dry.) Once it dries it sticks to anything else coated with dry rubber cement. The bond will be flexible and won't become brittle. Start by coating the paper folder and foamy… those will get coated on BOTH sides, but DON'T let any pieces touch each other.

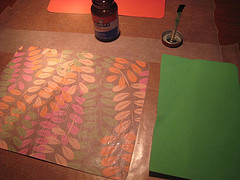
Is your tea getting cold? Stop and take a sip, then get ready; for the next step you'll need to work fast. Have your piece of fabric close by and ready. No, I hadn't told you to cut it, not yet; it should be at least 1 inch larger than the open folder on all sides. Coat the sanded side of the poly folder and don't worry if any gets on the other side, it'll peel right off. Make sure there's LOTS of wet rubber cement on the poly, lay it on thick then QUICKLY grab your fabric and lay it WRONG SIDE DOWN onto the still wet rubber cement and press it down. Don't worry if the rubber cement bleeds through; it'll dry clear. Now check everything over. You may want to re-coat areas that seem too thin.
Step back, let everything (including your hands) dry. Peel any cement off your hands… you don't want things sticking to you as you proceed.
CONSTRUCTION
Lay both pieces of foamy to the outer edges of the paper folder as shown. You want a gap in the center to allow for backwards folding. Lay the paper over a sheet of clean wax paper and fold it closed, foam side out, taking care not to let the inner glue-covered sides touch.
Now lay out your fabric, glue (wrong) side up, and place the paper folder centered on the fabric as shown. Press down firmly. flip to fabric side up and smooth. Now check the edges. If any haven't adhered as well as you'd like, this is the time to add some glue. Peel the fabric back, coat it and the foam with more glue, let them dry then smooth them down.

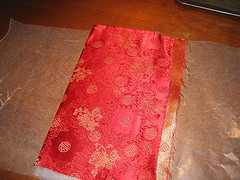
Now take the fabric and flip it over. Don't let the picture confuse you, the coral colored folder I'd been using is blue inside. Now we're going to trim the fabric a bit. I bevel the corners as shown to make folding easier and less bulky. Now it's time for more glue, this time slathered thick over the exposed fabric and the inner folder, in order to be sure thing hold together nice and secure. Again, go sip some tea while you let this dry.
Starting at the corners, fold the fabric gently over the inside edge, pulling the fabric inward as you press it down. Trim away SOME fabric overlap but don't trim too close to the edge. We're on the home stretch now! Coat all that folder over fabric with a fresh layer of glue, be sure to work some under any folds on the corners, and read a chapter on your Kindle while it all dries.
All dry? Smooth down any creases in the fabric, then very carefully line up the middle crease on the poly folder and align it with the crease on the now fabric covered folder then gently press them together.
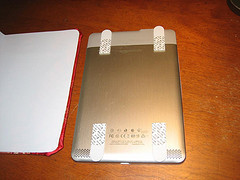
The whole arrangement will be a bit stiff to fold at first but it's best to work it back and forth. It will relax the more you use it. Now rub off any excess rubber cement inside the folder. Place command strips on the back of your Kindle as shown, then attach the Kindle. It's easiest to fold it closed slightly to position it where it would best fit.
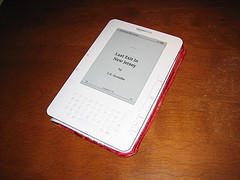

And that's it! If you'd like, you could even use Velcro as the fastener, I'm considering that so I could change covers from day to day if the mood hits. I'm sure this won't be my last version, I'm already tossing around a few ideas for further improvements. But enjoy your new and totally unique cover. Send me a picture if you'd like, I'd love to see how they come out. And now that you saved so much money covering your Kindle, you have plenty left over to download some great books. Might I suggest a very entertaining mystery by an up-and-coming author with a soon-to-be best-seller… and best of all, it's only $2.99!
UPDATE! COMING SOON – The first "Only in New Jersey" Contest!
Free stuff is cool! Free stuff from New Jersey is double-cool! So bookmark this blog because over the coming days I'll be announcing the rules and prizes for an exciting give-a-way, including an amazing 'only in New Jersey' Kindle Cover Contest!


August 20, 2010
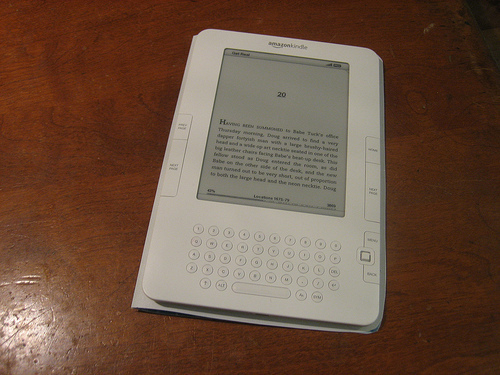
DIY Kindle Cover…
There is much I can say about how I'm enjoying my Kindle… but that's not the subject of this post. When not in my hand the Amazing Kindle resides in my favorite old messenger bag, a space it shares with my wallet, netbook, digital camera, digital recorder, Ipod and, on any given day, a random truck or boat part in transit to or from said truck or boat. It's a simple fact of life that all things in my bag must all coexist and though there are separate compartments to prevent gadget scuffles, a bit of protection is good insurance. However, there were two things holding me back from buying one of those Kindle covers you see on Amazon: 1. I'm too cheap frugal, and 2. It just wouldn't be me if I didn't somehow come up with my own jury-rigged version, one more specific to my own use.
As for that use, I dislike anything that bulks up some nice slim gadget — with the collection I carry ever bit of bulk adds up. And more important, all those lovely fancy covers attach in a way that, by all appearances, look as though it would obstruct me from holding the Kindle in my left hand and pressing the left side 'next page' button while cooking or holding a cup of tea/eating chips/whatever with my right hand. I came up with a solution using a rugged plastic 2 pocket folder I bought in Staples and some Command strips. Here it is – it's simple, easy, sturdy, cheap and removable, and the whole thing cost less than $3.
Pretty, isn't it? A bit too pretty, in fact, for my tastes but I'll either live with it or cover it with bumper stickers. What you see here is one of those flexible plastic '2-pocket' folders you find in Staples. The next picture shows the remains of the original folder and the cover I cut from it. That wasn't too difficult, I traced around the Kindle (adding in 1/2″, you can always trim it smaller once it's around the Kindle) with a pencil and cut the folder with scissors. (For the Kindle 2, that's roughly the size of a standard 8.5 x 11 paper folded in half.) Real tricky indeed.
So how did I manage to keep the Kindle within the cover? I considered Duct tape, but that can get a bit messy over time. I wanted something cleaner and more inclined to stay put… like those nifty little 'Command Strips' that allow you to hang hooks on anything and then remove them. Four command strips tucked strategically between the Kindle back and the inside of the cover and Whala! (I know, voila!) we're not going anywhere!
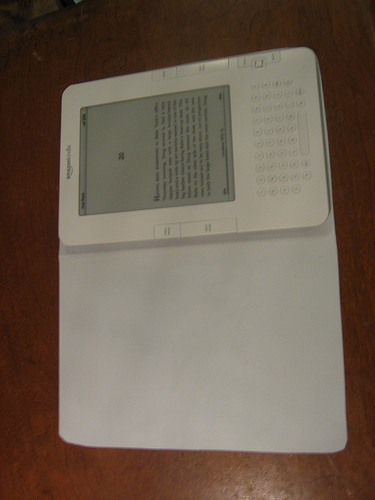
And best of all, aside from being wonderfully sleek and exceptionally cheap while protecting my screen from scrapes and scuffs, is that the cover can be flipped completely around, as shown below, allowing me to read in the comfort of my left hand!
If you're interested in something padded, you can check out my fancier cover. It involves a bit more work, but not much, it's super pretty and fun to make.
For those of you trying to determine what I'm currently reading, it's Donald Westlake's 'Get Real', a book I highly recommend. Now that you saved so much money covering your Kindle, you have plenty left over to download some great books. In addition to Get Real, might I suggest a very entertaining mystery by an up-and-coming author with a soon-to-be best-seller… and best of all, it's only $2.99!
UPDATE!
COMING SOON – The first "Only in New Jersey" Contest!
Free stuff is cool! Free stuff from New Jersey is double-cool! So bookmark this blog because over the coming days I'll be announcing the rules and prizes for an exciting give-a-way, including an amazing 'only in New Jersey' Kindle Cover Contest!


August 15, 2010
This is just a test…
Seriously, it is. That is all. Thank you.


July 26, 2010
The boneyard and Butch…
Among the projects we have planned for Annabel Lee is the addition of a proper mast for a steadying sail and mounts for the radar and other electronics. Most of Annabel Lee's sisters left the factory with spars; we managed to find one of the few boats that didn't. Directly across the river from us is an old boatyard in which, I'm told, many a boat has met its end. My old friend Butch, who passed away a few weeks back, had always told me I should visit there. He also warned me to be careful; surrounded by old boats he felt I could get in trouble, though that was back when I had a far more simple boat to care for. But now, being that I have an old boat of my own I figured I would be less inclined to adopt some new project. All the same, in all these years I'd yet to visit that marine graveyard… until last weekend.
Saturday the temperature was once again pushing 100 with extreme humidity, no clouds and no breeze. Frank couldn't muster the enthusiasm to spend the day grinding away at fiberglass and suggested we take a ride instead. So off we went, winding our way up the Hudson to the Bear Mountain Bridge and back down the other shore. Despite living here my entire life, despite all the times I've seen this stretch of the river both by land and water, the beauty of it still amazes me.
We located the boatyard, parked and looked around. I stepped into the office, occupying the basement of the house on the property to speak with the manager. I explained that I was looking for a mast, and there based upon my friend Butch's suggestion. "A shame about Butch," he said. "He'll be missed." I nodded in agreement. I'd known Butch for years, from long before I'd worked in another boatyard with him to long after I'd left. The manager mentioned not making it to the viewing; I told him I'd been there. He asked how I'd known Butch; I explained and he said he never knew Butch worked in that boatyard. The Butch I knew had worked there for decades. He reminisced about his memories, referring to Butch as a 'big happy fellow', always with a smile. Now I was really confused. Those were the last words I'd ever consider to describe him. I told the manager, "I'm beginning to wonder if your Butch and mine were one and the same." The Butch I knew and loved dearly was hands-down the grumpiest old bastard I've ever known. The more we compared notes, the more the Butch he spoke of and the one I knew were two entirely different people, literally. It turns out there were two Butches, one on either side of the Hudson, who both passed away recently, leaving the world an emptier place.
Anyhow, here's some pictures of the boneyard. It's a fascinating place, though tragic to see some magnificent boats sitting derelict and beyond salvage, no more than failed and forgotten dreams. There was much for me to fall in love with, much I could get myself into trouble with if not for the fact that I already have a boat that owns me.
You were right, Butch.
[image error]
That plumb bow in the middle has such magnificent lines, even as a derelict the elegance is still there.
[image error]
An old Tollycraft and a Viking. These two looked like they could be brought back… with MUCH work.
[image error]
The nesting ground of the old Evinrudes.
[image error]
Ladders? Lots of ladders.
[image error]
And swim platforms! Several of these looked to be in better shape than ours.
[image error]
A forgotten Wheeler Playmate, buried behind other boats. This was as close as I could get. The cabin looked like a greenhouse with vines climbing between the curtains.


![[image error]](http://www.cegrundler.com/images/mkcouter.JPG)
![[image error]](http://www.cegrundler.com/images/mkcopeninner.jpg)
![[image error]](http://www.cegrundler.com/images/mkcflipped.jpg)
![[image error]](http://www.cegrundler.com/images/mkctop.jpg)
![[image error]](http://www.cegrundler.com/images/moxrexsm.jpg)