
Christine Hansen's Blog, page 6
January 26, 2011
Bello Modo means Beautiful Way
One of my favorite sources of jewelry and art charm supplies is Bello Modo. Not just because Bello Modo is located in my home town, but because Bello Modo offers wonderful products, outstanding service, and free shipping with no minimums!
They carry a wide variety of great products including my ever-favorite Swarovski crystals (I'm partial to the bicones), European and Japanese seed beads (Miyuki, Toho, and Matsuno), GORGEOUS silk and satin cords, and their impressive line-up of findings and components (TierraCast, Vintaj Natural Brass, Patera Bezels & Findings, SLK Bezels, and many more).
Bello Modo also carries the Tim Holtz lineup, paper crafting must-haves (including my other ever-favorite washi paper), mixed media tools and elements (including shrink plastic, rubber stamps, paper punches, painting supplies, and Copic markers), and even kumihimo supplies! Bello Modo carries books as well - including my own!
Bello Modo is an online store as well as a popular vendor at many events, which makes browsing their wares a delight. I encourage you to spend a few minutes checking out Bello Modo's incredible offerings online or at a show near you!


January 25, 2011
What Seth has to say
One of my most favorite bloggers is Seth Godin, author, blogger, speaker, and founder of Squidoo.
Seth's daily posts are typically short & sweet, timely AND amazingly thought-provoking.
I encourage you to check his work out and see if you might appreciate subscribing to his blog as well.
The main link to Seth's blog.
Today's post outlines eight things we can learn from the iconic and recently deceased Jack LaLanne, may he enjoy a blissful rest!
January 24, 2011
Kitchen Remedies
Coping with a cold or sinus infection on top of multiple food allergies can be a real challenge - most children's cough syrups we've encountered contain at least one of Archer's allergens/intolerances (usually corn syrup and/or red food coloring). And stuff that comes in capsule or pill form frequently contains corn starch (often listed as "modified food starch") as a filler. Commercial cough syrups without corn syrup can be very helpful in the short-term, but at $8-10 per 10 oz. bottle, if you need to take cough syrup for more than a day or two, it can get pricey.
Following are a few simple recipes that we have used for years to feel better fast. The recipes for Tess' Garlic Syrup & Tess' Cough Syrup both came from my dear friend Tess Fox, who shared them with me. Tess is not only trained in reflexology, herbalism, and energy work, she's also an accomplished bellydancer, who leads and teaches Troupe O-Wa here in Olympia.
Disclaimer: this information is not intended to diagnose or treat any illness, and you are STRONGLY encouraged to rely on the advice of your personal medical professional.
You are ALSO STRONGLY encouraged to use your best judgement and common sense. Essential oils and herbs can be quite effective, however you should NOT deviate from the recipe measurements given OR the dosage of a particular remedy. (e.g. don't "double" or "triple" the measurement or dose of something, just because it's made with herbs or essential oils - I encourage you to approach these remedies with the same amount of diligent caution as you would any conventional cold remedy.)
Raw, unpasteurized apple cider vinegar, a tablespoon in a cup of water, 2-3 times a day, is a terrific immune system booster anytime you're feeling like you're starting to pick up a bug. It's so diluted in the water that it's not really that bad to chug down.
I make a blend of essential oils for sinus infections; we've been using this blend for a few years now, and I find it's much more effective for treating these buggers than antibiotics. The essential oils have antibiotic/antiviral properties and work really well. I put this blend together based on information from the Complete Book of Essential Oils and Aromatherapy by Valerie Worwood.
Here's the recipe:
9 parts tea tree essential oil
9 parts lavender essential oil
6 parts eucalyptus essential oil
6 parts peppermint essential oil
15 parts rose geranium essential oil
I use disposable pipettes to measure the essential oils, using a different pipette for each essential oil. I usually measure in milliliters; a 2 ounce bottle is plenty big to hold a batch of this blend, as measured in mls. Make sure the bottle is colored glass - essential oils are light-sensitive. If the bottle does not have a dropper lid, an orifice-reducer is very helpful when it comes to dispensing the blend, one drop at a time.
To use: Use no more than 3 drops in a bowl of steaming water for one minute (I usually count 10 inhalations). Cover your head with a towel to keep the steam on your face. Steam your head 2-4 times a day. You do not want to overdose on this stuff - it'll do a serious number on your sinuses.
Make sure your e.o.'s are from a reputable source. My favorite supplier of essential oils is Essential Oil University, but I also like to order from Liberty Natural.
Tess' cough syrup: (herbs are dried, not powdered)1 ounce marshmallow root1 ounce comfrey root1 ounce thyme1/2 ounce licorice1/4 ounce cinnamon bark1/2 ounce hops1/2 ounce catnip1/6 ounce dried ginger
Put all ingredients into glass or enamel pot. Top with one quart of distilled water. Simmer down to one pint (reduce by 1/2). You can measure the depth with a chopstick. (Of course, you have to remember to do this when you first put it on the stove, LOL) Strain liquid and put liquid into a pan. Add 2 pounds of honey and simmer for five minutes. If scum forms, skim scum off surface. Store in glass jar in the refrigerator. Take one tablespoon every 2-3 hours.
Tess' garlic syrup – good for sore throat, cough, heart, high blood pressure, nervous disorders, colds, viral thingswide-mouth gallon jar1 lb. peeled minced garlic
1 quart apple cider vinegar
1 quart distilled water--1 cup vegetable glycerine1 cup honey
Combine garlic, apple cider vinegar and distilled water in wide-mouth gallon jar. Cover and let stand in warm place for 4-7 days – shake a few times each day. At the end of that time, add one cup of glycerine and let it stand for another day. Strain and filter mixture through a muslin or linen cloth, giving a good squeeze. Add one cup of honey, stir until thoroughly mixed – store in cool cupboard, not fridge. Shake well before dispensing. Take 1 tbsp. 3 x daily with/after meals.
My mom shared the following recipe with me, as the majority of commercial electrolyte drinks contain ingredients that Archer can't ingest.
Citrus Sports Drink (electrolyte drink)1/3 cup granulated sugar½ tsp. salt½ cup boiling water½ cup fresh orange juice, preferably pulp-free¼ cup fresh lemon juice7 cups cold water, preferably filtered
In a glass pitcher or jug, combine sugar and salt. Pour in boiling water; stir to dissolve sugar and salt.
Add orange juice, lemon juice, and cold water; stir to mix. Cover and refrigerate up to 1 week. Stir before serving. Makes 8 (one-cup) servings.
For a lime version, omit orange juice, increase lemon juice by 2 tablespoons, and add 3 tablespoons fresh lime juice.
Chris' edits:I used a combination of lemon, lime, and tangerine juices – figuring ¾ cup of citrus juice per recipe. I juiced everything I had, and wound up with about 6 cups of juice. This is enough to make 8 batches of the drink. I'm going to mix the sugar, salt, boiling water, and juice, then divide it into canning jars and freeze it, one batch of concentrate per jar. Then all I need to do is take a jar out of the freezer, add 7 cups of cold water, and viola! electrolyte drink. Here are the measurements if you want to do the same:
2-2/3 cups granulated sugar4 tsp. salt4 cups boiling water6 cups citrus juice
Combine per above directions, omitting the 7 cups of water. Divide evenly among 8 freezer jars, and freeze.
January 23, 2011
Lemon Bars! (yes, no wheat, no corn, ALL good!)
Now that you've made up a batch of Four Flour Bean Mix and a batch of corn-free baking powder, you're all set to make Lemon Bars. Enjoy!
Lemon Squares, from Better Homes & Gardens New Cookbook [Recipe doubled. CH]
12 tablespoons butter or margarine½ teaspoon salt1/2 cup sugar2 cups of Four Flour Bean Mix plus 1-1/2 teaspoons guar gum4 eggs1-1/2 cups sugar4 tablespoons Four Flour Bean Mix½ teaspoon finely shredded lemon peel6 tablespoons lemon juice½ teaspoon baking powder
Preheat oven to 350°. Grease a 9" x 13" baking pan.
Beat butter for 30 seconds; add the ½ cup sugar and the ½ teaspoon salt, beating till fluffy. Stir in the 2 cups of flour. Pat dough onto bottom of pan. Bake in a 350° oven for 15 minutes.
Meanwhile, beat eggs; add remaining 1-1/2 cups sugar, 4 tablespoons flour, lemon peel, lemon juice, and baking powder. Beat 3 minutes or till slightly thickened. Pour over baked layer.
Bake in a 350° oven 25 to 30 minutes longer or till light golden brown around edges and center is set. Cool. Cut into squares. Makes 32.

January 22, 2011
Happy Saturday!
No, I didn't forget. I'm finishing up ...
Happy Saturday!
No, I didn't forget. I'm finishing up those mixed media paper art charms - they are thisclosetodone - just need to seal them, then I'll post pics and how-to's as fast as I can.
In the meantime, I'll keep posting my favorite wheat- and corn-free recipes.
Following is the BEST recipe for wheat- and corn-free pancakes I've found - from Special Diet Celebrations, by Carol Fenster. (I found Special Diet Celebrations at our local library - when I checked on Amazon for the book just now, it appears that the second edition has been renamed Gluten-Free Celebrations: Memorable Meals without Wheat - and couldn't find the book under either title on Carol's main website, though she has a number of other books on gluten-free cooking.)
GF BEST Pancakes 4 large eggs
2 cups plain or vanilla yogurt
1 cup garfava flour
½ cup potato starch
½ cup tapioca flour
4 tsp baking powder
2 tsp baking soda
4 tsp sugar
2 tsp salt
4 tsp vanilla (omit this if you're using vanilla yogurt)
2 tbsp cooking oil
Whisk egg and yogurt in bowl. Add remaining ingredients and blend, just until mixed. Cook over medium heat. * You can also replace the garfava flour, potato starch & tapioca flour with 2 cups of the Four Flour Bean Mix.
January 21, 2011
Pizza Crust recipe (wheat/corn/gluten-free)
Today's post will enable you to make PIZZA without wheat or corn! Both of the following recipes are from Bette Hagman's book, The Gluten-free Gourmet Bakes Bread. The first recipe is for French Bread/Pizza Mix; once you have this mixed up, it's a snap to prepare delicious pizza at home. As always, I've made a few modifications to the recipes to suit our family's needs as follows:use guar gum in place of xanthan gum (xanthan gum is produced using corn products, not OK for us)
omit egg replacer in dry mix, substitute with an extra egg in the wet ingredients
French Bread/Pizza Mix, p. 190, The Gluten-Free Gourmet Bakes Bread, Bette Hagmanmakes 12 cups of mix 7 cups white rice flour
5 cups tapioca flour
¼ cup guar gum (I found the best price on this at Barry Farms)
1 ounce unflavored gelatin (I buy gelatin in big cans at Cash & Carry, you can also use 4 7-gram packets)
¼ cup egg replacer (you can delete this ingredient and add an extra egg per single crust to the wet ingredients)
½ cup sugar
Stir together well or place in a plastic bag and tumble. (I use a plastic 1 gallon juice container.) Store on your pantry shelf, no need to refrigerate.
Seasoned Pizza Crust, p. 191, The Gluten-Free Gourmet Bakes Bread, Bette Hagman
To freeze for later use, bake for the first 10 minutes, coo, then wrap and freeze. To use, thaw completely, then top and bake.
CH Note: We use stoneware pizza pans for the best results – otherwise, the crust turns out soggy and limp. I got our stoneware from The Pampered Chef.
For 1 crust:Dry Ingredients1-1/2 cups French Bread/Pizza M
3 tbsp. dry milk powder
¾ tsp. Italian seasoning
½ tsp. salt
2-1/2 tsp. dry yeast granules
Wet Ingredients1 egg (2 eggs if you omitted the egg replacer in the dry mix)
1-1/2 tbsp. olive or vegetable oil
½ tsp. apple cider vinegar
½ cup + 1 tbsp. warm water
Preheat oven to 400°F (375°F if using stoneware pan). Lightly grease baking sheet.
Blend dry ingredients in a bowl and set aside.
Place wet ingredients in bowl of heavy-duty mixer and blend. Turn the mixer to low and add the flour mix. Beat on high for 3-1/2 minutes.
Spoon dough onto prepared pan, and spread to within ½ inch of pan edges. Dough is really sticky and will be a challenge to work with initially.
Let crust rise about 10 minutes, then bake for 10-15 minutes while you prepare pizza toppings. Top crust with sauce, cheese, and additional toppings. Bake again for about 25 minutes. Lift crust with a spatula to see if it's golden and done.

January 20, 2011
More Gluten-free & Corn-free tricks and tips
Here are two quick recipes to help you with cooking without wheat and corn. I rely heavily on both of these recipes.
The first is my tweaked-for-no-corn version of Bette Hagman's fabulous Four Flour Bean Mix. Add 3/4 tsp. of guar gum (or xanthan gum, if you don't have issues with corn) to each cup of this flour mix, and you'll be able to use this in most recipes calling for wheat flour. I've had great success using this flour mix to make oatmeal chocolate chip cookies, lemon bars that are (cue hallelujah chorus) simply divine, and tasty quick biscuits to go with soup. Check this blog in the near future for these, and more, yummy recipes.
Four Flour Bean Mix, makes 9 cups
2 cups garbanzo flour (you can also use the more expensive garfava flour) - available from Barry Farm and from Bob's Red Mill
1 cup sorghum flour - also available from Barry Farm and from Bob's Red Mill
4-1/2 cups tapioca starch - I buy this at our local Asian grocery, also available from Barry Farm and Bob's Red Mill
1-1/2 cups potato starch - Another item I buy at our Asian grocery, also available from Barry Farm and Bob's Red Mill
7 teaspoons guar gum - as a slacker mom, I add in the guar gum when I make up the flour mix, so I don't have to remember to add it when I'm working with a recipe. Barry Farm and Bob's Red Mill both carry guar gum.
Combine all ingredients, mixing well. I use a clean and dry 1-gallon pitcher (with the lid on!!!) to blend my flour mix - I hold the lid on with one hand, and shake, rattle, and roll that pitcher until everything looks seriously mixed up. Store flour mix in a 1 gallon zip-seal bag in the cupboard.
---
The second recipe is for no-corn-starch baking powder, an essential ingredient in the bread recipe I posted yesterday, as well as many others, including the aforementioned tasty quick biscuits. I found this recipe in The Allergy Self-Help Cookbook, written by Marjorie Hurt Jones, R.N.
No Corn Starch Baking Powder
The original version of this recipe makes 2 tablespoons - not nearly enough to have on hand for making up bread mixes, lots and lots of biscuits, and a few batches of cookies - so I tweaked it to make lots. Also - the original recipe calls for arrowroot flour - which is expensive compared to tapioca starch, so I just use tapioca starch instead, with pleasing results.
1/4 cup cream of tartar (I get mine from Cash & Carry, our local restaurant supply store - Barry Farm carries it as well.)
1/4 cup tapioca starch
1/8 cup baking soda
A couple of caveats for this recipe:
ALWAYS use fresh baking soda
sift your ingredients well - two times through the sifter should be adequate
store the finished baking powder in an airtight jar in the cupboard (I use a recycled jam jar & lid)
Wanna make more baking powder? The ratio is 2 parts cream of tartar, 2 parts tapioca starch, and 1 part baking soda.
1/2 cup cream of tartar
1/2 cup tapioca starch
1/4 cup baking soda
January 19, 2011
Gluten-free Bread
First off, I apologize for the lack of accompanying picture with today's post. I have pics of this bread, honest...they're on the recently deceased hard drive, and I can't get at them just yet. If I can recover them, I'll add the pics to the post.
Acknowledgments: I found the original recipe for this bread in Bette Hagman's excellent book, The Gluten-free Gourmet Bakes Bread. I am sad to report that Bette passed away in 2007. Bette, you were THE guiding light for me during my early days of learning how to feed my family without wheat. Thank you so very much!
Here's how I handle bread-making at Casa de Hansen:
1. I use stoneware loaf pans to bake my bread in. They make a WORLD of difference in my kitchen when it comes to wheat-free cooking. I purchased my stoneware loaf pans through The Pampered Chef. I expect other brands of stoneware loaf pans will perform similarly, but as I have no experience with anything other than TPC pans, I can't say for sure.
2. I make two loaves of bread at a time for our family of four (two adults, 2 always-hungry kids).
3. I pre-measure the dry ingredients ahead of time (except the yeast!) and store them in the cupboard in gallon-size zip-seal bags. One bag will hold enough dry ingredients for two loaves. I usually do up 7 or 8 2-loaf bags at a time. With my pre-measured ingredients, it takes me about 5 minutes to mix up a loaf of bread. Then, all I need to do is let it rise and bake it. Easy peasy!
4. I wouldn't trade my kick-butt KitchenAid stand mixer for ANYTHING. You need serious horsepower when it comes to mixing up gluten-free doughs and batters, and this mixer can handle the job.
5. My little man doesn't do breadcrust (even though it's really good), so we cut the crust off, and pop it into a freezer bag along with the heel ends of the loaf. The bits and pieces of crust will grind up into breadcrumbs (for other recipes) using a food processor or a blender, or you can make a spiffy delicious bread pudding too! I'll post Bette's recipe for this another time, OK?
6. Baking with gluten-free flours is a bit different than baking with wheat - most noticeably, the consistency of the batters/doughs. This particular recipe is gooey sticky - more like a really thick cake batter than the typical bread dough we are all familiar with.
So here's the deal. My current-favorite bread recipe is the New French Bread on page 74 of The Gluten-free Gourmet Bakes Bread...and it calls for French Bread/Pizza Mix, which is on page 190 of the same book. I've tweaked the recipe so I have all of the required ingredients on one page, and so I can make up my 2-loaf bags...but...I use a small kitchen scale to measure many of the ingredients, since it goes faster for me. Annnnd, since I use a scale for the ingredients required in larger quantities, I don't have measuring cup measurements for you.
Ready? Here goes:
Bette's New French Bread, tweaked by Chris
dry ingredients:
15.8 oz. white rice flour (I find this, tapioca starch, and potato starch at our local Asian grocery stores)
12.6 oz. tapioca starch/flour
21 grams guar gum (we use guar gum because xanthan gum is made with corn, and we can't use corn)
16.4 grams unflavored gelatin
2 oz. sugar
3.2 oz. almond meal or coconut flour
2 tsp. salt
2 tsp. baking powder (I make my own baking powder too, because almost all commercial brands contain corn starch - I'll post the recipe for that soon, OK?)
2 tbsp. yeast (if you're making up bread mixes ahead of time, don't include this - just add it to your dry ingredients right before you make your loaf)
wet ingredients:
6 large eggs (I omitted the egg replacer originally called for in Hagman's recipe, and just added another 2 eggs)
2 tsp. apple cider vinegar (this helps make a better loaf)
6 tbsp. vegetable oil or melted butter/margarine
2 cups warm water (warm enough to activate yeast, but not too hot because it'll kill the yeast)(also - you may need to play with the water amount to suit your own cooking style. I found that adding the amount of water listed in the original recipe made it too soupy.)
Grease loaf pans.
Add yeast to dry ingredients and mix thoroughly.
With heavy-duty mixer on low speed, mix together eggs, vinegar, oil or butter, and warm water.
Add dry ingredients and scrape sides down. Beat on high speed for 3 minutes.
Divide bread batter evenly between both loaf pans, and jiggle pans to settle batter. Cover lightly with waxed paper, and set aside in a warm place to rise for an hour.
Bake in pre-heated 375 degree F oven for about 40 minutes. Turn bread out onto rack to cool. Option: brush exterior of loaf with butter or margarine. If you want to slice your bread before it's fully cool, butter the sides of a serrated knife and cut very gently, without pressing down too much if possible. The butter keeps the hot bread from sticking to the cool metal of the knife.
Once cool, bread may be stored in a plastic bag.
January 18, 2011
Tweaking Alton's Recipe for Marshmallows
 Homemade Marshmallows, Hansen style
With both Archer & Jerry allergic to corn, storebought marshmallows have been on the no-can-do list for ages...no matter how many times we re-check the ingredients list on the packages, corn syrup is still on that darned list!
I've gotten pretty good at re-creating tasty bites while avoiding the multiple food allergens in this house, so I decided to take matters into my own hands last year, and found Alton Brown's recipe for Homemade Marshmallows here.
I printed it out, and went to work on the substitutions. First, I substituted brown rice syrup for the light corn syrup, then I used tapioca starch instead of cornstarch. Standard confectioner's sugar is made with corn starch, so I made my own powdered sugar by blending it in my blender. And while I was at it, I tripled the amount of vanilla extract Alton called for. The results? Delicious - and well worth the effort. The taste of a freshly made marshmallow is divine - not at all like the ones you get at the store.
Wanna give it a shot yourself? Here's how I did it:
Ingredients:
3 packages unflavored gelatin
1 cup ice cold water, divided in half
12 ounces granulated sugar (I used evaporated cane juice, which is less processed than white sugar)
1 cup brown rice syrup
1/2 teaspoon sea salt
1 tablespoon vanilla extract
1/4 cup confectioner's/powdered sugar (try making your own - put about 1/2 cup of sugar/evaporated cane juice in your blender and blend until it's powdery. voila!)
1/4 cup tapioca starch (our local Asian grocery stores carry this)
non-stick cooking spray
Directions:
Place whisk attachment on stand mixer. Place gelatin into bowl of stand mixer with 1/2 cup of the water.
Combine remaining 1/2 cup of water, granulated sugar, brown rice syrup, and salt in a small saucepan. Place over medium-high heat, cover and allow to cook for 3-4 minutes. Uncover pan, clip candy thermometer onto side of pan and continue to cook until mixture reaches 240 degrees F, about 7-8 minutes. Once mixture reaches 240 degrees, immediately remove from heat.
With mixer on low speed, slowly pour sugar syrup down the side of the bown into the gelatin mixture. Once you've added all of the syrup, increase mixer speed to high. Continue whipping mixture until it becomes very thick and is lukewarm, about 12-15 minutes. Add vanilla during last minute of whipping. While mixture is whipping, prepare pan as follows:
For miniature marshmallows:
Combine powdered sugar and tapioca starch in a small bowl. Lightly spray bottom and sides of a half-sheet pan/jelly roll pan with the nonstick spray. Add sugar/tapioca starch mixture and move around to coat bottom and sides of pan. Return extra sugar/tapioca starch mixture to small bowl and reserve for later use.
When the whipped mixture is ready, pour it into the prepared pan, using a lightly oiled spatula for spreading the mixture evenly. Dust the top of the whipped mixture with enough of the powdered sugar/tapioca starch mixture to lightly cover, saving the rest of the powdered sugar/tapioca starch mixture for later. Allow the marshmallows to sit uncovered for at least 4 hours and up to overnight.
Turn the marshmallows out onto a cutting board and cut into 1/2-inch squares using a pizza wheel. Lightly toss cut marshmallows with remaining powdered sugar/tapioca starch mixture. These will keep covered, at room temperature, for about a week.

January 17, 2011
Art Charm Challenge No. 1: Mixed Media Paper
Art Charm Challenges are little bitty charm projects that anyone can do at any time. I'm putting these challenges together for our Art Charms Yahoo Group, in which my lovely co-author Peg Krzyzewski is running a book study of our book, Making Mixed Media Art Charms & Jewelry. The idea is to have Challenges running each month which correlate with whatever chapter Peg is covering that month in the book study.
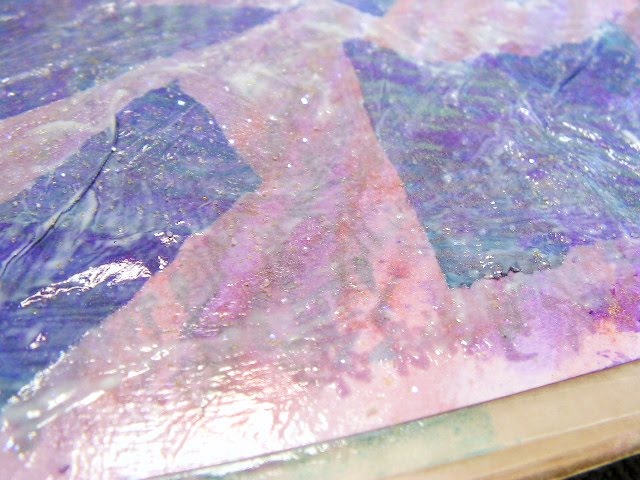
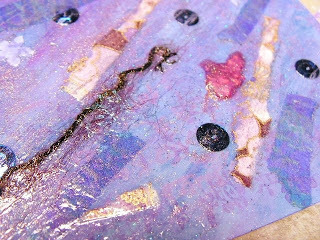 Chris' first sheet of completed Mixed Media Paper
I'm posting the Challenges here on my blog, so everyone can join in the fun!
Challenges are for folks who don't want to commit to a swap, but still want to try a technique and make a charm or two, and maybe post pictures of their results if they like.
How to do a Challenge?
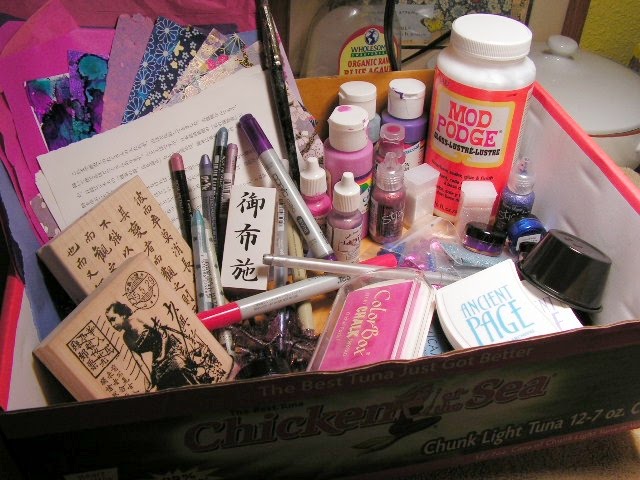
First, get most, if not all, of your supplies together ahead of time, and place them in a sturdy low-walled cardboard box like the Chicken of the Sea ones you get at Costco. That way, you're ready to do a little bit on your Challenge whenever you get a free moment.
Too, it'll be really helpful to find a large flat rectangle of cardboard (like Priority Mail large flat rate box size), and cover it with waxed paper (taped on the back), to give you a portable glue-friendly flat work space.
And now, without further ado, I will introduce Challenge No. 1: Mixed Media Paper.
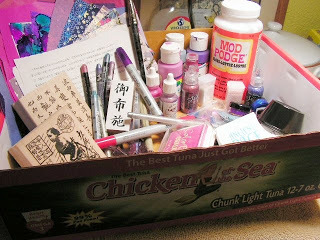 Chris' Challenge box, filled with supplies for this challenge
For the box:
• a piece or two of cardstock (color doesn't matter)
• a few paints, markers, gel pens, colored pencils, chalks, crayons (you might want to decide on a colorway before you gather your supplies)
• stamps & inks (if you have them), texture tools (combs, old credit cards, chopsticks, whatEVER!)
• bits & scraps of colorful paper for collage
• any sort of embellishment that will add detail – ephemera, fun fibers, confetti, glitter glue, stickers,
• white glue mixed with water, 50/50
• a couple of large pieces of waxed paper for you to work on.
The Confession:
I didn't use even half of the supplies I had in my Challenge box – I started out thinking I'd do pink/purple/blue with an Asian theme, then I decided to ditch all the pink stuff and I just worked with the purple and blue.
The Challenge:
First, lay your large pieces of waxed paper down on your flat rectangle of cardboard and tape them to the back of the cardboard. (yes, OVER the waxed paper you taped onto it earlier – this makes cleanup a snap when you're done!) BTW, you don't really HAVE to tape the second layer of waxed paper down – especially if you think you might have time to do more than one piece – just crease the edges of the waxed paper over the sheet of cardboard, so it stays put while you work – then when you're finished embellishing a sheet of cardstock, just lift off the whole thing – loose sheet of waxed paper under embellished cardstock - and set it aside to dry.
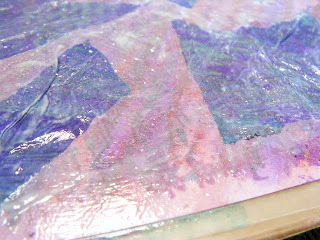 Chris' second completed (but not yet dry) sheet of Mixed Media Paper
Next, place a piece of cardstock on your waxed rectangle, and throw as much color, decoration, and detail onto it as you can manage.
It doesn't really matter in what order you add things – just as long as you're happy with it! And, since you'll be doing this in little steps, waiting for layers to dry won't be such a pain.
• Try adding a little bit of paint and smooshing it around the cardstock with a texture tool.
• Add scribbles of chalk or marker, or stamped images in ink.
• Use diluted glue to paste down scraps of paper, and/or embellishments.
You might want to seal the whole thing with the diluted glue when you're done. Let it dry and show us the results!
• Before I did my mixed media paper, I decorated some tissue paper with an Asian lady collage stamp using dye inks, then I scribbled on it with metallic pastels and painted over that with metallic watercolors – once this was dry, I tore it into pieces and added it to my mixed media paper.
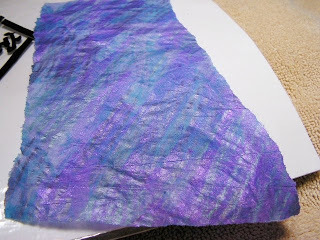 Mixed Media tissue paper
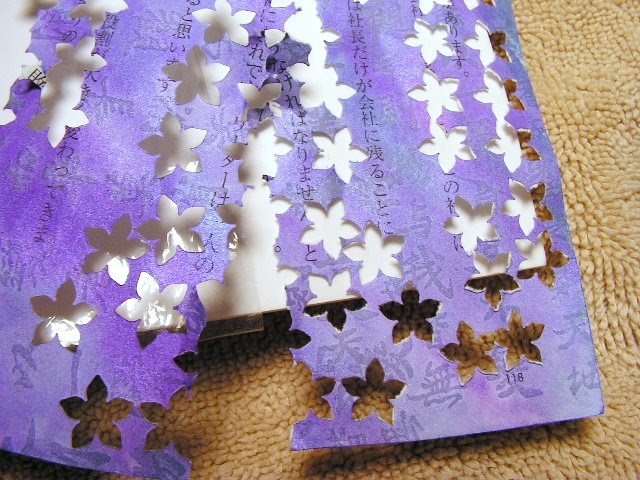
• I also took a page out of a Japanese book, and used Asian calligraphy stamps on it in metallic pigment inks and painted over that with metallic watercolors – when this was dry, I used the uber cool paper punches to punch out flowers – they're purple/blue, and really cool looking with all of the different colors and sizes of Asian calligraphy on them. I'm using them as embellishments on the charms.
 Mixed Media Asian text paper
 Uber-coolio Asian-flower-themed paper punches I used on the Mixed Media Asian text paper - here's where I found them: http://stores.ebay.com/sherryrodehave...
• I didn't even bother to mix the glue with water – just kind of mooshed it around with my paintbrush (which was wet from doing the metallic watercolors)
• I mixed the acrylic craft paint with Mod Podge, because I'm going for detail and depth – didn't want the paint to completely cover what was underneath – squirted a few drops each of purple and blue craft acrylic paint out onto the waxed paper and the dropped a small amount of Mod Podge nearby – used my brush to smoosh the colors and Mod Podge around and apply it to my mixed media paper, which gave me some really neat color variations.
• I started my mixed media papers with stamping – I covered each sheet of cardstock with the Asian calligraphy stamp in one color, then turned the page 90 degrees and overstamped that with a different ink color. Then I added paints, scraps of tissue paper and washi paper, snippets of fun fibers, sequins (thoroughly glued down), and scribbled over that with the pastels and painted over that with the paints – sprinkled some glitter in there too, somewhere.
 Inventory of what was in Chris' Challenge box, clockwise from top left:
NOTE: items I actually used are indicated with an asterisk *
* cardstock
* tissue paper
alcohol inks on glossy photo paper
*handmade paper by Peg Krzyzewski: http://artandsoultoo.blogspot.com/
*scraps of washi paper from Art 'n' Soul: http://bellacartaatartnsoul.blogspot....
*pages from Japanese book
*my favorite paintbrush
*acrylic paints – craft, Golden, Lumieres
*Mod Podge gloss
*Ranger Stickles (didn't use these on the MMP, but will be embellishing punched flowers with this)
*glitter
*sequins
tiny blue mosaic/rocks pieces (Peg gave these to me, so I don't know the name or source)
*Twinkling H2O's – metallic watercolors
black plastic cup for mixing Mod Podge & water
*pigment, chalk, & dye inkpads
Dreamweaver metallic FX from Art 'n' Soul: http://bellacartaatartnsoul.blogspot....
*scraps of fun fibers
*Asian-themed stamps
*Caran D'ache metallic pastels
*Cretacolor Aquastic metallic water-soluble oil pastels
Copic Markers
Micron pens by Sakura
Glaze pens by Sakura
Pearl line gel pen by MonAmi
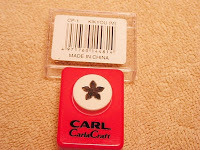
*Kikyou & Sakura (M) punches by CarlaCraft from here: http://stores.ebay.com/sherryrodehave...
 Chris' first sheet of completed Mixed Media Paper
I'm posting the Challenges here on my blog, so everyone can join in the fun!
Challenges are for folks who don't want to commit to a swap, but still want to try a technique and make a charm or two, and maybe post pictures of their results if they like.
How to do a Challenge?
First, get most, if not all, of your supplies together ahead of time, and place them in a sturdy low-walled cardboard box like the Chicken of the Sea ones you get at Costco. That way, you're ready to do a little bit on your Challenge whenever you get a free moment.
Too, it'll be really helpful to find a large flat rectangle of cardboard (like Priority Mail large flat rate box size), and cover it with waxed paper (taped on the back), to give you a portable glue-friendly flat work space.
And now, without further ado, I will introduce Challenge No. 1: Mixed Media Paper.
 Chris' Challenge box, filled with supplies for this challenge
For the box:
• a piece or two of cardstock (color doesn't matter)
• a few paints, markers, gel pens, colored pencils, chalks, crayons (you might want to decide on a colorway before you gather your supplies)
• stamps & inks (if you have them), texture tools (combs, old credit cards, chopsticks, whatEVER!)
• bits & scraps of colorful paper for collage
• any sort of embellishment that will add detail – ephemera, fun fibers, confetti, glitter glue, stickers,
• white glue mixed with water, 50/50
• a couple of large pieces of waxed paper for you to work on.
The Confession:
I didn't use even half of the supplies I had in my Challenge box – I started out thinking I'd do pink/purple/blue with an Asian theme, then I decided to ditch all the pink stuff and I just worked with the purple and blue.
The Challenge:
First, lay your large pieces of waxed paper down on your flat rectangle of cardboard and tape them to the back of the cardboard. (yes, OVER the waxed paper you taped onto it earlier – this makes cleanup a snap when you're done!) BTW, you don't really HAVE to tape the second layer of waxed paper down – especially if you think you might have time to do more than one piece – just crease the edges of the waxed paper over the sheet of cardboard, so it stays put while you work – then when you're finished embellishing a sheet of cardstock, just lift off the whole thing – loose sheet of waxed paper under embellished cardstock - and set it aside to dry.
 Chris' second completed (but not yet dry) sheet of Mixed Media Paper
 Next, place a piece of cardstock on your waxed rectangle, and throw as much color, decoration, and detail onto it as you can manage.
It doesn't really matter in what order you add things – just as long as you're happy with it! And, since you'll be doing this in little steps, waiting for layers to dry won't be such a pain.
• Try adding a little bit of paint and smooshing it around the cardstock with a texture tool.
• Add scribbles of chalk or marker, or stamped images in ink.
• Use diluted glue to paste down scraps of paper, and/or embellishments.
You might want to seal the whole thing with the diluted glue when you're done. Let it dry and show us the results!
• Before I did my mixed media paper, I decorated some tissue paper with an Asian lady collage stamp using dye inks, then I scribbled on it with metallic pastels and painted over that with metallic watercolors – once this was dry, I tore it into pieces and added it to my mixed media paper.
 Mixed Media tissue paper
• I also took a page out of a Japanese book, and used Asian calligraphy stamps on it in metallic pigment inks and painted over that with metallic watercolors – when this was dry, I used the uber cool paper punches to punch out flowers – they're purple/blue, and really cool looking with all of the different colors and sizes of Asian calligraphy on them. I'm using them as embellishments on the charms.
 Mixed Media Asian text paper
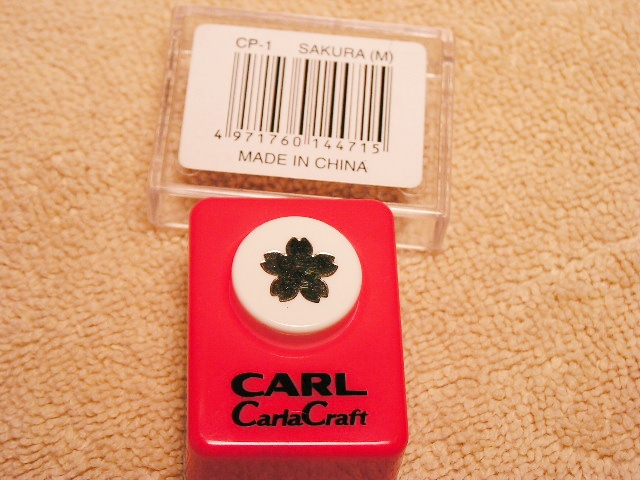 Uber-coolio Asian-flower-themed paper punches I used on the Mixed Media Asian text paper - here's where I found them: http://stores.ebay.com/sherryrodehave...
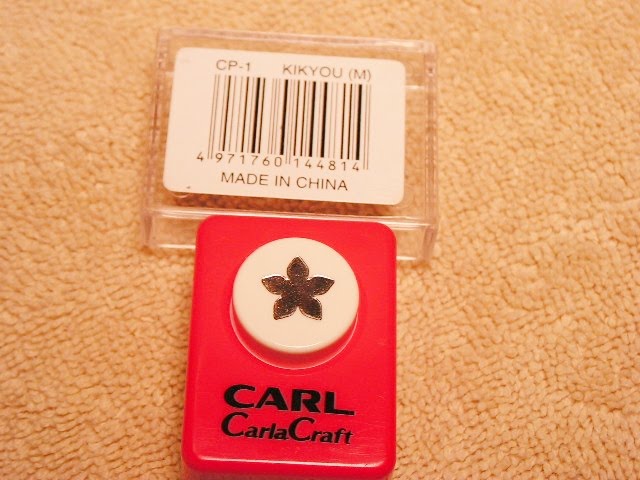
• I didn't even bother to mix the glue with water – just kind of mooshed it around with my paintbrush (which was wet from doing the metallic watercolors)
• I mixed the acrylic craft paint with Mod Podge, because I'm going for detail and depth – didn't want the paint to completely cover what was underneath – squirted a few drops each of purple and blue craft acrylic paint out onto the waxed paper and the dropped a small amount of Mod Podge nearby – used my brush to smoosh the colors and Mod Podge around and apply it to my mixed media paper, which gave me some really neat color variations.
• I started my mixed media papers with stamping – I covered each sheet of cardstock with the Asian calligraphy stamp in one color, then turned the page 90 degrees and overstamped that with a different ink color. Then I added paints, scraps of tissue paper and washi paper, snippets of fun fibers, sequins (thoroughly glued down), and scribbled over that with the pastels and painted over that with the paints – sprinkled some glitter in there too, somewhere.
 Inventory of what was in Chris' Challenge box, clockwise from top left:
NOTE: items I actually used are indicated with an asterisk *
* cardstock
* tissue paper
alcohol inks on glossy photo paper
*handmade paper by Peg Krzyzewski: http://artandsoultoo.blogspot.com/
*scraps of washi paper from Art 'n' Soul: http://bellacartaatartnsoul.blogspot....
*pages from Japanese book
*my favorite paintbrush
*acrylic paints – craft, Golden, Lumieres
*Mod Podge gloss
*Ranger Stickles (didn't use these on the MMP, but will be embellishing punched flowers with this)
*glitter
*sequins
tiny blue mosaic/rocks pieces (Peg gave these to me, so I don't know the name or source)
*Twinkling H2O's – metallic watercolors
black plastic cup for mixing Mod Podge & water
*pigment, chalk, & dye inkpads
Dreamweaver metallic FX from Art 'n' Soul: http://bellacartaatartnsoul.blogspot....
*scraps of fun fibers
*Asian-themed stamps
*Caran D'ache metallic pastels
*Cretacolor Aquastic metallic water-soluble oil pastels
Copic Markers
Micron pens by Sakura
Glaze pens by Sakura
Pearl line gel pen by MonAmi
*Kikyou & Sakura (M) punches by CarlaCraft from here: http://stores.ebay.com/sherryrodehave...
Christine Hansen's Blog

Christine Hansen isn't a Goodreads Author
(yet),
but they
do have a blog,
so here are some recent posts imported from
their feed.

