
Michael E. Shea's Blog, page 22
February 6, 2022
The Lazy D&D Cheat Sheet
New to Sly Flourish? Start Here!
James W. a Patreon of Sly Flourish asks: "I feel like a natural progression for you would to create a DMs screen. Have you thought about this before and what do you think you���d put on it?"
The Lazy DM's Workbook contains all of the material I'd want to put on a DM screen. I've often considered the Workbook to be the book sitting at your side when you run your game. I've never been a fan of the DM screen. It gets in my way and it puts up a literal wall between me and my players. I want to be sitting at the same table they're at in the same way. We're all in it together.
That said, I love simplicity and I have another DM-screen-like accessory: the Lazy D&D Cheat Sheet.
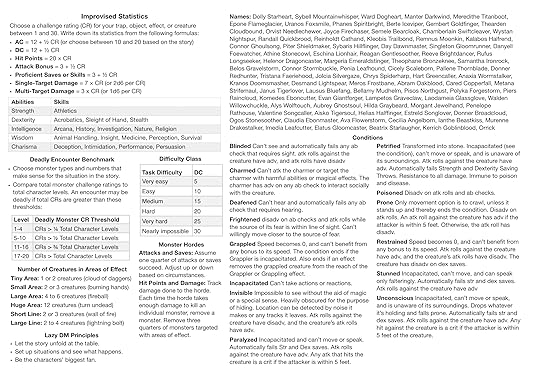
This single-page PDF includes:
Improvised statistics for objects, traps, and hazardsSkills and associated abilitiesDifficulty class descriptionsThe deadly encounter benchmarkNumber of Creatures in Areas of Effect for Theater of the Mind combatMonster Horde GuidelinesRandom namesCondition descriptionsNote: this is a recently updated cheat sheet based on new material from The Lazy DM's Companion including updated horde guidelines, new random names, updated areas of effect, and the updated deadly encounter benchmark. You can download the old sheet here
The cheat sheet is designed so you can clip off the top edge and the right edge to make it smaller than a sheet of paper. You can then laminate it and turn it into an excellent protected dry-erasable card. The front contains all of your cheat sheet information and the back can be used as a small white board for maps, drawings, diagrams, symbols, and anything else you want to show the players. You can print it on fancy paper to make it look cool and rustic.
This Lazy D&D Cheat Sheet is a perfect accessory for your Lazy DM Toolbox.
A Partner of the Campaign WorksheetsThis sheet works hand-in-hand with the Lazy DM's Workbook Campaign Worksheets. The Lazy D&D Cheat Sheet gives you handy mechanics to help you improvise your game while the worksheets help you focus on the characters of your campaign and the world around them.
Simple Tools To Share Fantastic StoriesLike all of the tools and philosophies captured in Return of the Lazy Dungeon Master, the Lazy DM's Workbook, and the Lazy DM's Companion; the Lazy D&D Cheat Sheet intends to help you improvise during your game and get out of the way while you share fantastic stories with your friends. Enjoy!
Related ArticlesTools of the Lazy Dungeon MasterThe Lazy Dungeon Master Cheat SheetLazy TrapsDungeons and Dragons 5th Edition Campaign WorksheetReturn of the Lazy Dungeon MasterWant More from Sly Flourish?Read more Sly Flourish articlesSubscribe to the Sly Flourish newsletterWatch Sly Flourish's YouTube videosSupport Sly Flourish on PatreonCheck Out Sly Flourish's Books Return of the Lazy Dungeon Master Lazy DM's Workbook Fantastic Lairs Fantastic Adventures: Ruins of the Grendleroot Fantastic AdventuresSend feedback to mike@mikeshea.net.
Article copyright 2021 by Mike Shea of Sly Flourish.


January 31, 2022
Running Rime of the Frostmaiden Chapter 6 & 7 - The Caves of Hunger and the Doom of Ythryn
New to Sly Flourish? Start Here!
This is one of a series of articles covering the Wizards of the Coast hardcover D&D adventure Icewind Dale: Rime of the Frostmaiden. The other articles include:
Rime of the Frostmaiden Session ZeroRunning Icewind Dale: Rime of the Frostmaiden Chapter 1Running Rime of the Frostmaiden Chapter 2Running Frostmaiden Chapter 3 & 4: Sunblight and Destructions LightRunning Frostmaiden Chapter 5: Auril's AbodeRunning Frostmaiden Chapter 6 & 7: The Caves of Hunger and the Doom of YthrynYou can also watch my YouTube playlist of Frostmaiden Lazy DM Prep videos.
The Final Chapters of the FrostmaidenIn these final two chapters of Rime of the Frostmaiden our heroes move from the frozen island of Solstice and the characters' battle with the duergar in defense of Ten Towns to the frozen and ancient Caves of Hunger and the lost Netherese city of Ythryn.
Most of chapter 6, the Caves of Hunger, can be run as-is with little changes. It's a fun dungeon crawl with interesting locations and entertaining discoveries as the vampire gnoll Tekeli-li hunts the characters.
Run a Powerful and Dangerous Tekeli-liAs written, Tekeli-li isn't a full vampire. Most importantly he's missing legendary resistances and legendary actions. At this point in the campaign, a character with a lucky banish or polymorph spell can turn this fun villain into a small turtle or banish him from the world itself, only returning to six readied actions likely to take him out immediately on his return.
Consider replacing Tekeli-li's stat block with that of a normal vampire and make these modifications:
Add 7 (2d6) or 10 (3d6) necrotic damage to his unarmed strikes and let this necrotic damage hit even if he grabs.Replace the necrotic damage on his bite attack with 21 (6d6) necrotic damage.Replace his charm with the sickening gaze of the Tekeli-li stat block.You can also flavor Tekeli-li's legendary movement, describing him bursting into a swarm of stirges or a bloody-mawed hyena when he races around the battlefield.
A powerful vampire version of Tekeli-li turns him into a villain the characters are sure to remember.
Options for Ythryn: Three of Nine KeysYou may choose to run Ythryn as is. Many DMs did so and enjoyed the results. If you want to change some things up, you might turn the clues in Ythryn into a three-of-five keys quest. Here's how:
A shell of protection wards off anyone from entering the central spire of Ythryn. Only three of the keys once held by the nine Netherese archmages of Ythryn let one pass into the central spire. The characters can explore the ruins of Ythryn seeking out these lost keys — each of them a magic item of considerable power. Once they have three, they can enter the central spire. You can move these keys around Ythryn and leave clues to lead the characters to interesting sites in the lost city.
For some added fun, you can have Averice, the wizard of the Arcane Brotherhood, and her hirelings seek out keys as well. Now it's a race for three of the keys or maybe one group tries to ambush the other once the former acquired three keys of their own. These hirelings can be tied to the former exploits or backgrounds of the characters. Maybe they're assassins sent to finish off one of the characters for a former grudge. Maybe they're cultists of the Black Sword. Choose Averice's hirelings based on the previous events of the campaign.
If you want to throw Auril into the mix, Averice could be physically possessed by Auril and once she's defeated, the three forms of Auril manifest one right after the other. This builds a huge four-stage battle sure to challenge the mightiest heroes. Feel free to turn the dials on Auril to make her the significant challenge she should be.
This gives you a lot of freedom and flexibility to offer interesting options and decisions for the characters instead of the scavenger hunt for weird passwords left all over Ythryn.
What's in the Spire?What rests within or below the spire is left to you. Tie it to a main driver for the campaign. For me, that was the cracked sarcophagus of Thruun, an elder evil trapped by the elves more than two thousand years ago used as a tremendous source of power for the Netherese before Ythryn fell to the earth. Guarded by the lich, Father Llymic, who summoned all sorts of horrors from Thruun's home world, the characters faced a mighty final battle indeed.
Use the events having taken place in your own campaign to build a final battle in or below the spire of Ythryn. Once this battle ends, only then can the characters complete the ritual to end Auril's endless night and restore the sun to Icewind Dale.
Options to Go Back In TimeAs written, the mythallar held within the central spire might transport the characters back over 2,000 years ago to a time when Icewind Dale was temprate. This is an awesome ending but it's best if it's voluntary. Offer this time traveling choice to the players instead of forcing the issue. This way they can integrate it into their [one year later] montage. Don't take away the characters' agency at the last minute. Give them control over their own endings.
Daylight ReturnsReinforce the return of the sun once the characters complete their journey. They step out over a frozen land and see a sun in the sky once again.
Thus ends our adventures in the Rime of the Frostmaiden!
Related ArticlesFrostmaiden Chapter 5: Auril's AbodeRunning Frostmaiden Chapter 3 & 4: Sunblight and Destructions LightRunning Rime of the Frostmaiden Chapter 2Rime of the Frostmaiden Session ZeroRunning Icewind Dale: Rime of the Frostmaiden Chapter 1Want More from Sly Flourish?Read more Sly Flourish articlesSubscribe to the Sly Flourish newsletterWatch Sly Flourish's YouTube videosSupport Sly Flourish on PatreonCheck Out Sly Flourish's Books Return of the Lazy Dungeon Master Lazy DM's Workbook Fantastic Lairs Fantastic Adventures: Ruins of the Grendleroot Fantastic AdventuresSend feedback to mike@mikeshea.net.
Article copyright 2021 by Mike Shea of Sly Flourish.
January 30, 2022
Require Consent for Adverse Character Interactions
New to Sly Flourish? Start Here!
No character can adversely affect another character without their player's consent.
This is an easy rule to put in place during our session zero that short circuits a lot of potential problems.
Scan Reddit's D&D forums for any length of time and you see numerous posts describing how games went south when one character stole something from another, polymorphed them into a chicken, or made them the central target of a fireball.
Requiring a player's consent for adverse actions is a no-brainer. Such a rule stops many problems before they even start.
Here are some specific examples of character consent:
You can't charm or dominate your fellow companion if their character doesn't agree.You can't roll persuasion or deception checks against another character expecting the character to behave a certain way when it fails unless the other player is good with it.You can't fireball your fighter friend no matter how many cultists of Talos they're surrounded by unless they say "do it".You can't steal another character's stuff unless that character's player is good with it.You can't attack another character unless both players are into it.Short Circuiting "That's What my Character Would Do"Defining hard out-of-game limits for any sort of player versus player conflict gets around any sort of story justification for bad behavior. It doesn't matter what a character would do in the world, the game itself at this table doesn't allow it. Those aren't the types of characters we want to follow unless, of course, we do. If all of the players are into it, go with the gods.
During your next session zero, consider adding a standing houserule that no character can adversely affect another character without their player's consent.
Related ArticlesLearning About the CharactersRunning Session ZerosBuilding a Great D&D CharacterEasy Tricks from DMs on TwitterFacing Insurmountable FoesWant More from Sly Flourish?Read more Sly Flourish articlesSubscribe to the Sly Flourish newsletterWatch Sly Flourish's YouTube videosSupport Sly Flourish on PatreonCheck Out Sly Flourish's Books Return of the Lazy Dungeon Master Lazy DM's Workbook Fantastic Lairs Fantastic Adventures: Ruins of the Grendleroot Fantastic AdventuresSend feedback to mike@mikeshea.net.
Article copyright 2021 by Mike Shea of Sly Flourish.
January 23, 2022
Add Necrotic Damage
New to Sly Flourish? Start Here!
A lot of undead monsters in D&D tend to inflict light damage at higher CRs. Much of this has to do with the other abilities they possess such as resistance to non-magical weapons or abilities that life drain but often these extra abilities don't actually make the monster more challenging. What good is resistance to non-magical weapons if all of the characters wield magical ones?
As we saw in Monster Dials, we can tweak the number of monsters in an encounter, the hit points of those monsters, a monster's number of attacks, and the damage of those attacks. Today we'll be looking at that last dial — damage.
It can make sense in the story of our game to add extra necrotic damage to an undead monster's attack. They are, after all, undead. No one bats an eye when a wight inflicts an extra 7 (2d6) necrotic damage on its longsword attack or a vampire inflicts an extra 21 (6d6) necrotic damage on its slam attacks.
We can think of this extra necrotic damage as an undead monster's "nastier special", a concept from the excellent RPG 13th Age.
Which monsters benefit the most from this boost in damage? Below I list a few. Note that this adds considerable challenge to these monsters and should be used with care. Use these boosts when you're confident the characters are up to the challenge.
Ghast. Add 7 (2d6) necrotic damage to its claw attack.Will-o'-wisps. Add 7 (2d6) necrotic damage to its spark attack. Wight. Add 7 (2d6) necrotic damage to its longsword attack.Bone Naga. Add 14 (4d6) necrotic damage to its bite attack.Vampire Spawn. Add 7 (2d6) necrotic damage to its slam attack.Vampire. Add 14 (4d6) necrotic damage to its slam attacks and 14 (4d6) extra necrotic damage to its bite attack.Dracolich. Add 14 (4d6) necrotic damage to all of it's melee attacks.If you find undead monsters who lack solid ranged attacks, take a tip from the upcoming Monsters of the Multiverse book and add a "grave bolts" ranged attack using the monster's normal attack bonus and number of attacks that and inflict 7 (2d6), 14 (4d6), or 21 (6d6) necrotic damage on a hit. Choose damage to suit the challenge you want to provide.
If you want something more detailed, the following chart helps you add ranged attacks to undead monsters of any CR.
CRAttack Bonus# AttacksDamage Per Attack1+424 (1d6)2+427 (2d6)3+5211 (3d6)4+5214 (4d6)5+6218 (4d8)6+6314 (4d6)7+7318 (3d6+7)8+7318 (4d8)9+8321 (4d6+3)10+8323 (3d8+9)11+9325 (3d6+14)12+9327 (4d8+9)13+10422 (3d8+9)14+10424 (3d6+14)15+11427 (4d8+9)16+11427 (3d10+11)17+12429 (3d10+13)18+12431 (3d8+18)19+13433 (4d10+11)20+13435 (4d6+21)21+14436 (4d8+18)22+14438 (3d10+22)23+15440 (4d10+18)24+15441 (4d8+23)25+16444 (4d10+22)26+16445 (4d8+27)27+17445 (4d8+27)28+17449 (3d10+33)29+18451 (4d10+29)30+18455 (4d10+33)And here's a secret tip. You can use the table above to add ranged attacks to any monster. Just flavor the attack and choose the appropriate damage type so it make's sense for the monster.
Keep the necrotic damage dial in your pocket means you can turn just about any monster into an unholy terror sure to scare the nine hells out of your players.
Related ArticlesCustomizing MonstersThe Dials of Monster DifficultyD&D's Nastier SpecialsThe Lazy Approach to Stronger EncountersThe Case for Static Monster DamageWant More from Sly Flourish?Read more Sly Flourish articlesSubscribe to the Sly Flourish newsletterWatch Sly Flourish's YouTube videosSupport Sly Flourish on PatreonCheck Out Sly Flourish's Books Return of the Lazy Dungeon Master Lazy DM's Workbook Fantastic Lairs Fantastic Adventures: Ruins of the Grendleroot Fantastic AdventuresSend feedback to mike@mikeshea.net.
Article copyright 2021 by Mike Shea of Sly Flourish.
January 16, 2022
Frostmaiden Chapter 5: Auril's Abode
New to Sly Flourish? Start Here!
This is one of a series of articles covering the Wizards of the Coast hardcover D&D adventure Icewind Dale: Rime of the Frostmaiden. The other articles include:
Rime of the Frostmaiden Session ZeroRunning Icewind Dale: Rime of the Frostmaiden Chapter 1Running Rime of the Frostmaiden Chapter 2Running Frostmaiden Chapter 3 & 4: Sunblight and Destructions LightYou can also watch my YouTube playlist of Frostmaiden Lazy DM Prep videos.
This article contains spoilers for Rime of the Frostmaiden.
A Conclusion in the Middle of the AdventureRime of the Frostmaiden has a problem with closure. It's an adventure with two separate and independent "final areas", Grimskalle and Ythrin, and it isn't clear why you should care about the latter if the characters' goal becomes ending the endless night.
Luckily we can make a few changes to tie these two locations together and build a conclusion supporting both areas. We'll talk about these changes here and in the writeup for chapter 7.
Summary of Potential ChangesHere's a quick summary of the changes we can make to chapter 5.
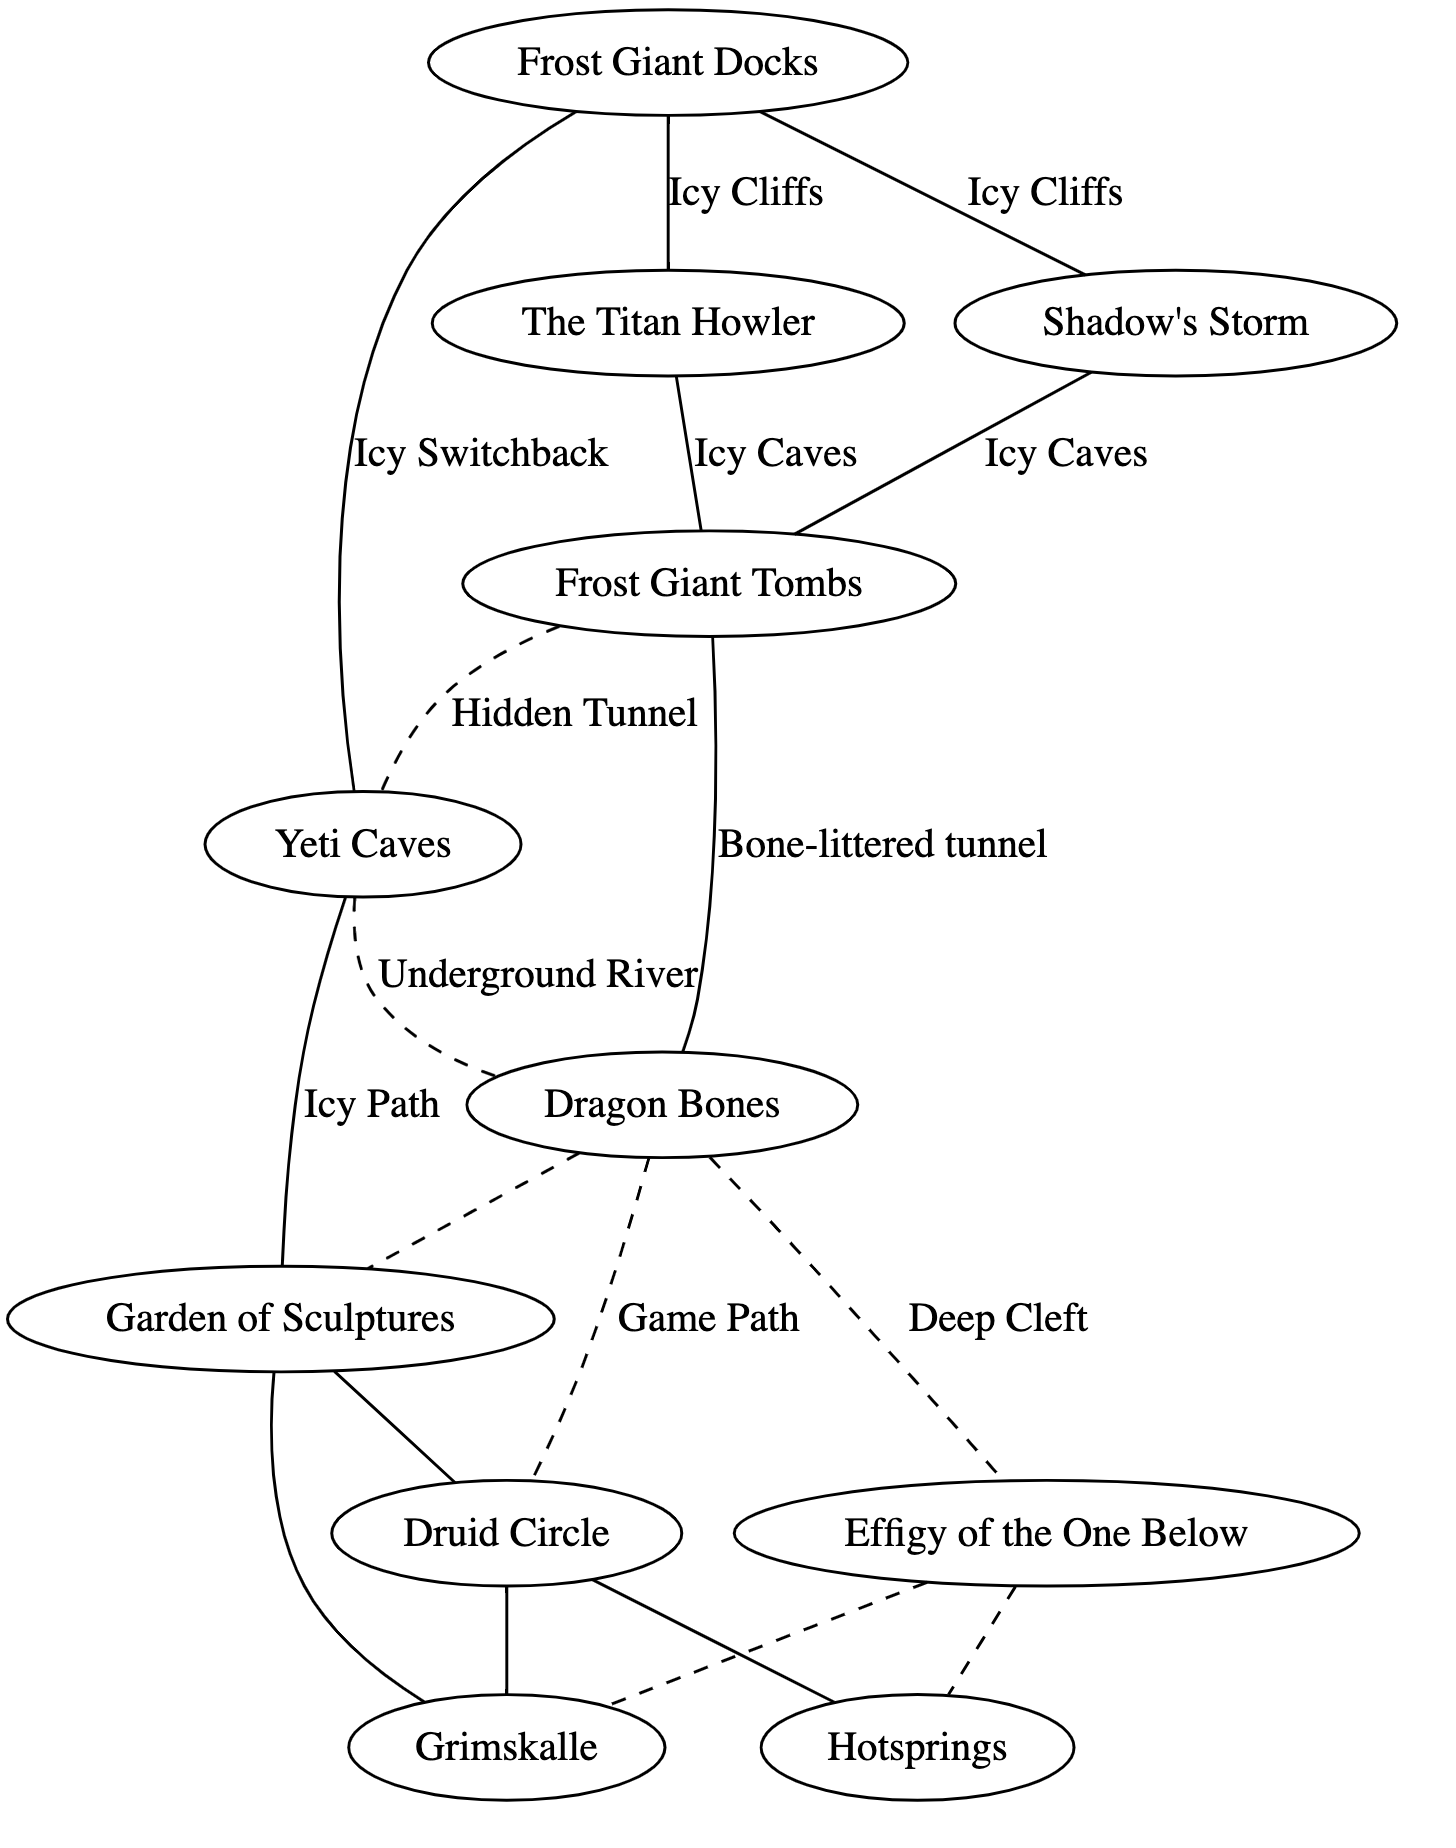
Build a pointcrawl for Solstice. Let the characters learn more about the island as they explore interesting locations before reaching Grimskalle.Tie the endless night to two objects: the Codicil of the White in Grimskalle and the power of the mythallar held within the city of Ythrin in chapter 7. Both must be dealt with to end the Endless Night. Ignore the idea that Auril needs Iskra the roc to cast her spell. The characters shouldn't be able to end the entire endless night by killing a big bird.Replace the Tests of the Frostmaiden with tests tailored to the individual characters based on their own backgrounds and own fears.Choose when Auril attacks and tweak her stat blocks.Exploring the Pointcrawl of SolsticeWhen the characters arrive on Solstice, we can offer a number of locations and interconnected paths to take them from the docks to Grimskalle. Here's one example pointcrawl we can run but I encourage you to build your own.
For more on pointcrawls, see Pointcrawls for Overland Travel.
This pointcrawl can contain a number of interesting locations including:
Pirate shipwrecks crawling with ghoulish cannibal sailors.A druid's circle with frozen dead druids.A series of hot springs that lure would-be acolytes to their boiling deaths.A cave containing the frozen bones of an ancient dragon entombed by the frost giants.The hidden effigy of an elder evil feared even more than Auril.The frozen tombs of frost giant heroes.Auril's garden of ice sculptures.The lair of the abominable yeti and its offspring.These locations can be connected with a range of natural pathways:
Narrow hidden ice tunnels.Cracked walkways along a deep rift.Icy switchback paths.Natural game trails.Underground rivers.Such locations and pathways offer some fun exploration to the otherwise relatively barren island of Solstice.
Tie the Fates of Ythrin and Grimskalle TogetherInstead of keeping Grimskalle and Ythrin separated in the story, connect the two together by tying the endless night to both locations. One cannot simply kill Iskra the roc to stop Auril's spell. One cannot even stop it if they have the Codicil of the White in hand. The spell is required, yes, but so is containing the power that fuels it — power from the Netherese city of Ythrin. This gives the characters reasons to go to both locations to stop the endless night. This power can come from the mythallar contained in Ythryn or to something else of your choosing.
In my own game, this was a powerful elder evil named Thruun based on Father Llymic from the older D&D book Elder Evils. In my game, elves drew the elder evil into the world thousands of years ago and then Netherese wizards encased it in a huge sarcophagus in the bottom of Ythryn so the Netherese wizards could harness its power. With the city collapsed, Thruun's essence has leaked from its sarcophagus and caused all sorts of problems.
You can, of course, choose your own source of power in Ythryn based on the characters' story and the story that evolves at the table. If nothing else comes to mind, the mythallar described in the book may be just the thing.
Replace the Tests with Character-Focused Hard ChoicesIf you're not feeling the tests as written in Rime of the Frostmaiden, here's an alternative.
Instead of the existing tests, we can replace them with tests of the actual characters. How far will they go when facing Auril's tests — tests intended to show the loyalty of would-be anointed druids in Auril's service?
Before the characters get to the tests, or even to Grimskalle, make sure you pay particular attention to the character's backgrounds. What do they want? What are they almost completely unwilling to give up? What do they fear? What will happen to them if they become lost?
Then we have the tests themselves. Tests that focus on isolation, cruelty, endurance, and preservation.
When the characters enter area G10 they see the four doors. When one of them touches a door, they are tested. They find themselves put in a position where they must make a hard choice, an impossible choice, and one that proves to Auril that they are willing to give up everything to join with her. Will they let loved ones freeze to death? Will they give up their family name and dynasty? Will they let their body become destroyed by a parasite living within them? Will they turn their back on the people of Ten Towns?
This is where we grab those knives the players have been giving us and stab them in the heart (with careful reason and clear safety tools in place). The idea here is that they prove their willingness to give up everything they love to join Auril's anointed. Even if the choice wasn't real, the characters will be forever changed by their choices. They know, deep down, what they are willing to give up.
Or maybe they don't. Maybe when facing the tests they give the finger to Auril and show they will not give up who they are. If the characters fail these tests, the third form of Auril arrives and gives them what-for. When they defeat the form, the Codicil is unprotected and they can grab it up and go.
This can be a real fun series of roleplay scenes to see how the characters act given the tests in front of them. Some may accept the test. Some may reject it. Regardless, they will be forever changed by facing them and learn who they really are.
Choose when Auril AttacksYou choose when, how, and with which form Auril attacks the characters. Perhaps her third form guards the Codicil of the White itself. Perhaps when they take the Codicil they find her first form in the chamber behind them or face her outside of Grimskalle.
We can test our boss here by letting them face the one to three forms of Auril before we unleash all of them on the characters at once in a final multi-phase boss fight if we choose.
You may need to tweak the stat blocks of Auril's forms. The crystalline form, for example, is seriously hindered by having only ranged attacks and no good way to escape from being pinned down. Instead, give it a legendary action to misty step. The other forms too need some work. Give them access to spells like Cone of Cold and make her ice darts more like ice lances, throwing around 36 cold damage a shot instead of 3.
One of Two End-Zones for FrostmaidenWith some tweaking, the island of Solstice and Grimskalle can be excellent end-game location worthy locations for our characters to explore. Use these tips and your own ideas to customize the island to suit you and your group.
Related ArticlesRunning Frostmaiden Chapter 3 & 4: Sunblight and Destructions LightRunning Rime of the Frostmaiden Chapter 2Rime of the Frostmaiden Session ZeroRunning Icewind Dale: Rime of the Frostmaiden Chapter 1Reinforce Cooperative Character MotivationsWant More from Sly Flourish?Read more Sly Flourish articlesSubscribe to the Sly Flourish newsletterWatch Sly Flourish's YouTube videosSupport Sly Flourish on PatreonCheck Out Sly Flourish's Books Return of the Lazy Dungeon Master Lazy DM's Workbook Fantastic Lairs Fantastic Adventures: Ruins of the Grendleroot Fantastic AdventuresSend feedback to mike@mikeshea.net.
Article copyright 2021 by Mike Shea of Sly Flourish.
January 9, 2022
Running Heists in D&D
New to Sly Flourish? Start Here!
Previous articles describe troublesome quest models and how the Seven Samurai quest model fits well into our D&D games. The heist is another useful quest model fitting well with the style of our D&D games. Today we're going to look at running great heists.
Patrons of Sly Flourish can watch a video in which Johnn Four and I talk about running great heists in D&D as well as three other videos on running situations and the five room dungeon, running mysteries, and thoughts on RPG map designs. Find out more at the Mike Shea and Johnn Four video collaboration page.
Great Situational D&DHeists follow a general model of D&D that often works very well — building situations. Instead of building adventures room by room and encounter by encounter, we consider a whole location with multiple entrances, multiple paths, and multiple ways to engage with the location and the inhabitants moving within it.
The heist is one such situation built from a number of components:
The target. What are the characters trying to acquire or accomplish at the location?The location. Where is the target held? What surrounds it?The inhabitants. Who guards the target? What bystanders happen to inhabit the area?Complications. What complications might occur in the situation? These might be planned or improvised.Heists also work well by running our game in two phases: the plan and the execution.
The TargetThe target can be just about anything in our heist scenario. It might be a physical object. It might be a piece of information. It might be a person, willing or unwilling. It might be a dream or a memory. The movie Inception is an example of a heist involving dreams.
When running heists, it's important to declare what the characters seek up front and not to change it during the execution or it can feel frustrating. No, Mario, your princess is not in another castle.
The LocationThe target sits in a location and certain locations lend themselves to great heist adventures. Locations work best for heists when they have the following criteria:
They have multiple potential entrances.They have multiple paths within the location.They have secret paths and shortcuts to discover.Justin Alexander's descriptions of Jaquay-style locations often work well for heists and many of Dyson Logos's maps fit this style.
In particular, manors, keeps, and castles work well for heists, especially those with underground tunnels, cellars, and other interesting ways in. The haunted manor in Sinister Secret of Saltmarsh from Ghosts of Saltmarsh is a good example of a great heist location, as is Vanthampur Manor in chapter 1 of Descent into Avernus and Gralhund Villa from chapter 3 of Waterdeep Dragon Heist.
InhabitantsInstead of populating locations room by room, consider the total force that occupies the location. Who are the guards? How many are there? What is their typical behavior? What monsters guard the secret locations or underground passageways? When we think about the overall force protecting the target at the location we can recognize how they act and react as the characters infiltrate the location.
We can also populate our location with non-combatants. Who populates the location that isn't really involved with protecting the target? They can add fun complications and roleplay opportunities while the characters move through the location. This is a great tip I picked up from Johnn Four at Roleplaying Tips.
Phases of PlayWhen running a heist, consider breaking down gameplay into two phases: the plan and the execution.
We want to give the players ample time to look at the situation, maybe even giving them a copy of the map of the location if it makes sense that they'd have it or give them a mixture of reliable and unreliable information. They might spend time reconnoitering the location, learning what they can and using this to aid in their plans.
We likely want to limit how much time the players spend on this or they'll get caught in decision cycles that go on forever. Limit the amount of time they spend on it to 30 minutes or so. It's an out-of-game limitation but one that helps move the game forward.
The second phase is execution in which the characters conduct their heist. This plays out like a traditional situational D&D game. The characters do what they do and the world reacts.
Avoiding Single-Roll FailuresWhen running heists, we don't want the whole heist to rely on a single roll for success or failure. Instead, each roll moves the situation forward either positively or negatively. Complications can still occur even if every ability check succeeds and success can still occur even if every ability check fails.
The excellent RPG Blades in the Dark is built around running heists and uses "progress clocks" to manage multiple successes and failures as situations evolve. A progress clock might require a number of successes before a full success occurs or might create two opposing clocks, one for the characters and one for those guarding the target. Instead of establishing progress clocks ahead of time, we can improvise progress clocks as we think about the approach the characters are taking and as the situation evolves.
Here's a YouTube Video on using progress clocks in D&D.
ComplicationsComplications are a fun way to change up the nature of a heist as it's happening. We don't want to drop in too many complications or include complications so big that the entire plan falls apart. Here are some example complications that might occur during the heist:
The target is moved within the location.A powerful enemy arrives at the location.Another group tries to steal the target.An external event changes up the situation.War erupts around the location.Extra non-combatants arrive at the location.The guardians of the target change their behavior.The target changes in some way. An egg hatches, a magic item wakes up.An accident or disaster occurs at the location. A dark force at the location wakes up.A Powerful and Flexible Quest ModelHeists are an excellent and flexible quest model for our D&D games. By changing up targets, locations, and inhabitants we can re-use this quest model for many different games, each resulting in a unique story we can share with our players. Add the heist model to your bag of tricks and you have a flexible model for some awesome D&D games.
Related ArticlesWaterdeep Dragon Heist Chapter 5: The HeistSession Zero of Waterdeep Dragon HeistRunning Waterdeep Dragon Heist Chapter 3: FireballTroublesome Quest ModelsRunning Waterdeep Dragon Heist Chapter 2: Trollskull AlleyWant More from Sly Flourish?Read more Sly Flourish articlesSubscribe to the Sly Flourish newsletterWatch Sly Flourish's YouTube videosSupport Sly Flourish on PatreonCheck Out Sly Flourish's Books Return of the Lazy Dungeon Master Lazy DM's Workbook Fantastic Lairs Fantastic Adventures: Ruins of the Grendleroot Fantastic AdventuresSend feedback to mike@mikeshea.net.
Article copyright 2021 by Mike Shea of Sly Flourish.
January 2, 2022
A World Without Heroes: A 1st to 20th level Campaign Outline
New to Sly Flourish? Start Here!
What if no heroes had come to save the Sword Coast?
What if all of the events from Tyranny of Dragons, Princes of the Apocalypse, Out of the Abyss, Tomb of Annihilation, Descent into Avernus, and Rime of the Frostmaiden took place but no heroes were around to stop them?
What if Tiamat's rise wasn't stopped and the queen of dragons now ruled over the Sword Coast from a golden ziggurat floating over Waterdeep?
What if none thwarted the demon princes summoned to the underdark and now Demogorgon rules Menzoberranzan against Orcus's undead illithids?
What if the Cult of Eternal Flame defeated the three other cults of elemental evil and now Imix sits upon a throne of molten iron in the center of the scorched remains of the Dessarin Valley?
What if Acererak's atropal devoured the souls of millions and became a new dark god nestled in the island of Chult?
What if Elturel was never saved, leaving a bleeding wound in the earth leading down to the hellscape of Avernus while the corruption of devils devours neighboring Baldur's Gate?
What if Auril turned everything north of the Spine of the World into a lifeless glacier slowly making its way south?
What if all of these things happened at once?
That is the seed for this campaign outline I call "A World Without Heroes". This is one of a number of campaign outlines I've written including the following:
The Hunger, a 1st to 20th level gnoll campaign.Harvaster of Worlds, a 1st to 20th level Githyanki / Mindflayer campaign.Demogorgon Must Die, a 1st to 20th level adventure caught between Demogorgon's warring heads.The Truths of the World Without Heroes.Tiamat rules the Sword Coast. Having ascended from Avernus, the queen of dragons rules from a huge ziggurat floating above the city of Waterdeep as the Sword Coast's god-queen.
The demon lords now rule the underdark. Demogorgon rules Menzoberranzan, its peoiple now driven insane by the demon prince's chaos while Orcus has built an army of undead illithids.
In a bloody battle between the cults elemental evil, the cult of Eternal Flame destroyed the other three and now Imix sits upon a throne of molten iron in the scorched land once known as the Dessarin valley.
The archlich Acererak birthed a dark god fed on a million lost souls. The twisted horror lies in its creche from the dead city of Omu in the heart of the poisoned land of Chult.
A hell-hole now sits where the city of Elturel once stood. Scheming devils led by the corrupt High Duke Thalamra Vanthampur and the pit fiend Gargauth overran the city of Baldur's Gate.
The Frostmaiden's rime destroyed everything north of the Spine of the World and now makes its way south of the mountains threatening Mirabar and Luskan.
Starting LocationsThis campaign could start in a number of adventure-filled locations. Choosing a location to start may be an important consideration in your session zero. Each starting location brings a very different theme to the campaign, particularly in the lower tiers.
These locations include:
Mirabar. The characters reside with the dwarves of Miribar crushed between Auril's terrible mile-high glacier slowly destroying the spine of the world and the scorched lands of the Dessarin valley and its elemental prince, Imix, to the south.Waterdeep. The characters scrape by, surviving in the ruins of the once mighty city of Waterdeep. The corrupted masked lords hunt down any sign of disobedience against Tiamat while criminal gangs rule the ten neighborhoods of the massive city, all of which sit under the shadow of Tiamat's golden ziggurat.Baldur's Gate. The characters hide in the hovels of Baldur's Gate fighting alongside the city's survivors and rebels against the devilish influences now ruling the city. They struggle against High Duke Vanthampur and her pit-fiend ally, Gargauth, as the fiendish duo crushes what little good remains in Baldur's Gate.Port Nyanzaru. The once lush lands of Chult now lie dead and diseased as Acererak's newly born god devours all life on the island. Undead hordes smash against the city gates of the once mighty port city while the people left inside fight for their meager existence and try to sail the poisoned seas to the Sword Coast seeking a peace they will not find.Blingdenstone. Travelers of the underdark hidden away from the chaos of the Rage of Demons make their way to the hidden city of Blingdenstone. There they keep the city hidden from the eyes of the warring demon princes raging through the Underdark.Secrets of the LandThese hidden secrets help fuel the GM's imgination when running a campaign in this grim setting:
Lord Neverember, ruler of Neverwinter and the last survivor of the Lord's Alliance, now swears fealty to Tiamat.The demon princes Jubilex and Zuggtmoy have wed and now rule side by side in the Neverlight Grove in the Underdark.Szass Tam has forged a truce with the dragon queen, although he recognizes that such a truce can never hold Tiamat back should her eyes fall upon Thay. He could be a powerful ally for those strong enough to threaten the queen.Imix's fire and Auril's glacier will one day crash together in a catacalysmic war. It's quite possible the minions of the two could be used against one another.The power of Acererak's newborn god competes with the undead nation of Thay. Szass Tam wishes to destroy the god, or perhaps capture it for himself.Orcus has corrupted an elder brain of the illithids and now rules over an army of undead mindflayers.The twin heads of Demogorgon war with one another across the city of Menzoberranzan, setting half of the city's drow against the other half. A hidden cabal of drow priestesses, still loyal to Lolth, seeks every option to destroy the prince of chaos.High Duke Thalamra Vanthampur completed a pact with the pit-fiend Gargauth to serve the souls of Baldur's Gate to Avernus. This pact, however, goes against the wishes of the archdevil Zariel who sees it as a betrayal.Unlikely AlliesPart of the fun of running a twisted campaign like this is bringing in unlikely allies and quest NPCs. Here are a few we might consider:
Szass Tam. The lich ruler of Thay may not like all these new big players in his sandbox (ahem). Once the characters show their quality, the lich may recruit them and offer them powerful weapons to defeat the new rulers of the Sword Coast. Of course, he may just as likely betray them if it serves his interest.Acererak. Perhaps the archlich got more than he bargained for with the birth of a new god. Parenthood isn't for everyone it seems. Maybe the being outstripped Acererak's own power and now the archlich seeks the god's end.Manshoon. The former lord of the Zhentarim may have changed his position now that the other rulers of the Sword Coast are gone. Perhaps the Zhentarim are the new Harpers and one of the remaining clones of Manshoon serves as their leader, hoping to return order to the chaotic Sword Coast.Iymrith. The ancient blue dragon sorceress may have found her loyalty to Tiamat waning as she sees the dragon queen's results first hand. Like Brutus to Caesar, betrayal may be inevitable and the characters may be just the knife she needs to slide into Tiamat's back.The Xanathar. The crime lord of Skullport may not appreciate the new leadership floating above Waterdeep and seeks heroes willing to make life harder for the dragon queen and her corrupt masked lords.Halaster Blackcloak. The once mad mage of Undermountain may be one of the few beings left who possesses the power to push back the gods, demon lords, and elder evils that now walk the Sword Coast.Lolth. Sure, having the demon princes battling each other in the underdark has been fun. The twin heads of Demogoron have done their jobs of culling the weak and raising the strong, but enough is enough. It's time for this to end. And who better to end it than these new heroes who seem to be making a name for themselves.Zariel. Seated upon a throne on the dead city of Elturl floating in the river Styx in Avernus, the archdevil of Avernus does not like the growth of power she sees with the fiend Gargauth. Deep within her, a spark of good still hopes the heroes can overcome the fiends devouring the souls of those she once served.As you can see, many of the once former villains in the Sword Coast could become fun allies as the titans walk the land.
Quests and Adventures from 1st to 20th LevelRather than list out individual quests for each tier, considering that a group could start in numerous areas, I'll describe instead the types of quests characters might go on at each tier.
One great advantage of a campaign like this is that we can use a lot of material from existing published adventures including Princes of the Apocalypse, Out of the Abyss, Tyranny of Dragons, Tomb of Annihilation, Descent into Avernus, and Rime of the Frostmaiden. We can pilfer a great deal of locations, maps, artwork, and NPCs from these adventures for use in our own dreadful campaign. Players who have played these adventures can enjoy returning to these people and places with this new spin.
1st through 4th Level: Facing Local ProblemsAt the first tier of play the characters likely face problems local to their starting location. They may battle invading forces from one or two of the titans now ruling over the Sword Coast but at this level, they cannot hope to face one of the beings. Instead, their goal is to help those who remain survive under the iron grip of the beings who now rule the land.
Quests in this tier might include rescue missions, reconnaissance missions against enemy strongholds, defeating local tyrants, defending local strongholds, and saving those who cannot withstand the terror of the titans now ruling the Sword Coast.
5th through 10th Level: Breaking Regional BarriersAt the second tier of play, the characters will begin to break into new areas, seeing the effects of more than one of the titans ruling over the Sword Coast. They may begin small revolutions against local lords allying with these mighty rulers. The initial stages of plans to push back, maybe even defeat, the lords might begin to take place.
Quests in this tier might include aiding refugees leaving one area for another, bringing important messages to new lands, bringing together networks of resistance across the lands, disrupting the plans of mid-level leaders of the arch-villains, seeking forgotten secrets of the Sword Coast, and finding lost artifacts that can aid in the war against the titans.
11th through 16th Level: Dethroning the Elder EvilsOnce the characters hit tier three they're ready to begin taking on some of the less powerful elder evils such as Imix or the demon princes in the Underdark. They might pit one elder evil against another, perhaps even allying with one to defeat another before betraying the first. This whole part of the campaign may play out like Fistful of Dollars, with the characters pitting one great evil against another. In the latter part of this tier, they should be powerful enough to fight and even defeat a number of the titans. Doing so, however, creates a vacuum other titans soon fill, making it that much harder.
Quests in this tier might involve retrieving the weapons needed to defeat the titans in long-forgotten vaults, secret missions to pit one arch villain against another, infiltration into the lairs of the lower titans, and the assassination of generals.
17th through 20th level: GodslayersFinally the characters reach the level of power to face the gods who have taken over the Sword Coast including Auril, Acererak's atropal, and, of course, Tiamat.
Many of the quests and adventures in this tier involve infiltrations of the lairs of the gods, defeating their last lieutenants, and facing off against the gods themselves.
A Dark "What If"Campaigns like this are a fun way to take the common understandings of the published adventures within the Sword Coast and turn it on its head. It makes those who know the Realms open their eyes and mouths wide as their head spins with the implications of so many elder evils ruling over the Sword Coast at once. It likewise shakes up our own imaginations, opening up tremendous possibilities for powerful campaigns.
Use the ideas in this article to fuel your own "what if" scenarios and let your imagination run wild!
Related ArticlesSession Zero of Storm King's ThunderA Guide to WOTC D&D Published AdventuresDemogorgon Must Die: A Twenty Level D&D Campaign OutlineAdding Depth to Storm King's ThunderTier Appropriate Adventure LocationsWant More from Sly Flourish?Read more Sly Flourish articlesSubscribe to the Sly Flourish newsletterWatch Sly Flourish's YouTube videosSupport Sly Flourish on PatreonCheck Out Sly Flourish's Books Return of the Lazy Dungeon Master Lazy DM's Workbook Fantastic Lairs Fantastic Adventures: Ruins of the Grendleroot Fantastic AdventuresSend feedback to mike@mikeshea.net.
Article copyright 2021 by Mike Shea of Sly Flourish.
December 26, 2021
How to Customize Published Campaign Adventures
New to Sly Flourish? Start Here!
Richard B. a Sly Flourish patron, asks:
Do you have any advice for a fairly new DM about going through a published adventure and making alterations to make it work for the group. I sometimes hear about things needing a fix but have no idea how to do that.
For experienced DMs, it's easy to forget how we go about customizing published adventures. There's a method to our chaotic hacking and slashing of a published adventure, however, and it's worth diving into the details.
This article focuses on larger campaign adventures, like the published hardcover adventures from Wizards of the Coast. Most of this advice is likely overkill for customizing a single-session or short adventure, though some of it still stands.
My friend Sharon offers three great pieces of advice for customizing shorter-run adventures:
Are there mutliple quest-givers before your players reach the heart of the adventure? Cut one of those. You'll never miss 'em.Cut things that won't make sense for your players: puzzles, riddles, language, ideas, or lore from other adventures. Replace them with stuff your players care about.Review the loot! There's almost always something you can include that means more to your players than the stuff in the published adventure.These ideas can work well for longer-run campaign adventures as well.
Nothing Is SacredChange anything in a published adventure to suit it to your group. Nothing is sacred. If you generate your own adventure from the inspiration of the cover art alone, you're still doing it right. Whether you only change a few NPCs or a touch of the flow of the adventure or hack it down to a root and rebuild it into a new forest, there's no wrong way if it works for you and your group. There is no honor in running an adventure as written at the expense of the fun of your game.
Change anything in a published adventure to suit you and your group.
Customize the Adventure Around the CharactersOne of the most effective ways to customize a campaign adventure is to thoroughly connect it to the characters. There are two ways we can do this:
First, ensure players build characters suited to the campaign during our [session zero]. A good one-page campaign guide like this one for Rime of the Frostmaiden helps players build characters focused on the themes of the campaign.
Second, modify the campaign to suit the characters. We can do this through NPC connections, historical connections, location-based connections and others. Here's a list of ten ways to tie characters to published campaigns:
A character has a history with a villain.The character's heritage connects them to a major location in the adventure.The character owes an NPC a debt.The character is related to an NPC or villain.A character has visited or has knowledge of a location.A character's relative has a history tied to a location or villain.An NPC is a rival of one or more of the characters.A character once served a villain or sub-boss but broke free.A character worships a god interwoven into the adventure's story.A character underwent a ritual connecting them to a villain either in a bond or as an enemy.Sharon's idea of customizing loot is another fantastic way to tie characters to the adventure.
Connecting the characters to the adventure goes a long way to engaging players with the story of a campaign.
Tune Encounters for Pacing and BeatsPublished adventures have no idea how the pacing or beats of your game are going to go. You usually have no idea either until you're running it. Regardless of what the published adventure describes, change the number and type of monsters in any given location based on what's fun at the moment.
If the characters just had a big fight against some monsters and the next room has six more of them, feel free to cut them down to one. Oscillate between hard and easy encounters as you see fit. Mix up gameplay types as well. Maybe what appears like a fight is actually a conversation or some other way to bypass the situation.
Always have your hands on the dials.
Add Subquests & Cut What You Don't LikeAs you run a published adventure, you're likely to get ideas of your own. Maybe one small throwaway location really grabs you and you want to add a whole subquest around it. Go crazy. Add your own small adventure in the middle if it feels cool to you. This might make the overall adventure longer but, just as we add our own quests, we can cut the parts of the published adventure that we don't dig. Move the MacGuffins around to change up the nature of the campaign if we need. Maybe that vital clue left in the published Medusa's garden fits better in the crypt of the forgotten king we decided to add ourselves.
Adding our Own StoriesAs we read the plot of a published campaign, our own mind might wander off and start playing "what if". What if the mind flayers of the Id Ascendent traveled into the Underdark with they're dying elder brain and allied with Orcus to save it? What if the power of the endless night in Icewind Dale was actually caused by a crack in an elven sarcophagus that encased the elder evil Thruun in the bowels of the lost city of Ythryn? What if a githyanki armada was soon headed to Faerun to rid the land of its mind flayer influence?
Sometimes we read a published adventure and are disappointed it isn't something else. Make it something else. Go with your ideas. The adventure is yours now.
Mashup Multiple AdventuresMy friend Jeff at the Tome Show loves to take multiple adventures and mash them together. What if you took Waterdeep Dragon Heist, Curse of Strahd, and Out of the Abyss and put their events into one campaign? Now your players have big choices they can make with big changes in the story depending on the path they follow. We needn't mash up whole adventures either. Instead we can take dungeons we like from one adventure, story elements we like from another, and an overland map we like from a third. We can shuffle all sorts of things from multiple adventures together. I wrote more about this in how to mash up Dragon of Icespire Peak and Lost Mine of Phandelver together.
Customized published adventures let us capitalize off of the tremendous investment publishers have put into these published adventures and still run campaigns that are all our own.
Related ArticlesThe Case For Published AdventuresUsing Published AdventuresReading Published AdventuresChoosing the Right Steps from the Lazy DM ChecklistConverting Older D&D Adventures and SourcebooksWant More from Sly Flourish?Read more Sly Flourish articlesSubscribe to the Sly Flourish newsletterWatch Sly Flourish's YouTube videosSupport Sly Flourish on PatreonCheck Out Sly Flourish's Books Return of the Lazy Dungeon Master Lazy DM's Workbook Fantastic Lairs Fantastic Adventures: Ruins of the Grendleroot Fantastic AdventuresSend feedback to mike@mikeshea.net.
Article copyright 2021 by Mike Shea of Sly Flourish.
December 19, 2021
How Long Does it Take You to Prep Your D&D Game?
New to Sly Flourish? Start Here!
Sly Flourish Patron MonsterVTpilot asks "What is your ratio of preparation time vs. play time for your games personally? For every hour of play do you think we spend 3 hours to prepare? What do you think is a normal ratio."
Three hours per hour?? I certainly hope not.
For a video on this topic, see my YouTube video "How Long Does it Take to Prep a D&D Game?".
In April 2020 I posted a Twitter poll asking DMs how long they prepared for a roughly four-hour D&D game. Here are the results from 3,663 responses:
Response% of totalAbout 30 minutes or less10%About an hour33%About two hours28%About three hours or more29%Just about a third of surveyed DMs spend three hours or more preparing on a four hour game. A little less than half spend an hour or less. Another quarter spend about two hours.
Personally, it takes me about 30 minutes to an hour to prepare for a 3 hour game using the eight steps from Return of the Lazy Dungeon Master and that feels about right to me. When I'm on my own and not livestreaming my preparation it usually takes about 30 minutes. That's assuming I'm in the middle of a published adventure I'm already running. This amount of prep-time changes depending on the type of game I'm running, where we are in that campaign, and what I've already prepared. If I'm running a single-session game from scratch, it could take one to two hours to get everything ready.
How Long Do YOU Need?We each likely need a different amount of time to prep our games. There's no single right answer. Sometimes the platform on which we play takes more or less time. I whip things up quickly in Owlbear Rodeo but others love to build big multimedia experiences in Roll20 or Foundry and that takes a lot of time. If I want to set up a nice Dwarven Forge setup, I'm not whipping that up in 30 minutes. It's going to take a couple of hours.
There are, however, diminishing returns. I experimented by taking a full day preparing for a Ghosts of Saltmarsh campaign and saw these diminishing returns in action. Some things had a big impact on the game including reading the whole adventure and considering connections between the characters and the story of the adventure. Other things, like setting up music playlists and printing out big poster maps, offered little value for the time spent.
Regardless of how much time we spend prepping on our games, it behooves us to look at each part of our prep and ask ourselves how much better our game will be because of it. Often we're driven to prep more than we need. Sometimes what we prep doesn't help at all. Sometimes it makes the game worse — it gets in the way.
Which Steps are the Right Steps?We each decide what most benefits our game. Of course, I believe in and use the eight steps from Return of the Lazy Dungeon Master and focus on the next game I'm going to run instead of what may happen in future sessions. Those steps work for me and seem to work for a lot of people. But each of us can ask ourselves what preparation makes for a great game and what does not to determine how long it takes us to prep our game.
Related ArticlesSpending a Whole Day Preparing a D&D Game2016 D&D 5th Edition Dungeon Master QuestionnairePrepare a D&D Game in 15 MinutesDungeons & Dragons Fifth Edition Facebook and Twitter Survey ResultsChoosing the Right Steps from the Lazy DM ChecklistWant More from Sly Flourish?Read more Sly Flourish articlesSubscribe to the Sly Flourish newsletterWatch Sly Flourish's YouTube videosSupport Sly Flourish on PatreonCheck Out Sly Flourish's Books Return of the Lazy Dungeon Master Lazy DM's Workbook Fantastic Lairs Fantastic Adventures: Ruins of the Grendleroot Fantastic AdventuresSend feedback to mike@mikeshea.net.
Article copyright 2021 by Mike Shea of Sly Flourish.
December 12, 2021
Writing a One-Page Campaign Guide
New to Sly Flourish? Start Here!
When you're getting ready to run a new campaign, write up a single-page guide for your players to get them on board with the campaign and steer your campaign in the right direction.
For a video on this topic, see my Writing a Single Page D&D Campaign Guide YouTube video.
This single-page guide has many advantages:
It helps players understand the world and the campaign in which they're going to play.It helps you focus on the most important parts of the campaign. It builds an agreement between you and the players about the type of game you're going to run.It gives the players information to help them build characters around the theme and focus of the campaign.This article breaks down the details of a single-page campaign guide and goes hand-in-hand with the idea of running a session zero. Here are a handful of one-page campaign guide examples:
Descent into Avernus Campaign One-pagerGhosts of Saltmarsh Campaign One-pagerEberron Second Mourning Campaign One-pagerRime of the Frostmaiden Campaign One-pagerPatrons of Sly Flourish get access to the Word template used to format these one-page campaign guides.
Keep It to One PageWe're going to be tempted to write out a big campaign bible for our game. Avoid that temptation. We're all busy. Our players are busy. The longer the guide, the less likely players read it. Even if you must include supplemental information, write up a single page guide covering everything the players should understand about the campaign. Keeping it down to a single page makes it far more digestable than a longer campaign guide.
The Campaign's PitchHook the players with an evocative pitch. What is the single-sentense or short paragraph drawing them into the world? Make the pitch specific enough that the players understand the role of their characters in the campaign. As much as we don't want to reveal surprises, avoid being so vague that no one understands what it's actually about.
Examples from the WOTC hardcover adventures include:
Draconic cults rise on the Sword Coast threatening to bring their goddess, Tiamat, into the world.You and your fellow adventures find yourself trapped in the gothic lands of Barovia under the watchful eye of the vampire lord Strahd.Typically secluded giants now threaten the villages and cities of the Sword Coast.Hellish cults rise in the lands surrounding the city of Elturel.An endless night has overtaken Icewind Dale isolating Ten Towns from the rest of Faerun and threatening its people with a frozen death.What is the single-sentense hook grabbing onto your players' imaginations and drawing them into your campaign? Write that down first in your one-page campaign guide and then fill in a short paragraph on the theme of the campaign.
The Truths of the CampaignWhat are the six truths of your campaign setting it apart from all other campaigns and worlds the players have played? These truths are known to the characters in the world. They're not secrets. These six truths help players understand how this campaign differs from others and helps them begin to scope out their characters.
You don't always need six. Shorter campaigns might only have two or three. You get to choose how many but don't go beyond six.
Here are five example truths for my Rime of the Frostmaiden campaign:
The sun hasn't risen in Icewind Dale for two years.The two-year night has cut off the frozen northfrom the rest of the Sword Coast.The Children of Auril demand sacrifices from thepeople of Ten Towns in the Frostmaiden's name.Ancient and powerful secrets lie under the ice.Shadowy figures lurk in the mountains hammeringupon strange black metal.These truths refine the concept of the campaign in the players' minds. It shows them what matters, what's important, and what sort of character fits best.
Potential Factions or PatronsIf you enjoy starting your campaign focused around a patron or faction, offer up to three choices for potential patrons or factions. These patrons or factions connect the characters together and give them a clear source for the quests that drive the rest of the campaign. Being able to choose which patron or faction they prefer gives the players agency over the campaign. These choices come out in your session zero with the agreement that the group together determines one primary patron or faction.
Character Creation Guidelines & HouserulesOffer guidelines for character creation. What sources are allowed? What ability score generation method do you use? Do you have any important houserules the players should know about?
Most important, what key theme or bond should players wire into their character to connect them together and focus them on the campaign's theme?
Here's an example from my Eberron Second Mourning Campaign One-pager:
"You seek to travel with your band of companions, in cooperation, to prevent the second Mourning."
Note the reinforcement of cooperation. No loner edge-lords thank you very much.
Safety Tools and ThemesAs part of our contract with our players we can describe our campaign's safety tools. I prefer a mix of "lines and veils" with descriptions of some expected lines and veils for this campaign along with a version of the X card I call "pause for a minute". The discussion of safety tools is an open conversation piece, of course, and can get further refined during your session zero. Update the guide with the players' described lines and veils as well and resend it out to the group so everyone is clear.
A Single Page to Steer the CampaignOne-page campaign guides help steer your entire campaign. Mixed with a solid session zero, they ensure players play characters focused on the campaign's themes, are built with the right drivers in their backgrounds, and join together in cooperation to engage in high adventures.
Related ArticlesRunning Session ZerosReinforce Cooperative Character MotivationsRime of the Frostmaiden Session ZeroSession Zero of Storm King's ThunderWolfgang Baur on WorldbuildingWant More from Sly Flourish?Read more Sly Flourish articlesSubscribe to the Sly Flourish newsletterWatch Sly Flourish's YouTube videosSupport Sly Flourish on PatreonCheck Out Sly Flourish's Books Return of the Lazy Dungeon Master Lazy DM's Workbook Fantastic Lairs Fantastic Adventures: Ruins of the Grendleroot Fantastic AdventuresSend feedback to mike@mikeshea.net.
Article copyright 2021 by Mike Shea of Sly Flourish.
Michael E. Shea's Blog

- Michael E. Shea's profile
- 39 followers

