
Rachael Ray's Blog, page 33
February 21, 2014
Master Class: How to Beat Egg Whites
Perfectly whipped egg whites are the key to many light and fluffy desserts like meringues, mousses, and soufflés. Egg whites add air and lightness, but they need to be whipped properly to add these properties.
Here are some tips to do it perfectly – every time:
1. Start with fresh eggs, at room temperature (a minimum of 30 minutes at room temp). Insider tip: To quickly bring refrigerated eggs to room temperature, place eggs in a bowl of warm (not hot!) water for about 10 minutes.
2. Use perfectly clean, dried utensils (either a whisk if you are whipping by hand – your arms might be sore the next day! – or a whisk attachment for an electric mixer) and a deep, non-plastic bowl. Any oily residue can interfere with your egg whites.
3. Start beating the whites at low speed until they are foamy, and then and move on to medium or even medium-high when beating your whites. Do not beat on high.
4. Add a pinch each of salt and cream of tartar at the foamy stage to speed up whipping and help to stabilize the whites.
5. The “soft peaks” stage is when you pull the whisk out of the whites and a peak forms – and then flops over.
6. If the recipe calls for sugar, slowly add at the soft peak stage.
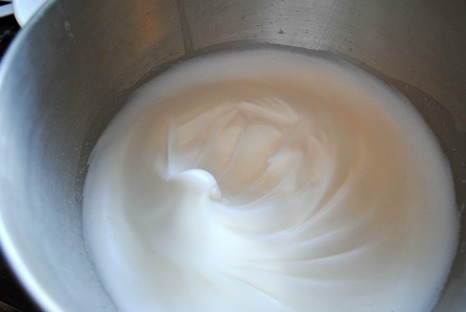
7. The “stiff peaks” stage is when the whites are smooth and glossy and the peaks stay straight up (*see the first photo with the peaks formed on the whisk and photo above). To test, you can turn your bowl upside down and the egg whites stay put (a good party trick, too!). At this point you can gently fold your whites into other ingredients.
8. You’ll know you have over-beaten your whites if the mixture starts to break down,if there is liquid weeping, and it looks grainy. You can try and add another white to recover the mixture, but you probably need to start over. Sorry!
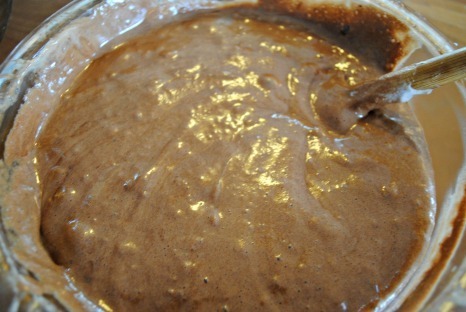
9. To fold whipped egg whites into a base mixture (like the chocolate and egg yolk mixture in our Easy Chocolate Soufflé recipe ), first stir in a small dollop of the egg whites into the base mixture. It will be lumpy.

Then place the rest of the egg whites on top of the chocolate mixture and fold in by taking a rubber spatula and cutting down the middle of the mixture. Take the spatula and fold half of the egg whites on top of the other half of the egg whites. Turn the bowl a quarter turn and repeat. Continue this turn, cut and fold routine until combined and slightly lumpy.
Now that you’ve mastered glossy, perfectly beaten egg whites, how about a chocolate soufflé? Try it for yourself!


A (Seriously!) Simple Chocolate Soufflé
Ever wanted to kick your dessert skills up a notch? We’ve got a next-level idea that your dinner guests will be over the moon for: soufflé!
Soufflés have a reputation of being notoriously difficult, but once you’re proficient at certain baking skills, they’re no trouble at all.
Hopefully you’ve taken our Master Class: How to Beat Egg Whites, and you’re ready to take on this beautiful dessert because you know exactly how to get to the “stiff peak” stage without breaking a sweat.
Soufflés simply don’t get any easier than this recipe – enjoy!
Easy Chocolate Soufflé
6 servings
Ingredients
2 tablespoons butter, plus additional to coat the baking dish
1/3 cup sugar, plus additional to coat the baking dish
1 1/3 cups (8 ounces) chopped chocolate or chocolate chips (the higher quality, the better)
6 eggs, room temperature, separated
1 teaspoon vanilla
Pinch of salt plus 1/2 teaspoon salt
1/4 teaspoon cream of tartar
Powdered sugar, whipped cream or ice cream, for serving (optional)
Directions
1. Preheat oven to 375 F. Butter and then add a layer of sugar to a 1 1/2 quart soufflé/baking dish.
2. Melt the butter and chocolate in a heat-proof bowl (either in the microwave or over a saucepan of simmering water). Whisk in the egg yolks, vanilla, and pinch of salt. Set aside.
3. Beat the 6 egg whites until foamy. Add the 1/2 teaspoon of salt and cream of tartar. Continue beating to soft peak stage and slowly add the sugar. Then, beat to stiff peaks stage.
4. Fold the egg whites into the chocolate base mixture by spooning in a small dollop of egg whites, stirring to combine. Then add the rest of the egg whites, folding slowly and carefully until combined.
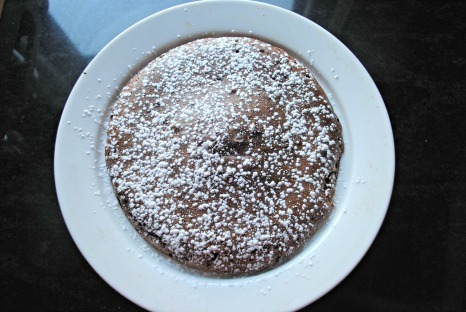
5. Transfer the mixture to the prepared dish and bake for 30 to 32 minutes. This is important: Do not peek while the soufflé is baking!
6. The soufflé will be puffed up and appear somewhat moist in the cracks when you remove it from the oven. Then, it will quickly deflate.
7. Serve immediately with powdered sugar and whipped or ice cream, if you wish. Store your leftovers in the fridge (I like the soufflé cold the next day, too!).
February 20, 2014
20 Kid-Friendly Kitchen Tasks
Picky eaters.
I think the majority of parents have at least one of these, and if you don’t, can you please share your secret? (This one’s mine!)
One proven way to get kids to try new foods is to get them into the kitchen. Kids are more apt to try what they make. Pretty simple, right?
Even the littlest ones (ages 2-3) can pull up a stool, roll up their sleeves, and help wash fruits and veggies, tear lettuce, or help assemble a sandwich. Kids as young as 10 (recognizing your child’s maturity) can get started making basic meals like pasta or eggs.
It is of the utmost importance, of course, that parents explain how to be safe in the kitchen. Show younger kids what is hot in the kitchen, how to use a potholder, and where the fire extinguisher is located. Be prepared for some messes – clean hands, aprons, and even a towel on the floor is always a good idea.
But the messes can be worthwhile: When you get your kids in the kitchen, you are both showing them cooking is fun and providing them with a life-long skill. Bonus!
Here is a suggested list of kid-friendly kitchen tasks (please note – this is just a guide and it is critical that parents recognize how comfortable your kids are in the kitchen and what they can handle):
Ages 2-4:
1. Tear lettuce and other herbs
2. Wash dishes (you might need to do some touch-up work, but they can have fun with a sink full of soap bubbles and a sponge!)
3. Wash produce
4. Cut an apple with an apple cutter (with Mom or Dad’s assistance for the littler ones)
5. Whisk
6. Frost
7. Scoop out cookie dough
8. Assemble a sammie
9. Help set, serve, and clear table
10. Knead dough
11. Mash potatoes, turnips, sweet potatoes, and other cooked root veggies with a hand masher
12. Help plan a meal
Ages 4-7:
13. Crack and separate eggs
14. Measure out ingredients for a recipe like flour, salt, sugar, spices, etc. (great math practice to boot!)
15. Peel veggies
Ages 7 -10:
16. Grate (carefully!) cheeses and vegetables
17. Chop and slice using a small paring knife (again, carefully and with supervision – know your child!)
18. Use the toaster
Ages 10-12 can independently (once they have mastered the above tasks):
19. Use the stove to prepare basic meals like eggs, pasta, and pancakes.
20. Use the oven to bake cookies, brownies, muffins, and simple casseroles.
Ready to find kid-friendly recipes or want more, wonderful ways to get your little ones in the kitchen? Check out Rachael’s nonprofit organization, Yum-o!, empowering kids and their families to develop healthy relationships with food and cooking!
Lunch Time? Taco Time!
Parenting has taught me many things. But mostly, I’ve learned that I can turn just about anything into a taco.
Steak and ground beef? Obviously. Barbecue pulled chicken or pork? Of course. Shrimp and haddock? Yup. In fact, I’ve taco’ed just about anything that walks, crawls, or swims.
And my son loves it.
That’s because tacos have near mystical powers at pretty much any meal involving children. Why?
First, there is the fun of eating with your hands. Second, there is the DIY aspect. Taco night is all about setting a table full of options, then letting folks assemble their own as they see fit.
Finally, there is the cover-it-up factor. Which is to say, an ingredient that otherwise displeases young eaters (vegetables, anyone?) generally is more acceptable once covered in guacamole, sour cream, cheese, and who knows what else.
So taco dinners are a gimme. But the allure of tacos also works at lunch. In fact, steak tacos are one of my 9-year-old’s favorite packed lunches.
It makes total sense. Think about those packaged lunch kits sold at the grocer. They aren’t popular because they’re delicious (and certainly not because they’re healthy). Kids like them because of the DIY factor.
And tacos make it easy to harness that appeal to get kids to buy into whatever healthier, and potentially less expensive, lunches you want to pack for them.
Where to start? Here’s the game plan.
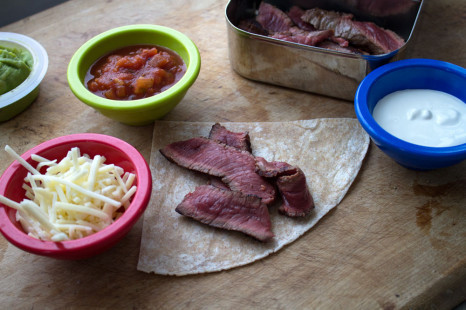
1. Pick your taco “shell.”
For taco dinners, hard corn taco shells are a common choice. But these can be tricky to pack without breakage. You’ll need a special container if you plan to pack those.
However, there are plenty of alternatives. Soft corn tacos are easy and familiar. There’s also flour tortillas, which come in healthy whole-grain options, too. And large flour tortillas can be cut in half or even quarters to make them easier for little hands to handle. While you’re at it, check the grocer’s bakery section – just about any soft flatbread will work.
2. Assemble your toppings.
Think about what your kid likes to dump on tacos at dinner. Most of these require little or no prep and are simple to pack. Guacamole, salsa, and low-fat sour cream are easily spooned into small containers, but also are available in single-serve cups. Shredded cheese is just a matter of dumping some in a cup or bag. Same for lettuce or sliced olives. Sliced roasted red peppers can be packed right out of the jar.
Making bacon for breakfast? Cook a little extra and crumble it into a bag for a topping. And don’t forget to work with your leftovers: If you’re having tacos for dinner, prep extra toppings. After dinner, your lunches almost pack themselves.
3. Pack your main filling.
This is where leftovers really come into play. Making steak for dinner? Cook a little extra, then slice it thinly. You can heat it and pack it in a thermos, or pack it cold. Delicious either way. Got leftover roasted or grilled chicken, turkey or pork? Heat it in the microwave and toss with a bit of bottled barbecue sauce, then pop it in a thermos. Leftover baked breaded fish (fish tacos!) or stir-fried shrimp work great, too.
No leftovers? Roast beef from the deli is a pretty good stand-in. And if your kid isn’t quite a carnivore, rice or refried beans also are easily heated and packed.
The point, of course, is that just about anything goes. Work with what your kids like, slip in some veggies and whole grains, then let the little ones assemble as they see fit.
Easy!
Snickerdoodles: Classic Cookies for a Reason
I am a die-hard chocolate fan, and usually think it isn’t worth splurging on a non-chocolate dessert.
As with most “absolutes” in my life, there are always some exceptions.
The few non-chocolate desserts I always have room for: cheesecake, pecan squares and molasses cookies.
And snickerdoodles. These classic chewy sugar cookies have been loved for ages. So what makes them different from a traditional sugar cookie?
1. They are rolled in cinnamon sugar.
2. Traditional versions don’t have vanilla extract like nearly all cookies (I, however, can’t imagine a cookie without vanilla so my recipe bucks tradition and includes a teaspoon. I think the cookie is better for it!).
3. Many snickerdoodle recipes include cream of tartar, which is a leavener (like baking soda or powder) but has a very faint tangy flavor.
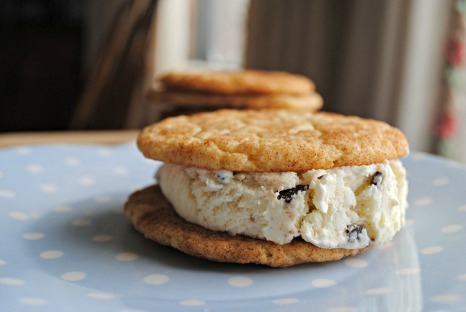
I like my cookies big and chewy, and these snickerdoodles fit the bill. They store well at room temperature for up to four days. Bonus: They are the perfect size for ice cream sandwiches!
Here’s how to make them:
Cream the butter and sugar, and add the eggs and vanilla and mix to combine. Sift together the dry ingredients and add to the dough.
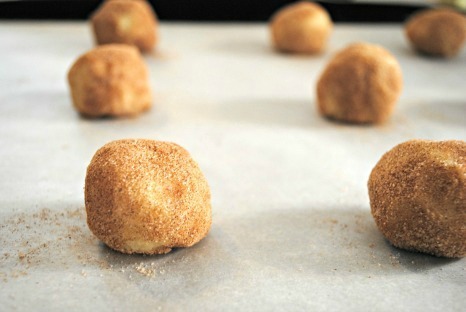
Scoop into balls roughly the size of 2 tablespoons…

…and roll in cinnamon sugar.
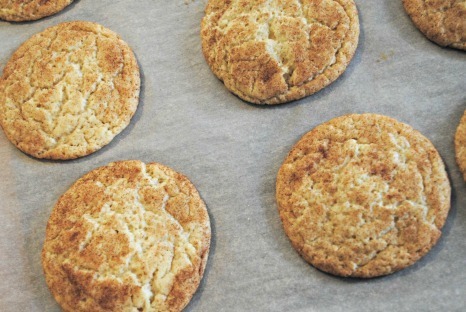
Bake at 350 F for 15 minutes. The cookies will appear underdone in the cracks, but don’t worry, they will continue to cook as they cool. This is what makes the cookies chewy. Let cool on the pan for 10 minutes, then transfer to a rack to cool completely.
Snickerdoodles are even better when they are sandwiching a scoop of your favorite ice cream.
Classic Snickerdoodles
Makes approximately 28 big cookies
Ingredients
For the cookies:
2 3/4 cups flour
2 teaspoons cream of tartar
1 teaspoon baking soda
1/2 teaspoon kosher salt
1/2 teaspoon cinnamon
2 sticks butter, softened
1 1/2 cups sugar
2 eggs
1 teaspoon vanilla
For the coating:
1/4 cup sugar
2 tablespoons cinnamon
Directions
1. Preheat the oven to 350 F. Line baking sheets with parchment paper.
2. Sift together the flour, cream of tartar, baking soda, salt and cinnamon. Set aside.
3. Cream together the butter and sugar until light and fluffy – about 2-3 minutes. Add eggs one at a time, beating well after each addition and scraping the bowl as necessary. Add vanilla and briefly beat to combine. Add dry ingredients and beat to combine.
4. Using a 2 tablespoon-size scoop, scoop dough into balls, and roll in the cinnamon sugar coating.
5. Place on prepared cookie sheet and bake for 15 minutes, until cookies are light brown around the edges and appear slightly underdone in the cracks.
6. Let cookies cool on the sheets for 10 minutes, then transfer to racks to cool completely.
February 14, 2014
Weekly Meal Planner: Potluck Edition

Welcome to the Weekly Meal Planner! Whether you work all day and are out of steam when the dinner hour hits, or are fresh out of ideas and in a cooking rut, we are here to make your life easier.
This week, embrace the stormy weather and get together with family, friends or neighbors for an impromptu potluck. Our inspiration came from a reader looking for some easy Mexican or Southwestern potluck dishes. We’ve brought you a few that could work, along with simply dinners that effortlessly feed a crowd. Enjoy!
And if you ever need meal ideas, feel free to ask us in the comments, on Facebook, or on Twitter!
Meatless Monday
Lunch: Brussels Sprouts Caesar Salad is a unique and tasty take on this popular dish.
Dinner: Deep-Dish Eggplant Parmigiana is so delicious and comforting, you’ll never miss the meat. Everything is better parmed! This would be a welcome addition to any potluck table.
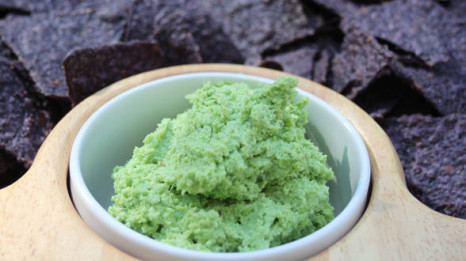
Snack: Edamame Hummus is a perfect dip or sandwich spread.
Tuesday

Lunch: Crispy Oven-Fried Turkey Patties with Bourbon BBQ Sauce is a healthy lunch with little clean up. You can use your favorite packaged barbecue sauce if you are in a pinch.
Dinner: Pulled Chipotle Chicken and Fixin’s is a fantastic Mexican-inspired potluck (or any night!) meal. Serve with the “fixins” of your choice like tortillas, shredded cheese, diced avocado, and jalapeños.
Dessert: Spicy Chocolate Monkey Bread does double duty as a dessert. Serve the leftovers for breakfast.
Wednesday

Lunch: Roasted Garlic and Chicken Double Dumpling Stoup has a secret ingredient (it’s packaged gnocchi, don’t tell!) that makes it hearty and filling.
Dinner: Roasted Pork Tenderloin with Green Onion Smashed Potatoes and Roasted Green Beans is an affordable, yet elegant, weekday meal.
Snack: Nutella-Swirled Banana Bread is good on its own or topped with peanut butter – or more Nutella.
Thursday

Lunch: Dine in Paris today with this yummy Croque Monsier with Fresh Spinach that comes together in a snap.
Dinner: With easy, crowd-pleasing ingredients, Florentine Penne with Chicken will become a regular in your weekly dinner rotation.
Snack: It tastes so decadent you won’t believe how healthy this Almond Cocoa Banana Blast Smoothie really is.
Friday

Lunch: Add some sliced chicken to this Orchard Salad for a balanced lunch.
Dinner: Enjoy Friday night take-out from your own kitchen with Daddy Wu’s Moo-Shu Pork which works just as well with chicken. You’ll never reach for the take-out menu again.
Snack: Potluck alert! Super Nachos with Butternut Queso is a healthy spin on a popular snack.
Entertaining Saturday

Brunch: Play with your food! Kids can dunk away to their hearts’ content with these Sausage and French Toast Meatballs.
Dinner: If you are attending or hosting a Saturday night potluck, this Chili Shepherd’s Pie is a crowd-pleaser that feeds a group.
Cocktail: John’s Sangroni is a special cocktail that’s is perfect with prosecco or champagne.
Family Sunday

Brunch: Potluck brunch anyone? Transform a favorite sandwich into a casserole with Reuben Patty Melt Casserole.
Dinner: Serve a restaurant-worthy dinner for your family’s Sunday supper this week with Spinach and Ricotta Stuffed Chicken with Rosemary Hasselback Potatoes.
Dessert: Wow your family with a Decadent Chocolate Tart. You can make it a few days in advance and bring to room temperature when you are ready to serve. Don’t forget the whipped cream!
Harness the Power of Peanut (or Not!) Sauce

My son and I have a rather intense relationship with peanut butter.
Because we (thankfully!) have no peanut allergies, we have embraced peanut butter in so many ways – both savory and sweet – that we tend to consume it at a rather alarming rate. Several jars a week is not unusual.
We eat it on graham crackers. We make peanut butter and banana sandwiches. We make peanut butter and banana and bacon sandwiches. We smear it on apples. We make peanut butter and jelly “quiche.” We make peanut marinades for grilled chicken. We bake cookies. We eat it straight up by the spoon.
But one of the most versatile ways we’ve found to enjoy peanut butter – spicy peanut sauce! – also happens to be lunch box-friendly. Even if your school is peanut-free.
Spicy peanut sauce not only is a delicious, rich and savory sauce that can be paired with so many foods, it also is easy to make, keeps well and is easily adapted to your preferences.
And don’t worry about the spicy part. While you certainly can crank up the heat, my version is more zippy and tangy than hot.
As for the peanut part? I’ve found that a totally delicious version can be made using peanut alternatives, particularly sunflower seed butter.

Kid-Friendly Spicy Peanut (Or Not!) Sauce
Start to finish: 5 minutes
Ingredients
1/2 cup peanut butter or sunflower seed butter
1/4 cup water
1 1/2 tablespoons low-sodium soy sauce
1 tablespoon vinegar
1 teaspoon sugar
1 teaspoon hot sauce
1/2 teaspoon garlic powder
Instructions
1. In a small bowl, combine all ingredients and mix until smooth. For a thicker sandwich spread, the water can be reduced to 2 tablespoons.
2. Cover and keep refrigerated for up to 2 weeks.
Now that you have the sauce, what to do with it?
- Spread it on bread as you would mayonnaise, then top with leftover roasted chicken or deli meat.
- Pack cold, leftover breaded chicken tenders with the sauce on the side for dipping.
- Toss leftover cooked pasta and some chopped vegetables with the sauce for a “peanut” noodle salad.
- Pair the sauce with a medley of cut raw vegetables for dipping.
- Use it as an alternative to soy sauce for dunking sushi.
- Thin the sauce with a bit of additional water, then use as a fantastic salad dressing for a robust salad, such as a chef’s salad with meat, cheese and eggs. (Pack on the side and drizzle over the salad just before eating.)
- Use as a dip for pretzels or crisp breads.
- Smear a thin coat of it over a whole-wheat tortilla, then add chopped vegetables and roll up. A hearty, portable take on the vegetarian spring roll!
February 13, 2014
Easy Chocolate Truffles

Chocolate truffles sound fancy and expensive, but like so many treats, they are relatively easy and inexpensive to make at home.
If you have good quality chocolate (Note: I used Trader Joe’s dark chocolate, but a mixture of semisweet and bittersweet, or even some milk chocolate would be good. The key to a good truffle is the quality of the chocolate!), heavy cream, and some time for a few steps of chilling, you are ready to go.
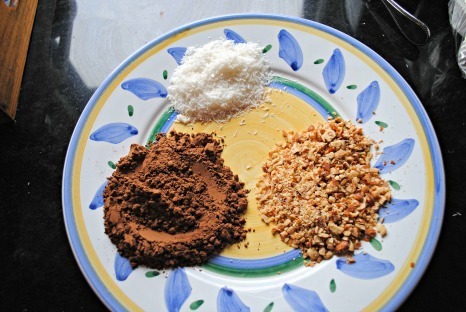
Truffles are fun because you can roll them in the toppings of your choice – I used coconut, chopped toasted almonds, and unsweetened cocoa, because that was what I had on hand. For a non-traditional twist, you could roll truffles in sprinkles or chopped M&Ms.
The unsweetened cocoa topping is the most traditional, but keep in mind some people find it too bitter. I sometimes combine powdered sugar with unsweetened cocoa and roll the truffles in that mixture for my kids.
These are candies for the true chocoholic – the flavor is intense chocolate. And I mean intense! Are you ready? Here’s how to make them:
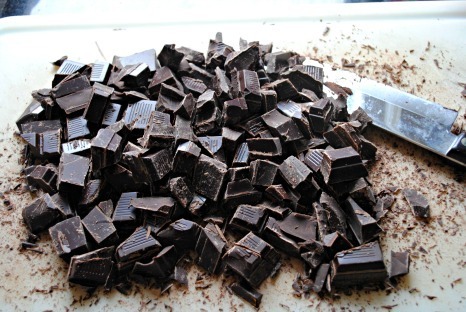
First, chop up a pound of chocolate and place it in a heatproof bowl. If you use chocolate chips, even better – the chopping is done for you!
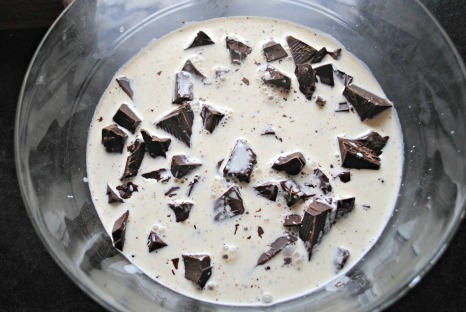
Heat a cup of heavy cream just to the boiling point, and pour it over the chocolate. Let it sit for a few minutes, and then whisk until completely smooth.
Insider tip: If you didn’t quite chop up your chocolate finely enough and it doesn’t seem to be melting all the way, quickly bring an inch of water to a simmer in a pan and place the bowl over the simmering water (make sure the bottom of the bowl does not touch the water or you will scorch the chocolate) and whisk until smooth. Problem solved!
Whisk in 1/2 teaspoon of vanilla and 1/4 teaspoon kosher salt and refrigerate for 45 minutes to 1 hour, or until the mixture is the consistency of soft ice cream. If you take it out and it’s too soft, keep refrigerating. And if it’s too stiff, leave it out at room temperature until it softens.

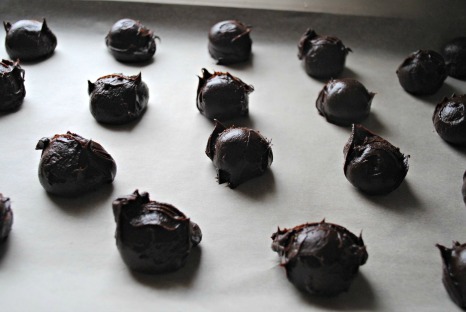
Using a tablespoon-size scoop or spoon, scoop mounds of the truffle mixture onto a parchment paper-lined pan – you will have about 30 mounds. Place the pan in refrigerator for 30 to 45 minutes, or until the mounds firm up.
Now for the fun part: get your toppings ready.
Take the mounds out of the fridge, and using your fingers, form them into uniform balls. You need to manhandle them! The consistency will be of stiff clay. I use my fingers to squeeze each ball into a somewhat uniform square shape, and then finish them by rolling between my palms into balls.
Be sure to take off your rings, and yes, your hands will get dirty, but it’s worth it! Roll each ball into the topping of your choice. I like to place the finished truffle in a mini cupcake wrapper for a cute presentation.
Store truffles in the refrigerator for up to one month. Needless to say, these make wonderful gifts.

Easy Chocolate Truffles
Makes approximately 30 truffles
Ingredients
1 pound of chopped dark, semisweet, or milk chocolate, or a combination thereof
1 cup heavy cream
1/2 teaspoon vanilla
1/4 teaspoon kosher salt
Topping options for rolling the truffles: unsweetened cocoa, powdered sugar, chopped nuts, shredded coconut, sprinkles, or whatever else you have on-hand!
Directions
1. Place chocolate in a heatproof bowl. Heat the heavy cream in a small saucepan just to the boiling point and pour the cream over the chocolate. Let it sit for a few minutes, and then whisk the chocolate and cream mixture until smooth. If you still have a few lumps of chocolate, quickly bring an inch of water to a simmer in the saucepan and place the bowl with the chocolate cream mixture over the simmering water (make sure the bottom of the bowl does not touch the water or you will scorch the chocolate) and whisk until completely smooth. Whisk in the vanilla and salt.
2. Refrigerate the mixture for 45 minutes – 1 hour, or until the mixture is the consistency of soft ice cream. If you take it out, and it’s too soft, keep refrigerating. If it’s too stiff, leave out at room temperature until it softens.
3. Using a tablespoon-size scoop or spoon, scoop mounds of the truffle mixture onto a parchment paper-lined pan. You will have about 30 mounds. Place pan in refrigerator for 30-45 minutes, or until the mounds firm up and are the consistency of stiff clay.
4. Assemble the toppings of your choice.
5. Take the mounds out of the fridge and, aggressively using your fingers, form into uniform balls. Finish them by rolling between your palms into balls. You will get chocolate on your hands!
6. Roll each ball into the topping of your choice and place the finished truffle in a mini cupcake wrapper (optional).
7. Store truffles in the refrigerator for up to one month.
February 11, 2014
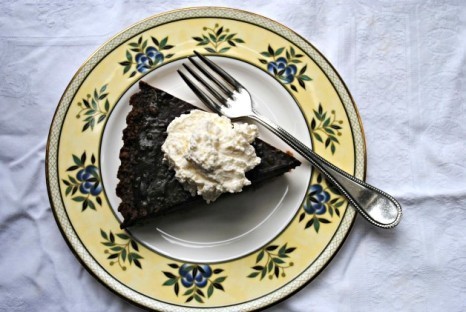
Decadent Chocolate Tart

Sometimes simple is best. This dessert is simplicity at its finest.
Chocolate, eggs, sugar, vanilla, and salt easily come together for a surprisingly elegant treat. Pure chocolate is offset by a not-too-sweet graham cracker crust. Topped with whipped cream, this Decadent Chocolate Tart is pure heaven.
The most challenging part of this recipe is that you need a tart pan. But once you’ve got it, serve this for guests, and they will swear you picked it up at a bakery. Another fantastic recipe for all you non-bakers out there, too!
Here’s how you make it:
Make the crust by combining graham cracker crumbs, melted butter, sugar, and a pinch of salt. Insider tip: I buy crushed graham cracker crumbs to cut out a step. They are delicious.
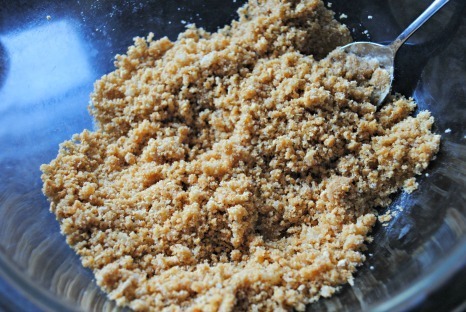
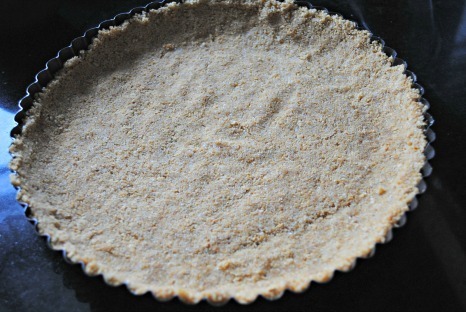
Press the graham cracker mixture into a tart pan and bake until firm and fragrant – about 8 to 10 minutes.
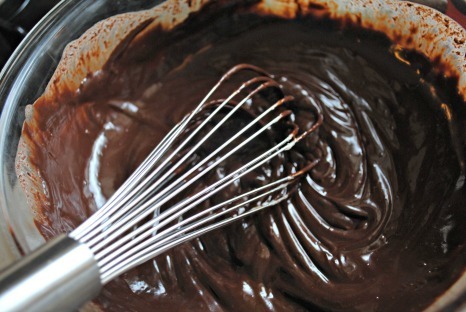
While the crust bakes, make the filling by combining warmed cream and chocolate chips, and then whisking in combined eggs, vanilla, and salt.
Pour the chocolate filling into the baked crust and bake at 350 F for about 20 to 25 minutes until the filling is just set – the center will be a bit wobbly.
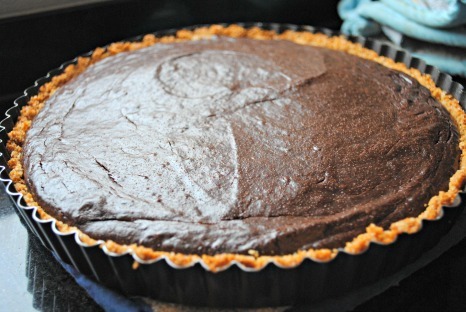
Cool completely, and serve the tart with freshly whipped cream or vanilla ice cream. Swoon.
Decadent Chocolate Tart
Ingredients
For the crust:
1 cup graham cracker crumbs
5 tablespoons butter, melted
1/4 cup sugar
Pinch of salt
For the filling:
2 tablespoons heavy cream
1 1/2 cups semi-sweet chocolate chips
2 eggs
1 1/2 teaspoons vanilla
1/2 teaspoon kosher salt
Directions
1. Preheat the oven to 350 F.
2. Make the crust: Combine graham cracker crumbs, melted butter, sugar, and salt and press evenly on the bottom and up the sides of a 9-inch tart pan. Bake until firm and fragrant, about 8-10 minutes. Set aside to cool.
3. Make the filling: Bring cream to a boil, pour over the chocolate chips in a medium bowl, and let stand for 5 minutes. Whisk until melted and smooth. In a separate bowl, whisk together the eggs, vanilla, and salt, then whisk into the melted chocolate mixture.
4. Pour the filling into the crust and bake for 20-25 minutes, or until the filling is just set (center will be a bit wobbly). Let cool completely and serve with freshly whipped cream or vanilla ice cream.
Reader Request: 5 Course Valentine’s Day Dinner on a Budget

If you’re like me, you show your love through food. So when we asked our followers for Valentine’s Day menu help, we were pumped to receive a few, cool challenges.
@OOGIAH, wrote in: “Any cool ideas for a Valentine’s Day treat that is also on my husband’s 40th birthday! Thanks!” She also gave us a few of her hubby’s likes and dislikes when it comes to dinner.
On Facebook, our friend Tawnee Subritzky was looking for an inexpensive, five-course meal for her husband, featuring garlic, pasta or seafood, and maybe a fondue for dessert.
Challenge accepted!
Here’s a totally delish, unique, cost-effective and relatively quick Valentine’s Day meal for you, Rachel and Tawnee, and anyone else cooking for their sweetheart. And if you’re ever in need of culinary assistance, we’re always around on Facebook and Twitter to help.
Appetizer: Eggplant Spread
This app is rich in flavor and low in cost. Quick to assemble, you just need time to roast the eggplant and pulse it a few times in a food processor (I’d recommend doing this the night before, so you can both nosh while you wrap up the rest of dinner that night). Add in a few, savory accompaniments like mixed olives and favorite cheeses, and you’ll have a beautiful start to your meal.
Soup: Mushroom Soup with Marsala

Quick-to-prepare and totally warming, this mushroom soup can also be made the night before so you’re already a few steps ahead to finish off your meal. If you have access to some great, crusty bread, that will kick this soup up to the next level.
Salad: Arugula and White Bean Salad with Lemon Dressing

Don’t let the simplicity of this salad fool you – it’s drop-dead delicious. I think a big mistake in salads is to always follow the “kitchen sink” mentality. Instead, focus on a few, punchy flavors for a real bite that pops. Artichokes and cannelini beans shine here with a zip of lemon juice that will perfectly compliment your entrée.
Entrée and Side: Greek Chicken or Shrimp with Everything Orzo
This dish is amazing because it comes together so quickly. The ingredients are also readily available and simple – I bet you have 90% of them in your kitchen already. Timing is important here, so have all of your ingredients prepped in advance (see our Bonus, below!). If orzo isn’t your thing, try this Wild Mushroom Risotto as a side.
Dessert: Super Simple Chocolate Peanut Butter Fondue
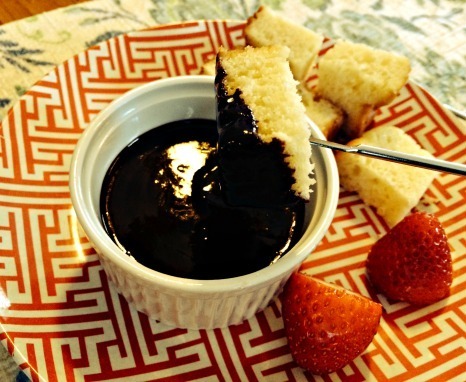
I think fondue is terribly romantic. It’s something you absolutely have to enjoy with a companion and feels so very decadent.
This fondue is wonderful because you can mix and match all of your love’s favorite treats, and you don’t even need a fondue pot. If peanut butter isn’t your jam (or won’t go with that carrot cake!), you can always omit. Try: Fresh fruits, sweet cakes, and crispy cookies for perfect dippers.
Bonus: Don’t forget that things can be tricky when you’re trying a new recipe, no matter how experienced you are in the kitchen. Check out our 5 top tips to never fail at a new recipe again before you get started on your romantic dinner.
Rachael Ray's Blog

- Rachael Ray's profile
- 296 followers

