
Rachael Ray's Blog, page 30
April 4, 2014
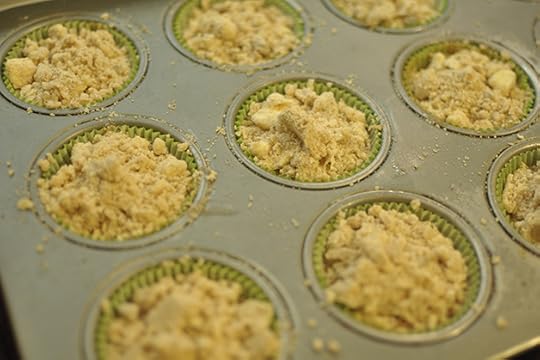
Perfect Banana Crumble Muffins
I had some overripe bananas staring at me for a few days, so I knew some sort of banana bread/baked good was in my future.
Tired of my same ol’ tried-and-true banana muffin recipe, I decided to jazz it up a bit with an easy crumble topping.
It turns out this topping brought my muffins from ordinary to extraordinary, and it’s safe to say I will be making them like this from now on. The crumble adds a slightly crunchy, sweet element to a moist and delicious muffin – perfect alongside a steaming cup of coffee or tall glass of milk!
Here’s how to make ‘em:
Banana Crumble Muffins
Makes 12 muffins
Ingredients
Crumble topping
3/4 cup all-purpose flour
1/3 cup packed light-brown sugar
3 tablespoons granulated sugar
1/4 teaspoon cinnamon
Pinch of salt
6 tablespoons cold, unsalted butter (cut into small pieces)
Muffins
1 1/2 cups all-purpose flour
1 cup granulated sugar
1 teaspoon baking soda
1/2 teaspoon salt
3 medium, ripe bananas
1 egg
1/3 cup vegetable oil
1 teaspoon vanilla extract
Instructions
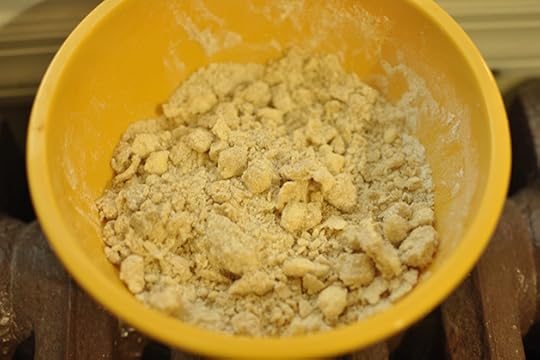
1. In a medium bowl, mix the flour, light brown sugar, granulated sugar and salt. Then with your hands, work in the butter until large clumps form. Cover with plastic wrap and chill in the refrigerator until ready to use.
2. Preheat your oven to 375 F and line a 12-cup muffin tin with paper liners.
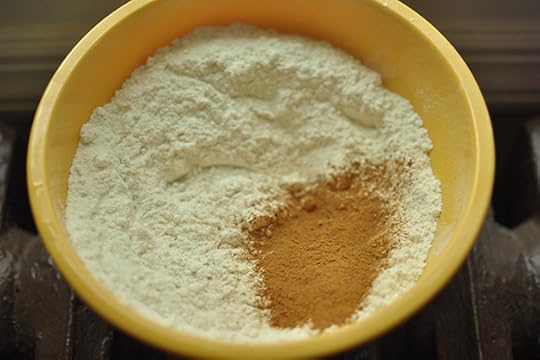
3. In a large bowl, combine dry ingredients.
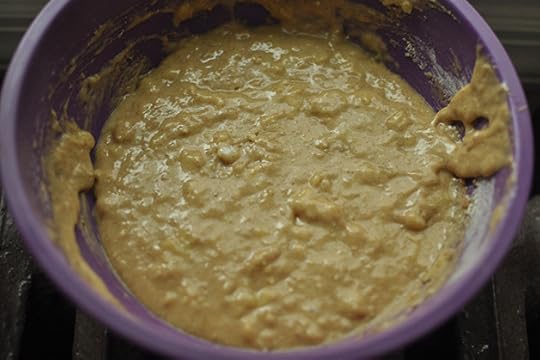
4. In another bowl, mash the bananas. Add egg, oil and vanilla and mix well.
5. Combine the dry and wet ingredients and stir until it just comes together.
6. Fill prepared muffin tins halfway…
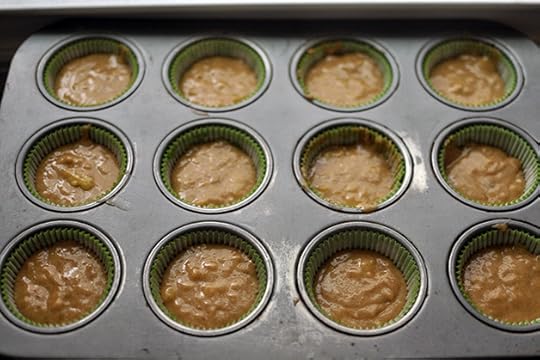
…then evenly distribute with crumble topping.
7. Bake muffins for 18 to 22 minutes, or until a toothpick inserted into the center comes out clean.

More muffin goodness:
- Morning Glory Muffins
- Perfect (and Gluten-Free!) Squash Muffins
- Jumbo Coffee Cake Muffins


March 28, 2014
No-Bake Chocolate Chow Mein Noodle Cookies
Sweet and salty.
I don’t think there is a better combination out there.
Chocolate-dipped pretzels, salted caramels, and peanut butter cups are just a few examples of sweet and salty goodness.
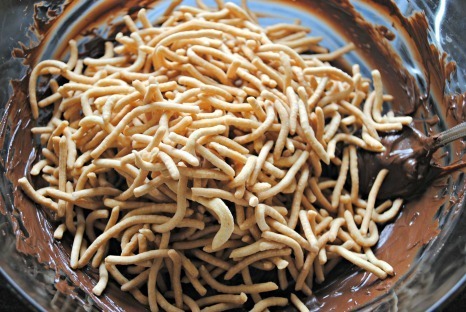
These cookies definitely fall into this category. Crunchy chow mein noodles are folded into melted chocolate to form quick and easy no-bake balls of deliciousness.
But don’t stop there – let your imagination go wild with these treats. Use milk chocolate, or a combination of butterscotch or peanut butter chips, with the chocolate chips. Mix in salted chopped nuts, shredded coconut, chopped marshmallow, or chopped dried fruit to make them your own. For an adult spin, try sea salt and a pinch of cayenne pepper.
And did I mention there is no baking required? Bonus!
Let’s get started:
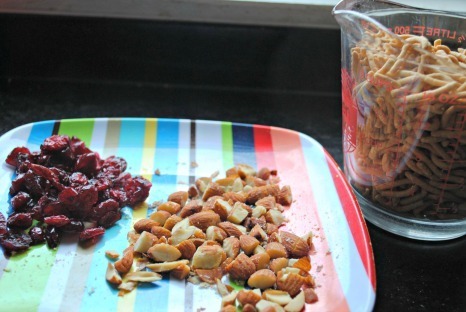
1. You have to work rather quickly, so first, assemble your mix-ins. I used salted almonds and dried cranberries this time around, along with the chow mein noodles. Line a cookie sheet with wax paper and set aside.
2. Next, melt 2 cups of chocolate chips in the microwave, or over a pot of simmering water, in a large heatproof bowl. Stir in 2 cups of chow mein noodles, along with any additional mix-ins, and a pinch of salt. Mix well to combine.
3. Scoop tablespoon-sized balls onto the cookie sheet.

4. Let them rest at room temperature until they’re firm. Enjoy!

No-Bake Chocolate Chow Mein Noodle Cookies
Ingredients
2 cups chocolate chips (or a combination of chocolate and butterscotch and/or peanut butter chips)
2 cups chow mein noodles
1/4 cup chopped salted almonds or peanuts (optional)
1/4 cup chopped dried cranberries or dried fruit of your choice (optional)
Pinch of salt
Directions
1. Line a cookie sheet with wax paper and set aside.
2. Assemble your mix-ins: chow mein noodles, and chopped nuts and/or chopped dried fruit, if using.
3. Melt the chocolate chips in the microwave, or over a pot of simmering water, in a large heatproof bowl until melted and smooth. Stir in 2 cups of the chow mein noodles, along with any additional mix-ins, and the salt.
4. Scoop tablespoon-sized balls onto the cookie sheet and let set at room temperature until firm. Store at room temperature.
Want more no-bake treats? Here you go:
10-Minute Fruit Tart
Cake Shakes
Prince William’s Chocolate Biscuit Cake
21 Meal Ideas for Busy Families
Welcome to the Weekly Meal Planner! Whether you work all day and are out of steam when the dinner hour hits, or are fresh out of ideas and in a cooking rut, we are here to make your life easier.
Dinner time is always easier when you prep ahead. This week, we’ve included some make-ahead weeknight meals so you can enjoy some stress-free time with family. Plus, check out our Friday fish dinner – you’ll never go out for a fish fry again!
And if you ever need meal ideas, feel free to ask us in the comments, on Facebook, or on Twitter!
Meatless Monday

Lunch: Make a batch of this budget-friendly Corn and Salsa Tortilla Soup over the weekend to enjoy all week long.
Dinner: Spaghetti Squash with Romesco Sauce is a filling vegetarian meal. Double the sauce to use on your favorite pasta later in the week!
Snack: Have a fun and healthy Parfait (yogurt layered with your favorite mix-ins like fruit, crushed graham crackers, or even chocolate chips!) for a snack with a creative twist.
Tuesday
Lunch: Enjoy Italian Pasta Salad with Sausage cold or at room temperature – perfect for brown bagging it.
Dinner: Polenta Deep-Dish White Pizza with Mushrooms and Sausage is a great weekday meal to assemble earlier in the day and bake when you are ready to serve. Bonus – it’s gluten free!
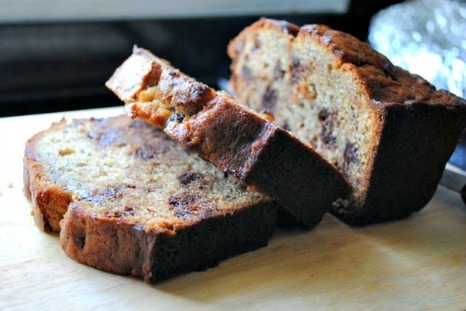
Snack: A small slice of Crunchy Peanut Butter Chocolate Chip Banana Bread rounds out the night. It’s also a great recipe for novice bakers – it comes together in just minutes!
Wednesday

Lunch: Chicken or Turkey Quesadilla Suizas (Pizzas) is a quick and tasty lunch. In a time crunch? Use leftover chicken or even deli turkey.
Dinner: A one-pot meal full of family favorites, Chicken and Rice Pilaf Skillet Supper will be a regular in your weekday repertoire.
Dessert: Happy Wednesday! Don’t wait for a special occasion to make Birthday Cookie Cake.
Thursday

Lunch: The kids will love Pizza Sausage Dogs. These are tasty at room temperature, too, so they’re perfect for packed lunches.
Dinner: Meatloaf and Potato Pileup highlights classic meatloaf in a casserole with veggies, potatoes and cheese sauce. You’ll want to make it again and again! Prep the casserole earlier in the day – or even the night before – if you’d like.
Snack: Salt and Vinegar Popcorn is a smart replacement over your favorite potato chips. Get some servings of whole grains and say goodbye to boring butter flavor!
Fish-Fry Friday

Lunch: You’ll realize how perfect the name is when you make this Great Grilled Vegetable Sandwich. Roasted veggies work well in this recipe, too.
Dinner: Skip going out for a Friday Fish Fry and make this lovely (and better for you!) Fish Picatta with Thin Spaghetti Asparagus, Green Beans and Peas. Note: This dish is equally delicious prepared with chicken.
Snack: Smoked Eggplant Hummus adds a flavorful twist to this favorite dip. Serve with freshly cut veggies or whole grain pita chips for a great bite!
Entertaining Saturday
Brunch: Green Chili Corn Waffles with Crispy Chicken are a delish anytime meal.
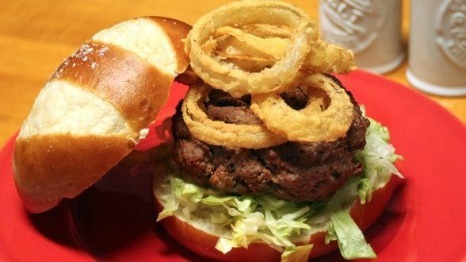
Dinner: Deviled Burgers with Crispy “O” Rings and Spicy Ketchup are perfect for casual entertaining and, yes, the onion rings go right on the burger. Yum! If you don’t have pretzel rolls on-hand (but are they ever worth a special trip to the store!), serve with your favorite hamburger roll.
Cocktail: Go back in time and serve up a classic Side Car tonight.
Family Sunday

Brunch: Show your love by treating the family to homemade Cinnamon Rolls. They may take a little effort, but they’re well worth it.
Dinner: Mulled Cider Beef with Potato Turnip Mash is a classic Sunday supper.
Dessert: End the week on a light and refreshing note that hints at beautiful summer months to come. Pineapple with Lime and Coconut is healthy and quick to put together.
March 26, 2014
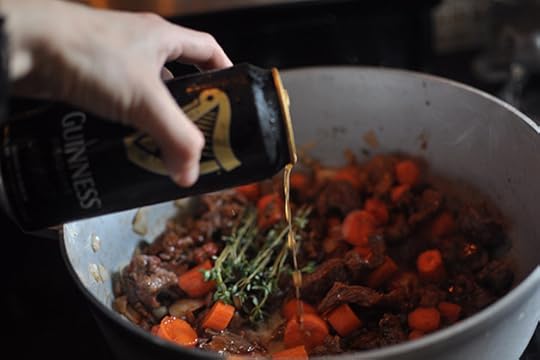
Worth the Wait: Irish Beef Stew with Guinness
Nothing is more comforting than a bowl of rich beef stew.
I like to make up a batch on Sunday and save the leftovers to eat throughout the week because it reheats beautifully.
This recipe has dark stout in it. The alcohol burns off, but the Guinness adds a delicious depth to the flavor of the stew, making this recipe truly unique.
It can be made up to five days in advance and stored in an airtight container in the fridge. Serve as-is or with a hunk of crusty bread for an extra-hearty meal.
Here’s how to make it:
Irish Beef Stew
Serves 4 to 6
Ingredients:
1 1/4 pounds chuck beef stew meat cut into 1 1/2-inch pieces
2 teaspoons salt
1/4 cup olive oil
4 cloves garlic, minced
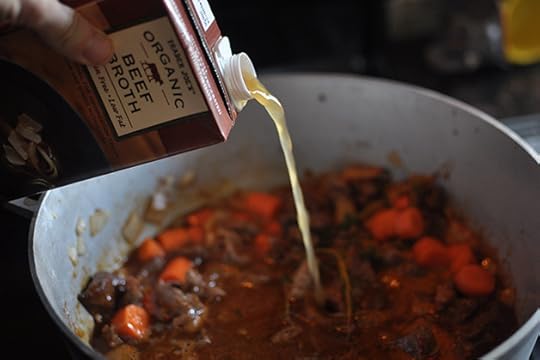
4 cups beef stock
2 cups water
1 cup Guinness extra stout
1 can tomato paste
1 tablespoon brown sugar
2 sprigs of thyme
1 tablespoon Worcestershire sauce
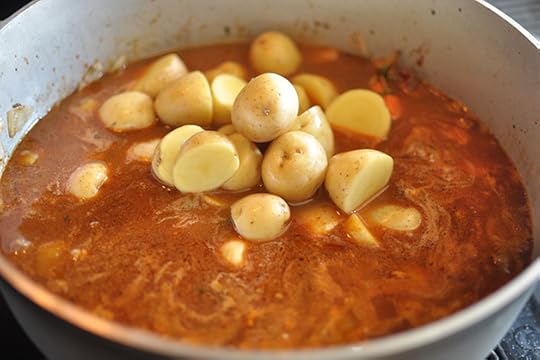
3 pounds of baby Yukon Gold potatoes, cut in half
1 large onion, chopped
2 carrots, chopped
1/2 teaspoon black pepper
Flat leaf parsley for garnishing
Instructions:
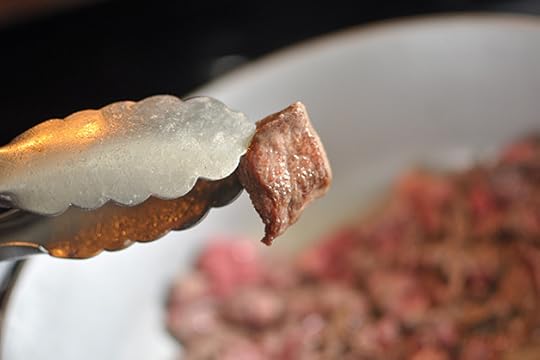
1. Sprinkle a teaspoon of salt over the beef pieces. Heat olive oil in a large (6-8 quart), heavy-bottomed pot over medium-high heat. Pat the meat dry with a paper towel.

2. Add the beef to the pot and cook, without stirring, until the pieces are browned on one side.

3. Then use tongs to turn the pieces over to brown the other side. Tip: Work in batches if need be, so you give the meat enough room to brown and not steam.
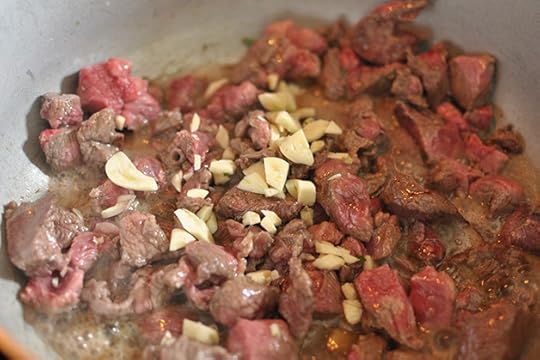
4. Add the garlic to the pot and sauté with the beef for a few seconds.
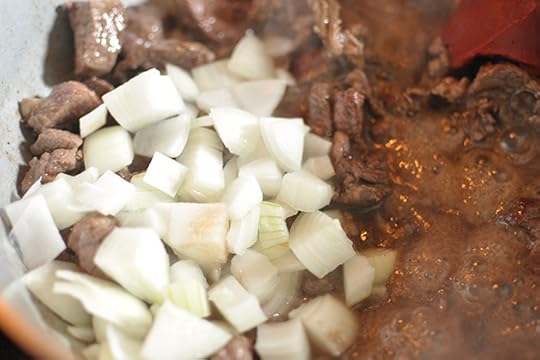
5. Add the onions and continue to sauté for a minute or so.
6. Pour in the beer and cook for 2 to 3 minutes.
7. Then, add in the beef stock, water, tomato paste, sugar, thyme, Worcestershire sauce, and carrots. Stir to combine. Bring mixture to a simmer, and let it simmer for one hour.
8. After an hour, add the potatoes and simmer for another 40 minutes until the beef is tender and potatoes are cooked through.
9. Discard the thyme, and serve garnished with shopped parsley. Enjoy!
Harnessing the Power of the Parfait
The word “parfait” generally brings to mind decadent desserts. And that’s a good thing. Because that’s a power you can harness to help your kids eat better.
At its most basic, a parfait is a layered dessert, usually involving some sort of fruit, some sort of dairy and something crunchy or cakey.
And when you look at it like that, those are some pretty broad parameters. This means a clever parent can build appealing parfaits designed to tempt their kids with healthy foods.
My 9-year-old has been eating parfaits at breakfast and lunch for years. Sometimes they are elaborate layerings of fancy yogurts, multiple fresh fruits and crunchy granolas.
But sometimes they are nothing more than plain yogurt layered with jam and graham crackers. And even on those lesser days, the parfait still is a healthy, filling snack that he loves.
The real beauty of a parfait is that you can build them with pretty much whatever you have on-hand. In my house, the only required “special” ingredient really is the yogurt. But truth is, a low-fat, low-sugar pudding (rice or tapioca, for example) would do nicely, too.
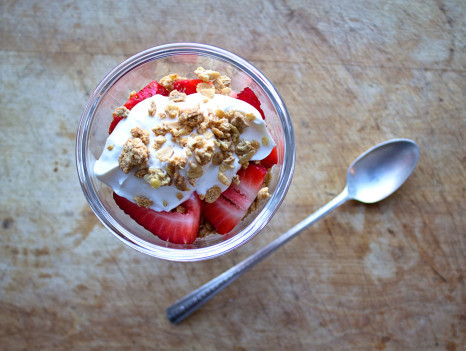
When I serve my son parfaits for breakfast, I usually layer them in an ice cream sundae glass (remember, particularly with kids, presentation counts). For lunch, I pack them in clear plastic jars, but you also could do them in thermos containers.
To help get you started, I’ve assembled my list of great parfait layers. Combine them as you see fit.
- Granola
- Healthy breakfast cereal
- Dried cranberries
- Dried cherries
- Mini pretzels
- Chopped dates
- Slivered almonds
- Unsweetened jams
- Applesauce
- Fresh berries
- Chopped dried apricots
- Flaked coconut
- Banana chips
- Sunflower seeds
- Graham crackers
- Lemon curd
- Chopped pineapple
- Chopped candied ginger
- Mandarin orange segments
- Crushed gingersnap cookies
- Kiwi slices
- Cinnamon (and a pinch of sugar)
- Whole berry cranberry sauce
- Leftover cinnamon-sugar toast (cubed)
- Mango chutney
- Crumbled mini rice cakes
- Chopped apples or pears
- Mini chocolate chips (just a teaspoon or so goes a long way)
Enjoy!
Want more lunch box inspiration? Try:
- A Fresh Twist on Pizza for Dinner (and Lunch!)
- 10 Healthy and Fast Whole Grain Lunches
- 6 Sandwich Spreads Your Kids Will Love
March 24, 2014
Cool and Creamy Mint Chip Frosting
When it comes to cakes and cupcakes, I tend to stick to the classics. Yellow or chocolate cake with chocolate buttercream frosting is the standard at my house for most birthdays.
I am pretty boring.
When I made this mint chip frosting for the first time I had one of those a-ha moments. As in, “why didn’t I think of this sooner?!” Mint chip ice cream is my favorite ice cream flavor, and now it is one of my favorite frosting flavors as well.
Creamy buttercream frosting with the cool flavor of mint, studded with chocolate chips, makes those same ol’ cupcakes (check out my favorite chocolate cupcake recipe here) something special.
Here are some tips for when you make it. Bonus: You can’t fail!
- When you add your half and half or milk, make sure you beat the frosting until it’s beautifully light and fluffy. If it’s too stiff and you don’t have that perfect texture, add more half and half if needed. Conversely, if the frosting is too loose, add more sugar.
- If you want to add some natural food coloring at this time for a green tint, go right ahead. The frosting is just as tasty without it, too!

Doesn’t it look just gorgeous?

Mint Chip Frosting
Frosts 24 cupcakes or one cake
Ingredients
3/4 cup butter, softened
1 teaspoon vanilla
1 teaspoon peppermint extract
1 2/3 cups powdered sugar
1/4 teaspoon kosher salt
1/4 – 1/2 cup half and half or milk
1/2 cup chocolate chips
Natural green food coloring (optional)
Directions
1. Beat the softened butter until creamy – about 2 to 3 minutes.
2. Add vanilla and peppermint extract and beat until combined.
3. Add the powdered sugar and salt, and beat to combine.
4. Add the half and half or milk, and beat on medium-high for 3 minutes, until the frosting is light and fluffy. Add more half and half if the frosting is too stiff, or more powdered sugar if it’s too thin, as-needed to achieve desired consistency.
5. If you’re using a food coloring, add it in now.
6. Mix in chocolate chips.
7. Use immediately (this won’t be a problem!)
Want to bake more cupcakes? Try:
Chocolate Peanut Butter Cupcakes
Red Velvet Cupcakes
Coconut Cupcakes
March 23, 2014
A Fresh ‘Twist’ on Pizza for Dinner (and Lunch)
As much sense as they make, lunches built from leftovers can be a hard sell. Most of us don’t want to eat the same thing over and over, which is why I’m a big fan of repurposing leftovers in new ways.
I try to avoid making a massive quantity of one dish, then serving it straight up for multiple meals. I find it better to make too much of just one part of a meal, then find fresh ways to use the extras.
So rather than make a ton of lasagna and hope everyone wants to eat it 24-7, I boil up too many noodles. I use what I need to make a lasagna for dinner, then find new ways to use the extra noodles for a couple lunches.
For example, on Day 1, I might break up the cooked noodles and pack them with jarred pasta sauce and cheese in a thermos. On Day 2, I could use the large, flat noodles as “bread” to make rollups with deli meat. On Day 3, use them to bulk up purchased tomato or chicken soup. And so on.
Still, rules are meant to be broken, right? And every once in a while I stumble onto a dinner recipe that’s fun, delicious, and lunch box-friendly enough that my son doesn’t mind eating it as-is for multiple meals.
These pizza sausage wraps are that sort of recipe.

My goal was pretty simple: I wanted to combine pizza and sausage, but I didn’t want to just dump sausage slices on a pizza. I wanted a fresh approach. And one that was easier to pack.
That’s how I came up with the idea of wrapping a spiral of pizza dough around a sausage. To make it more pizza-like, I also stuffed the sausage with cheese, then added a tomato dipping sauce.
The result was a delicious dinner that looks part hot dog, part pizza. And the leftovers held up so well, I was able to pack them for my son’s lunch the next day without any fuss.
Even better – like real pizza, these are as delicious cold as they are hot.
Pizza Sausage Dogs

Start to finish: 30 minutes (10 minutes active)
Servings: 5
Ingredients
12-ounce package sweet Italian chicken sausages (5 sausages)
1 ounce block cheddar, cut into thin sticks
Half of an 18-ounce ball of purchased pizza dough, room temperature
1 tablespoon olive oil
1/2 teaspoon Italian seasoning
1 cup jarred marinara or other pasta sauce
Instructions
1. Heat the oven to 350 F. Coat a baking sheet with cooking spray.
2. Using a paring knife, cut a slit down the length of each sausage, being careful not to cut all the way through. Wedge sticks of cheese into the slits of each sausage and set aside.
3. Divide the dough into 5 pieces. Roll each piece into a “snake” about 12 to 14 inches long. You may need to lightly flour the counter and your hands. Set aside.
4. In a small bowl, mix together the olive oil and the Italian seasoning. One at a time, dunk the dough snaked in the oil mixture, turning to coat well.
5. One at a time, wrap a piece of the dough in a spiral around each sausage. To do this, start at one end of the sausage and hold the dough in place with one hand. With the other hand, wrap the dough in a tight spiral down the length of the sausage.
6. When all of the sausages are wrapped, arrange them on the prepared baking sheet, leaving several inches between them. Bake for 20 minutes, or until the dough is puffed and lightly browned.
7. Meanwhile, heat the marinara and serve as a dipping sauce for the sausages.
March 21, 2014
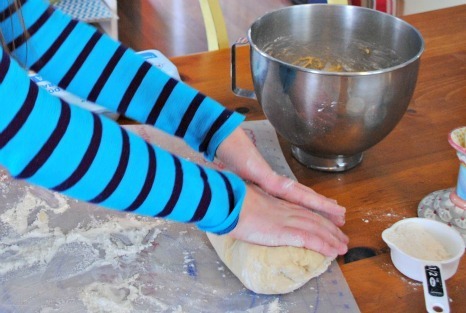
3 Tips for Kneading Dough – Plus, Homemade Cinnamon Rolls
Who doesn’t love cinnamon rolls?
Warm from the oven, topped with creamy icing, there are few breakfast treats that can compare, in my opinion.
I stayed away from making cinnamon rolls at home because I was hesitant to try out a recipe that called for kneading. I had many unsuccessful past attempts where my end-result resembled a door stop.
The kneading process develops the gluten in the dough, which gives it body. Plus, it’s a good workout and very rewarding. If your grandmother or great-grandmother was a baker, I bet she had fantastic arms!
I finally got the hang of it with my Pebble Top Oatmeal Bread and learned a few valuable lessons.
1. The dough is very sticky when you start to knead it, and it will cling to whatever surface you’re kneading on if you don’t liberally dust it. So, flour first and gradually add more as you knead, and be careful to not add too much. As soon as your dough is smooth and it bounces back when you press a finger into it, you’ve added enough.
2. Pay attention to your recipe and follow kneading times carefully. Different doughs require different levels of work – a softer bread needs less time (usually 6-8 minutes), while a chewy bread (like a french baguette) requires more time (usually 10 minutes).
3. To knead, place your dough ball on your floured surface, fold it in half, and push the dough with the heels of your hand. Turn the dough a quarter of a turn, and continue in this rhythm for the prescribed time.
It should look like this when you’re done:

Let’s put this kneading knowledge to use with some delicious cinnamon rolls (the complete recipe is below).
After you have kneaded the dough, let it rise in a warm spot (my house is cold, so I place it in the oven, set to 170 F) in a large bowl coated with non-stick cooking spray, tightly covered with plastic wrap. The dough needs to double in size, which takes about two hours. After the dough has doubled, punch it down and roll it out to a 15 x 11 inch rectangle.

Combine the butter, brown sugar, and cinnamon, and spread the mixture over the dough, leaving a 1/2-inch border.

Roll the dough into a log, lengthwise. When it’s rolled, pinch along the seam to seal.
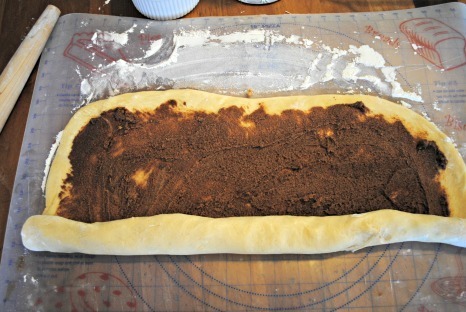
Use dental floss (wrap the floss under the dough and pull the ends toward each other, through the dough) for clean cuts, or a sharp knife, and cut the dough into equal slices (1/2 – 3/4 inch pieces). In this batch, this yielded about 20 rolls.

Place the rolls, lining them up next to each other, in a parchment-lined 13 x 9 glass baking pan, and cover the dish tightly with plastic wrap. You can also use two smaller round or square pans.

At this point you can either let the rolls rise in a warm place until doubled, or refrigerate them overnight (a great idea if you’d like to have warm cinnamon rolls in the morning but don’t want to wake up early!). If you refrigerate overnight, let the rolls come to room temperature (about an hour), then place in a warm place (30 to 40 minutes) until they are doubled in size.
This is also a good time to make your cream cheese frosting. Simply beat softened cream cheese, powdered sugar, butter, vanilla, and salt until combined.
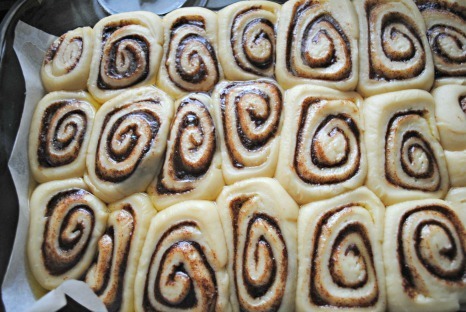
Once the rolls are doubled, take off the plastic wrap and bake at 350 F until the tops are golden, about 18 to 23 minutes. Remove from oven and let cool slightly. Spread rolls with the cream cheese frosting while still warm, and enjoy!

Cinnamon Rolls with Cream Cheese Frosting
Makes approximately 20 rolls
Ingredients
For the rolls:
1 cup milk
3 tablespoons butter
3 1/2 – 3 3/4 cups flour
1/2 cup sugar
1 egg
1 envelope rapid rise yeast (or 2 1/4 teaspoons)
1 teaspoon kosher salt
3/4 cup brown sugar
3 tablespoons cinnamon
4 tablespoons butter, softened
For the frosting:
4 ounces cream cheese, softened
1 cup powdered sugar
4 tablespoons butter, softened
1 teaspoon vanilla
1/4 teaspoon kosher salt
Directions
1. Combine the milk and butter in a glass measuring cup and heat in the microwave until butter melts and the mixture is 120 to 130 F (it should be warm, not hot, when you stick your finger in), about 30 to 45 seconds.
2. Pour the milk mixture in the bowl of a standing mixer and add 1 cup of the flour, the sugar, egg, yeast and salt. Beat on low for 3 minutes. Add the remaining 2 1/2 cups of flour and beat on low until the dough forms a ball and is pulling away from the sides of the bowl. Add a tablespoon or more of flour if the dough is too sticky.
3. Dump the dough on a floured board or surface and knead for 6 to 8 minutes, adding more flour as necessary, until dough is smooth and elastic. Transfer dough to a large bowl sprayed with non-stick cooking spray and wrap tightly with plastic wrap. Let rise in a warm place until doubled – about 2 hours.
4. Combine brown sugar, cinnamon and butter in a small bowl. Punch down dough and roll out into a 15 x 11 rectangle. Spread the brown sugar mixture evenly over the dough, leaving a 1/2 inch border.
5. Roll the dough lengthwise into a log, and pinch along the seam to seal. Use dental floss (wrap the floss under the dough and pull the ends toward and past each other, through the dough) for clean cuts, or a sharp knife, and cut the dough into equal slices (1/2 to 3/4 inch pieces).
6. Place the rolls, lining them up next to each other, in a parchment-lined 13 x 9 glass baking pan and cover the dish tightly with plastic wrap. You can also use two smaller round or square pans. Let the rolls rise in a warm place until doubled, or refrigerate overnight. If you refrigerate overnight, let the rolls come to room temperature (about an hour), then let them rise in a warm place until they are doubled in size.
7. Remove plastic wrap and bake at 350 F until tops are golden, 18 to 23 minutes. Remove from the oven, and let them cool slightly.
8. Beat softened cream cheese, powdered sugar, butter, vanilla and salt until smooth and well-combined. Spread rolls with the cream cheese frosting while still warm.
Weekly Meal Planner, with 5 Vegetarian Dinners to Love!
Welcome to the Weekly Meal Planner! Whether you work all day and are out of steam when the dinner hour hits, or are fresh out of ideas and in a cooking rut, we are here to make your life easier.
We are more than ready for spring, how about you? This week we are ushering in the new season with five nights of vegetarian dinners to put a little extra spring in your step (and maybe your wallet, too!).
And if you ever need meal ideas, feel free to ask us in the comments, on Facebook, or on Twitter!
Meatless Monday

Lunch: Ratatouille with Poached Eggs and Crunchy Croutons is a great make-ahead meal. Just reheat the stew and top with the poached egg and croutons when you are ready to serve.
Dinner: Hot off the presses from Rachael’s 2014 Feedback festival in Austin, these Grilled Eggplant and Roasted Tomato Sliders with Spicy Tahini are out-of-this-world.
Dessert: Outrageous Brownies will brighten up your Monday. Coffee is the secret ingredient here to really enhance the chocolate flavor.
Tuesday
Lunch: Winter Vegetable Chowder is a great soup to use up any veggies you have in your fridge.
Dinner: Welcome the new season with a spring-like supper: Carbonara-Style Tagliatelle with Grilled Asparagus and Lemon-Herb Breadcrumbs.
Snack: Moist and delicious Ginger Pumpkin Bread is a year-round favorite.
Wednesday

Lunch: PB & H Extreme will be a new go-to lunch once you try this sammie packed with bacon, banana, honey, cinnamon, and peanut butter!
Dinner: Spaghetti Squash with Warm Spinach-Walnut Pesto is super healthy and delicious. If you have little ones who are on the picky side, the pesto is tasty over pasta as well.
Snack: Fruit and Nut Scones are the perfect accompaniment to an afternoon cup of tea or coffee. No currants in the house? Dried cranberries or raisins are great substitutes.
Thursday

Lunch: Orzo and Zucchini Salad is delish on its own or topped with leftover cooked chicken, steak or pork.
Dinner: Rich and hearty Mushroom Paprikash will satisfy even the most die-hard meat lover. Polenta or mashed potatoes provide and nice base if you want to swap out the egg noodles.
Snack: Applesauce Cake or Muffins make a perfect after-school snack.
Friday
Lunch: Enjoy light lunch! Baby Spinach Salad with Mandarin Orange and Red Onions is slim and satisfying.
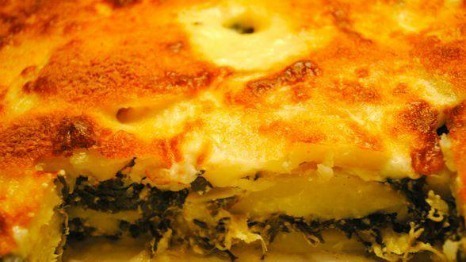
Dinner: Spinach Artichoke Potato Lasagna is a fantastic vegetarian meal featuring all the flavors of your favorite dip.
Dessert: Malted Milk Ball Blondies take bar cookies to the next level. Yum!
Entertaining Saturday

Brunch: Egg Tostada-Frittata with Refried Beans and Rainbow Salsa combines the unique flavors of Italian and Mexican cuisine into one unique and flavorful dish.
Dinner: The ultimate party food, Whiskey Chicken Drummers will be a big hit with guests.
Cocktail: Sample Rachael’s husband John’s Bloody Mary his way when you whip up a batch of Bloody Johnnies.
Family Sunday

Brunch: Deviled Ham Croque Madame is a crowd-pleasing BLD. The homemade deviled ham puts this sammie over the top.
Dinner: After a week of veggie dinners, treat the family to comforting Meaty Baked Ziti.
Dessert: Go all-out for dessert with this Chocolate Bundt Cake with Sour Cream Chocolate Glaze. You won’t regret it. As one rachaelray.com visitor wrote, it’s the, “…the cake of all cakes.”
Feedback 2014: That’s a Wrap!
Feedback is Rachael Ray and John Cusimano’s signature festival celebrating the two things they love most – music and food – in a city they love, Austin!
Feedback 2014 was a whirlwind: Thousands of attendees, 34 talented acts, and more delicious food and drinks than we can count. Without everyone involved, this year would not have been so wonderful!
First and foremost, to every person who came and celebrated with Rachael and John – thank you! Thank you for your time and patience while you waited in the rain or stood in line. Thank you for your energy and positivity – for dancing, eating, singing, and your general joy! We loved all your photos and updates via #RRFeedback, and we can’t wait to see you next year!

Blondie. Photo by Brian Lahiere
To the bands that graced the stages of our Feedback day party, you are amazing! CeeLo Green, Blondie, Foxboro Hot Tubs, Yelawolf, Allen Stone, Har Mar Superstar, The Wild Feathers, The Cringe, Bad Suns, Cody ChestnuTT, Bob Schneider, The Last Internationale, Spanish Gold, and Jamestown Revival.

The Wild Ones. Photo by Brian Lahiere
To the acts that delighted us at the Feedback House, thank you! Band of Skulls, Wild Ones, Cheerleader, Cheers Elephant, The Black Cadillacs, Sam Roberts Band, Frances Cone, The Districts, G.Love, Diarrhea Planet, In the Valley Below, Little Hurricane, NO, Natural Child, Roto’s Magic Act, Streets of Laredo, Cowboy Mouth, Grieves, and Fly Golden Eagle.

Frankfurters by Park’s Finest. Photo by Brian Lahiere.
Thank you to our wonderful sponsors, without whom this event would not have been possible: Ball Park Brand, Blue Moon Brewing Company, and Colavita.
Thank you to our partners, who made everything just a little more delicious: US Foods, Tito’s Handmade Vodka, Lillie’s Q, Jeni’s Splendid Ice Creams, and Gordough’s Specialty Donuts.

Blue Moon. Photo by Brian Lahiere.
Of course, our incredible venues, Stubb’s BBQ and The Chick Ranch, were gracious and helpful hosts.
And last, but certainly not least, thank you to the City of Austin for being our Feedback home away from home! You are one of Rachael’s favorite destinations, and for very good reason: Your hospitality is second-to-none.
See you next year!
[Top Image by Brian Lahiere]
Rachael Ray's Blog

- Rachael Ray's profile
- 296 followers

