R. Scot Johns's Blog, page 7
June 2, 2013
Fantasy Castle Books Website Re-Launch

For the third time in just a little over a year I've had to rebuild my primary website due to a crash. The first was my own fault, which occurred while migrating from Yahoo to Wordpress, but the last two were caused by Wordpress updates that created conflicts with the widgets I was using. This is an ongoing problem with Wordpress, due to the nature of plug-and-play design. Since widgets are created by separate and unaffiliated parties, there is a constant threat that one will not work well with another, or that an update to one will change its behavior in a way that causes an unexpected outcome. Last time it was a Wordpress update that brought the whole thing down, and I swore I'd never build a Wordpress site again.
Now, however, I have two of them. This was not at all intentional, but was simply a function of expediency. I frankly do not have the time to build a whole new site from scratch, nor the funds to pay someone else to do it for me. And even if I did I probably wouldn't, since I like to do things myself. Consequently, I've designed both the new Fantasy Castle Books website, as well as my second blog over at rscotjohns.com, both of which are in a constant state of pending development.
The new site is based on the Publisher theme, which has some handy features, but also some rather serious flaws and drawbacks, as with most generic templates. I've customized it as much as time would allow over the past week, adding product pages with links to my e-Junkie hosted files - the same ones found in the product links on this blog. So you can now visit the "publisher" page to view more information about the titles available and use a central shopping basket for your purchases.
The idea behind keeping a website presence in the form of a publisher bookstore is to allow an outlet for my work directly to my readers. This is one of the fundamental aspects of independent publishing, since it bypasses the middlemen and gate-keepers in favor of a more personal reader-writer relationship. Not only are we no longer tied to the whims of corporate marketing boards that are only interested in what will sell the most, but it is now entirely up to the readers themselves to determine what has value for them, rather than having these dictated by intermediaries who more than likely have their own interests in mind instead of mine or yours. In addition, whether you're an independent self-published author or have a traditional contract with a major trade, it is still left almost entirely to you to market your own work, and a central website is the primary means of doing that, regardless of what other methods you might use. Your website is where you send anyone who might be interested in what you do.
At the moment only the product pages are up, but I'll be adding back the Archives as I find the time. These include things like source materials and bonus content like notes and rough drafts, plus early concept art and render tests for the long-awaited Ring Saga project, which I plan to get back to with fervor now that the Kindle Comics book is done. If there's anything particular you'd like to see added to the new website feel free to let me know! Also, I plan to start updating my other blog with new content once I start producing new material for the Ring Saga. I'll continue to post updates here pertaining to industry news and ebook formatting matters, while the other blog is intended to be more about my own ongoing writing and illustration efforts. Because I've been consumed entirely with the Kindle formatting guide I haven't been able to work on anything "creative" for quite some time, so I'm very much looking forward to getting back to it.
So with that said, I'm off to do just that.

Published on June 02, 2013 14:02
May 26, 2013
How To Make Kindle Comics & Children's Books
At long last it is finally here! After months of painstaking labor creating and testing page layouts, compiling results, writing and revising, and producing original art to illustrate each point, the complete guidebook to producing illustrated content in the Kindle fixed layout format is finished and available from the tab on the menu bar above.
The ebook is being released only in mobi reflowable format at present, since it is presumed that anyone who is intending to create Kindle ebooks has access to at least one Kindle device or app on which to read it. The title has also been uploaded to Amazon, where it should be available to purchase sometime tomorrow.
Inside the book is a code to download the two companion template files for free, and for those who have already paid for the templates, a discount code will be sent to you tomorrow allowing you to apply the amount of your prior purchase to the new book. My heartfelt thanks to all who helped fund my work by purchasing the templates! I hope that you have found them useful.
The book will take you step-by-step and line-by-line through the files and elements in both templates, from the functional support files to a page-by-page breakdown of the content. The first portions are based on the tutorials first posted on this blog, which have been extensively revised and expanded, including a wealth of new content, from the ePub3 Navigation document and metadata to the latest changes in Kindle functionality. In addition, both templates have been updated with new content as well, including additional page layout elements and code examples.
The book comes in just shy of 80,000 words - the equivalent of roughly 425 average Kindle screen-size pages - with 167 images and screenshots scattered throughout. You can purchase it for ten bucks directly from me via the cart button below, or on Amazon.

$9.99 [8.94 Mb]
Kindle reflowable .mobi format
Here is the complete Table of Contents, although it only includes the primary sections, each of which are subdivided into any number of parts.
TABLE OF CONTENTS
Introduction
What is Fixed Layout?
The KF8 Format
Why Kindle?
Working Methodology
Tools
1. Content Editing
2. Conversion Tools
3. Third-Party Utilities
4. Documentation
PART I: The File Structure
Opening the File
Inside the Template
The OPF File
1. Metadata
Kindle-Specific Metadata
ePub3 Spec Metadata
eBook Content Metadata
2. Manifest
3. Spine
4. Guide
The Navigation Files
1. The NCX File
2. The NAV File
PART II: The Content
IMAGES
Resolution & Aspect Ratio
Image Format & File Size
PAGES
HTML & CSS for Fixed-Layouts
THE BASIC TEMPLATE
1. <div id> Insertion Method
2. <img src> Insertion Method
3. Self-Contained CSS Pages
4. Active Links
5. Multiple-Image Pages
THE ADVANCED TEMPLATE
FONTS
Live Text
Embedding Fonts
Text Shadows
PAGE LAYOUTS
1. Live Text Layers
2. Relative Positioning
3. Active Table Of Contents
4. Stacking Text & Image Layers
5. Positioning Text Boxes
REGION MAGNIFICATION
1. MagTargets Using “SourceId”
2. Alternate Content & Placement
3. Text Positioning & Alignment
4. MagTargets Using “TargetId”
5. Lightbox Fills Using TargetParent
6. Panel View Using TargetParent
7. Full-Page magTarget Example
PART III: Conversion & Testing
Compiling The File
Converting The File
Kindle Direct Publishing
Kindle Previewer
Kindlegen
Mobi7 vs. KF8
Kindle Unpack
Testing The File
APPENDIX A
Kindle Fixed Layout Functionality
APPENDIX B
Kindle Metadata Attributes
APPENDIX C
Standard Metadata Attributes
APPENDIX D
Device Display Resolution

Published on May 26, 2013 07:20
May 4, 2013
"Kindle Publishing Guidelines" Updated Again (2013.3)
Having released version 2013.2 of the Kindle Publishing Guidelines just a week ago - on April 27th - to incorporate support for audio/video content in reflowable ebooks (Section 6), Amazon today released another update with considerably more changes. Many of these are editorial in nature, showing that they are at least attempting to address the poor writing quality and general lack of clarity that has plagued the Guidelines since its inception.
As with version 2013.1 released back in February, I have highlighted and annotated all the changes made in this edition since the last one, and you can upload my version from the link above, since Amazon themselves provide no change log, or even a notice when a new version is released. I've just learned to check it regularly, and did so today quite by chance. I just happened to be going through copy-editing revisions for the new book, and while doing so for the section that covers documentation I thought I'd have one last look before the final draft is locked.
As far as functionality and content changes to the Guidelines, the most significant among these are:
A new section (3.1.9) added to the General Formatting Guidelines for "Customizing Font Selection" which seems to address an apparent problem with improper styling of primary embedded fonts (p.14).
Brazilian Portuguese (bp) added to the -locale language option for Kindlegen's readout (p.8).
Support for right-to-left vertical scripts and Japanese Ruby script added for the Paperwhite and newer Fire devices (p.11).
A large number of clarifications and additions for basic text formatting, which apparently address the improper use of imposed font styles and colors in reflowable ebooks (p.11).
Important clarification regarding the HTML cover page exception in Section 3.2.3 (p.16), which now specifies that this applies only to reflowable ebooks (although the conflicting and inaccurate statements in Section 4.3.7 still stand).
Some additional emphasis added for preferring tabular data over images (p.25).
Guide items are now "highly recommended," although they still remain optional (p.28).
Region Magnification pop-ups should not be positioned "too close" to the edge, in order to prevent content overflow on different devices (p.32). This is appended with one of several new notes advising content creators to test their files on as many different devices as possible. The unwritten implication is that Previewer is not accurate enough to rely on for final testing.
An additional line added in Section 4.2.3 to emphasize the recommended use of CSS background image embedding over HTML <img> tags, even though nearly all of Amazon's own sample files use the <img> method, as does Kindle Comic Creator (p.33).
Reiteration that there should be one CSS file per HTML page, and that its content should be relevant to just that page (p.33).
If back cover images are added, barcodes, etc., must be removed, and there should be no text popups included (p.34).
The use of non-breaking spaces for text alignment is now forbidden, rather than "limited" (p.36).
Two new points have been added to the "Best Practices" section for testing Kindle books (Section 9.1), one for checking text/background settings in reflowable ebooks, and the other to assure that all region magnification panels function correctly in fixed layouts. Similarly, some clarification and expansion has been added to Section 10 on Kindle Quality Guidelines (p.65).
A few of the supported HTML tags are now deprecated, including <big> (but, ironically, not <small>), <center>, and <font> (Section 11, p.66-7).
I have not highlighted the additions for audio/video support that were added in version 2013.2 released last week, but they are there in the first two paragraphs of Section 6, for those who are interested. See my comment on this issue in last week's post on the topic.
All in all, no major changes in this edition, but some welcome editorial revisions nonetheless. Changes that have not been made that I am waiting for include:
Increased file size limits for images to allow the recommended 2x resolution for image zoom (which would require a file 2400x3840 for the HD8.9" Kindle), or the removal of that recommendation
A clarification that the RegionMagnification metadata value is no longer valid (or at least the removal of it from the metadata table)
Statement of recommended aspect ratios / image dimensions for page sizes, so that they display correctly in two-page spreads (currently odd numbered resolutions result in gaps between the pages, even when "page-spread" is chosen as the Spine property rather than "facing-page")
Still needing fixed in the device software itself are these major issues:
Page-spread support on all devices for all book-types
Live text functionality and bookmarks for all fixed layout ebooks, which should never have been disabled in the first place
Layout-blank, which does not work correctly in almost any case
Missing menu links on the newer Fire devices when the "children" book-type is chosen
I mention these only in the off chance that someone from Amazon is actually paying attention.

Published on May 04, 2013 13:35
Amazon Brings Books To GoodReaders

Amazon today announced that they've acquired Goodreads, bringing together the largest social reading site with the biggest seller of ebooks on the planet. With more than 16 million members and 30,000 bookclubs, Goodreads could not be a better target audience for a book retailer, especially for a company whose primary business is in distributing reading material, and who act now as everything from publisher to reading device innovator, covering both ends of the spectrum.
Goodreads was founded in the same year that the Kindle first appeared, making this marriage a kind of happy accident, the meeting of two paths that were seemingly destined to cross. I've been a fan and advocate for both almost since inception, and have enjoyed seeing the success of each in the literary landscape.
More to the point here, both act as ardent advocates for independent authors, providing resources for production and dissemination of new content. Between the two you can take a project from concept to readership without ever needing any other resource, and do it virtually for free. These two powerhouses have now combined to take the next step in the (r)evolution of publishing. We may well be seeing the birth of the new publishing model.
Legacy publishers should be shaking in their boots at this news, as there is not a one of them that can boast its own built-in market, or even the faintest glimmer of that possibility. If Amazon keeps up at this rate (and there's no indication that they won't), one day in the not too distant future they'll have no need of outside publishers. I say that with the firm belief that among their future acquisitions will be one of the major publishing houses. And why not? Just imagine PenguinHouse, a subsidiary of Amazon, Inc.

Published on May 04, 2013 12:11
April 28, 2013
How to Make Kindle Comics - Final Draft Complete
After numerous additions, several revisions, and half a dozen lengthy delays, the final draft of How to Make Kindle Comics & Graphic Novels is finally complete.
Since I began this project back in December, Amazon has made major updates to the entire Kindle Fire line, upgraded Kindlegen, and released Kindle Comic Creator, all of which threw my efforts into sudden turmoil. My only hope now is to get through one last copy-edit pass and convert the thing to ebook format before a new line of Kindles is released!
The final manuscript comes in just shy of 70,000 words, with around 160 images. Additionally, I have added a number of new features to the Advanced Template (Version 3.0) to provide further examples of concepts covered in the guide, and this will be uploaded when the ebook is released.
My current plan is to upload the file to NetGalley and let it run its course for two or three weeks before the official launch, putting it somewhere around Memorial Day. This is what is called a "soft launch" in publishing circles. Some would call it sloppy. I call it necessity. Since I do all the work myself from start to finish - research, writing, testing, art, layout, and editing, not to mention marketing - and do it all on nights and weekends in between my real life as a bookseller, it's difficult to say when any given task will be checked off the never-ending list.
But this was the big one. From here it's all downhill.
I want to thank all of you who have waited patiently, and promise that I'll get the ebook posted up as soon as possible.

Published on April 28, 2013 20:25
April 27, 2013
Audio/Video in Kindle eBooks
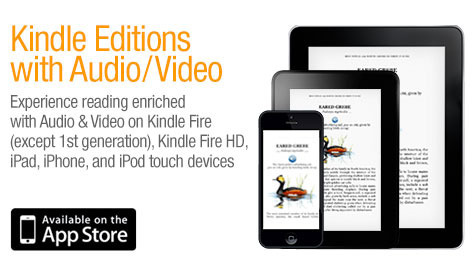
I mentioned in a post last month, Amazon's recent updates to the Kindle Fire software added audio/video support for the first time to the Kindle devices. Previously, multimedia support was only available in the Kindle for iOS app, which made it more or less irrelevant to invest the time and effort necessary to produce ebooks with these added features.
Now, however, all of the latest generation color Kindles have been given support for audio and video content. To that end, Amazon last week released an updated version of the Kindle Publishing Guidelines to incorporate this change. This is, in fact, the only change that has been made to the Guidelines, and consists of just a single change found on page 47 at the top of Section 6 Audio and Video Guidelines, where two lines have been altered to read:
Kindle Edition (sic) with Audio/Video content is available on Kindle Fire (2nd generation), Kindle Fire HD, iPad, iPhone, and iPod Touch.
Previously it simply listed "Kindle for iOS" as the only supported platform.
The important change, however, comes in the second paragraph, where it now reads:
KF8 features are not currently supported in Kindle Edition with Audio/Video content.
It then goes on to specify that a mobi7 file must be delivered to Amazon with self-contained audio and video. These two factors are crucial to understand and be aware of.
Firstly, and to my mind most importantly, KF8 does not support audio/video content. That is, only reflowable files can currently contain multimedia content, which fixed layouts are excluded.
The phrasing of this statement is somewhat convoluted, and would have been much clearer in its intent had it read: Audio/Video content is not supported in KF8, rather than reversing this to state that KF8 features are not supported, as if it were the audio/video content that supports the format, and not the format that supports the content. But this, perhaps, is just an English major's nitpicking.
Secondly, the audio/video content must be self-contained (i.e. embedded), and therefore, streaming content is not supported in any case. This is almost certainly a move by Amazon to limit bandwidth use, since it provides this for free. There is no inherent reason why the referenced content source must be internal when connected to a network.
As I mentioned in the previous post, I have tried this and found it works quite well on my devices. The major obstacle for independent authors here, as with fixed layout files in general, will be the file size restrictions, since video can quickly increase your file size. A few short interviews or behind-the-scenes videos, however, should not consume too much space. Cloud Atlas, for example, comes in at only 10Mb with four short embedded videos.

Published on April 27, 2013 13:01
April 20, 2013
Kindle Comic Creator - An Analysis
Last week Amazon released the public version of its newest addition to the Kindle creation suite, the Kindle Comic Creator. KC2 is a graphic user interface that allows you to create KF8 fixed layout ebooks using a drag-and-drop approach, which makes it simple, fast, and - with a number of exceptions - efficient. And, of course, one it's best features is that it's completely free.
The first and most obvious caveat to point out is that KC2 will only create comics. That is, you can only create Kindle fixed layouts files that have the "comic" book-type. There is not even an option to change this: it is simply a built in feature of the program. This means there can be no live text functionality (dictionaries, search, etc.), no bookmarks, and in some cases, no hyperlinks or background image zoom (even though KC2 ironically embeds images using the <img src> insertion method, against the recommendations of the Kindle Publishing Guidelines). Refer to my Kindle Fixed Layout Functionality chart for specific details.
An equally important point to make, however, is that you can really only use Kindle Comic Creator to produce very simple layouts, with minimal formatting. KC2 provides a Rich Text Editor that only allows for basic text styling features such as bold, italics, and underlines, as well as changing text size and color. You can alter the line height, and the letter-spacing, and embed your own fonts - although the preview window will NOT show them, making accurate layout impossible (embedded fonts will appear on the compiled device, but not in the KC2 preview window). Moreover, you cannot change the alignment (all text is left-aligned) or add styles for headers and sections, making it less than adequate as a text creation tool. You can, however, add inline images for such things as drop caps or unsupported glyphs.
Several additional points should be made regarding claims stated in the User's Guide or on the KC2 page. A significant one that I've seen running through the Kindle Forums this week is the page spread issue. Amazon states that you can "create books with double page spreads or facing pages," and this is true with one huge exception: you can only do so when there is no region magnification present. That is, you must choose "No" to the question "Would you like to create Kindle Panel View" during the title setup process:
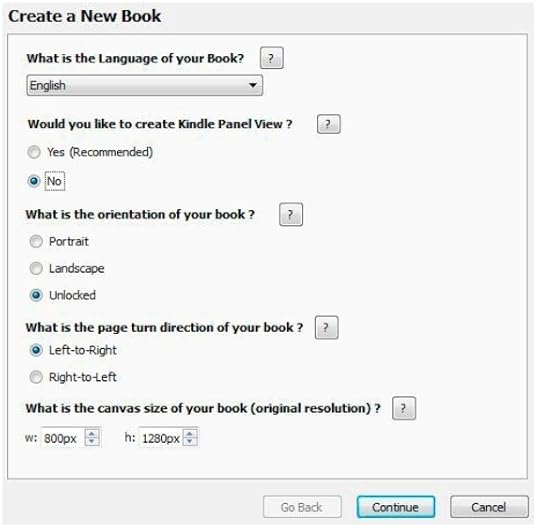
Note that this value cannot be changed once the title has been created. If you later change your mind, you'll have to start all over (or manually alter the settings in the OPF and re-import the title into KC2).
Also notice that on page 48 of the KCC User Guide, under Section 3.4 Joining Pages, the first line states explicitly (if not as boldly as it might) that the information that follows in that section applies only to ebooks "without Kindle Panel View" (my italics). This is the one and only place that this is mentioned! However, notice that these instructions for "Joining Pages" and using page spreads appear only in the User Guide in this section - Section 3 "Creating and Editing Books without Kindle Panel View" - while Section 2, which covers "Creating and Editing Books with Kindle Panels," does not contain any information regarding page spreads, because they are not available when Panel View is present.
Those who have referenced the Kindle Fixed Layout Functionality chart will know that this is the case with RegionMag in general when the "comic" book-type is chosen: page-spreads only work on the HD7 and Gen2 Fire, as well as the Android app, when RegionMag is absent, while on the HD8.9 and Paperwhite they work more or less correctly (see the chart footnotes for details). And, of course, two-page spreads do not work in any case on the Kindle for PC app or Kindle 3 (and I would guess the Kindle for Mac app as well).
Furthermore, you can only select "Unlocked" for the orientation value if you chose "No" to Panel View: which means any titles that have Panel View must be locked in either Portrait or Landscape orientation. This is a shortcoming of region magnification at present, which does not translate well from one orientation to the other when auto-orientation is allowed. Thus, Amazon have eliminated this option here.
As a final note on this subject, I should point out that page spreads do not work at all with any other book-type but comic, including (for some unfathomable reason) children's books! The only exception to this at present is the Paperwhite; even the HD8.9 no longer accepts two-page spreads in children's books, even though it did prior to the last update.
Another aspect of this that has been running through the Forum threads is that that orientation icons on the Display panel in KC2 will only show up when the "No" and "Unlocked" configuration is selected: in all other cases, these icons will be absent.
In addition, the "Add Blank Page" option will only be available with this configuration. I have tested the functionality of the Layout-Blank value, which is added to the OPF Spine item in a somewhat different manner than described in the Kindle Publishing Guidelines. Here, KCC adds both the "facing-page" value along with the "layout-blank" as a single property:
<itemref idref="item-4" linear="yes" properties="facing-page-right layout-blank"/>
However, this makes the blank page function just like any other page that you might add, which shows up in both portrait and landscape orientation, rather than only in landscape as is supposed to be the case with the "layout-blank" value. In none of my extensive tests have I ever seen the layout-blank work as it should, with the sole exception of the Paperwhite when the "comic" book-type value is not chosen (i.e. it works correctly with the "children" book-type, or none entered). The only reason to add a blank page is so that it retains a two-page spread in landscape, rather than centering a stand-alone page, but if it's going to show the blank page in portrait orientation as well, there's absolutely no point in adding the "layout-blank" value: it's just another page at that point.
I also want to point out here that the inner margin issue is still present using KC2: that is, on every Kindle Fire model except the generation 1, and also on the Andoid app, when the "comic" book-type is chosen, the inner margin is removed from two-page spreads, regardless of whether you use the "facing-page" or "page-spread" Spine value: they are all treated as page-spreads, and "facing pages" simply do not exist.
Another point I'd like to make here is that, contrary to the claim made on page 34 of the KCC User Guide, ebooks made using KC2 do NOT appear on the Books tab of your Kindle device. Because KC2 uses Kindlegen for its conversion, the same reservations apply here as they do when doing any conversion through Kindlegen. In this case, the required EBOK value for the "CDE Type" is not added, and so the files produced will appear on the DOCS tab when side-loaded. Only when these files are uploaded and put on sale via KDP will the downloads appear on the Books tab.
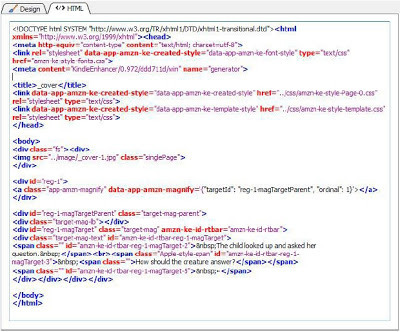
Finally, I want to mention the two features that actually make this a reasonably useful tool, and these are the creation of Panels and the built-in HTML/CSS editor.
Kindle Comic Creator not only lets you create text and image pop-ups using a graphic interface to visually layout and adjust the individual panel size and placement, but it will do this automatically using an auto-detect feature that is very handy. And regardless of the method used, you can always alter and adjust them later, even after saving and reopening the project. My tests have shown that the auto-detect function works only when there are white spaces between panels, not black ones. The page in my Advanced Template that has five panels divided by black borders, for example, was seen as one panel using auto-detect. This may simply be due to a lack of contrast between panels, however, and some adjustment in the settings is available, although I have not tested them extensively. Also useful is the fact that you can also drag-and-drop the panel thumbnails to quickly change their reading order, which is rather handy. Ultimately, however, I found the manual panel creation process more cumbersome than helpful, and not useful at all for complex layouts. You cannot, for example, add a different image or fill to the zoom region, or change the formatting of the lightbox effect without resorting to manually modifying the code, which essentially undermines the entire point of the application.
On that note, however, the other feature I will mention here is that KC2 does boast a nice HTML/CSS editing feature that allows you to alter the underlying code from right inside the program. This could be its nicest feature, were the preview able to actually show the embedded fonts correctly. But instead it will only show your custom fonts as system defaults, for which you can set the one that is the closest as a "fallback" using a drop-down menu beside the embedded font in the Rich Test Editor. Unfortunately, previewing pages is a less than adequate experience, as far as accuracy is concerned, and I ended up having to continually export the KF8 converted file to an actual device so I could see what it really looked like. If you're only using simple fonts like Georgia or Tahoma, KC2 should suffice, but if you want to add in more artistic fonts like Marker Fine Point or Eraser you're out of luck.
Ultimately, Kindle Comic Creator might be useful as a way to set up your initial layout, before adjusting the underlying code by hand. But I still recommend you do most of your coding manually, unless you're building a title with very basic layouts. KC2 only adds a small amount of extraneous entries to your code - primarily kindle generator references (such as "data-app-amzn-ke-created-style") - all of which can be deleted during cleanup. For image-only pages it will also add the CSS styling to the HTML tags, which can be a nuisance, but nothing that can't be easily replaced. The main place where KC2 will prove most useful for many Kindle comic creators is in the placement of Panels, which will generate CSS positioning data that can then be massaged for optimal placement.

Published on April 20, 2013 18:24
April 7, 2013
Kindle Fixed Layout Tutorial - Part 12
CONVERSION & TESTING
Once you have created at least one page of content, along with all the necessary support files (OPF, NCX/NAV, CSS, images, etc.), you are ready to convert your first test Kindle file. This will almost never goes as planned, and very often the resulting file simply will not work, or will be broken in some unexpected way.
However, if you have created each of your component files carefully, and listed them correctly in the manifest, the chances are your ebook will be work correctly on the first try and be fairly close to what you’re after.
This is why it is imperative to take your time and examine every line of code as you enter it, and then again before you save and close each file. It can save you endless hours searching for a missing semicolon or an unclosed tag.
Compiling The File
If you have created your content as an epub archive, either by using one of the templates to add and edit your own content, or by changing the extension of a .zip archive to .epub, then you are already set to go. Skip ahead to the section on Converting The File.
If, on the other hand, what you now have is a lot of files and folders on your hard drive, you have a bit of work to do yet in order to prepare the files for conversion.
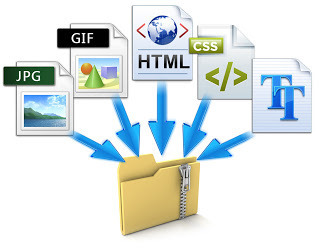
All of the necessary files must be added to a zipped archive in the manner described in the earlier section on Opening the Archive, and as seen in the templates. That is, the top-most level - or “root” level - of the archive structure must contain, at the very least, the OPF and any folders into which you have added support content.
All of your files can, in fact, be dumped together into the root level of the archive if you so choose, or you can order them in any way you like, so long as the location or every file is recorded correctly in the manifest section of the OPF so that the reading system knows where to find them. But only the OPF itself is required to be at the root level.

At this point you can either organize your file structure on your hard drive and then add it all at once to a zip archive, or you can create the compressed archive first with just one file inside and then add the others as they’re ready. Do not create a .rar or .7z archive, or use any other compression format than a standard zip. Also be sure the archive uses relative paths rather than full paths, as the latter will use your current hard drive for the root level, whereas you want the archive itself to be the top level, with all file paths relative to that location.
Once you have created a zip archive containing all of your required ebook files, change the .zip extension to .epub and you’re good to go. If you can’t see the file extensions you’ll need to change your system settings so that they’re not hidden (they’re hidden by default on both operating systems).
In Windows this is done in the Folder Options pop-up on the View tab, where you’ll need to uncheck “Hide extensions for known file types”.
On the Mac you do this in the Finder under Preferences > Advanced > Show all file extensions; but you can also show or hide extensions for individual files by opening the file’s info window (“Get Info”), where you’ll find a “Hide extension” checkbox at the bottom of the Name & Extension section.
Now you can simply rename the extension and you’ve got an epub file ready for conversion.

Converting The File
Amazon provides three different ways to convert your compiled epub archive into a Kindle ebook file, but there is really only one choice that you need consider, and that is Kindlegen.
The other two options are the Kindle Previewer, and the KDP upload portal, both of which have several major shortcomings that make them difficult and inefficient to work with, although this will depend to some degree on what you want and now complex your project is. To some degree it is also a matter of preference, so we’ll look at all three.
KINDLE PREVIEWER
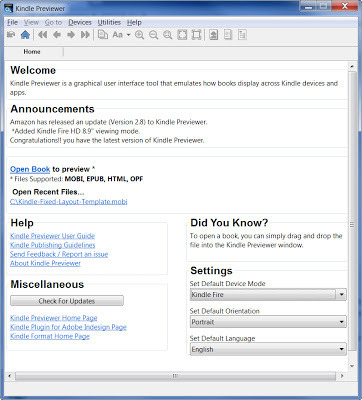
The Kindle Previewer serves two separate functions, with varying degrees of success. First, it provides a graphic user interface for Kindlegen, which is the program that performs the actual conversion behind the scenes. Kindlegen itself is a command-line program that at first may seem somewhat daunting to use, since we are all more or less accustomed to point and click interactivity. In many ways, Previewer is easier to work with for this reason, although it has some drawbacks as well.
Secondly, as its name suggests, Previewer allows you to view your converted Kindle ebook as it would appear on a wide range of devices. A drop-down menu on the home screen allows you to choose your preferred device as the default, and lists the models currently supported by the emulator:
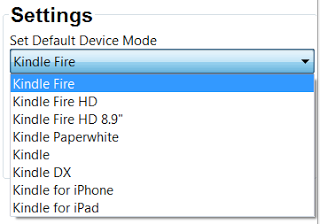
The obvious benefit to this is that it lets you see how you book will look on devices that you do not own. The problem is that many features (such as Panel View or landscape mode) do not work in Previewer the way they do on the actual device, and some of the devices listed don’t work at all. The iOS apps, for example, are not available for testing fixed layout files - the option is grayed out and inactive - which is one of the places Previewer would be most helpful, since it is not possible to test these on an actual iPad or iPhone.
On top of this, Previewer tends to be laggy and unresponsive even on the best desktops, testing the user’s patience as much as it does the ebook. It’s difficult to tell, for example, how many clicks are required to active a feature (such as a tap target or a hyperlink), since sometimes one click seems to work while sometimes two are needed - the delay in response is so great you almost always want to click again!
This makes using Previewer a slow and tedious process at best, although it is still useful to some degree, particularly if you have no other means of testing. But I don’t recommend you rely on it solely for your testing, since it is neither accurate nor fast. I rarely use it at all, as I do all my testing on the actual Kindle apps and devices.
One of the primary benefits to Previewer is that not only can you convert EPUB files, but it also accepts HTML, MOBI, and OPFs as well, and you can you can convert them simply by dragging and dropping the file onto the home page of the interface. Because Previewer accepts OPF files as a valid input, this allows you to skip the zip compression step and create your file structure directly on your hard drive. You then just drag the OPF into Previewer and this tells the conversion program where to look for all the necessary files.
Once the file has been converted it will open in the emulation mode you’ve set as your default. Again, there is a lengthy delay as the file is opened, and some uncomfortable sputtering as it’s content is sorted out. Finally, after a seeming lifetime, you can move around in your book (in fits and starts). This means that Previewer cannot be used as a conversion interface only, since it also automatically opens the converted file in an emulator. For this reason, among the many others given already, I recommend you go directly to the source and use Kindlegen itself without the Previewer interface. But again, this is a matter of personal preference, and the choice is up to you.
KINDLE DIRECT PUBLISHING
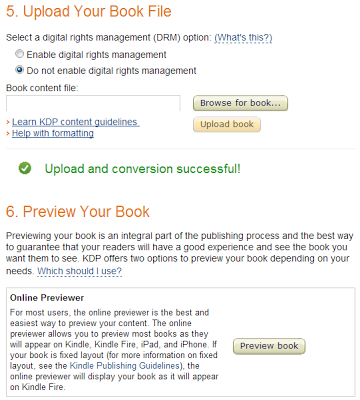
When you set up your title on KDP you will be given the opportunity to upload your unconverted source file, upon which it will be converted into a Kindle ebook. KDP accepts many source formats, including EPUB, HTML, DOC, RTF, TXT, and PDF, but the only viable format for fixed layouts is ePub. Only with this format can you control your layouts and metadata as this book has shown. The other formats are only useful for reflowable ebooks, and so do not concern us here.
Once the file has been ingested successfully into the KDP system, you will be provided with a link to download the converted file for external testing, or you can preview it online. Unfortunately, the Online Previewer is virtually worthless, as it has no interactivity and does not display fixed layouts correctly. It is also tediously slow in rendering the pages, and does not show two-page layouts, even on devices that support it.
It does, however, accurately convert your file, which is its main purpose, since this is the file that will be downloaded by your customers. Consequently, there is no better file to test than this. The downside is that it takes forever and a day to do what Kindlegen can accomplish on your own system in less than fifteen seconds. Therefore, I only recommend you use the KDP conversion system for the final round of testing before your book goes live.
And even better option is to do all the testing and conversion before you upload to KDP, and upload your converted mobi rather than the epub. Not only will this will be considerably faster, but it will also allow you to double-check your own testing and verify your process works.
Of course, one drawback to using KDP is that it requires you
to create a title listing for your book, which requires that you have a KDP
account, even if you never plan to sell the book on Amazon. Chances are, of
course, that you will, but it is a hindrance if you just want to convert your
file.

KINDLEGEN
The workhorse of the Kindle conversion pipeline, Kindlegen will become your best friend and ally in the process of turning hard work into literary art. While at first this command-line interface might seem foreboding, and even clunky, it is, in fact, highly efficient and simple to use, providing all the information you will need to repair any errors and determine exactly what is happening to your files during the conversion process.
Once you download and install Kindlegen you will want to put the primary program file (kindlegen.exe) in an easy to access location. I suggest you place it in the main C: drive root directory, and use this for all your conversion activities.
The reason for this is that you cannot simply double-click on the Kindlegen executable to run the program. Instead, you must run it from the Command Prompt in Windows (Windows / System32 / cmd.exe) or in Terminal on the Mac (Applications / Utilities / Terminal.app). In Windows this can also be accessed via the Start menu > All Programs > Accessories menu. I highly recommend you add a shortcut to this either on your main Start menu or your desktop for ease of access, as you’ll be using it a lot.
When you open the Command Prompt what you’ll get is an old-school MS-DOS style terminal where you type in the “commands” you want to run:

As you can see, you can change the default drive and file location using the cd (change directory) command. Here I’ve changed it to the main C:/ drive where my kindlegen.exe program is living. You can, of course, run this from anywhere. You may, for example, want to create a dedicated folder just for your conversions, and run Kindlegen from there instead.
To convert an epub file using Kindlegen you simply type in the command - which is just the word “kindlegen” followed by a space - as I have done in the screen cap above. You then enter the full name of the file you want to convert - including its extension - and press enter. The easiest way to do this is simply to copy and paste the file name.
Note that there must be a space between the command and the file to be converted, and that the file name itself must not contain any spaces. You can either remove any spaces between words in the file name or replace them with dashes or underlines. It is helpful to add a sequential number to your test files rather than simply overwriting the previous version, just in case something goes amiss. That way you always know where you are and can go back to earlier conversions if something didn’t quite work as planned.
Kindlegen supports a number of variables that you can append to the command line in order to achieve various outputs. You do this by adding any variables to the end of the command line string, such as:
Kindlegen filename.epub [-tag] [-tag <option>]
For example, you can change the language of the output log, using the -locale tag along with a two-character country identifier, such as:
Kindlegen filename.epub -locale jp
which will output the log in Japanese! Other language options currently supported are French [fr], German [de], Italian [it], Spanish [es], Chinese [zh], and of course, English [en].
You can also turn off the file compression, or increase it, using the -c0 variable for none and -c2 for heavy (Huffman) compression. The standard amount applied by default is -c1.
Another option that you may want to use is the -verbose tag, which outputs an additional amount of data in the conversion log, although it does not provide any particularly useful information.
Other variables allow you to change the output file name (useful for adding a version number or time stamp), view the release notes (also available in the Kindlegen extraction folder), or convert all your images to gifs - but I recommend you do this last one in Photoshop instead where you have more control over the image quality! See Section 2.2.2.3 of the Kindle Publishing Guidelines for a complete list of variables.
Once you press enter Kindlegen will leap into action, spewing out a log of what it’s doing, along with some useful statistics on the final file size and compression applied. The conversion will progress sequentially through a series of steps that are each given a line item number for reference, all in about ten to fifteen seconds, depending on the length and complexity of your file.
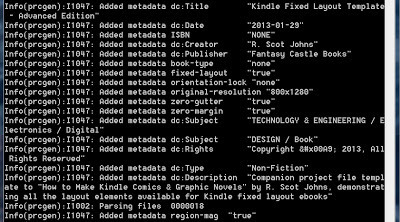
Using Kindlegen’s log can be among the most important tools in your conversion arsenal, since it is the only way to know what is really going on inside the end product. This, for example, is where you will see what actual metadata values are being applied (which in the case of region-mag has nothing to do with what you enter in yourself), or how much compression is being applied to your file.
Previewer, by the way, also offers you this log, but it’s hidden by default under a drop-down window, and is double-spaced so that you have to scroll several screens to view it all, making it somewhat more cumbersome to access. Previewer will also automatically append a version number to the output file with a date stamp that is helpful.
If there are any non-critical errors (such as non-closed tags or broken links) Kindlegen will attempt to fix them or apply a work-around (for example, it will forcefully close tags), and give you a warning noting the error location so that you can go back and manually correct it. It will complete the conversion successfully, but “with warnings.” You will need to fix these before you upload the file to KDP.
If the error encountered is critical, Kindlegen will abort the conversion at that point and tell you why so you can fix the problem. This can be anything from images that are too large to meet the file size restriction to non-existent support files or incorrectly entered information that is required for the ebook to function properly (such as missing navigation data or manifest entries).
Notice that the first portion of the log extract above is given to your metadata values (I1047 entries), although the final one - region-mag - does not get added until after the files are parsed (I1002); only then does Kindlegen determine whether or not your ebook contains region magnification, and it sets the metadata value accordingly, regardless of the value you have entered.
It then proceeds to build the PRC file (Palm Resource Code, the forerunner of the Mobi format on which Kindle files are based), resolves any hyperlinks, as well as determining the “start reading” location (based either on your Guide entries, or NAV data).
Page Maps
After this you will notice a line (I8000) that states “No Page map found in the book”. This is because the Kindle fixed layout format does not support Page maps, although you can add one if you like. Page maps are used to align an ebook’s pages with the print edition of that title, and it’s how Amazon adds “Real Page Numbers” in the reading progress indicator at the bottom of the Kindle.
A page map is simply an xml file that provides this page numbering information as a “map” - much like the Spine in the OPF, but with its own terminology:
<?xml version="1.0" encoding="UTF-8"?>
<page-map xmlns="http://www.idpf.org/2007/opf">
<page name="1" href="page1.xhtml#page1" />
<page name="2" href="page2.xhtml#page2" />
<page name="3" href="page3.xhtml#page3" />
<page name="4" href="page4.xhtml#page4" />
...
</page-map>
The anchors (#page1, etc.) are used to mark specific line locations within a given file as the start of a new page, since in reflowable ebooks this could be anywhere. In fixed layouts, of course, each page in the ebook equals one page in the print edition as well, so the anchors are unnecessary.
Also note that you can use Roman numerals for Front Matter, and even leave the name value empty for pages with no numbering, such as the Table of Contents.
If you do include a page map, also be sure to add a reference to it OPF manifest:
<item id="pagemap" media-type="application/oebps-page-map+xml" href="pagemap.xml" />
And in the top-level Spine entry you need to add the following page-map portion along with your toc=“ncx” tag:
<spine toc="ncx" page-map="pagemap">
where the page-map value is equal to the id value you entered in the manifest.
However, there is currently no real reason to do this in the Kindle fixed layout format, since these page numbers do not actually show up, even when a page map is included. Only a “Location” number is given on the progress indicator, as well as in the “Go to Page of Location” menu, where the “Page” button is inactive.
In essence, page maps are irrelevant in fixed layouts, since each page is given it’s own numeric location number, making this the de facto page number. That said, some day Amazon might start to include page maps in fixed layouts as they do in reflowable ebooks, so that real page numbers and Roman numerals can be added. If so, you now know how to use them.
As a final note on this point, I should mention that the lack of a page map is not considered an error in Kindlegen, and thus does not receive a warning. You can simply ignore this information.
Mobi7 vs. KF8
Finally, you will see that there are two sections near the bottom that each create a PRC file (I1017). The first of these creates a basic mobi version of your ebook (V6):

Notice that the record count is only five entries, whereas there are 18 pages in the book. This is because mobi7 is an older version of the Kindle format that does not support fixed layouts, and is used to produce a version of the ebook that can be read on older Kindles. This is only relevant to reflowable titles, but this part of the conversion process still takes place regardless. Here it has converted all the individual pages into a single reflowable HTML file compatible with older devices, as well as removing all the CSS files, so that only the NCX, OPF, and images remain.
This is pointless for the most part where fixed layouts are concerned, as this version of the file will never be available for download on Amazon, since Kindles that do not support fixed layouts present a message telling users that this ebook is not compatible with that device or app. Why Kindlegen does not bypass this portion of the process when it reads the fixed-layout=“true” metadata entry is beyond me. The mobi7 data can simply be ignored when building fixed layout titles.
Below this is where the real conversion gets underway:

Here Kindlegen starts building the “enhanced” PRC file, which is file format V8 (i.e. KF8). Note that there are a few additional lines where the various media id links are resolved (these are the links to images and embedded fonts), and the guide items are sorted out. The record count now shows that all 18 pages have been parsed and compiled.
And finally we get a statistic that shows how much the text has been compressed. This has nothing to do with how much compression has been applied to the images during conversion, but applies only to the text content. And since fixed layout files tend to have far less text than standard reflowable ebooks, this will be a fairly unimportant statistic in most cases.

What is important are the two lines near the end which give the final deliverable file size for both the standard mobi7 version and the KF8 fixed layout file that has just been created. Both of these are packed inside the converted file, along with a copy of the original epub source content, which makes the output file much larger than the one we started with. What these last line entries tell us is how large the actual files are that will be delivered to the buyer.
Here we have a Mobi file that is 4272 kB in size (4.27 Mb), while the KF8 version is just slightly larger at 4445 kB. The file that has been created, however, is 17,080 kB, as it also contains the 12.6 Mb epub archive. Amazon keeps a copy of the source files so that new conversions can be done when updates are available without having to re-upload the file every time.
And, of course, finally, the last line is the one you ultimately want to see, telling you that your ebook file has been built successfully. If you get an appendage to this message that says “but with Warnings” - or the dreaded abort message - you will need to go back through the log and find the entries that are marked as such and fix the errors.
Mobi Unpack
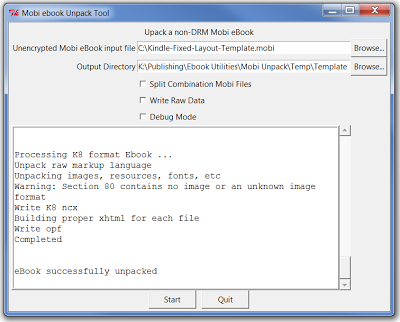
While the Kindlegen log shows the percentage of compression applied to the text content, the only way to see how much your images have been compressed is to unpack a converted file and look at the image file sizes.
Mobi Unpack is a python script that allows you to do just that. You simply double-click the script to launch the graphic interface, then enter the location of the mobi file to be unpacked and the output location where you want the file’s contents to be extracted. You do not need to worry about any of the checkboxes unless you’re doing more advanced analysis procedures. Click “Start” and in a matter of a few short moments the ebook will be successfully unpacked.
What you’ll find when you look at the extracted contents is a zip file named “kindlegensrc.zip” (which is your source epub content), a log file containing a record of the conversion process (which also appear in the interface window during the conversion), and one folder each for the mobi7 and mobi8 content.
kindlegensrc.zip
kindlegenbuild.log
/mobi7/
/mobi8/
Inside the mobi7 folder will be the compiled HTML containing all the content in one file, along with the OPF and NCX, plus a folder for your compressed images.
The mobi8 folder, however, now contains some extra files that were not in the source epub. These are actually required for an epub to function correctly, but Kindlegen creates them for you automatically. These are a mimetype file and a META-INF folder containing a container.xml file. Unlike when you build an iBooks file from scratch, here you do not need to mess with these at all.
There will also be an actual epub file that has been created from the converted and compressed content, which will be much smaller than the source file that you fed into Kindlegen, and of roughly the same size as the mobi7 file.
A second folder labeled OEBPS holds all the ebook content you created, with a few exceptions. First, if you have included a Nav document or page map, these will inexplicably be gone. Clearly, Amazon are now supporting the ePub3 Nav Doc for basic functionality, so it must still exist in the compiled Kindle file, but in the extracted folder it will be absent, It is, however, still present in the kindlegensrc zip file, so this is something Mobi Unpack is doing, and not Kindlegen.
The other thing you’ll notice right away is that the folder names have changed, along with the names of all the files they contain. The /html/ folder will be renamed /text/ and the /css/ folder will be called /styles/. But these are minor in comparison to what has taken place to your content files.
Every file in each of the folders will be renamed with a numeric string, based on the order it appears in the publication. So, for example, you images will be called “image00001.jpeg”, etc., and your pages labeled “part0001.xhtml” and so on. This makes it a little more awkward to find out which file is which, but of course for images it’s easy enough to see by using thumbnail view.
By looking at the images in the extracted folder you can compare their file sizes to the ones you added to your source epub, and get a good idea of how much compression is being used. The amount will vary greatly depending on the color depth and complexity of each image, as well as how large the image was to begin with. Kindlegen will reduce the image quality by up to 40% to get them within its limits, so the difference can be fairly significant, both in terms of file size and image quality.
One more thing that may be of interest is to look into the OPF. I warn you upfront, however, that it will not be a pretty sight. All you hard work organizing and creating clean, easily readable code will have turned into an endless stream of seeming doggerel. And not only are all your lines run together, but a whole load of new data will have been added as well.
In a section prefaced by the comment “The following meta tags are just for information and will be ignored by mobigen/kindlegen” you will find a number of extraneous entries regarding the conversion format and build version. And once your ebook has been uploaded to KDP and a purchased copy is downloaded, there will be even more.

Testing The File
Now that you have a converted Kindle ebook you will need to test it thoroughly to be sure it working properly. You can, of course, look at the converted file in the Kindle Previewer, using its various device emulation modes to see how it looks on different readers. I have already talked about Previewer’s shortcomings, but you may find it works just fine for you, and provides as much testing as you need.
The obvious drawback to this approach is that none of your readers will be viewing your book that way, and so at best it’s only an approximation of what the end user will see. To be certain that your product is functioning correctly and at its optimal best you really need to test it on at least one actual Kindle app or device.
The quickest and easiest (as well as cheapest) way to do this is to install the free Kindle app on your computer. Once installed all you have to do is double-click on the converted Kindle file and it will open in the Kindle desktop application, where you can scan through the pages, test the zoom functions and links, and see how your page layout actually appears when rendered. Be sure to click on every link and test out every feature that you’ve added so there are no harsh surprises down the line when customers can’t get something to work.
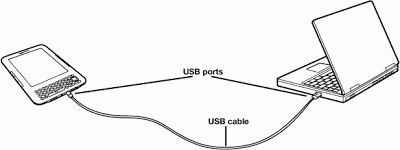
If you have an Android phone or tablet you can also download the free Kindle for Android app and “side-load” your ebook onto it. Side-loading is the process of manually transferring a file to a mobile device. You do this by connecting the device to your computer using a USB cable (one of which usually comes with the device), and then dragging the file from your computer to the appropriate folder on the device. On Android devices this will generally just be the Kindle folder, but it may have a “books” subfolder as well. Also be sure to eject the device before you unplug it and open the Kindle app, otherwise you’ll find there are no ebooks in your library!
Of course, even better is to test your files on at least one physical Kindle device as well, if not more. Many features only work - or work differently - on a device rather than an app. Refer to the table in Appendix A for a list of functionality variables among the Kindle readers. A lot of unnecessary frustration can be avoided by testing features only on devices that support them!
I highly recommend that you invest in one of the latest Kindle models to do your testing. It is a small outlay for something that will provide virtually unlimited usefulness, particularly if you plan to sell the ebooks you produce.
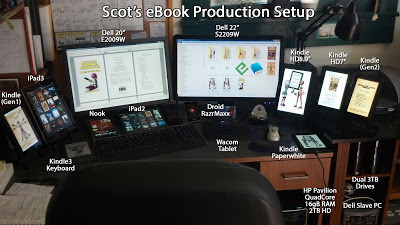
Above is a shot of my current ebook testing setup. It is
admittedly a bit excessive, but I share it to make the point that you can never
test a file too much, only too little. It is also very helpful to have multiple
devices side-by-side so that you can see exactly where things are working
properly and where they are not. But so long as you can get your book to work
on at least one Kindle device you should be more or less good to go.
A few additional points should be made here regarding the
Kindle testing process.
First, when transferring (side-loading) files to the Kindle
devices you will find them on the Docs tab rather than in Books. This is due to
a shortcoming in Kindlegen (intentional or otherwise), which does not allow for
the addition of the EBOK metadata value that creates this distinction:
<meta
name="CDE Type" content="EBOK" />
This meta entry will be added when the file is uploaded to
KDP, so if you download that file and load it onto your Kindle it will appear
in the Books tab. But any other ebooks that you side-load are considered
personal documents by Kindle and will appear in the Docs tab instead.
As a side note, Calibre will also add the “CDE Type” metadata
entry when it converts files. Unfortunately, it cannot convert fixed layouts as
of yet. Also, if you do go ahead and enter this value in your OPF, Kindlegen
will not only ignore it, but will, in fact, actually delete the line!
Lastly, there are some important differences between the
older Kindles and the newer models that come into play here. While the older
models actually delete a file from the device when you tap on the book and hit
“Delete from Device,” the newer HD models and the 2nd generation Fire retain
the file on the device and only delete it from the library.
This has repercussions if you’re testing features that are
only activated on first opening the book, such as the start location. You will
also notice that when you drag a newer version of the file to the device in
Explorer or Finder that it gives you the Copy/Replace pop-up window.
So if you want to add a clean instance of your ebook to a
device you’ll first need to manually delete the old one from the Books folder
on the Kindle, along with two other items that you might find there, the first
being a .luci folder with the same name as your ebook, and the second a .embp
file that you’ll find in the Sidecars folder. These store location and other usage
data associated with that title.
While this is sometimes a nuisance, there is a
major benefit that has been added to the new devices that offsets it amply. And
this is that you no longer need to eject the device from your computer before
you can view your ebook on it, as you do with the older Kindle models. This
saves you a great deal of time when testing, as you’ll be transferring the file
many times and often.
Once you have an ebook file that is working correctly and
looks the way you want it to, upload it to KDP and then download the preview
file. You now have a fully functional Kindle fixed layout ebook that you are
free to do with as you like. Congratulations! Here’s to many more!

Published on April 07, 2013 21:58
March 31, 2013
Kindle Functionality Update 3.0

With the release of the new "3.0" updates to the current Kindle Fire line, as well as those to the 1st Generation Fire (6.3.2) and the Paperwhite (5.3.4) earlier this month, it was time for a new round of functionality testing.
This brings all of the primary Kindle devices into the 3.x operating system, and enhances, repairs, or alters many of their features. And it turns out to have some fairly significant changes, although as always, they are far from ideally implemented, for a variety of reasons.
So for the past two days my Kindle lineup has been undergoing a battery of tests using a series of fifteen different files created solely for the purpose of creating a carefully controlled set of variables in different combinations:
The three book-type values
The presence or absence of Region Magnification
The presence or absence of a Navigation document
The inclusion of an HTML cover file
The use of the "layout-blank" Spine property
This last one is a whole new issue that has grown more convoluted with each update since its introduction, and I have added a new section in the Kindle Fixed-Layout Functionality table just to deal with it. In fact, the entire chart has been thoroughly updated to accurately represent the current state of these issues. I have added a whole new series of footnotes to the table, and a new and fairly lengthy update at the bottom of the commentary section, so be sure to read that for a complete breakdown of what's been done in these updates. Here I'll just give a quick rundown of the major changes made. First, to the Functionality chart itself, I have:
Updated virtually every section of the table and at least a few features of each device.
Added half a dozen footnotes to the table, bringing the total to 14.
Added commentary updates to sections 1. Virtual Panels, 6. HTML Cover Doubling, 7. TOC Menu Link, 10. Hyperlinks, and the new section 11. Layout-Blank.
Deleted the Cover Image Access data, as this issue has been resolved in all instances.
Deleted the Font Embedding section, as this is not an issue.
Replaced it with the "Layout-Blank" section, which deals with the issue of the "layout-blank" Spine property value rendering pages completely absent in some instances, or always visible in others, neither or which are correct.
Removed the bold styling from all the table entries, as it is getting too difficult in many cases to tell which ones should be emphasized.
Deleted some of the commentary content that is no longer relevant, such as that relating to the resolved cover issue and the Kindle3, which is no longer included on the chart (although it is still being tested, and that data is included in the ebook Appendix table).
Added a nice little picture at the bottom of the post showing my eBook Test Facility.
And among the major changes to the Kindle format itself, some of the main ones are:
Table of Contents menu link has been restored on the Paperwhite.
The inability to access pages with no Spine property value via backwards swiping has been resolved.
New menu options for Animation and Fit To Screen are available on the Paperwhite when Virtual Panels are active and the "comic" book-type is chosen.
Cover doubling issue now effects the entire Kindle line when there is no NAV doc present, with the sole exception of the Kindle 3 Keyboard model.
Virtual Panels now function on the HD8.9, but with the same conditions as the Gen2 Fire, and now the HD7 as well.
Images now only magnify up to their actual size, and do not shrink below the display size, when using Pinch & Zoom with Virtual Panels (this may have been the case before, but I've only just now noticed it, since Virtual Panels works in so few cases).
MagRegions on pages that contain text layers are now completely broken in the Paperwhite with the "comic" book-type value. And the image centering issue has still not been fixed.
Bookmarks have been disabled in comics on the Android app.
2-page spreads no longer appear on the HD8.9 with the "children" book-type chosen (which is utterly inexcusable in my opinion).
And, as it turns out, both internal and external hyperlinks are actually still non-functional on the 2nd Gen and HD Fire devices where the "comic" book-type is entered and there is no RegionMag code present in the publication. So the issue is not completely fixed.
For more details on these, and several other issues related to these latest updates, see the table and its associated commentary. And please let me know if you find any discrepancies, as this one was a real bugger to work out without going completely mad.

Published on March 31, 2013 19:42
March 28, 2013
Kindle Fire Updates Add Audio/Video Support


A new update rolled out to the Kindle Fire line this morning, with enough additions to give them all a new version number - 3.0 - with the HD8.9 jumping all the way from 8.1.4 to 8.3.0, bypassing an 8.2 update altogether. The HD7 model upgrades from Version 7.2.4, while the 2nd generation Fire moves up from 10.2.6, so that all of the current Fire line are at 3.0. The last update to the HD models came back in December.
Both the Paperwhite and 1st generation Fire got an update earlier this month, but those were mostly cosmetic. The changes here, however, are far more significant, as indicated by the version leap.
Among these are "enhancements" to Print Replica Textbooks that allow you to scroll through thumbnails along the bottom of the screen (much like on the iPad), as well as adding notes and highlights. In addition, X-Ray for Textbooks was added to the HD7 and Fire, though no mention was made of it for the HD8.9 - it may already have it, I'm not sure since I haven't used it for textbooks. All three devices already had the standard X-Ray for books feature. Neither was there any mention of the new X-Ray for TV feature that was announced by Amazon yesterday.
What was added, however, was the Time To Read feature that tracks your reading speed. This has actually become a favorite feature of mine, since reading time is all-too scarce in our busy lives. This feature helps to keep me focused and gives me an increasingly accurate estimation of how long it will take to get through a book, or just a chapter, or even a single page, letting me know at a glance if I've got time to finish off the next section before the next scheduled event arrives.
Also added to the Fire line is support for Simplified Chinese, with the 8.9 device finally getting the inexplicably missing Language option in its menu. Until now there has been no way to change the device language once it's been set upon registration. The HD8.9 will now allow both US & UK English, as well as German, French, Italian, Spanish, Japanese, and Chinese (Simplified).
But finally, and most importantly to my mind, is the addition of support for Audio & Video content. This adds a whole new chapter to the Kindle Editions saga. The Kindle Publishing Guidelines has had an entire section devoted to adding audio/video content since the very first edition, but until now only the Kindle of iOS app supported this content. It will be interesting to see how well it works, and what new content appears now that it's possible to embed these media formats for use on more devices.
So in order to try out these new features I purchased the Enchanced Edition of Cloud Atlas this morning (a book I've been intending to read for some time), which contains bonus video content featuring unreleased footage and interviews with the author and film creators. These are simply appended to the ebook as additional features, very much in the manner of appendices. But it was really nice to see and hear the author speaking in his own words. It gives a face to the creator of the book and adds another level to the reader's interaction with the story. Also, it's always fun to hear from Tom Hanks! One video I was surprised to find was not included was the trailer for the film - a natural add-on if there ever was one.
This now opens up a whole new chapter in the Kindle ebook story, and it will be exciting to see what intrepid content creators come up with. It's a far cry from interactive audio and video integrated into the page layouts, such as those found in many children's ebooks, but it's a start, and a step in the right direction. The primary stumbling block that I can see is Amazon's reluctance to allow large file sizes for their ebooks, due to bandwidth use most certainly. It also takes up more room on the device. But with cloud storage becoming the standard, this won't be a problem for much longer.
It does, however, mean I'll have to write a whole new section to my Kindle tutorial...
UPDATE: I have added a new note to the Fixed-Layout Functionality Chart regarding an issue with today's update.

Published on March 28, 2013 17:20


