
Emily Henderson's Blog, page 12
July 1, 2025
Design Coaching Update: You Have To See How Much Progress Chrissy And Pete Have Made

Big things are happening in the Cambor household! If you’re new to this “design coaching” project, let me catch you up to speed! Back in January, Emily wrote a post asking for people to submit their upcoming design/renovation projects in the hopes that she might be able to offer some insight and wisdom as someone with a lot of remodel experience under her belt. She wouldn’t be taking over the design or project management of someone else’s project, but she’d act more as a backboard–bouncing off ideas, advice and past learnings, as questions or design conundrums came up in the process. Chrissy and Peter Cambor submitted their kitchen renovation and it felt like just the right project to take on. In just a few months, they’ve made a TON of progress.


In our last update post, the final kitchen layout had been decided on, IKEA cabinets and stone countertops were purchased and demo was underway. Well, now it seems the kitchen is nearly complete! Pete had a lofty goal to finish the remodel by Chrissy’s birthday (June 22) and apart from a few finishing touches, they’ve pretty much met their deadline! WILDLY IMPRESSIVE. But hold on – this is not a reveal post just yet! There is PLENTY of fun process to catch you up on–so let’s get right to it.

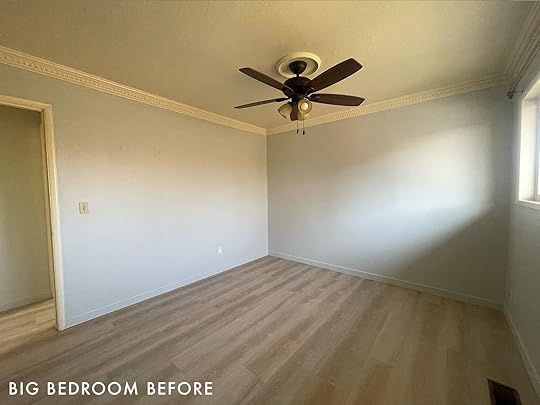
A quick reminder–this was their kitchen before. They have been pretty great about documenting their remodel journey and Pete had a lot of helpful things to say about how it’s been going so far. He’s done a ton of the hands-on work himself, only hiring out where necessary, but leading this renovation with great DIY success. Here’s what he had to say:

“To be clear – all of this is very doable, if not time-consuming. I am by no means a construction expert – I am a very JV DIY type of guy (I am sure there will be plenty of head scratching by some who look at my handiwork). I think it is important with DIY to remind yourself that you are GOING to make mistakes, and almost everything can be fixed at minimal cost.”

Here’s the gist of what all they’ve finished since we last checked up on their project:
Completed demoFinished drywall and bumping out the wallMoved and added a new windowBuilt & installed IKEA cabinetsInstalled stone countertopsInstalled appliancesTiled the back wall
One of the first things to address after demoing the old kitchen was the wall that was shared with the powder bathroom. The original corner cabinets receded into the wall initially, which meant that post-demo, they’d need to bump that wall out to make it flush. They originally thought this would add a little square footage to the bathroom, too, but Pete says, “We couldn’t open up the bathroom because there was water piping running upstairs in that bathroom wall – so we just popped some framing to make the new wall squared off with the kitchen. Even though we technically reduced the square footage of the room, the room actually feels LARGER. It’s just great.”

Simultaneously, they tackled arguably the most crucial part of the redesign–building and installing the IKEA cabinets. They went with the AXSTAD blue kitchen cabinet fronts.
“The cabinets from IKEA are great. The product has improved a lot over the last 15 years (in my opinion), and once you get into the swing of it, it is very doable. Our approach was to build the interior (the bones, if you will) of the cabinets in the 10 days leading up to the install. So basically, we would do a few a night, and just stored them in our living room. It was annoying in that it was inconvenient to have them lined up in our living room, but it made install day way easier. We hired a great group to come in and do the demo, which took about 4 hours, and it took me the rest of that day and the following day to install the cabinets and really get them dialed in. This included building a brace for the island (the cabinets have to be supported against something).”

“Here you can see the beginning of the island taking place. The 2x4s are there to support the cabinets and give them something to latch onto. Notice the gap in the 2×4 support structure. That is for the periscoping downdraft vent. This photo is before we had to move the gas line and vent location…”

Unfortunately, Pete discovered that the gas line and downdraft vent needed to be moved to line up perfectly with the periscoping vent fan that pops up behind the stovetop. They hired someone to move the gas line and the vent, but Pete was able to take care of the electrical. The red circle is where they had to shift everything to.
“The periscoping vent fan was the most stressful part of all of this, as it required total precision to line up behind the cooktop and for the [stone] fabricators to make the cut just right. I lost many a night of sleep over this, and had to constantly adjust, even a bit on the day with the fabricator. In the end, it all worked out, and we would have found someone to install it, but we had trouble locating anyone who had any experience in installing a periscoping vent.”

“Here’s a better look at the structure that supported the cabinets in the island. And shout out to Mountain House Camping Meals – I ate a zillion of them when the kitchen was out of commission. Mac and Cheese and Lasagna, I highly recommend (the kids were partial to Mac and Cheese).”

Either side of the island required a clever way to cover up these support beams, so they opted to waterfall their stone countertops. This also carved out a great spot for barstools along the backside (something many readers also suggested!). They had initially planned for cabinets on this side too, but ultimately, there just wasn’t space, so a spot for stools was an easy choice. Here’s what Pete had to say:

“The waterfall is great. We were definitely hesitant about it at first – from a design point of view, they were not our first choice, but we felt it was the best way to deal with making the IKEA island work. Due to the cooktop being on the island and the periscoping vent fan, there would have been a large gap in the end panels. The waterfall ensured this was covered seamlessly.” For the stone, they went with a quartz slab called “Enigma”.

“Here I was prepping for the top cabinets – this bracket had to be perfectly level and at just the right height for the IKEA cabinets. These were for the cabinet above the fridge and the oven/microwave. We had to move the 220 outlet, which was a bit of a thing, so we also hired someone to do that.”

Apart from a few hiccups and stressors, the bulk of the kitchen work was done, and then it was time for tile – something else Pete (and Chrissy!) tackled DIY-style. They finished up the surrounding drywall, making sure to prime the backsplash wall, which helps the mortar stick. Initially, Chrissy and Peter were pretty set on Pratt & Larson’s Idris Field tile in Pearl Gray, but after careful consideration, they instead opted for Zellige in ‘Casablanca’ by Zia Tiles.

“We ended up going with Zia Zellige Tile – which we really liked. Nice and thick, and all of our tile came UNHARMED. A few of them had some blue blemishes, which I am told is par for the course. Chrissy and I thought that ‘Casablanca’ would just brighten up the room a bit. And we LOVE it. Totally stoked. The Pearl Gray was pretty, but the white is just lovely.”

Before they could start with the install, they had to soak all of the tile in room temp water for 1-2 minutes, per the installation instructions. Chrissy mentioned that this releases the air bubbles in the clay, which you can see in the picture. Zia Tile also recommends this for glazed tile to remove dust and residue, and to make sure the tiles adhere properly. And here’s Pete’s “how to” when it comes to installation:

“The technique – take the mortar and use this thingy that has lines (super technical here) and spread it on smooth. Then make lines.”


“Then [apply mortar and] make the lines on the tile so they are perpendicular (there are like a million YouTube videos about how this creates a suction effect etc etc…).”

“Then you press the tile into the wall, and boom. You are an expert. (One thing – we used no spacers. Occasionally with imperfect tiles, we used a spacer, but for the most part, none. Also, get a laser level. Super important to make sure they are level. Just a laser that points a line at the wall. SUPER helpful. If you don’t have a tripod, get one as well for the level. Bosch makes a good one.”

Chrissy and Pete knew they wanted a sort of vertical border at the base, so they started with that and worked their way up and to the right as they placed the tile. Pete says, “People have all sorts of “ways” you are supposed to line up the tile and plan ahead. We knew we wanted to do this border at the bottom.” So that’s what made sense for them. Both mentioned this was pretty tedious and a pain in the…hands.

And here is the back wall fully tiled! The brackets sticking out of the wall are for floating shelves – something they made sure to plan for and install into the studs as they did the tile. Way easier than drilling into tile after the fact.
“You can see our cabinet fronts as well here – The blue is super dark because we left them wrapped in their plastic lining so as not to damage them during the tiling/grouting etc. Also, the blue tape – very important. Chrissy read about that online – use it to open the drawers and cabinets before you install the hardware!”

For grout, they tried out a few different grays but ended up choosing a color that felt a smidge lighter than the tile – Eggshell by Maipei. For now, that’s about where the update stops. The appliances are in, and it’s now a mostly-functioning kitchen, only missing a few final touches (like the shelves, hardware, and a handful of touch-ups) before the grand reveal.

So how are Chrissy and Pete hanging in there?
“Feeling very tired, but we did stick to our deadline of having the kitchen ready by Chrissy’s birthday – which we sort of hit – the kitchen was functioning and working, which was amazing. We even had it ready a week early for Father’s Day. I’m big on deadlines. What’s the expression, ‘Shoot for the moon, and if you come up short, at least you are that much closer to the moon?’ I’m probably butchering that, but you get it (that expression works for DIY, probably not so much for astronauts). Overall – feeling good – taking a mini break to regroup. A lot of late nights and sore backs. But we are getting ready to dive in on the lights, the hardware, and the bookshelves!”
A big thanks to Peter & Chrissy for sharing all of their kitchen DIY learnings with us, not to mention taking great process photos along the way (not always an easy task). We are so impressed with their FAST progress, and it’s been awesome to see their vision from the beginning to now. Many design shifts were made along the way, but all for the better. I think the next time we see their kitchen…it may just be ready for some profesh Kaitlin photos and a few styling touches. Stay tuned!


June 30, 2025
Your Blue Color Palette Is Probably Not Complete: Here’s How We’d Fix It (Using Real Reader Homes)
Over the course of my tenure at EHD (I’ve been around since 2018 off and on), I’ve seen into a ton of reader homes. It’s always so much fun for me to see how other people live; it speaks to my inner home voyeur. But you start picking up on things when you do it enough, and something I noticed over and over again in many submitted homes was that the color palette was falling short. I found this to be true particularly in the ones where help was being sought out for color or just a general sense of “make this better!” The majority of these rooms were built around blue and neutrals, which makes sense for fans of Emily’s style, of course.
So today, I’m revisiting some images that fit the bill for the above. They’ve been sitting in my email for a variety of reasons, such as not being selected for the original post they were submitted for, and it’s time they saw the light of day and get some of our EHD-approved feedback. I’ll break down my thoughts on their color strategies, establish some blue color palette rules, and then study some of Emily’s rooms and build expert palettes pulled from those.
Let’s go!
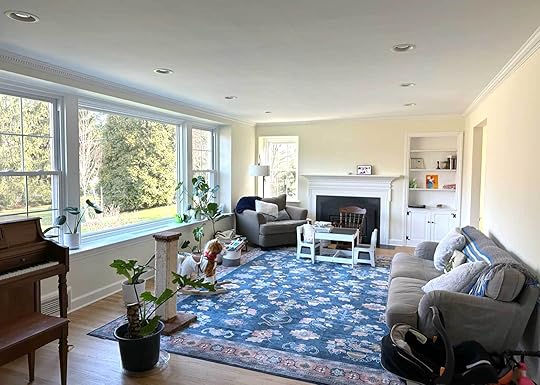
Let’s Look At Some Reader HomesThe below image was featured in a post I did in recent months about finisher pieces; meaning, rooms that readers felt were unfinished or just not quite there yet. In this home, at first glance (and per the reader request), the issue was the curtains. But as I looked at it a bit deeper, I realized the *true* answer to what the owner was seeking was the color palette, and yes, the curtains could solve that by introducing another layer of color.
In general, I find that most rooms readers were labeling as having a blue color were really just neutral rooms with a pop or two of blue. The base was essentially a mix of cream, or gray, or white, there were some wood tones typically in the same tonal family sprinkled around, and then a blue thing here and there. I totally understand why, though. Adding color into our homes in any substantial way can feel very risky. What if you tire of it? What if it feels too loud or bold or suffocating? Certainly, a neutral foundation makes the most sense to build from, right? Well…yes, in theory, but look, if you are a person who likes to have some color in your rooms, there *is* a way to do it without it feeling like you’re living on the set of Austin Powers. I’ll go through some rules in just a bit, but let’s keep exploring some homes first.
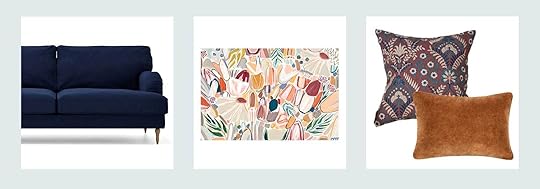
In the finishing piece post, I recommended some curtains that I know the reader actually ended up buying. Here’s how else I’d round it out, adding in some green via the curtain fabric, a throw pillow, and then a touch of soft steely blue for some variety with a throw (to be put on the brown leather chair):
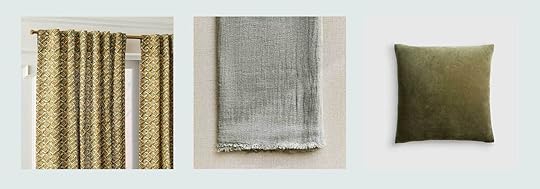
Pierce & Ward Floral Lattice Curtain | Fringed Linen Blanket | Classic Cotton Velvet Pillow Cover

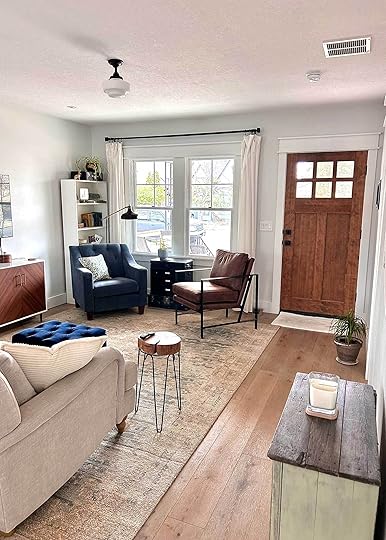
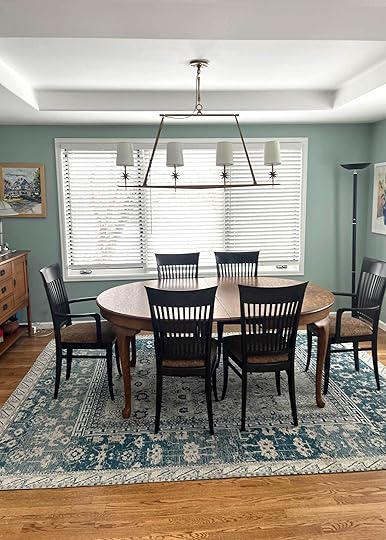
Next up was this home (above), that was submitted during my Fix It Friday call for assistance with color palettes. This room is beautiful. The architecture offers a lot; the fireplace is stately, and it has great bones. I can see from the blue pillows and the turquoise planter that the person who lives here is okay dipping their toe in color, but feels safest in a warm neutral territory. This is, of course, totally fine! But we’re here to talk about A+ color palettes (and again, that’s what they were asking for from me originally), so let’s break it down. While there is some variety thanks to the hit of black from the frames and mantel, the cream walls, rug, and cognac leather sofa could use some friends.
As you’ll see in my rules, it’s not just about adding in more blue, though in this case, I would. Taking some more chances with the pillows, an interesting throw, and something punchy (maybe a slate velvet chair) in the corner where those plants are now would be the first layer. Then, I’d bring in two additional accent colors. It could be via curtains, art, a few decorative accessories, or even something as subtle as a trim on a pillow. It doesn’t take much, but it’s all about intention. Maybe even something like this:
Accent Chair | Vase | Striped Pillow | Dark Blue Pillow | Lumbar Pillow
Here’s another. Similar home vibes in that they have traditional architecture, pretty windows, a fireplace, and mid-tone wood floors. Everything is neutral except the rug, which is very rarely enough to say anything. In my personal and professional experience, the lack of a locked-in color palette is where most rooms stay in novice limbo. Here, I’d pull from that rug, and even that one small colorful piece of art on the bookshelf, to create something a bit more robust. This room gets amazing light, so it can take on almost anything!
I’d consider a fun slipcover on the sofa and chairs to liven up the gray, bring in some warmth with burgundy to play off the pink, warm earthy tones like rust and orange in accessories, an amazing piece of eye-catchy art above the mantel, and simple window coverings in a warm neutral.
Stocksund IKEA Sofa Linen Slipcover | Art | Patterned Pillow | Lumbar
I didn’t include a window covering in the products above, but a flax or oatmeal curtain or shade would be really great to add a little contrast against the buttery walls.
Now here is a space that leaned into the blue, which I love. But there are two things I believe it could use to get it to the next level: varied blue and wood tones. The floors, table and sideboard are in the same range of brown, so in theory, either swapping either the sideboard or table to something lighter (as the chairs are already satisfying that dark tonal range) would make things more interesting. Not everyone is in the business of swapping out furniture, of course, so there are some other fixes: The brown on the seats can be easily reupholstered with a lighter neutral fabric, or even something that brings in more color and pattern. Even a subtle stripe or a solid hue (perhaps a rust or olive green) would work wonders. From there, I’d swap (or refinish) the frame on the art to widen the spectrum in here, and add in window coverings that complement the new seat upholstery.
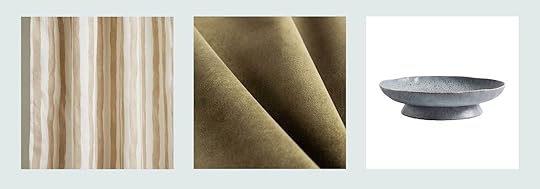
Curtains | Upholstery Velvet | Low Footed Bowl
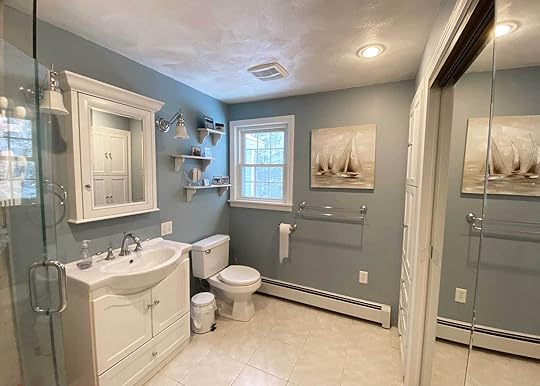
Finally, this bathroom. Soft and serene, yes, but perhaps just too stripped down in terms of color. An all-white bathroom can be beautiful, but when you go monotone, you must add textural differences. The homeowner here, as I remember, was tired of the blue walls and wanted to repaint, but I think the blue is lovely and just needs some more friends to play with. A rug, a trash can perhaps in more of a natural material like rattan, neutral towels with an interesting border or trim, and new art would reinvigorate this room so that no annoying painting has to be done. Even the medicine cabinet, if in the budget, could be swapped to something wood in order to break up all the white finishes. I’d even go as far as to say to do MORE of that blue, on the ceiling, to really hug the space. But that’s just me.
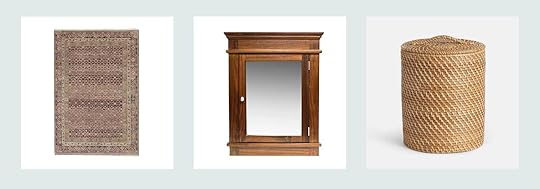
Rug | Medicine Cabinet | Waste Basket
Okay, time for some rules, because it wouldn’t be an EHD post without them.
Good Blue Color Palette RulesMix in multiple blues! I’m starting with the most crucial of rules for a blue color palette if you want it to feel robust and interesting. Using just the same medium or dark shade of blue in a few places of your room is stopping you from accomplishing that look you’re likely after. The key is to have at least two, if not three, shades of varied blue tones throughout your space.Avoid the “pops” of color strategy: Sorry if you’ve heard me say this already in the past, but I’m really just not a fan of a “pop” of color in a neutral room. A “pop” of red in a well-balanced room? Sure! A pair of blue throw pillows in a white and gray room? Nope. Have intention, people! Have your blue or blues be a main character in the design. This means on your walls, on your furniture, in your art, on your rug. Blue should be on at least two major surfaces.Vary your wood tones and brown tones. Just like with your shades of blue, you have GOT to bring in some variety to anything brown in your room, such as your wood furnishings, floors, and leather. Ideally, you’ll have a good mix of light, medium, and dark tones, but at least two of those should do the trick.Introduce supplemental colors. This is where most color palettes that fall short fail; they simply do not have enough else going on to be interesting. You need two to three additional colors to round things out, especially if you’re working with white walls. They don’t have to be huge moments, but they should come in as an accent on a rug, pillow, curtain, or even something as subtle as a single piece of decor.Make sure there is enough contrast and warmth. And while I’m at it, limit your gray, too. Blue color palettes that have too much gray or other cool tones without the contrast and warmth of something on the opposite side of the color wheel end up feeling cold and a bit dated.Add neutral pattern and texture. Pattern doesn’t have to be loud and dramatic. Your room will not end up feeling like a bag of Skittles exploded in it; I promise. To avoid your room feeling flat, bringing in moments of subtle pattern and texture in neutral colors will make it sing.Now that we have that established, I want to put together some blue color palettes pulled directly from some of the rooms in Emily’s farmhouse. She’s no stranger to blue, in fact, it’s her signature color as we all probably know. But there’s a reason the rooms feel full, intentional, layered, and that’s due in large part to fully rounded out color palettes.
EHD-Approved Blue Color Palettes (Pulled Straight From Emily’s House)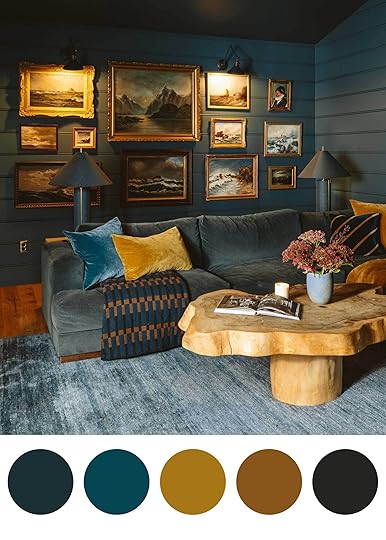 photo by kaitlin green | from: family room reveal
The family room in the farmhouse is an ode to blue. About 90% of the room is a similar shade of deep blue with greenish undertones, but to satisfy Rule #1, Emily brought in a brighter punch via the sharper aqua pillow. Two blue shades > one blue shade. From there, she added tons of contrast, which is needed in a monotone space like this, with earthy ochres, browns, and rust. Black detailing in the throw and sconces grounds everything nicely.
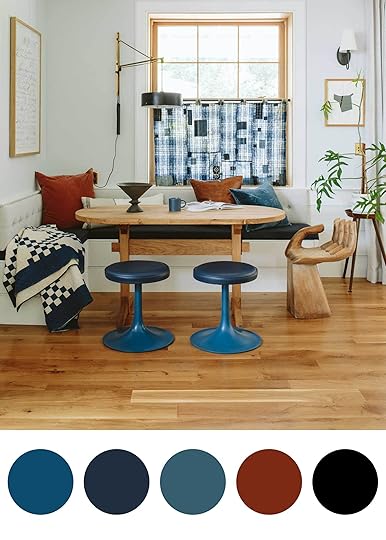 photo by kaitlin green | from: dining nook reveal (round two)
In contrast, the breakfast nook is light and bright, but still follows the blue rules above. Two to three shades of blue are satisfied: here, we have a deep navy on the throw, the seat upholstery, the leather tops of the stools, and the cafe curtain, then a brighter cerulean on the bottoms of the stools, and a dustier blue on the throw cushion. From there, rust-hued throw pillows bring in an accent, a dark wood side table adds to the mid-tone wood floor, table, and window framing, and black accessories and lighting, yet again grounds things.
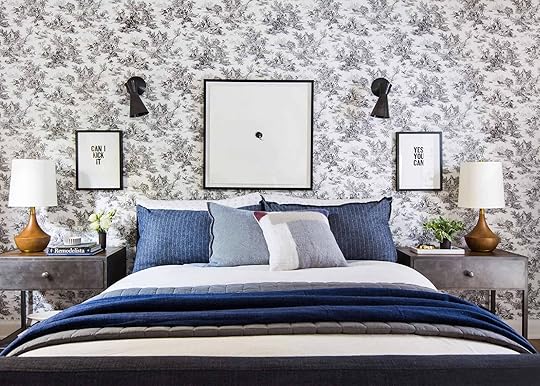
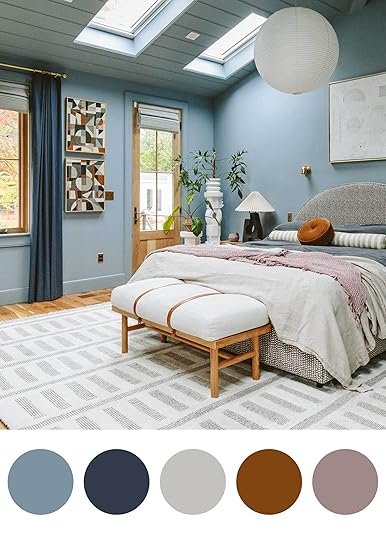 photo by kaitlin green | from: primary bedroom reveal
Emily’s primary bedroom is a perfect example of being super intentional about a color. She wanted blue, so she went all in. A dusty blue on the walls and bedding, a deeper blue on the curtains (and on the fireplace wall on the opposite side of the room). She continued the warm earth tone accents from the dining nook (and other areas of the house) in the throw pillow, art, and even the leather straps of the bench, and the mauve throw softens things nicely.
I also want to point out her use of neutral patterns, which can be such a help in making a room feel robust without being overly loud. The rug is neutral, but the low and high piles, as well as the dashes and lines make it interesting, but doesn’t overpower anything. Same goes for the Rebecca Atwood bed fabric. It’s like how they say people who speak quietly hold more power than those who yell, because it invites you to move in closer, listen more intently, and connect more.
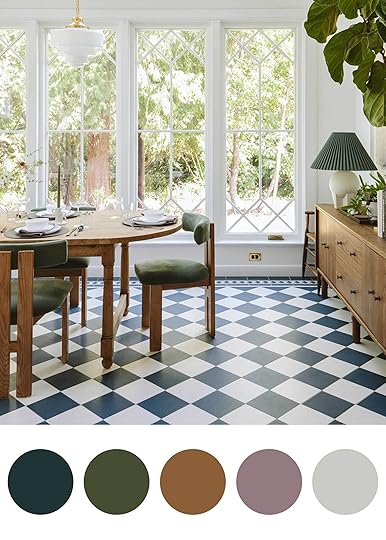 photo by kaitlin green | from: sunroom reveal
And finally, the sunroom dining space. At first look, you might think “this isn’t a blue room” but ah! It is! You can love the color blue and not have to make it everything in a space. It can be equally balanced with another start color (like the green here). If you want a specific shade of blue to stand alone in your home, pick another color as its sidekick and use it in equal amounts, but be sure to bring in at least one or two other colors and tones to make it interesting. Here, the subtle mauve napkins on the table (which, no, are not always there but look nice here) are that supporting color component, as are the beautiful wood tones of the furnishings.
SO! There are my thoughts on how to make a blue color palette truly sing. I know it can be daunting; trust me, I even struggle in my own home, and I’m a certified color lover. When is it too much? How do you balance it all? But I promise, if you identify with any of the reader homes at the beginning of this post, and you work through the rules for your spaces, you’ll see a huge difference in how you feel about them. They’ll feel more polished, robust, and intentional, all three things that come together to create beautiful rooms.
Good luck, send photos if you make any changes, and see you next time.
Opening Image Credit: Design by Emily Henderson | Photo by Kaitlin Green | From: Introducing The Next Room…Robyn’s Welcoming Patterned Dining Room Reveal
June 29, 2025
The Link Up: Em’s New Family Wall Frames, Gretchen’s Breezy Summer Pant, And A Great New Collection
Happy Sunday, everyone. In case you missed it, Emily and the amazing PDX gals made the best YouTube video. In order to start what we are officially now calling “The Carriage House” (the other home on her property from the 1850s), a major clean-out has begun. The video is fun, funny, and 100% Emily. Check it out here! Onto the links…
This week’s house tour is a feast for the eyes! Jacinta Platt, director of Design Scout, said, “No surface was left untouched. Every ceiling was considered, and there is not a white wall in the entire project.” I should also mention that their timeline was only six weeks! It’s an absolute must-see.
From Emily: The cutest wall frames for family photos (or any photos) from Etsy (and a long-time follower). Nothing makes me happier than ordering something from a small maker and finding out that they are a long-time reader/follower, so when I ordered these ADORABLE bobbin frames from Lily Field Studio (on Etsy), I was delighted to hear her response. I have a quick/fun partnership with Etsy (one of my favorite resources for shopping local/small/makers) so I’ll be featuring them more on social soon, but if you are wanting some elevated frames that are sweet, come in a lot of colors, are very high quality (lacquered, perfectly constructed) and with custom painted frame mattes, consider looking here. I LOVE them and wish I had ordered more big ones (just might) for up our stairway. Whimsical without being too “baby”. Thanks, Joanna! Also, follow her here!
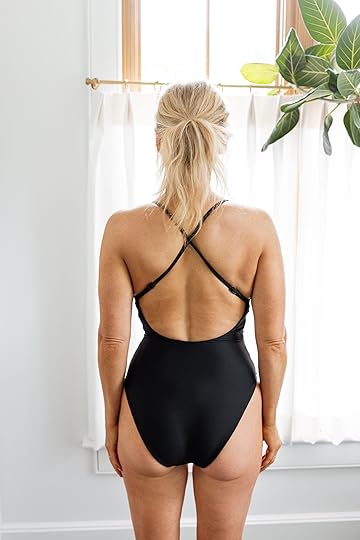
Also From Emily: If you missed my annual supportive swimsuit post (yes, with my real body and never any photoshopping), my number #1 go-to suit is 25% off in some of the colors. I got another one in Navy! Go check out the post here too!
From Marlee: I know that the Supergoop Glowscreen has been around for quite a while, and I’m sure that it’s been included in the linkup before, but I just finally got around to trying it, and I finally understand the buzz. I’m finding myself wanting to wear it on days that I’m not even going to be outside. It has essentially the same effect as the Saie Glowy Super Gel (which is an everyday staple for me), so I’m so happy to have found an SPF alternative that I can wear during days out in the summer. I got the golden hour color, which blends out into a nice sun kissed bronzy glow. Fun fact, if you have an HSA, you can buy it with your HSA funds – yay for sun care!
The Nordstrom Anniversary Sale is upon us!! Here’s a link to the preview so you can get your cart going if you needed some new things:)
From Gretchen: One of my favorite items of clothing to wear in the summer is a pair of flowy, breezy, lightweight linen pants. Lightweight linen? In summer? Groundbreaking, I know. Technically, these Cloud Gauze pants from L.L. Bean are cotton, but they have been my fave pants to reach for since this time last year. They’ve held up extremely well through many wears and washes, and their gauze-y texture is just so cute, breathable, and very comfortable. I wear a size large and love how they fit (I’m usually around a size 12 in regular pants) and how they swing on my body. I’m a pretty tall girl (5′ 9″), so these don’t quite hit me around the ankles like they do on the model–but I prefer them looking a little cropped! The wide leg and generous slit up the side make them extra cooling when the days are just too hot to handle.

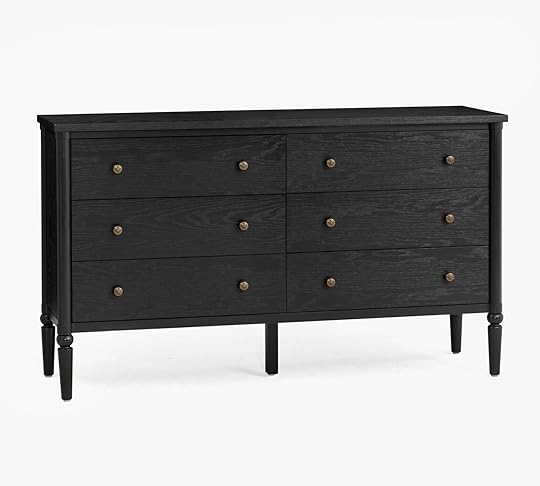
Modern Traditional Bed | Modern Traditional Vanity Mirror | Modern Traditional Dresser
In case you missed it, Chris Loves Julia just launched a beautiful collab with Pottery Barn. There are only a handful of pieces, but they are all extremely thoughtful. We actually already used that amazing dresser in Jess’ modern traditional bedroom combo post. Go check out the rest of the collection here.
From Arlyn: Public service announcement! If you don’t already have a jar scraper spatula, I highly recommend you add one to your kitchen tool arsenal ASAP. It’s much more narrow/slender than your standard silicone spatula, which doesn’t always fit in the mouth of some jars. I was clearing out a peanut butter jar this morning with mine (I like this one) and realized I had never sung the praises of mine in a Link Up. Its purpose may seem pretty one-note, but I promise, you’ll use this thing all the time if you’re a saucy house. I also use mine to scrape bowls when cooking or baking, or just as a general spatula.
From Mallory: Have you ever been to the hair salon when nearly everyone in the salon breaks into a group conversation about periods?? I HAVE AND I FOUND OUT CRITICAL INFO. Apparently, there are these heat pads that are only $15, and they are super thin and go on the inside of your pants to help out with cramps. GAME CHANGER AND WHY DIDN’T I KNOW ABOUT THIS?!
From Jess: I checked, and I can’t believe I haven’t talked about this yet. For Christmas, my wonderful and cool cousin got me this exfoliating bar of soap. I think her words before gifting it to me were, “It’s not that exciting, but it has changed my life.” I was clearly intrigued, and once I used it, I got it. It smells amazing and fills my whole bathroom with the aroma. But most importantly, my skin always feels so good. It’s not cheap, but it’s lasted me quite a bit of time (6 months and I still have a few more for sure). It’s also a truly great gift, as proven with me:)
From Caitlin: Stop what you’re doing, put down all of your other books, ditch your podcasts, and listen to the audio version of Careless People, a memoir penned by Facebook’s former head of global policy. I’d been waiting for a copy from my local library for months when I saw I could stream the audiobook for free as part of my Spotify subscription, and I was hooked from the jump (even Dennis stopped what he was doing to listen in!). “Careless” is far too generous a word for the Facebook executive team, most of whom still lead the business today (I’d be more inclined to go for “psychotic” or “callous” or “cruel.”) This firsthand account makes Miranda Priestly look like a saint in comparison – chapter 32, in particular, left my blood boiling – and I struggle with knowing that these executives have amassed more money and power than all the kings of yore combined. It’s horrifying, it’s heartbreaking, and it’s frustrating (“just quit your job” or “grow a spine” were my constant refrains), but it’s also dryly humorous and even better when heard aloud. I spent the last week rushing to do the dishes or vacuuming so I’d have an excuse to tune in to a few chapters – it’s that juicy. (But be forewarned: If you’re on the fence about letting your kid get on social media, Careless People will radically shape your opinion.)
As always, thank you for stopping by and hanging out with us. See y’all tomorrow. xx
Opening Image Credits: via MyDomaine
June 28, 2025
Best Supportive Swimsuits For All Budgets On My Real Body

Well, here we are again – another summer where we (the collective WE) shop online for swimsuits, only to be confronted with an increasing lack of body inclusivity, and then hope that our real and unphotoshopped bodies will look good in said suits. I’ve sadly never been immune to body dysmorphia, but a good, flattering suit can make your summer less stressful and fill you with more confidence. And summer should be fun:) So I take one for the team almost every year and shop, try on, shoot, and review my non-photoshopped (but heavily self-tanned, lol) body for the internet. I really try to find the best supportive swimsuits on the market. You’ll see each suit from the front and back (good god), and I’ll break down the level of bust support, cheek coverage, and how I feel inside each of these. You should know that I’m 5’4″, between size 4-6, 34D bust, and stick to one-pieces. I generally want to be comfortable, I err on the side of pretty modest (that’s when I feel most confident and therefore sexiest – I’m a former Mormon ’90s teen, lol). So these won’t be the first choice for all bodies (and some of them aren’t the best on me either, and I’ll explain why), but if you want a one-piece with support, here are some options in a few different budgets. And no “gifting” or trades were involved here.
“New To Me” Favorites

Gail One-Piece In Classic Sculpt™
New to me, but super impressed. Wearing a size 6 (if you are smaller in the chest size down). Here’s what you need to know:
FABRIC: The fabric is soft and thick (it’s J. Crew’s new “Sculpt Fabric,” which has some compression but not too much).BUST SUPPORT: 6/10. Not bad at all, good enough in a lot of ways (my standards are low TBH). There is a light shelf that attempts real support, but you aren’t going to want to run around (but lifts a bit for sure). As you can see, they are more smooshed together, which isn’t my favorite shape (see other leopard below).CHEEKINESS: It’s cheeky enough and medium cut. You can see it slightly cuts in on the hip.STRAPS: I love the shape of the back straps and thought it was really flattering. The straps are wide which I thought I liked, but once I compared it with its thinner strapped sister, I realize that with big boobs maybe thinner is actually better on me.PATTERN: The pattern is really busy (not see-through and can hide lumps and bumps)LINING: The lining kinda peeks out as you can see on my left cheek, lol.FINAL THOUGHTS: Very comfortable, soft, easy to wear, and I felt pretty confident in it (but I’m keeping the other leopard suit instead).

Mira One-Piece Swimsuit In Classic Sculpt™
A solid black suit that I ended up keeping (I have no black suits right now). I still have notes, but I really really, really liked it. I’m wearing a 6 and almost sized down but wasn’t big enough in the boobs. Good to knows:
FABRIC: Soft compression fabric (same J. Crew “Sculpt Fabric”) that feels really good and does the job while still being comfortable.BUST SUPPORT: 6/10. There is a shelf with a seam that adds some support, enough for walking/lying and feeling secure, but def not your river rafting suit (Tell me you are an Oregonian without telling me you are an Oregonian).CUT/SHAPE: The cut is flattering – the height of the leg, the location of the straps, the little dip in the front – while it looks basic, it’s thoughtfully designed.CHEEKINESS: Great cut in the butt. The fabric holds in place well enough, but if it pops up (because it will), it doesn’t cut in.STRAPS: I love the back – felt that it was flattering and loved the adjustable straps.FINAL THOUGHTS: I felt really good in this, sexy enough for night time hot tubs with Brian, but still good to daytime with families.


Claudia One-Piece In Classic Sculpt™
A classic suit in a really pretty color. Size 6 (I tried on a four and too tight, cut in and not enough boob space, so if you are in between sizes, size up).
FABRIC: Another J. Crew “Sculpt Fabric” – soft and the color is so pretty. I could see my lumps and bumps underneath, which is fine at night, but not what I prefer during the day.BUST SUPPORT: 8/10. Pretty good! I liked the scoop neck on me, and it gave cleavage, but in a way I’m feel comfortable about.CUT/SHAPE: The shape is pretty great; there is some stitching in the back that creates a nice hourglass shape. It does however, cut in at the hip, which I don’t love.CHEEKINESS: Mid-coverage. Higher cut on the thighs for sure.FINAL THOUGHTS: I passed on this one for me, but it’s a really solid suit.


De Soleil Scoop Back One-Piece Swimsuit
While this suit isn’t very “me” (feels too preppy for me), I thought it was flattering and great for a coastal/Hamptons vibe. I’m wearing a size 6, which fit as well as it could:
FABRIC: It looks expensive (and it is) – great for fancier pool parties.BUST SUPPORT: 4/10. While it has some, the V flattens more than lifts. I think better for those C cups and under, IMHO. I like cleavage, but not the big, flat kind of line that this gave me (thus passing on it).CUT/SHAPE: The scoop back is so pretty! I thought the back was so flattering.CHEEKINESS: Pretty cheeky, without being too high. I really like the white trim on the suit – a detail without garnering too much attention.PATTERN: The color blocking is super flattering. The dark navy is slimming, then the pops of white delight your eye and keep you looking tanner next to it.FINAL THOUGHTS: Better if you have smaller boobs, otherwise pretty great for a modest suit that doesn’t scream “mom”.
Highly Rated Affordable Amazon DupesAs a total swimsuit snob, I tried hard this time to order some that were truly affordable to try – maybe my snobbery is off base and there are some really supportive swimsuits for $35?? Well, no and maybe. After trying on many, I found a few worth discussing. I ordered medium, which was a mistake (I also have a short torso), so in all of these, I would size down if you are in between sizes. These are solid, affordable options for sure, with a lot more cheek coverage. They don’t have compression fabrics and are thinner, so they don’t conceal as much, but I was surprised by how much I liked the tops of a few of these, so I’m showing you the 3 out of 10 that I tried (some were god-awful).


Women Tummy Control Ruched Slimming Bathing Suit
This floral number (size M) is for those who want more coverage in the butt, and a busy overall pattern. What you need to know:
BUST SUPPORT: 5/10. Not the worst, for sure (they say “supportive” on the site, and I was like “I’ll be the judge of that”). It has a shelf and you won’t fall out, but it doesn’t lift or shape like others.CUT/SHAPE: I liked the top – felt like I could throw on some shorts and cruise around on a bike. No compression, sculpting, or shaping (the things you pay $$ for with the higher-priced suits).CHEEKINESS: Full cheek coverage.STRAPS: Adjustable straps – always a plus.PATTERN: The busy pattern makes it so you can’t see underneath lumps and bumps, if that’s your preference. The colors are pretty and modern (i.e., some of the Amazon patterns are SOOOOO questionable).FINAL THOUGHTS: I think this is a great affordable suit that I personally would wear cute swim shorts with at, say, the local pool or public splash pad. It’s fun, family-friendly, and affordable.


Women’s Button Up One Piece Swimsuit Tummy Control Bathing Suits Built in Bra
I was very curious about this Andie Swim dupe, and it measured up exactly how I thought it would (wearing a Medium and should have sized down):
BUST SUPPORT: 6/10. Good enough for most things because even though it’s not going to lift and shape, you get enough coverage to never worry about falling out. There is a shelf inside that does the job just fine.CUT/SHAPE: The top and snaps are pretty cute.CHEEKINESS: Full coverage. Stays put because, well, it’s full coverage.STRAPS: The straps feel casual and cool.FINAL THOUGHTS: While the OG Andie is far superior, this felt like a solid dupe. I’m a small and should have ordered a small (sizing on the internet is just so weird!). I liked the color, and while I didn’t feel sexy at all in this, it’s a great “add shorts and run around” kind of suit that still feels youthful while being solidly modest.

Tummy Control One Piece Swimsuit Ruffle Square Neck Bathing Suit


Tummy Control One Piece Swimsuit Ruffle Square Neck Bathing Suit
Ok, this one, FULL, full coverage, was actually really cute! Great for trips with in-laws if you know what I mean. I wore a medium and should have sized down to a small (doesn’t run big but it’s not tight).
BUST SUPPORT: Fine, like a 5/10 (zero is no support where boobs are just flying blind inside). But the coverage makes you feel supported in a way, but no lifting.CUT/SHAPE: There is rouging in the stomach area, which I have mixed feelings about – sometimes it gives maternity, and I’d rather a suit help compress instead. Also, Too much with the sleeves, IMHO.CHEEKINESS: Full butt coverage. PATTERN: The pattern is bold. I liked it more with a sarong as shown (just too much coverage on the butt for me).FINAL THOUGHTS: Sure, it gives “mom,” but it’s also cute and fun and family resort appropriate. The sleeves are cute and fun, and the back has some style. If you are in between sizes like me, size down for sure.


Eomenie Women’s One Piece Swimsuits Tummy Control Cutout High Waisted Bathing Suit
This Amazon suit was highly rated, so I ordered it in a few patterns/colorways. I liked this one the most because of the colorway (lighter/pattern on top). I didn’t keep but I did feel it was good enough to talk about.
BUST SUPPORT: Pretty good! The back strap helps keep the ladies up there, and you aren’t going to fall out. The shape of the front flattens boobs more than I’d like rather than lifting.CUT/SHAPE: Good if you want to feel like you are wearing a two piece without actually wearing a two piece (the cut out in the midsection. And also great if you want attention up above, but less so on the bottom. It felt pretty booby :)CHEEKINESS: Full, but I still thought it was flattering from the back since it was black on the bottom and lighter on the top.PATTERN: Comes in a ton of patterns and colors.FINAL THOUGHTS: All in all, more solid, comfortable, and flattering than so many of the other affordable Amazon suits I tried on. Not very me, but a good, affordable dupe.


Women Tummy Control Ruched Slimming Bathing Suit
Another Amazon number with a cute top and a lot of coverage. I have mixed feelings.
FABRIC: It is double layered, but as you can see, it still shows more underneath than I would like (this is a deal breaker for me as I’m stupidly self-conscious about that).BUST SUPPORT: Fine! Like a 6/10. You aren’t going to fall out, but it’s not lifting and supporting necessarily. There is a shelf for sure, so you aren’t flying blind.CUT/SHAPE: The scoop/square neck with the snaps is cute and flattering.CHEEKINESS: Full coverageSTRAPS: I like where the straps hit.FINAL THOUGHTS: It has rouging on the stomach, which isn’t my favorite, but great if you want more room.
My #1 Go-To


This is my #1 because it’s so flattering, comfortable, and versatile. It is my perfect “family, active, snorkeling, river hiking, then to lunch” suit. I literally where it most days on our family adventure vacations or when with other families. They have it in other types of fabric (ribbed and gingham), which I don’t love as much, so I stick to the classics (and just ordered the navy, too). I wish it came in a black and white stripe in the same fabric (hint, hint, Andie, folk). I’m wearing a small, classic torso.
FABRIC: It has two light compression layers, so it is flattering without being too compressing (like some below). It is thick enough to hide lumps and bumps but not so thick to be uncomfortable or hot.BUST SUPPORT: Is an 8/10 in boob support (which is enough, without being uncomfortable). You are so supported and won’t ever fall out (it’s what I wear snorkeling or running around at a splash pad). It lifts and doesn’t smoosh or flatten (creates a nice rounder shape, imho).CUT/SHAPE: It doesn’t flatten, but it does conceal enough in a comfortable way. Two of my friends with very different body shapes (smaller on top and hippier) also have it and love it. Seems to be a universally great casual suit that I think still looks stylish.CHEEKINESS: It’s the perfect level of cheeky and stays in place.FINAL THOUGHTS: It reads more like a tank top if you throw on shorts (thus perfect at a beach or poolside restaurant). You can button it up and down (can still be sexy). I have worn it for three years (one broke a snap, and I bought it again). 10/10. Love this suit. Oh, and the navy color is currently 25% off!!
The Most Flattering And SupportiveWell, you simply can’t beat TA3 for flattery, support, and shape – made for curvier ladies to feel hot. I’m obsessed with these suits and feel so good in them (while sometimes wishing the colors weren’t so bright – they have black in a lot of the shapes, don’t worry). These are corseted suits, designed to be extremely flattering, tailored, and give you an hourglass shape while lifting and flattening. They are expensive for a reason, but my goodness, they are a game changer.

 FABRIC: Super compression fabric – great for being flattering, and you can see NO bumps or lumps – just a smooth flat tummy. But these are not comfortable for all-day wear (like at all). And remember, if you cinch somewhere, it often comes out in other places, so you might find yourself adjusting more than other suits.BUST SUPPORT: 10/10. You are lifted and sculpted and supported. It’s so awesome.CUT/SHAPE: Undeniably flattering, compared to most suits. Designed to give you an hourglass shape. However, not as great for smaller boobs or more lanky ladies – two of my less curvy friends tried mine on and while they looked good in them, they simply didn’t need what this suit specializes in. We all agreed that while good, if you don’t need support or want stomach flattening, this suit might not be for you.CHEEKINESS: They have a lot of different cuts, but this one is mid-cheek (I can not do a thong YET despite Brian begging me)
FINAL THOUGHTS: This one doesn’t have the corsetted tie back, instead this mesh number (it’s newer, which I LOVE. I would buy this suit in many colors and patterns – it’s expensive and you can’t wear it all day, but as far as feeling great in a suit, this is it for me.


A decidedly “non-friends and family” suit, for me at least, y’all. This suit is low cut, high cut and demands attention (and you have medium to big boobs, you’ll get it). It’s what I pull out on vacation with Brian, and more so at night, but I feel GREAT in it. I’ve had it for three years and still pull it out when I need a boost (mentally and physically). I’m desperate for a collaboration with them to create more patterns, so I’m putting it out there in case they are reading.
FABRIC: The TA3 technology creates that hourglass shape while compressing and smoothing underneath. It’s magical, truly. It boosts where I wanted boosting and flattens where I want flattening.BUST SUPPORT: 10/10. Yes, it’s very low cut, but it has a shelf and lifts and shapes – again, magical. My boobs look and feel fantastic in this suit despite being 45 years old (they aren’t that perky, y’all). They also strangely aren’t smooshed together – it’s designed to give enough room to create a really pretty rounder shape, instead of just flattening them down or smooshing them together.CUT/SHAPE: High cut – be prepared to get a wax – this suit is super super high cut (which is why I wear it more at night, lol). The back corset will create back cleavage, at least it does on me – you just have to be ok with it.CHEEKINESS: Pretty darn minimal, and while it stays in place OK, it’s definitely not for the faint of heart/cheek.STRAPS: Adjustable straps – great!COLOR: The color is so fun – electric blue, which demands attention, but they have other colors, too.FINAL THOUGHTS: If you want sexy and supportive, this could be for you. Like, if I had to go on Love Island and be in a suit, this is what I would choose (what a sentence).


Lana One-Piece In Classic Sculpt™
I LOVED this suit (and so glad I tried it on – I was very doubtful it would look great on me). I was so happy to find something new (outside of the red Andie and the TA3s) that felt both daytime and sexy. Wearing a size 6, which fit great.
FABRIC: The fabric is soft and sculpt-y (some compression but you can wear all day – V. comfortable).BUST SUPPORT: 7/10, but I felt GREAT in it. I’m not going to go river rafting in it, but they are lifted, and I felt properly supported. Doesn’t flatten or squish together, just allows for boobs to be supported yet full.CUT/SHAPE: Thigh cut – perfect. Not too high (like the blue TA3 that is extreme) but flattering. Remember, the higher the cut, the longer the leg, if you are into that.CHEEKINESS: PERFECT, i.e., the amount that I like. Enough that you can see some bum, but not a thong.STRAPS: V neck and little straps are so flattering.PATTERN: The leopard pattern is busy, fun, stylish, and feels on-trend.FINAL THOUGHTS: I really, really loved this suit and am so happy to add it to my repertoire. 9/10
Hopefully, this helps you make some decisions with more confidence. It’s hard out there, but my suggestion is to pick yourself up some self-tanning lotion (I love Loving Tan, Coco and Eve and St. Tropez – don’t forget to use the mitt!), and save for one good suit, versus trying out suits that don’t make you feel 100% great. While at 45, I’ll likely never be that girl who struts around the pool in front of people I know with full confidence (which is so dumb), but a good suit has made a huge difference in my summer pool confidence. Hoping to not pass down my body dysmorphia to my daughter, but that’s another story for another day (and she lives in the same messed-up world full of outrageously high expectations for women, so we’ll just do our best, right?). It’s all about highlighting what you love about your body while finding silhouettes, fabrics, and cuts that make you feel your best. May we all just do the best we can, right?
*Photos by Kaitlin Green
June 27, 2025
A One Month Living Room Makeover – Here’s The Design Plan + A BIG Media Center DIY
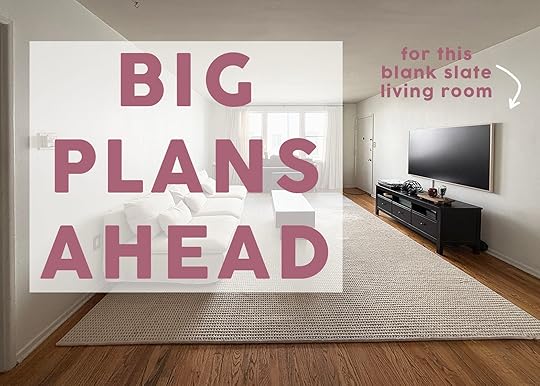
Welcome to my living room!! This is my 1950s apartment in Los Feliz, and I moved here because it’s A. Super affordable B. In a fantastic location and C. Has a ton of charm and potential. At its current state, this living room is underwhelming at best, but we’re going to make it so sick, I promise. Perhaps a pretty fun living room DIY?? Some of the big issues we’re having with the space as it is:
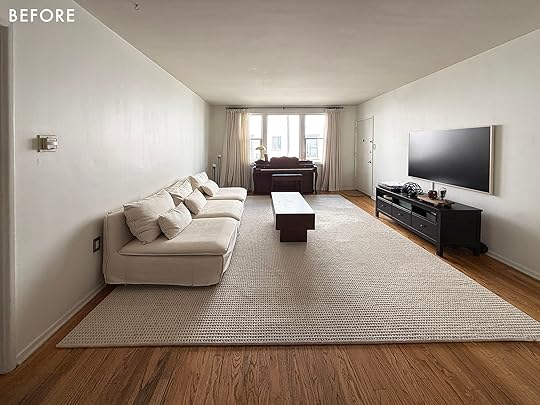
It’s the first thing you see when you walk in, and it’s currently not a looker. I got a white rug when I first moved in because I didn’t know what design direction/color palette I would want to do (and I thought I could eventually layer it), but now it’s looking rough, and also I think it’s slightly too big for the space. We have a lot of hand-me-down pieces we’ve been living with (except for that awesome vintage piano), so it needs an intentional design plan.
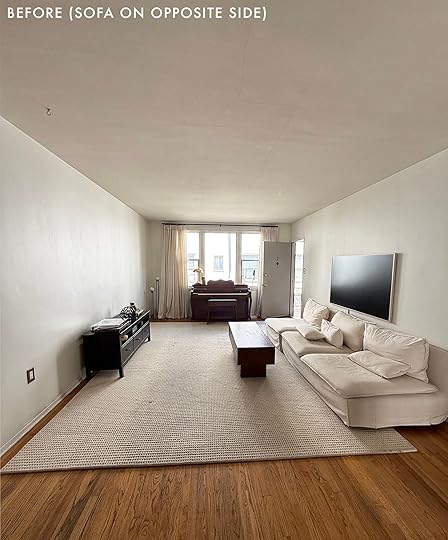
In case you were wondering, I also tried flipping the living room to see what that layout would feel like, but ultimately we decided we wanted it how we already had it. Who doesn’t love lugging large pieces of furniture back and forth? :)
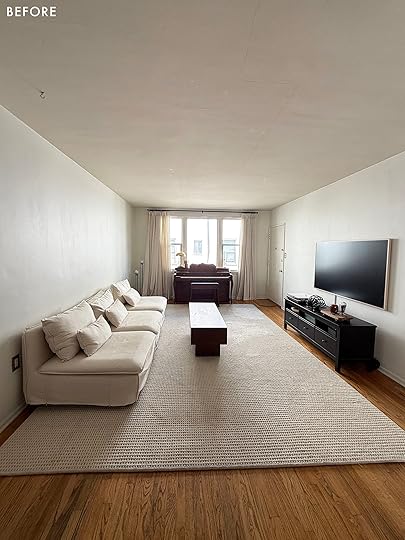
It’s a rental, so this space feels really blank and boring at the moment, so I want to make it feel homey. We need a lot of seating since we regularly host movie nights and such. So those are the problems at hand, now I’m going to walk you through some solutions!! Like I said, we’ve been living with some “works for now” pieces, so we’re in need of a lot of the major players: new rug, chair, sofa, art, lamps…the works. I want to make the space have that vintage charm while still being modern, fresh, and new. I call it “grandma style, except she’s single and ready to mingle.” You get the vision, right?
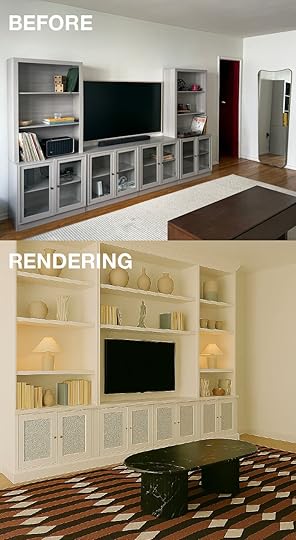
So my current plan is to do a media center DIY on the TV wall to cross off the “make it feel homey” box (plus it will give grandma a spot for all the trinkets she’s been collecting over time) and then for the rest of the room we picked out some AWESOME pieces from AllModern you’re going to love and literally all of my living room dreams are coming true!! Let me show you them now…
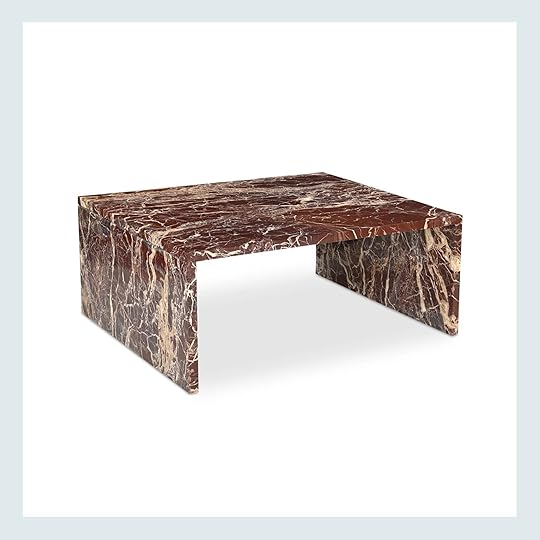
Coffee Table: This was my jumping-off piece for the entire living room. My marble obsession seems to get stronger every day, so when I found this GORGEOUS maroon stone coffee table with this cream veining, I knew our only choice was to snag it and build the rest of the room around it. In the corner of my living room is my viral closet speakeasy, which is a deep maroon red “lacquer” (aka patent leather fabric on the walls), so I knew this table would be the perfect way to bring some of that color into the space without going overboard.
Rug: Originally, I was thinking of doing a more mauve/lighter colored rug, but then I remembered the state that my current rug is in, and I said nay nay – we must go darker or more textured. When I rendered this deep brown red rug into the space, I knew it would be absolutely perfect, and the tonal vibe with the coffee table had me shaking in my boots. I know darker rugs can also get dirty quickly, but I vacuum regularly, and at least it won’t get shoe/dirt stains on it like a white colored rug will.
Sofa: Finding a sofa that’s perfect for your space can be such a challenge, but when I found this one, it was truly a scroll stopper for me. I need a modular sofa because a longer, single-piece sofa won’t fit through my front door (cool!), so thank god the modular sofa options are getting GOOD these days. I love the rounded edges and the arms on this piece – plus the reviews are fabulous!!
Jemma Metal Table Lamp | Deckard Ceramic Table Lamp
Table Lamps: We have zero overhead lighting in our living room, which I think is generally a good thing, except for that moment you move in and realize it’s pitch black in your house at night. SO we’re in need of some lamps and some cute ones at that!! I’m planning on putting this black metal one on a side table by the sofa and then this smaller lamp over on the bookcase on the TV wall to spread some light and love around the room.
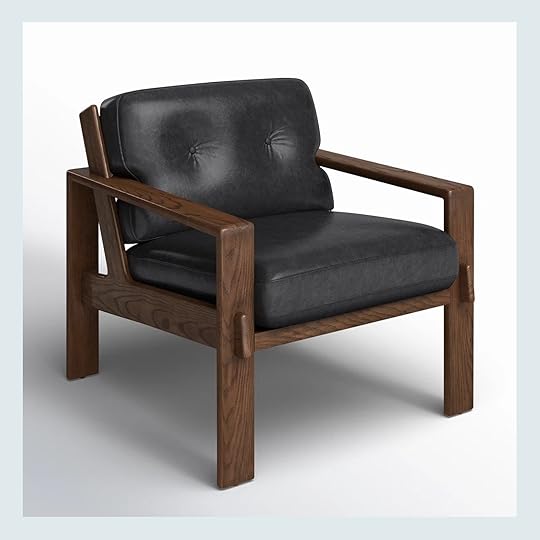
Glenbrook Genuine Leather Accent Chair
Accent Chair: This chair gives the “grandma is single and ready to mingle” part of the design vision. It is black, it is leather, it has that sexy wood grain. IT IS THE MOMENT. And it will contrast perfectly with the lighter colored sofa and darker red coffee table/rug. EEK I’M EXCITED!
Okay, that’s all I have to say…until next time (which will likely be the reveal because this is happening ASAP!) Thanks for tuning in to this episode, MLRM (Mallory’s Living Room Makeover). I’m scared some of these pieces will be out of stock (specifically the sofa I’m nervous about), so hopefully they place the order before this post goes live!! Oh, and I hope youre as excited as I am for my media center DIY:)
Let’s Save Some Money! The Best July 4th Sales On Home, Fashion, And Beauty From The Experts

Hello, friend! You’ve stumbled on a little test – we’re building our July 4th sales guide in public this year! Normally, we spend the week leading up to any major sale with our heads down – we’re analyzing prices, products, and trying to find the best deals for you. We release this information to you in one fell swoop – one huge, massive, enormous sales guide, usually published during the holiday weekend. (PS. If you’re new here, hello! We publish the best-curated sales guides on the internet.)
But this year, I want to try something – I want to assemble our sales guide in public! These deals are pre-vetted by the EHD team and available now – why shouldn’t you know about them before everyone else? Every day, I’ll be adding more retailers, products, and images to break up all the walls of text. You’ll even be able to see us play around with formatting, new tools, and all that jazz! It’s a quiet launch for our most eagle-eyed readers (however you got here, thank you for coming!) and I’d more than welcome any feedback or ideas as we flesh this guide out for it’s full publication in July. And in the meantime…happy savings, gang. :)
Furniture & Home DécorAllModernDeal: Up to 60% off furniture, decor, and more.
Our Picks: The modernist, Calder-inspired floor lamp from the art barn; Polywood Adirondack chairs, guaranteed to stand the test of time; Em’s outdoor living room loveseat.
Deal: 25% off site-wide.
Our Picks: The bestselling textured blue rug, now in a washable format; a colorful indoor/outdoor rug (imagine with a Haight Blue porch for instant summer!); a handwoven jute rug in a fresh quilted pattern.
EHD Exclusive Deal: 20% off regular-priced items with code EMILYH20 through 6/30. (This isn’t part of their July 4th promotion – it’s a special early access deal just for our readers!)
Our Picks: The iconic live-edge coffee table (you know the one); the painfully charming collection of summer serve- and table-ware; Em’s graphic and punchy indoor/outdoor pillows.
Deal: Up to 40% off hundreds of styles for outdoor, bedroom, living room, and more.
Our Picks: An outdoor sectional set so nice we used it twice (at Bowser’s and the River House); a simple oak bed frame for only $239; the classic Sven sofa, now in a rich, chocolatey performance velvet.
Deal: 20% off site-wide; plus up to 50% off special bundles.
Our Picks: My favorite linen sheet set; the percale sheet set Em ordered this week (in Pebble, for her primary bedroom); the dream weave waffle towels – they’re both plush and quick drying.
Deal: 20% off site-wide.
Our Picks: $55 hand-stitched leather catch-alls, perfect for your entry or dresser; a simple, petite side table crafted from Hinoki wood; the classic, quilted, easy-to-layer organic cotton bed blanket.
Deal: Up to 40% off bestselling furniture (!!!); up to 50% off outdoor; up to 60% off decor, entertaining, rugs, and more.
Our Picks: A sweet, vintage-inspired writing desk under $400; this deeply-discounted burl mirror by Athena Calderone; the no-fail selection of indoor/outdoor planters – there’s a pot for every style.
Deal: 20% off in-stock lighting, furniture, and decor; plus free shipping on orders over $2,000 with code FREESHIP.
Our Picks: HAY’s colorful, recycled crates (especially if you’re shopping for a dorm or first apartment!); a fresh, feminine, stainless steel tray to anchor your vignettes; my friendly, cheery, chunky dinner plates.
Deal: Up to 60% off decor, textiles, tabletop, and more.
Our Picks: The sub-$15 stoneware vase that makes Ikebana floral arrangements easy; an old-meets-new, trend forward fabric globe pendant; come for the scented candle, stay for the modernist ceramic jar.
Deal: 20% off site-wide; 25% off orders over $2,999.
Our Picks: The twin-size sleeper sofa, perfect for hosting in small spaces; an elevated storage ottoman with custom piping; the beautifully-proportioned upholstered bed that feels like a hug.
Deal: 30% off mattresses.
Our Picks: Em swears by the Sapira Hybrid Chill mattress – she tested it in Birdie’s room at the farm and loved it so much that she got a second for her primary bedroom.
Deal: Up to 70% off furniture, decor, lighting, rugs, and more.
Our Picks: A deeply-discounted Loeffler Randall vase (under $20!); a sweet, works-anywhere stool with timeless bobbin legs; $1,500 off (!!!) this streamlined, organic modern coffee table.
Deal: Up to 75% off site-wide.
Our Picks: A solid, Nordic Knots-esque rug at a fraction of the price; the dupe for my living room rug; an unbelievably charming folk-art inspired rug (last year’s Swedish trend prediction is coming to bear!).
Deal: Up to 40% off site-wide; free shipping on orders over $2,500.
Our Picks: The sun-bleached pine breakfast table you’ll be able to pass down; a modern Windsor dining chair (especially in that sweet duck egg blue); a solid, tiered cerused oak side table under $300.
Deal: Up to 25% off select mattresses, bedding, and pillows.
Our Picks: The Mint Hybrid mattress – Jess and I both own one and love it. (I’ve literally broken my back, and sleeping on this mattress leaves me pain-free by morning – it’s what I miss most while traveling.)
Deal: 20-50% off site-wide, plus an extra 20% off clearance.
Our Picks: The game-changing Curve Love line of shorts (for those of us with big ol’ butts, hips, or thighs); the prettiest summer dress I bought this year; my favorite skort (they’re back!).
Deal: 30% off apparel, plus an extra 50% off markdowns with code FIREWORK.
Our Picks: A responsibly-made, Emily-esque block print blouse for only $30; this subtle, pretty layering cardigan (the sky blue is divine!); a slouchy, EHD-approved grown-up graphic tee.
Deal: 25% off bestsellers.
Our Picks: Em’s all-time favorite one piece swimsuit; a strappier one piece swimsuit with a flirty, unexpected back detail; a classic, supportive one piece that’s perfect for an active beach day.
Deal: Up to 50% off women, girls, boys, and baby; plus 20% off new Mini styles with code 4PYY.
Our Picks: A classic, wear-all-summer fit-and-flare linen dress; an adorable little girl’s dress that’s giving me baby fever (oh no!); lightweight, wide-leg linen pants that just scream “fun!”.
Deal: 50% off shorts, tees, swim, and dresses.
Our Picks: $39 lightweight denim shorteralls in a bright, tomato red; an easy-to-wear organic cotton dress (the cabana stripe is destined for a beach!); these modern, half-priced apron-neck tank tops.
Deal: Up to 50% off site-wide.
Our Picks: This summer’s biggest trend in bottoms: boxer-style shorts (they’re wearable outdoors, I promise!); Em’s ultra-flattering chinos from $69; my ultra-comfortable cognac leather sandals.
Deal: Up to 60% off with code SUMMERTIME.
Our Picks: An Alex Mill-style poplin midi skirt for $52; the tailored short that’s simple to dress up or down; Em’s perforated summer ballet flats (for those who’d prefer to keep their toes private).
Deal: 40-70% off summer deals, plus select styles from $2.
Our Picks: A classic, chic striped midi shirtdress (to help you live out your “cooking in a Nancy Meyers beach home” dream, of course); $15 pull-on summer shorts; a cute and flirty one piece swim dress (!!!).
Deal: Up to 50% off select makeup, fragrance, and more.
Our Picks: Three Saie essentials – the illuminator, lip oil, and cream blush – for only $36 (!!!); the full-sized Rare Beauty hydrating lotion for $14; the Bobbi Brown waterproof cream eyeshadow stick.
Opening Image Credits: Design by Annie Segal and Marieke Ochtman of ASOM HOME | Styled by Velinda Hellen, Emily Bowser, and Julie Rose | Photo by Sara Ligorria-Tramp | From: Tour This Eclectic Midcentury Modern House Designed by ASOM Home + 10 Approachable Design Tricks Anyone Can Do
June 26, 2025
Am I A Hoarder? Our Next Youtube Video – Inside The Vintage Carriage House
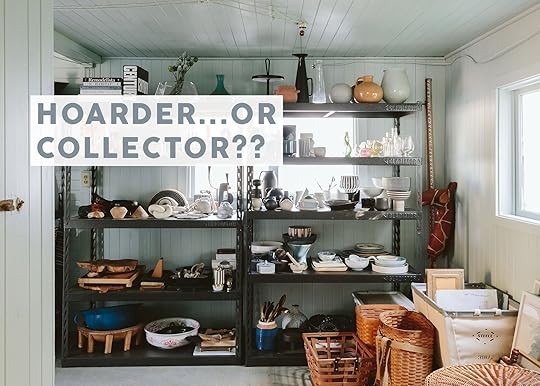
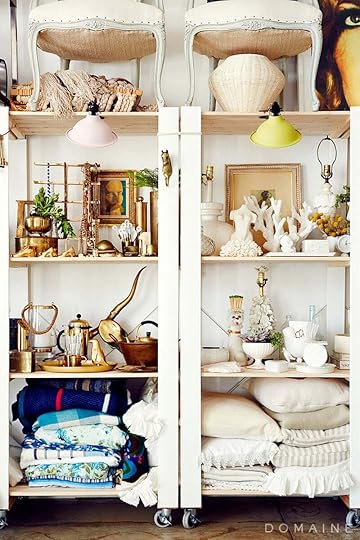
Today we are discussing two very important things – 1. I am a hoarder of vintage stuff, and I don’t have as much shame about it as I probably should, and 2. We have produced some new YouTube videos in the vintage carriage house that you simply must watch (it’s my favorite video we’ve ever produced – linked HERE and embedded below). But it’s been a lot of moving parts… we’ve been working hard behind the scenes to finish fixing up our garages so that we can move all my goods (and bads) into them, and therefore start the restoration of the 1850s original carriage house on the property. What you see above is the neat, organized version of the prop house, but in the video, you’ll really see what it looked like on most days (terrifying, embarrassing, full of vintage stuff, and sure, with a big side of shame).
Please, I Prefer The Word “Collector”
Let’s rebrand this a bit – I’ve been vintage shopping my whole life (starting with thrift stores in the 80s in Coos Bay, Oregon). Sure, my budget has grown and my tastes have been honed, but the desire for one-of-a-kind old things with character remains strong. These days, I like mixing vintage with new (to avoid it looking like an actual thrift store), but for most of my life/career, vintage was what I could afford and what I had.


Vintage shopping in LA was fantastic – the sheer number of people who lived there during the mid-century and postmodern eras created an abundance of dope stuff from those times. So ever since I had my TV show, I’ve had a storage unit or at least a prop garage to house my hoarding. And hoard I did.
My First Prop Studio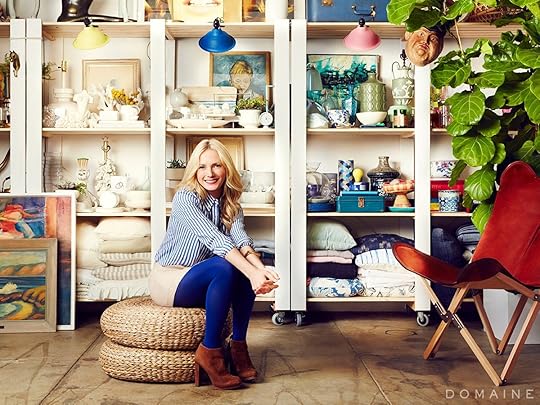
Years ago, when we moved into our first studio (2014, I believe), it looked like this all styled out (I still have so many of those things!). Some of them I felt very attached to (see? hoarder), but for the most part, I would pull from the shelves for every project to ensure that it looked unique and like “me”. Vintage is clutch to making a room look unique and full of personality (especially on a budget).

My collection of gold shoes (right) was epic (and so odd!), and if you look closely, you can see my collection of doll house fly swatters and mouse traps that I framed (left). Oh dear…and oh yes!!
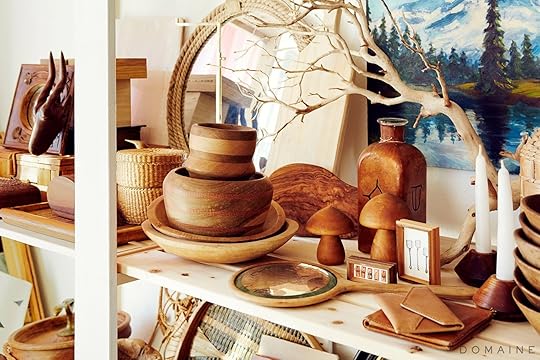
Things I still pick up are vintage fabrics and art, but if I’m being honest, I still buy anything that is a fantastic deal and pulls at my gut (but I now don’t let myself buy things that I have an abundance of, like wooden sculptures and footed vessels). Real self-control, I know. I also try not to let myself go shopping unless I have a project to shop for (or else I can get super sidetracked and buy too many random things that get stored for years.. Although now that I’m saying that, sometimes those things become THE PIECES that make that future project perfect.
Wait, So Where Was Your Prop House And What Is This “Carriage House”?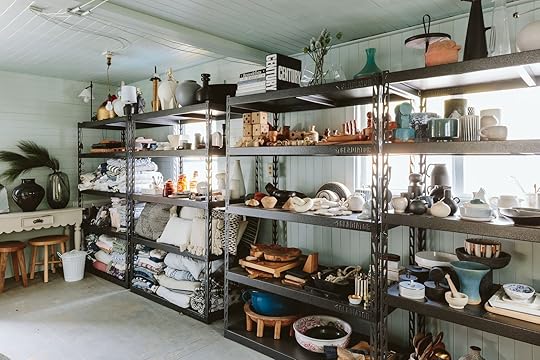
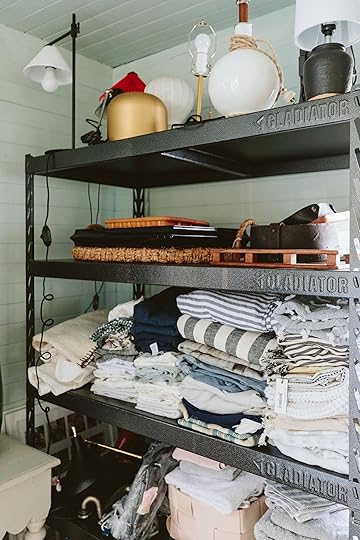
When we bought the property, there were two houses on it – one that we renovated and now live in, and one that we barely touched, except for painting this room to turn it into the prop house. It doesn’t have electricity, and it’s cold and wet in the winter (not the best art storing conditions).
But I still felt lucky to have it. It was super hard to keep organized in the winter months (cold, wet, gross, full of spiders and other critters), but again, grateful that I could keep my house more organized during all the shoots inside. It’s been a real Godsend having it (while it certainly enables the hoarding).
When it’s stacked all nice like that, it looks good! But most of the time, it was such a mess.
 What It Typically Looks Like…
This isn’t even as bad as it can get, I promise. She ain’t pretty. But stop staring at these photos and judging me, and get to watching the YouTube that we made! Gretchen and Marlee were so encouraging about doing this series – I was nervous we wouldn’t have the bandwidth or that I wouldn’t be entertaining enough to make it watchable. But y’all, I personally think it turned out so fun. It was shot super organically, and they pulled out the clips that they thought you would all want to see the most. Give it a watch (and please, please, please like it and subscribe – it’s the only way the algorithm helps show it to other people!). Can’t wait to show you more:)
Opening Image Credits: Photo by Kaitlin Green | From: My New Prop Room At The Farm And Why I Hold On To So Many Beautiful Things
June 25, 2025
You Asked, We Delivered…AGAIN! 5 Modern Traditional Bedrooms You’ll Want To Jump Right Into
Welcome to the second installment of the “Modern Traditional” room combo series! You all seemed to really love our affordable modern traditional lighting post and our living room post, so I thought, let’s tackle modern traditional bedrooms next. I’ve made A LOT of progress on mine, so they are heavy on my mind currently. Plus, once the summer is over, our focus tends to shift to communal spaces for things like the holidays. If you are able, maybe focus on your more private spaces for right now. “Modern Traditional” style was our most requested style to dig into when we did our reader survey, so that’s why we are focusing on it. We want to give you what you want.
Now, the team has talked a lot about AI, and like most people, we have a ton of questions and deep concerns about its use without necessary regulation, but we also know it’s not going anywhere. So when used sparingly, there are uses that could make some of our more time-consuming work (that takes longer than you’d think) go so much faster…like creating a good-looking mood board of pretty products. So that’s what we tried today. This was my first time ever doing anything with AI, and I have some notes, but it is pretty incredible when used appropriately (not for everything). Let me show you what I came up with because we have some Modern Traditional bedrooms to talk about.
The “A Dash Of Color” Modern Traditional Bedroom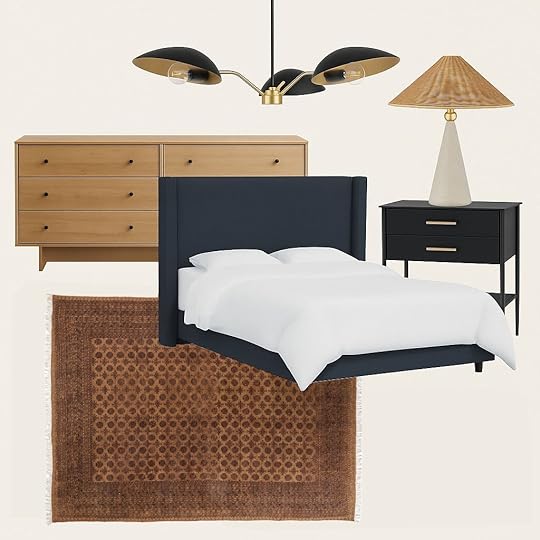
Rug | Bed | Nightstand | Dresser | Table Lamp | Chandelier
Dare I call this an almost colorful modern traditional bedroom? But let’s talk about style first. Aside from the rug, everything is streamlined and “clean”, making it feel modern. But these modern pieces were clearly influenced by traditional-style pieces. A perfect style marriage if you ask me. The blue upholstered bed is both commanding and simple. The size gives it presence, but the color makes it feel more neutral. That dark navy is an easy way to bring in color that feels less scary. I also wanted to mix materials. The bed is fabric, the nightstand is metal (it’s SUCH a good nightstand that we’ve used and it comes in a smaller size), and the dresser is wood. Oh, and that dresser is under $400 and also comes in black. Additionally, I love how the contrast of the lights, which are decidedly more modern, works with the rug that helps to ground the space, not only with those beautiful copper colors, but also with the vintage and more traditional design. Fun fact: the rug is reversible with a lighter shade on the flip side.
The “Updated Shabby Chic” Modern Traditional Bedroom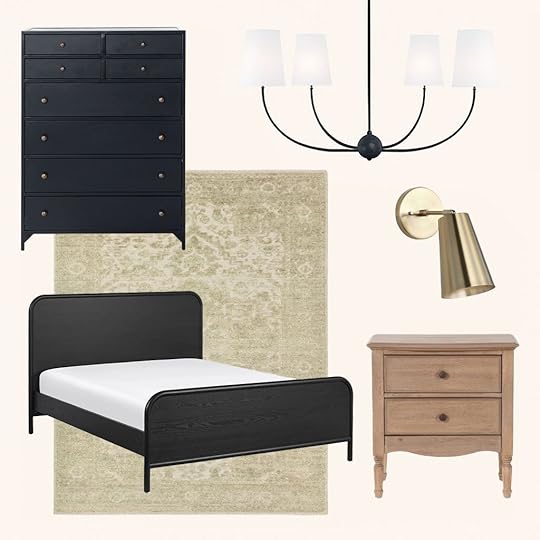
Rug | Bed | Nightstand | Dresser | Sconce | Chandelier
This pretty little combo leans more traditional on the modern traditional bedrooms style scale. But that’s the beauty of this style, you make it right for you. The first piece I knew I had to use in one of the combos was that black wood bed. It’s so chic and sexy. And would you believe it’s from Article?? I know! What this also tells me is that it’s made well. Gretchen was just raving yesterday about how her furniture still looks brand new. Another piece that I knew I had to include was this tall dresser. It’s the same one I got for my neighbor/friend’s bedroom makeover (it was actually borrowed because the one we originally chose had a shipping delay). While the one they eventually got was perfect for them, I secretly preferred this one:) I will warn you that it’s very heavy and metal, but it’s also extremely solid. Then, to give the space a little more of a “traditional” look, I found these perfect wooden nightstands from Living Spaces. They have THREE drawers (yes, that curved bottom piece is a drawer too), are under $300 each, AND have a charging station on the back side. Now, both of the lights are elegant and simple, but one leans more modern (the sconce) and one leans more traditional (the chandelier). That’s a very easy way to mix in both elements when you are designing. The sconce in the graphic is hardwired, so here is a similar plug-in version. Finally, what I loved about this rug was the luxurious, traditional pattern, with it being in a soft sage. Just a little color to make it a little more fun.
The “MCM” Modern Traditional Bedroom
Rug | Bed | Nightstand | Dresser | Sconce | Pendant
In full transparency, this one really is more modern than anything with a heavy MCM bent. However, with the right traditional-leaning accent chair and decor, this could easily become a more classic modern traditional bedroom. Well, actually, I very much stand by that dresser being a little traditional-leaning. Plus, it’s under $500 and comes in three other colors. The knobs are what really got my though. The bed is also a great price at $380 and is really versatile if you end up wanting to mix up your style later down the line. The rug is a big star in the design, and what I didn’t love about using AI was the lack of seeing the rug’s texture (hence the added graphic on the side). Actually, I ended up photoshopping two other rugs into the graphics because what was replicated wasn’t good enough for me. This rug is also from Revival Rugs, which I can wholeheartedly say is so soft. I have one from them, and my cousin has at least four in her home. Point being, I know that rug is going to feel so good under your feet. Plus, the colors feel fresh, it’s washable, and it’s under $800 for an 8’x10′ size. The goal for the lights was to bring in texture as well. I love a rattan light fixture, especially for a room where moodier, ambient lighting is preferred. It’s also a little hard to tell, but the main part of the sconce is made of wood. I think it’s so warm but cool and mixes in another texture to a design that has a lot of wood in it. Lastly, if you love this Crate & Barrel nightstand, then you’ll love the nightstand in the design even more because it’s half the price. Well, actually, the black version of the Crate one is on clearance, but that also means final sale, which is a gamble:)
The “California” Modern Traditional Bedroom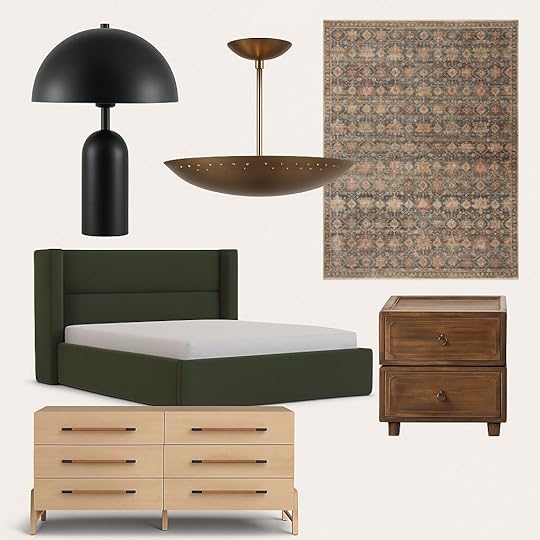
Rug | Bed | Nightstand | Dresser | Table Lamp | Pendant
I say “California” because this combo, once I was done with it, gave my Amber Lewis vibes…just much more affordable. And I also just remembered that that beautiful rug is an Amber Lewis x Loloi collab, ha. So clearly this combo is aptly named:) I chose that rug, not only because it was beautiful, but because the big green bed that I wanted to use worked so well with it. It’s already a great price, but I would recommend a cushy rug pad. The bed really brings out the rug’s green tones. I really wanted to choose a more traditional-looking nightstand, so this cutie was a great fit. It’s under $250 and also comes in black. Then, to contrast, I chose that modern dresser with those incredible handles. Makes me think of this Croft House sofa I’ve loved forever. For the lighting, I really love this kind of pendant because they look vintage but don’t have a vintage price tag. That warm bronze is so stunning to me. And while that table lamp could happily live on the dresser, I love the idea of having one on each nightstand to really show that wonderful contrast of modern and traditional and how perfectly they work together.
The “Parisian Chic” Modern Traditional Bedroom

Rug | Bed | Nightstand | Dresser | Table Lamp | Pendant
I had to have one that went a little more “modern European”. It’s the Jess Bunge law. I don’t know which piece is my favorite. Let’s just start with the dresser. It’s from the newly launched Chris Loves Julia x Pottery Barn collection, and this piece is really stunning. Well, the whole collection is beautiful, and Julia definitely knows “Modern Traditional”. But then, of course, I wanted to contrast with a more modern nightstand, and naturally, I love this one too. The slight curve on the front, the texture on the drawers, and those teeny knobs, all really do it for me. Now what I really want to talk about is the fact that this beautiful bed has a secret…it’s a storage bed! This one is from Article, and the drawer pulls from the front. Speaking of Article, the rug is also from them. I’m always into a classic check pattern, and the variation in colors in this rug. A bit more “life-friendly”…but as you can see, AI misrepresented it a bit too much to me. Now, let’s talk about those lights. True, they are also MCM vintage-inspired lights, but I think using them instantly elevates any room. The table lamp is so chic, and that pendant is what dreams are made of. The details of the cord could knock me over alone. If you can’t tell, I really love this design.
So there you have it. 5 Modern Traditional bedrooms that are all cohesive, elevated, and collected. Do you have any favorites? Any pieces you have and love? Or don’t love?? Let me know!
Love you, mean it.
Opening Image Credits: Photo by Tessa Neustadt | From: Eclectic Traditional Bedroom Reveal
June 24, 2025
Gretch’s Next MOTO: The Bedroom Switch Up
Timing is everything, and that’s also true in design. A little over a year ago, in April, to be exact, I revealed my first Makeover Takeover–my bedroom. I had moved into my place a few months prior and was so excited to have the opportunity to design my room from the ground up, so soon after moving in. It felt like perfect timing.
 photo by kaitlin green | from: gretchen’s moto bedroom reveal
I was (and still am) absolutely in love with how the space turned out. I scored some incredible furniture pieces from Article (a sick storage bed, the coolest floating headboard, and the dresser of my dreams), plus enough fabric to completely cover my walls and then some. It was awesome! But a year and two months of living in a space, even in a room you LOVE, can tend to reveal some things. Namely, how wrong I was in making the smaller room my bedroom, with the stubbed toes to prove it.

I consider myself lucky to reside in a two-bedroom apartment, where both rooms are mine to do with as I please. When I moved from my last spot, “more livable space” was high on my wishlist. I’d had a garage previously, which was AWESOME but very dangerous. Not in the sense that anything could harm me (except maybe the rats, damp/crumbling walls, and broken/exposed pipes…okay maybe it was a little dangerous). But when you have a ton of extra space, especially the kind disconnected from daily life (a garage), it is alarmingly easy to fill it with extra stuff. And for me, that is very dangerous. (Later this week, Em will dive into an assessment of her own stuff, which is initially what inspired me to take a closer look at mine, so definitely check that out when it’s live!)
 the garage!
When I had the garage, I was working a variety of freelance creative jobs and was heavily into flipping furniture and selling vintage decor on Facebook Marketplace. Having a workshop space was ideal and necessary for how I made a living. But soon enough, I started working for Em, and that garage space just wasn’t needed anymore. And yet somehow I convinced myself that most of what lived inside still was.
 the second bedroom/my current “office” studio
A handful of unfinished projects, paint cans with some life left (debatable), a huge collection of vintage wares (and soooo much more) came with me to the new spot. When it was time to choose which room would serve as my bedroom and the other as my “studio”, it made more sense to me at the time to pile my mountains of crap into the larger space, thinking I would eventually turn it into a state-of-the-art creative zone and office, with plenty of room to spread out and work. Fast forward a bit, and I can barely walk inside. The in-home studio I envisioned earned its new name, The Doom Room, in record time. A place where all of my extra things went to die, disappearing out of sight and out of mind as soon as I shut the door. No systems, all chaos.
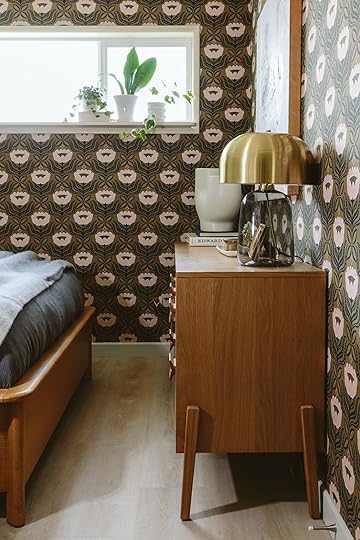 photos by kaitlin green | from: gretchen’s moto bedroom reveal
And when chaos lives next door, even the dreamiest of bedrooms will begin to suffocate you. After a year in my beautiful room, I began to feel the walls closing in, and not because of the wallpaper, no complaints there–but the lack of wiggle room, in both spaces. My storage bed is so functional, but not if the drawers will only open when all of the dresser drawers across it are closed. Then there’s my clothes closet–the true catalyst for the switch up. If hang up one more romper, and I promise you that wooden rod will SNAP. I literally have to fist fight my t-shirts daily to get them back behind closed doors. And I’m sick of it!! Sick of traversing the narrow walkways of my tiny room, carved out by my big, beautiful bed. Sick of the piles of stuff ignored next door, filling the room with more and more doom every second. Sick of the overall lack of breathing room, accidental injuries, and impenetrable wall of garments.
Caitlin’s closet confidential had awoken something in me. Em’s recent prop/carriage house assessment inspired me. Tripping one too many times in both of my rooms drove me insane enough to need a change. Sometimes you really just have to empty everything out, take stock, trim alllll the fat and put back only what’s really important to you, with care (and a bit of a cut-throat mentality) while trying your darnedest not to add more stuff to the stuff. Then step-and-repeating every few years because consumerism has us in a chokehold, and this is a lesson I never seem to be done learning.
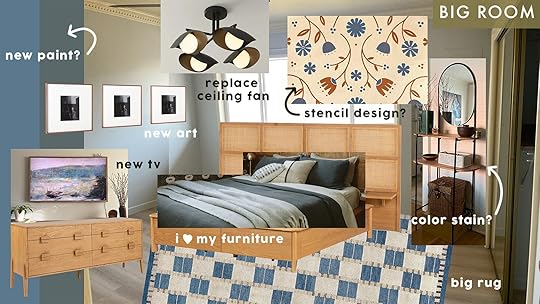
So that’s my plan! This is the official kick-off of my MOTO: Take 2. A reassessment. And my first step is to purge. My neighborhood is having a garage sale this weekend, and it’s the perfect opportunity (hell yes, deadline) to decide what really deserves to take up space in my life and home. Then it’s another small room challenge–this time a guest room/office that is actually useable and inspired. I want to live in a livable space! My biggest priority is having a bedroom I can actually walk around in, and plenty of room to sit back and admire the pieces I love so much, with the ability to use the drawers (all of them, at the same time) without stubbing my damn toe!
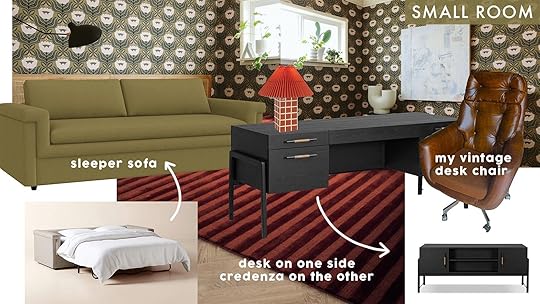
I don’t have a solid design plan for either space. Concepts of a plan, sure. What I know for a fact is that all of the major elements of my first MOTO design will live on. I will not be parting ways with my bedroom furniture, only migrating it. I am not exaggerating when I say: these are some of the best pieces I’ve ever owned and still look as good as the day I got them. The headboard, storage bed, and dresser–they’ll live on in the bigger room for a chance to really shine! I will also NOT be touching the wall fabric in the smaller room. This hasn’t budged since the day I installed it (a year ago! With just liquid starch, a bucket, and a paint roller!), and I don’t intend to remove it anytime soon. But it’s totally renter-friendly, and when I am ready to take it down, I can re-use the fabric elsewhere (shameless DIY post plug)!
I actually can’t fathom designing a space without adding a little DIY mojo to the mix. The wall fabric is the foundation of the smaller room, so it should be a fun challenge for me to pick pieces that work well with the existing vibe. But the DIY element in my new bedroom is yet to be determined. One big idea on the brain is: stencils. I’ve been vision boarding a lot lately and find myself continuously drawn to the vintage magazine images of stenciled, folky flowers on the walls (or the ceiling, perhaps?). It’s not necessarily renter-friendly, but I’m a friendly renter and could always paint over it when I leave.
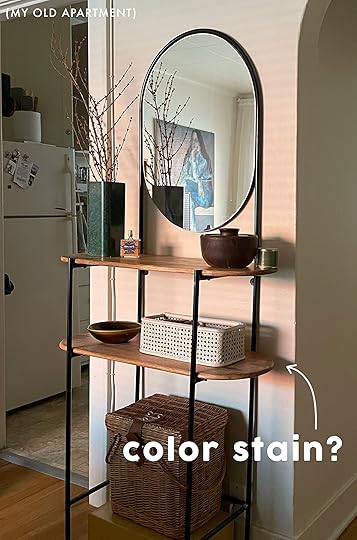
But also, I’ve been dying to play with the color stain trend I’ve been seeing everywhere lately and might need to test it out on an older piece of mine that could use a refresh (my garage workshop mentality will never die). It’s a beautiful etagere I’ve been using (and not really loving) in my bathroom, which I think would serve me better in my new big bedroom. Better yet, if the wood was stained…burgundy? Or maybe a denim-y blue? I don’t know! But I want to try. So look out for that DIY sometime down the line.
That’s it for now. The grunt work comes first, hopefully followed by clarity and tons of radical vision. I’ll keep you posted as I move the needle. All in due time. Until then…
Sincerely,
Gretch
Opening Image Credits: Photo by Kaitlin Green | From: Gretchen’s First MOTO Reveal: A Tiny Bedroom Comes Alive With The Perfect Pieces From Article (And Fabric On The Walls??)
June 23, 2025
5 Tiny Design Details You’ve Likely Overlooked That Make Your Home Look Super Locked In
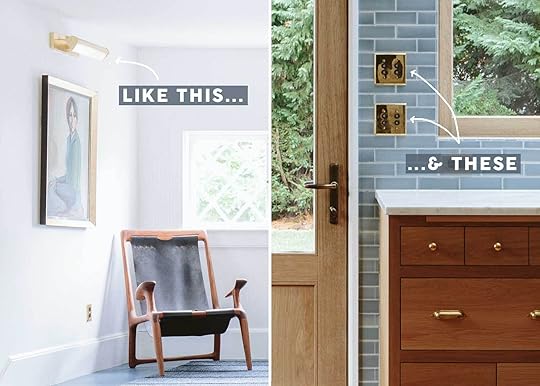
There are some homes that just seem to have it together. You can’t quite put a finger on why. Maybe the furniture is spaces apart just right for the ultimate flow and comfort. Maybe the art is way cooler than anything in your own home. Maybe the lighting is perfectly layered. Or maybe, the micro design details you’re not meant to notice, are super locked in. Today, we’re exploring the latter, because it’s these little moments that can take a beautiful room and turn it into something truly special.
The best part? Most of these do not cost an arm and a leg. Sure, upgraded wall switches and plates can add up to be quite pricey if you do them all over your home (see point #2), but if you do it little by little, or use them sparingly for maximum impact, you can turn up the quiet luxury knob of your home…even for as little as $9. Yup…keep reading.
#1: Decorative (Or Camouflage) Air Vents & Floor RegistersUnless you’re a luxury home designer or architect frankly, one of the most overlooked details in your home is the air vent. Anything builder grade is going to have the most basic (a.k.a.) cheap cover in place. And while they are completely fine to live with and no one is going to throw tomatoes at you because you have them, it’s one of those things that a beautifully designed home has figured out. They are, of course, fully functional and needed in any house that has central A/C or heat, but we can do so much better than the white metal slats you find at The Home Depot.
They make them in beautiful designs and metal finishes to stand out, or in the same (or similar) wood tone of your floor or ceilings to disappear. While they aren’t the easiest thing to find inspiration photos of—because they are often just photoshopped out of images for publishing—here are just a few examples to get the gist:
View this post on InstagramA post shared by Red Door Homes (@reddoorhomes)
Look up and you’ll see a beautifully designed air vent in this bedroom’s ceiling. These are wood to blend in but have a trellis design for that custom touch.
View this post on InstagramA post shared by NB Design Group (@nbdesigngroup)
Blink and you’ll miss this one in this wildly gorgeous modern home by NB Design Group. This wood vent is made out of the same wood and seamless so it doesn’t steal from the architecture of the views.
View this post on InstagramA post shared by Anthony Rodriguez (@136home)
I happen to love a metal register or vent, because it takes something that’s “ugly” and turns it into something quite beautiful. They work especially well in more traditional homes, in my opinion, like this one by blogger 136 Home.
There are numerous companies out there that will make custom sizes and designs for you, but I found some ready-made options here, as well. Each of these are offered in an array of shapes, size ratios, and material finish.

1. Flush Mount Wood Register | 2. Honeycomb Brass Wall Register – Antique Brass | 3. Astoria Brass Wall Register – Brushed Nickel | 4. Giovanna Vent Cover – White Collection | 5. Square Pattern Register | 6. Modern Solid Brass Floor/Wall Register – Antique Brass
#2: Upgraded Light Switches & PlatesThat same builder that grabbed the basic air vent cover also probably got you the most basic light switches and a 10-pack of white plastic plates. Again, completely fine, but this post isn’t titled “5 Completely Fine But Very Vanilla Things You Builder Picked For Your Home” is it? Nope! Antique-style switches are very popular right now both by designers and DIY decorators because they seriously level up the lighting experience. If you’ve never touched the luxe tactility of a brass dimmer knob, let me explain it to you: it’s one of those itty bitty, nearly imperceptible details that make living in your home that much more of a pleasure. Let’s get inspired before doing a little shopping.
View this post on InstagramA post shared by CHRISTIAN BENSE (@christian_bense)
So often, I see these upgraded switches and plates in antique or polished brass, but wow are they gorgeous in a chrome or polished nickel. I especially love this finish for a modern Parisienne style home (like this London pad above by Christian Bense), or something a bit more contemporary.
View this post on InstagramA post shared by Buster + Punch™ (@busterandpunch)
Buster & Punch makes beautiful options that you can customize to your lighting needs. The one above seems to be both silver with brass details, which is a nice touch.
View this post on InstagramA post shared by Buster + Punch™ (@busterandpunch)
Here’s another look at Buster & Punch’s offerings in this gorgeous bathroom.
View this post on InstagramA post shared by Forbes & Lomax (@forbesandlomax)
Forbes & Lomax is an EHD favorite (you can buy the brand through Rejuvenation, as well as directly). On top of the standard metal finishes, they also have paintable plates like the one above for something more inconspicuous.
Here are a few more I’m loving (how cute is the vintage dome switch plate, #2??):
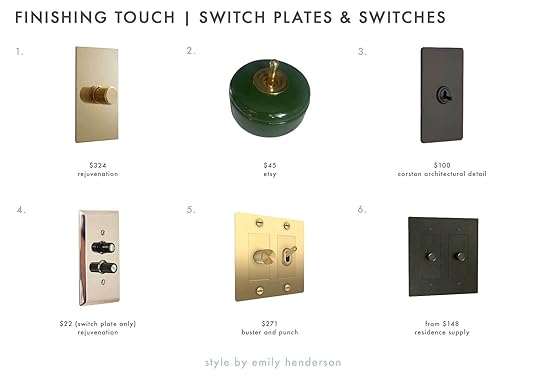
1. Forbes & Lomax Rotary Dimmer | 2. Retro Green Polished Porcelain And Brass Dolly Switch | 3. Grove 1G Toggle Switch Bronze 52252 | 4. Lewis Single Push-Button Switchplate | 5. Build Your Own Switches + Outlets | 6. The Brass 3-Way Rotary Dimmer Switch
#3: Ceiling MedallionsGosh, I love a ceiling medallion. Once a thing of grand palaces or intricate brownstones, you can find ceiling medallions gracing the base of chandeliers even in very stylish studio apartments. Traditionally made of plaster (though you can find them now made of all kinds of material like wood, metal and even plastic), I always thought they were designed just to make a lighting fixture take pride of place in a room, but as it turns out, they had a purpose. I found this on an article I came across on Apartment Therapy:
“Before the light bulb, all forms of indoor lighting — from candles to whale-oil lamps to gas and kerosene lanterns — involved a flame, Winkler says. ‘The byproduct of all of those was soot, and the medallion, the center, helped conceal what could have been a ring of soot on the ceiling,’ she says. ‘That’s why the medallions got to be so large — they’re three dimensional in the way in which they’re formed, and the reason is to kind of hide the soot.'”
Medallions can be as simple as a few concentric rings, or as ornate and large as you can dream up. Let’s take a look at a few.
View this post on InstagramA post shared by Visual Comfort & Co. (@visualcomfort)
Ceiling Medallions are like a statement earring: you can’t wear them with every outfit; best to choose the right moment. They were traditionally used in the parlors of Victorian homes (though had a presence prior to that period, as well), but today, can be seen in dining rooms, kitchens, primary suites…basically in any room you want to make a big impact in.
View this post on InstagramA post shared by Interior Designer Vancouver (@marinamedinadesign)
If you think they are just for traditoinal and classically designed homes, you’re wrong! Adding an ornate ceiling medallion to a modern space causes tension (and you know how much I love that).
View this post on InstagramA post shared by @brownstoneboys
There doesn’t seem to be any firm and set rules for ceiling medallion sizing, but some things I found around the web suggests they should be as wide as the widest point of your light fixture (or at least 3/4 of it if it’s particularly large). Something else I read was that if you are using them in a small room, they should be a little smaller than your lighting as to not overwhelm the eye. That rule plays out in this gorgeous salon by Brownstone Boys (on the third slide).
You’ll find some that are intact (like #1 and #6) which need to be installed before the light fixture. There are also some that are split (#2) which can be installed without removing an existing chandelier.
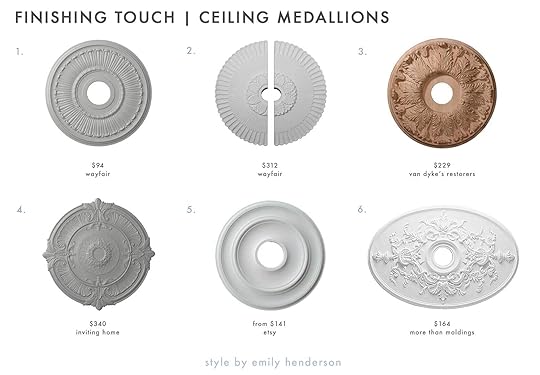
1. CM16MLFRF Melonie Ceiling Medallion | 2. Melonie Ceiling Medallion | 3. Restorers Architectural 16 Inch Florentine Wooden Ceiling Medallion | 4. Delecroix Ceiling Medallion | 5. Art Deco Plaster Ceiling Medallion | 6. Royal Oval Ceiling Medallion
#4: Gallery Lights (Or Art Sconces)There is something so grown up about a gallery light. In my mind, they were always things used for “real art” and that Paris canvas I bought at IKEA just like 2 million other people in my 20s just wasn’t going to cut it. But guys, WHO CARES. Add an art sconce above any piece of art you want, whether it costs $20 at Home Goods or you sourced it from a prestigious gallery.
Gallery lights are meant to bring attention to a work of art, and are best left for either a clean grid of frames or a singular hung piece. They are really elegant, and anytime you add to your lighting layers, you’re going to elevate the look and feel of your room.
View this post on InstagramA post shared by Zoe Feldman (@zoefeldmandesign)
I love how the placement of this art light (a room by Zoe Feldman) brings the eye up so high and emphasizes the ceiling height.
View this post on InstagramA post shared by Stacy Goldberg (@stacyzaringoldberg)
For any large artwork over a sofa, a gallery sconce really brings it home, especially in a rich, luxurious room like this one by Anne Pulliam Interiors.
View this post on InstagramA post shared by Summer Thornton (@summerthorntondesign)
Most gallery sconces are thin, horizontal fixtures, but don’t forget that you can always use a regular sconce above a frame, as well. Summer Thornton did just that in her office’s lounge to great affect.
Like any other lighting fixture, price ranges vary greatly. On the plus side, there are a ton of options such as hardwired, plug-in (#1, #6), and even battery-powered (#3).
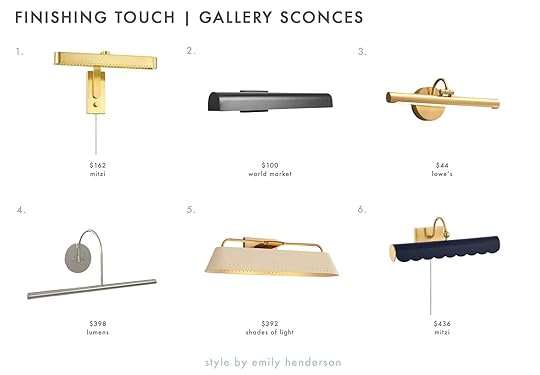
1. Julissa Plug-In Sconce | 2. Remi Black Metal 2 Light Gallery Wall Sconce | 3. allen + roth Prichard Brushed Gold LED Battery Picture Light | 4. Curved Arm Direct Wire Slim-Line Picture Light | 5. Montague Picture Light | 6. Fifi Picture Light
#5: SkiffersFinally, we reached the inspiration for this post: Skiffers. When Jess and I toured the Pasadena Showcase House of Design, we noticed these little brass corner brackets in one of the rooms. I had never seen them before, and immediately dove into researching what they were because I was obsessed with them. These sweet metal details aren’t meant to protect the corners of baseboard from scuffs, chips and general damage and are often used in high-traffic rooms. They can also be used on kitchen cabinetry and even furniture. I actually used to have something similar on the edges of a Campaign-style cabinet I once DIYed, and still love the look today. Micro details add up, folks!
View this post on InstagramA post shared by Broughtons (@broughtonsofleicester)
Wow, is it hard to find photos of these things that aren’t from a catalog, but the above, by UK lighting and ironworks company Broughtons, gives you a taste.
And just as styled, pulled back imagery of rooms with skiffers being used are rare, so are variations in design. You’ll often find them in a similar look to the above (or #2 which is from a US company called Stairrods), in a more cleaned up silhouette like #1 or super decorative, such as the leaf shape of #3.
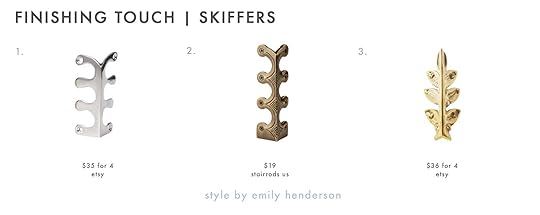
1. 2.9″ SET of Solid Brass Corner Protector | 2. Large Skiffer Antique | 3. 85mm Set of Olive Fern Corner Protector Solid Brass Skiffers
And there you have it! An exploration into design details you may have not known existed, or simply just don’t spend the time thinking about. Once your furniture is selected, your walls are painted and papered, your linens are just-so…if you’re looking for more little projects, I just unlocked five more for you! Enjoy, and see you next time!
Opening Image Credits: Designs by Emily Henderson and ARCIFORM, Photos by Kaitlin Green | Left From: The HIGHLY Anticipated…Farmhouse Living Room Reveal | Right From: The Farmhouse Kitchen Reveal And All My Thoughts And Feelings About It
Emily Henderson's Blog

- Emily Henderson's profile
- 10 followers

