
Harold Davis's Blog, page 202
June 8, 2013
Preview: The Way of the Digital Photographer
I am very pleased to be able to show you a preview adapted from my new book, The Way of the Digital Photographer. In this story: a special pre-publication discount offer from the publisher; the Table of Contents; material from the introduction to The Way of the Digital Photographer.
This is a special offer on pre-orders of both the print and eBook versions of The Way of the Digital Photographer directly from the publisher, Peachpit. I have arranged this discount as a way to say thanks for your support and reading my blog. To receive the 30% discount from Peachpit, be sure to use the discount code PP-DAVIS30 (this code is case sensitive) after you add my book to your shopping cart when you proceed to check-out. Click here to order The Way of the Digital Photographer now!

Book description: In The Way of the Digital Photographer, master photographer and digital artist Harold Davis shows you how to make digital photography an art form. Great digital photographs need both camera and computer to be truly extraordinary. Using detailed examples and case studies from his own work, Davis provides myriad ideas you can use in your own work, and he shows you how to unlock your own creativity to make those special images you have always dreamed of! Readers discover how to effectively use post-processing techniques and gain insight as to how the techniques and steps involved can inform their choices when making a photo and in post-production workflow.
Pre-order your copy of The Way of the Digital Photographer: Walking the Photoshop post-production path to more creative photography!
Table of Contents
Introduction
18 Digital Photography Is Painting
21 First things first
21 The camera to use
22 JPEG versus RAW
24 Photoshop prejudices
27 Seeing is about light
33 It all starts with a layer
38 Adjustment layers
43 Working with layer masks
44 Creating a layer stack
45 Combining two exposures with a Hide All
layer mask
47 Using a Reveal All layer mask to combine
two exposures
51 Using the Brush Tool
54 Selective sharpening
59 Working with gradients
60 Using the Gradient Tool to seamlessly
blend two layers
67 Drawing directly on a layer
71 Introducing blending modes
73 Screen Blending Mode
80 Using Screen for selective lightening
83 Multiply Blending Mode
87 Blending mode categories
88 Testing the blending mode categories
91 Comparative blending
97 Workflow
102 Do it on your iPhone: Slow Shutter Cam
104 Multi-RAW and Hand-HDR
Processing
107 Multi-RAW processing
108 Expanding tonal range with multi-RAW processing
109 Getting the widest gamut with
ProPhoto RGB
111 All roads lead to Photoshop: Smart
objects and Lightroom
112 Adjusting exposure selectively
117 Hand-HDR
118 Shooting a bracketed sequence for
hand-HDR
120 May the force be with your florals
125 Automated HDR
126 Automated HDR programs
134 Do it on your iPhone: PhotoForge
136 Enhancement to Glory
139 Workflow redux
140 Checkpoints
143 Tripping the light fantastic
144 Why be average?
145 Multiply and Screen blending modes
146 Sharpening and blurring
147 Glamour Glow and Tonal Contrast
148 A second helping of HDR
149 Pushing the boundaries: Pixel Bender
150 Some other painterly filters
155 Using LAB inversions
156 Understanding the LAB color model
167 Black and white
175 Backgrounds and textures
176 Blending a background with an image
178 Using textures to change the scene
184 Do it on your iPhone: Lo-Mob and Plastic
Bullet
186 Resources
188 Notes
189 Glossary
190 Index
Introduction
Your digital camera probably resembles a film camera in both appearance and basic functionality. Like a film camera, your digital camera has a lens with aperture and shutter controls that can be used to decide how much light penetrates into the body of the camera for each shot.
But that’s where the similarities between film and digital cameras end. Despite the similarity in appearance of the hardware device used to make the exposures, digital photography is an entirely new medium compared to film photography.
Historically, chemical properties of film and developing were used to record light that entered the camera. Today with a digital camera, the light is captured as a digital signal by a sensor. Digital signal data recorded by the sensor can be processed by the computer in your camera. More powerfully, and here’s where the fun really begins, image data saved by your camera can be processed on a standalone computer after you upload your files.
People don’t fully understand this new digital medium that consists of the camera-computer partnership. They’re still hooked on the fact that their hand-held computer with a lens (a.k.a. a digital single-lens-reflex, or DSLR) looks like
a good old-fashioned film camera—and if it looks like one, it must work like one. Not so. For those who get over this misunderstanding the door is wide open for experimentation and new approaches.
Digital is different. Very different.
One of the main goals of The Way of the Digital Photographer is to show you how to take advantage of this difference to enrich your own work.
…
In The Way of the Digital Photographer, you’ll discover how to effectively use several of the post-processing techniques that I use to create the final versions of my own imagery.
These techniques are presented as case studies in the context of actual examples, so you can understand what each step does. More important, I want you to gain insight into how the techniques and steps involved can inform your choices when you make a photo and in your post-production workflow. (For a discussion of workflow and to understand how best to adapt your workflow to the digital world, turn to page 107.)
…
Digital photography and post-production techniques that are used to inform one another—how you take a photograph with an idea or pre-visualization in mind, knowing what you can do to it later in post-production—are the basis of this new digital medium. If you can see a photograph in your mind’s eye before you take it and know how you can process it later to achieve your vision, then nothing can hold your imagery back. Truly, the sky’s the limit!
Technique without heart is banal and useless. I’ve found in the workshops I give that many people come to digital photography precisely because they enjoy—and are good at—working with technology. Indeed, perhaps these folks work in technology related industries.
But even if you are a technocrat it is important not to lose the creative aspects of digital photography. Often the people who start with digital photography because they are comfortable with the gear find some resistance to fully engaging their creative powers. They may be more comfortable with measuring pixels and navigating software than with conveying emotion.
If this describes you, be of good cheer. Provided that you approach image making in the spirit that anything is possible, you may be amazed by what you can achieve.
Along with the post-production case studies in The Way of the Digital Photographer, you will find thoughts and exercises, presented as Meditations. These Meditations will help you with the conceptual and emotional side of digital photography and also guide you in pre-visualizing your photographs with the idea of post-production in mind.
As you walk down the path of the digital photographer, you will find that photography is about your creative vision and your notions about art. Digital photography is also a way to show others your very personal view of the world. By combining your pre-visualization with your photography and appropriate post-production techniques, you can fully render anything you can imagine.
Please keep in mind the 30% pre-publication discount from the publisher for The Way of the Digital Photographer. Use discount code PP-DAVIS30 (case sensitive) at checkout to get your discount.


June 6, 2013
Chartres
Looking up at Chartres is a memorable experience! What a vast amount of effort, creativity, engineering and spirituality over what a long period of time went into building this structure. Whatever else may be said, the cathedral is a monument to human tenacity, and the tenacity of aspiration—an embodiment and statement in stone and masonry and stained glass of the importance of there being more than humanity when one is human.

Chartres © Harold Davis
Exposure data: 10.5mm digital fisheye lens, nine exposures at shutter speeds from 1/6 of a second to 13 seconds, each exposure at f/9 and ISO 200, tripod mounted; processed and combined in Photoshop and Nik HDR Efex Pro; converted to monochromatic using Photoshop, Nik Silver Efex, and the Topaz plugin.

June 5, 2013
72.5 Hours Left
Three days and change left to buy an original Harold Davis print at below market prices via Kickstarter and to help me out at the same time. Thanks for your consideration!

June 4, 2013
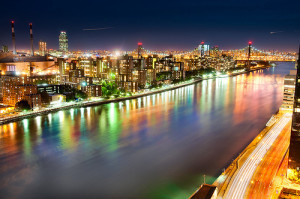
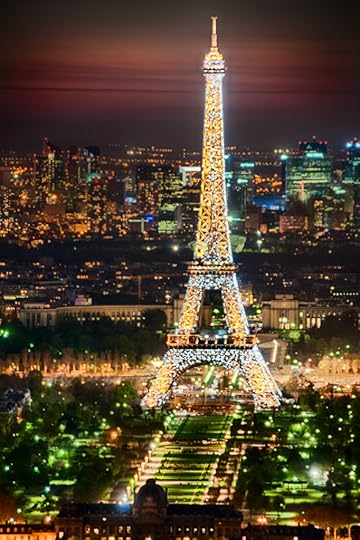
Les Lumières de Paris
The lights of Paris, laid out below in this photo, remind me of a geometric pattern, thanks to the energetic city planning of Baron Hausmann back in the 1860s. Hausmann, and his employer Napoleon III, liked order and regularity. They felt the wide boulevards were attractive, and would be good for marching troops into Paris to contain the rabble.

Les Lumières de Paris © Harold Davis
Be that as it may, from above the Parisian cityscape is special. I shot this view from the roof deck at the Tour Montparnasse as twilight turned to night. Behind la tour Eiffel, you can see the modern towers of La Défense. Napoleon’s tomb at Les Invalides is visible on the right, along with the Arc de Triomphe if you look carefully.
According to one recent email, “Enough of Paris already Harold. Come down to earth!” On this topic, I make no promises.
Please keep in mind the 30% pre-publication discount from the publisher for my new book, The Way of the Digital Photographer. Use discount code PP-DAVIS30 (case sensitive) at checkout to get your discount.
Wouldn’t you like to know my night photography processing secrets? Star Circle Academy is offering for a limited time $5 off my Creative Night Photography Post-Processing Video with Harold Davis, which features a night shot from above the East River in New York City. Use the coupon code 5$harold (case sensitive) at checkout to get your discount.

June 3, 2013
Saint-Sulpice
Work on the Eglise Saint-Sulpice began in 1646, and has never been finished. The second largest church in Paris (after Notre Dame), Saint-Sulpice is on the border of the 5th and 6th arrondissments, near the Luxembourg Gardens. The vast and romantic interior space of Saint-Sulpice shows its lack of meticulous maintenance—perhaps this, along with the unfinished quality, is part of what makes it so great for photography. A sense of mystery pervades within this church, which is rich in chiarascuro lighting, and extreme contrasts from light to dark. As I was taking my time shooting this image sequence, I even noticed pigeons nesting in the far reaches of the rafters.

Saint-Sulpice © Harold Davis
Exposure data: 10.5mm digital fisheye lens, ten exposures at shutter speeds from five seconds to 1/80 of a second, each exposure at f/9 and ISO 200, tripod mounted; exposures combined using Nik HDR Efex Pro and processed in Photoshop.
Please keep in mind the 30% pre-publication discount from the publisher for my new book, The Way of the Digital Photographer. Use discount code PP-DAVIS30 (case sensitive) at checkout to get your discount.
Also, Star Circle Academy is offering for a limited time $5 off my Creative Night Photography Post-Processing Video with Harold Davis video. Use the coupon code 5$harold (case sensitive) at checkout to get your discount.

June 1, 2013
Lighting the Eiffel Tower
The normal night lighting for the Eiffel Tower up until midnight is pretty nice, but every hour on the hour after dark it is additionally lit up like a kind of LED firecracker. I have mixed feelings about this light show—it is a bit vulgar, but then Paris is famously the City of Light.
Issues of taste—or lack thereof—aside, the extraordinary light display does present an exposure conundrum for two reasons: the lights on the Eiffel Tower are much brighter than the lights of the surrounding cityscape, and also the LED lights are in constant motion, like a giant sparkler, so one needs a fast shutter speed to freeze things in place.
Eiffel Lights © Harold Davis
I was lucky that I was in the middle of an extended bracketing exposure sequence when the light show went off at 10PM from the roof of the Tour Montparnasse. Combining the exposures as an HDR sequence led to decent results, but I still had to work in post-production to treat the resulting image with finesse and creativity.
 Speaking of the craft of night photography post-production, you may be interested in the video recording of my recent Creative Night Photography Post-Processing webinar. Thanks to Star Circle Academy, this video presentation is now available for download. The cost is $19, but readers of my blog have a (limited time) $5 discount. Click here for more information about the video, and here to purchase the video. Use the coupon code 5$harold (case sensitive) at checkout to get your discount.
Here’s the video description: Creative Night Photo Post Processing with Harold Davis Video: 1 hour, 15 minutes. Harold Davis, author, professional photographer, and workshop leader presents his approach to Post Processing Night Photos.
This video includes detailed discussions of:
Stacking using the statistics capabilities of Photoshop Extended;
An explanation of gamuts and color space – and why you do not want to work in sRGB (default space)—how to tweak your workflow to keep as wide a gamut of colors as possible
Creative sharpening of night images using LAB color
A look at a workflow to make an East River night scene in New York City stand out by applying multi-RAW processing, and a handful of filters and special effects.
Please bear in mind that this is not a video recording with Hollywood production standards. But, as one webinar participant put it, “There is information about processing night photos in this video you can’t get anywhere else!”
Click here to learn more about the Creative Night Photography Post-Processing Video with Harold Davis video, and here to purchase the Creative Night Photography Post-Processing Video with Harold Davis video. Don’t forget to use the coupon code 5$harold (case sensitive) to get your discount!
Also please bear in mind the 30% pre-publication discount from my publisher for my new book, The Way of the Digital Photographer. My new book has quite a bit of detailed information about working with layers, creative post-production, and how post-production possibilities should inform your choices at the moment of exposure.
Use the discount code PP-DAVIS30 (case sensitive) at checkout to get your discount. Click here for more information and to buy The Way of the Digital Photographer.

May 31, 2013
Beneath the Surface
To make this photo-collage, I shot a number of bracketed exposure sequences of individual shells on a white background. I then auto HDR processed each sequence, converting to monochromatic HDR within the software that I used (in this case, Photomatix).
Bringing each finished monochromatic shell into Photoshop as a separate image, I combined the images using layers, layer masks, and blending modes to create the finished image. Yes, a certain amount of warping, transforming, and distorting was also involved—but no shells were hurt in the process.

Beneath the Surface 2 © Harold Davis
Exposure data: 100mm macro lens, fifteen bracketed sequences of five exposures each, each sequence shot at f/16 and ISO 200 with exposure times between 1.6 seconds and 1/25 of a second, tripod mounted; exposure sequences processed for monochromatic HDR in Photomatix, and combined to create a collage in Photoshop.


May 29, 2013
Special offer: 30% discount on pre-orders of my new book “The Way of the Digital Photographer”
This is a special offer on pre-orders of both the print and eBook versions of The Way of the Digital Photographer directly from the publisher, Peachpit. I have arranged this discount as a way to say thanks for your support and reading my blog. To receive the 30% discount from Peachpit, be sure to use the discount code PP-DAVIS30 (this code is case sensitive) at check-out. Click here to order The Way of the Digital Photographer now!
Book description: In The Way of the Digital Photographer, master photographer and digital artist Harold Davis shows you how to make digital photography an art form. Great digital photographs need both camera and computer to be truly extraordinary. Using detailed examples and case studies from his own work, Davis provides myriad ideas you can use in your own work, and he shows you how to unlock your own creativity to make those special images you have always dreamed of! Readers discover how to effectively use post-processing techniques and gain insight as to how the techniques and steps involved can inform their choices when making a photo and in post-production workflow.
Pre-order your copy of The Way of the Digital Photographer: Walking the Photoshop post-production path to more creative photography!

May 28, 2013
Room with a View
In photography, as in life, there are always at least two points of view: that of the camera, and that of the subject. My title for Room with a View may seem sardonic, but actually it was an interesting view—and far better than the view from the first room I had at this luxury Parisian hotel, which was buried at the bottom of a deep courtyard. Kind of reminded me of the view from one of my New York studios facing a dark air shaft, but I digress.
Which room has the view? My view of curves, shapes and lines, and facing a rooftop Parisian apartment window sporting a pair of sneakers stored outside—or the window-with-sneakers facing towards me, with a view of my window (you may have to look hard to see the sneakers in aerated storage, click on the image to view it larger!).

Room with a View © Harold Davis
Exposure data: 70mm, eight exposures at shutter speeds between 3/10 of a second and 1/160 of a second, each exposure at f/25 and ISO 100, tripod mounted; exposures processed and combined in Photoshop and converted to monochromatic using Silver Efex Pro.


