
Harold Davis's Blog, page 200
July 22, 2013
Learning is best when it is fun
Many years ago, the high-tech job that moved us out to California had me attend a couple of weeks of training before I got started. The lead instructor was probably a pussycat in real life, but to us trainees she seemed like a real drill sergeant. Remember, this was a very technical job. One thing she made crystal clear was that anyone scoring less than 90% on the final exam would be looking for a new job the next day. Read more.

Rooftops of Paris © Harold Davis—Click image to view larger!
My oldest son Julian had just been born prematurely two weeks before the hospital tour, and I had just moved my family across the country. With a child in intensive care, keeping my benefits was important to me, and you can imagine that I crammed hard for that final exam.
Whether they really would have fired me if I hadn’t aced the exam I will never know, but I wasn’t going to find out.
I was motivated.
Fear is a great motivator—but it motivated me to cram, not to really learn, and I doubt I retained much of the material that I had studied for very long.
Over the years, as I’ve written books that are intended to teach, and as I’ve become an experienced workshop leader, I’ve pondered the question of what helps people learn. In other words, since I’m supposed to be helping people learn, what mechanisms can I best use?
As in my example of high-tech training, fear works to some degree, at least as a motivator. But it is not clear that fear teaches the right things, or that it best for long term learning and retention.
Repetition is also a learning tool that works in limited doses. Like fear, some degree of repetition is a good thing when you are learning, but too much repetition is a turn-off.
When will the schools recognize that boredom and true learning are orthogonal?
If fear and repetition, the two great motivators of our current educational system, don’t work—what does?
My answers are that one learns best by doing, and also one learns best when one is having fun. You might be surprised to find out that there is quite a bit of neuroscience that backs up the proposition that having fun enhances learning.
I think that you also learn best from instructors who are committed to continued learning themselves, and having fun while they do it. Anyone who thinks they know everything, doesn’t (to paraphrase Socrates)—and is probably a bit pompous and boring, to boot.
Within the overall arch of learning by doing, and learning best while having fun, different learning styles have also to be acknowledged—there is no one size fits all when it comes to how people learn, but everyone learns best through immersion, and when they are having fun.
Which is what I design my workshops to achieve. Sure, Photographing Paris in 2014 is going to be fun—and that is part of the point. It’s also going to be a 24/7 immersion in photography. I’m pleased that when I discuss this year’s Photographing Paris workshop with participants so many of us say, “Hey, that was fun! And I learned so much…”


July 21, 2013
Château de Saumur
In Saumur I stayed in an old hotel on the banks of the Loire River. My room was on the back of the hotel, and a bit cramped, but when I threw open the old-fashioned windows I saw this great view looking up at the old Château de Saumur.
I waited until after dark, then pointed my camera and tripod out the window to capture the old structures in the foreground as well as the lit castle behind.

Château de Saumur © Harold Davis
Exposure data: Five exposures, each exposure at 22mm, f/8 and ISO 200, shutter speeds ranging from 8 seconds to two minutes, tripod mounted; processed and combined in Adobe Camera RAW, Photoshop CC, and Nik HDR Efex Pro 2, and converted to black and white using Nike Silver Efex Pro 2.

July 15, 2013
Pyramide du Louvre in the Cour Napoléon
I plead guilty to an affaire de coeur with Photoshop. I am passionate about the Photoshop darkroom. Indeed, there comes a point in every workshop I give that I am asked, “Did you Photoshop that?”
The answer is always Yes. Every photo of mine passes through Photoshop, and it can fairly be said that much of my work is one part photography, and one part digital painting with photography.

Pyramide © Harold davis
To Photoshop, or not to Photoshop? For me, that is hardly a question. But it is worth bearing in mind that it all starts with a photographic composition. It’s often much easier to get striking photos right in the camera than to attempt to embellish things in post-production.
I believe—and I teach my students—that using camera technique to further one’s vision is one of the most important aspects of being a photographer in the digital era. The take away from the digital darkroom should be to inform one’s photography, not to take its place!
Being such a fervent Photoshop evangelist can lead to assumptions that my photos have been Photoshopped—even when they have not.
A case in point is this image of the glass pyramid in the central court of the Louvre in Paris, France, shot during a night photography session of a workshop I was leading. A number of people have assumed that the reflection is a post-production transformation—or, as one person put it with delightful humor, “I detect a bit of Photoshop wizardry herEreh yrdraziw pohsotohP fo tib a tceted I”.
Shades of the Mirror of Erised!
In this case, however, there’s no compositing or changing the composition around. There were three shots, bracketed for exposure, and I used a polarizer, and that’s it. The three RAW files are shown in Adobe Bridge CC below, along with the exposure data for the image.
So the art here is primarily in the seeing, and the craft is in the photographic technique—as much as I love Photoshop, this is an image that could have been accomplished using a film camera. Not that there would be anything wrong with using Photoshop to create this, it just isn’t the case.
I like to teach being the best we can be, whether in the camera photographically, or in the Photoshop darkroom in post-production.

Pyramide (black & white) © Harold Davis
Exposure data: 12mm, circular polarizer, three exposures at 2.5, 5 and 10 seconds, each exposure at f/7.1 and ISO 100, tripod mounted; RAW exposures shown below in Adobe Bridge CC; processed in Adobe Camera RAW, Nik HDR Efex Pro 2 and Photoshop CC; converted to monochromatic using Photoshop CC, Nik Silver Efex Pro 2, and Topaz Adjust 5.

The three RAW exposures shown in Adobe Bridge CC

July 14, 2013
2014 Photograph Paris with Harold Davis Workshop
I’m very pleased to announce the 2014 Photograph Paris with Harold Davis Workshop, from April 26-May 4, 2014. Click here for the complete itinerary, terms and conditions, and online registration. A $500 per person “early-bird” discount applies if you enroll before September 1, 2013.
It is my fond hope that you’ll join Mark Brokering and myself for the extraordinary experience of photography in Paris, the City of Light. The 2014 workshop will once again be located at the wonderful and atmospheric Hotel Lutetia.
We’ve included many of the highlights from the 2013 workshop for this occasion, such as the visit to Monet’s garden at Giverny with after hours access (one of my personal favorites from 2013), and also added a day. If you check out the itinerary, I think you’ll also see some wonderful locations we didn’t get to last time, such as the top of the Tour Montparnasse at night, the Parc de Sceaux, and Père Lachaise.
As one of the participants in last year’s workshop said, put Paris ”on your bucket list ‘cause you may not see this in Heaven.”

Les Lumières de Paris (from Tour Montparnasse) © Harold Davis
Photography begins with the medium of light, which the artist captures and applies to the canvas in endlessly surprising ways. And what better place to explore this medium than Paris, the City of Light?
Join acclaimed photographer Harold Davis for the experience of a lifetime in Paris, the birthplace of photography. There you’ll have the opportunity to experience firsthand the places and sights that have inspired artists for centuries.
We’ll focus our lenses on Paris in bloom, Paris at night, and Paris in black & white, reinterpreting for ourselves some of the images that have been captured in paint and on film by many great artists, including Daguerre, Monet, Atget, Picasso, and Erwitt. We’ll have a grand time photographing and we’ll return home with many priceless shots to treasure!
“I already admired Harold Davis, and had confidence that he would lead us to fantastic places – and he did!”—2013 Paris workshop participant
2014 Photograph Paris with Harold Davis Quick facts and links:
Workshop hosts: Harold Davis, master photographer, and Mark Brokering, life-long lover of all things Parisian
Workshop duration: nine packed days (eight nights), April 26-May 4, 2014—see itinerary for details
Accomodations: At the historic, elegant and charming 4-star Hotel Lutetia in the heart of the fashionable left-bank of Paris
Online workshop e-Brochure
Detailed itinerary and terms and conditions
2014 Photograph Paris with Harold Davis registration
Workshop fee: $5639.00
“Early-bird” Discount: $500, applies through September 1, 2013
Discount for attending previous Harold Davis destination workshop: $500
2014 Photograph Paris with Harold Davis on Meetup.com
2013 Photograph Paris with Harold Davis on Meetup.com
2013 Photograph Paris photo album on Meetup.com
Photography of Paris on Harold Davis’s blog

Pyramide du Louvre in the Cour Napoléon © Harold Davis

July 13, 2013
Gargoyle
This gargoyle has been watching Paris for centuries from the towers of Notre Dame. Why not consider a bit of Paris watching (and photography) by joining me for the 2014 Photograph Paris with Harold Davis workshop? We’ll focus on Paris at night, flowers—and, of course, black and white.
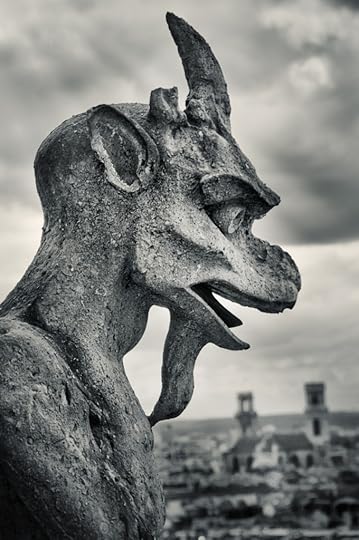
Gargoyle © Harold Davis

July 9, 2013
Swinging under the stars
The world’s best swing is under an old oak tree on the Bolinas plateau facing the Mount Tamalpais ridge line. It is shown here under the oak tree by starlight with the moon rising, in a six minute exposure.

Oak Tree Swing © Harold Davis

July 7, 2013
New Workshop: Monochromatic HDR in the Big Sur landscape
Friday, September 27 through Sunday, September 29, 2013—Sponsored by the Center for Photographic Art (CPA), Carmel, CA
Click here to register for the Monochromatic HDR in the Big Sur Landscape with Harold Davis workshop.

Workbench © Harold Davis
When folks think of HDR (High Dynamic Range) photography, they tend to have color imaging in mind. But the fact is that HDR techniques are just as applicable to monochromatic photography as to color.
In both cases, the point is to extend the dynamic range of the resulting image beyond what is normally seen in a single exposure—and, indeed, beyond normal human perception. When working in digital black and white, the tonal range is extended from the lightest lights to the darkest darks. This results in images with great graphical appeal that make for splendid monochromatic prints.
In this workshop, Master Photographer Harold Davis guides participants in both aspects of the monochromatic HDR process: shooting and post-processing.
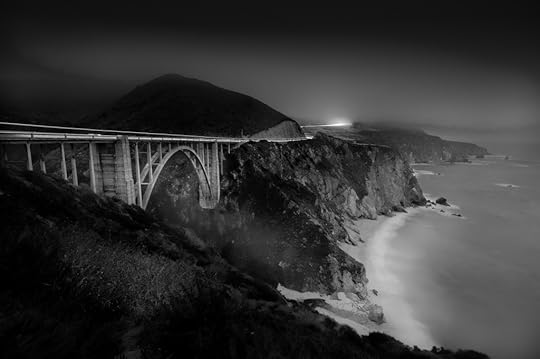
Bixby Bridge, Big Sur © Harold Davis
Workshop participants will take advantage of Carmel and historic Monterey as well the glorious landscape of Big Sur, photographing subjects as varied as Bixby Bridge along Highway 1, Point Lobos, Mission Carmel, and more. In the classroom, hands-on guidance will explain techniques for extending dynamic range, monochromatic conversion methods, and best practices where the two technologies intersect.
In addition, the workshop will provide extensive coverage of the creative vision required to successfully create monochromatic HDR images as well as the workflow necessary to make art prints from this specialized image-making technique.

Under the Old Oak Tree © Harold Davis
Tuition: $400 (CPA members); $450 (non-members)
Click here for more information, detailed curriculum, and registration.

May the best flower photo win
I am judging a flower contest on Photo.net: “Flowers find a way into vacation, portraiture, wedding, landscape, fine art and nearly any kind of photography collection you can think of. How DOES nature create such beautiful, perfect, magical living things?”
The flower photo with the most Photo.net member votes gets a nice Sigma 120-400mm lens (I want one!), and I get to choose a winner who will receive a copy of my new book The Way of the Digital Photographer.
Here’s the link for the flower photography contest.

Dance of the Tulips © Harold Davis
About this image: I started with some beautiful tulips from the North Berkeley Farmer’s Market. I placed the tulips on a black background.
I’ve written previously about using my 18-200mm zoom lens with a 36mm extension tube to create a kind of poor person’s macro lens. This kind of setup can get you very close, and it has a neat soft focus feeling and cool bokeh. Of course, I wouldn’t use it if I wanted end-to-end precision macro sharpness. The odd thing is that optically what works best is to set the lens manually on infinity, find your distance, and then “focus” using the zoom ring.
My next step was to add approximately 8 f-stops of neutral density to the front of the lens so I could make quite long exposures, in the 5 seconds to 30 seconds range with the lens stopped down.
Finally, I timed each exposure so that the lens was fixed and “in focus” for about half the exposure, and then a carefully and smoothly rotated the zoom dial to get an out-of-focus effect for the remainder of the exposure.
In other words, the effect combines the hardness and definition of a fully stopped-down in-focus lens with the soft focus of a motion blur and an image thrown intentionally out-of-focus.
Exposure data: 18-200mm zoom lens, starting at about 135mm, 36mm extension tube, 15 seconds at f/36 and ISO 100, tripod mounted.

July 6, 2013
Derrière
This statue was resident in the lobby at the Hotel Lutetia in Paris when we held the 2013 Photograph Paris with Harold Davis workshop. It amused me to snap an iPhone photo, more or less from the viewpoint of the front desk.

Derrière © Harold Davis

July 4, 2013
Bolinas is the winner
The Bolinas team, shown here at the Bolinas July 4 parade in front of Smiley’s Saloon, is the winner in the 2013 annual tug of war contest with Stinson Beach, just across the channel to the Bolinas Lagoon. Party time!

Bolinas Winning Tug of War Team © Harold Davis


