
Selena Robins's Blog, page 7
June 25, 2021
Italian Flavour Bomb

Italian food is love in every bite, comprised of fresh ingredients created into simplistic delicious dishes.
The tastiest Italian meals are not fussy or fancy. They are created with passion while sipping a glass of wine in a kitchen filled with the acoustics of Nona’s wooden spoon, pot-stirring, and music.
As with most of the Italian recipes I post, the following recipe (Rappini con Pasta) is another forgiving one where you can either follow the recipe exactly or feel free to adjust it to suit your taste buds.
This year I added a new vegetable to grow in my garden–Rapini (also known as Broccoli Rabe), and grow it did. I was excited to pick the first harvest and treated myself to one of my childhood comfort dishes: RAPINI CON PASTA.
 Rapini from my garden
Rapini is a versatile green and can be sautéed, steamed, or baked and it will take whatever you throw at it, and shine every time.
It has a mild and distinctive bitterness which pairs well with mild or hot spices. If the bitterness (which I happen to love) is not in your taste bud wheelhouse you can tone it down by simply drizzling the green with freshly squeezed lemon juice. This eliminates all bitterness and makes the rapini sweeter.
The whole plant can be eaten; the leaves, stocks, and flowers.

Ingredients:
1/4 cup Extra-Virgin Olive Oil (more as needed)
1/2 TBSP unsalted butter
6 cloves roasted garlic (if using raw garlic, slice them and use 4 cloves)
1.5 to 2 lbs. Rapini, trimmed and washed
1 lb. Linguini or Spaghetti (fresh or dry, your choice)
2 tsp. grated lemon rind
Freshly grated Romano cheese (you can also use Parmesan)
Salt to taste
1/4 tsp. Red Pepper Flakes, or to taste
Directions:
Bring a large pot of water to a rolling boil and add salt.
Heat up a large skillet over medium-low heat, and add olive oil, then add the garlic and cook for 2 to 3 minutes, then remove from heat and set skillet aside.
Add rapini to boiling water and cook for 3 to 4 minutes, using a slotted spoon, remove the rapini and put it in a colander and rinse with cold water right away, drain well and chop into bite size pieces.
Return pot of water (that the rapini was cooked in) back to the stove on high heat and bring to a boil, and add the pasta. Cook pasta according to package directions, less 2 minutes.
While pasta is cooking, add a bit more oil to the skillet and turn heat on medium-low.
Add rapini and toss well to coat it with garlic and oil, add the lemon rinds, and add salt a little at time, and sprinkle with red pepper flakes, tasting to adjust the seasoning, keep the skillet on low heat,
Once pasta is cooked, drain it then toss into the skillet.
Add butter to the hot pasta, and toss pasta and rapini together, letting it all cook for about 2 minutes.
Remove from heat and serve with freshly grated Romano (or Parmesan or both if you’d like).
This dish also pairs extremely well with Italian sausage.
Buon Appetito
Another flavour bomb thriving in my garden–Basil.
For my quick and easy basil recipe, please click here.
 Basil
Basil


February 26, 2021
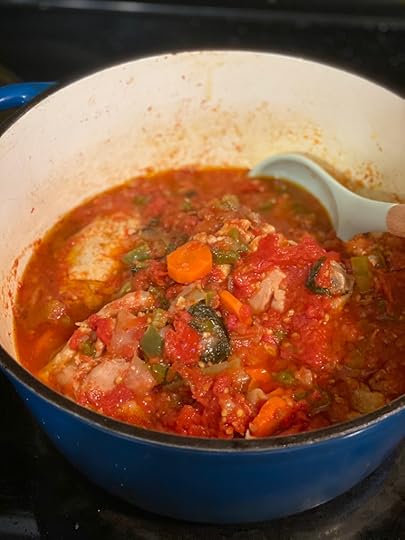
Italian for dinner – CHICKEN CACCIATORE

Chicken cacciatore is a classic Italian comfort dish.
As with most Italian dishes, each family has its own version of sauce, pasta dishes, and desserts that are passed down from generation to generation.
As the recipe is passed down, some family members (meaning me), and at times (meaning me, most of the time) the family member will tweak and put their own spin on the dish.
This is my version for a succulent Cacciatore that will fill your house with warm, comforting aromas.
INGREDIENTS:
2 small carrots, sliced
1 celery rib, chopped
1 Vidalia onion, diced
1 green bell pepper, diced
extra-virgin olive oil
6 ounces tomato paste
6 chicken thighs, bone-in, and skin
¼ cup all-purpose flour
10 plum tomatoes, drizzle with olive oil, sea salt and roast in oven, until done
3 TBSP fresh basil, chopped
5 cloves garlic, roasted and squeezed out
½ cup red wine (wine you would drink yourself, not cooking wine)
salt to taste
crushed red pepper flakes to taste
DIRECTIONS:
Slice, dice, and chop, carrots, celery, onion, pepper, set aside.

In a Dutch oven (or large skillet) heat olive oil on medium high.
Season the chicken thighs with salt, and lightly coat each thigh with flour.
Brown chicken in the pan; 3 to 4 minutes each side (until chicken is browned).
Remove from the skillet and set aside.

Add; onion, carrots, celery, pepper to the skillet, scraping the chicken juices from the pan, and cook for 6 minutes.

Add tomatoes, tomato paste, roasted garlic, chicken and wine to the vegetables in the pot, and stir to combine.
Set heat on low and let simmer until chicken is cooked through to an internal temperature of 165F.
Stir occasionally, and taste so you can adjust the salt and pepper flakes.
SUBSTITUTIONS:
You can use chicken legs instead of thighs. Chicken breast won’t work as well, as dark meat works best for this dish. You can choose to use skinless thighs or legs.
Any sweet onion will work if you don’t have Vidalia.
You can substitute use red, orange or yellow bell pepper
If you don’t want to roast your own plum tomatoes, you can use 1 large can of plum tomatoes
You can use chicken broth instead of wine
Buon appetito

February 13, 2021
Widowhood–Navigating the emotional minefield on Valentine’s Day

After my beloved husband died in 2018, I knew that the days ahead, navigating through this new life I never wanted, would be challenging.
Inevitably I encountered emotional landmines, especially during the holidays, riding a roller coaster of triggered anxiety and depression. Even something simple as grocery shopping and spotting a carton of orange sherbet—his favourite dessert—swallowed me whole with a fresh wave of grief.
Now that the bright lights of Christmas and New Year’s are behind us, a new landmine blasts at every turn complete with hearts, flowers, chocolates and advertisements for dinner for two–and when you’re suffering heartache as a widow or widower on Valentine’s Day, they seem to pop up everywhere.
My husband and I didn’t celebrate Valentine’s Day with a lot of fanfare, as he was a “here’s-a-gift-for-no-reason” type of guy, however, we did mark the day in our own way.

He’d kick off the morning by serving me tea and toast, using peanut butter to draw a heart on the toast, and I would give him a bowl of Smarties (he loved his sweets).

I’d give him a card—the kind we used to give as kids at school–of course, there wasn’t anything childlike in the naughty note I’d written inside the card (well, I am a romance author after all).
He’d give me a card—the traditional “for all occasions card.”
Twenty-years ago, my husband gave me a card for my birthday–the card looked oddly familiar, and then when I opened the card I knew why it looked familiar. He had given me that card on our anniversary with a sticky note inside with his endearment—here it was again for my birthday, with a different note inside.
It was a running joke that I treasured all these years, as he said it saved him from never forgetting a card for any occasion, he’d just recycle the card and just change the sticky note to suit the occasion.

As I said earlier, he loved giving gifts for no reason, and about six months after he died, I finally went through a few of his things in his man cave area, and discovered a binder filled with vintage Beatles cards.
I figured out that he had been collecting them to surprise me with them at some point, but with chemotherapy and in his weakened state, he hadn’t spend much downtime in his man cave, and I am guessing he forgot about that binder with all that was going on.
It was a bittersweet moment, and I remember having to spend a day in bed after finding the cards—the heart ache was so intense. I then shook myself out of my despair and with tears in my eyes, felt joy for his thoughtfulness. I forced myself to go to MICHAEL’s and purchased a frame. Some of the cards hang in my office where I can enjoy them.

This Valentine’s Day I will make toast and use peanut butter to draw a heart on it; I will hold the for-every-occasion-card close to my heart; I will look out into the garden and take in the tall oak tree, and remember the day twenty-eight-years ago when we planted the acorn together on the first day we moved into our home.
I will open the treasure trove of memories my husband left me from the beautiful life he lovingly gifted me every single day of our marriage, remember his deep love, his smile, his wit, his great sense of humour, and how passionate he was about our family, and although it will be another heart-wrenching reminder of all that I’ve lost, I will force myself to smile through the tears and continue to be grateful for the everlasting love we share.
As I do every night, I will close my eyes, remember his soft kisses and say, “I’ll see you on the other side of the stars, my love.”

January 19, 2021
When you buy too much Greek Yogurt. . .

The other day, while performing my weekly clean-out-the-fridge task, I noticed I still had two full cartons of Greek Yogurt which I hadn’t opened and they were about to expire.
Instead of devouring the yogurt with the addition of Nutella (which by the way tastes like chocolate pudding) I decided to put my own spin on the two-ingredient bagel recipe which I could then freeze for future breakfasts, lunches or snacks.
Lemon-Sesame-Yogurt BagelsINGREDIENTS:
2 TBSP chia seeds
2 TBSP flax seeds
4 TBSP water
Lemon rind (of 1 lemon)
2 Cups Plain Greek Yogurt (make sure it’s Greek & NOT “Greek style”)
2 Cups Flour
1 TBS Baking Powder
1/2 tsp salt
Sesame Seeds (optional: everything bagel seasoning mix, or poppy seeds)
1 Egg, lightly beaten for the egg wash
DIRECTIONS:
Preheat oven to 375F and prepare a baking sheet by lining it with parchment paper, and lightly spray it with cooking spray.
 In a small bowl, add chia seeds, flax seeds, and water. Stir and let them sit for about 20 minutes so that the seeds can soak up the water.
 In a large bowl, whisk together: flour, baking powder and salt, until well blended.
 In a separate bowl, add: Greek Yogurt and lemon rind, stir well.
 Add the chia seeds and Flax seeds mixture into the Greek Yogurt,
stir well to combine.
 Using a spatula, add the yogurt mixture to the flour. Stir well, until
everything is incorporated. The dough will be sticky and shaggy.
 With floured hands, divide the dough into eight pieces, roll each piece into a ball, and place on baking sheet.
 Insert your thumb in the middle of each dough ball, to make a bagel hole.
Brush each bagel with egg wash.
 Sprinkle each bagel with sesame seeds (or poppy seeds, or seasoning, your choice)
Bake for 15 to 20 minutes, then rotate the baking sheet, and continue baking for another 15 to 20 minutes.
Remove from oven, increase temperature to 450 F
Return the baking sheet to oven and bake for another 5 to 7 minutes (until the tops of the bagels have browned).
 Remove from oven and place on cooling rack
Bagels can be eaten warm out of the oven (delicious with your favourite jam—mine is Bonne Mamma apricot and pear).

You can store bagel in a well-sealed container in the fridge for a few days, or freeze them by wrapping them individually, once thawed, cut and toast.
January 11, 2021
The Chocolate Moon

Ask any grandparent and they will tell you that becoming a grandparent makes even a curmudgeon giddy with joy. I am the proud nana of two beautiful boys (eleven and four years old), and they are the highlight of my day and life.
The joys of nana-life include: rocking it out, playing Fortnite, mini-stick hockey, holding dance parties in the living-room, helping out with homework, and writing stories.
Introducing the newest author in the family; four-year-old, Henri, his debut novel is called: THE CHOCOLATE MOON.
He wrote this book (dictated to me and I typed it, and also served as his editor) in December and I had it printed it up, and gave it to family members.
I am sharing his book with you, and because the subject (chocolate) is so dear to my heart, I am including a scrumptious chocolate sauce recipe at the end of this post—you can even pour it on the moon. 
January 3, 2021
Comfort Food: Italian Style
Winter is the time for fleece-wear, a roaring fire, page -turning books, and delicious aromas swirling around the kitchen as your comfort food is simmering or baking.
We all have favourite dishes that feel like a hug as we relish each bite; and for me, it’s Italian food.
One of my favourite meals to whip up for a self-care dinner is a simple dish with humble ingredients: Pasta Aglio e Olio (pasta with garlic and oil).
I had some polpette e sugo (meatballs in sauce) leftover from Christmas in the freezer. When I make meatballs, I make a huge batch and freeze them for those days when I need a hug from an Italian staple.
Here’s the recipe for you to try so you too can get your own comfort-food-hug Italian style:
Pasta Aglio e Olio with Polpette

I use homemade pasta, however, you can use whatever type of pasta you have on hand (packaged or homemade), and the same with your sauce–use whatever tomato sauce you normally would use, or no sauce at all, it’s a flexible recipe.
This recipe will serve four. Cut the ingredients in half if making for two.
Ingredients:
1 head of garlic, roasted. You can use raw garlic, if you do, thinly slice 6 cloves
1/2 cup Extra Virgin Kalamata Olive oil (or any other type of Extra Virgin olive oil)
1/2 tsp. red pepper flakes, or less if you don’t like spicy, or eliminate
1 cup finely grated, Romano cheese (this is my preference, but you can use Parmigiano or a combination of both)
1 pound uncooked pasta (your choice)
Salt to taste
Directions:
1. Roast the garlic, remove and squeeze out the garlic.
2. Warm up a large pasta bowl.
3. Cook your pasta, according to package directions in a large pot of salted water, al dente. If using fresh pasta, cook only for a few minutes until it’s firm to the bite.
4. Drain and transfer pasta to the warmed pasta bowl.
5. Warm the oil on medium heat in a skillet. Once oil is hot, add the garlic and lower heat to low, stirring the garlic in the oil for 10 minutes, then remove from the heat.
6. Add pasta to the skillet, and toss so that the pasta is coated with the garlic-oil, and sprinkle with salt (to taste).
7. Put pasta back in the bowl, and add pepper flakes, and the grated cheese, and stir well until cheese is combined.
8. Serve with additional grated cheese.
If you’d like to serve the pasta with meatballs, you can find my meatball recipe on my blog. Please click here.
December 1, 2020
SMILE THROUGH THE TEARS
Like many people who are challenged with grieving the loss of a loved one, the upcoming Christmas season is again emphasizing the loss of my husband in every level of my being.
It’s a daily struggle to navigate life without my beloved. I have learned that even on a day when I feel good, it doesn’t mean that I’ve been cured of my grief, because there is no cure.
Therefore, I have no choice but to find a way to embrace the concept of allowing grief to co-exist with joy, so that even with feeling heartache and pain, I can enjoy moments of joy, laughter, and . . . smile through the tears.
I could tell you it’s been easy to have grief and joy co-exist with each other, and that it gets better each day, because time heals all wounds, but that would be fiction filled with empty platitudes.
It does not get easier or better with time, however, with time, patience, and a sense of humour, I am finding a balance with handling both as I . . . smile through the tears.
[image error]
I am going to share how I am preparing for the Christmas season in the hopes that it will help another person who is struggling with the challenges of pushing through each day of the holiday season.
Something that I personally find helpful; not only to steer my way through any holiday, but also through my daily life is; changing my routine, creating new traditions, releasing any and all idea of what “normal” is, or what it used to be, because there is no normal when it comes to grieving, and at the same time, keeping my cherished husband’s memory and image in my mind and heart as I . . . smile through the tears.
MEMORY FILLED ADVENT PILLOW.
[image error]
I grew up with the advent calendar tradition for the days leading up to Christmas, and each day I enjoyed a chocolate kiss candy, so I used this idea and added my own twist, creating a new tradition with the Christmas Advent Pillow.
Each day, beginning December 1st, I will pull out a note from the pockets of the pillow that holds a treasured memory of my life with my husband, along with a list of what I am grateful for on that day, as I have also found an attitude of gratitude has helped me handle my grief.
On December 1st I pulled out the first memory and relived that moment in time when my cheeks burned with mortification under my green face (homemade avocado mask), and how my husband’s sense of humour, love and support got me through an embarrassing situation (or what David loved to call them “Lucy moments”) I . . . smiled through the tears.
As I opened the flood gates, remembering all our adventures, my heart and soul once again filled with love and gratitude for the life we had together, and with each memory, I . . . smile through the tears.
I’m still a work in progress and I know I will never nail the concept of having joy co-exist with grief perfectly, or navigate this new life without finding it unbearable at times, but you know what? I’m okay with that.
[image error]
In the past I have blogged about life with my husband and my “Lucy moments,” and as I re-read them, I . . . smile through the tears.
Here are a few memories if you’d like to read them:
Antioxidant Little Pricks
How Does One Eat A Taco?
Nothing says I love you…Like a box of rice.
Exploding Roast Beef
Always on my mind, forever in my heart, the sunshine in my soul.
I love you, Mr. Rugged
[image error]
November 23, 2020
One-Hour for Amazing Thighs
Who says you need to squat, lunge, box jump and twist yourself into a pretzel for amazing thighs?
Not me, that’s for sure.
All you need is a baking pan, root vegetables, olive oil and chicken thighs and one hour of your time.
I know what you’re thinking—that heading is clickbait.
I admit, there is that, but also, chicken thighs are packed with a lot of health benefits which in turn will benefit your own thighs.
A great source of lean protein, and essential nutrients like iron and zinc, boosting your immune system (we all want that these days, right?).
This delicious recipe is easy, fail proof, and clean up is a breeze.
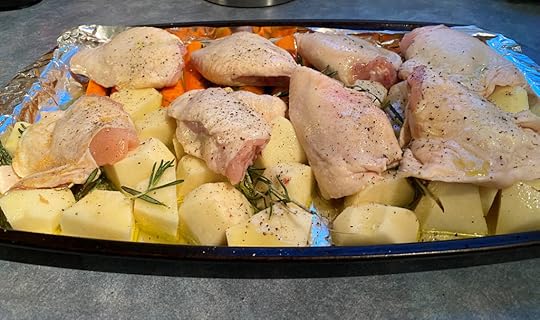
Crispy Succulent Baked Chicken Thighs
Ingredients:
3 lbs. chicken thighs, with bone and skin (about 6 to 8 pieces)
4 to 6 potatoes
4 carrots
6 sprigs fresh rosemary
1 lemon (squeeze the juice out of lemon)
olive oil
Kosher salt (or sea salt)
freshly ground black pepper
Directions:
Preheat oven to 500 F (260 C)
Line a roasting pan or baking sheet with aluminum foil
Spray the pan with olive oil (or you can use non-stick spray)
After cleansing potatoes and carrots, pat dry with paper towel (this will help keep them crispy) and chop them in large pieces.
Note: You can use any other root vegetable as well.
Line vegetables in pan, and spray with olive oil and sprinkle salt over them
Place the fresh rosemary sprigs on top of the vegetales
[image error]
Pat chicken thighs dry with paper towel (this will help the thighs crisp up) and then place thighs on top of the vegetables
Lightly brush lemon juice on each thigh, and then lightly spray olive oil over each thigh, season with salt and pepper
Bake for 45 to 50 minutes (until internal temperature of chicken reaches 165 F (74 C).
Remove and let rest for 5 to 10 minutes.
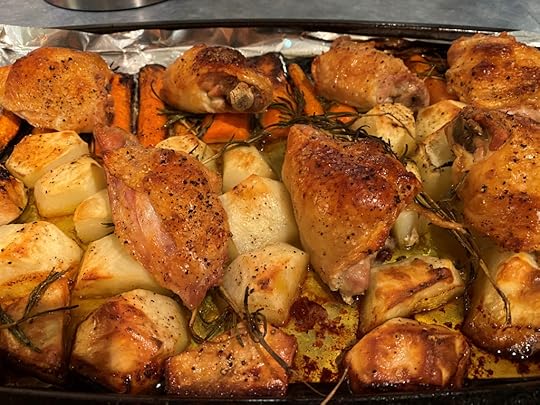
There you go, amazing looking thighs and you didn’t have to perform any lunges.
October 9, 2020
Bake Your Best Shot
Take a break from life, the bombardment of 24/7 news and bake a batch or two of Chocolate Chip Bourbon Cookies.
Yes, you read that right. A shot of Bourbon in your cookies is not only out-of-this-world-delicious, but it’s hard to be stressed and sad when you’re eating these cookies.
WARNING: These cookies are addictively moreish.
[image error] Put them in a tin and give them as a gift. These cookies freeze well.
Bourbon Chocolate Chip Cookies
Ingredients:
1 tsp. baking soda
2 tsp. hot water
1 cup unsalted butter, softened
1/2 cup pure maple syrup
1/2 cup white sugar
1 cup light brown sugar, packed
2 large eggs
1 1/2 TBSP Bourbon
3 cups all purpose flour
1/2 tsp. salt
2 cups milk chocolate chips (you can use semi-sweet or dark chocolate chips if you’d like, your choice)
Directions:
1. Preheat oven to 350F
2. Dissolve the baking soda in the hot water, set aside.
3. In a large bowl, add softened butter, white sugar, brown sugar and maple syrup, and Bourbon and cream everything together until mixture is smooth.
[image error] Smooth and creamy texture that looks like caramel.
4. Beat in the eggs, ONE at a time, mix well.
5. Add the dissolved baking soda and the salt to the batter and mix in well.
6. In a separate bowl, add: flour and chocolate chips, and mix to evenly distribute the chocolate chips.
7. Add flour bowl to the wet mixture, and mix all together, but don’t mix for too long or too strong, just enough to incorporate your creamy mixture with the flour and chocolate chips.
[image error] Don’t mix too much, just enough to incorporate the dry and wet ingredients.
8. Set aside for about 1/2 hour (or you can put in fridge for 10 minutes).
9. Using a tablespoon drop cookies (and flatten just a little bit) onto an ungreased cookie sheet.
[image error]
10. Bake for 10 minutes, or until edges are nicely browned.
11. Leave on baking sheet for 5 minutes, then transfer onto a cooling rack.
[image error]
[image error]
September 28, 2020
Be a star breadwinner.
When my home is filled with the scent of bread baking in the oven it always brings back nostalgic memories of my childhood.
On Friday’s when I’d come home from school, and before even reaching the front door, the aroma of fresh baked bread filled the air as Friday’s was my mom’s baking day—breads, buns, pies and cookies—she made enough for the week ahead to feed a family of seven.
A slice of delicious love with creamy butter, and homemade jam awaited me for an after school snack.
When I had a day off from school, I would help, and it is at our kitchen table that I learned how to put love into baking and cooking. I made a lot of mistakes when trying it on my own, but my mother taught me that making mistakes is how one learns to make great meals.
As I watched her knead the dough for the breads, I saw how much love she put into each loaf, and how happy it made her when they came out of the oven, all risen and deliciously golden.
She would always make the sign of the cross, and say a silent prayer after she finished kneading the dough.
I followed this routine, as I knew she was giving thanks for the flour, yeast and all the food she was able to prepare.
I told her once that it was such a nice tradition to give thanks while baking.
She told me that it was one of the reasons she prayed while baking, the other reason was that she prayed the dough would rise.


![[image error]](https://selenarobinsmusings.files.wordpress.com/2020/12/meme-2-blog.png)
![[image error]](https://selenarobinsmusings.files.wordpress.com/2020/12/img_5714.jpg)
![[image error]](https://selenarobinsmusings.files.wordpress.com/2020/12/meme-blog-3.png)
![[image error]](https://selenarobinsmusings.files.wordpress.com/2020/12/blog-david.jpg)
![[image error]](https://selenarobinsmusings.files.wordpress.com/2020/11/1.jpg)
![[image error]](https://selenarobinsmusings.files.wordpress.com/2020/10/bourbon.png)
![[image error]](https://selenarobinsmusings.files.wordpress.com/2020/10/cookies-6.jpg)
![[image error]](https://selenarobinsmusings.files.wordpress.com/2020/10/cookie-1.jpg)
![[image error]](https://selenarobinsmusings.files.wordpress.com/2020/10/cookie-2.jpg)
![[image error]](https://selenarobinsmusings.files.wordpress.com/2020/10/cookie-3.jpg)
![[image error]](https://selenarobinsmusings.files.wordpress.com/2020/10/cookie-5.jpg)